


实验目的:
- 理解多边形填充的目的
- 掌握多边形的各种填充算法
实验内容:
一、编写程序实现四连通种子填充算法
算法原理:
算法的输入:种子点坐标(x,y),要填充的颜色
以种子点为起点,查看它是否是边界(根据颜色) 或者是否已经被填充。
如果是,则返回,否则填充该像素,并用一个邻接的像素作为新的种子进行递归。
算法步骤:
a) 种子像素压入栈中;
b) 如果栈为空,则转e);否则转c);
c) 弹出一个像素,并将该像素置成填充色;并判断该像素相邻的四连通像素是否为边界色或已经置成多边形的填充色,若不是,则将该像素压入栈;
d) 转b);
e) 结束。
实现步骤: - 在项目名称上右键——添加——类,输入类名stack_node,新建一个栈元素结构类,类里的成员包括:
CPoint PixelPoint;
Stack_node *Next; - 在**View.h文件中添加 #include “stack_node.h”
- 在**View类中(**View.h文件)添加数据成员
CPoint Point[4];//new:定义多边形
CPoint Seed,PointLeft,PointTop,PointRight,PointBottom;//种子及其四个相邻点
Stack_node *Head,*Base,*Last;//结点指针 - 在**View类中(**View.h文件)添加成员函数
void PolygonFill();//区域填充
void Push(CPoint point);//入栈
Stack_node *Pop();//出栈 - 在**View类的构造函数(**View.cpp文件)中进行数据成员的初始化
Point[0] = CPoint(20,20);
Point[1] = CPoint(20,300);
Point[2] = CPoint(60,60);
Point[3] = CPoint(300,20);
Head = Last = NULL; - 在**View.cpp文件中实现入栈和出栈的成员函数
void **View::Push(CPoint point)//入栈函数
{
Base=new Stack_node;
Base->PixelPoint=point;
Base->Next=NULL;
if(Head==NULL)//空链
{
Last = Head = Base;
}
else
{
Last->Next=Base;
Last = Base;
}
}
Stack_node * **View::Pop()//出栈函数
{
//弹出栈顶元素
Stack_node *t;
Base=Head;
if(Base->NextNULL)
{
Head=NULL;
return Base;
}
while(Base->Next!=NULL)
{
Base=Base->Next;
if(Base->NextLast)
{
Base->Next=NULL;
t = Last;
Last = Base;
return t;
}
}
return NULL;
}
实验作业:
- 完成四连通种子填充函数PolygonFill(),提示:边界点颜色为黑色,在OnDraw()函数中,填充之前用黑色线条绘制出多边形。
代码:
void CSeedFillingView::OnDraw(CDC* pdc)
{
CSeedFillingDoc* pDoc = GetDocument();
ASSERT_VALID(pDoc);
if (!pDoc)
return;
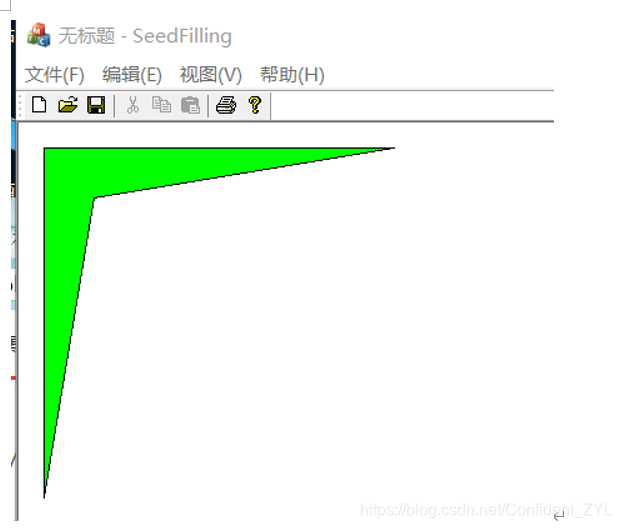
Point[0] = CPoint(20,20);
Point[1] = CPoint(20,300);
Point[2] = CPoint(60,60);
Point[3] = CPoint(300,20);
Head = Last = NULL;
COLORREF fillColor=RGB(0,255,0);
COLORREF boundaryColor=RGB(255,255,255);
Seed=CPoint(40,40);
pdc->Polygon(Point,4);
PolygonFill(Seed,fillColor,boundaryColor);
// TODO: 在此处为本机数据添加绘制代码
}
2. 在OnDraw()函数中,用黑色的线条绘制出多边形,设置一个内部点作为种子点,调用PolygonFill()进行填充。
代码:
这里一开始用了老师的进栈出栈大函数,花费了好久个小时,都没有做成功,检查许久还没有发现,后面利用C++里面的库函数stack。
需要在SeedFillingView.h加上
#include<stack>
using namespace std;
就可以了。
在SeedFillingView.cpp中:
void CSeedFillingView::PolygonFill(CPoint Seed,COLORREF fillColor,COLORREF boundaryColor)//区域填充
{
CClientDC *pdc;
pdc=new CClientDC(this);
CPoint head;
head=Seed;
stack<CPoint> s;
s.push(head);
while (!s.empty())
{
CPoint base=s.top();//访问栈顶
s.pop();//栈顶元素出栈
pdc->SetPixel(base,fillColor);
PointTop.x=base.x; //(x, y+1)
PointTop.y=base.y+1; //(x, y+1)
if (pdc->GetPixel(PointTop)== boundaryColor&&pdc->GetPixel(PointTop)!=fillColor)
{
s.push(PointTop);
}
PointLeft.x=base.x-1;//(x-1, y)
PointLeft.y=base.y;//(x-1, y)
if (pdc->GetPixel(PointLeft)== boundaryColor&&pdc->GetPixel(PointLeft)!=fillColor)
{
s.push(PointLeft);
}
PointBottom.x=base.x;//(x, y-1)
PointBottom.y=base.y-1;//(x, y-1)
if (pdc->GetPixel(PointBottom)== boundaryColor&&pdc->GetPixel(PointBottom)!=fillColor)
{
s.push((PointBottom));
}
PointRight.x=base.x+1;//(x+1, y)
PointRight.y=base.y;//(x+1, y)
if (pdc->GetPixel(PointRight)== boundaryColor&&pdc->GetPixel(PointRight)!=fillColor)
{
s.push(PointRight);
}
}
老师给的答案:
void CTestView::PolygonFill()//区域填充函数

{

	CClientDC dc(this);

	COLORREF FillColor,BoundaryColor,PixelColor;//填充色,边界色,当前点像素色

	BoundaryColor=RGB(0,0,0);//边界色为黑色

	FillColor=RGB(0,0,255);//填充色为蓝色

	Head=new Stack_node();//建立堆栈结点

	Head->PixelPoint=Seed;//种子结点入栈

	Head->Next=NULL;

	while(Head!=NULL)//如果栈不为空

	{

		Stack_node *PopPoint;

		PopPoint=Pop();

		if(PopPoint==NULL)

			return;

		//Last=Base;

		dc.SetPixel(PopPoint->PixelPoint,FillColor);//画蓝色种子

		//搜索出栈结点的左方像素

		PointLeft.x=PopPoint->PixelPoint.x-1;

		PointLeft.y=PopPoint->PixelPoint.y;

		PixelColor=dc.GetPixel(PointLeft.x,PointLeft.y);

		if(PixelColor!=BoundaryColor && PixelColor!=FillColor)

		//不是边界色并且未置成填充色

			Push(PointLeft);//左方像素入栈

		//搜索出栈结点的上方像素

		PointTop.x=PopPoint->PixelPoint.x;

		PointTop.y=PopPoint->PixelPoint.y+1;

		PixelColor=dc.GetPixel(PointTop);

		if(PixelColor!=BoundaryColor && PixelColor!=FillColor)

			Push(PointTop);	//上方像素入栈

		//搜索出栈结点的右方像素

		PointRight.x=PopPoint->PixelPoint.x+1;

		PointRight.y=PopPoint->PixelPoint.y;

		PixelColor=dc.GetPixel(PointRight);

		if(PixelColor!=BoundaryColor && PixelColor!=FillColor)

			Push(PointRight);//右方像素入栈

		//搜索出栈结点的下方像素

		PointBottom.x=PopPoint->PixelPoint.x;

		PointBottom.y=PopPoint->PixelPoint.y-1;

		PixelColor=dc.GetPixel(PointBottom);

		if(PixelColor!=BoundaryColor && PixelColor!=FillColor)

			Push(PointBottom);//下方像素入栈

	}

}
截图:


 1465
1465

 被折叠的 条评论
为什么被折叠?
被折叠的 条评论
为什么被折叠?
 到【灌水乐园】发言


