


系统需求
- 64位linux系统
- 4核16G内存最低
- 可使用api接入算力,本地服务器不需部署
使用阿里CES服务器为例
系统版本:Ubuntu 22.04 64
安装宝塔控制台
wget -O install_panel.sh https://download.bt.cn/install/install_panel.sh && sudo bash install_panel.sh ed8484bec安装成功后,根据系统提示,在防火墙中打开对应端口
注意,BT安装后会生成/www/wwwroot目录,下面我们将程序放置在此目录下,而非官方文档中的/var/www目录。
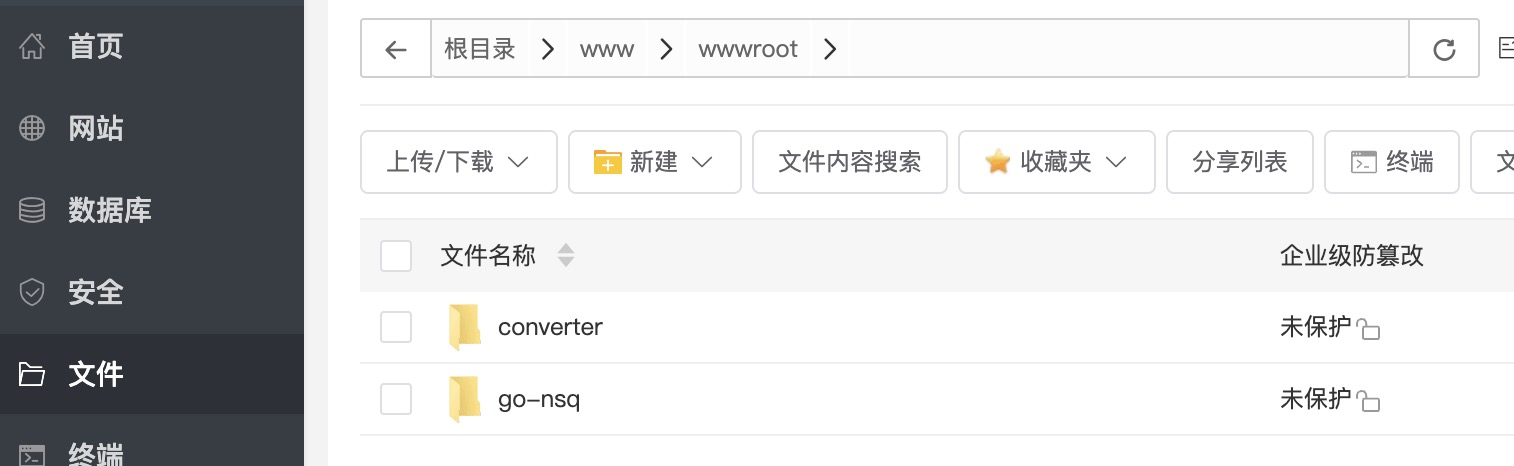
部署Chatwiki项目文件
- 将项目压缩包chatwiki-main.zip上传到\www\wwwroot目录,解压后重命名为chatwiki
或
cd /www/wwwroot
#从github 克隆代码
git clone https://github.com/zhimaAi/chatwiki.git
#从gitee克隆代码
git clone https://gitee.com/zhimaAi/chatwiki.git
安装python环境
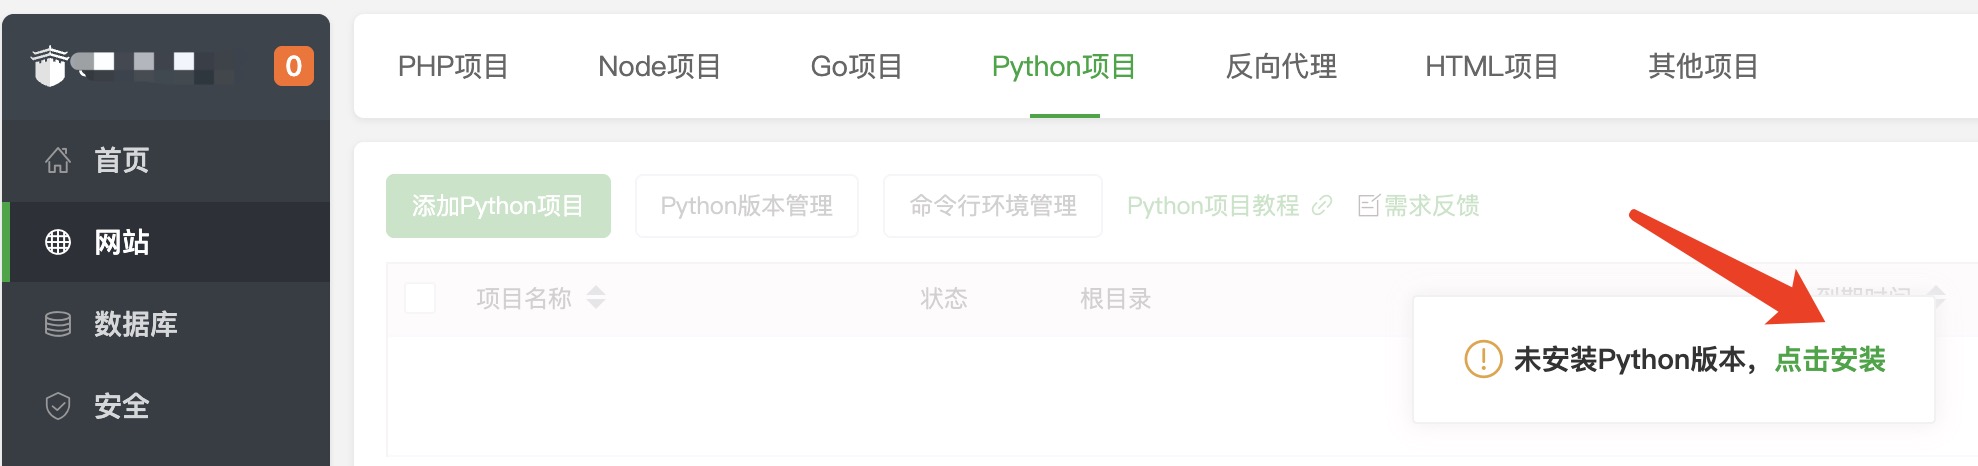
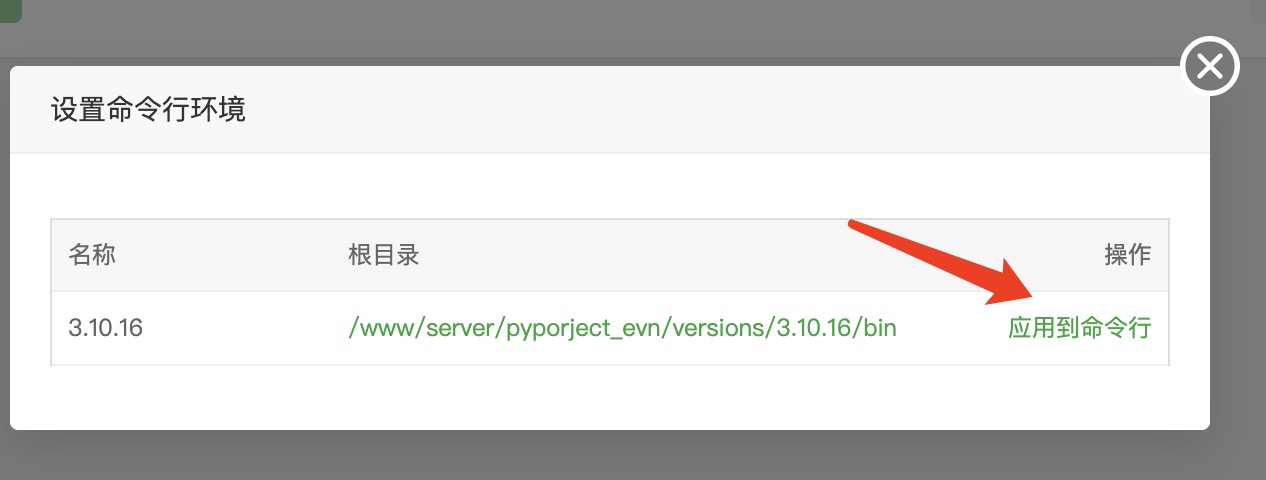
- 进入宝塔的网站管理功能模块,安装Python运行环境
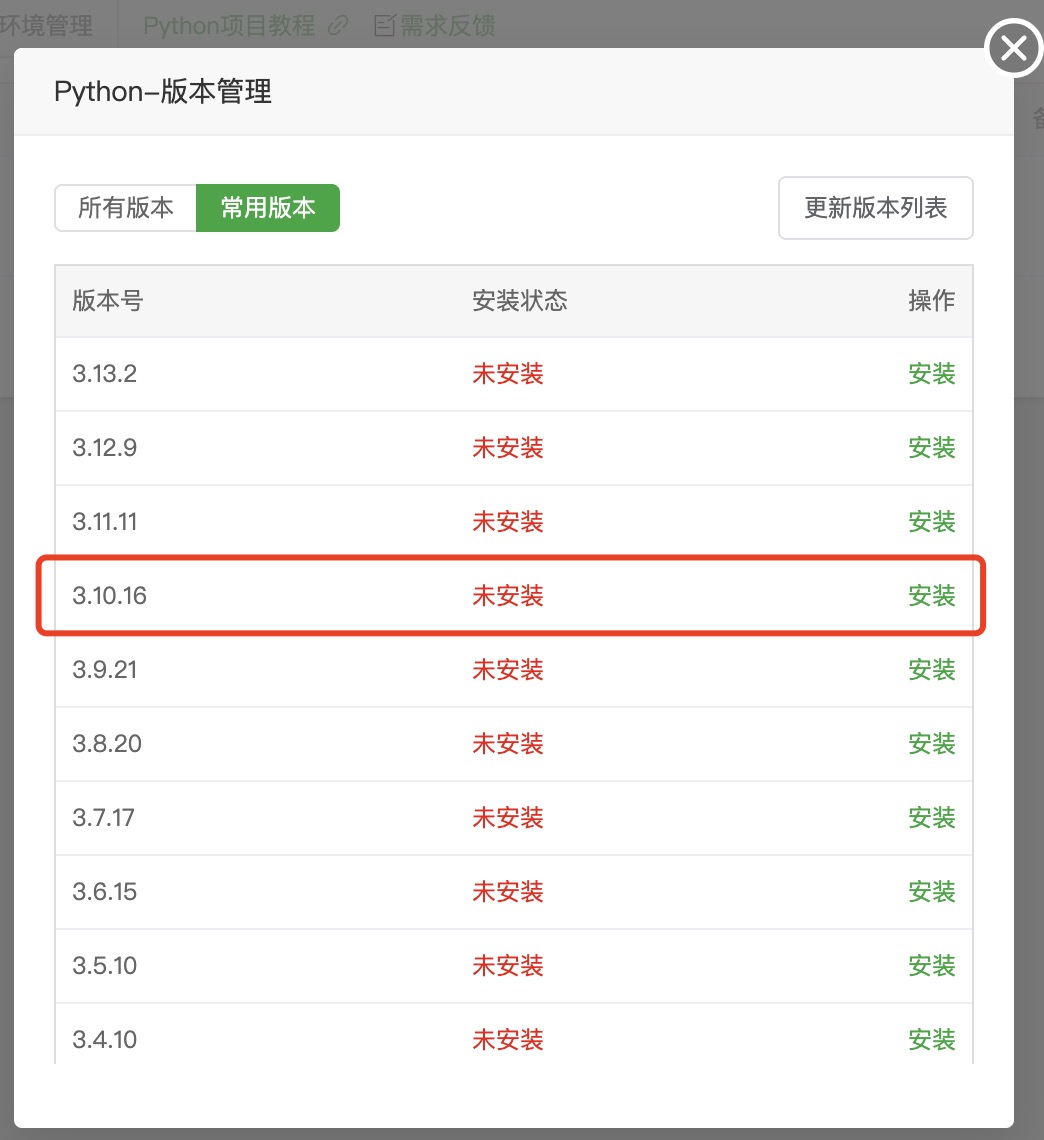
- 安装Python3.10版本
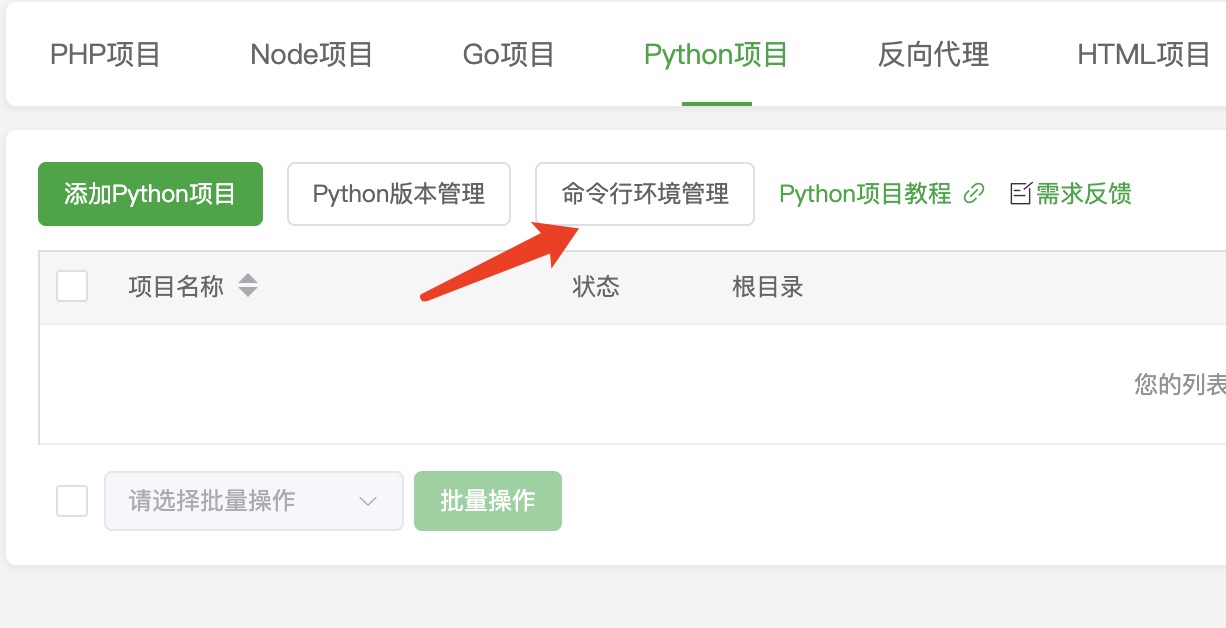
- 安装完成后,刷新页面,设置命令行环境管理
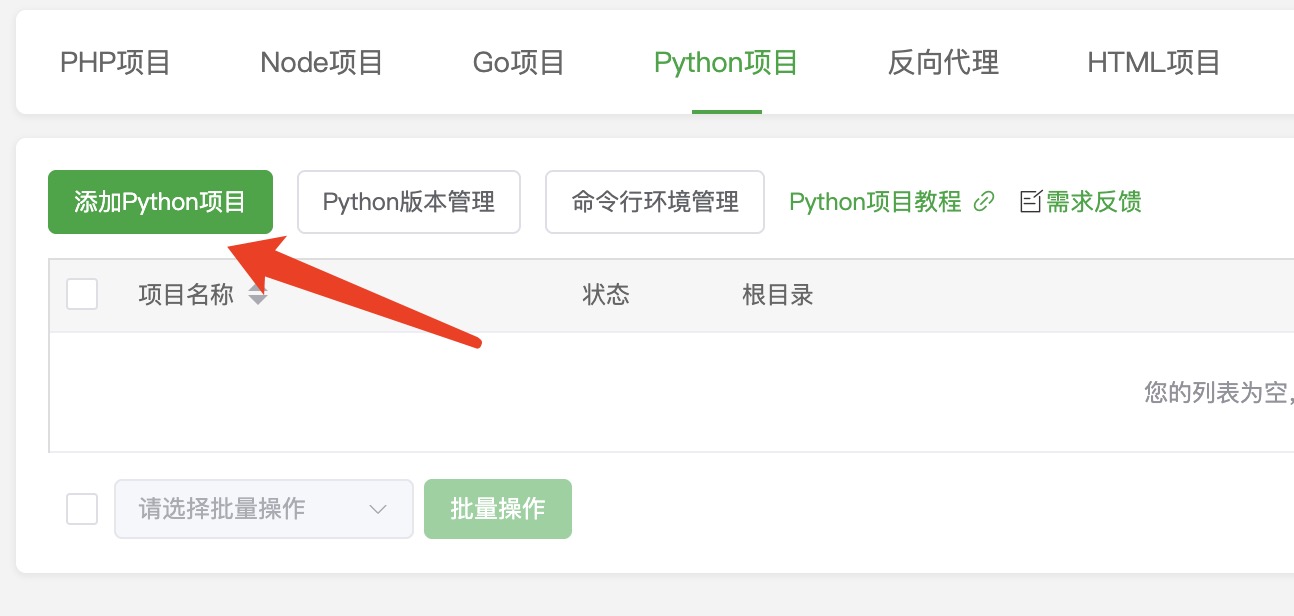
添加知识库PDF文档转服务
#克隆github项目
cd /www/wwwroot
#从github 克隆代码
git clone https://github.com/zhimaAi/converter.git
#如果服务器无法连接github服务器,连接gitee服务器或直接下载zip包,上传解压也是一样的
git clone https://gitee.com/zhimaAi/converter.git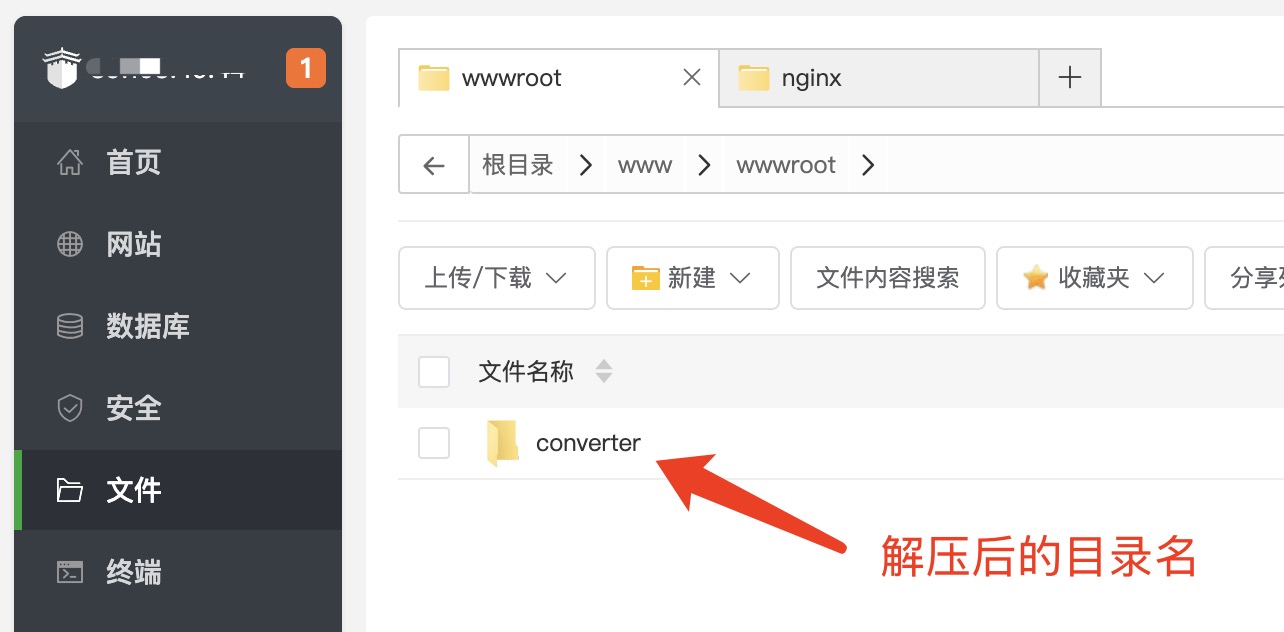
#在终终端中编写启动sh
echo '#!/bin/bash' > /www/wwwroot/converter/uvicorn.sh
echo 'source env/bin/activate' >> /www/wwwroot/converter/uvicorn.sh
echo 'uvicorn main:app --host 0.0.0.0 --port 8090'>> /www/wwwroot/converter/uvicorn.sh- 添加PDF文档转服务
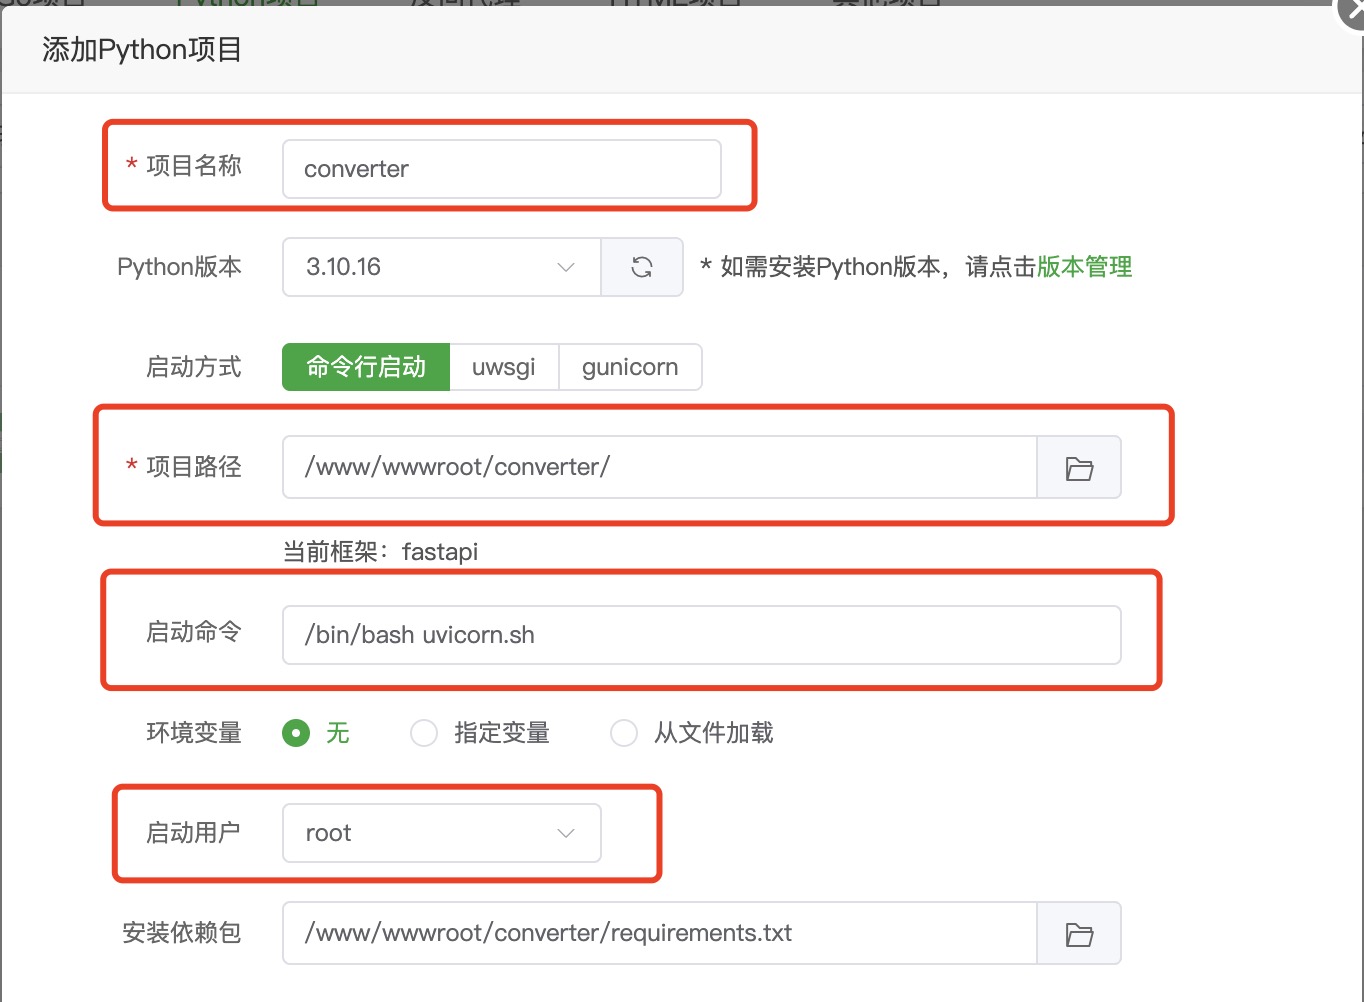
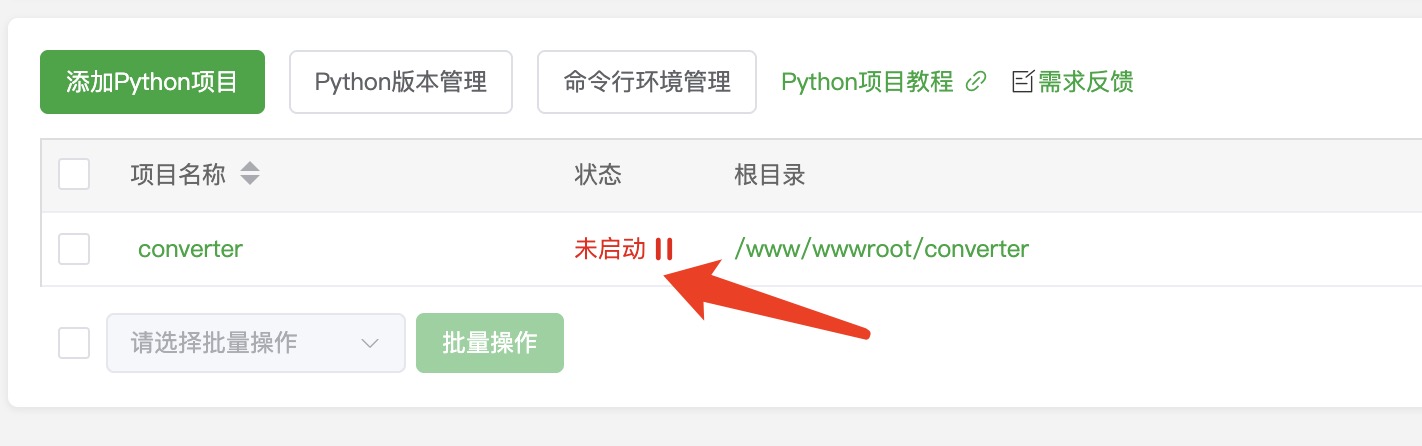
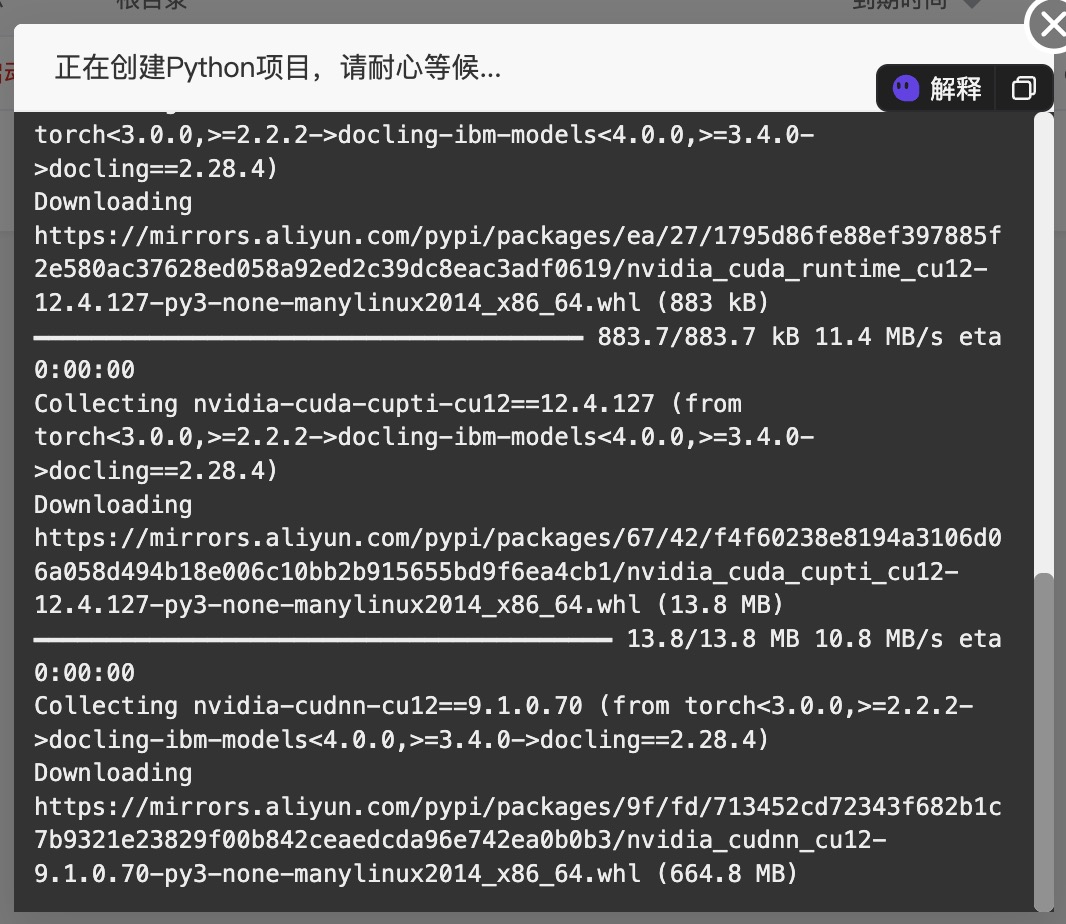
点击启动按钮后,会提示查看日志,此时程序在根据/www/wwwroot/converter下的requirements.txt内容,安装模块,点击项目后的设置按钮可查看安装进度,会很慢,大约会下载6G内容并安装,要耐心等待一段时间。
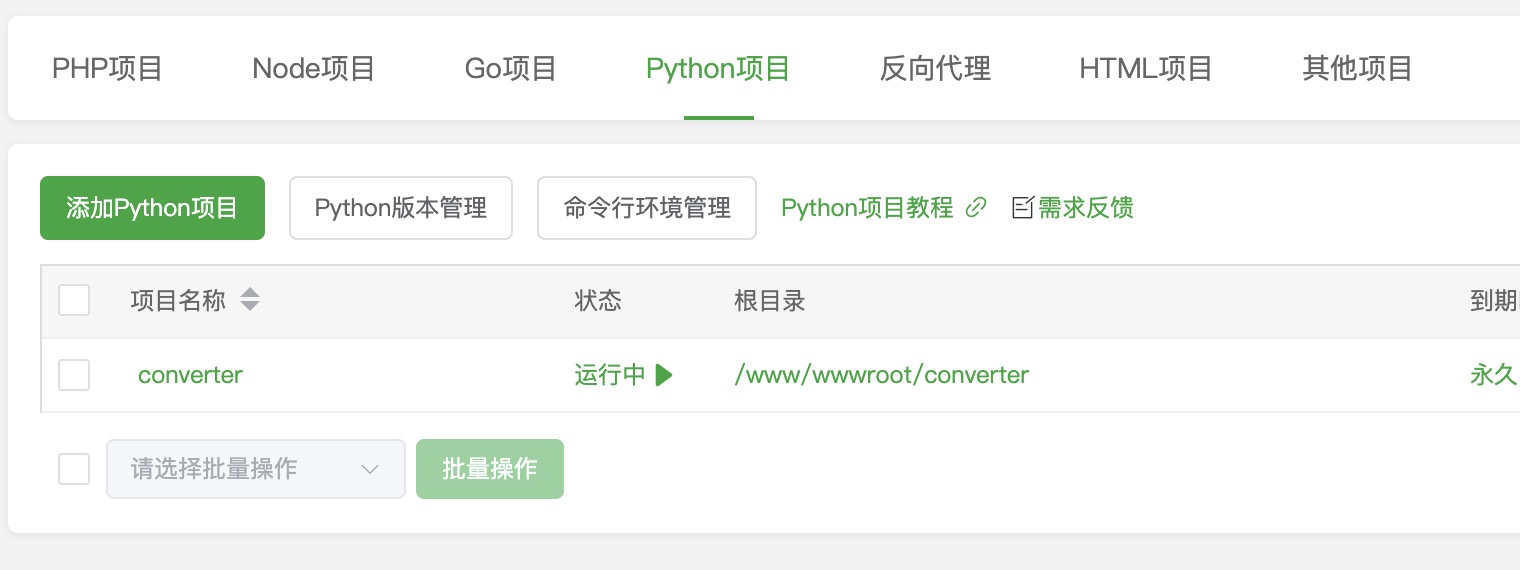
创建成后即可启动PDF文档转服务。
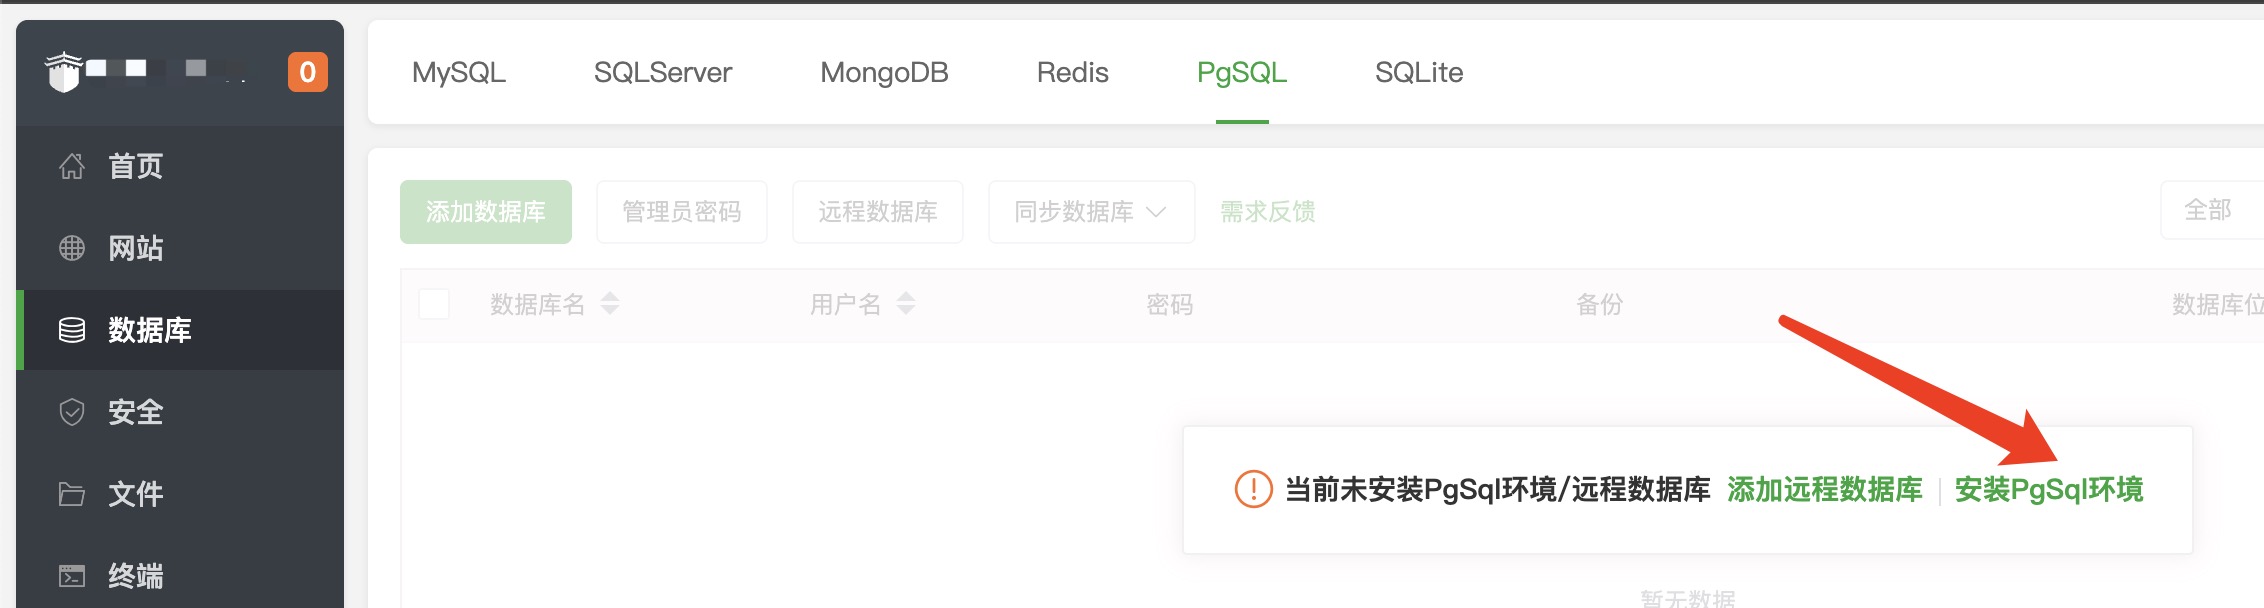
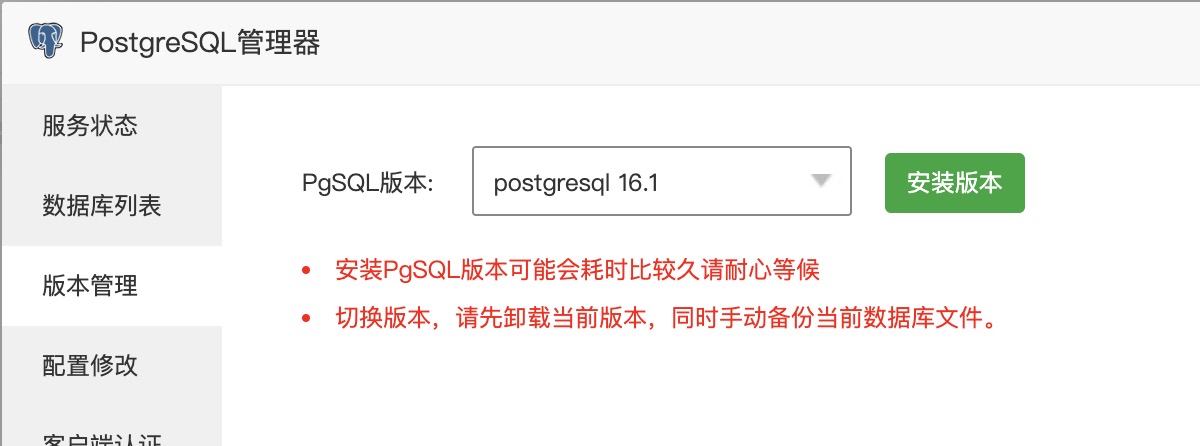
安装Postgres数据库
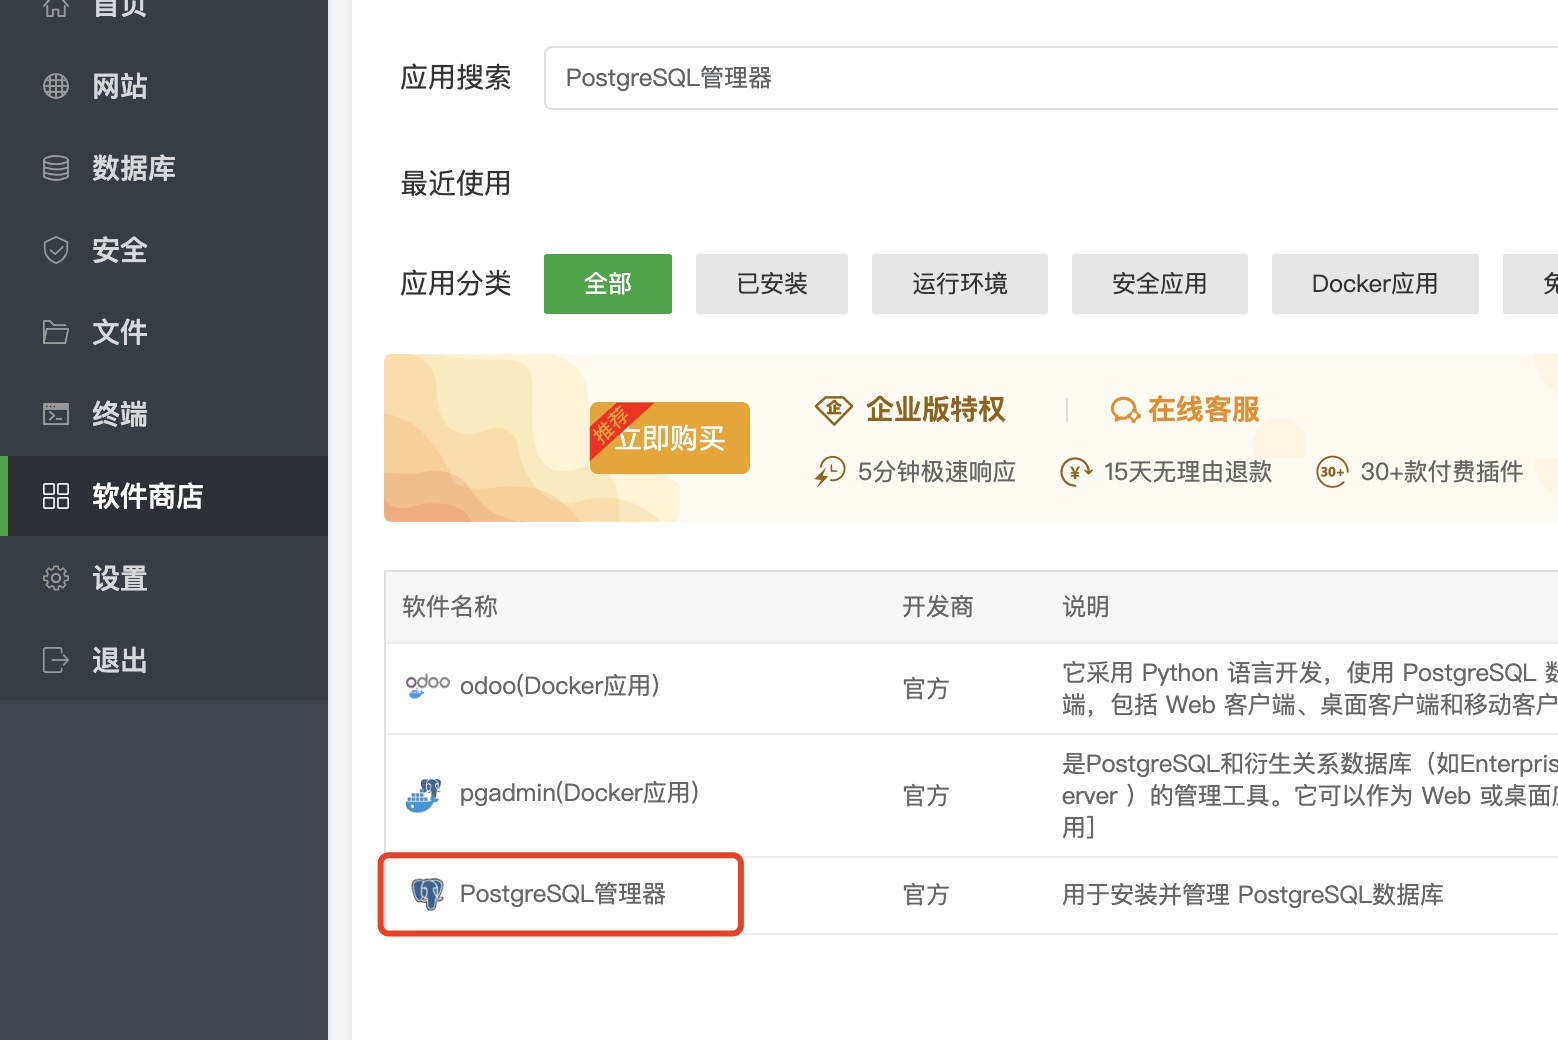
- 在宝塔软件商店中安装PostgreSQL管理器
- 安装PgSQL 16.1版本数据库
- 安装数据库扩展
#在终端用命令安装数据库扩展
curl -fsSL https://repo.pigsty.cc/pig | bash
pig repo add pigsty pgdg -u
pig ext install -y vector -v 16
pig ext install -y zhparser -v 16
pig ext install -y pg_search -v 16
pig ext install -y pg_bigm -v 16
pig ext install -y age -v 16
#在终端中,将安装的扩展文件复制到宝塔数据库配置目录中
cp /usr/lib/postgresql/16/lib/age.so /www/server/pgsql/lib/
cp /usr/share/postgresql/16/extension/age* /www/server/pgsql/share/extension/
cp /usr/lib/postgresql/16/lib/vector.so /www/server/pgsql/lib/
cp /usr/share/postgresql/16/extension/vector* /www/server/pgsql/share/extension/
cp /usr/lib/postgresql/16/lib/zhparser.so /www/server/pgsql/lib/
cp /usr/share/postgresql/16/extension/zhparser* /www/server/pgsql/share/extension/
cp /usr/lib/postgresql/16/lib/pg_search.so /www/server/pgsql/lib/
cp /usr/share/postgresql/16/extension/pg_search* /www/server/pgsql/share/extension/
cp /usr/lib/postgresql/16/lib/pg_bigm.so /www/server/pgsql/lib/
cp /usr/share/postgresql/16/extension/pg_bigm* /www/server/pgsql/share/extension/
cp /usr/lib/postgresql/16/lib/pg_prewarm.so /www/server/pgsql/lib/
cp /usr/share/postgresql/16/extension/pg_prewarm* /www/server/pgsql/share/extension/
cp /usr/lib/postgresql/16/lib/pg_stat_statements.so /www/server/pgsql/lib/
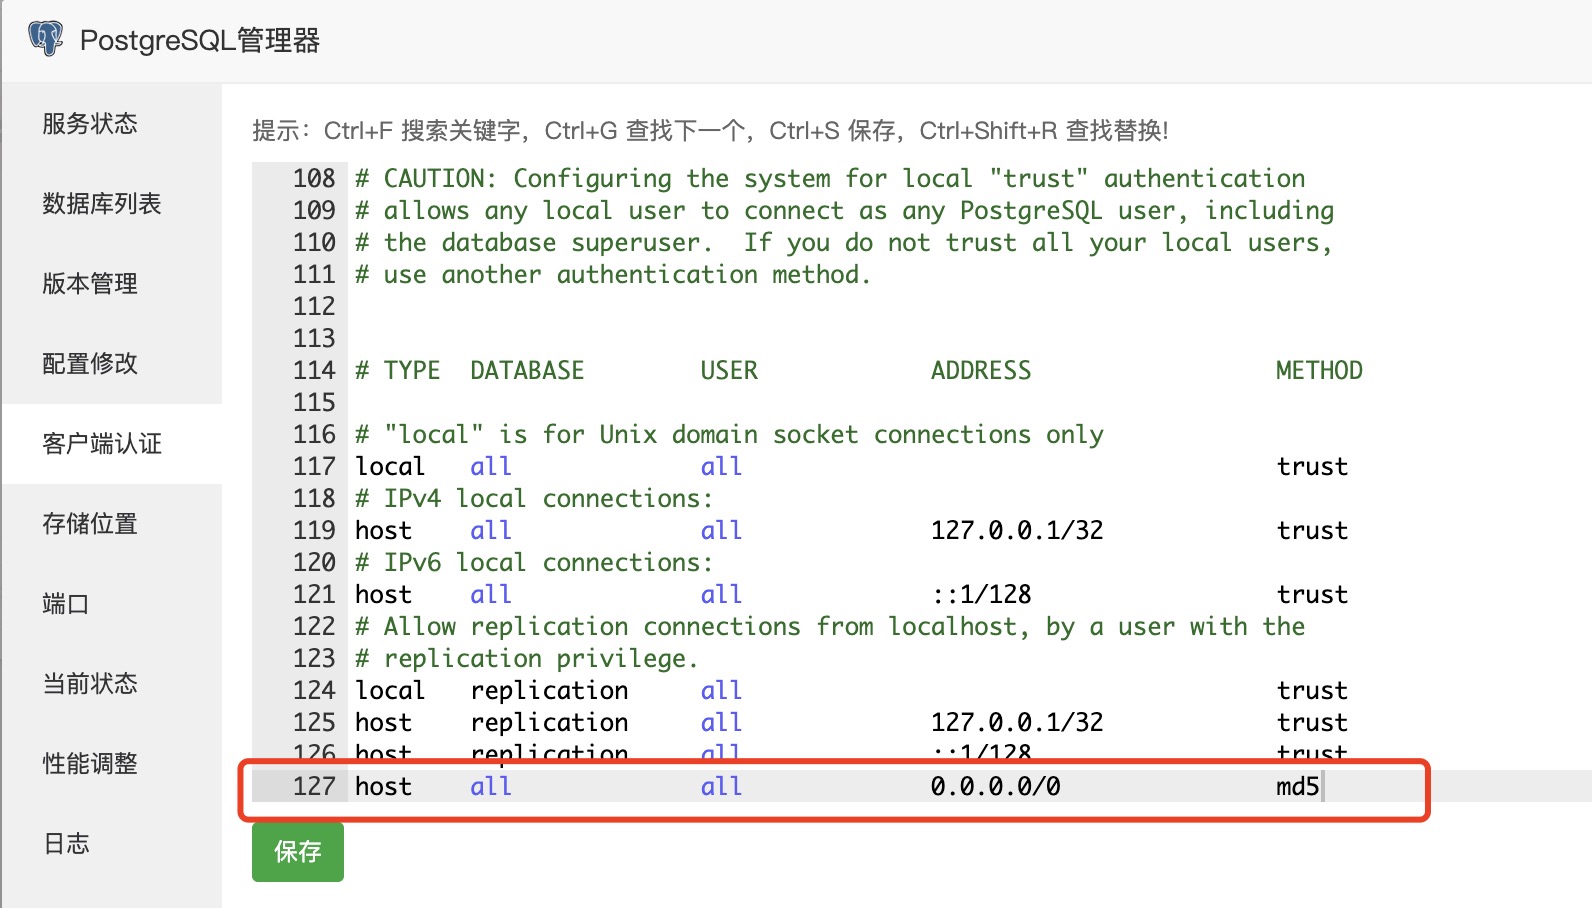
cp /usr/share/postgresql/16/extension/pg_stat_statements* /www/server/pgsql/share/extension/- 添加客户端认证
- 修改数据库配置并重启
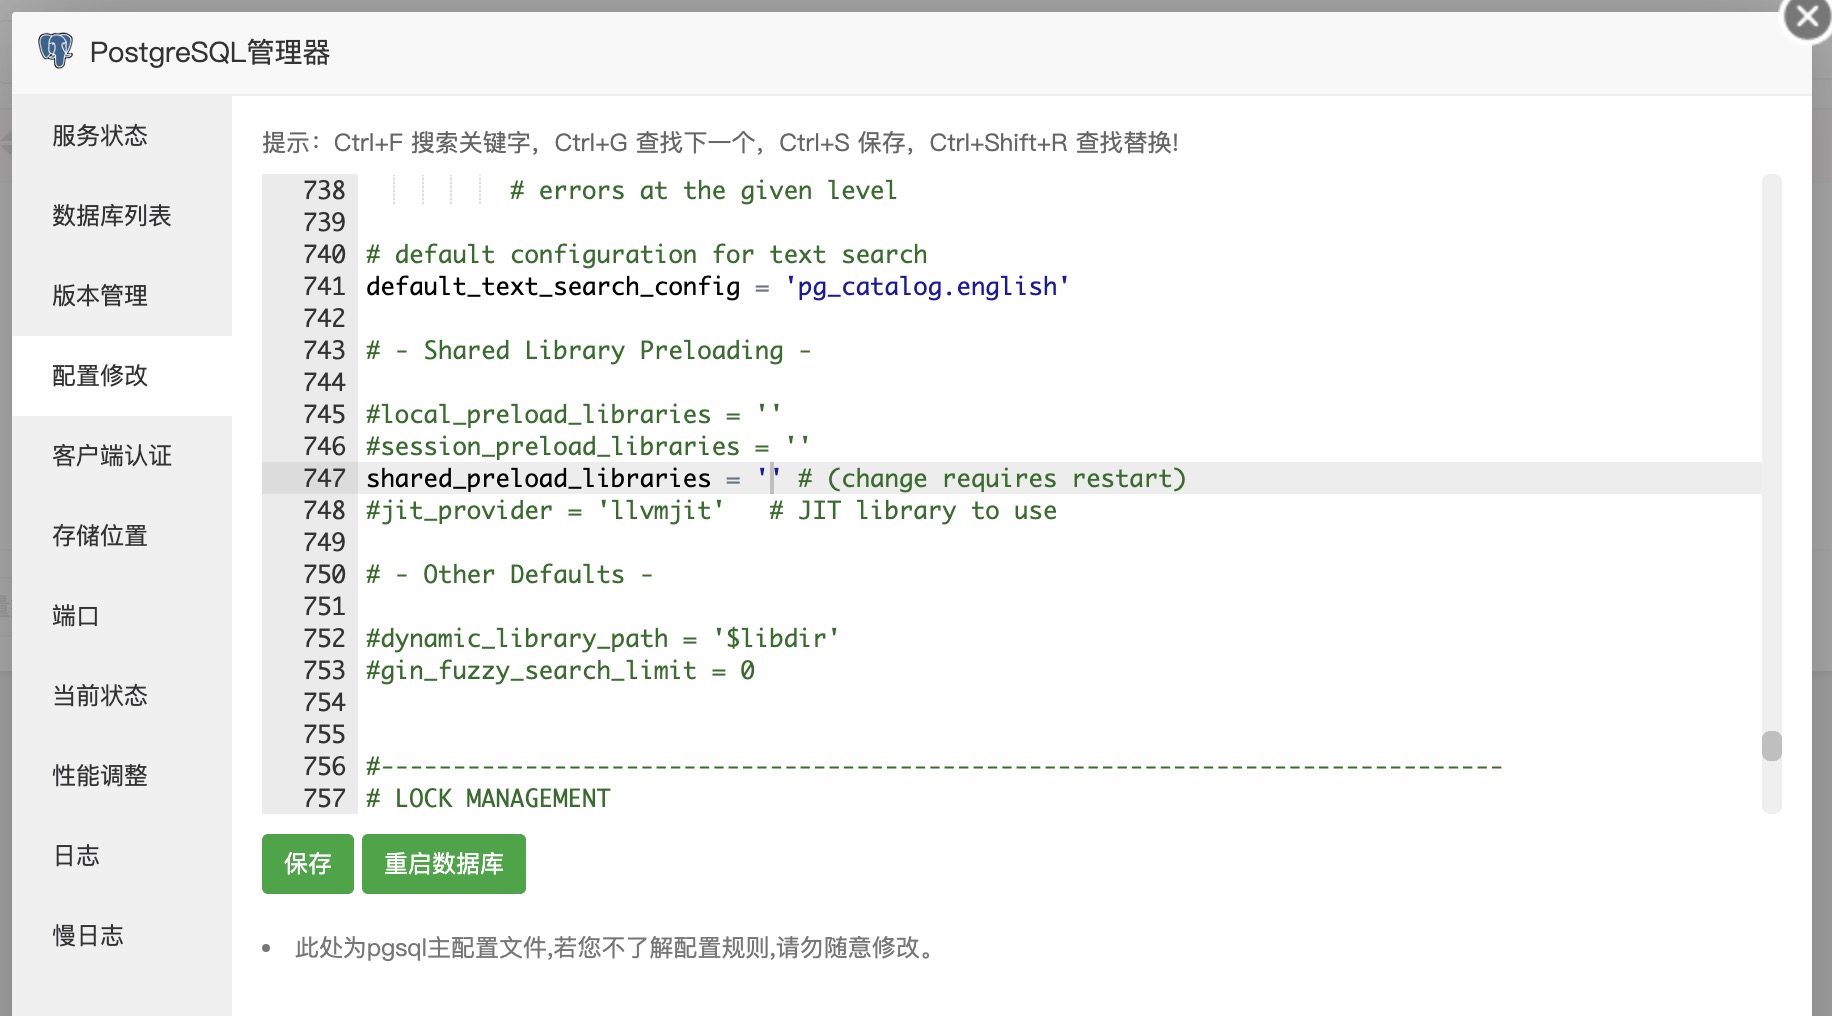
#listen_addresses = 'localhost'        替换成
listen_addresses = '*'
#shared_preload_libraries = ''        替换成
shared_preload_libraries = 'pg_prewarm,pg_stat_statements,pg_bigm,pg_search'
#search_path = '"$user", public' 替换成
search_path = 'public, ag_catalog, "$user"'
#末尾追加配置
zhparser.multi_short = t
zhparser.punctuation_ignore = t
zhparser.dict_in_memory = t- 创建PgSQL数据库
数据库名称:chatwiki
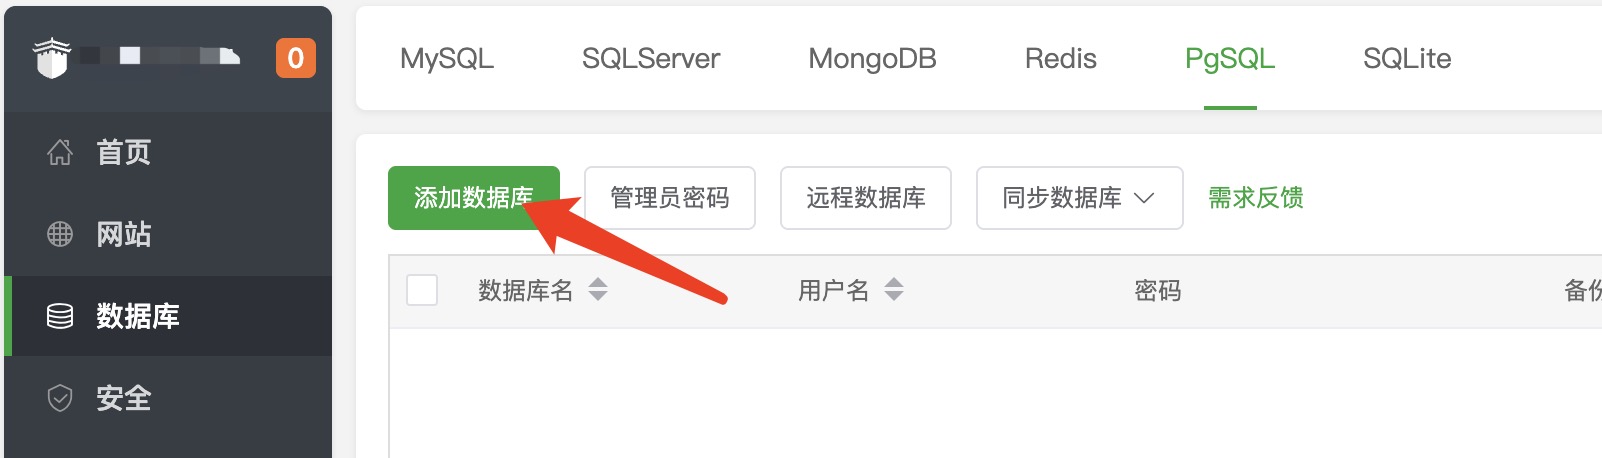
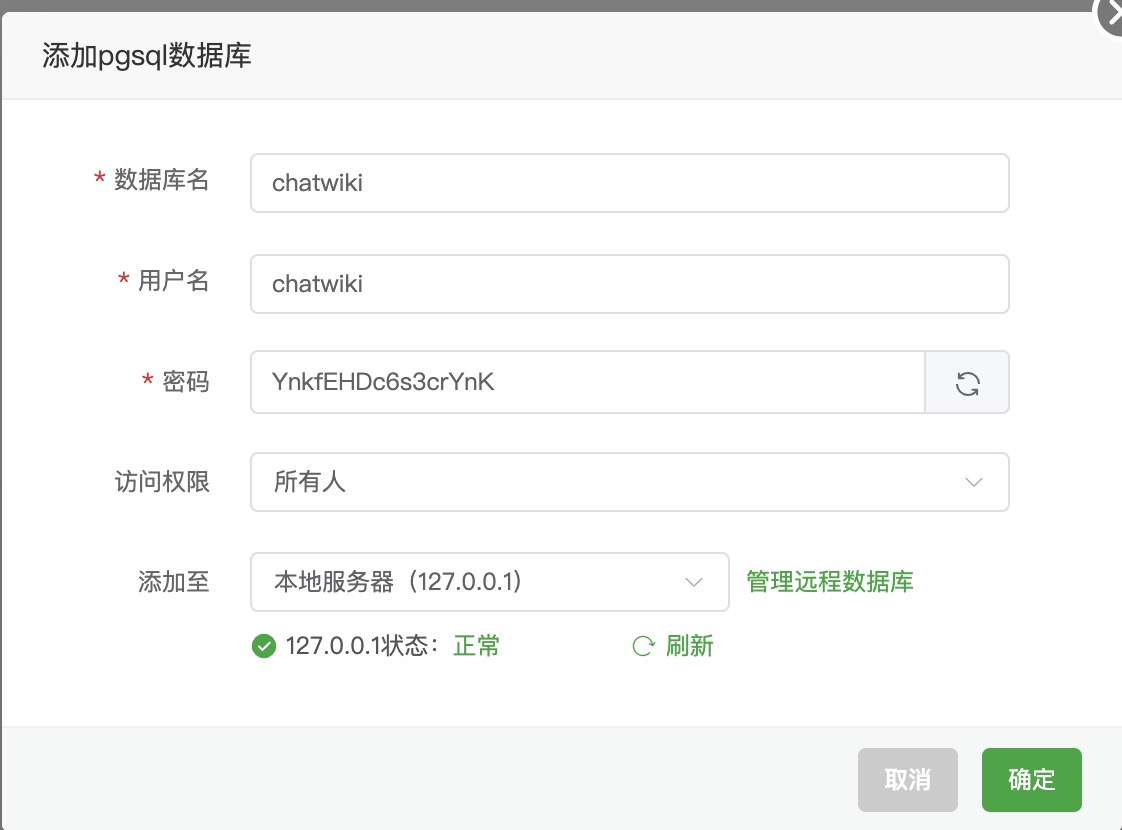
- 提升chatwiki用户权限,添加数据库扩展
#添加扩展到数据库中
sudo -i -u postgres
psql
#将chatwiki赋予超级用户权限,这个很重要
ALTER USER chatwiki WITH SUPERUSER CREATEDB CREATEROLE BYPASSRLS;
\c chatwiki
CREATE EXTENSION IF NOT EXISTS vector;
CREATE EXTENSION IF NOT EXISTS zhparser;
CREATE EXTENSION IF NOT EXISTS pg_search;
CREATE EXTENSION IF NOT EXISTS pg_bigm;
CREATE EXTENSION IF NOT EXISTS age;
# SELECT * FROM pg_extension;
\q
exit
数据库安装完毕!
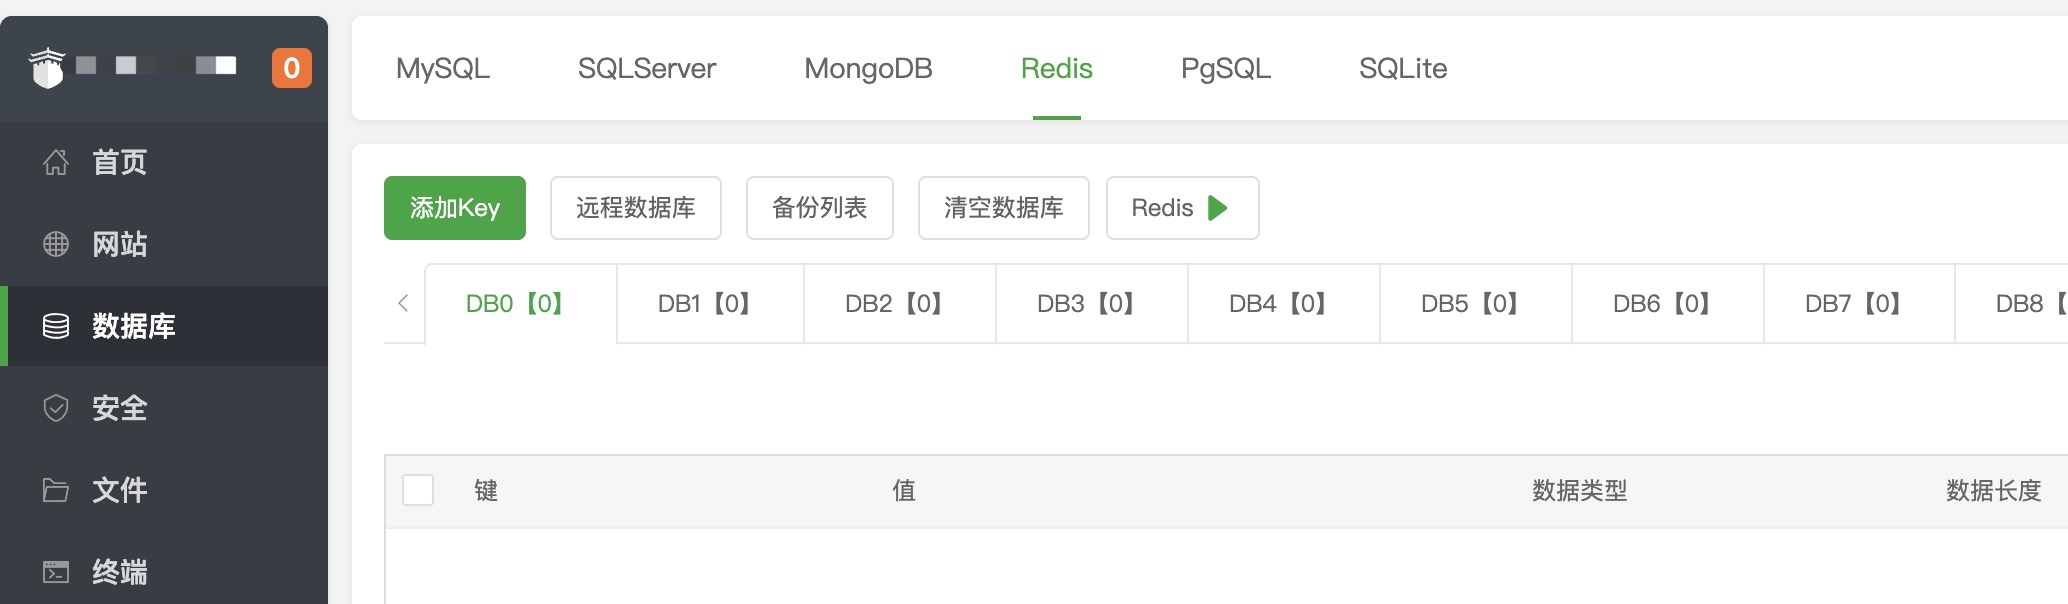
安装Redis缓存服务
- 宝塔软件商店搜索并安装
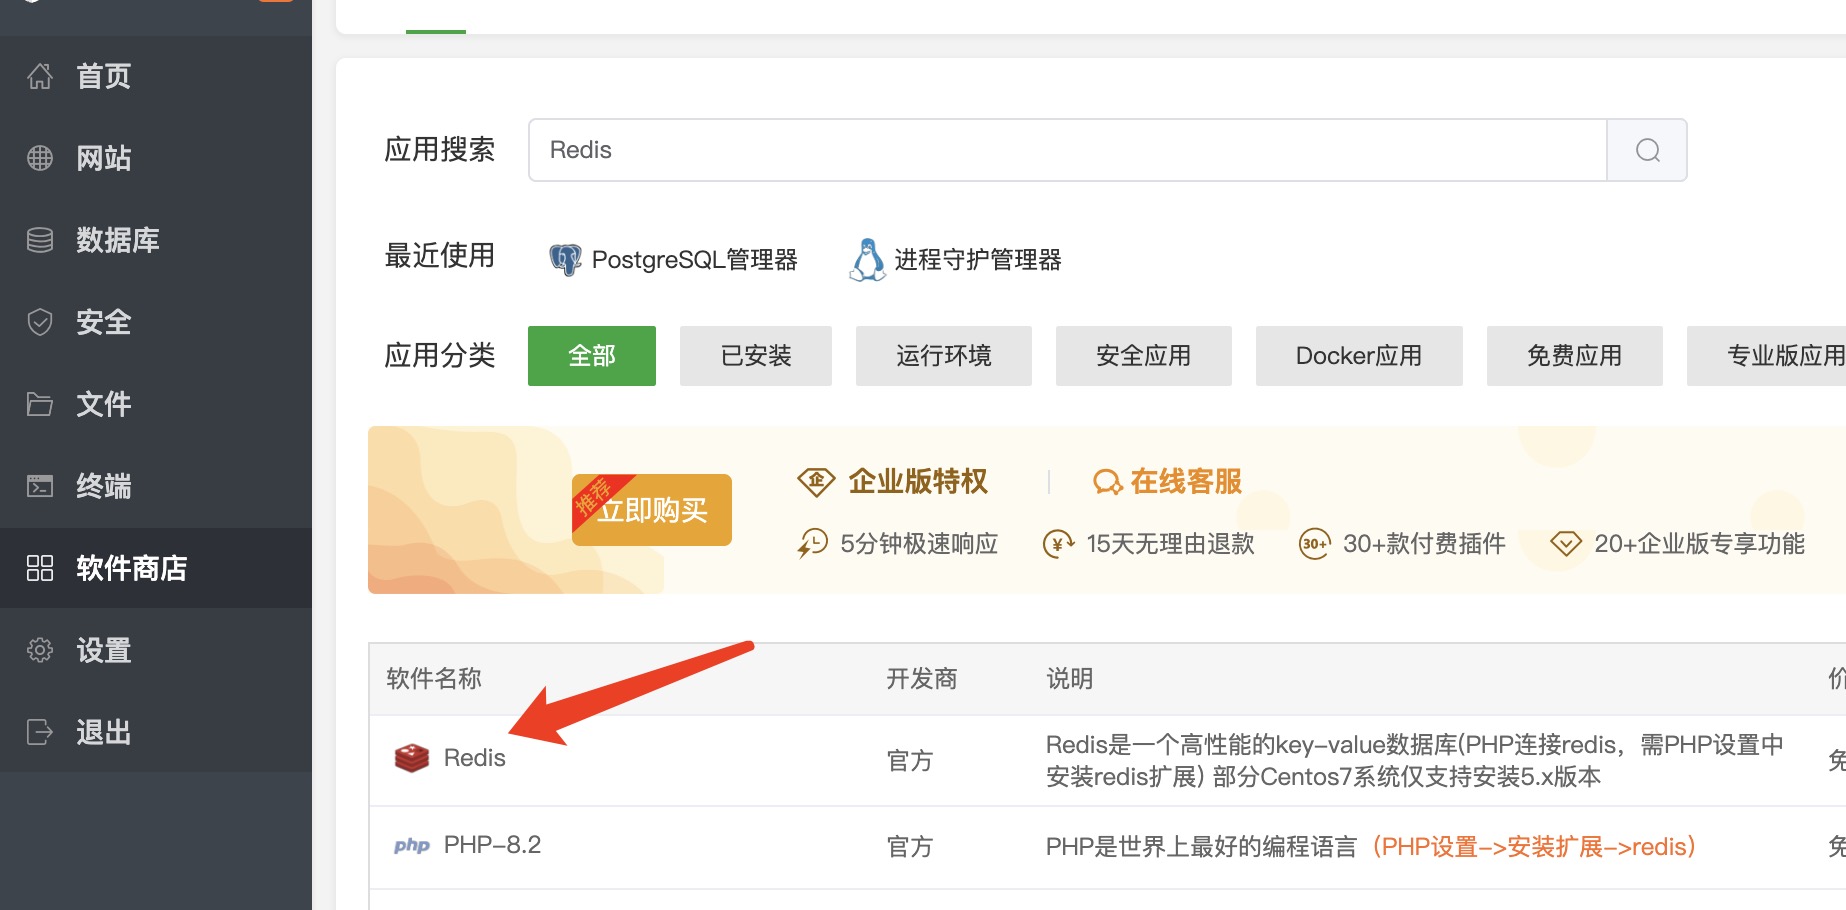
考虑到兼容性,版本可以选择较低的6.2.17版本
- 修改Redis服务配置
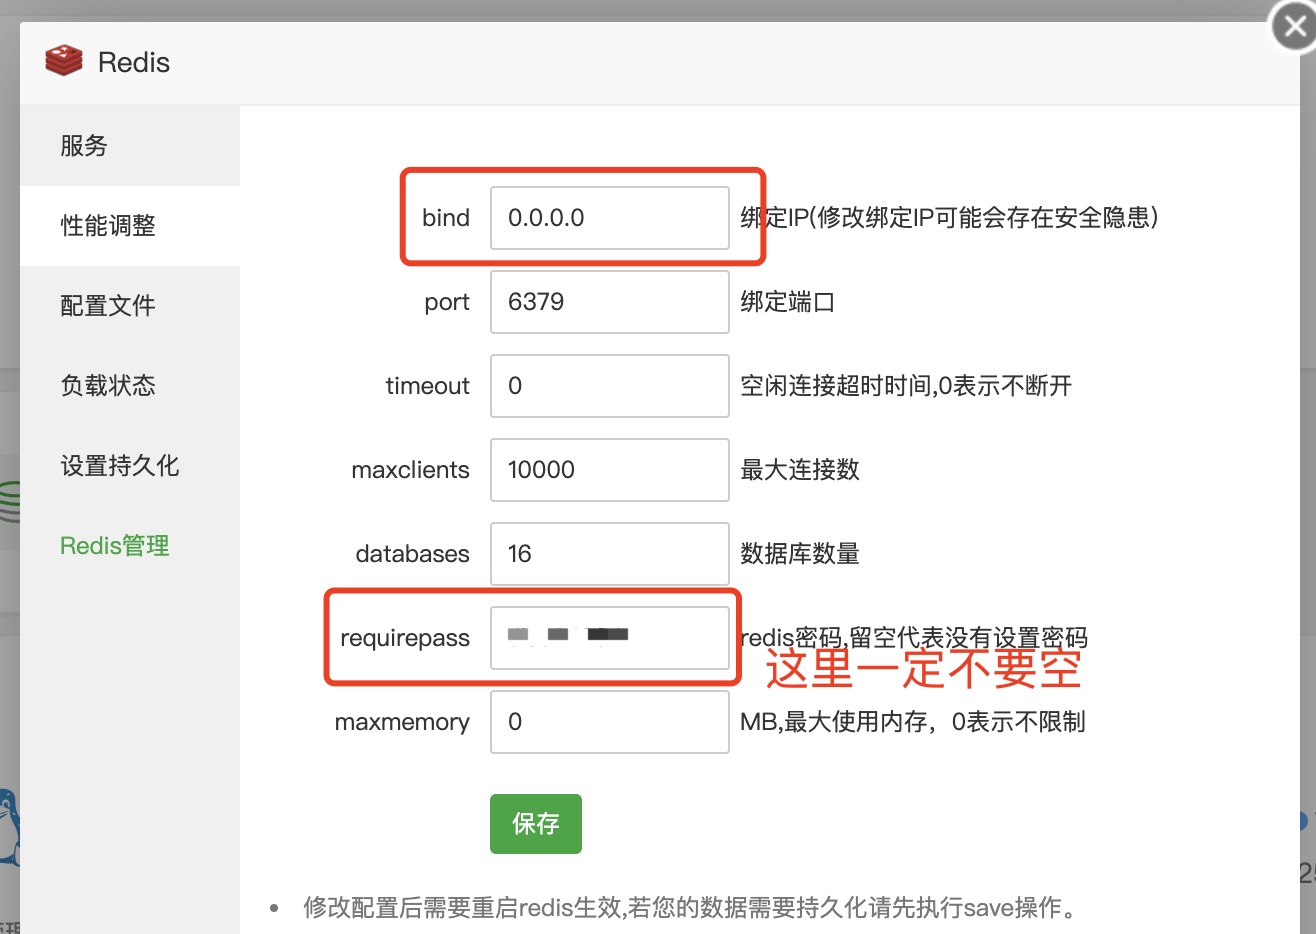
- 重启服务,redis服务安装完毕。
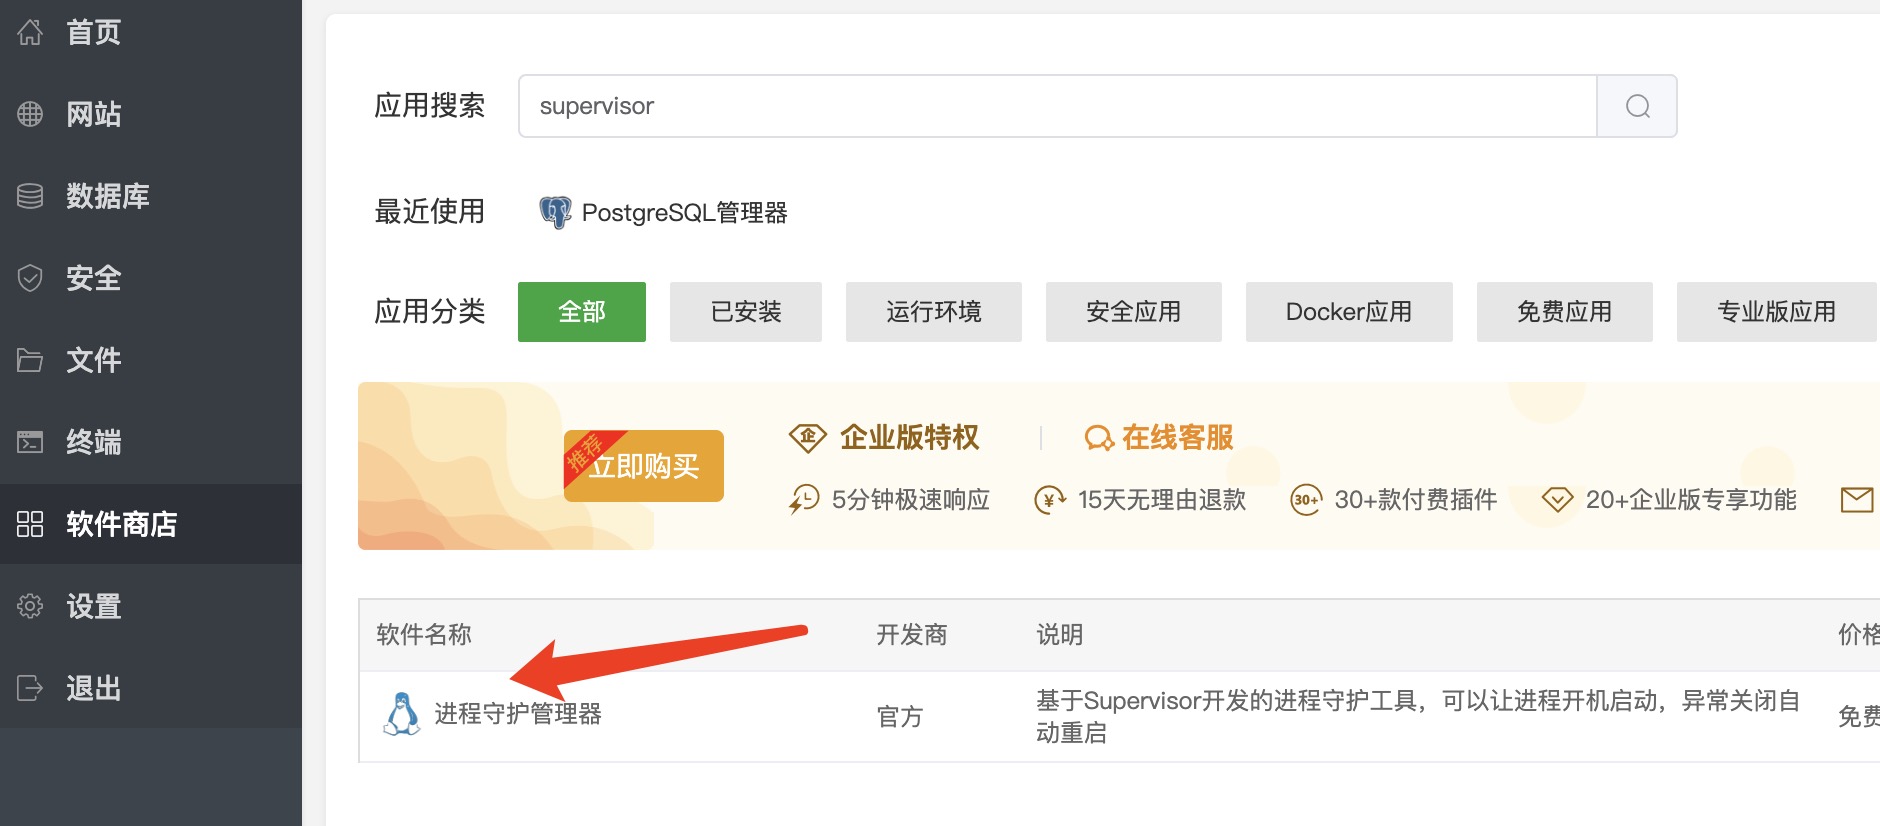
安装supervisor进程守护程序
- 在宝塔软件商店搜索并安装
系统部署成功后,完整的进程列表如下图所示

安装nsq异步队列服务
- 下载nsq程序:NSQ Docs 1.3.0 - Installing
- 将nsq-1.3.0.linux-amd64.go1.21.5.tar.gz文件上传到/www/wwwroot目录下,并解压。
- 将目录修改为root用户组并将权限设置为755
- 在supervisor中添加go-nsqadmin进程
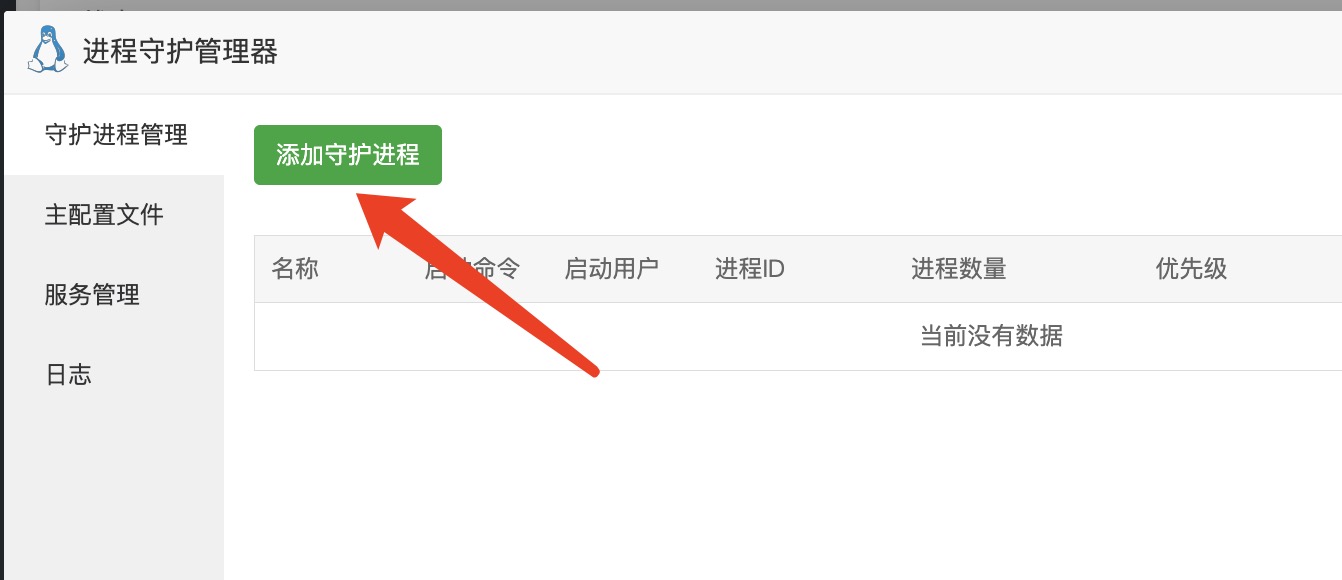
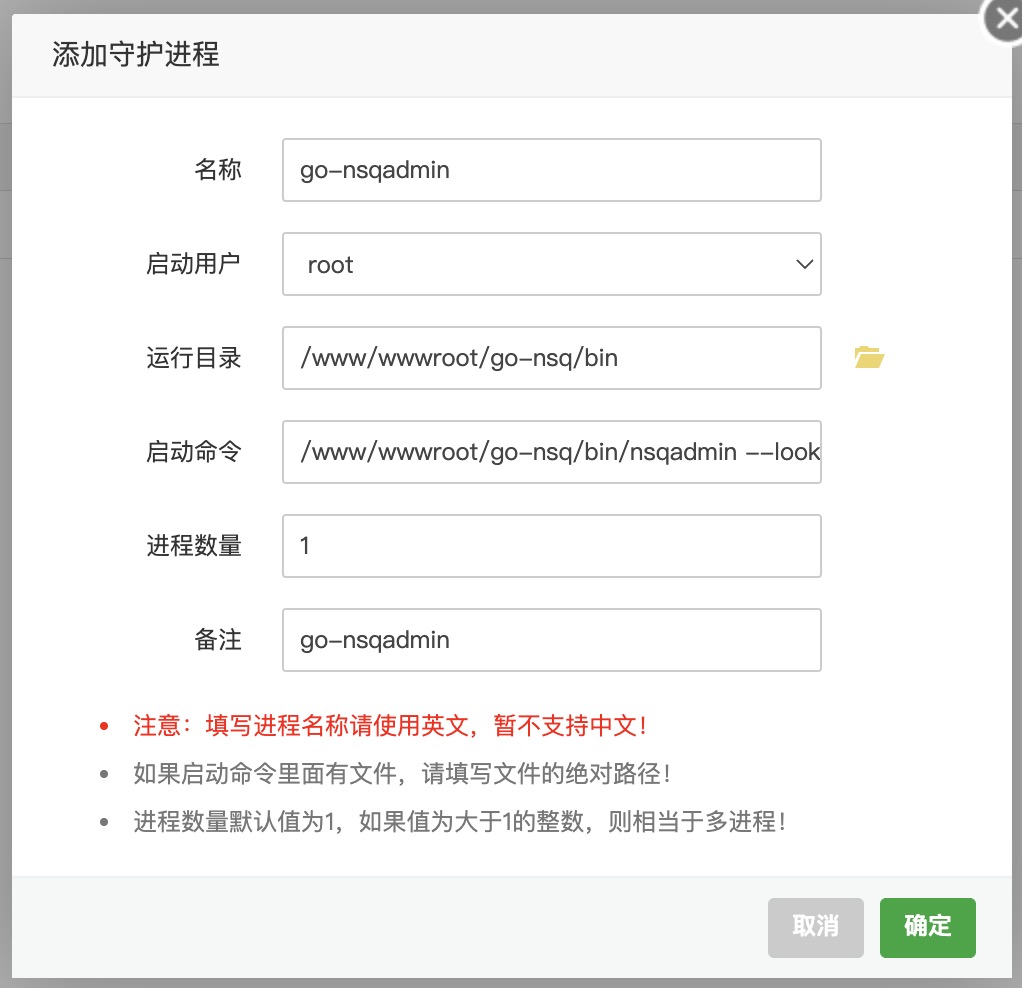
添加后,可能无法正常启动,请按照下方代码块的内容,核对进程配置文件内容
[program:go-nsqadmin]
command=/www/wwwroot/go-nsq/bin/nsqadmin --lookupd-http-address=127.0.0.1:4161
directory=/www/wwwroot/go-nsq/bin
autorestart=true
autostart=true
startsecs=3
startretries=3
stdout_logfile=/www/server/panel/plugin/supervisor/log/go-nsqadmin.out.log
stderr_logfile=/www/server/panel/plugin/supervisor/log/go-nsqadmin.err.log
stdout_logfile_maxbytes=20MB
stderr_logfile_maxbytes=20MB
user=root
priority=999
numprocs=1
process_name=%(program_name)s_%(process_num)02d
[program:go-nsqd]
command=/www/wwwroot/go-nsq/bin/nsqd --lookupd-tcp-address=127.0.0.1:4160 -msg-timeout=1h -max-msg-timeout=2h
directory=/www/wwwroot/go-nsq/bin/
autostart=true
autorestart=true
startsecs=3
startretries=3
stdout_logfile=/www/server/panel/plugin/supervisor/log/go-nsqd.out.log
stderr_logfile=/www/server/panel/plugin/supervisor/log/go-nsqd.err.log
stdout_logfile_maxbytes=20MB
stderr_logfile_maxbytes=20MB
user=root
priority=999
numprocs=1
process_name=%(program_name)s_%(process_num)02d[program:go-nsqlookupd]
command=/www/wwwroot/go-nsq/bin/nsqlookupd
directory=/www/wwwroot/go-nsq/bin/
autostart=true
autorestart=true
startsecs=3
startretries=3
stdout_logfile=/www/server/panel/plugin/supervisor/log/go-nsqlookupd.out.log
stderr_logfile=/www/server/panel/plugin/supervisor/log/go-nsqlookupd.err.log
stdout_logfile_maxbytes=20MB
stderr_logfile_maxbytes=20MB
user=root
priority=999
numprocs=1
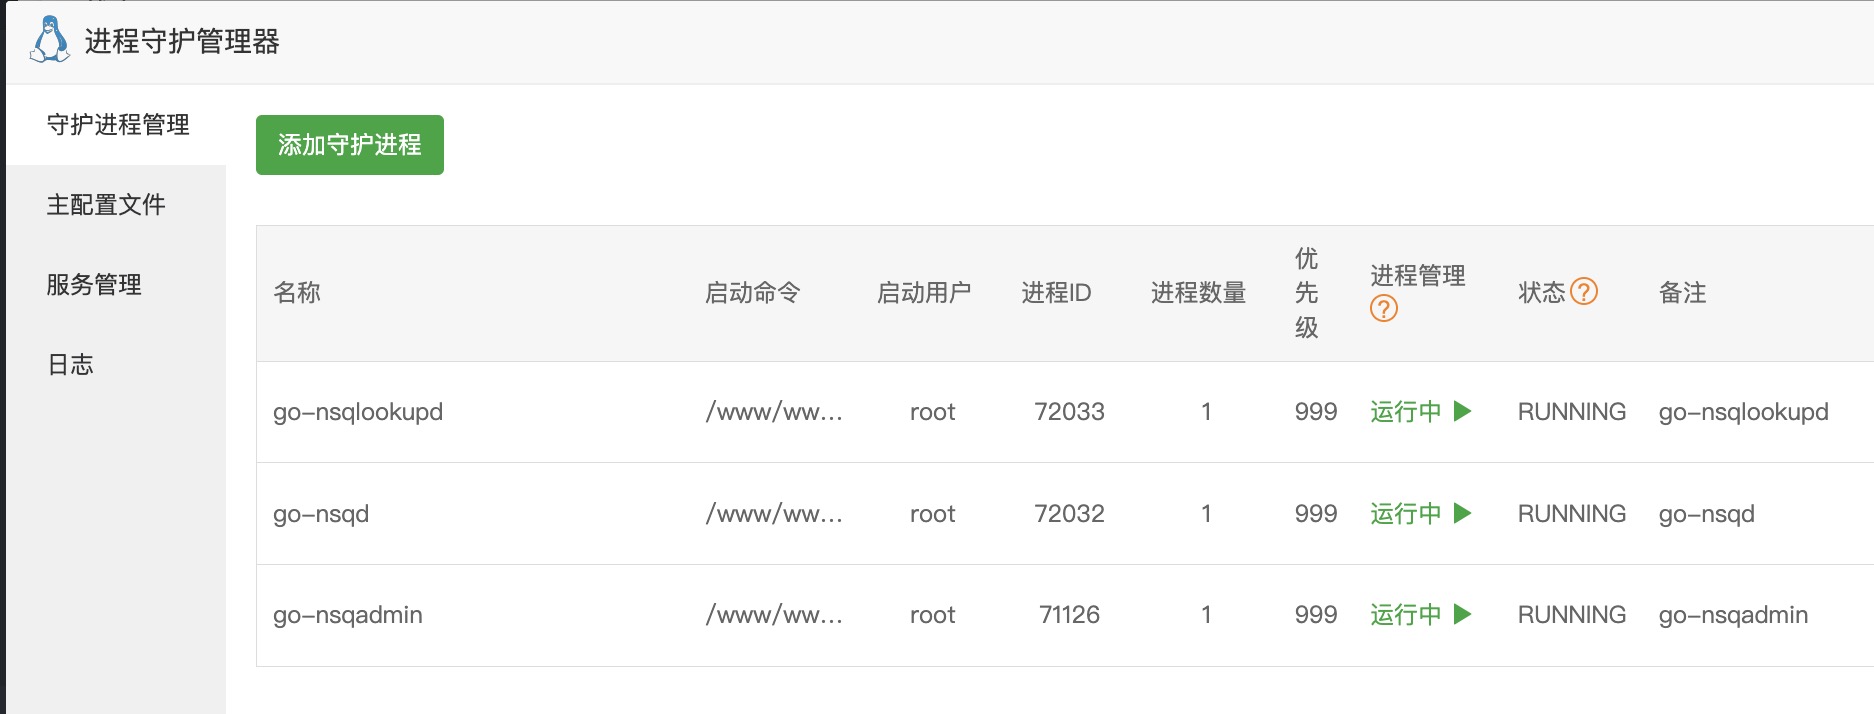
process_name=%(program_name)s_%(process_num)02d配置好后的状态
在线文档爬虫服务
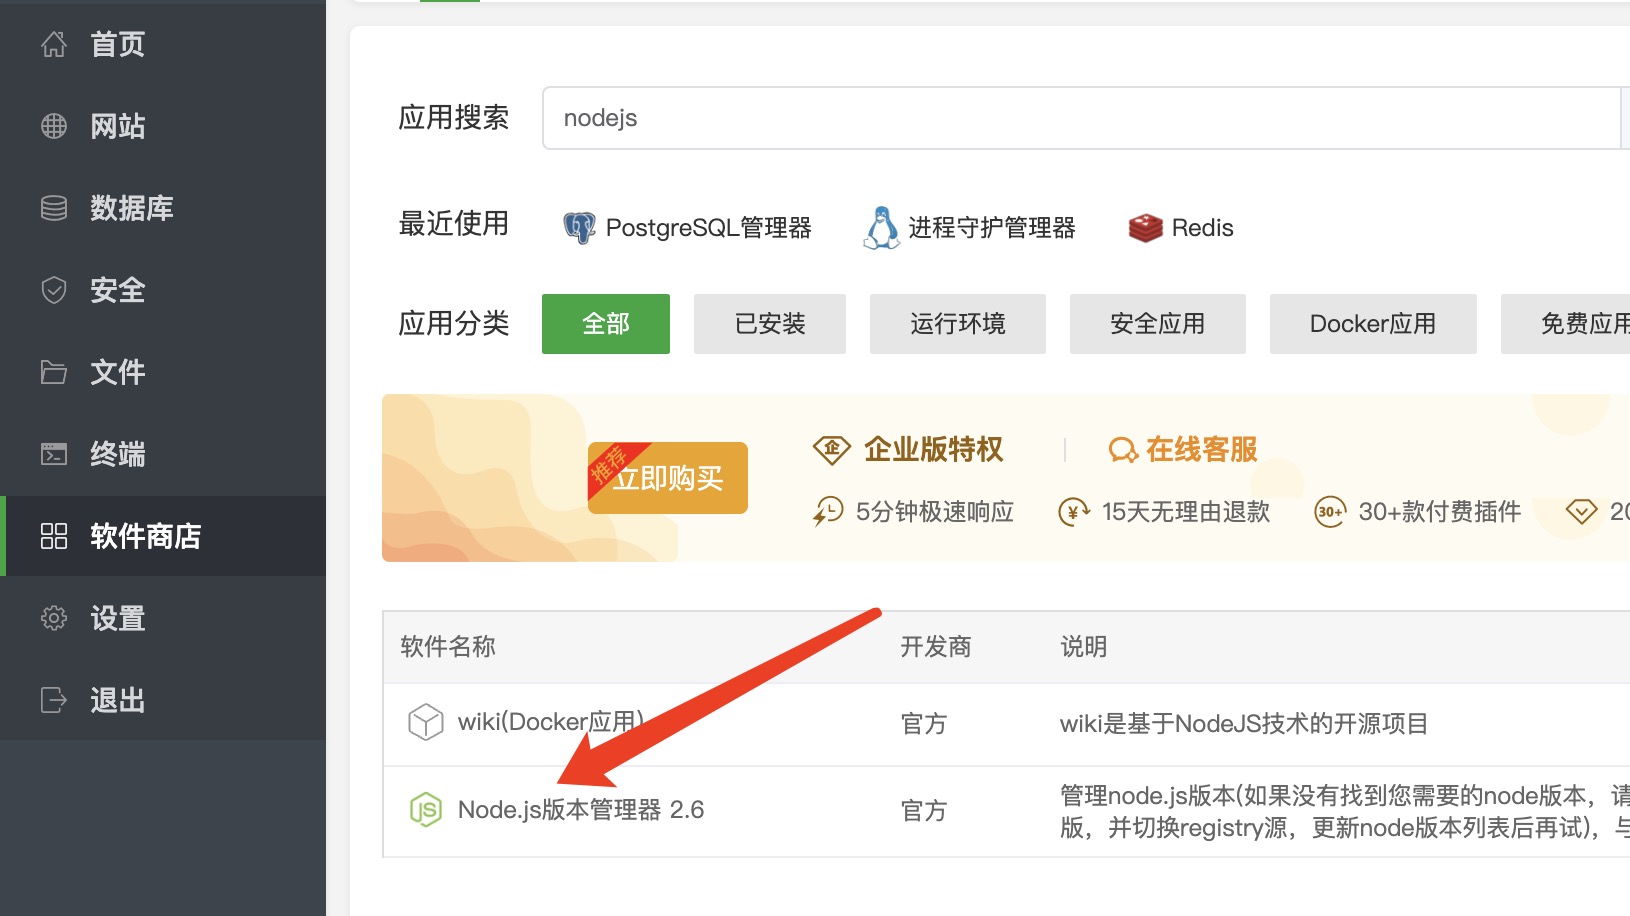
- 安装nodejs运行环境
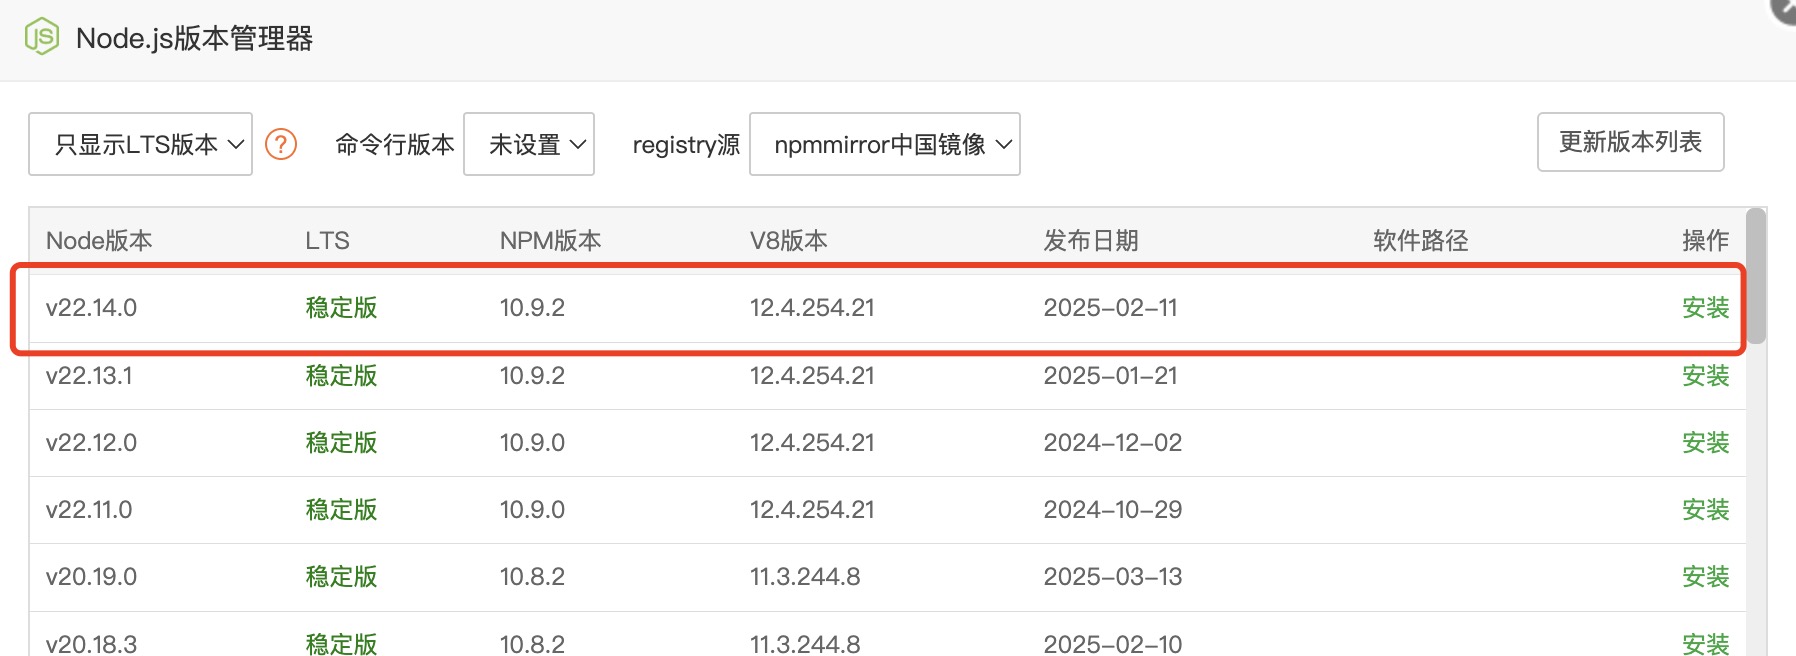
- 更新npm模块版本

- 设置命令行版本
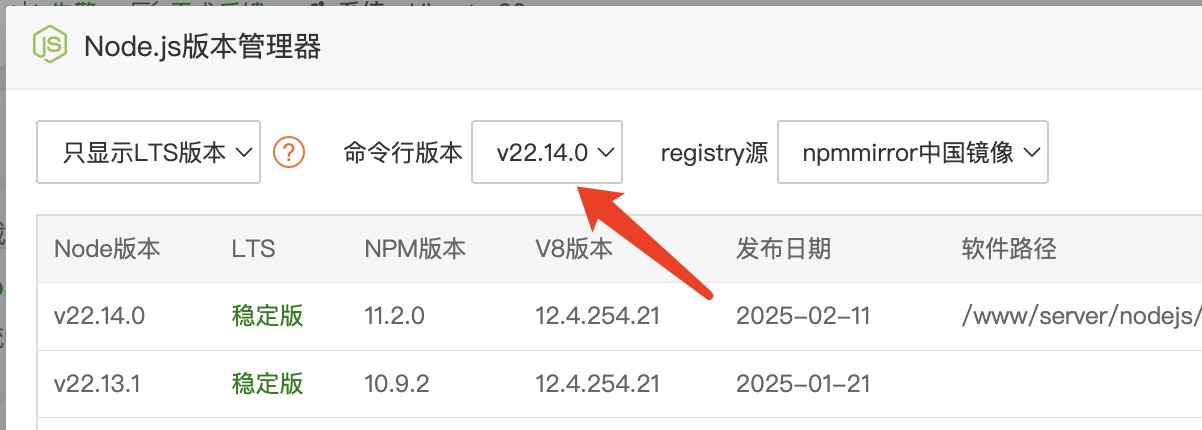
- 安装缺失的lib库
apt-get install libatk1.0-0 libatk-bridge2.0-0 libcups2 libatspi2.0-0 libxcomposite1 libxdamage1 libxfixes3 libxrandr2 libgbm1 libxkbcommon0 libpango-1.0-0 libcairo2 libasound2- 安装playwright组件
npx playwright install-deps- 在supervisor中添加文档爬虫服务进程
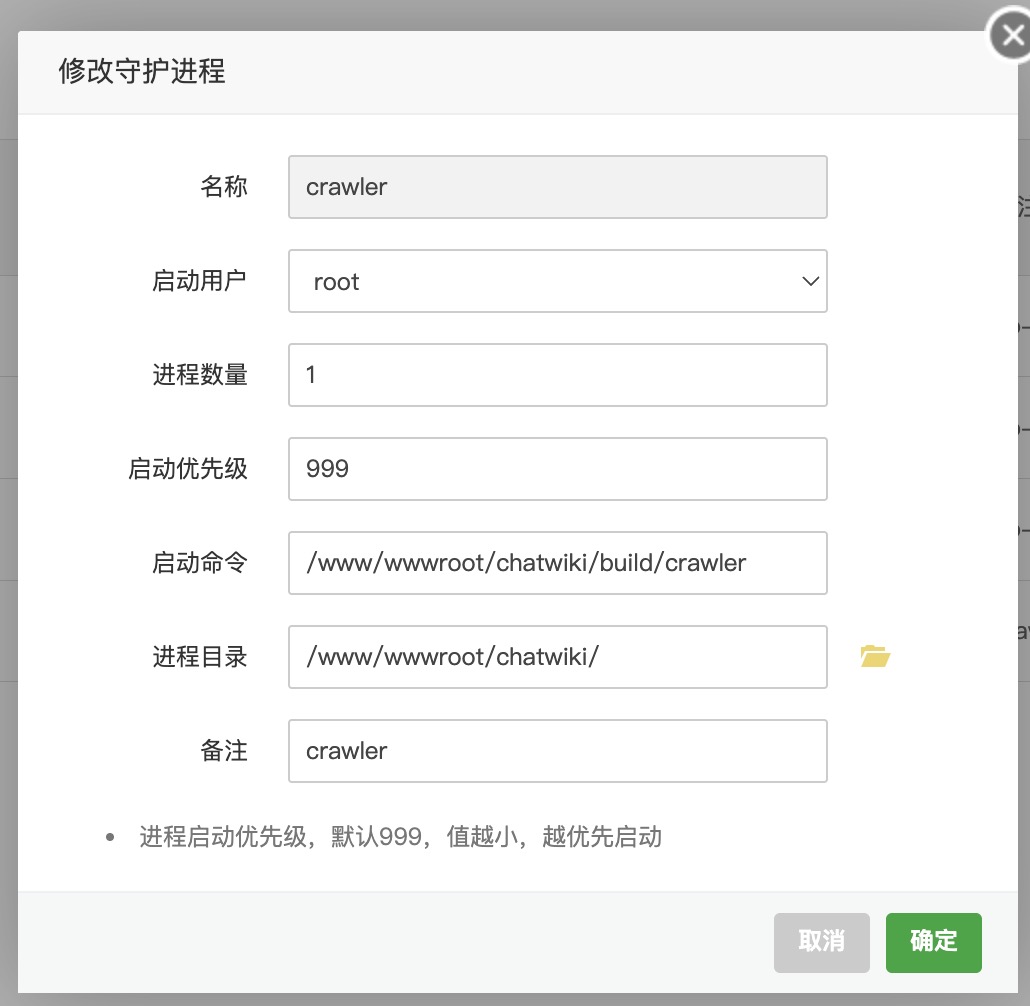
添加后,可能无法正常启动,请按照下方代码块的内容,核对进程配置文件内容
[program:crawler]
command=/www/wwwroot/chatwiki/build/crawler
directory=/www/wwwroot/chatwiki/
environment=HOME=/root
autostart=true
autorestart=true
startsecs=3
startretries=3
stdout_logfile=/www/server/panel/plugin/supervisor/log/crawler.out.log
stderr_logfile=/www/server/panel/plugin/supervisor/log/crawler.err.log
stdout_logfile_maxbytes=100MB
stderr_logfile_maxbytes=20MB
stopwaitsecs=100
user=root
priority=999
numprocs=1
process_name=%(program_name)s_%(process_num)02d
如果添加完启动后失败,可以多等一会,也许一会就启动了。
通过日志可以查看ms-playwright-go的下载进度
安装WebSocket服务
- 修改/www/wwwroot/chatwiki/configs/websocket/config_pro.ini项目配置参数
- 在supervisor中添加WebSocket服务进程
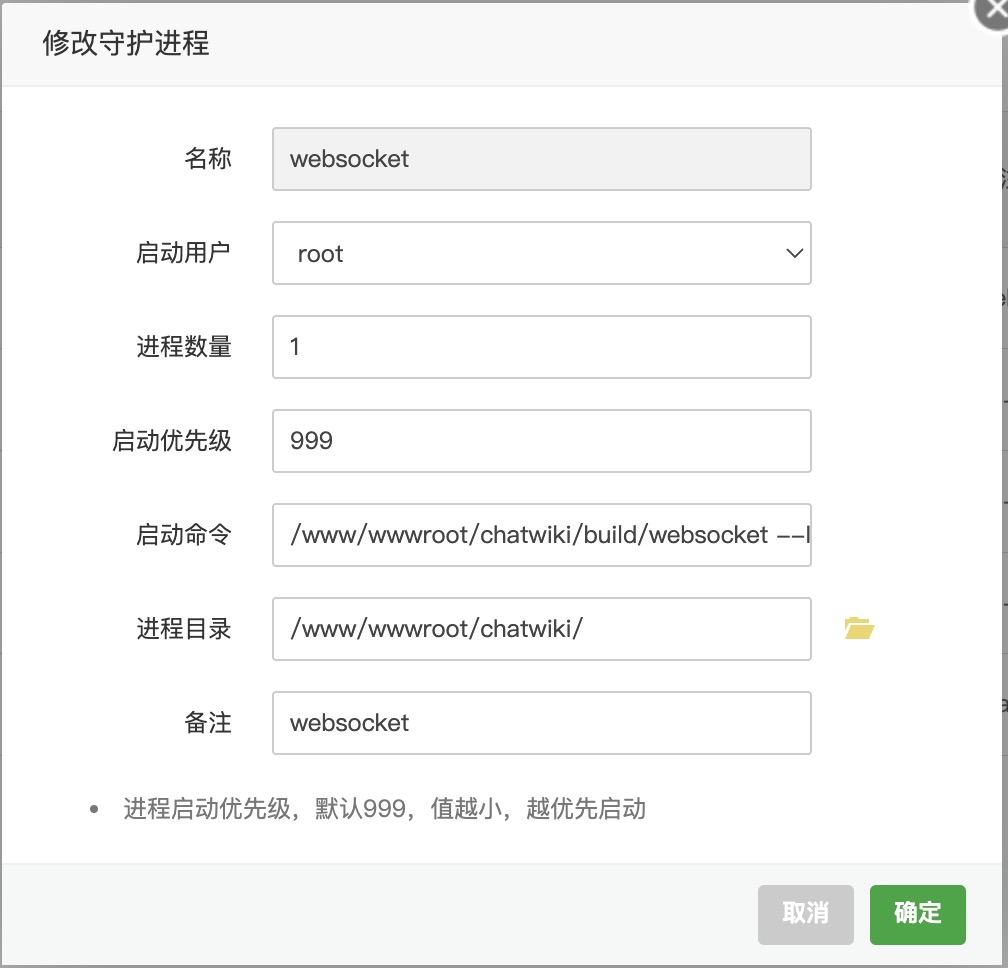
添加后,可能无法正常启动,请按照下方代码块的内容,核对进程配置文件内容
[program:websocket]
command=/www/wwwroot/chatwiki/build/websocket --IsDev=false
directory=/www/wwwroot/chatwiki/
autostart=true
autorestart=true
startsecs=3
startretries=3
stdout_logfile=/www/server/panel/plugin/supervisor/log/websocket.out.log
stderr_logfile=/www/server/panel/plugin/supervisor/log/websocket.err.log
stdout_logfile_maxbytes=100MB
stderr_logfile_maxbytes=20MB
user=root
priority=999
numprocs=1
process_name=%(program_name)s_%(process_num)02d
安装chatwiki核心服务
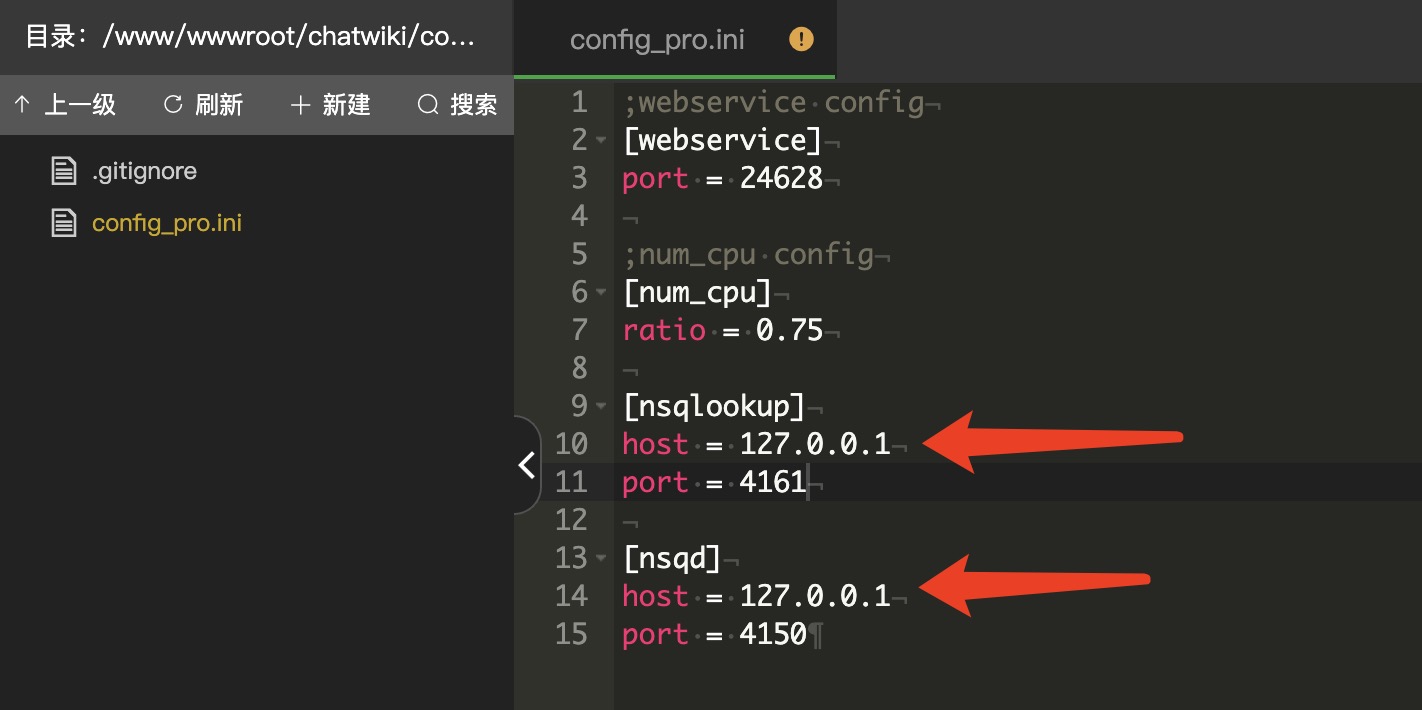
- 修改/www/wwwroot/chatwiki/configs/chatwiki/config_pro.ini文件内容
;webservice config
[webservice]
port = 24412
converter = http://127.0.0.1
crawler = http://127.0.0.1:3800
h5_domain = http://x.x.x.x:8081                #这里可以换成内网IP地址
pc_domain = http://x.x.x.x:8082                #这里换成外网IP地址
ws_domain = x.x.x.x:8083                        #这里换成外网IP地址
ws_use_ssl = 0
api_domain = http://x.x.x.x:8080        #这里换成外网IP地址

;num_cpu config
[num_cpu]
ratio = 0.75

;redis config
[redis]
host = 127.0.0.1
port = 6379
password = redis_password                   #换成自己设置的redis密码

;postgres config
[postgres]
host = 127.0.0.1
port = 5432
user = chatwiki
password = postgres_password                #换成自己设置的redis密码
dbname = chatwiki
sslmode = disable

[nsqlookup]
host = 127.0.0.1
port = 4161

[nsqd]
host = 127.0.0.1
port = 4150

;oss_config 配置
[oss_config]
enable = 0
keyid =
secret =
endpoint =
endpoint_internal =
bucket =

;user_domain_service
[user_domain_service]
domain = http://x.x.x.x:24450                #这里换成外网IP地址
上面的配置文件中“#”号及后面的内容要删掉,不要无脑复制
- 在supervisor中添加chatwiki核服务进程
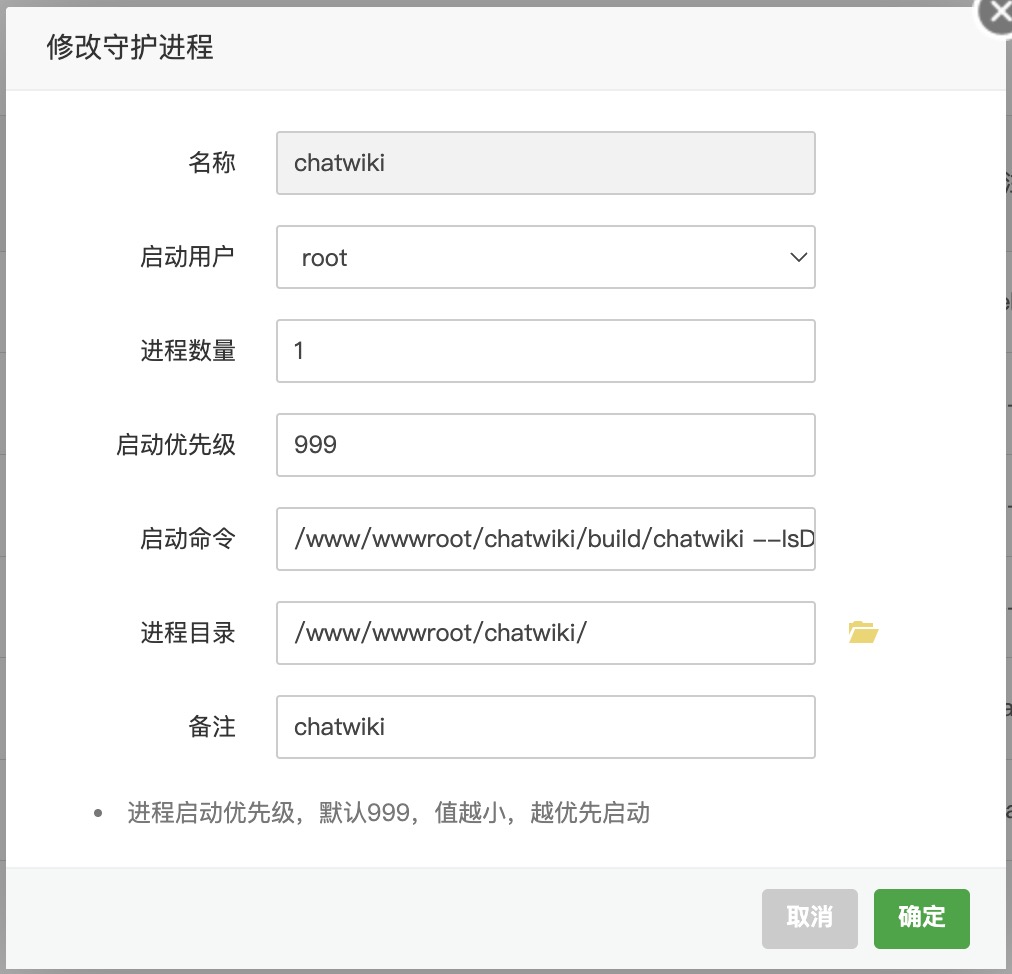
添加后,可能无法正常启动,请按照下方代码块的内容,核对进程配置文件内容
[program:chatwiki]
command=/www/wwwroot/chatwiki/build/chatwiki --IsDev=false
directory=/www/wwwroot/chatwiki/
autostart=true
autorestart=true
startsecs=3
startretries=3
stdout_logfile=/www/server/panel/plugin/supervisor/log/chatwiki.out.log
stderr_logfile=/www/server/panel/plugin/supervisor/log/chatwiki.err.log
stdout_logfile_maxbytes=100MB
stderr_logfile_maxbytes=20MB
user=root
priority=999
numprocs=1
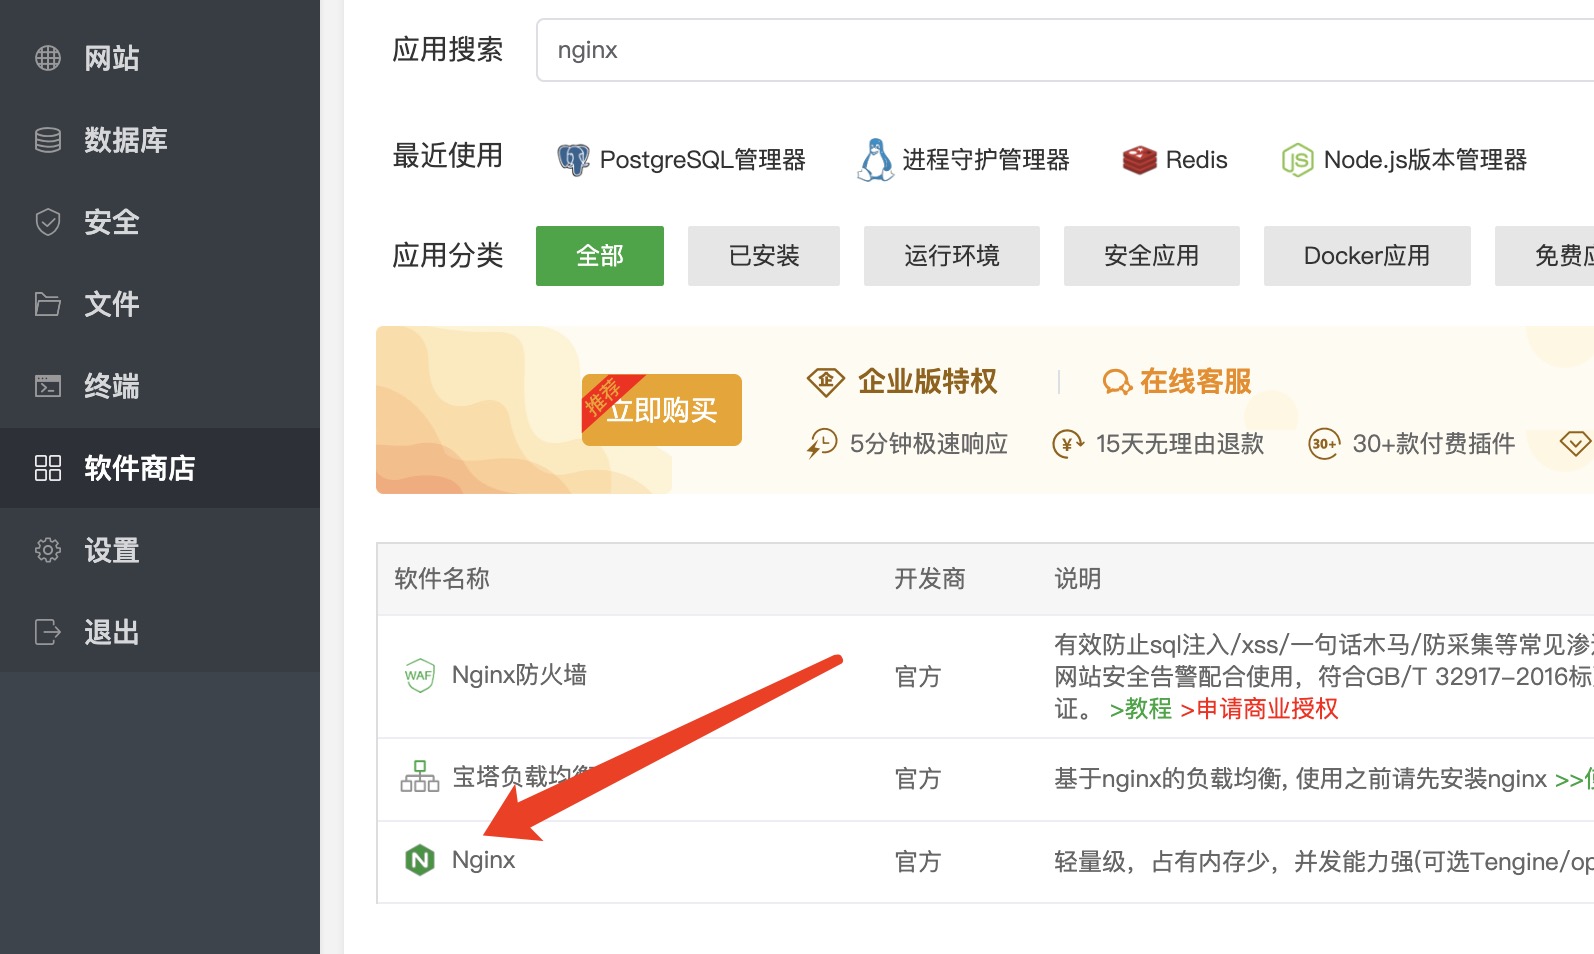
process_name=%(program_name)s_%(process_num)02d安装部署nginx服务
- 在宝塔软件商店中搜索安装nginx服务
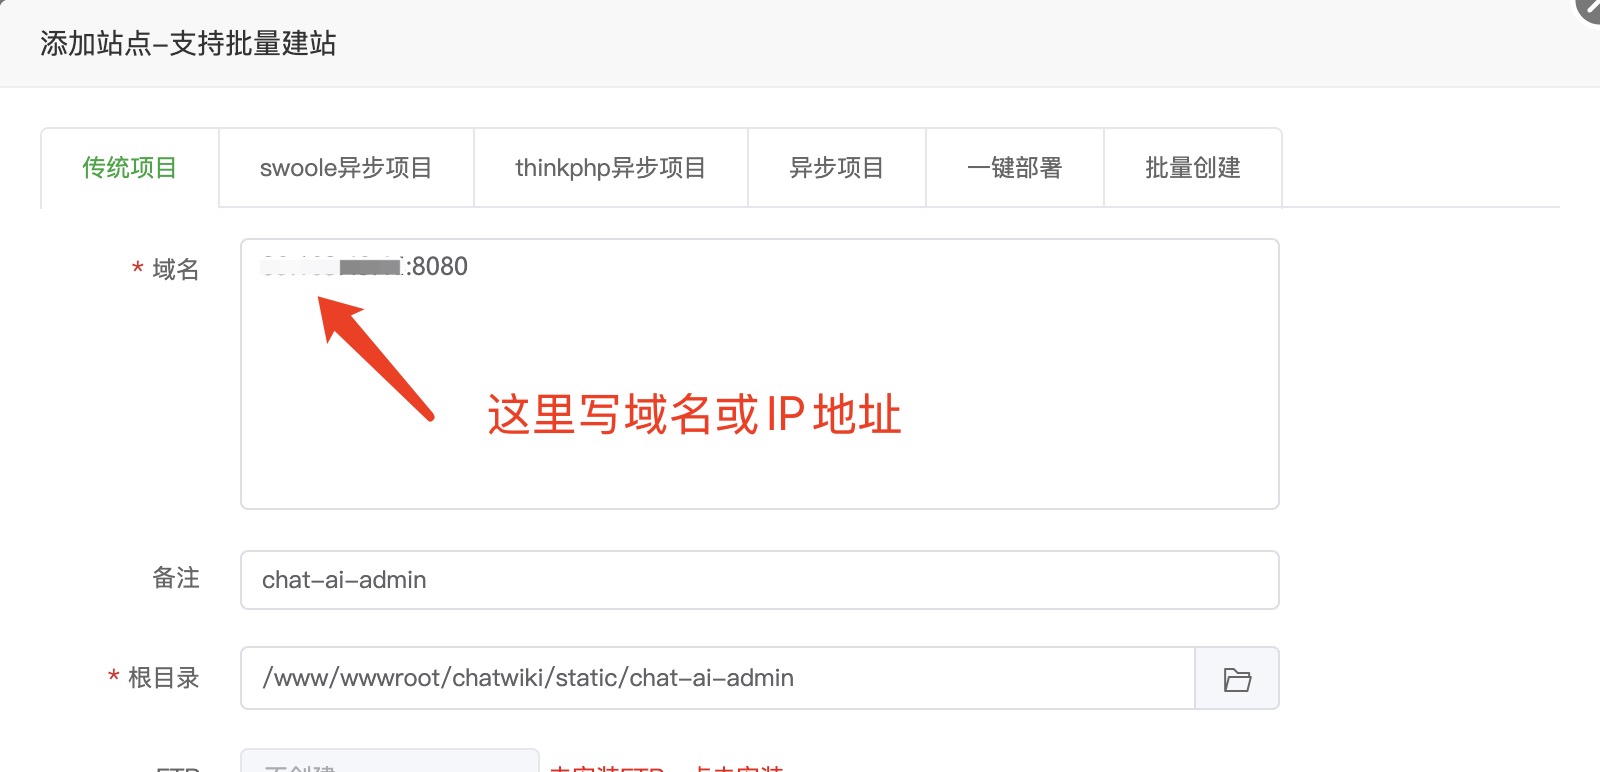
- 在网站中添加站点
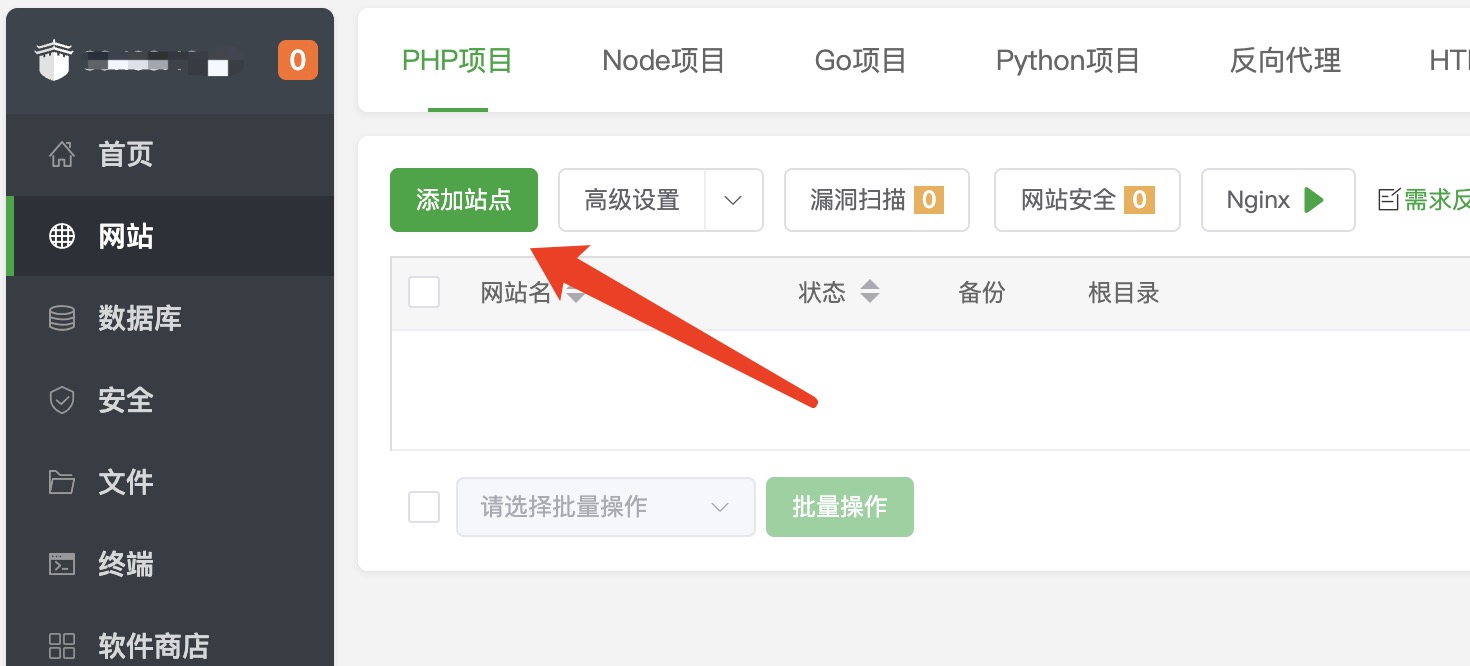
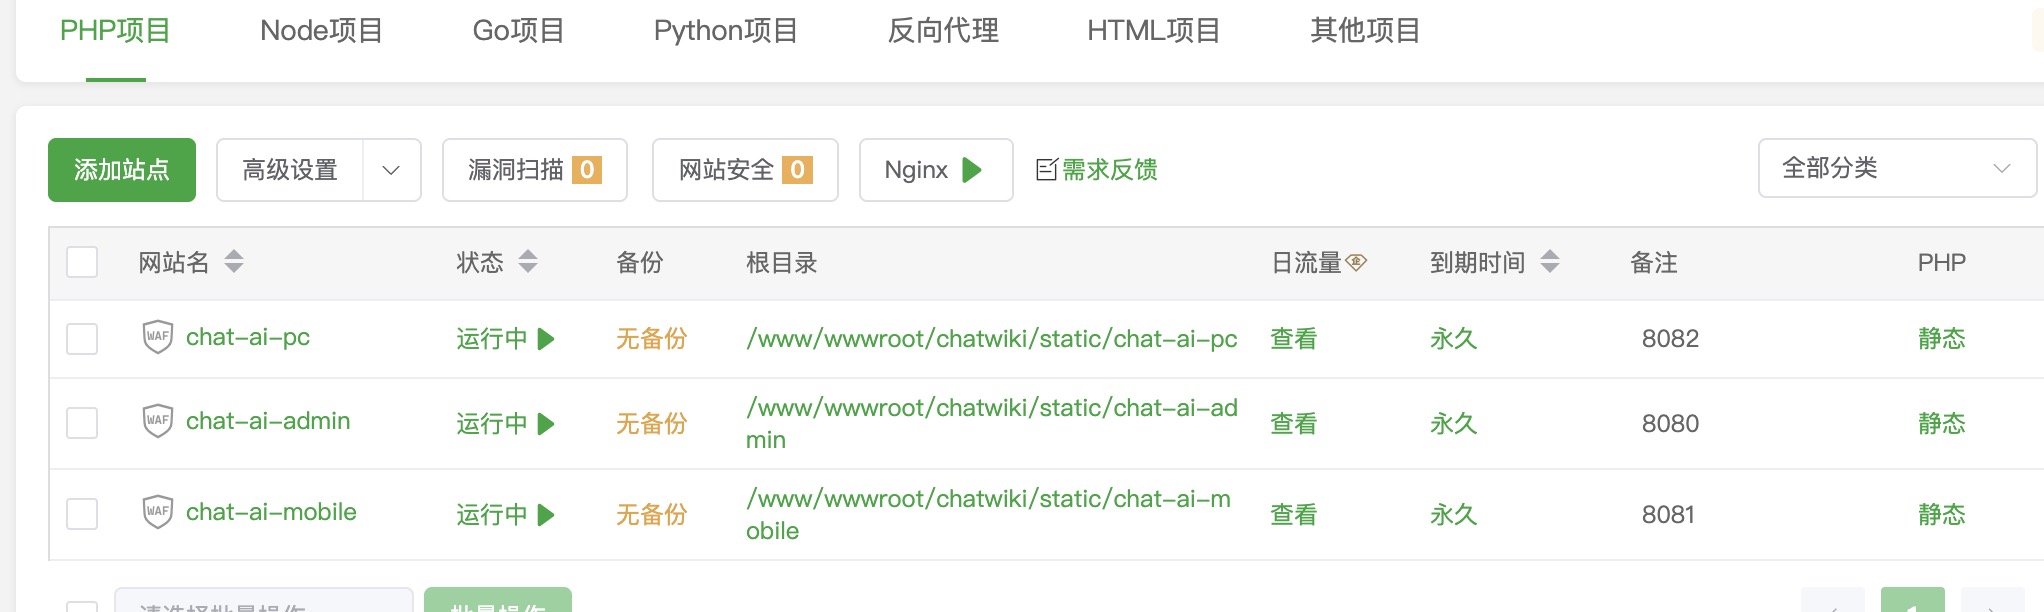
- 通过“IP+端口”的方式添加3个站点,分别是chat-ai-admin、chat-ai-mobile、chat-ai-pc
添加后的列表如下图所示
- 修改每个站点的配置文件
listen 8080;
    server_name xx.xx.xx.xx;  #这里是域名或是外网IP地址
    index index.html;
    root /www/wwwroot/chatwiki/static/chat-ai-admin;
    client_max_body_size 200m;
    location ~ /(manage/|chat/|v1/|open/|upload/|ping) {
        proxy_cache off;  # 关闭缓存
        proxy_buffering off;  # 关闭代理缓冲
        chunked_transfer_encoding on;  # 开启分块传输编码
        tcp_nopush on;  # 开启TCP NOPUSH选项,禁止Nagle算法
        tcp_nodelay on;  # 开启TCP NODELAY选项,禁止延迟ACK算法
        keepalive_timeout 300;  # 设定keep-alive超时时间为300秒
        proxy_pass http://127.0.0.1:24412;
        proxy_set_header Host $http_host;
        proxy_set_header X-Real-IP $remote_addr;
        proxy_set_header X-Forward-For $remote_addr;
    }
    location ^~ /public/ {
        alias   /www/wwwroot/chatwiki/static/public/;
    }
    location / {
        if ($request_filename ~* .*\.html$){
                add_header Cache-Control "private, no-store, no-cache, must-revalidate, proxy-revalidate";
        }
    }
     location ~ (\w+\.txt)$ {
        set $filename $1;
            proxy_pass http://127.0.0.1:24412/test/domain?file=$filename;
            break;
     }
    #CERT-APPLY-CHECK--START
    #下面的内容不用管了....
listen 8081;
server_name xx.xx.xx.xx; #这里是域名或是外网IP地址
index index.html;
root /www/wwwroot/chatwiki/static/chat-ai-mobile;
client_max_body_size 200m;
location ~ /(manage/|chat/|v1/|open/|upload/|ping) {
proxy_cache off; # 关闭缓存
proxy_buffering off; # 关闭代理缓冲
chunked_transfer_encoding on; # 开启分块传输编码
tcp_nopush on; # 开启TCP NOPUSH选项,禁止Nagle算法
tcp_nodelay on; # 开启TCP NODELAY选项,禁止延迟ACK算法
keepalive_timeout 300; # 设定keep-alive超时时间为300秒
proxy_pass http://127.0.0.1:24412;
proxy_set_header Host $http_host;
proxy_set_header X-Real-IP $remote_addr;
proxy_set_header X-Forward-For $remote_addr;
}
location ^~ /public/ {
alias /www/wwwroot/chatwiki/static/public/;
}
location / {
if ($request_filename ~* .*\.html$){
add_header Cache-Control "private, no-store, no-cache, must-revalidate, proxy-revalidate";
}
}
#CERT-APPLY-CHECK--START
#下面的内容不用管了....listen 8082;
server_name xx.xx.xx.xx; #这里是域名或是外网IP地址
index index.html;
root /www/wwwroot/chatwiki/static/chat-ai-pc;
client_max_body_size 200m;
location ~ /(manage/|chat/|v1/|open/|upload/|ping) {
proxy_cache off; # 关闭缓存
proxy_buffering off; # 关闭代理缓冲
chunked_transfer_encoding on; # 开启分块传输编码
tcp_nopush on; # 开启TCP NOPUSH选项,禁止Nagle算法
tcp_nodelay on; # 开启TCP NODELAY选项,禁止延迟ACK算法
keepalive_timeout 300; # 设定keep-alive超时时间为300秒
proxy_pass http://127.0.0.1:24412;
proxy_set_header Host $http_host;
proxy_set_header X-Real-IP $remote_addr;
proxy_set_header X-Forward-For $remote_addr;
}
location ^~ /public/ {
alias /www/wwwroot/chatwiki/static/public/;
}
location / {
if ($request_filename ~* .*\.html$){
add_header Cache-Control "private, no-store, no-cache, must-revalidate, proxy-revalidate";
}
}
#CERT-APPLY-CHECK--START
#下面的内容不用管了....- 通过ip+端口访问管理后台(需要开放指定的端口8080)或者域名访问
默认账号:admin 密码:chatwiki.com@123
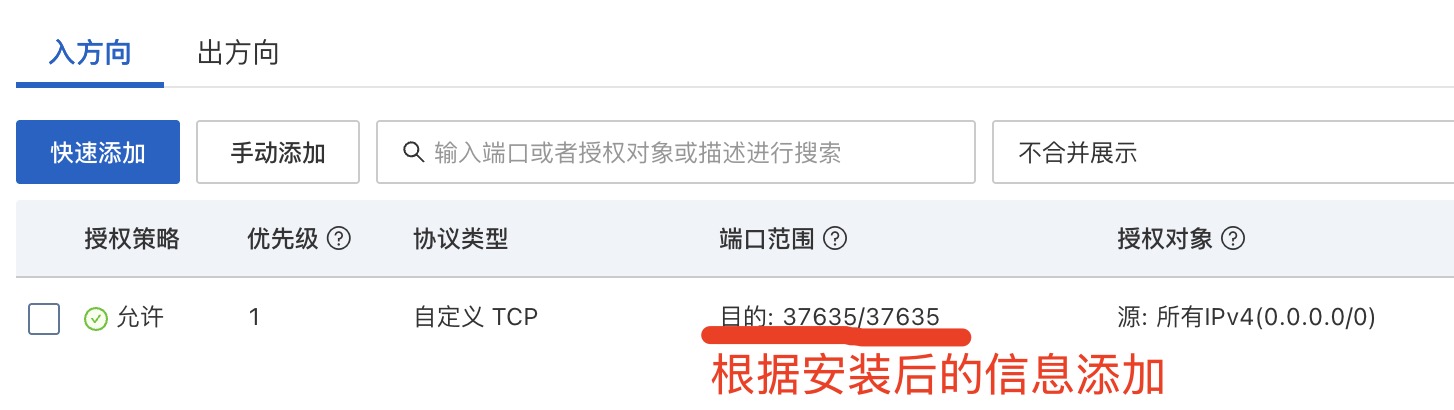
如果访问出现502错误,请检查宝塔控制台中安全设置是否有放行8080\8081\8082三个端口;云服务器还要在访问规则中添加上述三个端口


 1762
1762


 到【灌水乐园】发言


