


Tus系统(吐司问卷):项目总结
Date: March 17, 2025 10:03 PM (GMT+8)
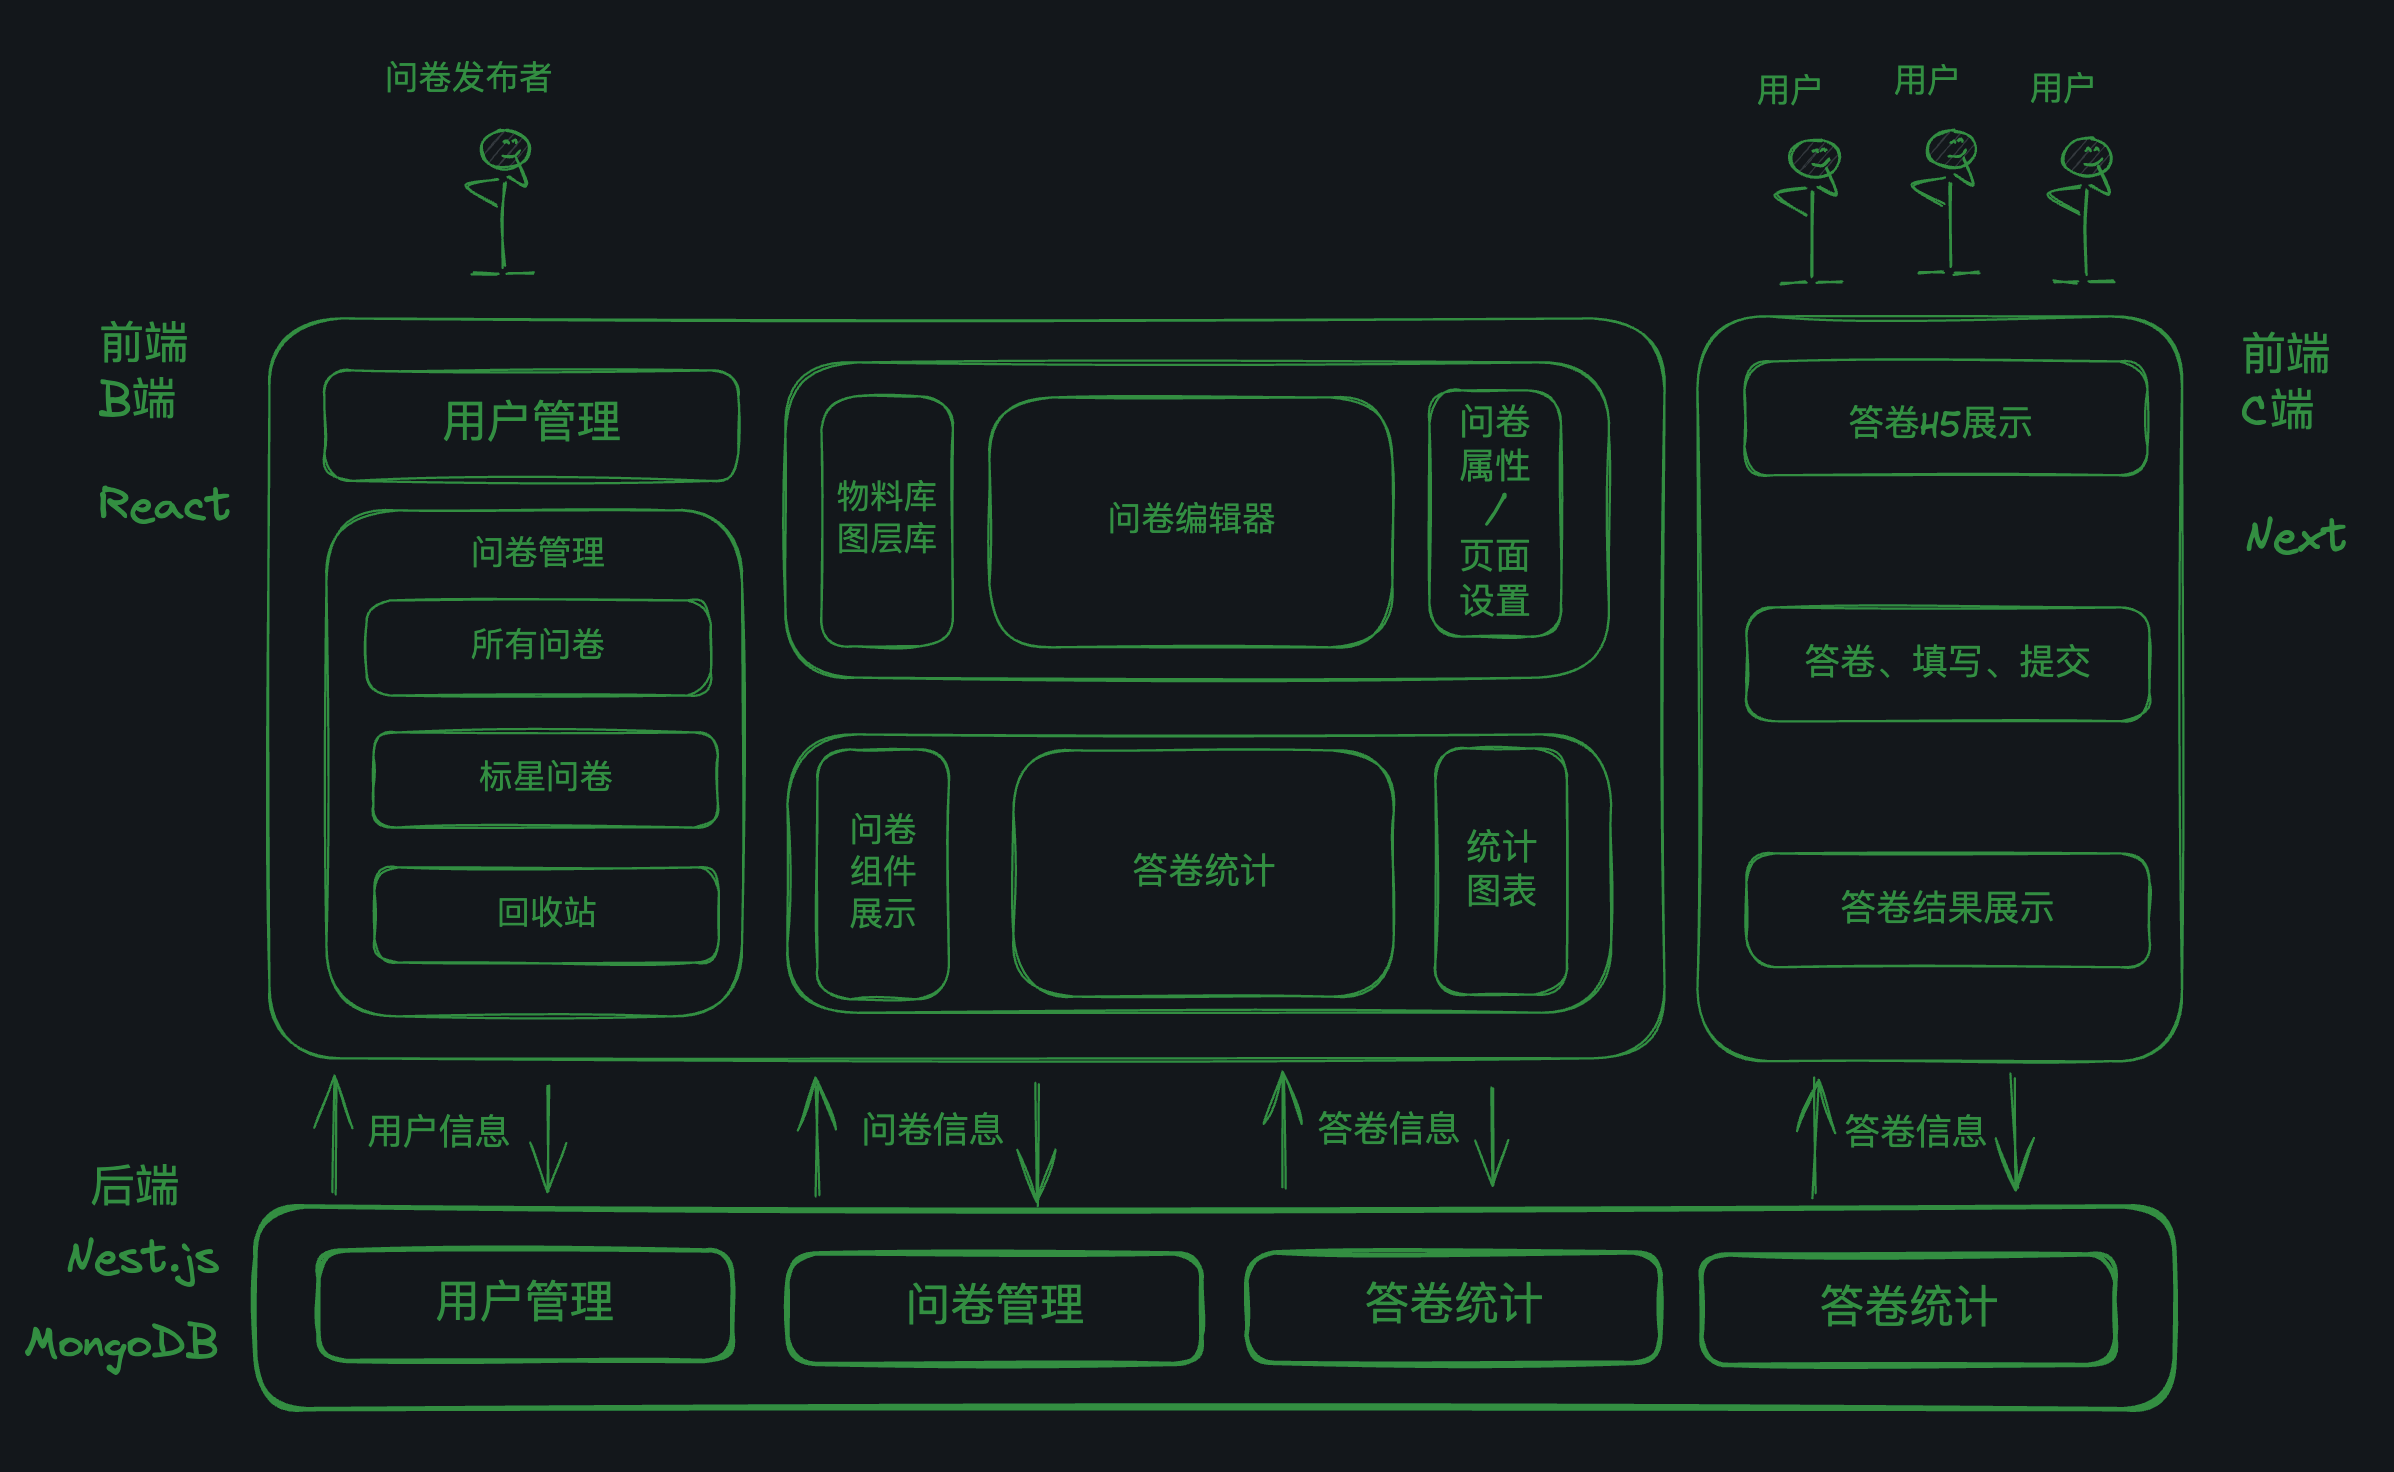
项目整体介绍
这是一个全栈低代码项目,主要业务是问卷调查与统计,分成B端和C端:
B端用于管理、编辑、统计问卷,C端用于用户填写问卷。
项目的技术栈有:
前端:React + Next
后端:Nest + MongoDB
测试:Jest + Storybook
整个项目开发分成三个阶段:
- 第一阶段:B端的搭建 + Mock平台的搭建
- 第二阶段:C端的搭建,项目性能优化和核心组件测试覆盖
- 第三阶段:服务端搭建,并进行前后端联调。
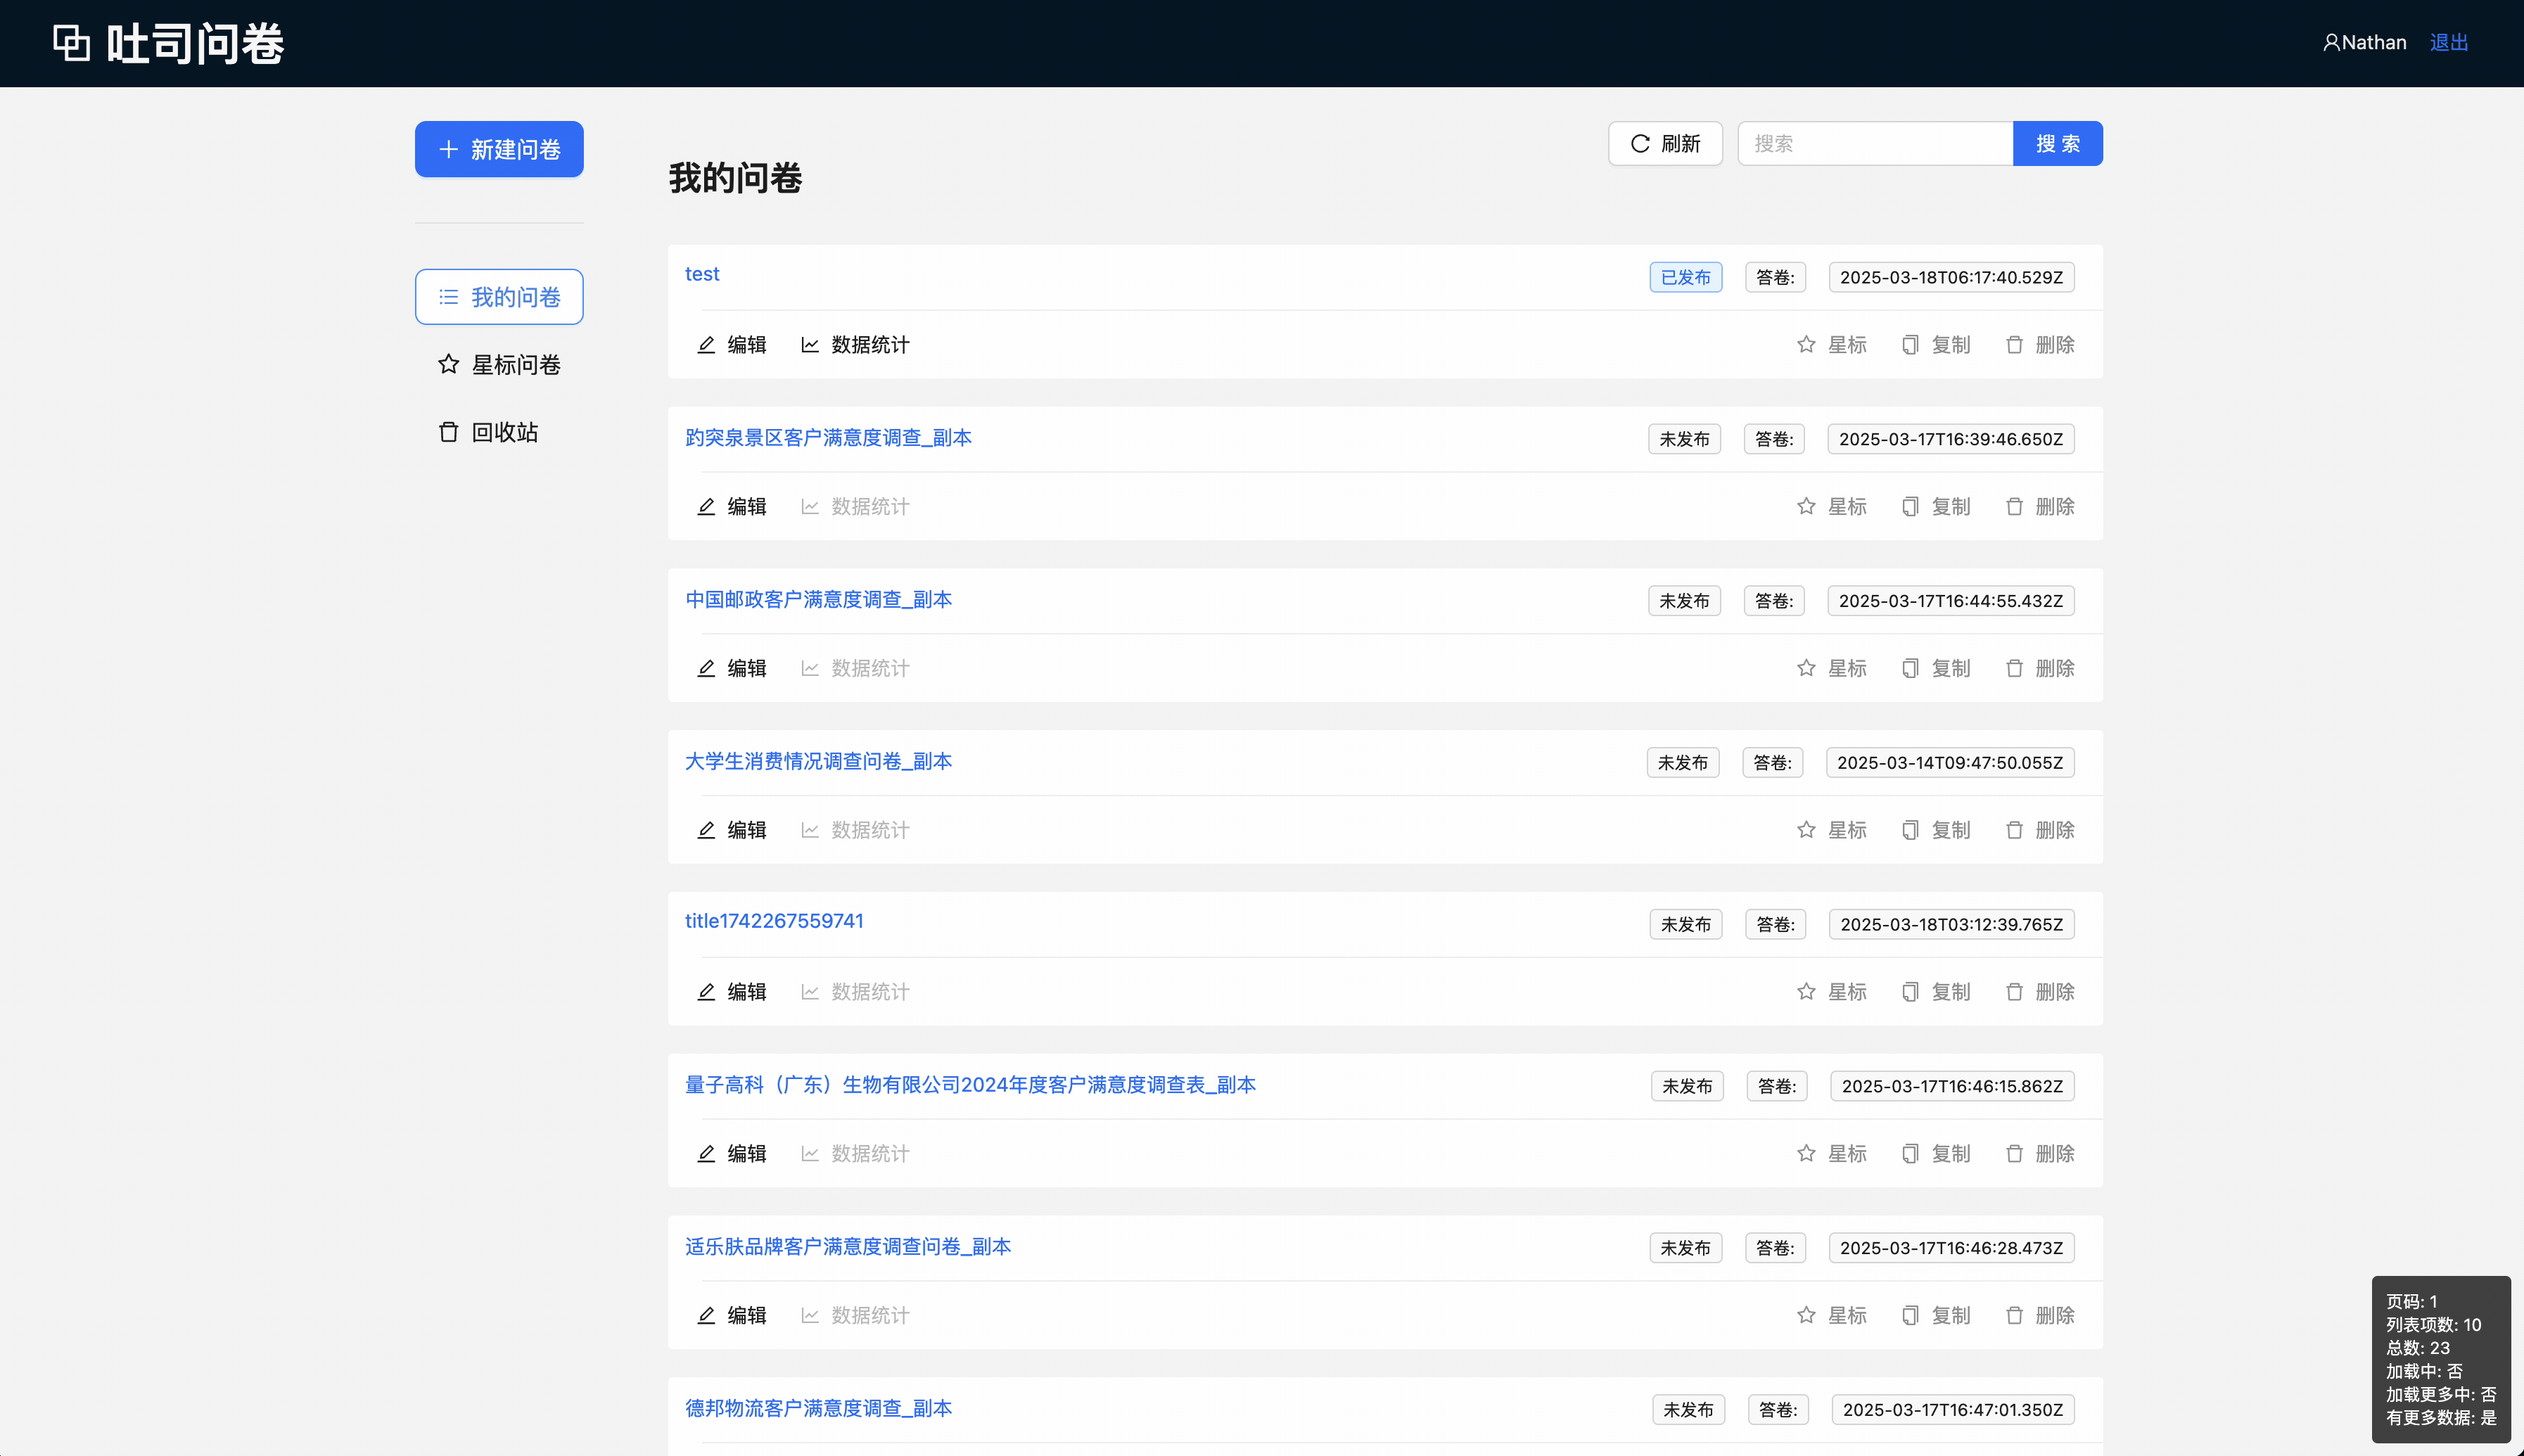
以下是部分页面展示:
B端:
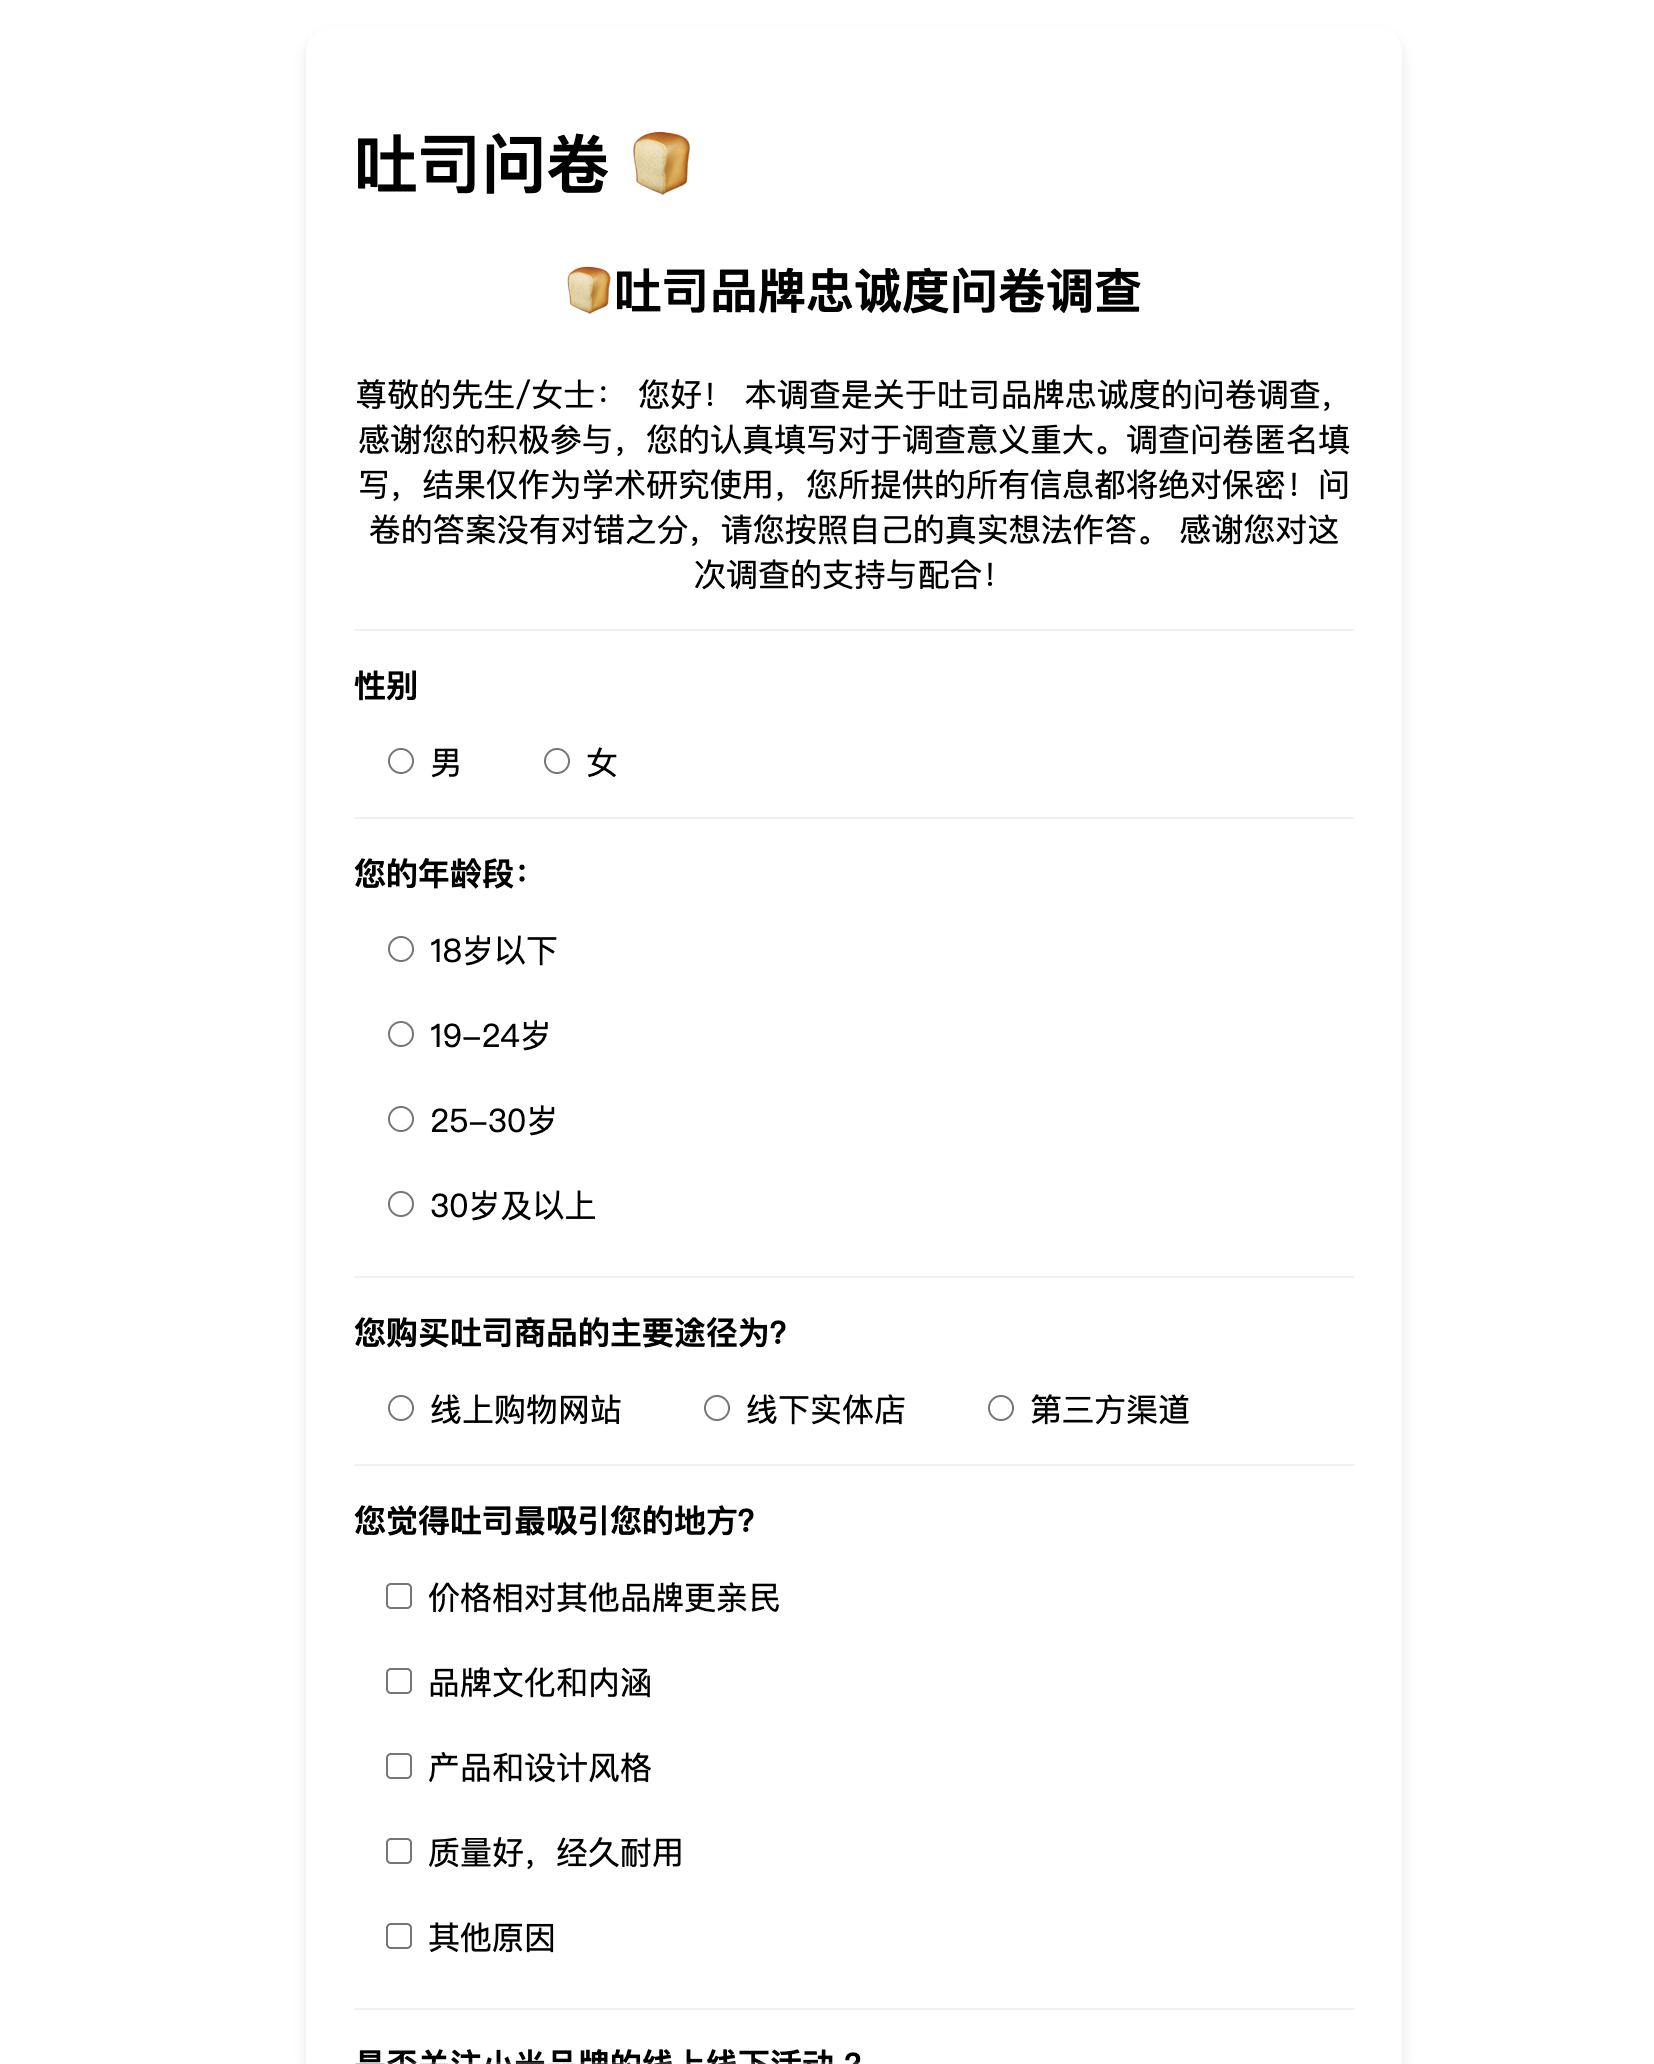
C端:
项目业务架构图
数据结构设计
问卷与答卷数据结构
数据结构图:
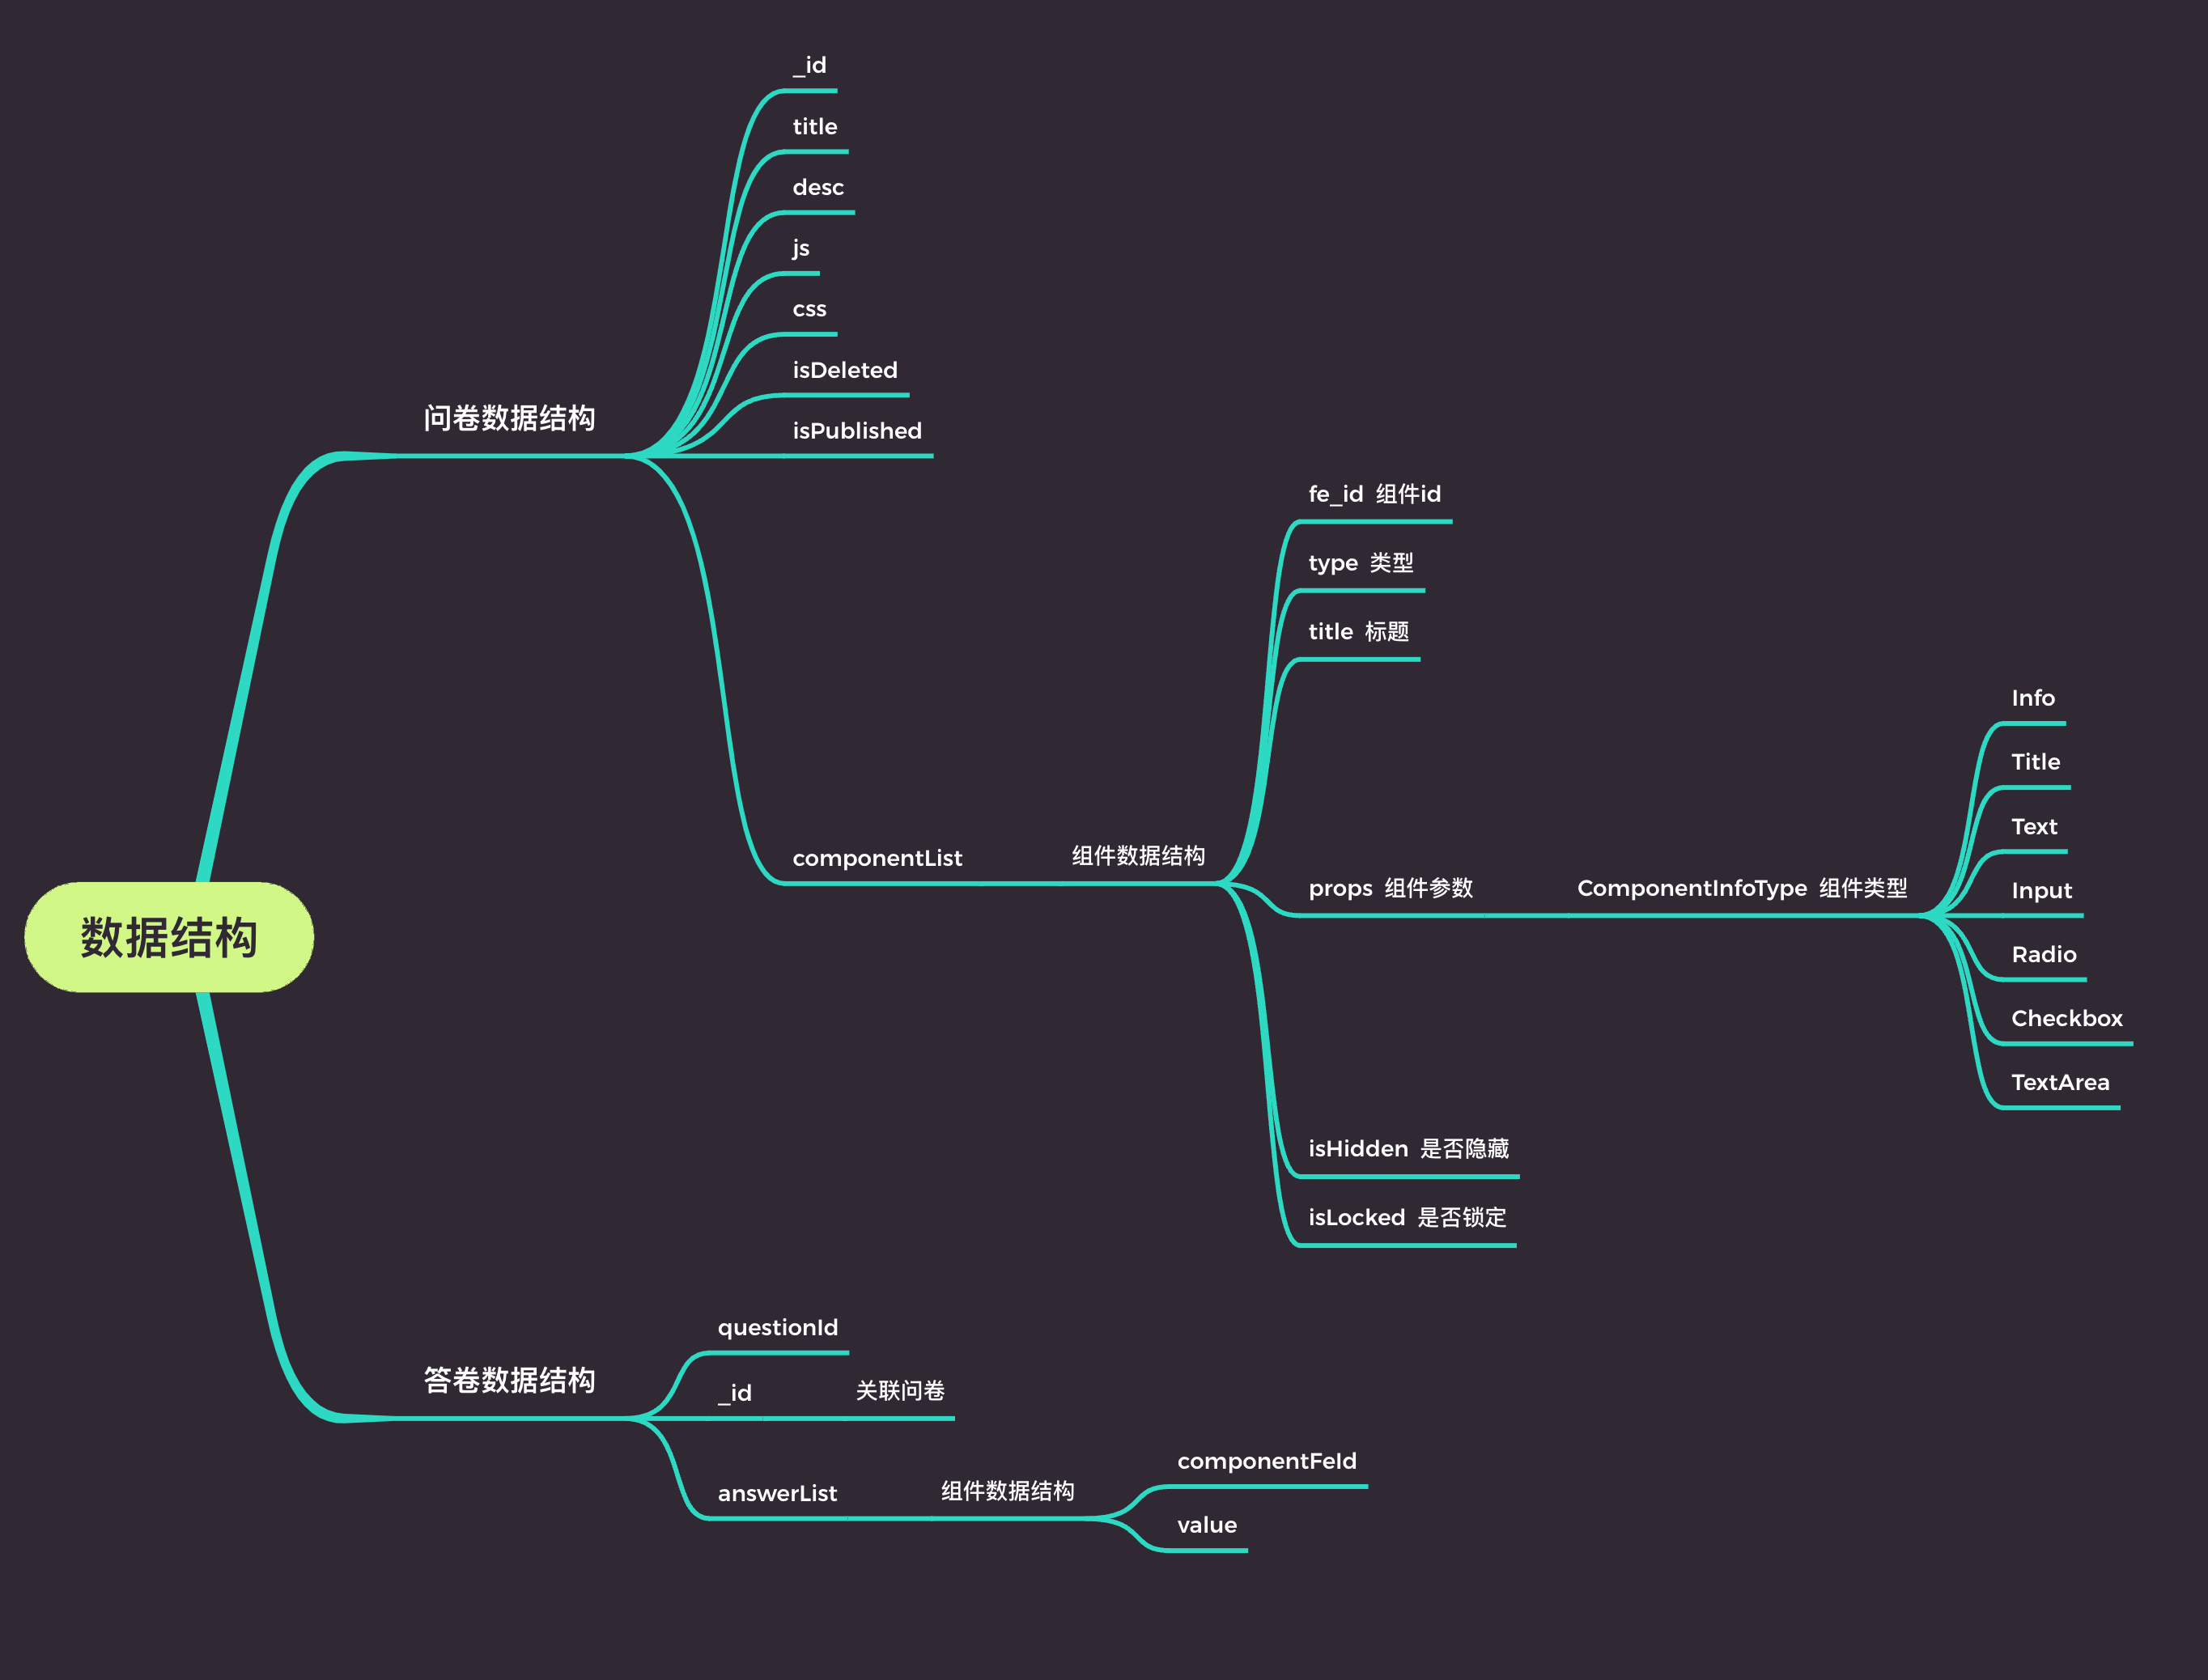
要点:
- 问卷数据结构:由外而内包括 问卷基础信息、组件列表、组件基础信息 三层
- 答卷数据结构:包括问卷id、答卷id 与答卷组件
- 一份问卷对应多份答卷
实例展示:
问卷:
{
	_id: '67d3fb46b31f241460da7752',
	title: 'title1741945670048',
	...
	componentList: [
			{ fe_id: 'c1' /* title props 等 */},
			{ fe_id: 'c2' /* title props 等 */},
			{ fe_id: 'c3' /* title props 等 */},
			{ fe_id: 'c4' /* title props 等 */},
	]
}
答卷:
{
	_id: '67d3fba2b31f241460da778e'
	questionId: '67d3fb46b31f241460da7752',
	answerList: [
			{ componentFeId: 'c1', value: undefined }, // 标题 info
			{ componentFeId: 'c2', value: zs }, // input
			{ componentFeId: 'c3', value: '12341251231' }, // input
			{ componentFeId: 'c4', value: '1-3年' }, // 单选
			{ componentFeId: 'c5', value: 'Vue2,Vue3' }, // 多选
	]
}
一个问卷对应多个答卷,最终数据结构转换:
[
	// 用户 A
	{
		_id: 'xx',
		c2: 'zs',
		c3: '1-3年',
		c4: 'Vue2,Vue3',
		c5: '大于20k',
		c6: '备注xx',
	},
	// 用户 B
	{
		_id: 'xx',
		c2: 'zs',
		c3: '1-3年',
		c4: 'Vue2,Vue3',
		c5: '大于20k',
		c6: '备注xx',
	},
]
物料数据结构定义
关于如何定义一个物料,比如文本标题、输入框等等。

物料数据结构图:
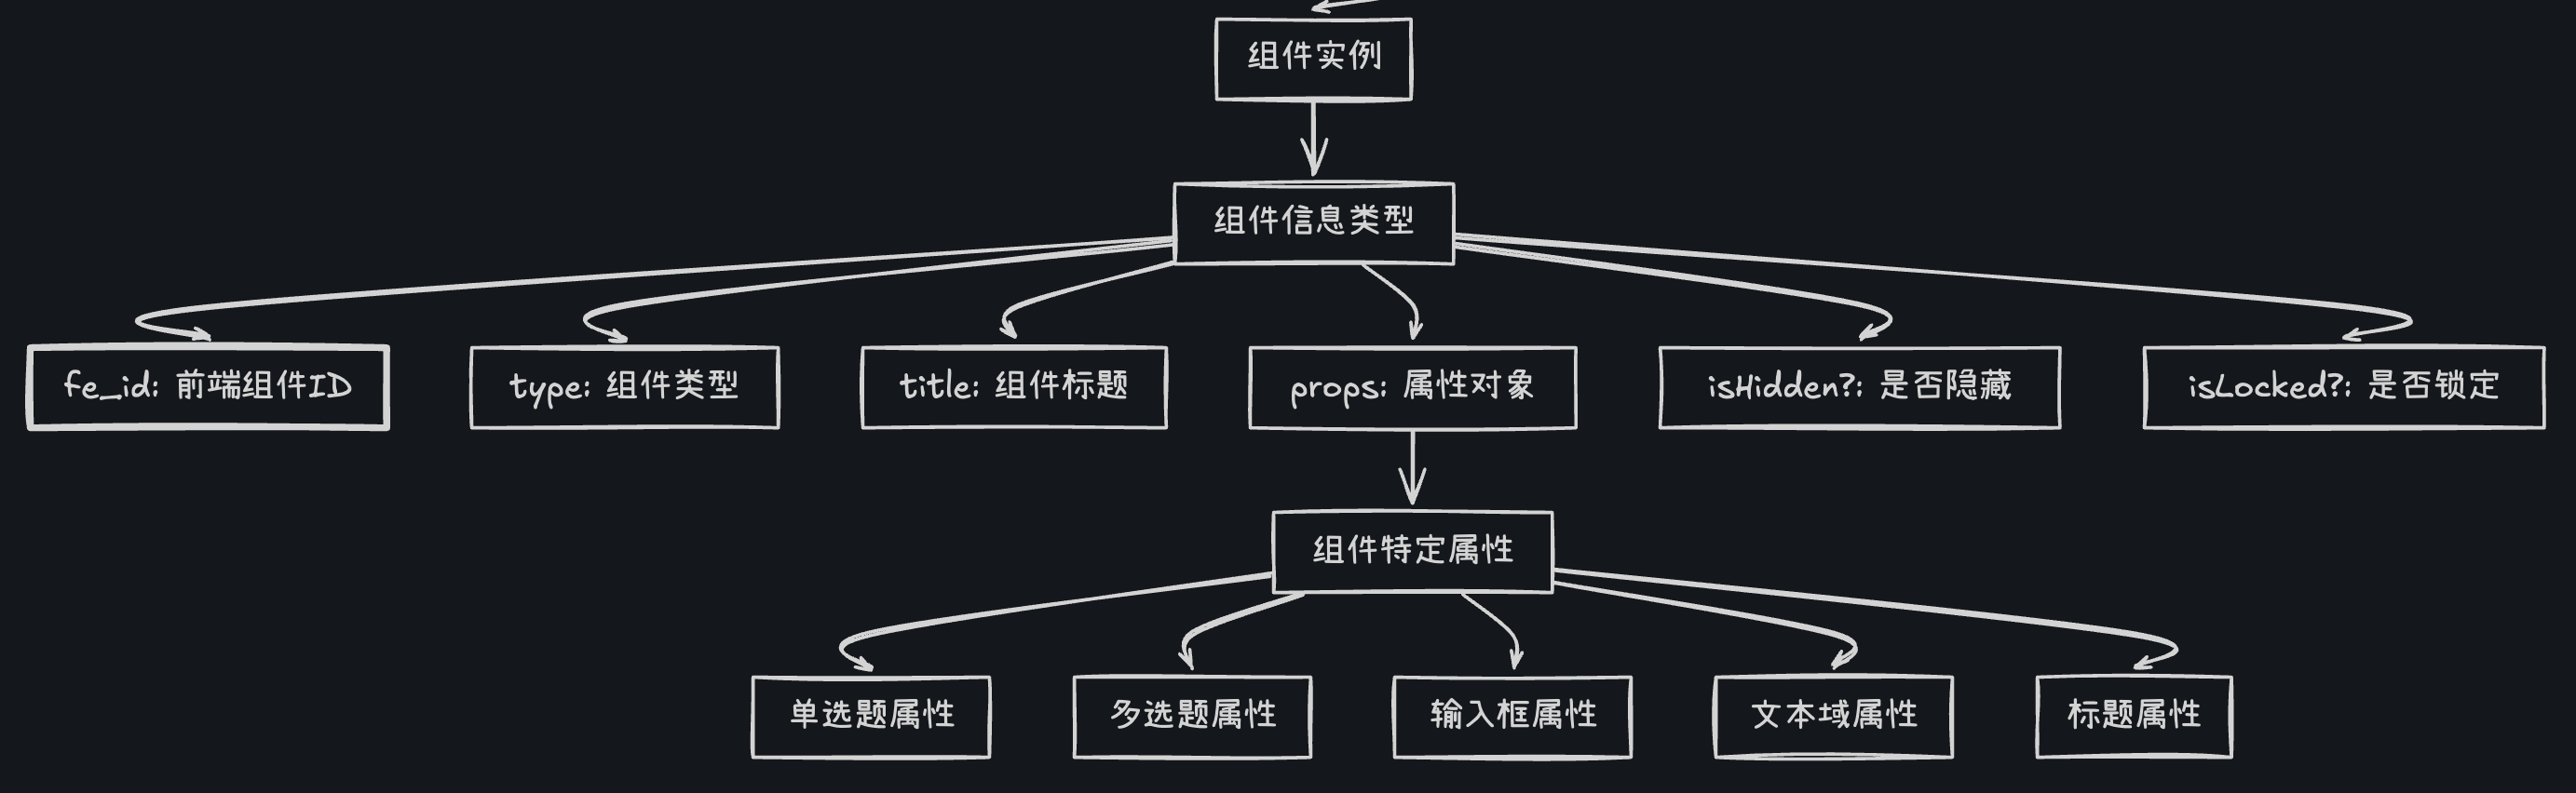
组件实例类型定义 (src/store/componentReducer/index.ts)
// 组件实例信息类型
export type ComponentInfoType = {
  fe_id: string                // 前端组件唯一标识
  type: string                 // 组件类型
  title: string                // 组件标题
  isHidden?: boolean          // 是否隐藏
  isLocked?: boolean          // 是否锁定
  props: ComponentPropsType    // 组件属性
}

// Redux中的组件状态类型
export type ComponentsStateType = {
  selectedId: string           // 当前选中的组件ID
  componentList: Array<ComponentInfoType>  // 组件列表
  copiedComponent: ComponentInfoType | null // 复制的组件
}
组件配置类型定义 (src/component/QuestionComponents/index.ts)
// 组件配置类型定义
export type ComponentConfType = {
  title: string                         // 组件显示标题
  type: string                          // 组件类型标识符
  Component: FC<ComponentPropsType>     // 组件渲染函数
  PropComponent: FC<ComponentPropsType> // 属性编辑组件
  defaultProps: ComponentPropsType      // 默认属性值
  StatComponent?: FC<ComponentStatPropsType> // 可选的统计组件
}
// 组件注册表
const componentConfList: ComponentConfType[] = [
  QuestionInputConf,
  QuestionTitleConf,
  QuestionParagraphConf,
  QuestionInfoConf,
  QuestionTextareaConf,
  QuestionRadioConf,
  QuestionCheckboxConf,
]
// 组件分组定义
export const componentConfGroup = [
  {
    groupId: 'textGroup',
    groupName: '文本显示',
    components: [QuestionInfoConf, QuestionTitleConf, QuestionParagraphConf],
  },
  {
    groupId: 'inputGroup',
    groupName: '用户输入',
    components: [QuestionInputConf, QuestionTextareaConf],
  },
  {
    groupId: 'selectGroup',
    groupName: '用户选择',
    components: [QuestionRadioConf, QuestionCheckboxConf],
  },
]
物料状态管理

状态定义 (src/store/componentReducer/index.ts)
// 组件信息类型定义
export type ComponentInfoType = {
  fe_id: string        // 前端组件唯一ID
  type: string         // 组件类型
  title: string        // 组件标题
  isHidden?: boolean   // 是否隐藏
  isLocked?: boolean   // 是否锁定
  props: ComponentPropsType  // 组件属性
}

// 组件状态类型
export type ComponentsStateType = {
  selectedId: string   // 当前选中的组件ID
  componentList: Array<ComponentInfoType>  // 组件列表
  copiedComponent: ComponentInfoType | null  // 复制的组件
}

// 初始状态
const INIT_STATE: ComponentsStateType = {
  selectedId: '',
  componentList: [],
  copiedComponent: null,
}
Redux Reducer (src/store/componentReducer/index.ts)
export const componentsSlice = createSlice({
  name: 'component',
  initialState: INIT_STATE,
  reducers: {
    // 重置组件列表
    resetComponentList: (
      state: ComponentsStateType,
      action: PayloadAction<ComponentsStateType>
    ) => {
      return action.payload
    },

    // 修改选中组件ID
    changeSelectedId: (
      draft: ComponentsStateType,
      action: PayloadAction<string>
    ) => {
      draft.selectedId = action.payload || ''
    },

    // 添加组件
    addComponent: (
      draft: ComponentsStateType,
      action: PayloadAction<ComponentInfoType>
    ) => {
      const newComponent = action.payload
      insertNewComponent(draft, newComponent)
    },

    // 修改组件属性
    changeComponentProps: (
      draft: ComponentsStateType,
      action: PayloadAction<{ fe_id: string; newProps: ComponentPropsType }>
    ) => {
      const { fe_id, newProps } = action.payload
      const component = draft.componentList.find(c => c.fe_id === fe_id)
      if (component) {
        component.props = {
          ...component.props,
          ...newProps,
        }
      }
    },

    // 组件拖拽排序
    moveComponent: (
      draft: ComponentsStateType,
      action: PayloadAction<{ oldIndex: number; newIndex: number }>
    ) => {
      const { componentList: curComponentList } = draft
      const { oldIndex, newIndex } = action.payload
      draft.componentList = arrayMove(curComponentList, oldIndex, newIndex)
    },
  }
})
🚩 B端:问卷管理、编辑与统计
低代码编辑器
页面展示:
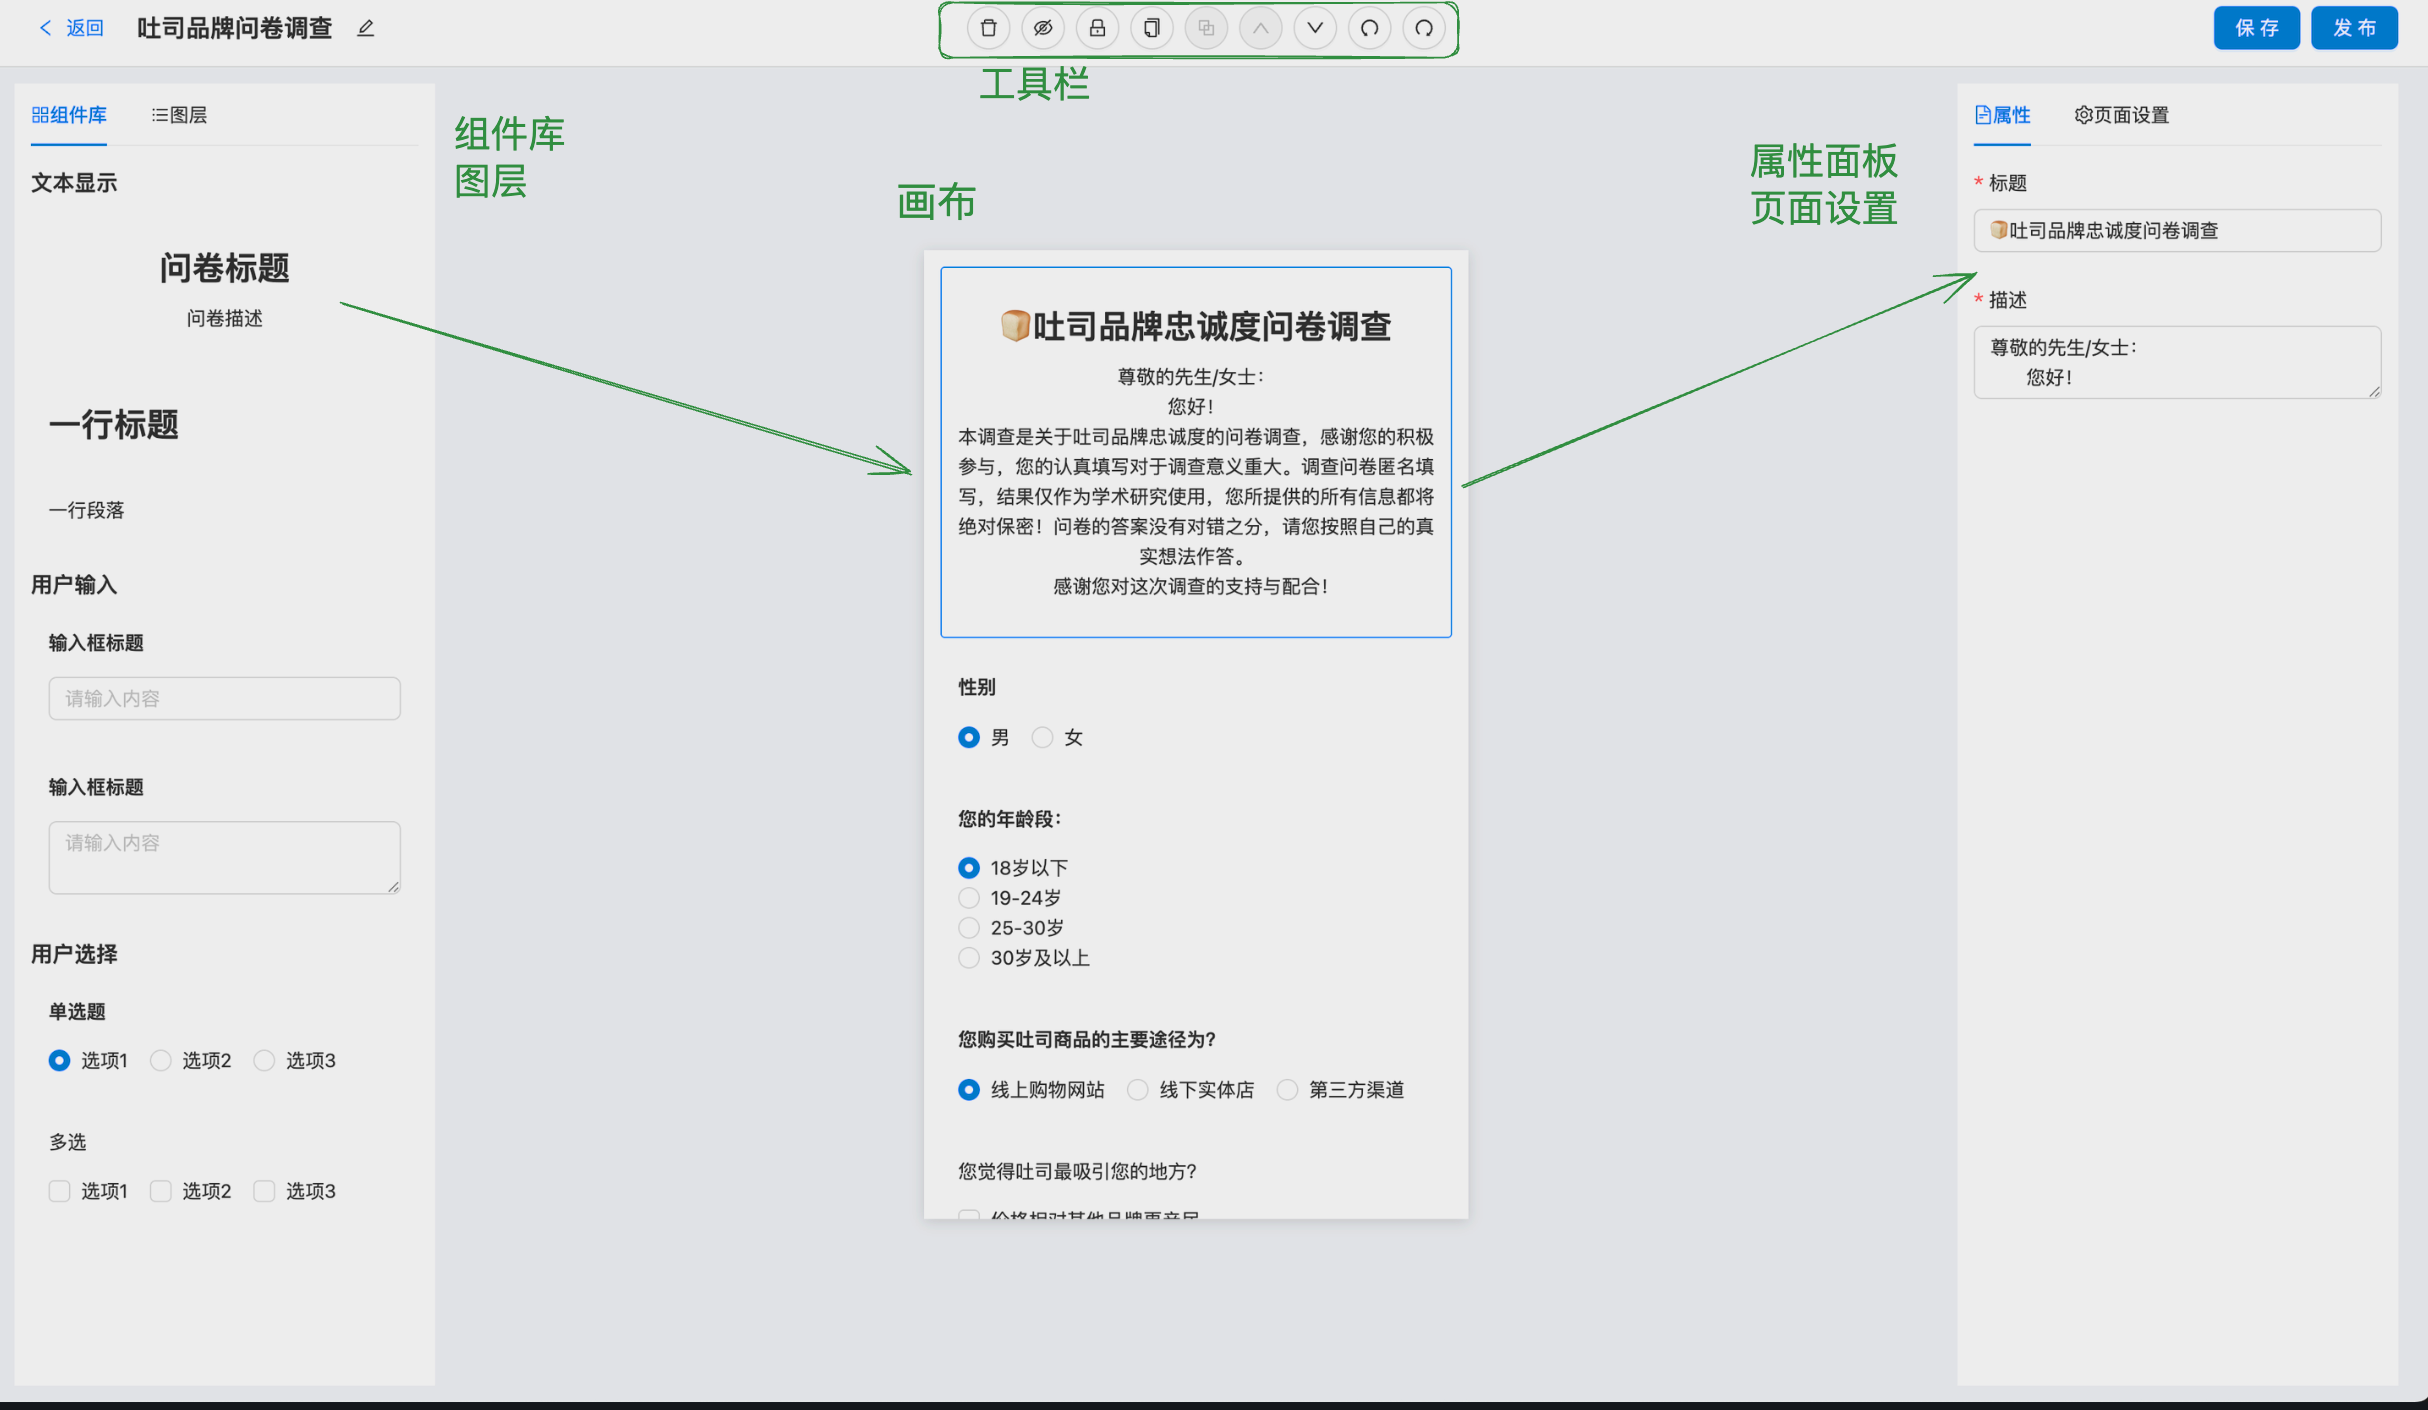
要点:
- 顶部:标题修改、工具栏、保存、发布
- 左侧:组件库/图层
- 中间:问卷画布展示
- 右侧:问卷属性/页面设置
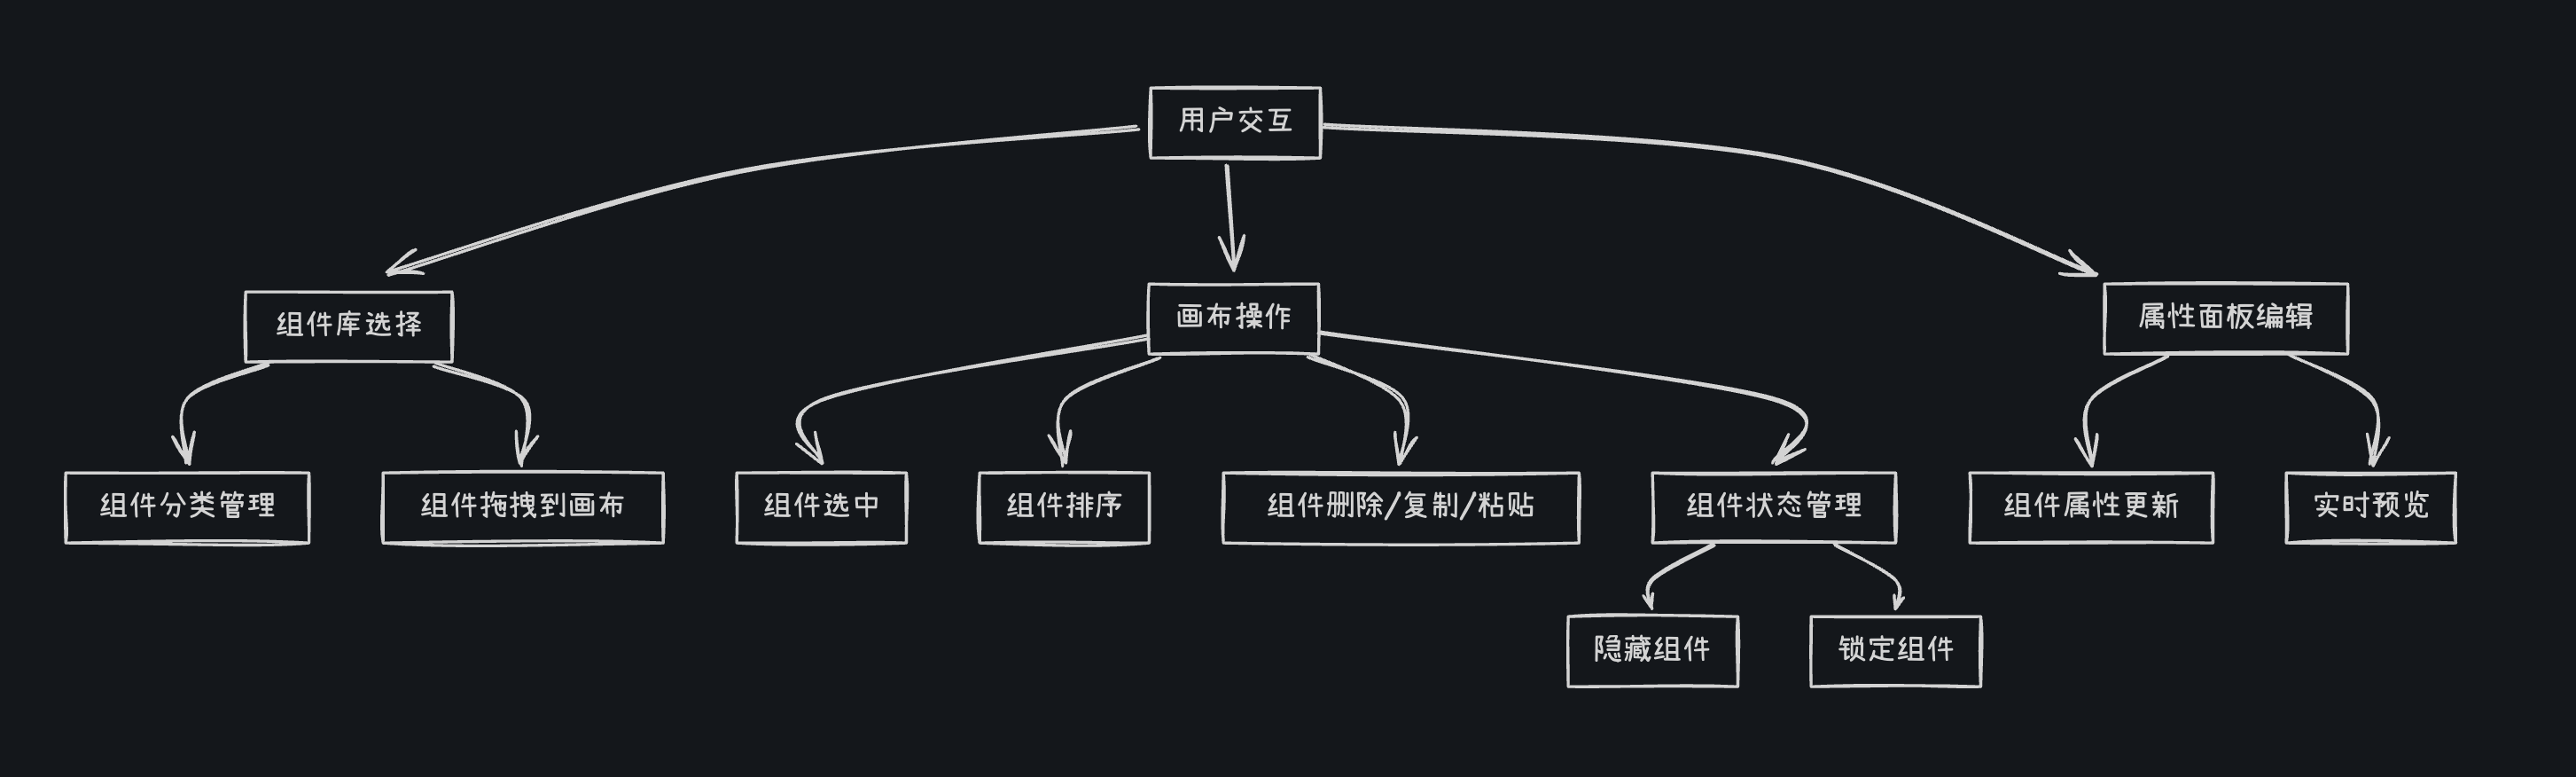
物料编排
物料编排流程图:
物料组件库
组件库定义与分类:

// 组件类型定义
export type ComponentConfType = {
  title: string                         // 组件展示名称
  type: string                          // 组件类型标识
  Component: FC<ComponentPropsType>     // 渲染组件
  PropComponent: FC<ComponentPropsType> // 属性编辑组件
  defaultProps: ComponentPropsType      // 默认属性
  StatComponent?: FC<ComponentStatPropsType> // 可选的统计组件
}

// 组件分类管理
export const componentConfGroup = [
  {
    groupId: 'textGroup',
    groupName: '文本显示',
    components: [QuestionInfoConf, QuestionTitleConf, QuestionParagraphConf],
  },
  {
    groupId: 'inputGroup',
    groupName: '用户输入',
    components: [QuestionInputConf, QuestionTextareaConf],
  },
  {
    groupId: 'selectGroup',
    groupName: '用户选择',
    components: [QuestionRadioConf, QuestionCheckboxConf],
  },
]
问卷工具栏
效果:

要点:
- 删除
- 隐藏
- 锁定
- 复制/粘贴
- 上移/下移
- 撤销
- 重做
组件状态管理:
export const componentsSlice = createSlice({
  name: 'component',
  initialState: INIT_STATE,
  reducers: {
    // 重置组件列表
    resetComponentList: (
      state: ComponentsStateType,
      action: PayloadAction<ComponentsStateType>
    ) => {
      return action.payload
    },

    // 添加新组件
    addComponent: (
      draft: ComponentsStateType,
      action: PayloadAction<ComponentInfoType>
    ) => {
      const newCompontent = action.payload
      insertNewComponent(draft, newCompontent)
    },

    // 修改组件属性
    changeComponentProps: (
      draft: ComponentsStateType,
      action: PayloadAction<{ fe_id: string; newProps: ComponentPropsType }>
    ) => {
      const { fe_id, newProps } = action.payload
      const component = draft.componentList.find(c => c.fe_id === fe_id)
      if (component) {
        component.props = {
          ...component.props,
          ...newProps,
        }
      }
    },

    // 组件拖拽排序
    moveComponent: (
      draft: ComponentsStateType,
      action: PayloadAction<{ oldIndex: number; newIndex: number }>
    ) => {
      const { componentList: curCompnentList } = draft
      const { oldIndex, newIndex } = action.payload
      draft.componentList = arrayMove(curCompnentList, oldIndex, newIndex)
    },
  },
})
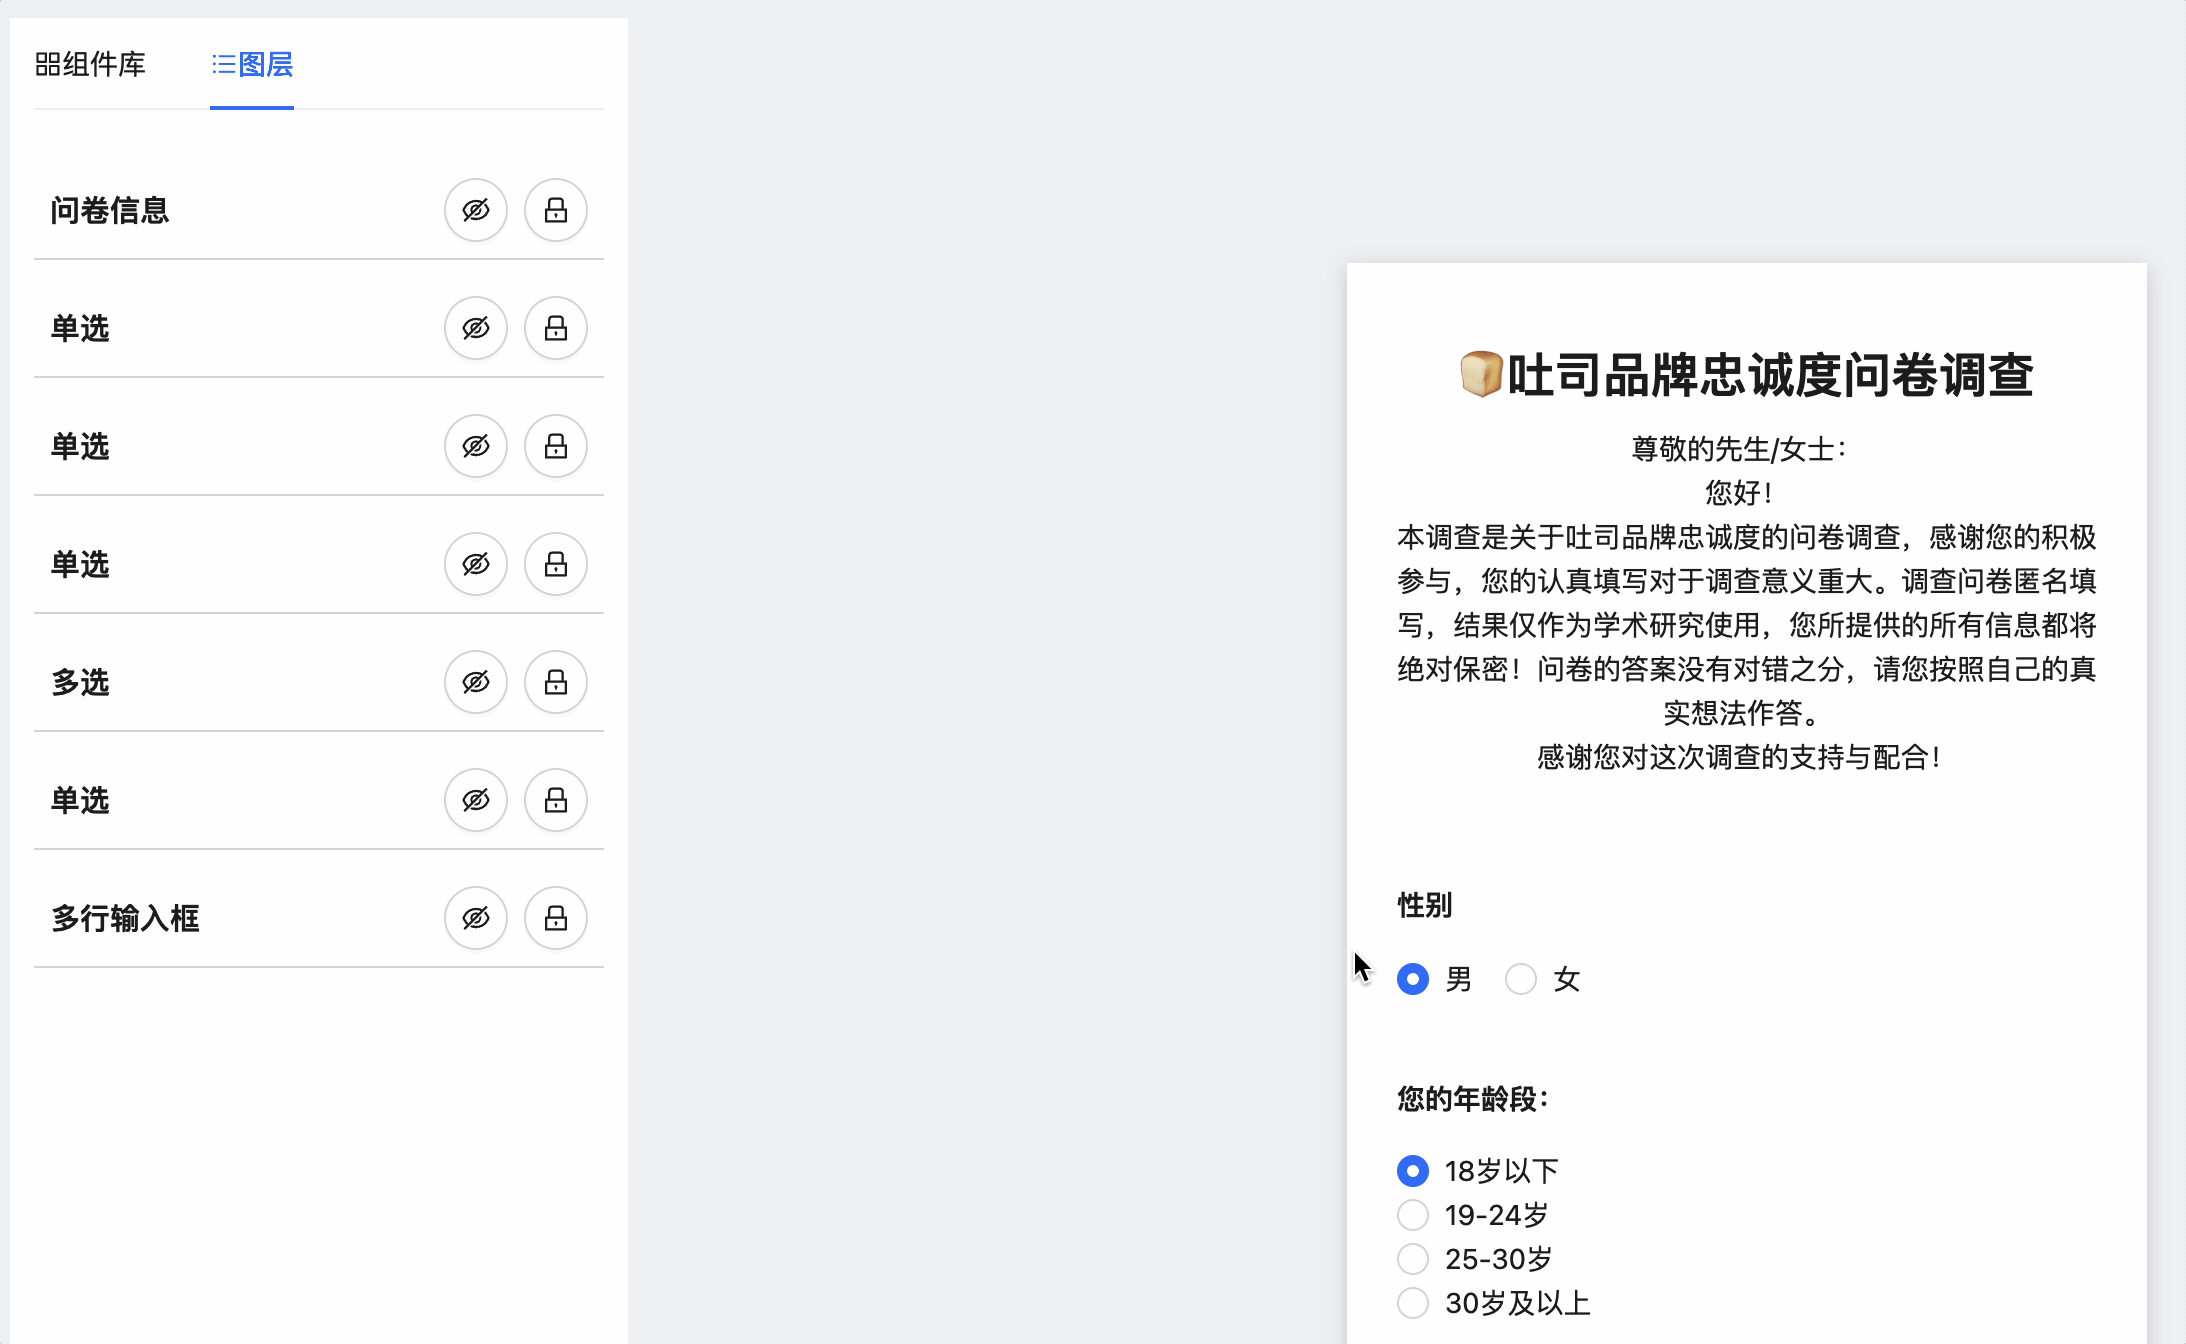
画布/图层同步拖拽
效果:
技术要点:
- React-dnd
- React-beautiful-dna
- Sortable.js
- React-sortable-hoc
- Dnd-kit
拖拽排序功能实现:

核心组件:SortableContainer
function handleDragEnd(event: DragEndEvent) {
  const { active, over } = event
  if (over === null) return
  if (active.id !== over.id) {
    const activeIndex = items.findIndex(item => item.id === active.id)
    const overIndex = items.findIndex(item => item.id === over.id)
    onDragEnd(activeIndex, overIndex)
  }
}
Redux 状态管理
moveComponent: (
  draft: ComponentsStateType,
  action: PayloadAction<{ oldIndex: number; newIndex: number }>
) => {
  const { componentList: curCompnentList } = draft
  const { oldIndex, newIndex } = action.payload
  draft.componentList = arrayMove(curCompnentList, oldIndex, newIndex)
}
组件渲染
<SortableContainer items={componentListWithId} onDragEnd={handleDragEnd}>
  {componentList.map(c => (
    <SortableItem key={c.fe_id} id={c.fe_id}>
      {/* 组件渲染内容 */}
    </SortableItem>
  ))}
</SortableContainer>
撤销/重做功能
撤销/重做功能实现:

要点:
- 核心实现:基于
redux-undo库,它是Redux的一个增强器,通过维护三个状态来工作:过去状态数组(past)、当前状态(present)和未来状态数组(future)。 - 用户可以通过两种方式触发撤销/重做:工具栏按钮和键盘快捷键(Ctrl+Z/Ctrl+Shift+Z)。当触发时,系统派发UndoActionCreators.undo()或UndoActionCreators.redo(),这些action会被redux-undo拦截并处理,实现状态的回退或前进。
Redux Store 配置
// src/store/index.ts
import undoable, { excludeAction, StateWithHistory } from 'redux-undo'

export type StateType = {
  user: UserStateType
  components: StateWithHistory<ComponentsStateType> // 包装了组件状态
  pageInfo: PageInfoType
}

export default configureStore({
  reducer: {
    user: userReducer,
    // 使用redux-undo增强componentReducer
    components: undoable(componentReducer, {
      limit: 20, // 最多保存20步历史
      filter: excludeAction([
        'components/resetComponentList',
        'components/changeSelectedId',
        'components/selectPrevComponent',
        'components/selectNextComponent',
      ]), // 排除特定action不记录历史
    }),
    pageInfo: pageInfoReducer,
  },
})
src/hooks/useGetComponentInfo.ts
function useGetComponentInfo() {
  // 使用useSelector获取Redux中的状态
  const { componentList = [], selectedId = '', copiedComponent = null } =
    useSelector((state: StateType) => {
      // 从redux-undo包装的状态中获取present(当前)状态
      return state.components.present
    })

  const selectedComponent = componentList.find(c => c.fe_id === selectedId)

  return { componentList, selectedId, selectedComponent, copiedComponent }
}
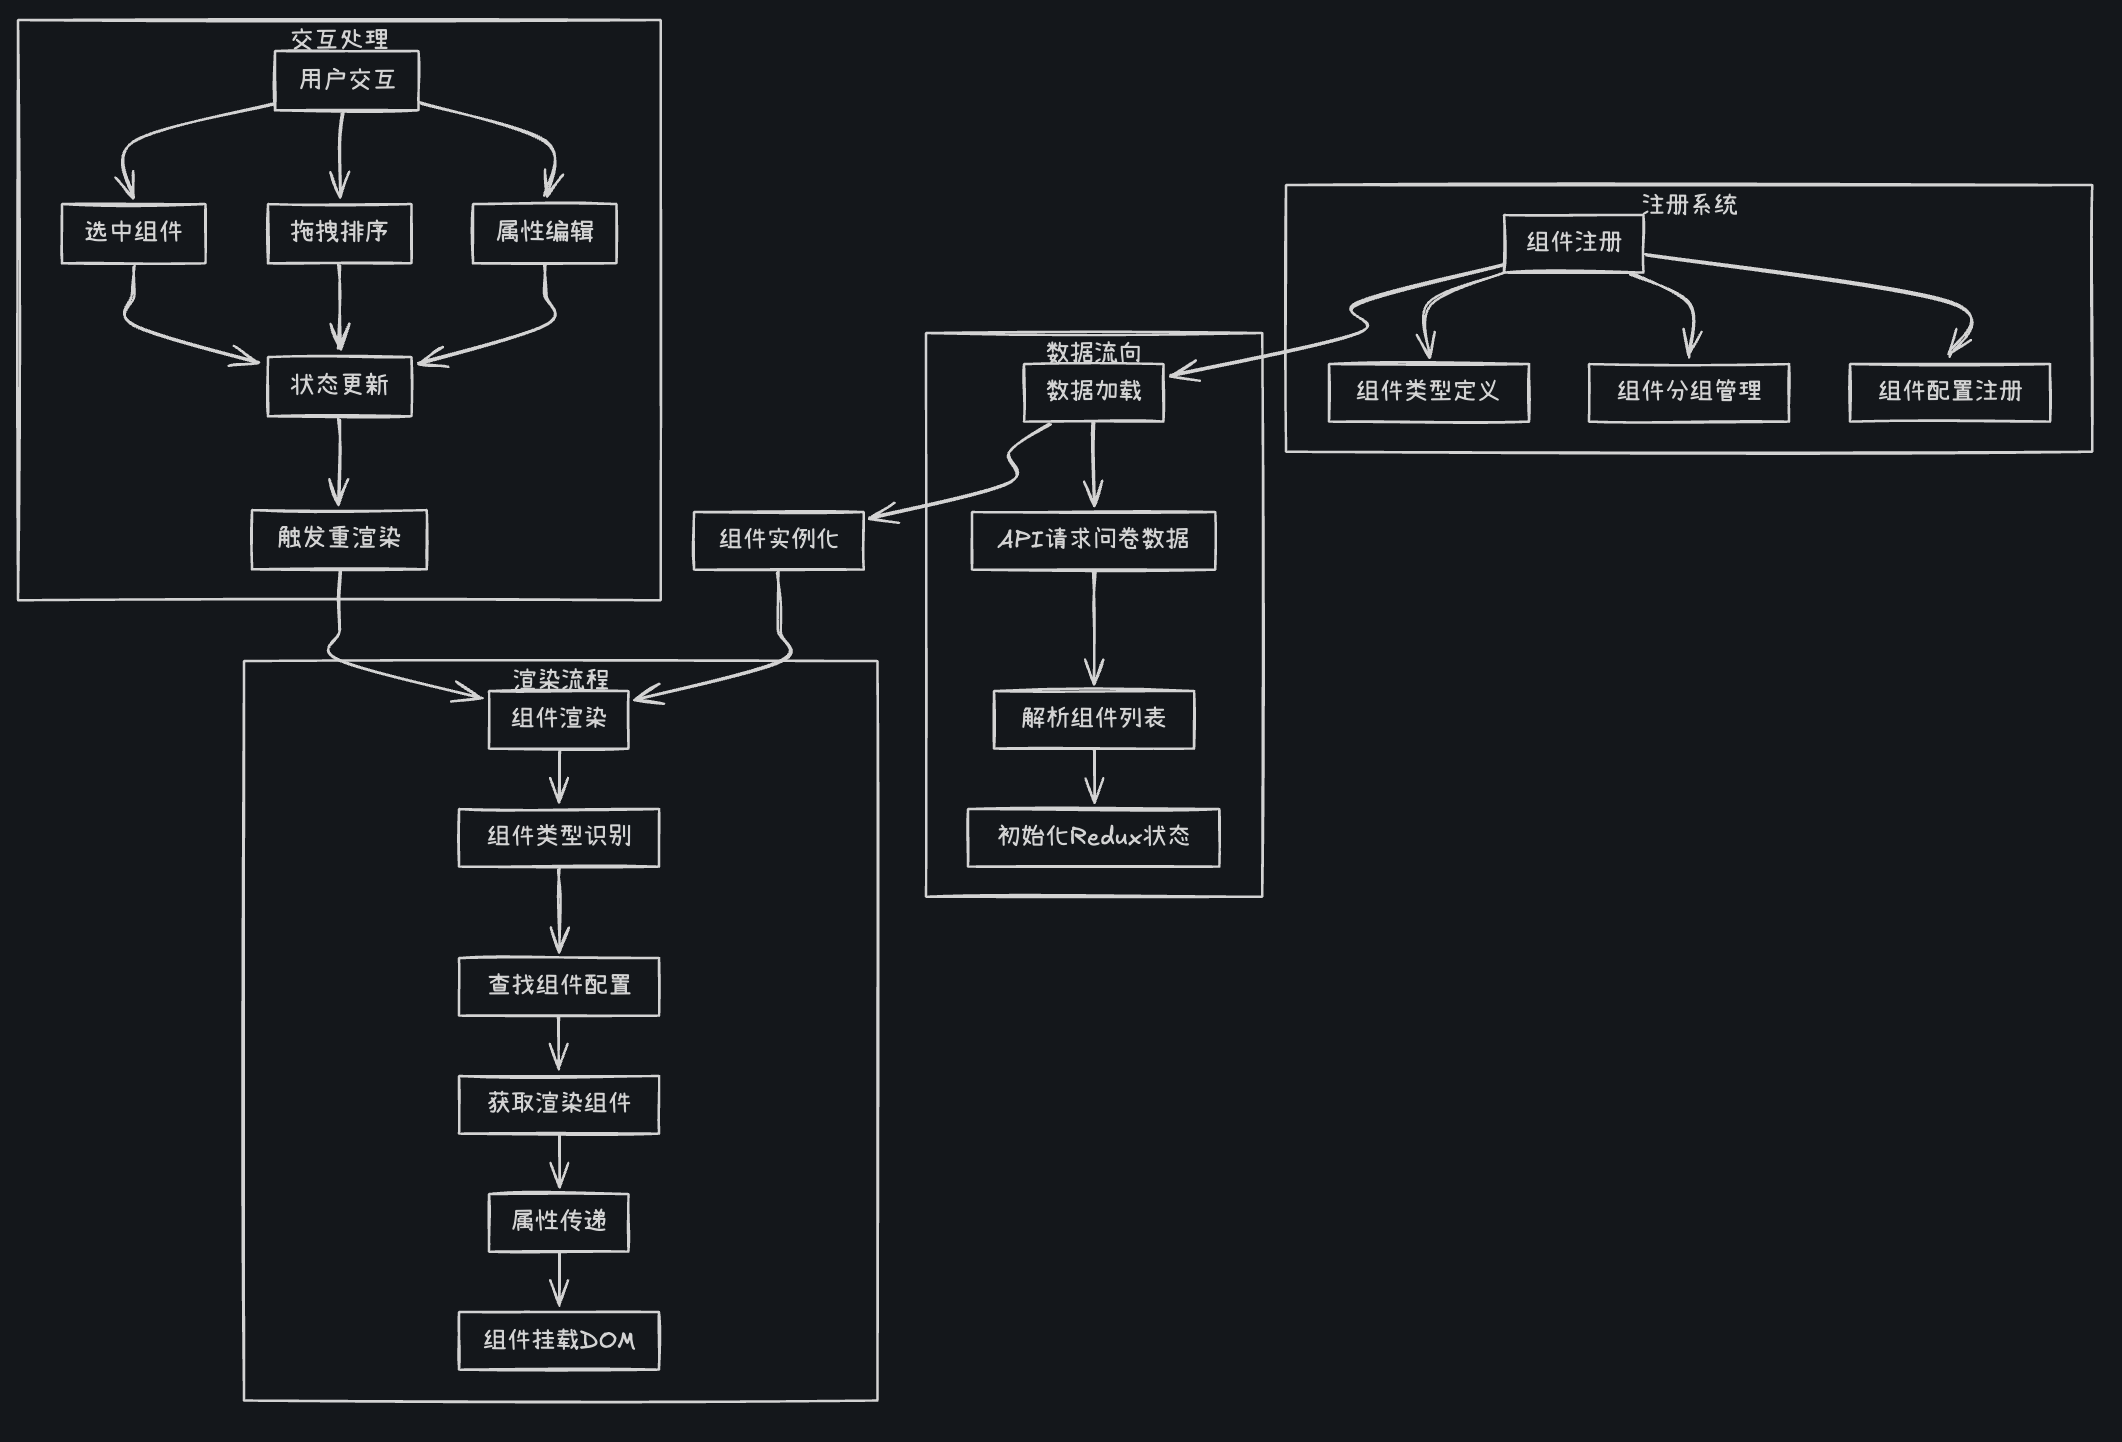
物料渲染引擎
渲染引擎设计
物料渲染引擎的设计:
物料渲染引擎是整个问卷系统的核心,它采用组件化和声明式设计,主要分为四个关键部分:
首先是组件注册系统,我们定义了统一的组件接口ComponentConfType,每个问卷组件都需要提供渲染组件、属性编辑组件和默认属性。这种设计使得添加新组件变得非常简单,只需实现这个接口并注册到组件列表中,系统就能自动识别并使用它。
第二部分是数据流管理,我们使用Redux存储组件列表和状态,结合Immer实现了不可变数据更新。通过useLoadQuestionData钩子加载问卷数据,并将其转换为渲染引擎可识别的组件实例列表。
第三部分是渲染层,核心是getComponent函数,它根据组件类型动态查找并渲染对应的React组件。这种工厂模式实现了组件定义与渲染逻辑的解耦,提高了系统的可扩展性。
最后是交互层,我们基于@dnd-kit实现了拖拽排序功能,并封装了SortableContainer和SortableItem组件,使拖拽操作与业务逻辑分离。
物料渲染流程图:
组件类型定义与注册:
// 组件配置类型
export type ComponentConfType = {
  title: string                         // 组件标题
  type: string                          // 组件类型标识
  Component: FC<ComponentPropsType>     // 渲染组件
  PropComponent: FC<ComponentPropsType> // 属性编辑组件
  defaultProps: ComponentPropsType      // 默认属性
  StatComponent?: FC<ComponentStatPropsType> // 可选的统计组件
}

// 组件注册列表
const componentConfList: ComponentConfType[] = [
  QuestionInputConf,
  QuestionTitleConf,
  QuestionParagraphConf,
  // ...其他组件
]

// 根据类型查找组件配置
export function getComponentConfByType(type: string) {
  return componentConfList.find(c => c.type === type)
}
组件渲染逻辑
// 根据组件信息获取对应的React组件
function getComponent(componentInfo: ComponentInfoType) {
  const { type, props } = componentInfo
  const componentConf = getComponentConfByType(type)
  if (!componentConf) {
    return null
  }
  const { Component } = componentConf
  return <Component {...props} />
}

// 渲染组件到画布
const EditCanvas: FC<PropsType> = ({ loading }) => {
  const { componentList, selectedId } = useGetComponentInfo()

  // 拖拽排序
  const componentListWithId = componentList.map(c => {
    return { ...c, id: c.fe_id }
  })

  return (
    <SortableContainer items={componentListWithId} onDragEnd={handleDragEnd}>
      <div className={styles.canvas}>
        {componentList
          .filter(c => !c.isHidden)
          .map(c => {
            const { fe_id, isLocked } = c
            // 构建样式类
            const wrapperClassName = classNames({
              [styles['component-wrapper']]: true,
              [styles.selected]: fe_id === selectedId,
              [styles.locked]: isLocked,
            })

            return (
              <SortableItem key={fe_id} id={fe_id}>
                <div
                  className={wrapperClassName}
                  onClick={e => handleClick(e, fe_id)}
                >
                  <div className={styles.component}>
                    {getComponent(c)}
                  </div>
                </div>
              </SortableItem>
            )
          })}
      </div>
    </SortableContainer>
  )
}
数据加载与状态管理
function useLoadQuestionData() {
  const { id = '' } = useParams()
  const dispatch = useDispatch()

  const { data, loading, error, run } = useRequest(
    async (id: string) => {
      const data = await getQuestionService(id)
      return data
    },
    { manual: true }
  )

  useEffect(() => {
    if (!data) return
    const { componentList = [], title = '', desc = '', js = '', css = '', isPublished = false } = data

    // 获取默认选中组件ID
    let selectedId = ''
    if (componentList.length > 0) {
      const { fe_id } = componentList[0]
      selectedId = fe_id
    }

    // Redux初始化组件列表
    dispatch(resetComponentList({
      componentList,
      selectedId,
      copiedComponent: null,
    }))

    // 初始化页面信息
    dispatch(setPageInfo({ title, desc, js, css, isPublished }))
  }, [data])

  useEffect(() => {
    run(id)
  }, [id])

  return { loading, error }
}
拖拽排序实现
const SortableContainer: FC<PropsType> = (props: PropsType) => {
  const { children, items, onDragEnd } = props

  // 配置拖拽传感器
  const sensors = useSensors(
    useSensor(MouseSensor, {
      activationConstraint: {
        distance: 8, // 移动8px才激活拖拽
      },
    })
  )

  // 处理拖拽结束事件
  function handleDragEnd(event: DragEndEvent) {
    const { active, over } = event
    if (over === null) return
    if (active.id !== over.id) {
      const activeIndex = items.findIndex(item => item.id === active.id)
      const overIndex = items.findIndex(item => item.id === over.id)
      onDragEnd(activeIndex, overIndex)
    }
  }

  return (
    <DndContext
      sensors={sensors}
      collisionDetection={closestCenter}
      onDragEnd={handleDragEnd}
    >
      <SortableContext items={items} strategy={verticalListSortingStrategy}>
        {children}
      </SortableContext>
    </DndContext>
  )
}
组件状态更新
export const componentsSlice = createSlice({
  name: 'component',
  initialState: INIT_STATE,
  reducers: {
    // 重置组件列表
    resetComponentList: (
      state: ComponentsStateType,
      action: PayloadAction<ComponentsStateType>
    ) => {
      return action.payload
    },

    // 修改选中ID
    changeSelectedId: (
      draft: ComponentsStateType,
      action: PayloadAction<string>
    ) => {
      draft.selectedId = action.payload || ''
    },

    // 修改组件属性
    changeComponentProps: (
      draft: ComponentsStateType,
      action: PayloadAction<{ fe_id: string; newProps: ComponentPropsType }>
    ) => {
      const { fe_id, newProps } = action.payload
      const component = draft.componentList.find(c => c.fe_id === fe_id)
      if (component) {
        component.props = {
          ...component.props,
          ...newProps,
        }
      }
    },

    // 组件排序
    moveComponent: (
      draft: ComponentsStateType,
      action: PayloadAction<{ oldIndex: number; newIndex: number }>
    ) => {
      const { componentList: curCompnentList } = draft
      const { oldIndex, newIndex } = action.payload
      draft.componentList = arrayMove(curCompnentList, oldIndex, newIndex)
    },
  }
})
画布渲染
画布渲染流程图:

核心渲染逻辑(来自 Layers.tsx)
{componentList.map(c => {
  const { fe_id, isHidden } = c
  if (isHidden) return null // 过滤隐藏组件

  return (
    <SortableItem key={fe_id} id={fe_id}>
      <div
        className={classnames({
          [styles.wrapper]: true,
          [styles.selected]: fe_id === selectedId, // 选中状态样式
        })}
        onClick={() => handleTitleClick(fe_id)} // 点击事件绑定
      >
        {fe_id === changingTitleId ? (
          <Input /> // 标题编辑模式
        ) : (
          c.title // 正常显示标题
        )}
      </div>
    </SortableItem>
  )
})}
状态管理(来自 componentReducer)
const componentSlice = createSlice({
  reducers: {
    changeComponentHidden: (draft, action: PayloadAction<{ fe_id: string; isHidden: boolean }>) => {
      const { componentList } = draft
      const curComp = componentList.find(c => c.fe_id === action.payload.fe_id)
      if (curComp) {
        curComp.isHidden = action.payload.isHidden
      }
    },
    moveComponent: (draft, action) => {
      draft.componentList = arrayMove( // 使用dnd-kit的排序算法
        draft.componentList,
        action.payload.oldIndex,
        action.payload.newIndex
      )
    }
  }
})
用户登陆模块
登陆注册流程
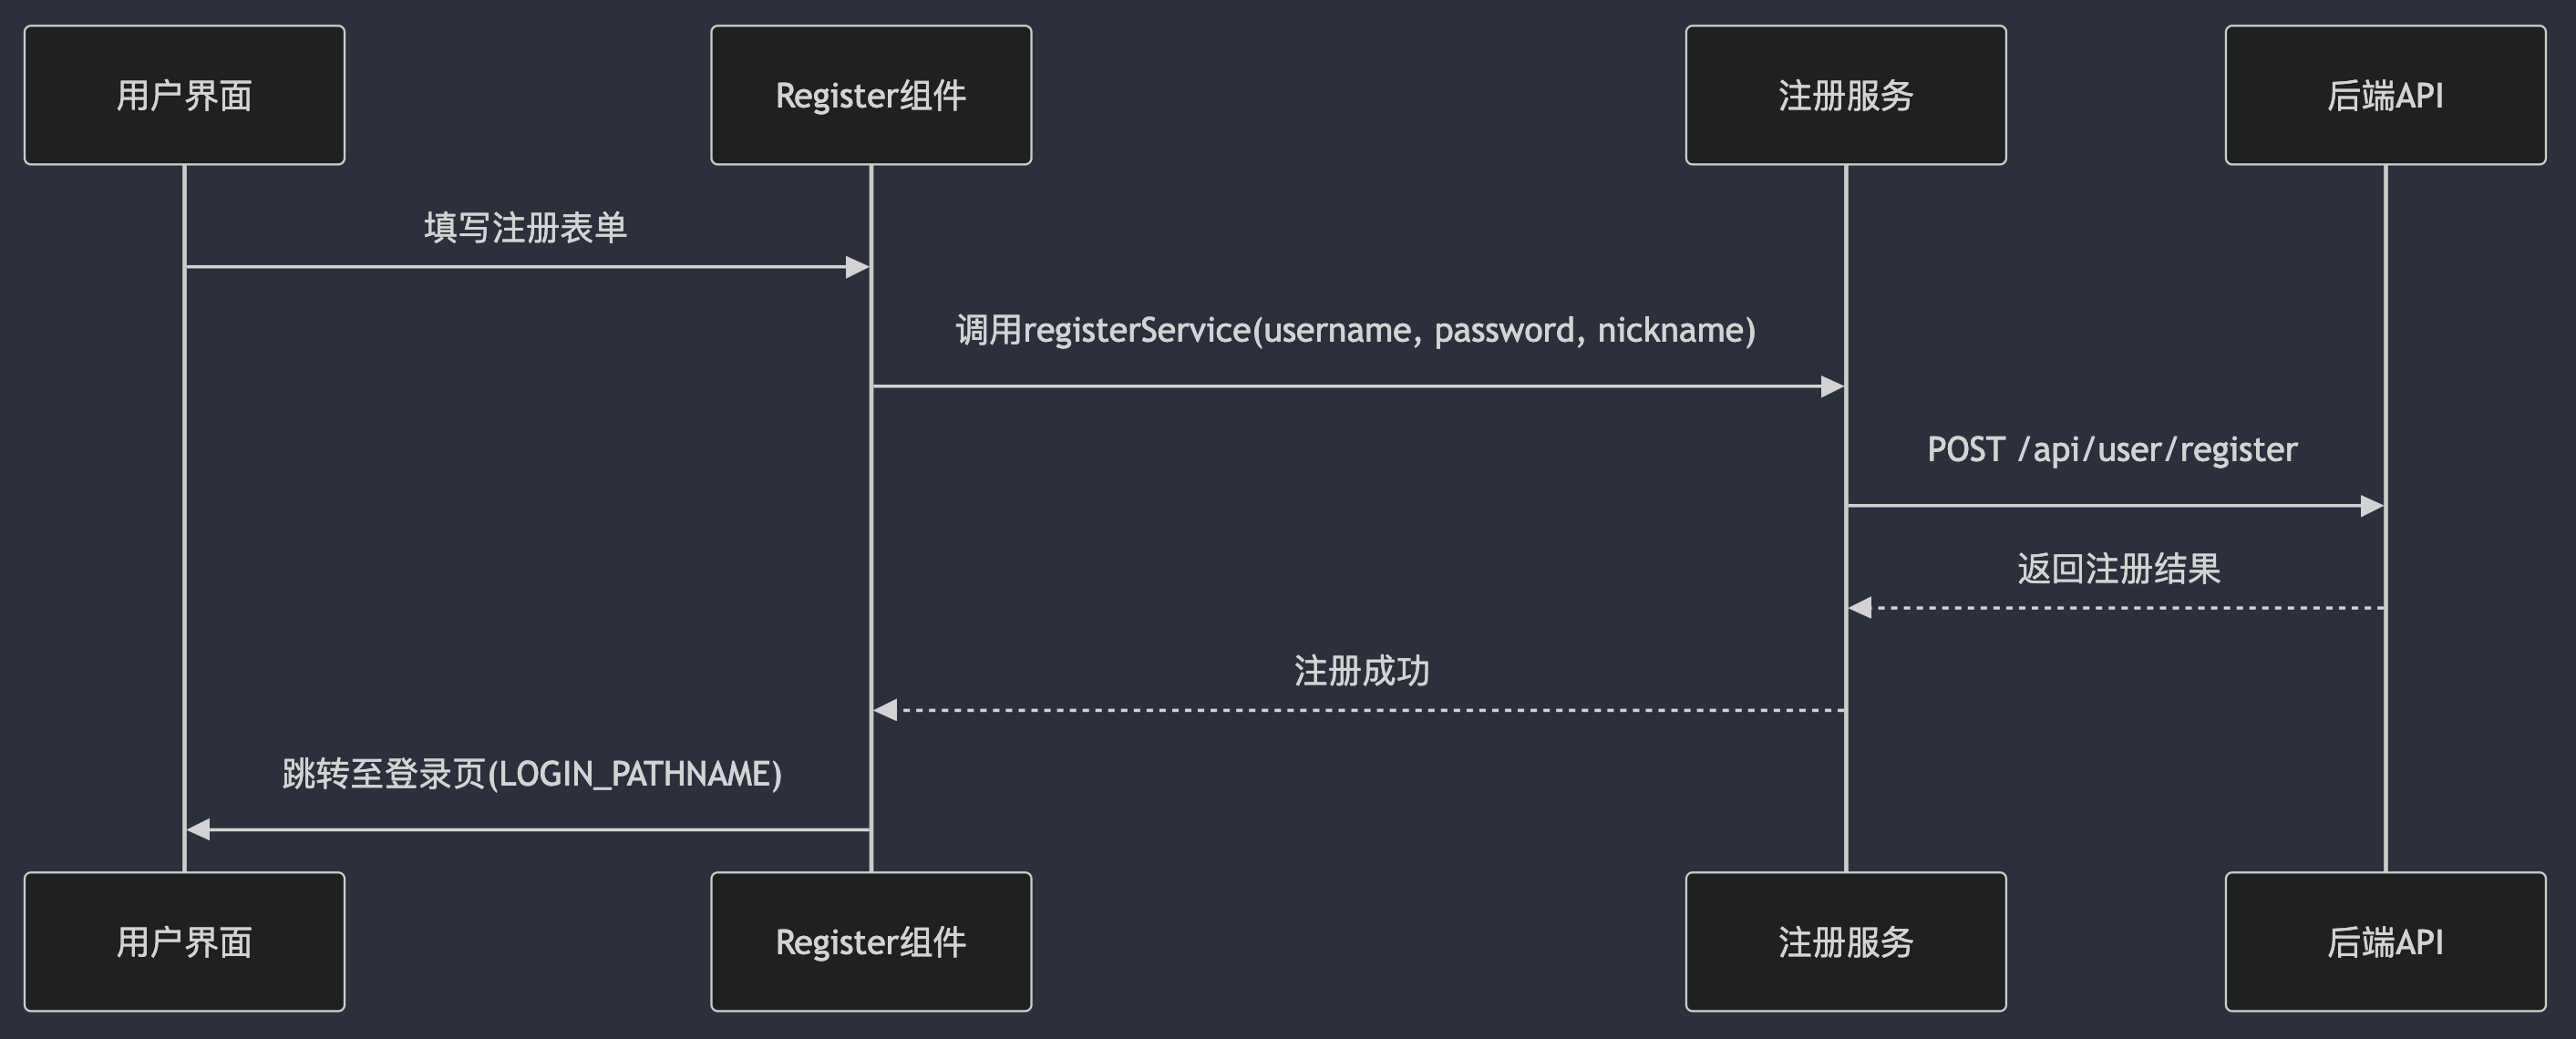
注册流程:
- 用户填写表单
- Register组件调用 registerService,请求后端接口
- 后端返回数据,显示登陆成功
- 用户跳转至登陆页面
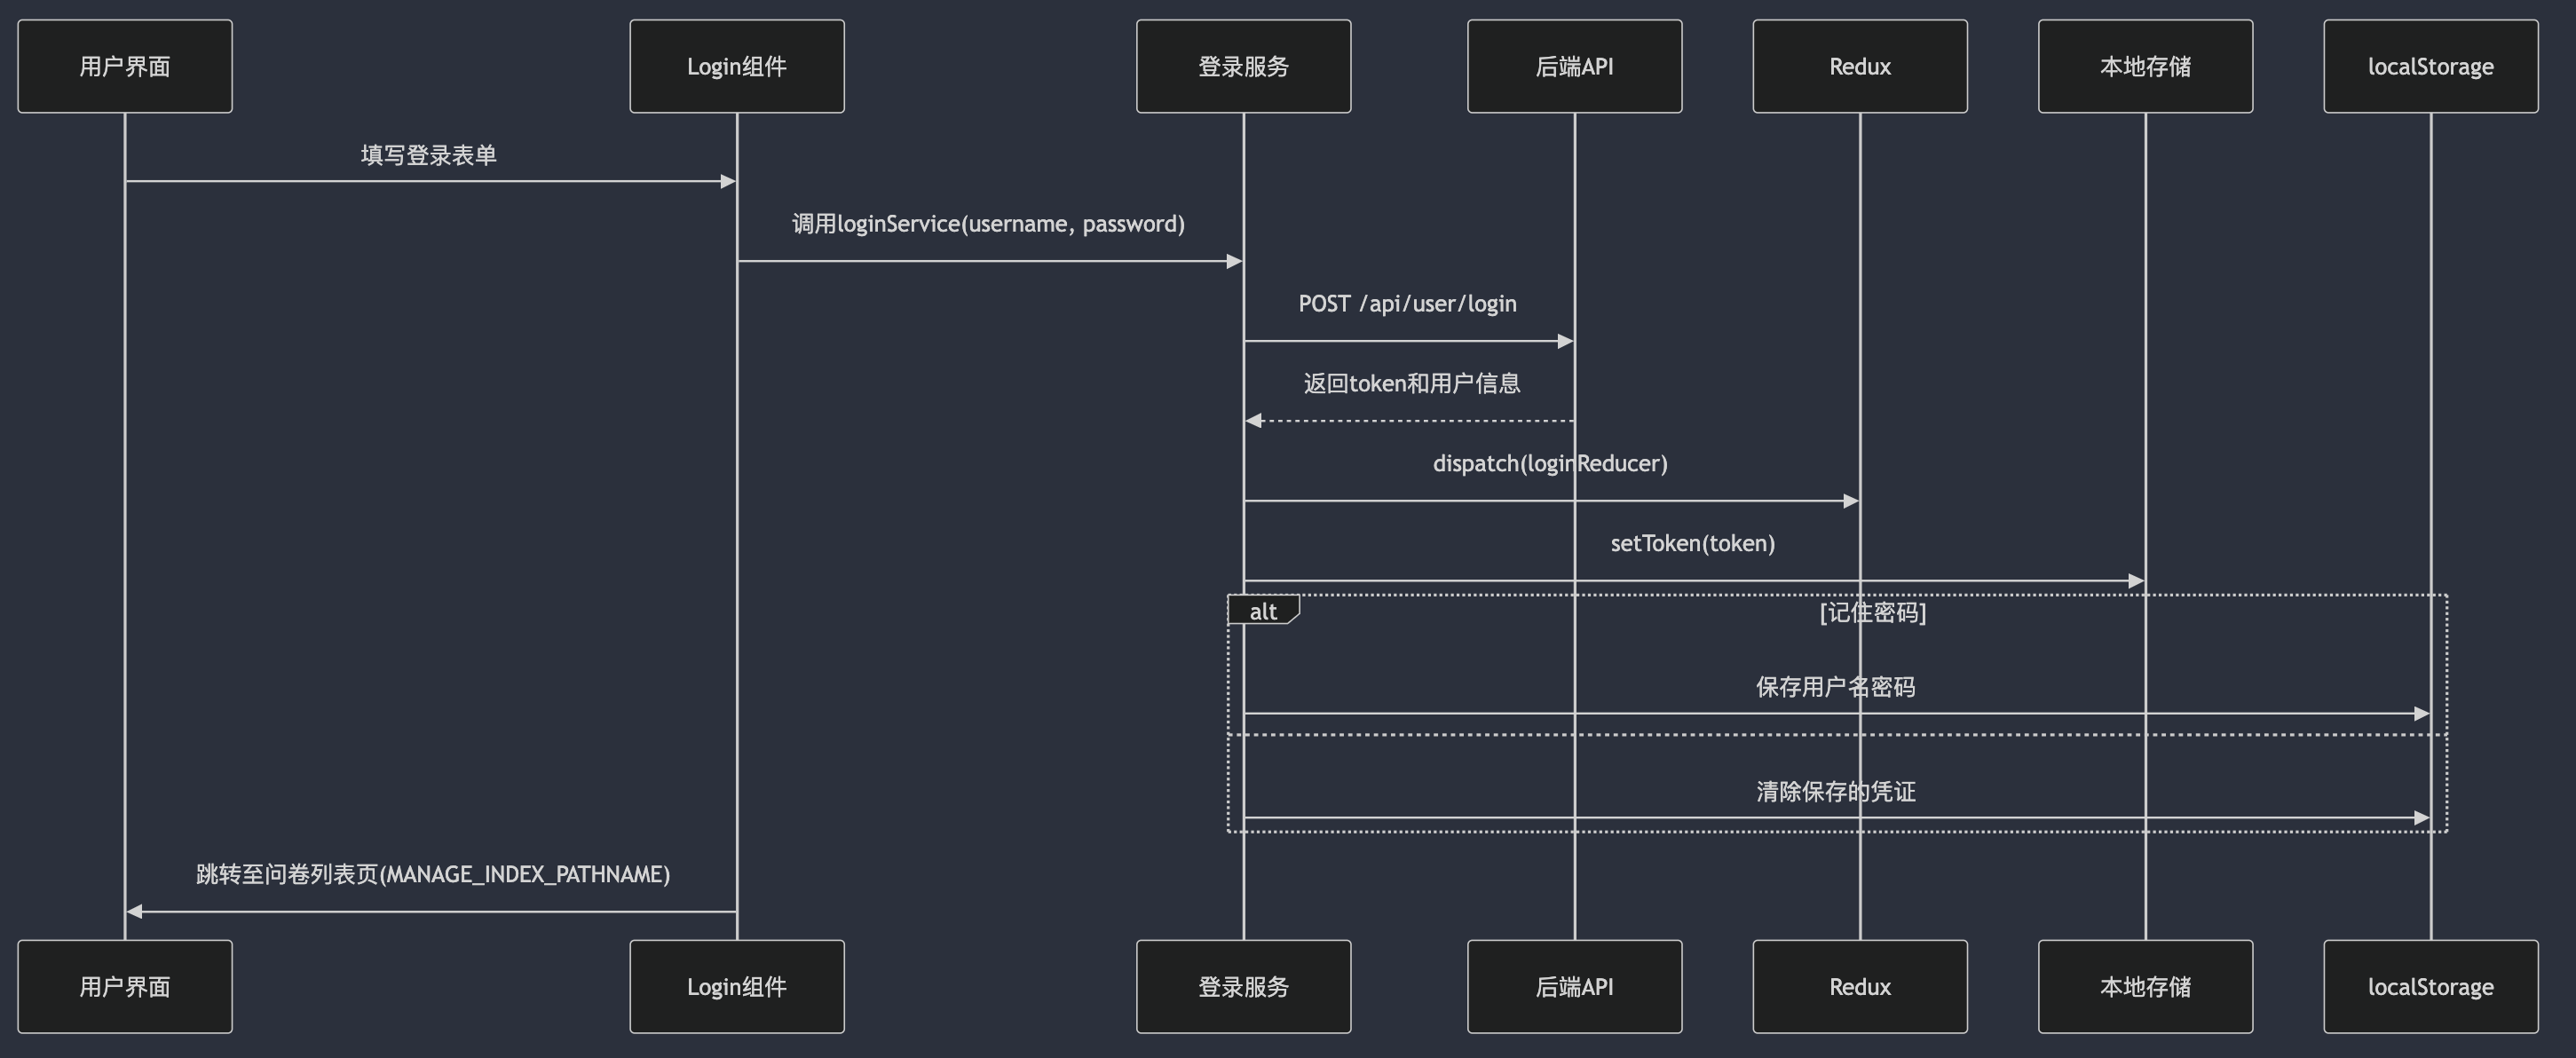
登录流程:
- 用户填写表单
- Login组件调用 LoginService,请求后端接口
- 后端返回 token 和 用户信息
- 前端 Redux 更新用户信息,如果用户勾选记住密码的话,还需要本地存储信息
- 用户跳转问卷列表页
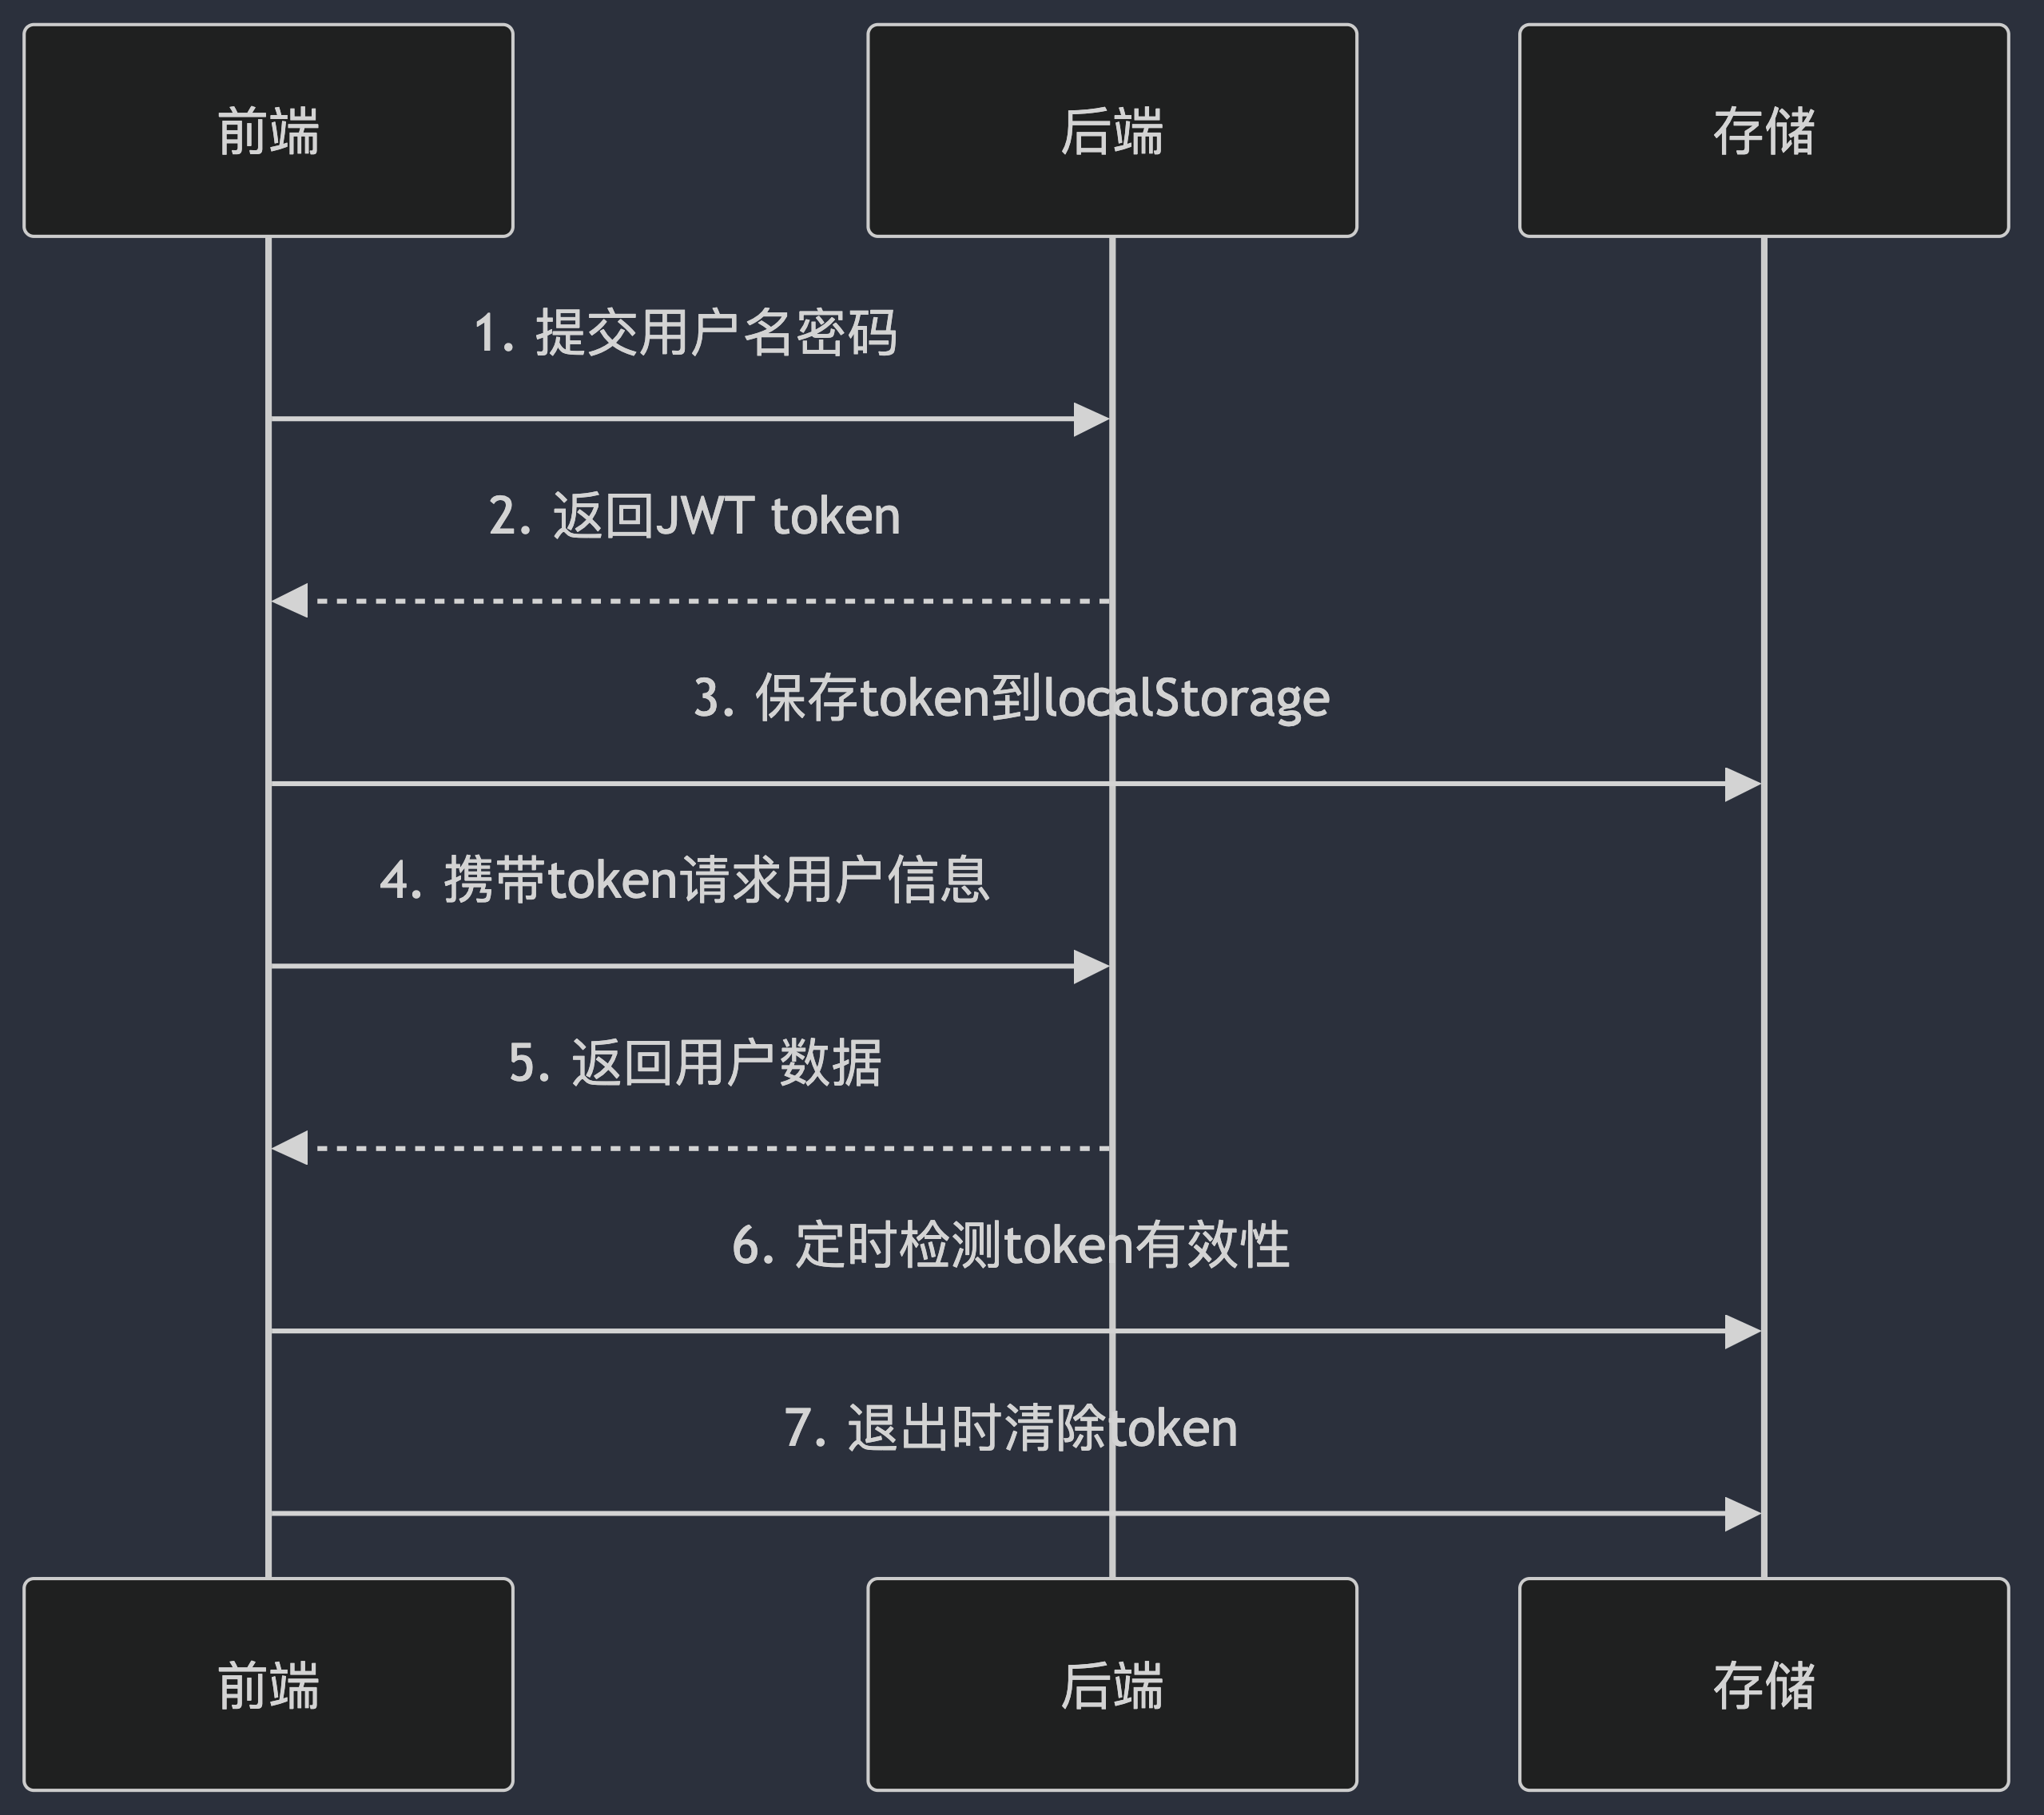
信息认证流程
JWT
JWT 认证流程:
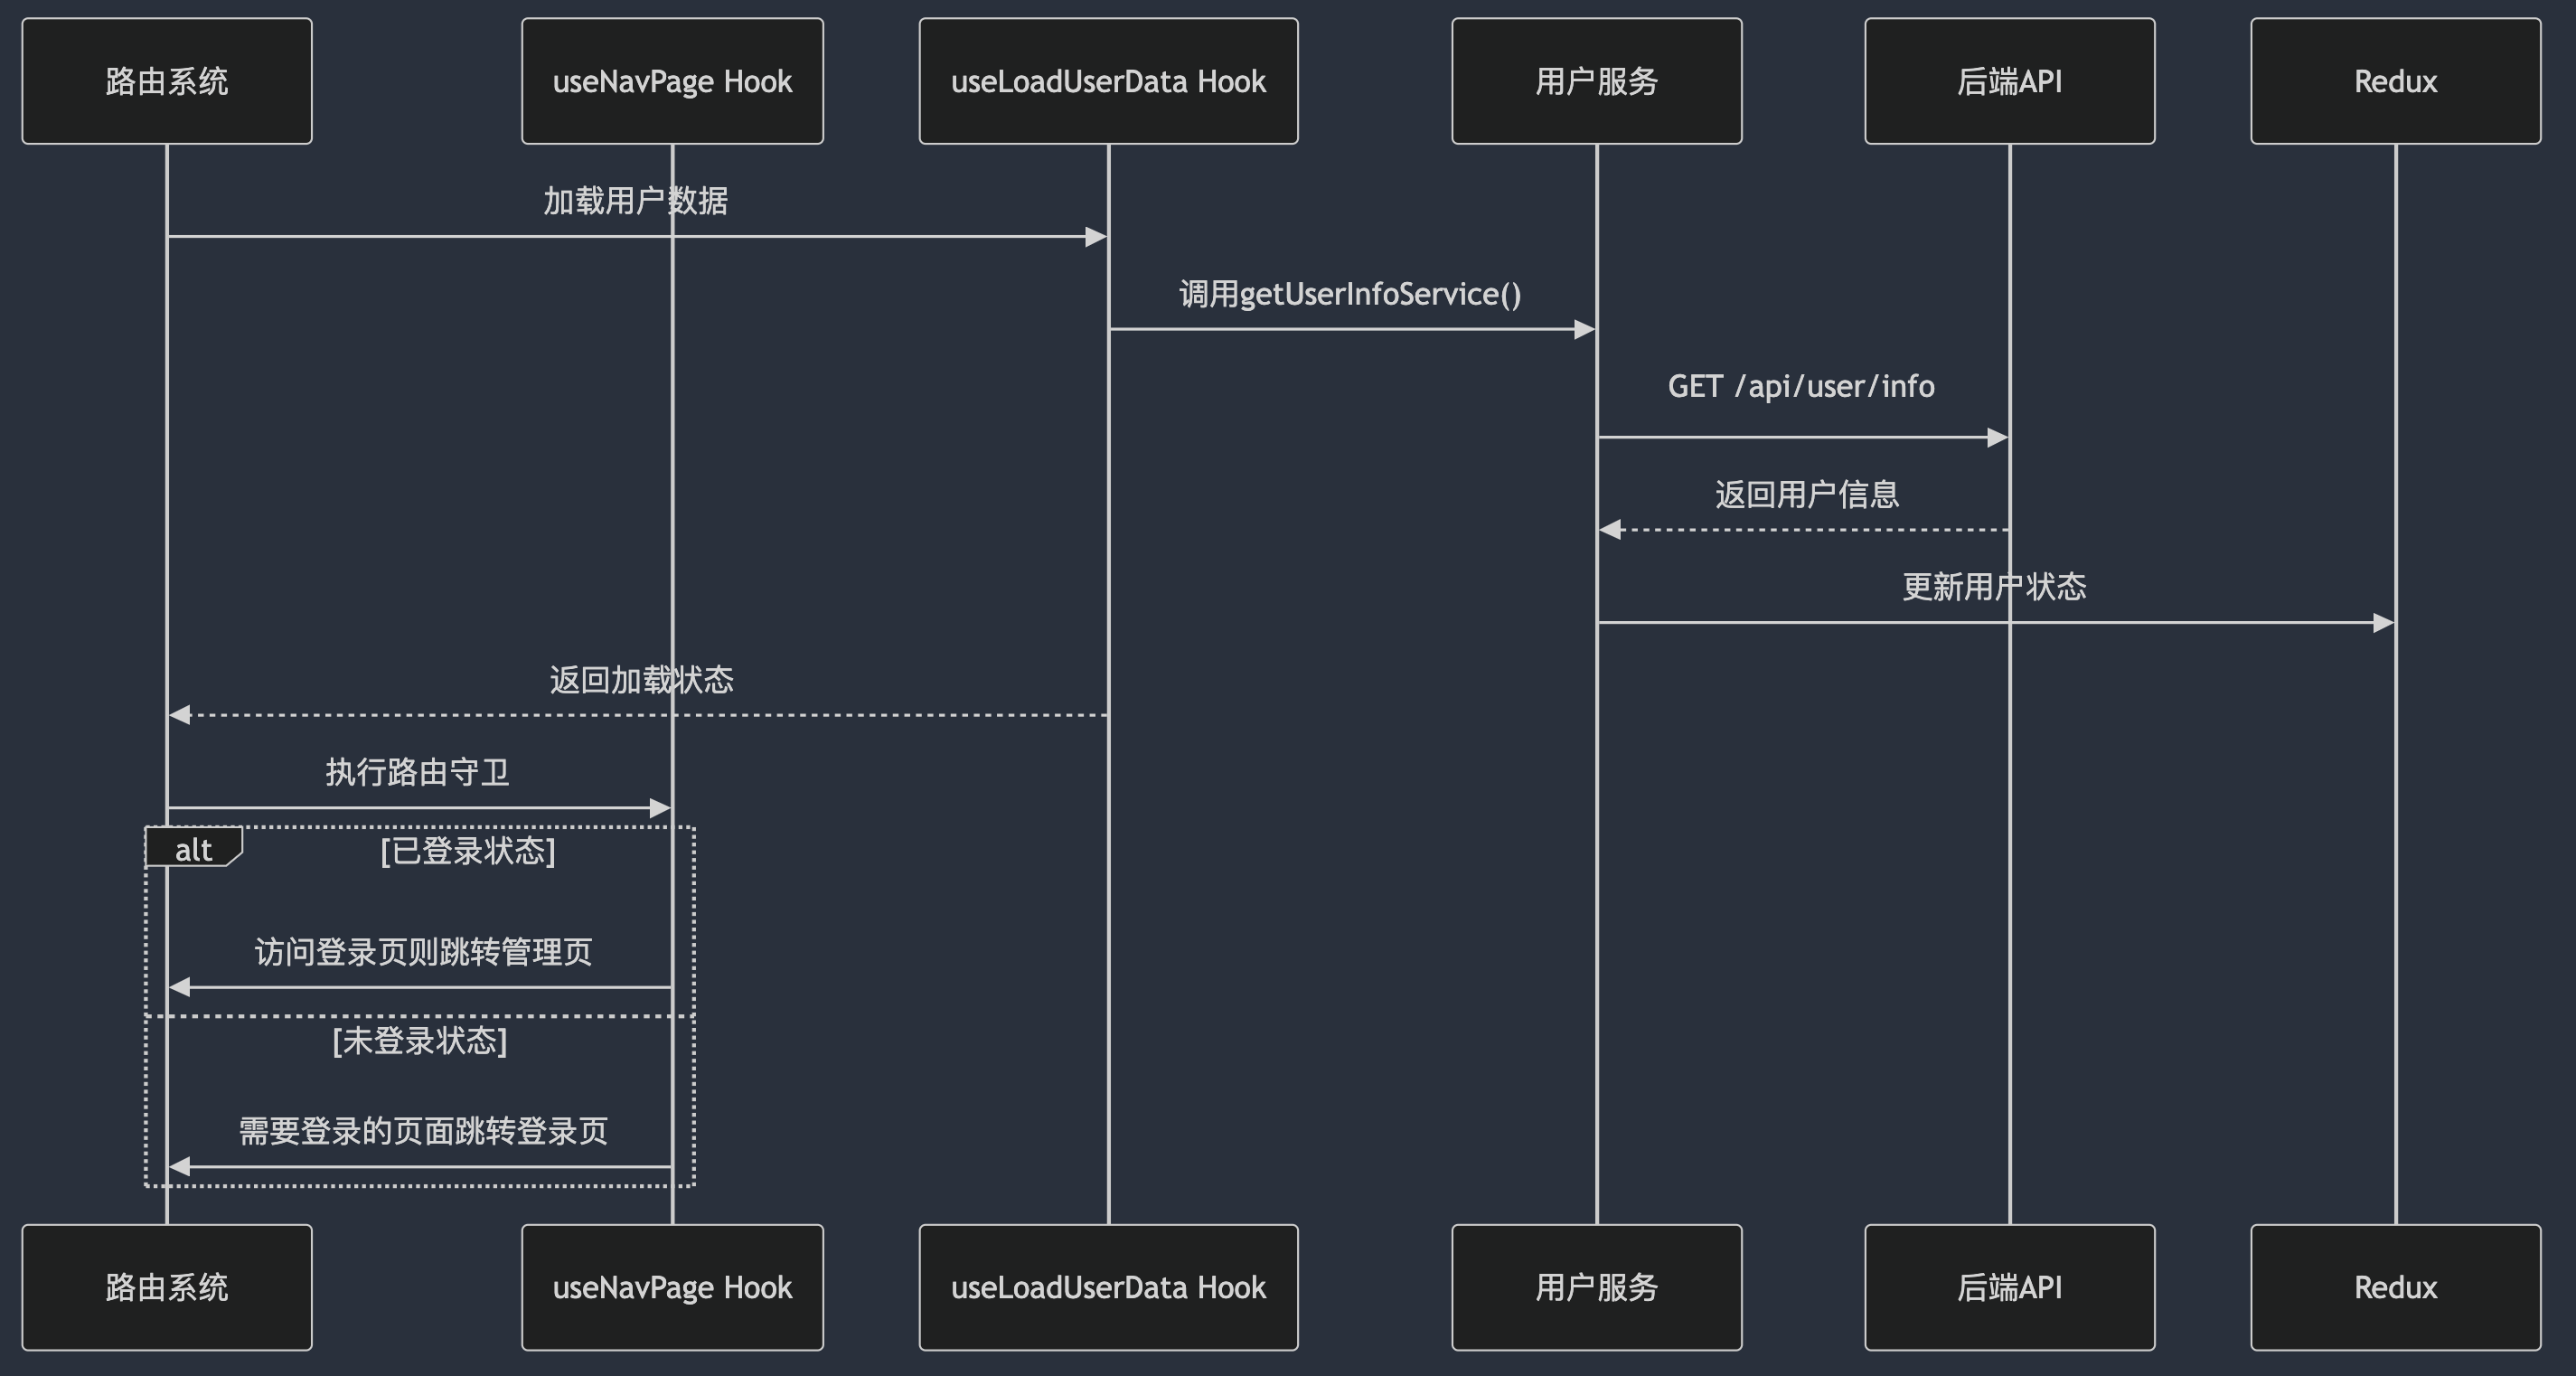
路由守卫
路由守卫管理流程:
- 路由系统加载用户信息
- 路由守卫根据白名单进行鉴权,跳转对应页面
路由守卫实现流程:
- 路由分层:
- 将路由分为「无需鉴权」(登录/注册/首页)和「需要登录」两类
- 通过
isNoNeedUserInfo工具函数维护白名单路径
- 权限判断:
// 检查路径是否在免登录白名单
if (需要用户信息 && 未登录) {
  重定向到登录页
} else if (已登录 && 访问登录/注册页) {
  重定向到问卷管理页
}
- 状态管理:
- 使用Redux全局存储用户信息
- 本地存储持久化token(通过
setToken/removeToken) - 登录后自动获取用户信息并更新Redux状态
- 跳转逻辑:
- 登录成功 → 管理首页
- 退出登录 → 登录页
- 未登录访问受保护路由 → 登录页(保留原路径便于登录后跳回)
路由鉴权流程图:
守卫详细实现可看:吐司问卷:用户登陆
性能优化
要点:
- React 性能优化:缓存数据,減少计算
- Craco配置:代码分析、路由懒加载、包拆分,CSS包拆分
React 性能优化
要点:
- useState 传入函数,只在组件渲染时执行一次
- useMemo 可以缓存数据,不用每次执行函数都重新生成
比如生成二维码,依赖项为 id 和 isPublished,二维码的创建成本一般较高,就可以采用 useMemo

- useCallback缓存函数
- React.memo控制子组件更新
优化代码体积
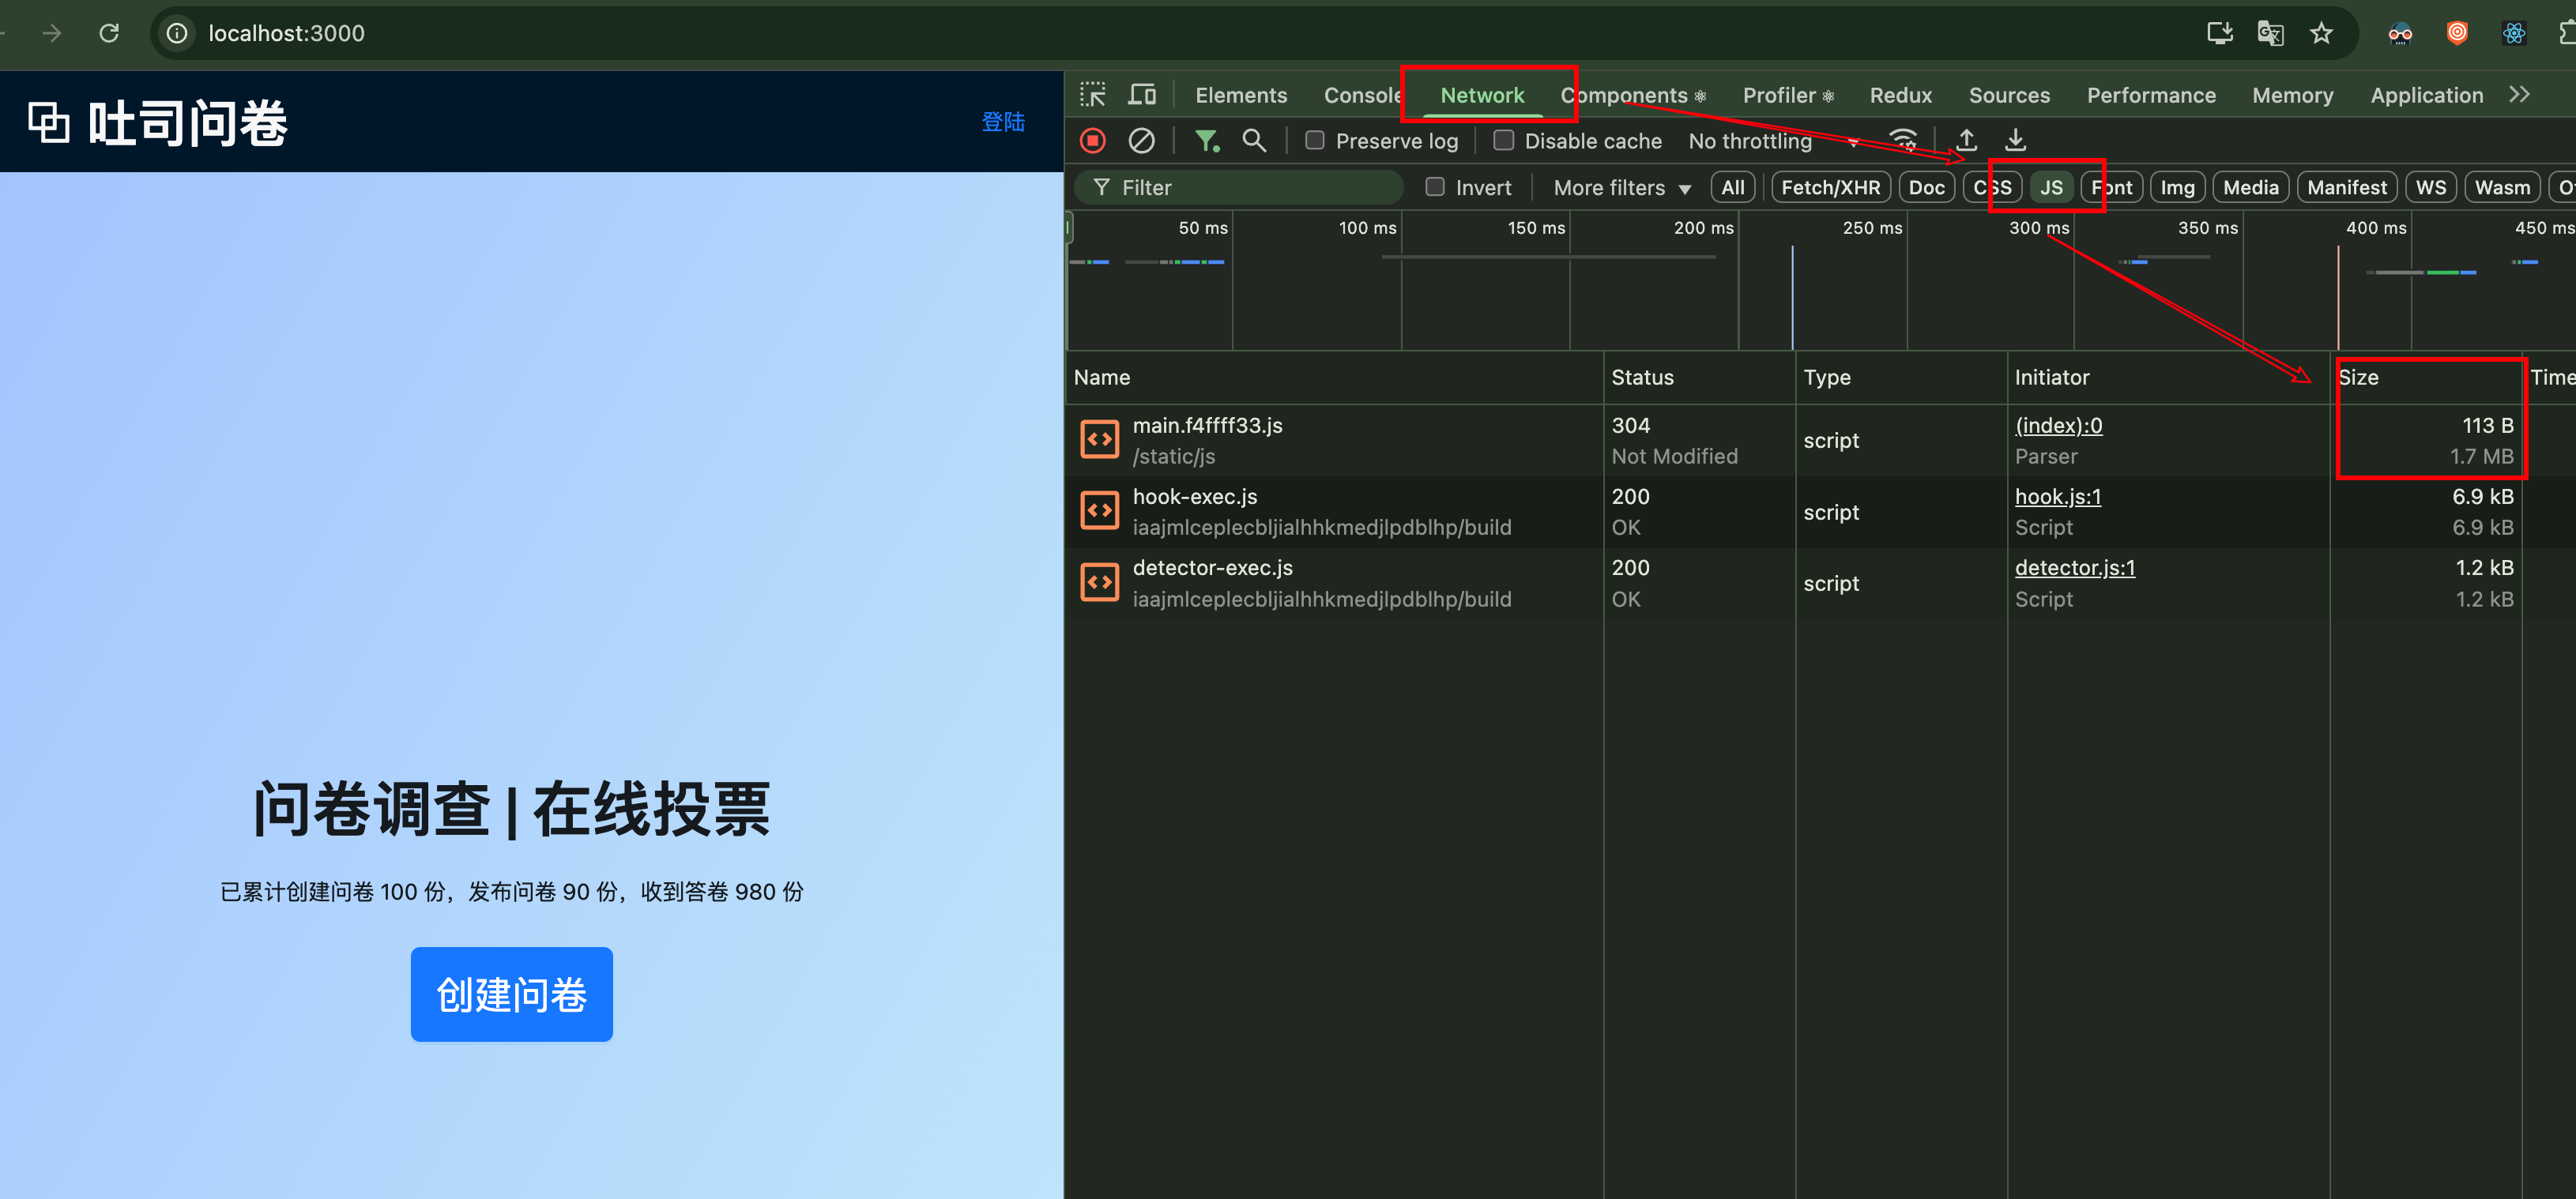
**打包资源图:**根据图分析如何进行拆包处理
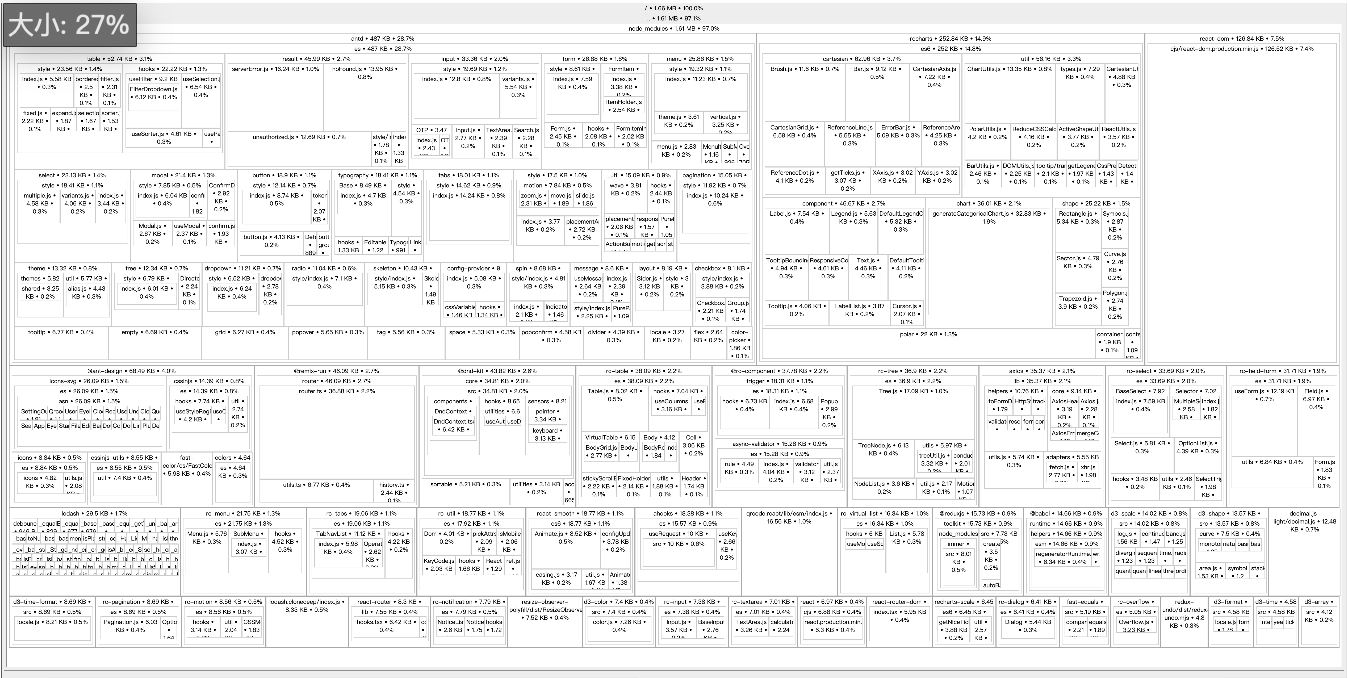
分包前 main 包大小为 1.3MB
serve -s build
路由懒加载
我们可以通过路由懒加载,拆分 bundle,以此优化首页体积。
index.tsx
// import Edit from '../pages/question/Edit'
// import Stat from '../pages/question/Stat'

const Edit = lazy(
  () => import(/* webpackChunkName: "editPage" */ '../pages/question/Edit')
)
const Stat = lazy(
  () => import(/* webpackChunkName: "statPage" */ '../pages/question/Stat')
)
分包加载
将包分成 src、antd、react-dom 以及第三包 这四种包
craco.config
webpack: {
  configure: webpackConfig => {
    // 生产环境:抽离公共代码
    if (webpackConfig.mode === 'production') {
      if (webpackConfig.optimization === null) {
        webpackConfig.optimization = {}
      }
      webpackConfig.optimization.splitChunks = {
        chunks: 'all',
        // 采用缓存,提高打包速度
        cacheGroups: {
          antd: {
            name: 'antdchunk',
            test: /antd/,
            priority: 100,
          },
          reactDom: {
            name: 'reactDom-chunk',
            test: /react-dom/,
            priority: 99,
          },
          // 第三方插件
          vendors: {
            name: 'vendors-chunk',
            test: /node_modules/,
            priority: 98,
          },
        },
      }
    }
    return webpackConfig
  },
},
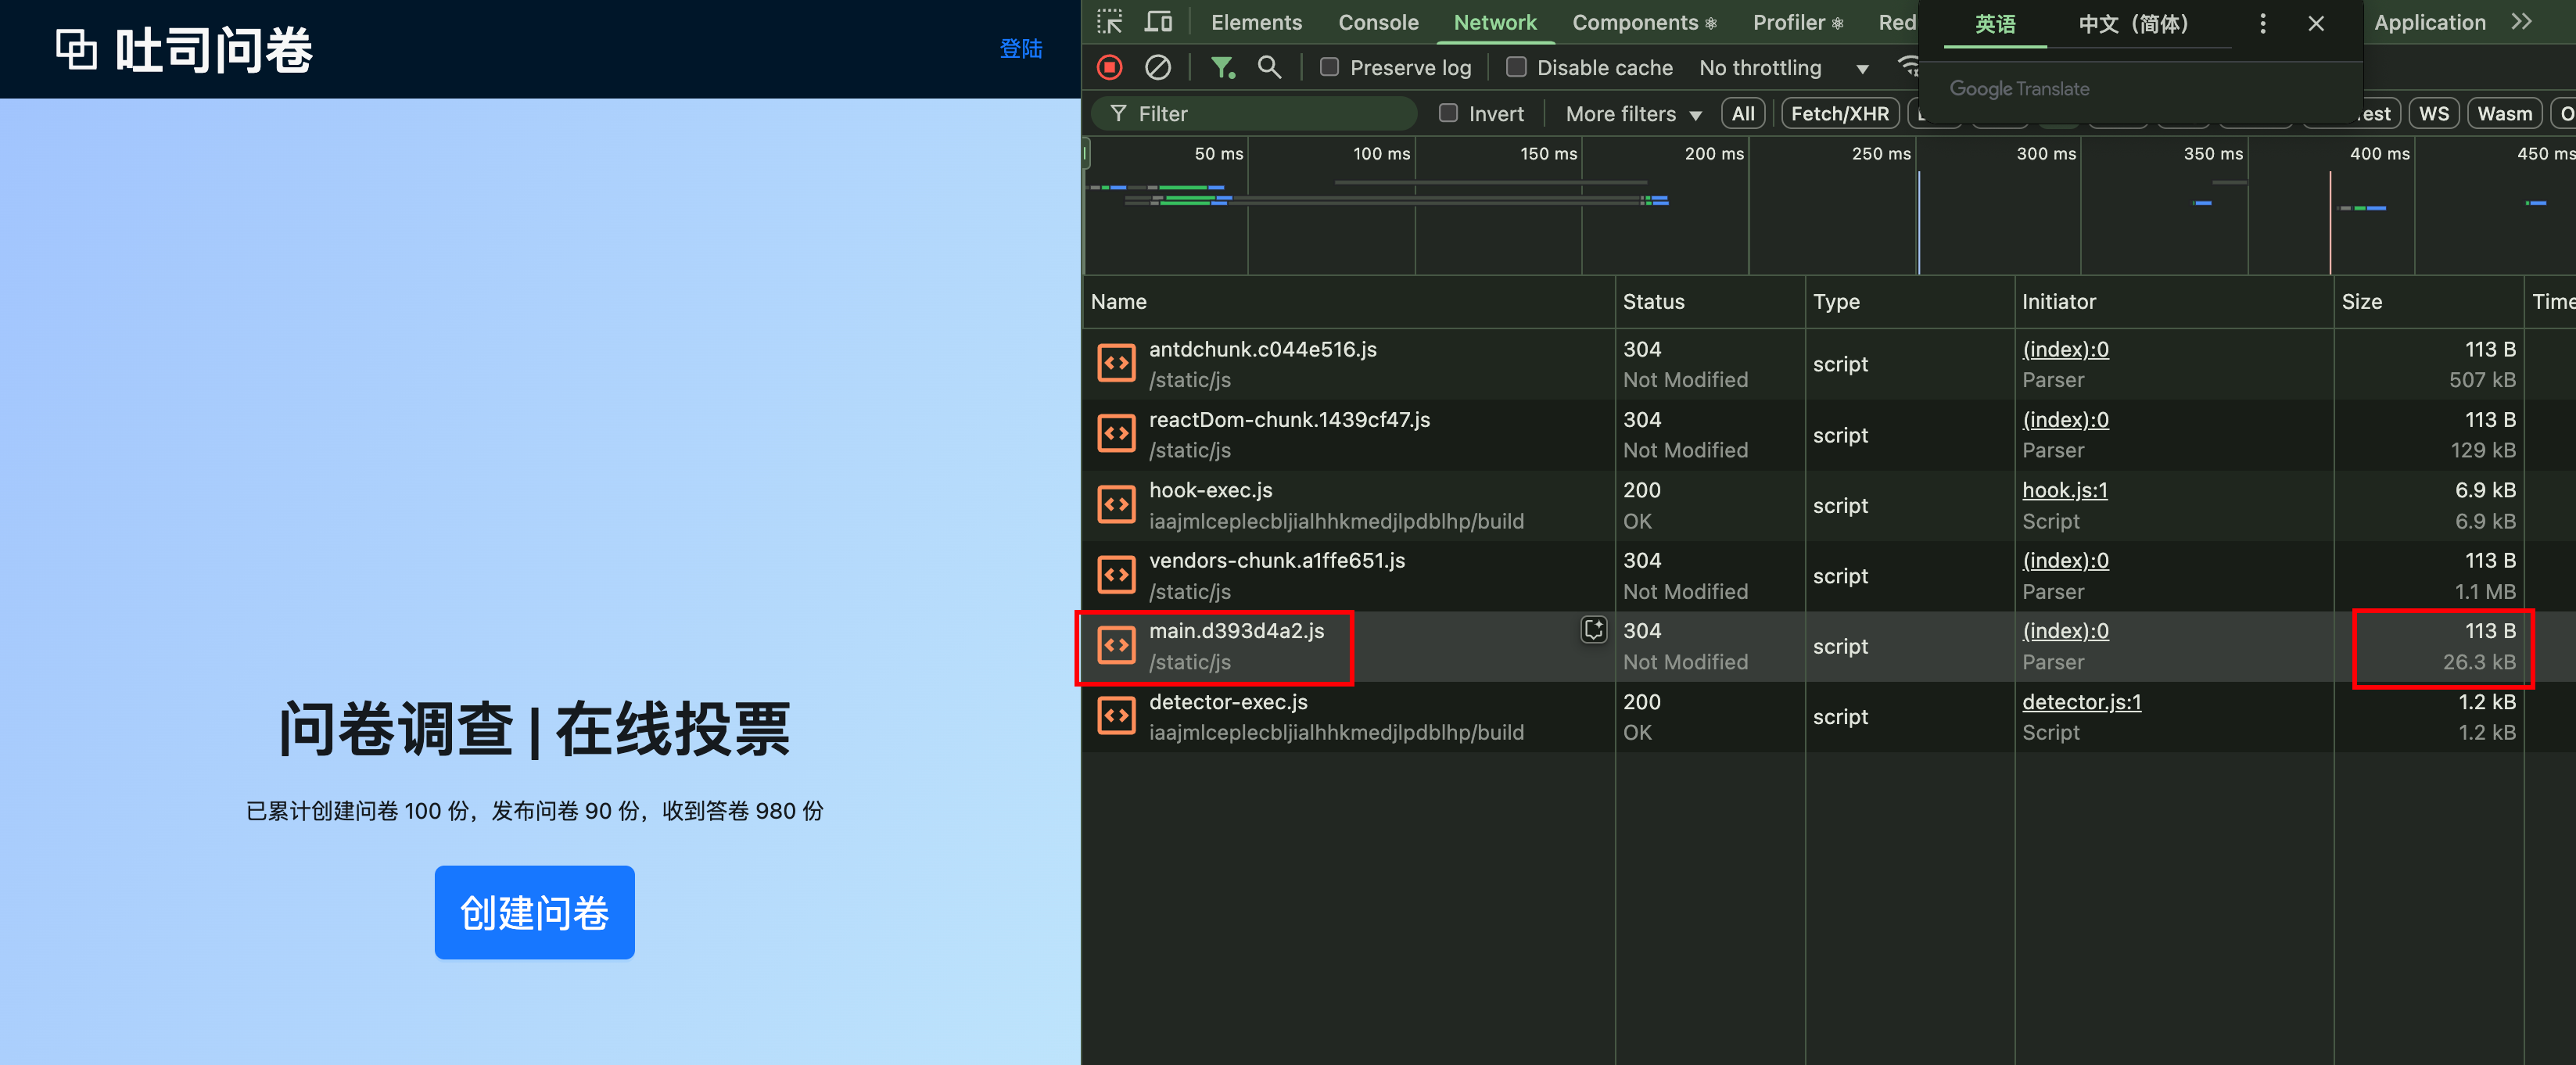
经过路由懒加载和分包处理:
npm run build 后可见分析(以下是压缩后):
File sizes after gzip:

  343.21 kB (+18.63 kB)  build/static/js/vendors-chunk.7bb93744.js
  138.79 kB (+400 B)     build/static/js/antdchunk.44c16e36.js
  41.45 kB               build/static/js/reactDom-chunk.1439cf47.js
  9.59 kB (+554 B)       build/static/js/main.29ab4e1f.js
  3.88 kB (+10 B)        build/static/js/editPage.b9332f3b.chunk.js
  3.36 kB (+38 B)        build/static/js/766.9f144573.chunk.js
  2.44 kB (-7 B)         build/static/js/statPage.85a628ec.chunk.js
  955 B                  build/static/css/editPage.2fabb9d5.chunk.css
  820 B                  build/static/css/main.d0183c63.css
  633 B (+34 B)          build/static/css/statPage.82d41fdf.chunk.css
分包后可见 main包为 26.3 KB,从 1.7 MB 压缩到了 26.3 KB
CSS拆分
Craco 会自动根据路由来拆分css,所以以上路由懒加载实现后,Craco 已经拆分出 editPage、statPage 的 css 文件,如下所示:
File sizes after gzip:

  343.21 kB (+18.63 kB)  build/static/js/vendors-chunk.7bb93744.js
  138.79 kB (+400 B)     build/static/js/antdchunk.44c16e36.js
  41.45 kB               build/static/js/reactDom-chunk.1439cf47.js
  9.59 kB (+554 B)       build/static/js/main.29ab4e1f.js
  3.88 kB (+10 B)        build/static/js/editPage.b9332f3b.chunk.js
  3.36 kB (+38 B)        build/static/js/766.9f144573.chunk.js
  2.44 kB (-7 B)         build/static/js/statPage.85a628ec.chunk.js
  955 B                  build/static/css/editPage.2fabb9d5.chunk.css
  820 B                  build/static/css/main.d0183c63.css
  633 B (+34 B)          build/static/css/statPage.82d41fdf.chunk.css
质量保障体系
代码提交流程图

Husky Git 配置
Husky Git Hooks 配置
.husky/pre-commit
#!/usr/bin/env sh
. "$(dirname -- "$0")/_/husky.sh"

npm run lint      # 运行ESLint检查代码质量
npm run format    # 运行Prettier格式化代码
npm run test      # 运行Jest测试
git add .         # 将格式化后的更改添加到暂存区
package.json
"scripts": {
  "analyze": "source-map-explorer 'build/static/js/*.js'",
  "start": "craco start",
  "build": "craco build",
  "test": "craco test --watchAll=false",
  "eject": "react-scripts eject",
  "lint": " eslint 'src/**/*.+(js|ts|jsx|tsx)' ",
  "format": " prettier --write 'src/**/*.+(js|ts|jsx|tsx)' ",
  "prepare": "husky install",
  "storybook": "storybook dev -p 6006",
  "build-storybook": "storybook build"
}
ESLint 配置 (eslint.config.mjs)
import globals from 'globals'
import pluginJs from '@eslint/js'
import tseslint from 'typescript-eslint'
import pluginReact from 'eslint-plugin-react'
import prettierPlugin from 'eslint-plugin-prettier'
import prettierConfig from 'eslint-config-prettier'

/** @type {import('eslint').Linter.Config[]} */
export default [
  { files: ['**/*.{js,mjs,cjs,ts,jsx,tsx}'] },
  { languageOptions: { globals: globals.browser } },
  pluginJs.configs.recommended,
  ...tseslint.configs.recommended,
  pluginReact.configs.flat.recommended,
  // 添加 Prettier 规则
  {
    plugins: { prettier: prettierPlugin },
    rules: {
      ...prettierConfig.rules, // 兼容 Prettier
      'prettier/prettier': 'warn', // 显示 Prettier 格式化建议
    },
  },
  // ts any爆红处理
  {
    rules: {
      '@typescript-eslint/no-explicit-any': 'off',
    },
  },
]
组件单元测试示例:
import React from 'react'
import { render, screen } from '@testing-library/react'
import Component from './Component'

test('默认属性', () => {
  render(<Component />) // 渲染属性
  const h = screen.getByText('一行标题')
  expect(h).toBeInTheDocument()
})

test('传入属性', () => {
  render(<Component text="两行标题" level={2} isCenter={true} />)
  const h = screen.getByText('两行标题')
  expect(h).toBeInTheDocument()
  expect(h.matches('h2')).toBeTruthy()
  const style = h.style
  expect(style.textAlign).toBe('center')
})
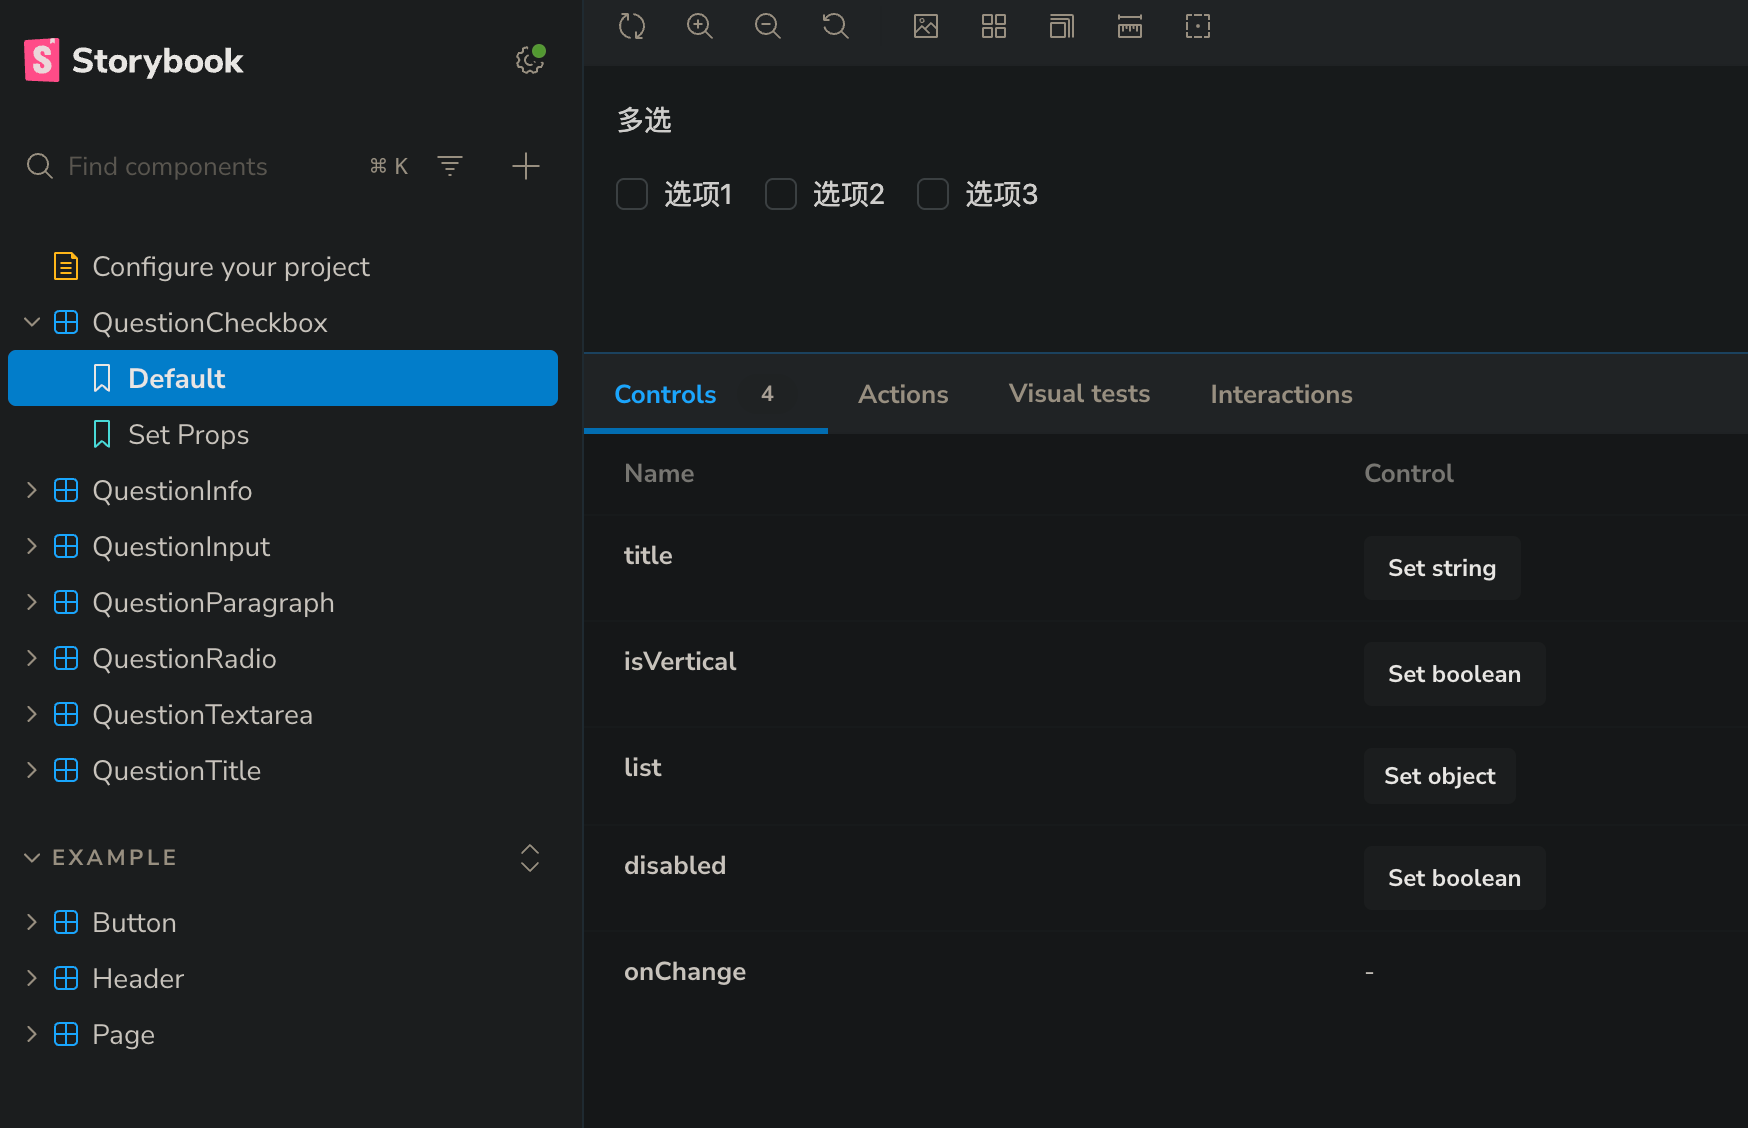
StoryBook 测试页面:
🚩 服务端:Nest
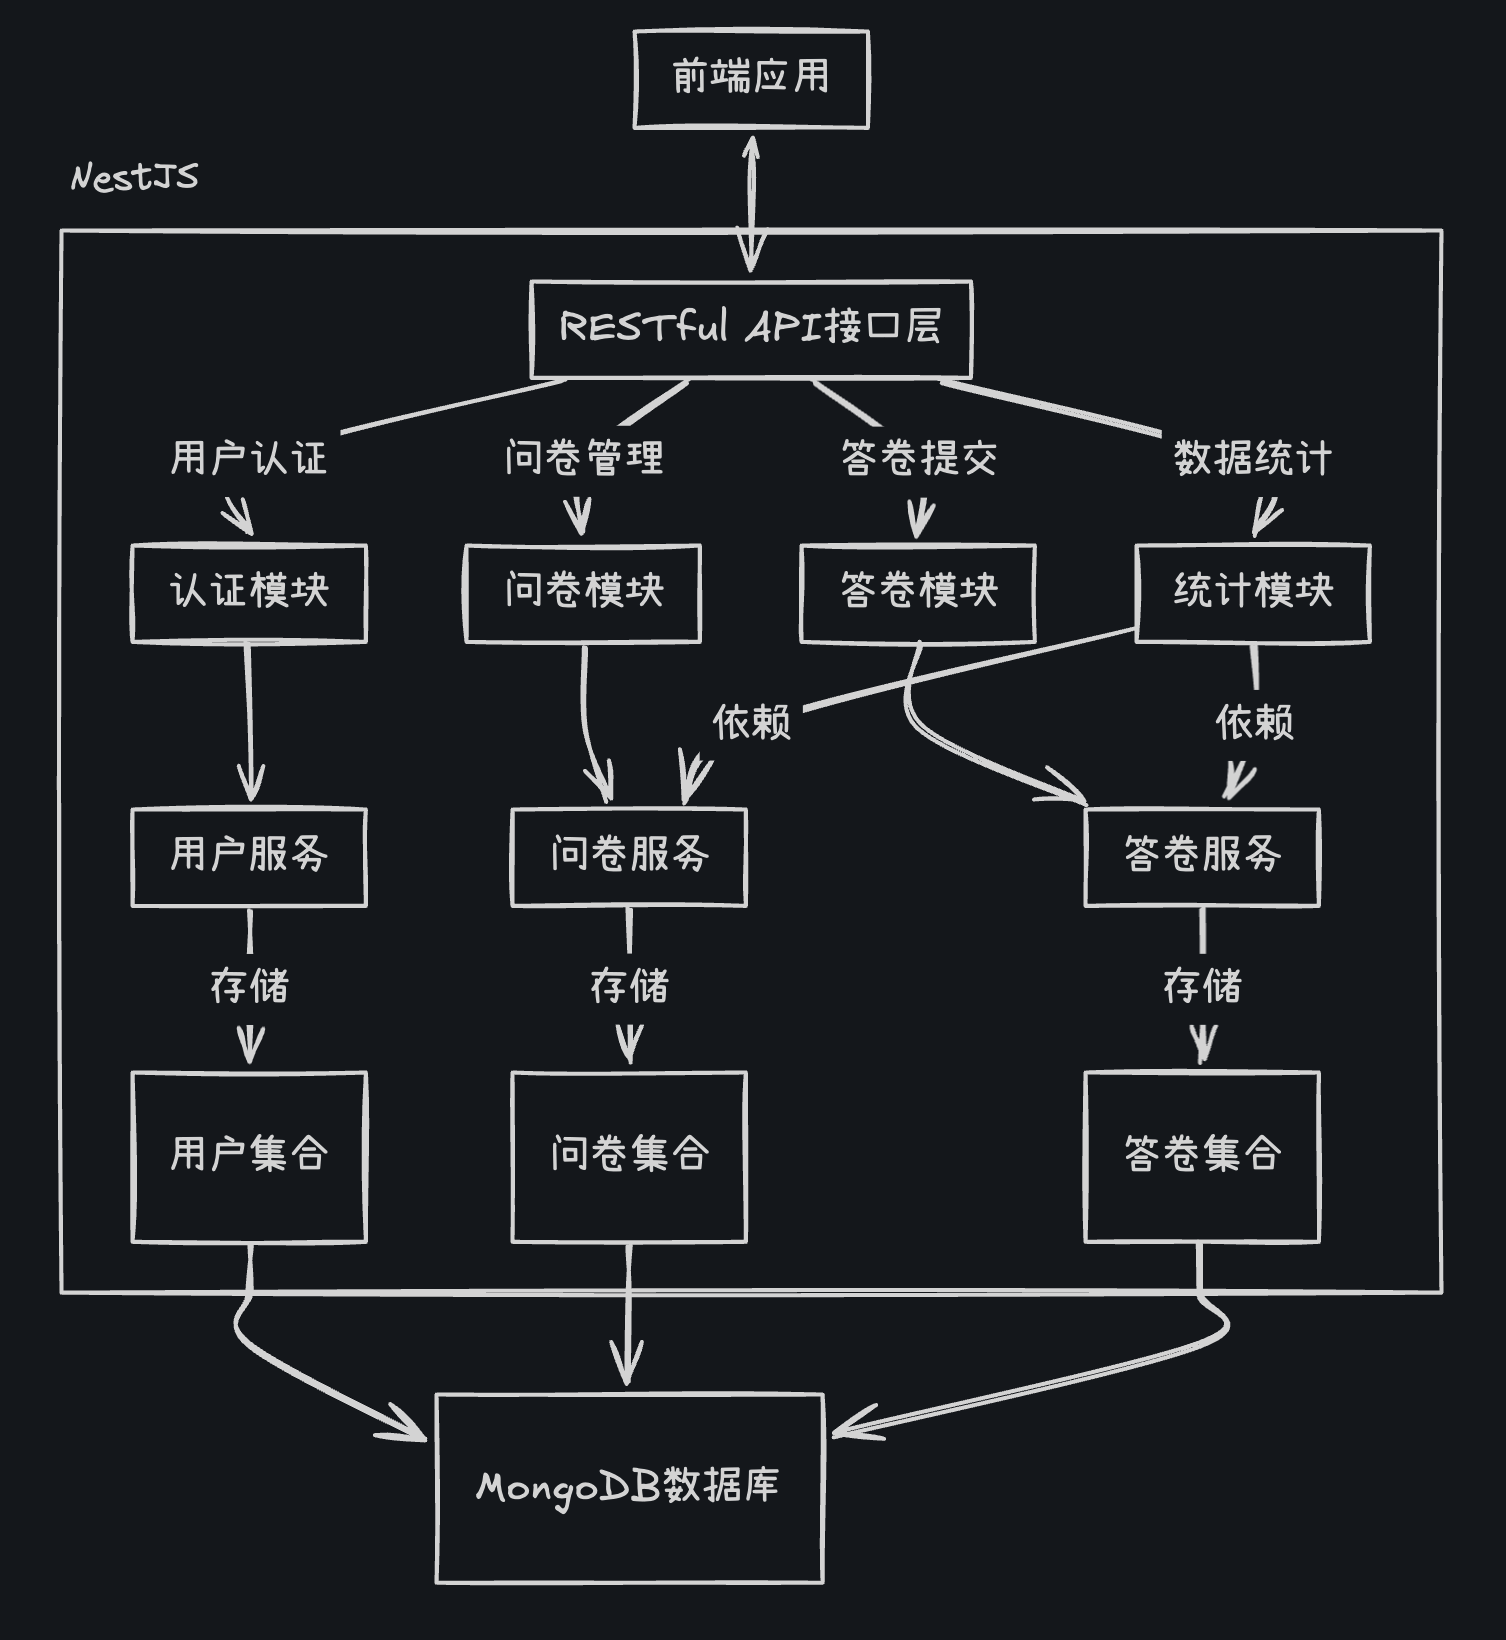
项目介绍
简介:
这是一个问卷调查系统后端,支持问卷的创建、编辑、发布、填写和数据统计分析。系统采用模块化设计,实现了用户认证、问卷管理、答卷收集和数据可视化等核心功能。
技术栈: NestJS、MongoDB
技术架构图:
业务流程图:
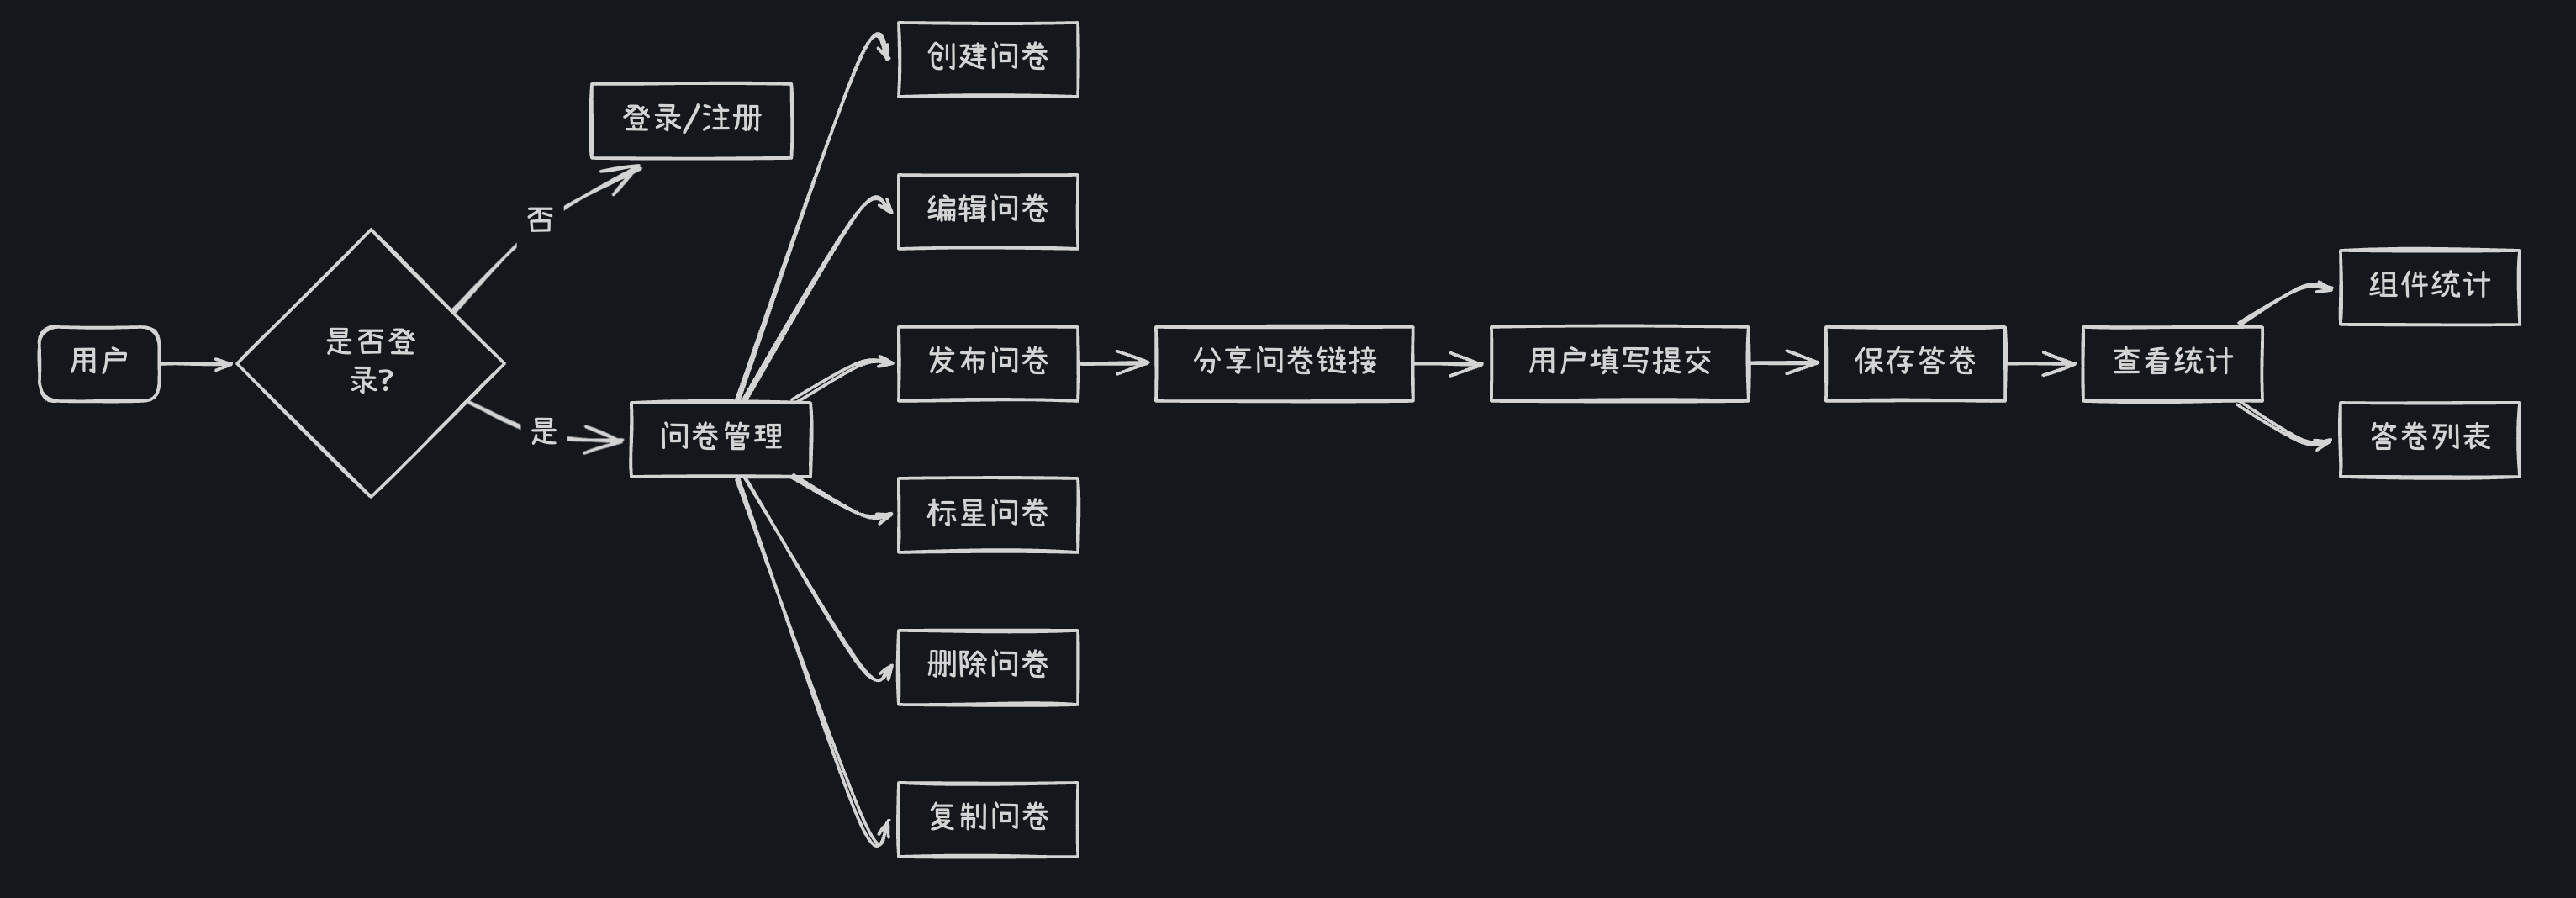
RESTful API 设计
RESTful API是一种以资源为核心的架构风格,在问卷系统中体现为:
资源驱动的URL设计:
GET /api/question           # 获取问卷列表
POST /api/question          # 创建问卷
PUT /api/question/:id       # 更新问卷
DELETE /api/question/:id    # 删除问卷
GET /api/stat/:questionId   # 获取问卷统计
...
以下是设计的部分 API 表格,涵盖了用户功能和问卷功能:
| 功能 | 方法 | 路径 | 请求体 | 响应 |
|---|---|---|---|---|
| 获取用户信息 | GET | /api/user/info | 无 | { errno: 0, data: {...} } 或 { errno: 10001, msg: 'xxx' } |
| 注册 | POST | /api/user/register | { username, password, nickname } | { errno: 0 } |
| 登录 | POST | /api/user/login | { username, password } | { errno: 0, data: { token } } — JWT 使用 token |
| 创建问卷 | POST | /api/question | 无 | { errno: 0, data: { id } } |
| 获取单个问卷 | GET | /api/question/:id | 无 | { errno: 0, data: { id, title ... } } |
| 获取问卷列表 | GET | /api/question | 无 | { errno: 0, data: { list: [ ... ], total } } |
| 更新问卷信息 | PATCH | /api/question/:id | { title, isStar ... } | { errno: 0 } |
| 批量彻底删除问卷 | DELETE | /api/question | { ids: [ ... ] } | { errno: 0 } |
| 复制问卷 | POST | /api/question/duplicate/:id | 无 | { errno: 0, data: { id } } |
Nest 数据处理流程图
Nest核心工作流程遵循请求生命周期:
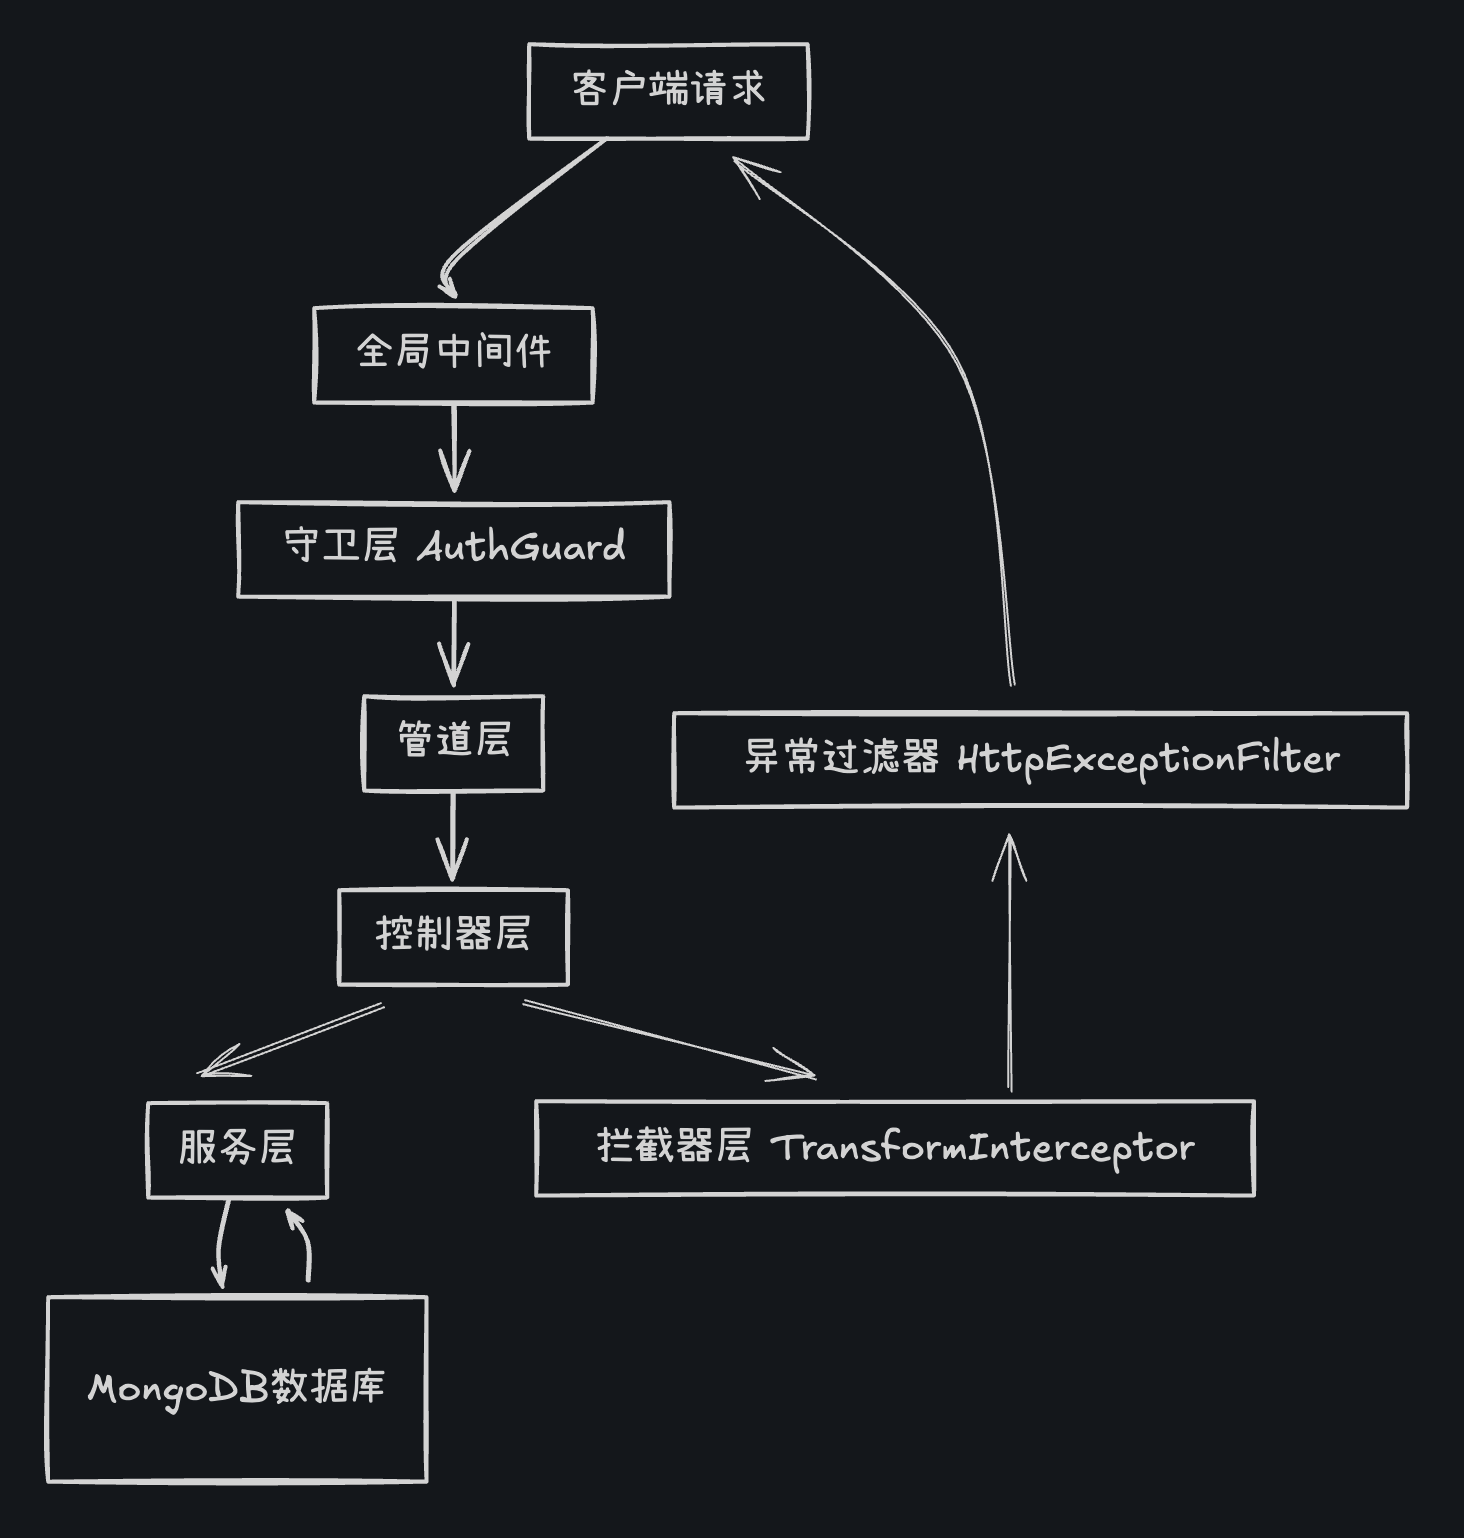
- 请求进入应用后,首先经过全局中间件处理
- 守卫层进行身份验证,决定请求是否可以继续
- 管道层负责数据验证和转换
- 控制器层接收请求并调用相应的处理方法
- 服务层实现业务逻辑并与数据库交互
- 拦截器在响应返回前进行处理和转换
- 异常过滤器捕获并处理整个过程中的异常
模块化设计
@Module({
  imports: [
    MongooseModule.forFeature([
      { name: Question.name, schema: QuestionSchema },
    ]),
  ],
  exports: [QuestionService],
  controllers: [QuestionController],
  providers: [QuestionService],
})
export class QuestionModule {}
依赖注入实现
// StatService依赖其他服务并通过构造函数注入
@Injectable()
export class StatService {
  constructor(
    private readonly questionService: QuestionService,
    private readonly answerService: AnswerService,
  ) {}

  // 服务方法...
}
控制器示例 (stat.controller.ts)
@Controller('stat')
export class StatController {
  constructor(private readonly statService: StatService) {}

  @Get(':questionId')
  async getQuestionStat(
    @Param('questionId') questionId: string,
    @Query('page') pageStr: string = '1',
    @Query('pageSize') pageSizeStr: string = '10',
  ) {
    const page = parseInt(pageStr) || 1;
    const pageSize = parseInt(pageSizeStr) || 10;
    return await this.statService.getQuestionStatListAndCount(questionId, {
      page,
      pageSize,
    });
  }
}
服务层示例 (answer.service.ts)
@Injectable()
export class AnswerService {
  constructor(@InjectModel(Answer.name) private readonly answerModel) {}

  async findAll(questionId: string, opt: { page: number; pageSize: number }) {
    if (!questionId) return [];
    const { page = 1, pageSize = 10 } = opt;
    return await this.answerModel
      .find({ questionId })
      .skip((page - 1) * pageSize)
      .limit(pageSize)
      .sort({ createdAt: -1 });
  }
}
🚩 C端:答卷展示
项目介绍
简介:
本项目是一个基于 Next.js 的答卷客户端,主要功能包括问卷的展示、提交和结果反馈。
技术栈: Next.js, React, TypeScript, SCSS
核心功能:
- 问卷展示与提交
- 问卷状态管理(已删除、未发布、错误处理)
- 提交结果反馈(成功/失败)
架构特点:
- 使用 Next.js 的 SSR 功能进行数据获取
- 组件化设计,易于扩展;‘组件采用HTML原生设计,具有更好的兼容性。
- 使用 TypeScript 进行类型检查
页面展示:
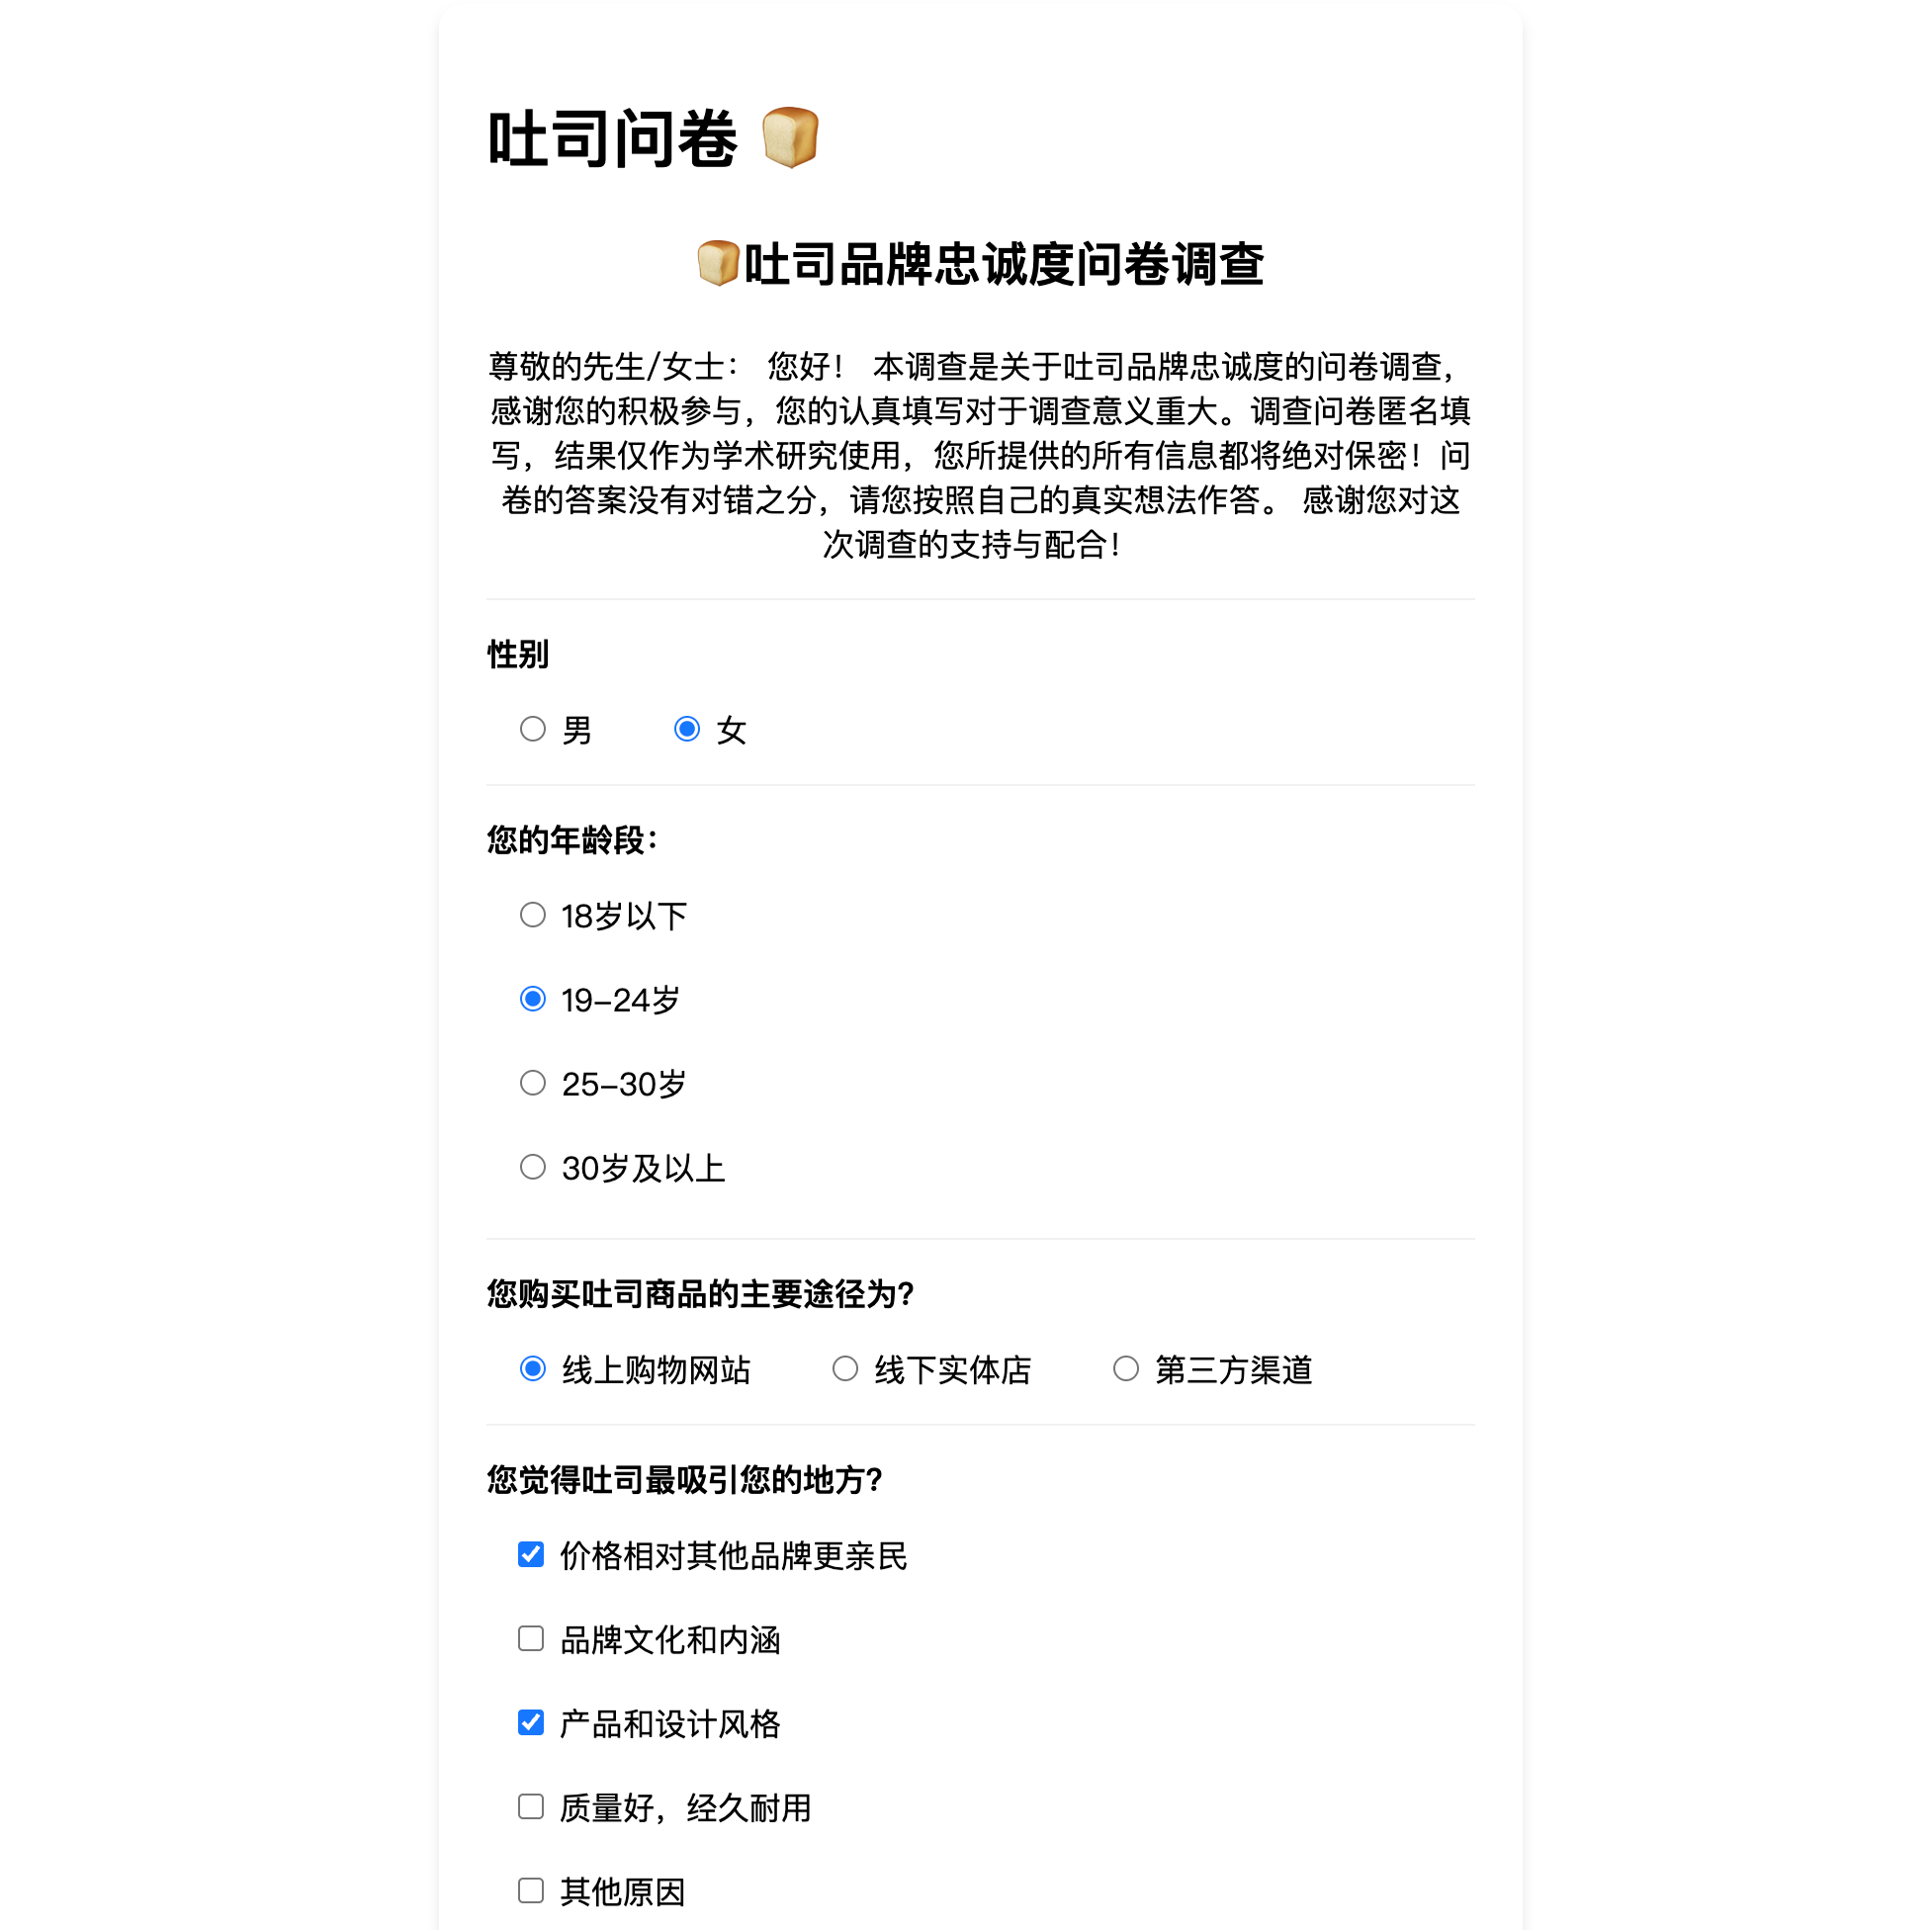
本地地址:http://localhost:3000/question/67d8ebdd17337c0a2ae07ed5
业务流程
业务流程:

SSR 渲染流程
SSR 渲染流程:

Code:
SSR 实现 ([id].tsx)
// ... 其他代码 ...

export async function getServerSideProps(context: any) {
  const { id = '' } = context.params
  const data = await getQuestionById(id)
  return {
    props: data
  }
}

export default function Page(props: PropsType) {
  const { errno, data, msg = '' } = props
  // ... 页面渲染逻辑 ...
}
性能分析:
- Lighthouse:Google 提供的开源工具,可以生成详细的性能报告,包括 FCP 指标。

非常感谢你能看到这里~~~ : )


 954
954

 被折叠的 条评论
为什么被折叠?
被折叠的 条评论
为什么被折叠?
 到【灌水乐园】发言


