


view的绘制基本概念
进入到activity的时候,会对布局xml的所有空间view、viewgroup进行绘制,绘制包括了view的大小即height、width确认,view的位置确认,view的颜色内容画板确认。
引申出view中三个重要函数onMeasure、onLayout、onDraw,字面意思很容易理解,onMeasure就是测量函数,onLayout就是确认布局位置,onDraw就是绘制函数
view绘制函数
我们来看下源码
onMeasure:
protected void onMeasure(int widthMeasureSpec, int heightMeasureSpec) {
        setMeasuredDimension(getDefaultSize(getSuggestedMinimumWidth(), widthMeasureSpec),
                getDefaultSize(getSuggestedMinimumHeight(), heightMeasureSpec));
    }
查看注释:
Measure the view and its content to determine the measured width and the measured height. This method is invoked by measure(int, int) and should be overridden by subclasses to provide accurate and efficient measurement of their contents.
CONTRACT: When overriding this method, you must call setMeasuredDimension(int, int) to store the measured width and height of this view. Failure to do so will trigger an IllegalStateException, thrown by measure(int, int). Calling the superclass’ onMeasure(int, int) is a valid use.
The base class implementation of measure defaults to the background size, unless a larger size is allowed by the MeasureSpec. Subclasses should override onMeasure(int, int) to provide better measurements of their content.
If this method is overridden, it is the subclass’s responsibility to make sure the measured height and width are at least the view’s minimum height and width (getSuggestedMinimumHeight() and getSuggestedMinimumWidth()).
简单翻译一下核心内容就是:此方法用来测量view,确定view的大小,该方法被Measure()调用,如果需要重写该方法,必须要调用setMeasuredDimension,这个方法是保存width和height属性的
参数含义:
widthMeasureSpec – 宽度属性,这个int属性我们打印出来的时候是不明所以的,需要将这个值转化为32位的二进制,前2位表示属性,后30位表示宽高的具体值。那么前两位表示的属性是什么意思呢?
view的宽高属性有三种,这边需要引申一个小常识,我们对子view设置大小的时候,如果父view设置了100dp,子view设置了120dp,最终会发现展示的效果就是子view也是100dp,用这个案例我们可以很简单的了解,子view设置大小其实会和父布局的设置大小有关,所以讲解下面的三个模式大家可能就会好理解,为什么测量模式要和父布局有关。下面的MODE_SHIFT=30,表示左移30位
1.UNSPECIFIED:未确定模式,一般用于复杂布局,比如scrollView、listView
public static final int UNSPECIFIED = 0 << MODE_SHIFT;
2.EXACTLY:精确模式,当我们设置了height和width为具体的像素值或者dp值的时候,会设置成这个属性
public static final int EXACTLY = 1 << MODE_SHIFT;
3.AT_MOST:最大模式,一般view设置了wrap_content
public static final int AT_MOST = 2 << MODE_SHIFT;
heightMeasureSpec – 同上,只不过是宽度变成了高度
听起来比较模糊,那么直接上几个例子吧
布局a:
<?xml version="1.0" encoding="utf-8"?>
<androidx.constraintlayout.widget.ConstraintLayout xmlns:android="http://schemas.android.com/apk/res/android"
    xmlns:app="http://schemas.android.com/apk/res-auto"
    xmlns:tools="http://schemas.android.com/tools"
    android:id="@+id/main"
    android:layout_width="match_parent"
    android:layout_height="match_parent"
    tools:context=".viewdraw.ViewDrawActivity">

    <com.example.myapplication.viewdraw.MyView
        android:layout_width="wrap_content"
        android:layout_height="wrap_content"
        app:layout_constraintTop_toTopOf="parent"
        app:layout_constraintStart_toStartOf="parent"/>

</androidx.constraintlayout.widget.ConstraintLayout>
结果a:父布局是match_parent,子view是wrap_content,那么测量模式是AT_MOST,即最大模式,就是MyView大小不固定,最大可以撑到父布局大小
———————————————这是一个分割线o( ̄︶ ̄)o———————————————
布局b:
<?xml version="1.0" encoding="utf-8"?>
<androidx.constraintlayout.widget.ConstraintLayout xmlns:android="http://schemas.android.com/apk/res/android"
    xmlns:app="http://schemas.android.com/apk/res-auto"
    xmlns:tools="http://schemas.android.com/tools"
    android:id="@+id/main"
    android:layout_width="100dp"
    android:layout_height="100dp"
    tools:context=".viewdraw.ViewDrawActivity">

    <com.example.myapplication.viewdraw.MyView
        android:layout_width="wrap_content"
        android:layout_height="wrap_content"
        app:layout_constraintTop_toTopOf="parent"
        app:layout_constraintStart_toStartOf="parent"/>

</androidx.constraintlayout.widget.ConstraintLayout>
结果b:父布局是100dp,子view是wrap_content,那么测量模式是AT_MOST,View的大小也是可以撑到父布局最大
———————————————这是一个分割线o( ̄︶ ̄)o———————————————
布局c:
<?xml version="1.0" encoding="utf-8"?>
<androidx.constraintlayout.widget.ConstraintLayout xmlns:android="http://schemas.android.com/apk/res/android"
    xmlns:app="http://schemas.android.com/apk/res-auto"
    xmlns:tools="http://schemas.android.com/tools"
    android:id="@+id/main"
    android:layout_width="100dp"
    android:layout_height="100dp"
    tools:context=".viewdraw.ViewDrawActivity">

    <com.example.myapplication.viewdraw.MyView
        android:layout_width="100dp"
        android:layout_height="100dp"
        app:layout_constraintTop_toTopOf="parent"
        app:layout_constraintStart_toStartOf="parent"/>

</androidx.constraintlayout.widget.ConstraintLayout>
结果c:父布局是100dp,子view是100dp,那么测量模式是EXACTLY精确模式
———————————————这是一个分割线o( ̄︶ ̄)o———————————————
布局d:
<?xml version="1.0" encoding="utf-8"?>
<androidx.constraintlayout.widget.ConstraintLayout xmlns:android="http://schemas.android.com/apk/res/android"
    xmlns:app="http://schemas.android.com/apk/res-auto"
    xmlns:tools="http://schemas.android.com/tools"
    android:id="@+id/main"
    android:layout_width="100dp"
    android:layout_height="100dp"
    tools:context=".viewdraw.ViewDrawActivity">

    <com.example.myapplication.viewdraw.MyView
        android:layout_width="wrap_content"
        android:layout_height="wrap_content"
        app:layout_constraintTop_toTopOf="parent"
        app:layout_constraintStart_toStartOf="parent"/>

</androidx.constraintlayout.widget.ConstraintLayout>
结果d:父布局是100dp,子view是wrap_content,那么测量模式是AT_MOST,即最大不会超过父布局
———————————————这是一个分割线o( ̄︶ ̄)o———————————————
布局e:
<?xml version="1.0" encoding="utf-8"?>
<androidx.constraintlayout.widget.ConstraintLayout xmlns:android="http://schemas.android.com/apk/res/android"
    xmlns:app="http://schemas.android.com/apk/res-auto"
    xmlns:tools="http://schemas.android.com/tools"
    android:id="@+id/main"
    android:layout_width="wrap_content"
    android:layout_height="wrap_content"
    tools:context=".viewdraw.ViewDrawActivity">

    <com.example.myapplication.viewdraw.MyView
        android:layout_width="wrap_content"
        android:layout_height="wrap_content"
        app:layout_constraintTop_toTopOf="parent"
        app:layout_constraintStart_toStartOf="parent"/>

</androidx.constraintlayout.widget.ConstraintLayout>
结果e:父布局是wrap_content,子view是wrap_content,那么测量模式是AT_MOST,即最大不会超过父布局
———————————————这是一个分割线o( ̄︶ ̄)o———————————————
布局f:
<?xml version="1.0" encoding="utf-8"?>
<androidx.constraintlayout.widget.ConstraintLayout xmlns:android="http://schemas.android.com/apk/res/android"
    xmlns:app="http://schemas.android.com/apk/res-auto"
    xmlns:tools="http://schemas.android.com/tools"
    android:id="@+id/main"
    android:layout_width="wrap_content"
    android:layout_height="wrap_content"
    tools:context=".viewdraw.ViewDrawActivity">

    <com.example.myapplication.viewdraw.MyView
        android:layout_width="match_parent"
        android:layout_height="match_parent"
        app:layout_constraintTop_toTopOf="parent"
        app:layout_constraintStart_toStartOf="parent"/>

</androidx.constraintlayout.widget.ConstraintLayout>
结果f:父布局是wrap_content,子view是match_parent,那么测量模式是AT_MOST,即最大不会超过父布局
———————————————这是一个分割线o( ̄︶ ̄)o———————————————
布局e:
<?xml version="1.0" encoding="utf-8"?>
<androidx.constraintlayout.widget.ConstraintLayout xmlns:android="http://schemas.android.com/apk/res/android"
    xmlns:app="http://schemas.android.com/apk/res-auto"
    xmlns:tools="http://schemas.android.com/tools"
    android:id="@+id/main"
    android:layout_width="wrap_content"
    android:layout_height="wrap_content"
    tools:context=".viewdraw.ViewDrawActivity">

    <com.example.myapplication.viewdraw.MyView
        android:layout_width="200dp"
        android:layout_height="200dp"
        app:layout_constraintTop_toTopOf="parent"
        app:layout_constraintStart_toStartOf="parent"/>

</androidx.constraintlayout.widget.ConstraintLayout>
结果e:父布局是wrap_content,子view是200dp,那么测量模式是EXACTLY
———————————————这是一个分割线o( ̄︶ ̄)o———————————————
下面还有各种各样的布局,就省略了,大概知道view的测量模式会和父布局有关就行了
onLayout:
protected void onLayout(boolean changed, int left, int top, int right, int bottom) {
    }
查阅注释:Called from layout when this view should assign a size and position to each of its children. Derived classes with children should override this method and call layout on each of their children.
翻译一下就是此方法被layout调用,当此视图应为其每个子视图指定大小和位置时,从布局调用。带有子类的派生类应重写此方法,并在每个子类上调用布局(什么意思呢,简单来说viewgroup就要重写此方法,然后layout一下所有的子view。
参数含义:
changed – This is a new size or position for this view
left – Left position, relative to parent
top – Top position, relative to parent
right – Right position, relative to parent
bottom – Bottom position, relative to parent
onDraw:
绘制函数,比较简单,在draw函数中调用,有需要的重写实现即可,一般android原生的子view比如textview、imageview都肯定要重写的
protected void onDraw(@NonNull Canvas canvas) {
}
绘制流程
大概知道了绘制函数是什么了,那么接下来就是要分析一下具体的调用逻辑了,进入activity是怎么调用的,哪个先调用,调用之后干啥了,怎么测量,怎么绘制的?
好,直接进入正题
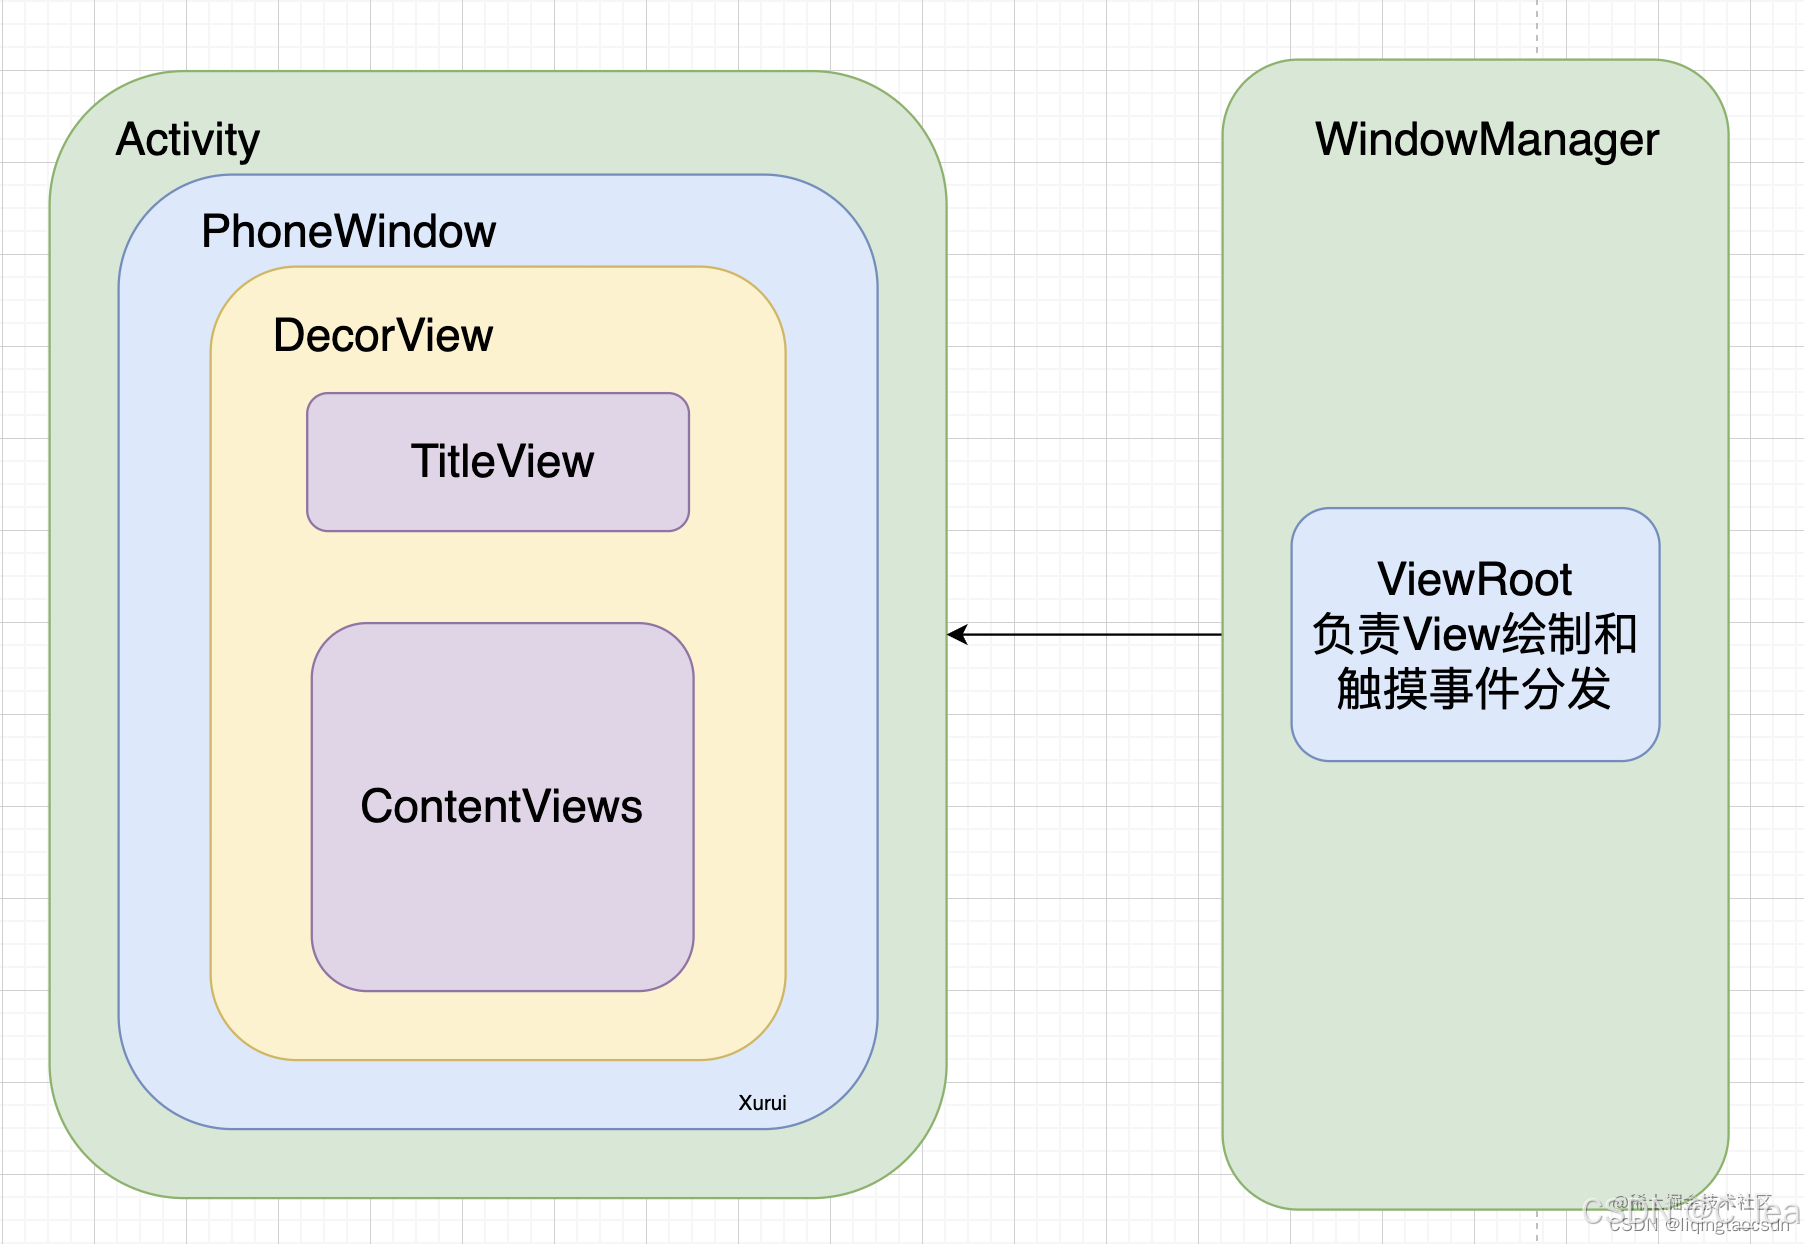
1.首先进入activity的各种什么生命周期这里就不做阐释了,涉及到ams逻辑很复杂,后续有空讲**(也可以查看下面的原文链接,里面讲解了activity、window等等等关系)**,我们直接讲viewRoot,ViewRoot作用非常重大。所有View绘制、触摸事件分发、界面刷新等都是通过它来执行或传递的。ViewRoot对应ViewRootImpl类,它是连接WindowManagerService和DecorView的纽带。
ViewRoot并不属于View树的一份子。从源码实现上来看,它既非View的子类,也非View的父类,但是,它实现了ViewParent接口,这让它可以作为View的名义上的父视图。RootView继承了Handler类,可以接收事件并分发,Android的所有触屏事件、按键事件、界面刷新等事件都是通过ViewRoot进行分发的。
原文链接:https://blog.youkuaiyun.com/liqingtaocsdn/article/details/129044937
下面一张图直接来表明activity、window、dector、content、viewRoot的关系
简单来说,创建了一个activity时,handleLaunchActivity()-> performLaunchActivity()-> activity.attach()
mWindow = new PhoneWindow(this, window, activityConfigCallback);
mWindow.setWindowControllerCallback(mWindowControllerCallback);
mWindow.setCallback(this); //设置回调,触发onCreate
在里面创建了phoneWindow
-> performLaunchActivity还会触发Activity.onCreate() ->setContentView()-> PhoneWindow.setContentView()->
public void setContentView(View view, ViewGroup.LayoutParams params) {
    if (mContentParent == null) {
        installDecor();                // 初始化DecorView和mContentParent.这个逻辑里实际上会将view作为dectoerView的子view,有兴趣的同学可以继续往下细看
    } else {
        mContentParent.removeAllViews();
    }
    mContentParent.addView(view, params);
    final Callback cb = getCallback();
    if (cb != null && !isDestroyed()) {
        cb.onContentChanged();
    }
}
-> handleResumeActivity()
final void handleResumeActivity(IBinder token, boolean clearHide, boolean isForward, boolean reallyResume) {
    ......
    ActivityClientRecord r = performResumeActivity(token, clearHide);          //会调用到Activity.onResume().

    if (r != null) {
        //...
        if (r.window == null && !a.mFinished && willBeVisible) {
            r.window = r.activity.getWindow();                 // 获得在attach()函数中创建出来的window对象。
            View decor = r.window.getDecorView();             // 获得一个View对象
            decor.setVisibility(View.INVISIBLE);
            ViewManager wm = a.getWindowManager();            // 获得ViewManager对象
            WindowManager.LayoutParams l = r.window.getAttributes();
            a.mDecor = decor;
            l.type = WindowManager.LayoutParams.TYPE_BASE_APPLICATION;
            l.softInputMode |= forwardBit;
            if (a.mVisibleFromClient) {
                a.mWindowAdded = true;
                wm.addView(decor, l);     // 重点!!!添加View对象到WindowManager中。
            }
        } else if (!willBeVisible) {
            //...
        }
       //...
}
-> WindowManager.addView() ->
public void addView(View view, ViewGroup.LayoutParams params,
    Display display, Window parentWindow) {
    ......
    ViewRootImpl root;
    View panelParentView = null;

    synchronized (mLock) {
        ......
        root = new ViewRootImpl(view.getContext(), display);    // 创建ViewRootImpl对象

        view.setLayoutParams(wparams);
        mViews.add(view);
        mRoots.add(root);
        mParams.add(wparams);
    }
    try {
        root.setView(view, wparams, panelParentView); //重点!!最终  ViewRootImpl 的setView实际上是decorView
    } catch (RuntimeException e) {
              ......
    }
}
大概流程知道了吧,最终window层级设置的根布局就是decorView
———————————————这是一个分割线o( ̄︶ ̄)o———————————————
ViewRootImpl中有一个方法就是performTraversals(),这个方法很重要,最终会走view的测量、布局、绘制,调用链:ViewRootImpl.setView()->requestLayout()->scheduleTraversals()->mTraversalRunnable->doTraversal()-> performTraversals()
private void performTraversals() {
	int childWidthMeasureSpec = getRootMeasureSpec(desiredWindowWidth, lp.width);
	int childHeightMeasureSpec = getRootMeasureSpec(desiredWindowWidth, lp.height);
	//...
	performMeasure(childWidthMeasureSpec, childHeightMeasureSpec);
	//..
	performLayout(lp, mWidth, mHeight);
	//...
	performDraw();
}
查看getRootMeasureSpec代码,我们可以看到会对viewGroup的布局模式设置测量模式,由于这个window是根布局窗口,所以不需要根据父布局来确定测量模式(因为也没有父布局),注意一下啊,这个根布局并不是我们设置的xml的根布局,且此大小不会变,永远等于屏幕大小
private int getRootMeasureSpec(int windowSize, int rootDimension) {
    int measureSpec;
    switch (rootDimension) {
    case ViewGroup.LayoutParams.MATCH_PARENT:
        // Window can't resize. Force root view to be windowSize.
        measureSpec = MeasureSpec.makeMeasureSpec(windowSize, MeasureSpec.EXACTLY);
        break;
    case ViewGroup.LayoutParams.WRAP_CONTENT:
        // Window can resize. Set max size for root view.
        measureSpec = MeasureSpec.makeMeasureSpec(windowSize, MeasureSpec.AT_MOST);
        break;
    default:
        // Window wants to be an exact size. Force root view to be that size.
        measureSpec = MeasureSpec.makeMeasureSpec(rootDimension, MeasureSpec.EXACTLY);
        break;
    }
    return measureSpec;
}
查看performMeasure源码
    private void performMeasure(int childWidthMeasureSpec, int childHeightMeasureSpec) {
        if (mView == null) {
            return;
        }
        Trace.traceBegin(Trace.TRACE_TAG_VIEW, "measure");
        try {
            mView.measure(childWidthMeasureSpec, childHeightMeasureSpec);
        } finally {
            Trace.traceEnd(Trace.TRACE_TAG_VIEW);
        }
    }
可以看到最终调用了mView.measure,这个mView是哪个了?是decorView还是我们设置的xml的根布局呢?上文我们描述了activity启动的时候,最终会走到ViewRootImpl.setView,查看源码ViewRootImpl.setView,就会发现mView就是传进来的decorView
public void setView(View view, WindowManager.LayoutParams attrs, View panelParentView) {
        synchronized (this) {
            if (mView == null) {
                mView = view;
                //...

            }
            //...
    }
    //...
 }
2.View.measure()
既然知道了会走viewgoup的measure了,那我们来看下源码,performMeasure传递widthMeasureSpec和heightMeasureSpec,我们可以看到measure会姜参数传递给onMeasure,且measure是终类,说明不能重写
public final void measure(int widthMeasureSpec, int heightMeasureSpec) {
        boolean optical = isLayoutModeOptical(this);
        if (optical != isLayoutModeOptical(mParent)) {
            //...
        }

       //...

        if (forceLayout || needsLayout) {
            // ...
            int cacheIndex = forceLayout ? -1 : mMeasureCache.indexOfKey(key);
            if (cacheIndex < 0 || sIgnoreMeasureCache) {
                if (isTraversalTracingEnabled()) {
                    Trace.beginSection(mTracingStrings.onMeasure);
                }
                //重点,会调用onMeasure(widthMeasureSpec, heightMeasureSpec)
                onMeasure(widthMeasureSpec, heightMeasureSpec);
                if (isTraversalTracingEnabled()) {
                    Trace.endSection();
                }
                mPrivateFlags3 &= ~PFLAG3_MEASURE_NEEDED_BEFORE_LAYOUT;
            } else {
                //...
            }

            //...
        }
        //...
    }
查看View.onMeasure()
protected void onMeasure(int widthMeasureSpec, int heightMeasureSpec) {
        setMeasuredDimension(getDefaultSize(getSuggestedMinimumWidth(), widthMeasureSpec),
                getDefaultSize(getSuggestedMinimumHeight(), heightMeasureSpec));
    }

protected final void setMeasuredDimension(int measuredWidth, int measuredHeight) {
        boolean optical = isLayoutModeOptical(this);
        if (optical != isLayoutModeOptical(mParent)) {
            Insets insets = getOpticalInsets();
            int opticalWidth  = insets.left + insets.right;
            int opticalHeight = insets.top  + insets.bottom;

            measuredWidth  += optical ? opticalWidth  : -opticalWidth;
            measuredHeight += optical ? opticalHeight : -opticalHeight;
        }
        setMeasuredDimensionRaw(measuredWidth, measuredHeight);
    }
private void setMeasuredDimensionRaw(int measuredWidth, int measuredHeight) {
        mMeasuredWidth = measuredWidth;
        mMeasuredHeight = measuredHeight;

        mPrivateFlags |= PFLAG_MEASURED_DIMENSION_SET;
    }
可以看到,最后会将mMeasuredWidth和mMeasuredHeight设置完毕,我们平常使用的view.getMeasuredWidth()返回的值就是在这里赋值的。当然具体布局或者view具体分析,一般情况下会对onMeasure的时候,对子view进行measure。
3.View.Layout()
上述view measure完成后,继续走下一步逻辑performLayout(lp, mWidth, mHeight)->
host.layout(0, 0, host.getMeasuredWidth(), host.getMeasuredHeight()) -> onLayout
可以看到默认的根布局decorView是从左上角开始布局的,占满了全屏
public void layout(int l, int t, int r, int b) {
     //...

    int oldL = mLeft;
    int oldT = mTop;
    int oldB = mBottom;
    int oldR = mRight;
    boolean changed = setFrame(l, t, r, b);
    if (changed || (mPrivateFlags & LAYOUT_REQUIRED) == LAYOUT_REQUIRED) {
        if (ViewDebug.TRACE_HIERARCHY) {
            ViewDebug.trace(this, ViewDebug.HierarchyTraceType.ON_LAYOUT);
        }
        onLayout(changed, l, t, r, b);   //重点onLayout
        mPrivateFlags &= ~LAYOUT_REQUIRED;
        if (mOnLayoutChangeListeners != null) {
            ArrayList<OnLayoutChangeListener> listenersCopy =
                    (ArrayList<OnLayoutChangeListener>) mOnLayoutChangeListeners.clone();
            int numListeners = listenersCopy.size();
            for (int i = 0; i < numListeners; ++i) {
                listenersCopy.get(i).onLayoutChange(this, l, t, r, b, oldL, oldT, oldR, oldB);
            }
        }
    }
    mPrivateFlags &= ~FORCE_LAYOUT;
}
view的原码中onLayout是一个空实现,需要具体问题具体分析,可以看其他viewgroup比如FrameLayout中查看onLayout是怎么走的,一般情况下viewgroup的onLayout会对子view循环进行layout布局
4.View.Draw()
performDraw-> draw-> onDraw,具体不过多阐述了,这个比较简单
———————————————这是一个分割线o( ̄︶ ̄)o———————————————
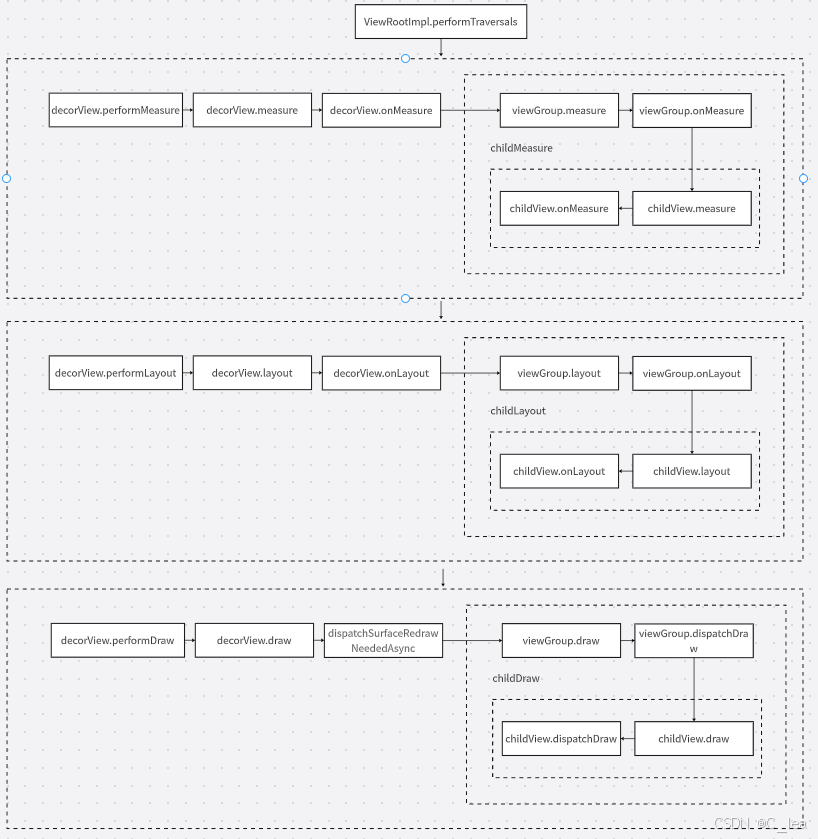
整体的view绘制流程的图如下:
5.一些api的官方建议
measure():该方法不可重写!!,且没必要重写!!
layout():该方法官方不建议重写,如果有子view的,需要重写onLayout,然后依次调用子view的layout
draw():不建议重写,如果需要重写,要加上父类实现否则会报错,即
override fun draw(canvas: Canvas) {
        super.draw(canvas)
        //todo your code
}
onMeasure():重写的时候,一定加上setMeasuredDimension(),保存一下宽高值
源码阅读——FrameLayout为例
为什么选择这个阅读呢?很简单,个人能力有限,菜鸡一个
protected void onMeasure(int widthMeasureSpec, int heightMeasureSpec) {
        int count = getChildCount();
        //获取测量模式,true表示FrameLayout的宽高都是固定的
        final boolean measureMatchParentChildren =
                MeasureSpec.getMode(widthMeasureSpec) != MeasureSpec.EXACTLY ||
                MeasureSpec.getMode(heightMeasureSpec) != MeasureSpec.EXACTLY;
        mMatchParentChildren.clear();

        int maxHeight = 0;
        int maxWidth = 0;
        int childState = 0;

        for (int i = 0; i < count; i++) {
            final View child = getChildAt(i);
            //mMeasureAllChildren一般都是false,可以xml中设置true暂时不知道什么意思
            if (mMeasureAllChildren || child.getVisibility() != GONE) {
            	//根据当前的测量模式,对子view进行测量
                measureChildWithMargins(child, widthMeasureSpec, 0, heightMeasureSpec, 0);
                final LayoutParams lp = (LayoutParams) child.getLayoutParams();
                //获取FrameLayout的最大和最高宽度
                maxWidth = Math.max(maxWidth,
                        child.getMeasuredWidth() + lp.leftMargin + lp.rightMargin);
                maxHeight = Math.max(maxHeight,
                        child.getMeasuredHeight() + lp.topMargin + lp.bottomMargin);
                childState = combineMeasuredStates(childState, child.getMeasuredState());
                if (measureMatchParentChildren) {
                    //如果子view中有宽高属性有设置了match_parent
                    if (lp.width == LayoutParams.MATCH_PARENT ||
                            lp.height == LayoutParams.MATCH_PARENT) {
                        mMatchParentChildren.add(child);
                    }
                }
            }
        }

        // Account for padding too
        maxWidth += getPaddingLeftWithForeground() + getPaddingRightWithForeground();
        maxHeight += getPaddingTopWithForeground() + getPaddingBottomWithForeground();

        // Check against our minimum height and width
        maxHeight = Math.max(maxHeight, getSuggestedMinimumHeight());
        maxWidth = Math.max(maxWidth, getSuggestedMinimumWidth());

        // 获取FrameLayout设置的前置背景
        final Drawable drawable = getForeground();
        if (drawable != null) {
            maxHeight = Math.max(maxHeight, drawable.getMinimumHeight());
            maxWidth = Math.max(maxWidth, drawable.getMinimumWidth());
        }
        //保存宽高值
        setMeasuredDimension(resolveSizeAndState(maxWidth, widthMeasureSpec, childState),
                resolveSizeAndState(maxHeight, heightMeasureSpec,
                        childState << MEASURED_HEIGHT_STATE_SHIFT));

        count = mMatchParentChildren.size();
        //有子view的宽高属性之一设置了match_parent
        if (count > 1) {
            for (int i = 0; i < count; i++) {
                final View child = mMatchParentChildren.get(i);
                final MarginLayoutParams lp = (MarginLayoutParams) child.getLayoutParams();

                final int childWidthMeasureSpec;
                if (lp.width == LayoutParams.MATCH_PARENT) {
                    final int width = Math.max(0, getMeasuredWidth()
                            - getPaddingLeftWithForeground() - getPaddingRightWithForeground()
                            - lp.leftMargin - lp.rightMargin);
                    //对子view重新设置spec值,精确模式,宽是width,这个传递的值就是FrameLayout的width了
                    childWidthMeasureSpec = MeasureSpec.makeMeasureSpec(
                            width, MeasureSpec.EXACTLY);
                } else {
                    //设置了dp值或者设置了wrap_content,讲Frameleyout的测量模式传进去,然后getChildMeasureSpec中和子view的宽度做case比较(match、wrap、dp),最终得到子view的测量模式
                    childWidthMeasureSpec = getChildMeasureSpec(widthMeasureSpec,
                            getPaddingLeftWithForeground() + getPaddingRightWithForeground() +
                            lp.leftMargin + lp.rightMargin,
                            lp.width);
                }

                //和上面一样的逻辑,只是宽改成了高
                final int childHeightMeasureSpec;
                if (lp.height == LayoutParams.MATCH_PARENT) {
                    final int height = Math.max(0, getMeasuredHeight()
                            - getPaddingTopWithForeground() - getPaddingBottomWithForeground()
                            - lp.topMargin - lp.bottomMargin);
                    childHeightMeasureSpec = MeasureSpec.makeMeasureSpec(
                            height, MeasureSpec.EXACTLY);
                } else {
                    childHeightMeasureSpec = getChildMeasureSpec(heightMeasureSpec,
                            getPaddingTopWithForeground() + getPaddingBottomWithForeground() +
                            lp.topMargin + lp.bottomMargin,
                            lp.height);
                }

                //对设置了match_parent的子view计算到了MeasureSpec,重新测量
                child.measure(childWidthMeasureSpec, childHeightMeasureSpec);
            }
        }
    }

//getChildMeasureSpec的原码和上述讲的一些demo例子是一样的,逻辑很好理解
public static int getChildMeasureSpec(int spec, int padding, int childDimension) {
        int specMode = MeasureSpec.getMode(spec);
        int specSize = MeasureSpec.getSize(spec);

        int size = Math.max(0, specSize - padding);

        int resultSize = 0;
        int resultMode = 0;

        switch (specMode) {
        // Parent has imposed an exact size on us
        case MeasureSpec.EXACTLY:
            if (childDimension >= 0) {
                resultSize = childDimension;
                resultMode = MeasureSpec.EXACTLY;
            } else if (childDimension == LayoutParams.MATCH_PARENT) {
                // Child wants to be our size. So be it.
                resultSize = size;
                resultMode = MeasureSpec.EXACTLY;
            } else if (childDimension == LayoutParams.WRAP_CONTENT) {
                // Child wants to determine its own size. It can't be
                // bigger than us.
                resultSize = size;
                resultMode = MeasureSpec.AT_MOST;
            }
            break;

        // Parent has imposed a maximum size on us
        case MeasureSpec.AT_MOST:
            if (childDimension >= 0) {
                // Child wants a specific size... so be it
                resultSize = childDimension;
                resultMode = MeasureSpec.EXACTLY;
            } else if (childDimension == LayoutParams.MATCH_PARENT) {
                // Child wants to be our size, but our size is not fixed.
                // Constrain child to not be bigger than us.
                resultSize = size;
                resultMode = MeasureSpec.AT_MOST;
            } else if (childDimension == LayoutParams.WRAP_CONTENT) {
                // Child wants to determine its own size. It can't be
                // bigger than us.
                resultSize = size;
                resultMode = MeasureSpec.AT_MOST;
            }
            break;

        // Parent asked to see how big we want to be
        case MeasureSpec.UNSPECIFIED:
            if (childDimension >= 0) {
                // Child wants a specific size... let them have it
                resultSize = childDimension;
                resultMode = MeasureSpec.EXACTLY;
            } else if (childDimension == LayoutParams.MATCH_PARENT) {
                // Child wants to be our size... find out how big it should
                // be
                resultSize = View.sUseZeroUnspecifiedMeasureSpec ? 0 : size;
                resultMode = MeasureSpec.UNSPECIFIED;
            } else if (childDimension == LayoutParams.WRAP_CONTENT) {
                // Child wants to determine its own size.... find out how
                // big it should be
                resultSize = View.sUseZeroUnspecifiedMeasureSpec ? 0 : size;
                resultMode = MeasureSpec.UNSPECIFIED;
            }
            break;
        }
        //noinspection ResourceType
        return MeasureSpec.makeMeasureSpec(resultSize, resultMode);
    }
整体逻辑也不复杂,就是FrameLayout获取传递过来的MeasureSpec,将自己的模式和子view的宽高模式做计算,最终再重新给子view测量
实战操练
写一个流式布局的demo,一直添加view,如果view的宽度超过了一行,那么就在下一行布局,代码比较简单
package com.example.myapplication.viewdraw

import android.content.Context
import android.util.AttributeSet
import android.view.ViewGroup

class FlowLayout@JvmOverloads constructor(
    context: Context,
    attrs: AttributeSet? = null,
    defStyleAttr: Int = 0,
): ViewGroup(context,attrs,defStyleAttr) {

    val mHeight = 200


    override fun onMeasure(widthMeasureSpec: Int, heightMeasureSpec: Int) {
        val count = childCount
        for (i in 0 until count){
            val childView = getChildAt(i)
            val lp = childView.layoutParams
            if (lp.width >= 0) {
                val childWidthMeasureSpec = MeasureSpec.makeMeasureSpec(lp.width,MeasureSpec.EXACTLY)
                val childHeightMeasureSpec = MeasureSpec.makeMeasureSpec(mHeight,MeasureSpec.EXACTLY)   //默认高度
                childView.measure(childWidthMeasureSpec,childHeightMeasureSpec)
            } else if (lp.width == LayoutParams.MATCH_PARENT){
                val childWidthMeasureSpec = MeasureSpec.makeMeasureSpec(this.measuredWidth,MeasureSpec.EXACTLY)
                val childHeightMeasureSpec = MeasureSpec.makeMeasureSpec(mHeight,MeasureSpec.EXACTLY)   //默认高度
                childView.measure(childWidthMeasureSpec,childHeightMeasureSpec)
            } else if (lp.width == LayoutParams.WRAP_CONTENT) {
                val childWidthMeasureSpec = MeasureSpec.makeMeasureSpec(this.measuredWidth,MeasureSpec.AT_MOST)
                val childHeightMeasureSpec = MeasureSpec.makeMeasureSpec(mHeight,MeasureSpec.EXACTLY)   //默认高度
                childView.measure(childWidthMeasureSpec,childHeightMeasureSpec)
            }
        }
        setMeasuredDimension(
            getDefaultSize(suggestedMinimumWidth, widthMeasureSpec),
            getDefaultSize(suggestedMinimumHeight, heightMeasureSpec)
        )
    }

    //l,r,t,b实际上能确定view的大小、和位置,坐标不是相对屏幕的原点,而且相对于他的父布局来说的
    override fun onLayout(changed: Boolean, l: Int, t: Int, r: Int, b: Int) {
        val count = childCount
        var usedWidth = 0
        var usedHeight = mHeight+paddingTop
        for (i in 0 until count){
            val childView = getChildAt(i)
            val lp = childView.layoutParams
            val addedWidth = usedWidth + lp.width
            if (addedWidth > this.measuredWidth) {   //加完之后超了
                //换行
                usedWidth = 0
                childView.layout(usedWidth,usedHeight,lp.width,usedHeight+mHeight)
                usedHeight += mHeight
                usedWidth += lp.width
            } else {      //加完之后没超一行
                childView.layout(usedWidth,usedHeight - mHeight,usedWidth+lp.width,usedHeight)
                usedWidth += lp.width
            }
        }
    }
}
布局文件
<?xml version="1.0" encoding="utf-8"?>
<com.example.myapplication.viewdraw.FlowLayout xmlns:android="http://schemas.android.com/apk/res/android"
    xmlns:tools="http://schemas.android.com/tools"
    android:id="@+id/main"
    android:layout_width="match_parent"
    android:layout_height="match_parent"
    tools:context=".viewdraw.ViewDrawActivity"
    android:background="@color/black">

    <com.example.myapplication.viewdraw.MyView
        android:layout_width="100dp"
        android:layout_height="wrap_content" />
    <com.example.myapplication.viewdraw.MyView
        android:layout_width="300dp"
        android:layout_height="wrap_content" />
    <com.example.myapplication.viewdraw.MyView
        android:layout_width="200dp"
        android:layout_height="wrap_content" />
    <com.example.myapplication.viewdraw.MyView
        android:layout_width="200dp"
        android:layout_height="wrap_content" />
    <com.example.myapplication.viewdraw.MyView
        android:layout_width="150dp"
        android:layout_height="wrap_content" />
    <com.example.myapplication.viewdraw.MyView
        android:layout_width="220dp"
        android:layout_height="wrap_content" />
    <com.example.myapplication.viewdraw.MyView
        android:layout_width="120dp"
        android:layout_height="wrap_content" />
    <com.example.myapplication.viewdraw.MyView
        android:layout_width="60dp"
        android:layout_height="wrap_content" />


</com.example.myapplication.viewdraw.FlowLayout>
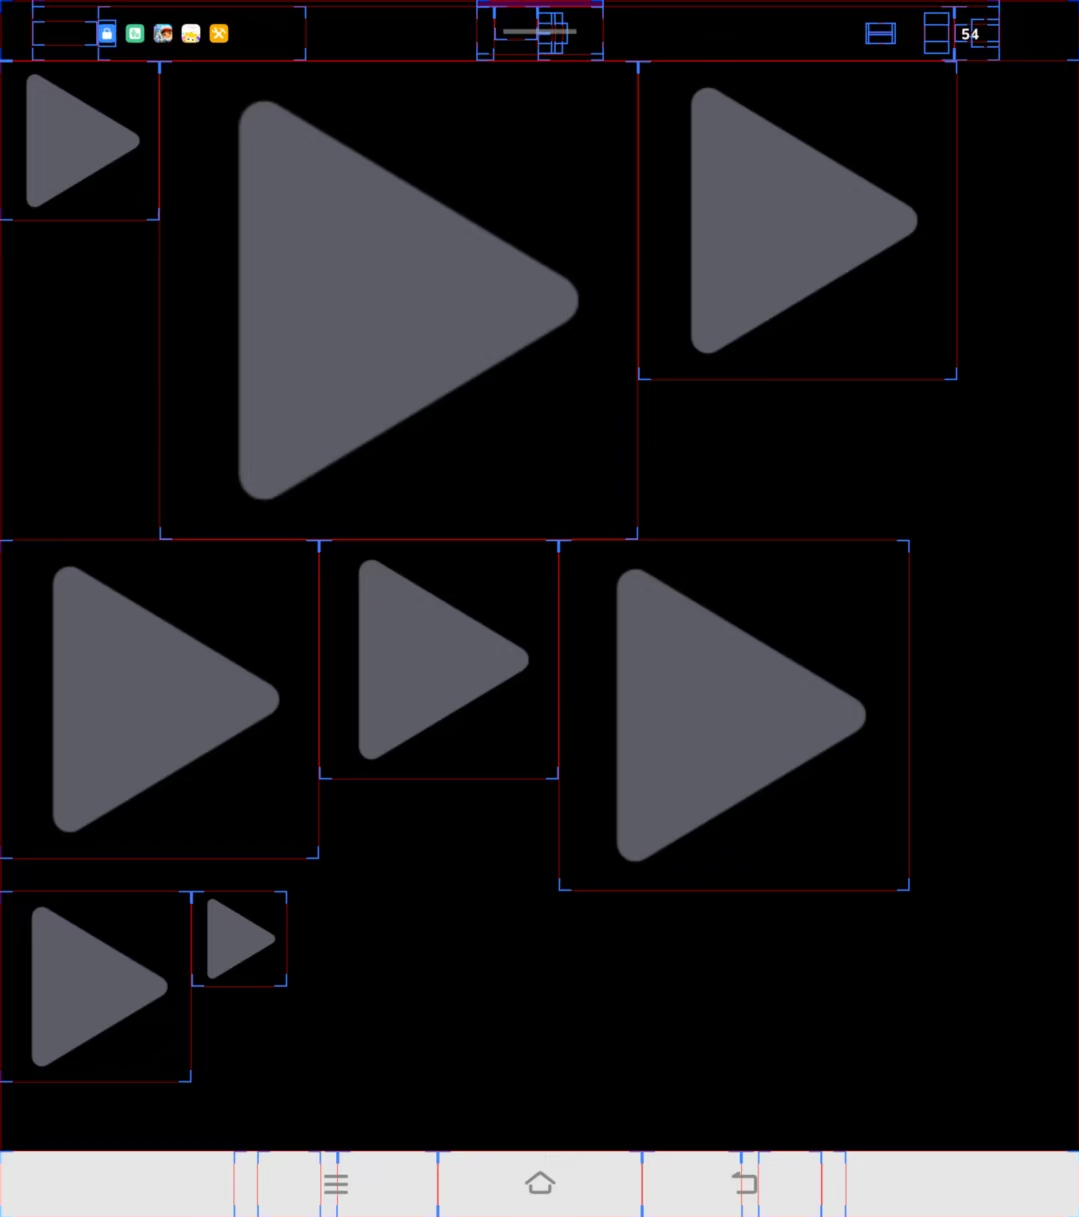
结果:

上述的高度写死了300dp只是方便理解学习,如果兼容了高度、margin、padding又会很复杂,比如下面进阶的一段代码,就是见兼容了精确高度的
class FlowLayout@JvmOverloads constructor(
    context: Context,
    attrs: AttributeSet? = null,
    defStyleAttr: Int = 0,
): ViewGroup(context,attrs,defStyleAttr) {

    var currentLineMaxHeight = 0

    override fun onMeasure(widthMeasureSpec: Int, heightMeasureSpec: Int) {
        val count = childCount
        //设置自己布局大小
        setMeasuredDimension(
            getDefaultSize(suggestedMinimumWidth, widthMeasureSpec),
            getDefaultSize(suggestedMinimumHeight, heightMeasureSpec)
        )
        for (i in 0 until count){
            val childView = getChildAt(i)
            val lp = childView.layoutParams

            if (lp.width >= 0) {
                if (lp.height >= 0) {
                    val childWidthMeasureSpec = MeasureSpec.makeMeasureSpec(lp.width,MeasureSpec.EXACTLY)
                    val childHeightMeasureSpec = MeasureSpec.makeMeasureSpec(lp.height,MeasureSpec.EXACTLY)
                    childView.measure(childWidthMeasureSpec,childHeightMeasureSpec)
                } else if (lp.height == LayoutParams.MATCH_PARENT) {
                    val childWidthMeasureSpec = MeasureSpec.makeMeasureSpec(lp.width,MeasureSpec.EXACTLY)
                    val childHeightMeasureSpec = MeasureSpec.makeMeasureSpec(this.measuredHeight,MeasureSpec.EXACTLY)
                    childView.measure(childWidthMeasureSpec,childHeightMeasureSpec)
                } else if (lp.height == LayoutParams.WRAP_CONTENT) {
                    val childWidthMeasureSpec = MeasureSpec.makeMeasureSpec(lp.width,MeasureSpec.EXACTLY)
                    val childHeightMeasureSpec = MeasureSpec.makeMeasureSpec(this.measuredHeight,MeasureSpec.AT_MOST)   //默认高度
                    childView.measure(childWidthMeasureSpec,childHeightMeasureSpec)
                }
            } else if (lp.width == LayoutParams.MATCH_PARENT){
                if (lp.height >= 0) {
                    val childWidthMeasureSpec = MeasureSpec.makeMeasureSpec(this.measuredWidth,MeasureSpec.EXACTLY)
                    val childHeightMeasureSpec = MeasureSpec.makeMeasureSpec(lp.height,MeasureSpec.EXACTLY)
                    childView.measure(childWidthMeasureSpec,childHeightMeasureSpec)
                } else if (lp.height == LayoutParams.MATCH_PARENT) {
                    val childWidthMeasureSpec = MeasureSpec.makeMeasureSpec(this.measuredWidth,MeasureSpec.EXACTLY)
                    val childHeightMeasureSpec = MeasureSpec.makeMeasureSpec(this.measuredHeight,MeasureSpec.EXACTLY)
                    childView.measure(childWidthMeasureSpec,childHeightMeasureSpec)
                } else if (lp.height == LayoutParams.WRAP_CONTENT) {
                    val childWidthMeasureSpec = MeasureSpec.makeMeasureSpec(this.measuredWidth,MeasureSpec.EXACTLY)
                    val childHeightMeasureSpec = MeasureSpec.makeMeasureSpec(this.measuredHeight,MeasureSpec.AT_MOST)
                    childView.measure(childWidthMeasureSpec,childHeightMeasureSpec)
                }
            } else if (lp.width == LayoutParams.WRAP_CONTENT) {
                if (lp.height >= 0) {
                    val childWidthMeasureSpec = MeasureSpec.makeMeasureSpec(this.measuredWidth,MeasureSpec.AT_MOST)
                    val childHeightMeasureSpec = MeasureSpec.makeMeasureSpec(lp.height,MeasureSpec.EXACTLY)
                    childView.measure(childWidthMeasureSpec,childHeightMeasureSpec)
                } else if (lp.height == LayoutParams.MATCH_PARENT) {
                    val childWidthMeasureSpec = MeasureSpec.makeMeasureSpec(this.measuredWidth,MeasureSpec.AT_MOST)
                    val childHeightMeasureSpec = MeasureSpec.makeMeasureSpec(this.measuredHeight,MeasureSpec.EXACTLY)
                    childView.measure(childWidthMeasureSpec,childHeightMeasureSpec)
                } else if (lp.height == LayoutParams.WRAP_CONTENT) {
                    val childWidthMeasureSpec = MeasureSpec.makeMeasureSpec(this.measuredWidth,MeasureSpec.AT_MOST)
                    val childHeightMeasureSpec = MeasureSpec.makeMeasureSpec(this.measuredHeight,MeasureSpec.AT_MOST)
                    childView.measure(childWidthMeasureSpec,childHeightMeasureSpec)
                }
            }
        }
    }

    //l,r,t,b实际上能确定view的大小、和位置,坐标不是相对屏幕的原点,而且相对于他的父布局来说的
    override fun onLayout(changed: Boolean, l: Int, t: Int, r: Int, b: Int) {
        val count = childCount
        var usedWidth = 0
        var usedHeight = currentLineMaxHeight+paddingTop
        for (i in 0 until count){
            /**
             * this.measuredWidth一定要用这个属性,不能用lp.height,因为this.measuredWidth包含了wrap_content和match_parent情况下的尺寸
             */
            val childView = getChildAt(i)
            val lp = childView.layoutParams
            val addedWidth = usedWidth + lp.width
            if (addedWidth > this.measuredWidth) {   //加完之后超了
                //换行
                usedWidth = 0
                usedHeight += currentLineMaxHeight
                childView.layout(usedWidth,usedHeight,lp.width,usedHeight+childView.measuredHeight)
                usedWidth += lp.width
                currentLineMaxHeight = childView.measuredHeight
            } else {      //加完之后没超一行
                childView.layout(usedWidth,usedHeight,usedWidth+lp.width,childView.measuredHeight+usedHeight)
                if (childView.measuredHeight >= currentLineMaxHeight) {
                    currentLineMaxHeight = childView.measuredHeight
                }
                usedWidth += lp.width
            }
        }
    }
}
布局文件是:
<?xml version="1.0" encoding="utf-8"?>
<com.example.myapplication.viewdraw.FlowLayout xmlns:android="http://schemas.android.com/apk/res/android"
    xmlns:tools="http://schemas.android.com/tools"
    android:id="@+id/main"
    android:layout_width="match_parent"
    android:layout_height="match_parent"
    tools:context=".viewdraw.ViewDrawActivity"
    android:background="@color/black">

    <com.example.myapplication.viewdraw.MyView
        android:layout_width="100dp"
        android:layout_height="100dp" />
    <com.example.myapplication.viewdraw.MyView
        android:layout_width="300dp"
        android:layout_height="300dp" />
    <com.example.myapplication.viewdraw.MyView
        android:layout_width="200dp"
        android:layout_height="200dp" />
    <com.example.myapplication.viewdraw.MyView
        android:layout_width="200dp"
        android:layout_height="200dp" />
    <com.example.myapplication.viewdraw.MyView
        android:layout_width="150dp"
        android:layout_height="150dp" />
    <com.example.myapplication.viewdraw.MyView
        android:layout_width="220dp"
        android:layout_height="220dp" />
    <com.example.myapplication.viewdraw.MyView
        android:layout_width="120dp"
        android:layout_height="120dp" />
    <com.example.myapplication.viewdraw.MyView
        android:layout_width="60dp"
        android:layout_height="60dp" />


</com.example.myapplication.viewdraw.FlowLayout>
我们可以自定义高度了,结果如下:


 3076
3076

 被折叠的 条评论
为什么被折叠?
被折叠的 条评论
为什么被折叠?
 到【灌水乐园】发言


