


 探讨了在Activity设置noactionbar主题及状态栏半透明后,Fragment中fitSystemWindow属性在二次添加Fragment时失效的问题。分析了fitsSystemWindows的工作原理,深入源码解释原因,并提供了解决方案,涉及ViewRootImpl、WindowInsets对象、ViewGroup和View的dispatchApplyWindowInsets等关键概念。
最近在学习fragment的时候碰到了一个问题,activity设置noactionbar主题、设置状态栏半透明之后,add fragment第二次即以后的fragment,xml里设置的fitSystemWindow属性无效。写了这篇,希望能帮助到大家。
首先学习一下fitsSystemWindows的工作原理:
(基于SDK27源码)(解决方法在最后,不想看原理的直接skip吧2333333)
先大概讲一下,然后分析一下源码。fitsSystemWindows属性是为了实现全屏,即内容占满整个屏幕、包括状态栏那块区域,同时使状态栏那块区域变成padding,让背景进行填充,让真正的内容在状态栏下方,以达到一种美观。我们就是要控制哪个View应该设置这个padding
大概的说,从ViewRootImpl开始,传递一个WindowInsets对象,这个对象包含了状态栏区域的一个Rect(实际比这个复杂),传递给祖宗ViewGroup,如果ViewGroup自身不消费这个WindowInset,那么会继续传递给子View/ViewGroup,直到有View消耗或者根本没有View消耗。整一个过程是深度优先的。
从源码角度看一下: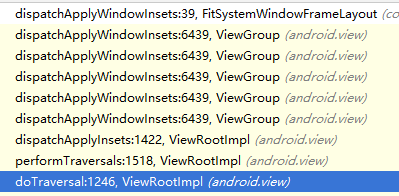
这是调用堆栈,在doTraversal里调用直接performTraversals,在performTraversals里调用ViewRootImpl自身的dispatchApplyInsets(View host) 。函数如下:
    void dispatchApplyInsets(View host) {
        host.dispatchApplyWindowInsets(getWindowInsets(true /* forceConstruct */));
    }
通过getWindowInset函数获取一个WindowInset对象,然后传递给host。getWindowInset函数暂时没看懂,现在看来返回的就是包含状态栏大小Rect的WindowInset。同时从堆栈信息获得,host即DecorView,而DecorView是一个ViewGroup,再看一下ViewGroup的dispatchApplyWindowInsets:
    public WindowInsets dispatchApplyWindowInsets(WindowInsets insets) {
        insets = super.dispatchApplyWindowInsets(insets);
        if (!insets.isConsumed()) {
            final int count = getChildCount();
            for (int i = 0; i < count; i++) {
                insets = getChildAt(i).dispatchApplyWindowInsets(insets);
                if (insets.isConsumed()) {
                    break;
                }
            }
        }
        return insets;
    }
insets = super.dispatchApplyWindowInsets(insets);调用View#dispatchApplyWindowInsets(WindowInsets),得到结果WindowInsets,如果该ViewGroup自身没有消费,那么挨个询问子View,如果一旦有某个子View消费,立即退出。
再看下View#dispatchApplyWindowInsets:
    public WindowInsets dispatchApplyWindowInsets(WindowInsets insets) {
        try {
            mPrivateFlags3 |= PFLAG3_APPLYING_INSETS;
            if (mListenerInfo != null && mListenerInfo.mOnApplyWindowInsetsListener != null) {
                return mListenerInfo.mOnApplyWindowInsetsListener.onApplyWindowInsets(this, insets);
            } else {
                return onApplyWindowInsets(insets);
            }
        } finally {
            mPrivateFlags3 &= ~PFLAG3_APPLYING_INSETS;
        }
    }
将PFLAG3_APPLYING_INSETS置位,这个FLAG在后面判断会用到。然后优先外部的lisetner回调,若无则调用VIew#onApplyWindowInsets(WindowInsets),跟进看一下:
    public WindowInsets onApplyWindowInsets(WindowInsets insets) {
        if ((mPrivateFlags3 & PFLAG3_FITTING_SYSTEM_WINDOWS) == 0) {
            // We weren't called from within a direct call to fitSystemWindows,
            // call into it as a fallback in case we're in a class that overrides it
            // and has logic to perform.
            if (fitSystemWindows(insets.getSystemWindowInsets())) {
                return insets.consumeSystemWindowInsets();
            }
        } else {
            // We were called from within a direct call to fitSystemWindows.
            if (fitSystemWindowsInt(insets.getSystemWindowInsets())) {
                return insets.consumeSystemWindowInsets();
            }
        }
        return insets;
    }
第一次进入这个函数时,flag上的PFLAG3_FITTING_SYSTEM_WINDOWS为0,调用fitSystemWindows(WindowInsets):
    protected boolean fitSystemWindows(Rect insets) {
        if ((mPrivateFlags3 & PFLAG3_APPLYING_INSETS) == 0) {
            if (insets == null) {
                // Null insets by definition have already been consumed.
                // This call cannot apply insets since there are none to apply,
                // so return false.
                return false;
            }
            // If we're not in the process of dispatching the newer apply insets call,
            // that means we're not in the compatibility path. Dispatch into the newer
            // apply insets path and take things from there.
            try {
                mPrivateFlags3 |= PFLAG3_FITTING_SYSTEM_WINDOWS;
                return dispatchApplyWindowInsets(new WindowInsets(insets)).isConsumed();
            } finally {
                mPrivateFlags3 &= ~PFLAG3_FITTING_SYSTEM_WINDOWS;
            }
        } else {
            // We're being called from the newer apply insets path.
            // Perform the standard fallback behavior.
            return fitSystemWindowsInt(insets);
        }
    }
上面已经置位了PFLAG3_APPLYING_INSETS,那么直接调用View#fitSystemWIndowsInt(WindowInsets),这个函数即最关键的是否消费WindowsInsets,返回true为消费,false为不消费。看一下View#fitSystemWIndowsInt(WindowInsets):
    private boolean fitSystemWindowsInt(Rect insets) {
        if ((mViewFlags & FITS_SYSTEM_WINDOWS) == FITS_SYSTEM_WINDOWS) {
            mUserPaddingStart = UNDEFINED_PADDING;
            mUserPaddingEnd = UNDEFINED_PADDING;
            Rect localInsets = sThreadLocal.get();
            if (localInsets == null) {
                localInsets = new Rect();
                sThreadLocal.set(localInsets);
            }
            boolean res = computeFitSystemWindows(insets, localInsets);
            mUserPaddingLeftInitial = localInsets.left;
            mUserPaddingRightInitial = localInsets.right;
            internalSetPadding(localInsets.left, localInsets.top,
                    localInsets.right, localInsets.bottom);
            return res;
        }
        return false;
    }
首先判断FITS_SYSTEM_WINDOWS属性是否为true,是的话要进行padding设置,这里computerFitSystemWindows(Rect, Rect)是用于交换insets, localInsets这两个变量,并将insets置空,在internalSetPadding()函数中最终设置padding并且requestLayout()。
不过padding的变量太多,实在搞不懂,而且top也不知道是多少、在哪里被赋值......
到了这里,在ViewGroup#dispatchApplyWindowInsets(WindowInsets)中调用的super.dispatchApplyWindowInsets(WindowInsets)算分析完毕了,然后就是一个for循环询问每个子View,是否要消费,一旦消费立即退出,最终返回剩下的WindowInsets,一般来说,consumed之后WindowInsets中的Rect即为空。
    public WindowInsets dispatchApplyWindowInsets(WindowInsets insets) {
        insets = super.dispatchApplyWindowInsets(insets);
        if (!insets.isConsumed()) {
            final int count = getChildCount();
            for (int i = 0; i < count; i++) {
                insets = getChildAt(i).dispatchApplyWindowInsets(insets);
                if (insets.isConsumed()) {
                    break;
                }
            }
        }
        return insets;
    }
那么为什么会出现多次add fragment,第二次开始的fragment,fitSystemWindow会失效呢?
我从Layout Inspector中得出,add fragment相当于把onCreateView返回的View,添加到调用FragmenetManager#add(int, Fragment, String)指定容器中,在这里可以理解为调用ViewGroup#addView(),那么ViewGroup#dispatchApplyWindowInsets在分发WindowInsets时,第一个fragment的View就消费掉了,第二个fragment即之后的都不会有机会去消费WindowInsets。所以我们可以自定义一个容器,重写他的ViewGroup#dispatchApplyWindowInsets,使得每个子View都可以消费WindowInsets。
我自己在学习中用的是一个FrameLayout做容器,所以这里继承了FrameLayout:
public class FitSystemWindowFrameLayout extends FrameLayout {

    ...

    @TargetApi(Build.VERSION_CODES.LOLLIPOP)
    @Override
    public WindowInsets dispatchApplyWindowInsets(WindowInsets insets) {
        WindowInsets result = super.dispatchApplyWindowInsets(insets);
        if (!insets.isConsumed()) {
            final int count = getChildCount();
            for (int i = 0; i < count; i++)
                result = getChildAt(i).dispatchApplyWindowInsets(insets);
        }
        return result;
    }

    @Override
    public void addView(View child, int index, ViewGroup.LayoutParams params) {
        super.addView(child, index, params);
        ViewCompat.requestApplyInsets(child);
    }

}
将自身的WindowInsets发给每一个子View,而不是前一个子View使用之后的(可以与ViewGroup#dispatchApplyWindowInsets比较,看一下差异),同时重写了addView,这是因为我们知道add fragment可以理解为addView,但是addView并不会引起WindowInsets的重新分发,因此需要通过ViewCompat.requestApplyInsets(child)引起WindowInsets的重新分发,调用dispatchApplyWindowInsets,就可以为新添加的View分发WindowInsets了。
看一下效果:
如有错误,请指出。


 1391
1391

 被折叠的 条评论
为什么被折叠?
被折叠的 条评论
为什么被折叠?
 到【灌水乐园】发言


