


 本文介绍了如何在WPF应用程序中使用图标创建按钮,并详细解释了样式和模板的应用。通过阴影和位移动画实现了按钮的按下效果。
原文链接:http://www.codeproject.com/KB/WPF/WPF-IconButton.aspx
介绍
我看到了许多使用Expression Blend创建十分漂亮的按钮(Button)的演示视频,但是却没有找到一个是详细讲解如何从一幅图片创建按钮的.这篇文章试图填补这一空白.IconButtonStyle留出按钮的内容由用户决定,并给按钮加上了阴影和用户按下时的陷入动画效果.
背景
样式(Style)是XAML用来定义一组可重用的相同属性的方法.通常样式都定义在XAML中的Apps.Resources 或 Window.Resources 部分中.
更深的讨论可以参考选自MSDN Magazine 的文章Customizing Controls For Windows Presentation Foundation.
使用代码
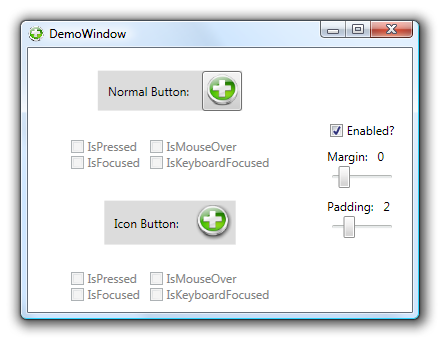
附件中的样例项目由一些练习和对比普通按钮和图标按钮的控件组成的单窗口程序.如果你想在自己的项目中使用图标按钮,与其相关的样式和资源都集中在App.xaml的Resources部分,在那里你同样会找到由Expression Blen 2生成的xaml源码.
只需将App.xaml中的IconButtonStyle部分拷贝到自己的程序的Resources中,并将T你的按钮的Style属性设置为 "{DynamicResource IconButtonStyle}"即可.尽管这个样式最初是为图片设计的,但是按钮的内容可以是任何XAML元素.
<Button Style="{DynamicResource IconButtonStyle}">
    <Image Source="/WpfIconButton;component/Icons/Symbol-Add.png" />
</Button>
要点
样式的基本结构如下:
<Style x:Key="IconButtonStyle" TargetType="{x:Type Button}">
<!-- set default values -->
<!-- set the visual tree of the control -->
<Setter Property="Template">
<Setter.Value>
<ControlTemplate TargetType="{x:Type Button}">
<!-- here come the actual sub-controls -->
<ControlTemplate.Triggers>
<!-- the triggers define the reactions to various state
changes -->
最神奇的交互逻辑发生在triggers中,它修改"translation"的渲染变换合"shadow"的位图效果来产生"按下"的效果.如下是ControlTemplate的部分内容:
<ContentPresenter ... >
    <ContentPresenter.BitmapEffect>
        <!-- give the content a bit of shadow -->
        <DropShadowBitmapEffect x:Name="shadow"
            ShadowDepth="2"
            Softness="0.3"
            Opacity="0.7"/>
    </ContentPresenter.BitmapEffect>
    <ContentPresenter.RenderTransform>
        <!-- push the content a bit to the left and the top -->
        <TranslateTransform x:Name="translation"
            X="-1" Y="-1"/>
    </ContentPresenter.RenderTransform>
</ContentPresenter>
<ControlTemplate.Triggers>
    <Trigger Property="IsPressed" Value="True">
        <Trigger.EnterActions>
            <BeginStoryboard> <Storyboard>
                <DoubleAnimation
                    Duration="0:0:0"
                    To="0"
                    Storyboard.TargetName="shadow"
                    Storyboard.TargetProperty="(DropShadowBitmapEffect.ShadowDepth)"/>
                <DoubleAnimation
                    Duration="0:0:0"
                    To="0"
                    Storyboard.TargetName="translation"
                    Storyboard.TargetProperty="(TranslateTransform.X)"/>
                <DoubleAnimation
                    Duration="0:0:0"
                    To="0"
                    Storyboard.TargetName="translation"
                    Storyboard.TargetProperty="(TranslateTransform.Y)"/>
            </Storyboard> </BeginStoryboard>
        </Trigger.EnterActions>
        <Trigger.ExitActions>
            <BeginStoryboard> <Storyboard>
                <!-- The ExitActions StoryBoard reverses the made changes -->
            </Storyboard> </BeginStoryboard>
        </Trigger.ExitActions>
    </Trigger>
</ControlTemplate.Triggers>


 779
779

 被折叠的 条评论
为什么被折叠?
被折叠的 条评论
为什么被折叠?
 到【灌水乐园】发言


