


前言
作为一个热衷于数据结构化和 AI 应用的开发者,我深知,数据的真正价值在于可查询性、可推理性和可可视化性。我们每天接触的大部分信息,都以非结构化的文本形式存在——PDF、文章、传记。如何让LLM高效地理解这些信息背后的复杂联系?
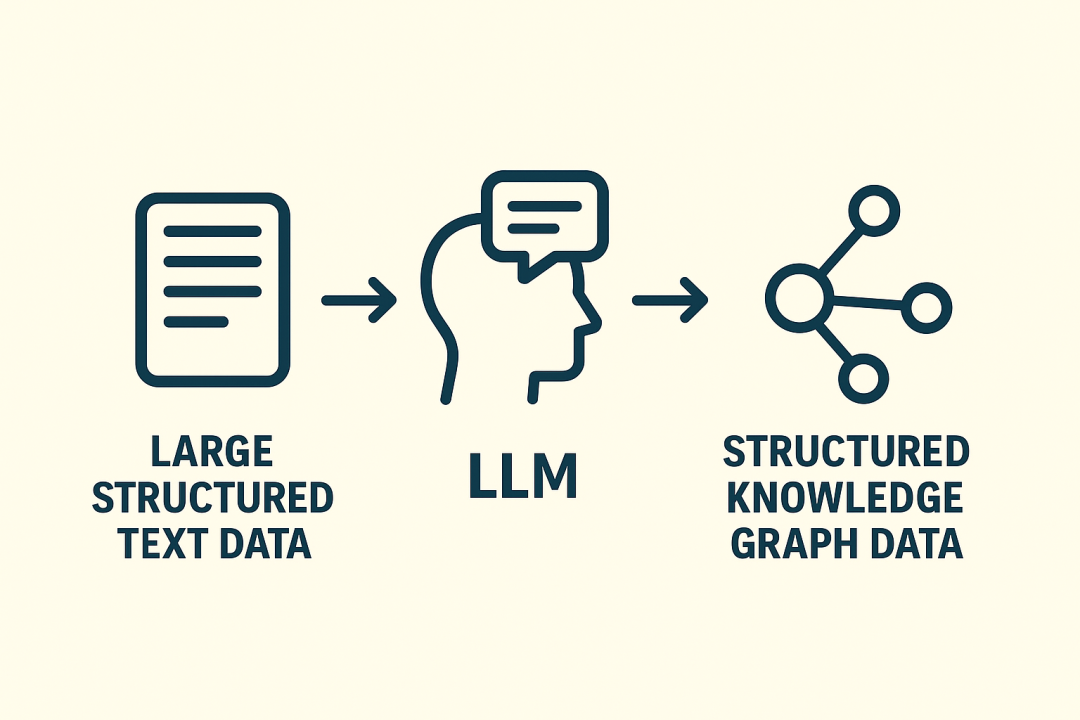
今天,我就为大家深度剖析一个我最近完成的初级知识图谱构建项目:《从非结构化文本到交互式知识图谱的流水线构建》(KG-Pipeline)。这个项目展示了如何利用大型语言模型(LLMs)的强大能力,将一段普通的传记文本,转化为一个可以交互、可以分析的知识网络,项目十分基础,适合python初级、中级开发者,以及各类尝试使用LLM进行AI应用开发的技术人员。
项目总览:知识图谱的“炼金术”
本项目旨在提供一个高度细化、循序渐进的流程,利用LLM将原始、非结构化的文本转换为结构化、交互式的知识图谱(Knowledge Graph, KG)。
KG-pipeline Framework
我将一步步揭示数据在整个流程中的演变过程,争取让所有对自然语言处理(NLP)、知识图谱和 LLMs 感兴趣的初级到中级 Python 用户都能有所收获,不在意代码的简介,更注重项目落地实现及代码可读性。
1. 核心理论:理解知识图谱的语言
一个知识图谱,本质上是用网络来表达信息的结构化数据库。它由以下两个基本要素构成:
-
节点(Nodes / Entities)
:代表现实世界的概念、人、地点等。在我们的图谱中,每个独特的主语或宾语都将成为一个节点。
-
边(Edges / Relationships)
:表示实体之间的关系或互动。它们具有方向和描述关系的标签。
知识图谱的基础,是 SPO 三元组(Subject-Predicate-Object):
| 元素 | 作用 | 对应图谱组件 | 示例 |
|---|---|---|---|
| Subject (S) | 语句的主体 | 节点 (Node) | Marie Curie |
| Predicate § | 连接主体和客体的关系 | 边上的标签 (Edge Label) | discovered |
| Object (O) | 语句的客体 | 节点 (Node) | Radium |
KG-Pipeline的任务,就是让 LLM 帮助我们从文本中识别出并提取这些 SPO 三元组。说到三元组,其实我研究生期间研究方向就算关系三元组的抽取,那时候大模型还未横空出世,BERT占据DeepLearning的绝大部分江山,基于有监督的SPO抽取方法泛化性很弱,只在训练数据集或规整的数据上有不错效果。短短几年,NLP的绝大部分细分领域都被LLM同一,小模型的应用场景越来越少,不仅让人感叹技术更新迭代速度之快。
2. 技术栈与环境准备(Step 1 & 2)
为了实现这个端到端(End-to-End)的流程,KG-Pipeline主要依赖以下核心 Python 库:
| 库名 | 核心作用 | 技术细节 |
|---|---|---|
| openai | LLM 交互与三元组提取 | 兼容 OpenAI 或 Ollama/Nebius 等 API 端点。 |
| networkx | 图数据结构管理 | 用于创建和操作 有向图 (DiGraph),作为图谱的核心结构。 |
| ipycytoscape | 交互式可视化 | 用于在 Jupyter Notebook 中渲染高质量、可缩放的图谱。 |
| pandas | 中间数据展示 | 用于清晰地展示分块结果、提取结果和规范化结果。 |
| re / json | 数据清洗与解析 | 用于解析 LLM 返回的 JSON 和文本的正则表达式处理。 |
# Install libraries (run this cell once)
%pip install openai networkx "ipycytoscape>=1.3.1" ipywidgets pandas
# If in classic Jupyter Notebook (not Lab), you might need to enable the widget extension:
# jupyter nbextension enable --py widgetsnbextension
# --- IMPORTANT: Restart the kernel/runtime after running this cell! ---
导入库:库已经安装完毕,我们将必要的组件导入到我们的 Python 环境中。
import openai             # For LLM interaction
import json               # For parsing LLM responses
import networkx as nx     # For creating and managing the graph data structure
import ipycytoscape       # For interactive in-notebook graph visualization
import ipywidgets         # For interactive elements
import pandas as pd       # For displaying data in tables
import os                 # For accessing environment variables (safer for API keys)
import math               # For basic math operations
import re                 # For basic text cleaning (regular expressions)
import warnings           # To suppress potential deprecation warnings
# Configure settings for better display and fewer warnings
warnings.filterwarnings('ignore', category=DeprecationWarning)
pd.set_option('display.max_rows', 100) # Show more rows in pandas tables
pd.set_option('display.max_colwidth', 150) # Show more text width in pandas tables
print("Libraries imported successfully.")
Libraries imported successfully.
3、LLM 配置 (Step 3)
为了保证提取出的事实信息具有高确定性和低幻觉,我在配置 LLM 时,严格将温度(llm_temperature)设置为 0.0。此外,为了安全起见,API 密钥和基础 URL 都是通过环境变量(如 OPENAI_API_KEY, OPENAI_API_BASE)获取的。
# For OpenAI
export OPENAI_API_KEY='your_openai_api_key'
# For Ollama (example)
export OPENAI_API_KEY='ollama' # Or any non-empty string
export OPENAI_API_BASE='http://localhost:11434/v1'
# For Nebius AI (example)
export OPENAI_API_KEY='your_nebius_api_key'
export OPENAI_API_BASE='https://api.studio.nebius.com/v1/'
# --- Retrieve Credentials ---
api_key = os.getenv("OPENAI_API_KEY")
base_url = os.getenv("OPENAI_API_BASE") # Will be None if not set (e.g., for standard OpenAI)
# --- FOR TESTING ONLY (Less Secure - Replace with Environment Variables) ---
# Uncomment and set these lines ONLY if you cannot set environment variables easily.
# api_key = "YOUR_API_KEY_HERE"  # <--- PASTE KEY HERE FOR TESTING ONLY
# base_url = "YOUR_API_BASE_URL_HERE" # <--- PASTE BASE URL HERE (if needed)
# Example for Nebius:
# base_url="https://api.studio.nebius.com/v1/"
# api_key="YOUR_NEBIUS_KEY"
print(f"Retrieved API Key: {'Set' if api_key else 'Not Set'}")
print(f"Retrieved Base URL: {base_url if base_url else 'Not Set (will use default OpenAI)'}")
接下来,验证 API 密钥并初始化 openai 客户端。
# --- Validate Key and Initialize Client ---
if not api_key:
print("Error: OPENAI_API_KEY environment variable not set or key not provided directly.")
print("Please set the environment variable (or uncomment/edit the test lines) and restart the kernel.")
raise SystemExit("API Key configuration failed.")
else:
try:
client = openai.OpenAI(
base_url=base_url, # Pass None if not set, client handles default
api_key=api_key
)
print("OpenAI client initialized successfully.")
except Exception as e:
print(f"Error initializing OpenAI client: {e}")
print("Check your API key, base URL (if used), and network connection.")
raise SystemExit("LLM client initialization failed.")
最后,记得定义其他 LLM 参数,例如温度和最大token数。
# --- Define LLM Call Parameters ---
llm_temperature = 0.0 # Lower temperature for more deterministic, factual output. 0.0 is best for extraction.
llm_max_tokens = 4096 # Max tokens for the LLM response (adjust based on model limits)
print(f"LLM Temperature set to: {llm_temperature}")
print(f"LLM Max Tokens set to: {llm_max_tokens}")
4、三重提纯:从文本到结构化事实
使用Marie Curie传记作为原始非结构化文本(可以使用任何文本代替),通过三个关键环节,逐步将Marie Curie传记中的非结构化文本“提纯”为干净的 SPO 三元组。
显示输入的文本及其一些基本统计信息:
unstructured_text = """
Marie Curie, born Maria Skłodowska in Warsaw, Poland, was a pioneering physicist and chemist.
She conducted groundbreaking research on radioactivity. Together with her husband, Pierre Curie,
she discovered the elements polonium and radium. Marie Curie was the first woman to win a Nobel Prize,
the first person and only woman to win the Nobel Prize twice, and the only person to win the Nobel Prize
in two different scientific fields. She won the Nobel Prize in Physics in 1903 with Pierre Curie
and Henri Becquerel. Later, she won the Nobel Prize in Chemistry in 1911 for her work on radium and
polonium. During World War I, she developed mobile radiography units, known as 'petites Curies',
to provide X-ray services to field hospitals. Marie Curie died in 1934 from aplastic anemia, likely
caused by her long-term exposure to radiation.
Marie was born on November 7, 1867, to a family of teachers who valued education. She received her
early schooling in Warsaw but moved to Paris in 1891 to continue her studies at the Sorbonne, where
she earned degrees in physics and mathematics. She met Pierre Curie, a professor of physics, in 1894,
and they married in 1895, beginning a productive scientific partnership. Following Pierre's tragic
death in a street accident in 1906, Marie took over his teaching position, becoming the first female
professor at the Sorbonne.
The Curies' work on radioactivity was conducted in challenging conditions, in a poorly equipped shed
with no proper ventilation, as they processed tons of pitchblende ore to isolate radium. Marie Curie
established the Curie Institute in Paris, which became a major center for medical research. She had
two daughters: Irène, who later won a Nobel Prize in Chemistry with her husband, and Eve, who became
a writer. Marie's notebooks are still radioactive today and are kept in lead-lined boxes. Her legacy
includes not only her scientific discoveries but also her role in breaking gender barriers in academia
and science.
"""
print("--- Input Text Loaded ---")
print(unstructured_text)
print("-" * 25)
# Basic stats visualization
char_count = len(unstructured_text)
word_count = len(unstructured_text.split())
print(f"Total characters: {char_count}")
print(f"Approximate word count: {word_count}")
print("-" * 25)
--- Input Text Loaded ---
Marie Curie, born Maria Skłodowska in Warsaw, Poland, was a pioneering physicist and chemist.
She conducted groundbreaking research on radioactivity. Together with her husband, Pierre Curie,
she discovered the elements polonium and radium. Marie Curie was the first woman to win a Nobel Prize,
the first person and only woman to win the Nobel Prize twice, and the only person to win the Nobel Prize
in two different scientific fields. She won the Nobel Prize in Physics in 1903 with Pierre Curie
and Henri Becquerel. Later, she won the Nobel Prize in Chemistry in 1911 for her work on radium and
polonium. During World War I, she developed mobile radiography units, known as 'petites Curies',
to provide X-ray services to field hospitals. Marie Curie died in 1934 from aplastic anemia, likely
caused by her long-term exposure to radiation.
Marie was born on November 7, 1867, to a family of teachers who valued education. She received her
early schooling in Warsaw but moved to Paris in 1891 to continue her studies at the Sorbonne, where
she earned degrees in physics and mathematics. She met Pierre Curie, a professor of physics, in 1894,
and they married in 1895, beginning a productive scientific partnership. Following Pierre's tragic
death in a street accident in 1906, Marie took over his teaching position, becoming the first female
professor at the Sorbonne.
The Curies' work on radioactivity was conducted in challenging conditions, in a poorly equipped shed
with no proper ventilation, as they processed tons of pitchblende ore to isolate radium. Marie Curie
established the Curie Institute in Paris, which became a major center for medical research. She had
two daughters: Irène, who later won a Nobel Prize in Chemistry with her husband, and Eve, who became
a writer. Marie's notebooks are still radioactive today and are kept in lead-lined boxes. Her legacy
includes not only her scientific discoveries but also her role in breaking gender barriers in academia
and science.
-------------------------
Total characters: 1995
Approximate word count: 324
-------------------------
5、上下文管理与分块(Step 5)
面对长文本,我们不能直接扔给 LLM,因为这会触及上下文窗口的限制。
KG-Pipeline采用 文本分块(Text Chunking) 策略,将文本分割成若干个小块:
-
块大小(chunk_size)
:我设置为 150 个词。
-
重叠(overlap)
:设置为 30 个词。
技术意义: 重叠部分的存在至关重要。它确保了跨越两个块的完整事实或因果关系不会在分割处被截断,从而保障了提取的完整性。
# --- Chunking Configuration ---
chunk_size = 150  # Number of words per chunk (adjust as needed)
overlap = 30     # Number of words to overlap (must be < chunk_size)
print(f"Chunk Size set to: {chunk_size} words")
print(f"Overlap set to: {overlap} words")
# --- Basic Validation ---
if overlap >= chunk_size and chunk_size > 0:
print(f"Error: Overlap ({overlap}) must be smaller than chunk size ({chunk_size}).")
raise SystemExit("Chunking configuration error.")
else:
print("Chunking configuration is valid.")
Chunk Size set to: 150 words
Overlap set to: 30 words
Chunking configuration is valid.
将输入的文本拆分成单词列表:
words = unstructured_text.split()
total_words = len(words)
print(f"Text split into {total_words} words.")
# Visualize the first 20 words
print(f"First 20 words: {words[:20]}")
Text split into 324 words.
First 20 words: ['Marie', 'Curie,', 'born', 'Maria', 'Skłodowska', 'in', 'Warsaw,', 'Poland,', 'was', 'a', 'pioneering', 'physicist', 'and', 'chemist.', 'She', 'conducted', 'groundbreaking', 'research', 'on', 'radioactivity.']
然后根据配置执行分块操作:
chunks = []
start_index = 0
chunk_number = 1
print(f"Starting chunking process...")
while start_index < total_words:
end_index = min(start_index + chunk_size, total_words)
chunk_text = " ".join(words[start_index:end_index])
chunks.append({"text": chunk_text, "chunk_number": chunk_number})
# print(f"  Created chunk {chunk_number}: words {start_index} to {end_index-1}") # Uncomment for detailed log
# Calculate the start of the next chunk
next_start_index = start_index + chunk_size - overlap
# Ensure progress is made
if next_start_index <= start_index:
if end_index == total_words:
break # Already processed the last part
next_start_index = start_index + 1
start_index = next_start_index
chunk_number += 1
# Safety break (optional)
if chunk_number > total_words: # Simple safety
print("Warning: Chunking loop exceeded total word count, breaking.")
break
print(f"\nText successfully split into {len(chunks)} chunks.")
Starting chunking process...
Text successfully split into 3 chunks.
可以使用pandas库进行适当数据分析:
print("--- Chunk Details ---")
if chunks:
# Create a DataFrame for better visualization
chunks_df = pd.DataFrame(chunks)
chunks_df['word_count'] = chunks_df['text'].apply(lambda x: len(x.split()))
display(chunks_df[['chunk_number', 'word_count', 'text']])
else:
print("No chunks were created (text might be shorter than chunk size).")
print("-" * 25)
6、Prompt 工程(Step 6)
这是项目成功的核心。LLM 往往倾向于“自由发挥”,而我们的目标是让它成为一个严格遵循协议的机器。
我在用户提示词中,定义了七条**“非常重要”**的规则,强制 LLM 输出纯净、规范的 JSON 数组:
- 纯 JSON 输出: 严格要求只返回一个有效的 JSON 数组,禁止任何解释性文字或 Markdown 代码围栏(````json`),目前部分模型已支持json schema强制输出,可确保输出格式同一,避免bug。
- 强制小写: 所有 S、P、O 的值都必须是小写。这极大地简化了后续的清洗和去重工作。
- 代词解析: 要求 LLM 在提取时,将“她(she)”等代词立即替换为具体的实体名称(例如 ‘marie curie’)。
- 谓词简洁性: 谓词(关系)必须简洁,通常是动词或短语(1-3 个词),例如 ‘discovered’。
提取的鲁棒性:
# --- System Prompt: Sets the context/role for the LLM ---
extraction_system_prompt = """
You are an AI expert specialized in knowledge graph extraction.
Your task is to identify and extract factual Subject-Predicate-Object (SPO) triples from the given text.
Focus on accuracy and adhere strictly to the JSON output format requested in the user prompt.
Extract core entities and the most direct relationship.
"""
# --- User Prompt Template: Contains specific instructions and the text ---
extraction_user_prompt_template = """
Please extract Subject-Predicate-Object (S-P-O) triples from the text below.
**VERY IMPORTANT RULES:**
1.  **Output Format:** Respond ONLY with a single, valid JSON array. Each element MUST be an object with keys "subject", "predicate", "object".
2.  **JSON Only:** Do NOT include any text before or after the JSON array (e.g., no 'Here is the JSON:' or explanations). Do NOT use markdown ```json ... ```tags.
3.  **Concise Predicates:** Keep the 'predicate' value concise (1-3 words, ideally 1-2). Use verbs or short verb phrases (e.g., 'discovered', 'was born in', 'won').
4.  **Lowercase:** ALL values for 'subject', 'predicate', and 'object' MUST be lowercase.
5.  **Pronoun Resolution:** Replace pronouns (she, he, it, her, etc.) with the specific lowercase entity name they refer to based on the text context (e.g., 'marie curie').
6.  **Specificity:** Capture specific details (e.g., 'nobel prize in physics' instead of just 'nobel prize' if specified).
7.  **Completeness:** Extract all distinct factual relationships mentioned.
**Text to Process:**
```text
{text_chunk}
7、LLM 交互 - 提取三元组(逐块提取)(Step 7)
在实际 LLM 交互(Step 7)中,即使启用了 JSON 模式,模型有时仍会出错。我编写了多级解析逻辑:
- 首先尝试
json.loads()直接解析。 - 如果失败(
JSONDecodeError),则采用 正则表达式(Regex)回退策略,尝试从可能被包裹在文本中的原始 JSON 数组结构中提取字符串,再进行二次解析。
这种多级防御,确保了我们能从每一个块中最大化地挽救有效三元组。遍历每个文本块,将其连同提示信息一起发送到 LLM,并尝试解析预期的 JSON 输出。下面将展示每个文本块的处理过程。
# Initialize lists to store results and failures
all_extracted_triples = []
failed_chunks = []
print(f"Starting triple extraction from {len(chunks)} chunks using model '{llm_model_name}'...")
# We will process chunks one by one in the following cells.
 ### 处理数据块 1(示例 - 循环结构将处理所有内容)
# --- This cell represents the core logic inside the loop for ONE chunk ---
# --- In a real run, this logic would be in a loop like the original notebook ---
# --- We show it step-by-step for the first chunk for clarity ---
chunk_index = 0 # For demonstration, we process only the first chunk here
if chunk_index < len(chunks):
chunk_info = chunks[chunk_index]
chunk_text = chunk_info['text']
chunk_num = chunk_info['chunk_number']
print(f"\n--- Processing Chunk {chunk_num}/{len(chunks)} --- ")
# 1. Format the User Prompt
print("1. Formatting User Prompt...")
user_prompt = extraction_user_prompt_template.format(text_chunk=chunk_text)
# print(f"   Formatted Prompt (Snippet): {user_prompt[:200]}...{user_prompt[-100:]}") # Optional: View prompt
llm_output = None
error_message = None
try:
# 2. Make the API Call
print("2. Sending request to LLM...")
response = client.chat.completions.create(
model=llm_model_name,
messages=[
{"role": "system", "content": extraction_system_prompt},
{"role": "user", "content": user_prompt}
],
temperature=llm_temperature,
max_tokens=llm_max_tokens,
# Request JSON output format - helps models that support it
response_format={ "type": "json_object" },
)
print("   LLM response received.")
# 3. Extract Raw Response Content
print("3. Extracting raw response content...")
llm_output = response.choices[0].message.content.strip()
print("--- Raw LLM Output (Chunk {chunk_num}) ---")
print(llm_output)
print("-" * 20)
except Exception as e:
error_message = str(e)
print(f"   ERROR during API call: {error_message}")
failed_chunks.append({'chunk_number': chunk_num, 'error': f'API/Processing Error: {error_message}', 'response': ''})
# 4. Parse JSON (if API call succeeded)
parsed_json = None
parsing_error = None
if llm_output is not None:
print("4. Attempting to parse JSON from response...")
try:
# Strategy 1: Direct parsing (ideal)
parsed_data = json.loads(llm_output)
# Handle if response_format={'type':'json_object'} returns a dict containing the list
if isinstance(parsed_data, dict):
print("   Detected dictionary response, attempting to extract list...")
list_values = [v for v in parsed_data.values() if isinstance(v, list)]
if len(list_values) == 1:
parsed_json = list_values[0]
print("      Successfully extracted list from dictionary.")
else:
raise ValueError("JSON object received, but doesn't contain a single list of triples.")
elif isinstance(parsed_data, list):
parsed_json = parsed_data
print("   Successfully parsed JSON list directly.")
else:
raise ValueError("Parsed JSON is not a list or expected dictionary wrapper.")
except json.JSONDecodeError as json_err:
parsing_error = f"JSONDecodeError: {json_err}. Trying regex fallback..."
print(f"   {parsing_error}")
# Strategy 2: Regex fallback for arrays potentially wrapped in text/markdown
match = re.search(r'^\s*(\[.*?\])\s*$', llm_output, re.DOTALL)
if match:
json_string_extracted = match.group(1)
print("      Regex found potential JSON array structure.")
try:
parsed_json = json.loads(json_string_extracted)
print("      Successfully parsed JSON from regex extraction.")
parsing_error = None # Clear previous error
except json.JSONDecodeError as nested_err:
parsing_error = f"JSONDecodeError after regex: {nested_err}"
print(f"      ERROR: Regex content is not valid JSON: {nested_err}")
else:
parsing_error = "JSONDecodeError and Regex fallback failed."
print("      ERROR: Regex could not find JSON array structure.")
except ValueError as val_err:
parsing_error = f"ValueError: {val_err}" # Catches issues with unexpected structure
print(f"   ERROR: {parsing_error}")
# --- Show Parsed Result (or error) ---
if parsed_json is not None:
print("--- Parsed JSON Data (Chunk {chunk_num}) ---")
print(json.dumps(parsed_json, indent=2)) # Pretty print the JSON
print("-" * 20)
else:
print(f"--- JSON Parsing FAILED (Chunk {chunk_num}) --- ")
print(f"   Final Parsing Error: {parsing_error}")
print("-" * 20)
failed_chunks.append({'chunk_number': chunk_num, 'error': f'Parsing Failed: {parsing_error}', 'response': llm_output})
# 5. Validate and Store Triples (if parsing succeeded)
if parsed_json is not None:
print("5. Validating structure and extracting triples...")
valid_triples_in_chunk = []
invalid_entries = []
if isinstance(parsed_json, list):
for item in parsed_json:
if isinstance(item, dict) and all(k in item for k in ['subject', 'predicate', 'object']):
# Basic check: ensure values are strings (can be refined)
if all(isinstance(item[k], str) for k in ['subject', 'predicate', 'object']):
item['chunk'] = chunk_num # Add source chunk info
valid_triples_in_chunk.append(item)
else:
invalid_entries.append({'item': item, 'reason': 'Non-string value'})
else:
invalid_entries.append({'item': item, 'reason': 'Incorrect structure/keys'})
else:
print("   ERROR: Parsed data is not a list, cannot extract triples.")
invalid_entries.append({'item': parsed_json, 'reason': 'Not a list'})
# Also add to failed chunks if the overall structure was wrong
if not any(fc['chunk_number'] == chunk_num for fc in failed_chunks):
failed_chunks.append({'chunk_number': chunk_num, 'error': 'Parsed data not a list', 'response': llm_output})
# --- Show Validation Results ---
print(f"   Found {len(valid_triples_in_chunk)} valid triples in this chunk.")
if invalid_entries:
print(f"   Skipped {len(invalid_entries)} invalid entries.")
# print(f"   Invalid entries details: {invalid_entries}") # Uncomment for debugging
# --- Display Valid Triples from this Chunk ---
if valid_triples_in_chunk:
print(f"--- Valid Triples Extracted (Chunk {chunk_num}) ---")
display(pd.DataFrame(valid_triples_in_chunk))
print("-" * 20)
# Add to the main list
all_extracted_triples.extend(valid_triples_in_chunk)
else:
print(f"--- No valid triples extracted from this chunk. ---")
print("-" * 20)
# --- Update Running Total (Visual Feedback) ---
print(f"--- Running Total Triples Extracted: {len(all_extracted_triples)} --- ")
print(f"--- Failed Chunks So Far: {len(failed_chunks)} --- ")
else:
print(f"Chunk index {chunk_index} is out of bounds (Total chunks: {len(chunks)}). Skipping.")
print("\nFinished processing this chunk.")
# --- IMPORTANT: In a full run, you would uncomment the loop in the original notebook ---
# --- and remove the `chunk_index = 0` line to process ALL chunks. ---
--- Processing Chunk 1/3 ---
1. Formatting User Prompt...
2. Sending request to LLM...
LLM response received.
3. Extracting raw response content...
--- Raw LLM Output (Chunk {chunk_num}) ---
[
{ "subject": "marie curie", "predicate": "born as", "object": "maria skłodowska" },
{ "subject": "marie curie", "predicate": "born in", "object": "warsaw, poland" },
{ "subject": "marie curie", "predicate": "was", "object": "physicist" },
{ "subject": "marie curie", "predicate": "was", "object": "chemist" },
{ "subject": "marie curie", "predicate": "conducted", "object": "research on radioactivity" },
{ "subject": "marie curie", "predicate": "discovered", "object": "polonium" },
{ "subject": "marie curie", "predicate": "discovered", "object": "radium" },
{ "subject": "marie curie", "predicate": "was", "object": "first woman to win nobel prize" },
{ "subject": "marie curie", "predicate": "was", "object": "first person to win nobel prize twice" },
{ "subject": "marie curie", "predicate": "was", "object": "only woman to win nobel prize twice" },
{ "subject": "marie curie", "predicate": "was", "object": "only person to win nobel prize in two scientific fields" },
{ "subject": "marie curie", "predicate": "won", "object": "nobel prize in physics" },
{ "subject": "marie curie", "predicate": "won", "object": "nobel prize in chemistry" },
{ "subject": "marie curie", "predicate": "developed", "object": "mobile radiography units" },
{ "subject": "marie curie", "predicate": "died in", "object": "1934" },
{ "subject": "marie curie", "predicate": "died from", "object": "aplastic anemia" },
{ "subject": "marie curie", "predicate": "born on", "object": "november 7, 1867" },
{ "subject": "marie curie", "predicate": "born to", "object": "family of teachers" }
]
--------------------
4. Attempting to parse JSON from response...
Successfully parsed JSON list directly.
--- Parsed JSON Data (Chunk {chunk_num}) ---
[
{
"subject": "marie curie",
"predicate": "born as",
"object": "maria sk\u0142odowska"
},
{
"subject": "marie curie",
"predicate": "born in",
"object": "warsaw, poland"
},
{
"subject": "marie curie",
"predicate": "was",
"object": "physicist"
},
{
"subject": "marie curie",
"predicate": "was",
"object": "chemist"
},
{
"subject": "marie curie",
"predicate": "conducted",
"object": "research on radioactivity"
},
{
"subject": "marie curie",
"predicate": "discovered",
"object": "polonium"
},
{
"subject": "marie curie",
"predicate": "discovered",
"object": "radium"
},
{
"subject": "marie curie",
"predicate": "was",
"object": "first woman to win nobel prize"
},
{
"subject": "marie curie",
"predicate": "was",
"object": "first person to win nobel prize twice"
},
{
"subject": "marie curie",
"predicate": "was",
"object": "only woman to win nobel prize twice"
},
{
"subject": "marie curie",
"predicate": "was",
"object": "only person to win nobel prize in two scientific fields"
},
{
"subject": "marie curie",
"predicate": "won",
"object": "nobel prize in physics"
},
{
"subject": "marie curie",
"predicate": "won",
"object": "nobel prize in chemistry"
},
{
"subject": "marie curie",
"predicate": "developed",
"object": "mobile radiography units"
},
{
"subject": "marie curie",
"predicate": "died in",
"object": "1934"
},
{
"subject": "marie curie",
"predicate": "died from",
"object": "aplastic anemia"
},
{
"subject": "marie curie",
"predicate": "born on",
"object": "november 7, 1867"
},
{
"subject": "marie curie",
"predicate": "born to",
"object": "family of teachers"
}
]
--------------------
5. Validating structure and extracting triples...
Found 18 valid triples in this chunk.
--- Valid Triples Extracted (Chunk 1) ---
8、规范化与去重(Step 8)
LLM 提取的结果可能存在冗余或不规范。在将数据送入图谱前,我们必须进行最后一道清洗。
我执行了以下关键步骤:
- 规范化(Normalization): 清除所有三元组组件首尾的空白字符,并将所有内容转为小写。
- 去重(De-duplication): 我使用一个集合(Set)来追踪所有已见的
(subject, predicate, object)元组。只有当一个三元组是全新的组合时,才会被加入最终列表。这确保了我们知识图谱中的每条边都是独特的。这里可以采用LLM去重,目前我最新的项目中就采用的是Embedding召回+LLM进行实体节点的去重方法。但KG-pipeline暂时采用的是完全规则去重。
遍历提取出的三元组,对其进行清理,并检查重复项。下面展示最初的几个转换过程:
print("Processing triples for normalization (showing first 5 examples):")
example_limit = 5
processed_count = 0
for i, triple in enumerate(all_extracted_triples):
show_example = (i < example_limit)
if show_example:
print(f"\n--- Example {i+1} ---")
print(f"Original Triple (Chunk {triple.get('chunk', '?')}): {triple}")
subject_raw = triple.get('subject')
predicate_raw = triple.get('predicate')
object_raw = triple.get('object')
chunk_num = triple.get('chunk', 'unknown')
triple_valid = False
normalized_sub, normalized_pred, normalized_obj = None, None, None
if isinstance(subject_raw, str) and isinstance(predicate_raw, str) and isinstance(object_raw, str):
# 1. Normalize
normalized_sub = subject_raw.strip().lower()
normalized_pred = re.sub(r'\s+', ' ', predicate_raw.strip().lower()).strip()
normalized_obj = object_raw.strip().lower()
if show_example:
print(f"Normalized: SUB='{normalized_sub}', PRED='{normalized_pred}', OBJ='{normalized_obj}'")
# 2. Filter Empty
if normalized_sub and normalized_pred and normalized_obj:
triple_identifier = (normalized_sub, normalized_pred, normalized_obj)
# 3. De-duplicate
if triple_identifier not in seen_triples:
normalized_triples.append({
'subject': normalized_sub,
'predicate': normalized_pred,
'object': normalized_obj,
'source_chunk': chunk_num
})
seen_triples.add(triple_identifier)
triple_valid = True
if show_example:
print("Status: Kept (New Unique Triple)")
else:
duplicates_removed_count += 1
if show_example:
print("Status: Discarded (Duplicate)")
else:
empty_removed_count += 1
if show_example:
print("Status: Discarded (Empty component after normalization)")
else:
empty_removed_count += 1 # Count non-string/missing as needing removal
if show_example:
print("Status: Discarded (Non-string or missing component)")
processed_count += 1
print(f"\n... Finished processing {processed_count} triples.")
Processing triples for normalization (showing first 5 examples):
--- Example 1 ---
Original Triple (Chunk 1): {'subject': 'marie curie', 'predicate': 'born as', 'object': 'maria skłodowska', 'chunk': 1}
Normalized: SUB='marie curie', PRED='born as', OBJ='maria skłodowska'
Status: Kept (New Unique Triple)
--- Example 2 ---
Original Triple (Chunk 1): {'subject': 'marie curie', 'predicate': 'born in', 'object': 'warsaw, poland', 'chunk': 1}
Normalized: SUB='marie curie', PRED='born in', OBJ='warsaw, poland'
Status: Kept (New Unique Triple)
--- Example 3 ---
Original Triple (Chunk 1): {'subject': 'marie curie', 'predicate': 'was', 'object': 'physicist', 'chunk': 1}
Normalized: SUB='marie curie', PRED='was', OBJ='physicist'
Status: Kept (New Unique Triple)
--- Example 4 ---
Original Triple (Chunk 1): {'subject': 'marie curie', 'predicate': 'was', 'object': 'chemist', 'chunk': 1}
Normalized: SUB='marie curie', PRED='was', OBJ='chemist'
Status: Kept (New Unique Triple)
--- Example 5 ---
Original Triple (Chunk 1): {'subject': 'marie curie', 'predicate': 'conducted', 'object': 'research on radioactivity', 'chunk': 1}
Normalized: SUB='marie curie', PRED='conducted', OBJ='research on radioactivity'
Status: Kept (New Unique Triple)
... Finished processing 18 triples.
9、结构化构建:从三元组到知识图谱(NetworkX)
数据清洗完毕后,我们开始构建知识图谱的物理结构。
- NetworkX 图构建(Step 9)
我们使用 networkx.DiGraph() 创建了一个有向图。
-
节点与边:
我遍历每一个规范化的三元组。主语和宾语自动作为节点加入图谱,而谓词(Predicate)则作为边的 label 属性存储。
# Create an empty directed graph
knowledge_graph = nx.DiGraph()
print("Initialized an empty NetworkX DiGraph.")
# Visualize the initial empty graph state
print("--- Initial Graph Info ---")
try:
# Try the newer method first
print(nx.info(knowledge_graph))
except AttributeError:
# Fallback for different NetworkX versions
print(f"Type: {type(knowledge_graph).__name__}")
print(f"Number of nodes: {knowledge_graph.number_of_nodes()}")
print(f"Number of edges: {knowledge_graph.number_of_edges()}")
print("-" * 25)
Initialized an empty NetworkX DiGraph.
--- Initial Graph Info ---
Type: DiGraph
Number of nodes: 0
Number of edges: 0
-------------------------
将三元组逐一添加到图中,显示图的增长情况:
print("Adding triples to the NetworkX graph...")
added_edges_count = 0
update_interval = 5 # How often to print graph info update
if not normalized_triples:
print("Warning: No normalized triples to add to the graph.")
else:
for i, triple in enumerate(normalized_triples):
subject_node = triple['subject']
object_node = triple['object']
predicate_label = triple['predicate']
# Nodes are added automatically when adding edges, but explicit calls are fine too
# knowledge_graph.add_node(subject_node)
# knowledge_graph.add_node(object_node)
# Add the directed edge with the predicate as a 'label' attribute
knowledge_graph.add_edge(subject_node, object_node, label=predicate_label)
added_edges_count += 1
# --- Visualize Graph Growth ---
if (i + 1) % update_interval == 0 or (i + 1) == len(normalized_triples):
print(f"\n--- Graph Info after adding Triple #{i+1} --- ({subject_node} -> {object_node})")
try:
# Try the newer method first
print(nx.info(knowledge_graph))
except AttributeError:
# Fallback for different NetworkX versions
print(f"Type: {type(knowledge_graph).__name__}")
print(f"Number of nodes: {knowledge_graph.number_of_nodes()}")
print(f"Number of edges: {knowledge_graph.number_of_edges()}")
# For very large graphs, printing info too often can be slow. Adjust interval.
print(f"\nFinished adding triples. Processed {added_edges_count} edges.")
Adding triples to the NetworkX graph...
--- Graph Info after adding Triple #5 --- (marie curie -> research on radioactivity)
Type: DiGraph
Number of nodes: 6
Number of edges: 5
--- Graph Info after adding Triple #10 --- (marie curie -> only woman to win nobel prize twice)
Type: DiGraph
Number of nodes: 11
Number of edges: 10
--- Graph Info after adding Triple #15 --- (marie curie -> 1934)
Type: DiGraph
Number of nodes: 16
Number of edges: 15
--- Graph Info after adding Triple #18 --- (marie curie -> family of teachers)
Type: DiGraph
Number of nodes: 19
Number of edges: 18
Finished adding triples. Processed 18 edges.
在这一步,我们就可以观察图谱的初步形态,例如:总节点数、总边数、以及图谱的弱连通性(weakly connected)。弱连通意味着如果忽略边的方向,所有实体(节点)之间至少存在一条路径。
10、交互式可视化(Step 10)
静态的图片无法展示图谱的价值,交互式体验才是王道!我们使用 ipycytoscape 在 Notebook 中渲染图谱。
关键技术点:
-
动态节点大小(Scaling Nodes by Degree)
:为了突出图谱中的核心实体(如’marie curie’),我计算了每个节点的度数(Degree)——即与该节点连接的边的数量。节点的视觉大小被动态地放大,度数越高的节点越大。
-
CSS-like 样式
:我定义了一套详细的 CSS-like 样式(如使用
#3498db亮蓝色作为节点背景,使用绿色箭头),并加入了**悬停(hover)**效果,增强用户体验。 -
布局算法(COSE Layout)
:为了让图谱自动排列得清晰、美观,我采用了 COSE (Compound Spring Embedder) 布局算法。该算法基于物理模型,将连接紧密的节点拉近,将图谱结构清晰地展示出来。
最终,用户可以通过滚动缩放、拖拽背景平移、拖动节点移动实体,并悬停查看关系标签和实体属性。
部分主要代码:
ipycytoscape 要求节点和边采用特定的 JSON 格式(字典列表):
cytoscape_nodes = []
cytoscape_edges = []
if can_visualize:
print("Converting nodes...")
# Calculate degrees for node sizing
node_degrees = dict(knowledge_graph.degree())
max_degree = max(node_degrees.values()) if node_degrees else 1
for node_id in knowledge_graph.nodes():
degree = node_degrees.get(node_id, 0)
# Simple scaling for node size (adjust logic as needed)
node_size = 15 + (degree / max_degree) * 50 if max_degree > 0 else 15
cytoscape_nodes.append({
'data': {
'id': str(node_id), # ID must be string
'label': str(node_id).replace(' ', '\n'), # Display label (wrap spaces)
'degree': degree,
'size': node_size,
'tooltip_text': f"Entity: {str(node_id)}\nDegree: {degree}" # Tooltip on hover
}
})
print(f"Converted {len(cytoscape_nodes)} nodes.")
print("Converting edges...")
edge_count = 0
for u, v, data in knowledge_graph.edges(data=True):
edge_id = f"edge_{edge_count}" # Unique edge ID
predicate_label = data.get('label', '')
cytoscape_edges.append({
'data': {
'id': edge_id,
'source': str(u),
'target': str(v),
'label': predicate_label, # Label on edge
'tooltip_text': f"Relationship: {predicate_label}" # Tooltip on hover
}
})
edge_count += 1
print(f"Converted {len(cytoscape_edges)} edges.")
# Combine into the final structure
cytoscape_graph_data = {'nodes': cytoscape_nodes, 'edges': cytoscape_edges}
# Visualize the converted structure (first few nodes/edges)
print("\n--- Sample Cytoscape Node Data (First 2) ---")
print(json.dumps(cytoscape_graph_data['nodes'][:2], indent=2))
print("\n--- Sample Cytoscape Edge Data (First 2) ---")
print(json.dumps(cytoscape_graph_data['edges'][:2], indent=2))
print("-" * 25)
else:
print("Skipping data conversion as graph is not valid for visualization.")
cytoscape_graph_data = {'nodes': [], 'edges': []}
Converting nodes...
Converted 19 nodes.
Converting edges...
Converted 18 edges.
--- Sample Cytoscape Node Data (First 2) ---
[
{
"data": {
"id": "marie curie",
"label": "marie\ncurie",
"degree": 18,
"size": 65.0,
"tooltip_text": "Entity: marie curie\nDegree: 18"
}
},
{
"data": {
"id": "maria sk\u0142odowska",
"label": "maria\nsk\u0142odowska",
"degree": 1,
"size": 17.77777777777778,
"tooltip_text": "Entity: maria sk\u0142odowska\nDegree: 1"
}
}
]
--- Sample Cytoscape Edge Data (First 2) ---
[
{
"data": {
"id": "edge_0",
"source": "marie curie",
"target": "maria sk\u0142odowska",
"label": "born as",
"tooltip_text": "Relationship: born as"
}
},
{
"data": {
"id": "edge_1",
"source": "marie curie",
"target": "warsaw, poland",
"label": "born in",
"tooltip_text": "Relationship: born in"
}
}
]
if can_visualize:
print("Creating ipycytoscape widget...")
cyto_widget = ipycytoscape.CytoscapeWidget()
print("Widget created.")
print("Loading graph data into widget...")
cyto_widget.graph.add_graph_from_json(cytoscape_graph_data, directed=True)
print("Data loaded.")
else:
print("Skipping widget creation.")
cyto_widget = None
Creating ipycytoscape widget...
Widget created.
Loading graph data into widget...
Data loaded.
使用类似 CSS 的语法来控制节点和边的外观:
if cyto_widget:
print("Defining enhanced colorful and interactive visual style...")
# More vibrant and colorful styling with a modern color scheme
visual_style = [
{
'selector': 'node',
'style': {
'label': 'data(label)',
'width': 'data(size)',
'height': 'data(size)',
'background-color': '#3498db',  # Bright blue
'background-opacity': 0.9,
'color': '#ffffff',             # White text
'font-size': '12px',
'font-weight': 'bold',
'text-valign': 'center',
'text-halign': 'center',
'text-wrap': 'wrap',
'text-max-width': '100px',
'text-outline-width': 2,
'text-outline-color': '#2980b9',  # Matching outline
'text-outline-opacity': 0.7,
'border-width': 3,
'border-color': '#1abc9c',      # Turquoise border
'border-opacity': 0.9,
'shape': 'ellipse',
'transition-property': 'background-color, border-color, border-width, width, height',
'transition-duration': '0.3s',
'tooltip-text': 'data(tooltip_text)'
}
},
{
'selector': 'node:selected',
'style': {
'background-color': '#e74c3c',  # Pomegranate red
'border-width': 4,
'border-color': '#c0392b',
'text-outline-color': '#e74c3c',
'width': 'data(size) * 1.2',    # Enlarge selected nodes
'height': 'data(size) * 1.2'
}
},
{
'selector': 'node:hover',
'style': {
'background-color': '#9b59b6',  # Purple on hover
'border-width': 4,
'border-color': '#8e44ad',
'cursor': 'pointer',
'z-index': 999
}
},
{
'selector': 'edge',
'style': {
'label': 'data(label)',
'width': 2.5,
'curve-style': 'bezier',
'line-color': '#2ecc71',         # Green
'line-opacity': 0.8,
'target-arrow-color': '#27ae60',
'target-arrow-shape': 'triangle',
'arrow-scale': 1.5,
'font-size': '10px',
'font-weight': 'normal',
'color': '#2c3e50',
'text-background-opacity': 0.9,
'text-background-color': '#ecf0f1',
'text-background-shape': 'roundrectangle',
'text-background-padding': '3px',
'text-rotation': 'autorotate',
'edge-text-rotation': 'autorotate',
'transition-property': 'line-color, width, target-arrow-color',
'transition-duration': '0.3s',
'tooltip-text': 'data(tooltip_text)'
}
},
{
'selector': 'edge:selected',
'style': {
'line-color': '#f39c12',         # Yellow-orange
'target-arrow-color': '#d35400',
'width': 4,
'text-background-color': '#f1c40f',
'color': '#ffffff',               # White text
'z-index': 998
}
},
{
'selector': 'edge:hover',
'style': {
'line-color': '#e67e22',         # Orange on hover
'width': 3.5,
'cursor': 'pointer',
'target-arrow-color': '#d35400',
'z-index': 997
}
},
{
'selector': '.center-node',
'style': {
'background-color': '#16a085',    # Teal
'background-opacity': 1,
'border-width': 4,
'border-color': '#1abc9c',        # Turquoise border
'border-opacity': 1
}
}
]
print("Setting enhanced visual style on widget...")
cyto_widget.set_style(visual_style)
# Apply a better animated layout
cyto_widget.set_layout(name='cose',
nodeRepulsion=5000,
nodeOverlap=40,
idealEdgeLength=120,
edgeElasticity=200,
nestingFactor=6,
gravity=90,
numIter=2500,
animate=True,
animationDuration=1000,
initialTemp=300,
coolingFactor=0.95)
# Add a special class to main nodes (Marie Curie)
if len(cyto_widget.graph.nodes) > 0:
main_nodes = [node.data['id'] for node in cyto_widget.graph.nodes
if node.data.get('degree', 0) > 10]
# Create gradient styles for center nodes
for i, node_id in enumerate(main_nodes):
# Use vibrant colors for center nodes
center_style = {
'selector': f'node[id = "{node_id}"]',
'style': {
'background-color': '#9b59b6',   # Purple
'background-opacity': 0.95,
'border-width': 4,
'border-color': '#8e44ad',      # Darker purple border
'border-opacity': 1,
'text-outline-width': 3,
'text-outline-color': '#8e44ad',
'font-size': '14px'
}
}
visual_style.append(center_style)
# Update the style with the new additions
cyto_widget.set_style(visual_style)
print("Enhanced colorful and interactive style applied successfully.")
else:
print("Skipping style definition.")
择一种算法来自动排列节点和边:
if cyto_widget:
print("Setting layout algorithm ('cose')...")
# cose (Compound Spring Embedder) is often good for exploring connections
cyto_widget.set_layout(name='cose',
animate=True,
# Adjust parameters for better spacing/layout
nodeRepulsion=4000, # Increase repulsion
nodeOverlap=40,    # Increase overlap avoidance
idealEdgeLength=120, # Slightly longer ideal edges
edgeElasticity=150,
nestingFactor=5,
gravity=100,        # Increase gravity slightly
numIter=1500,      # More iterations
initialTemp=200,
coolingFactor=0.95,
minTemp=1.0)
print("Layout set. The graph will arrange itself when displayed.")
else:
print("Skipping layout setting.")
后续优化:深化技术栈
虽然我们已经成功地构建了一个完整的知识图谱,但这个领域的探索永无止境。
未来,我计划从以下几个方面对这个项目进行技术栈的拓展和深化:
- 高级规范化与推理:
◦ 实体链接(Entity Linking):引入外部知识库(如 Wikidata)来识别和规范化同义实体(例如,将 “Pierre Curie” 和 “Pierre” 统一链接到同一个 Wikidata ID),从而避免重复节点。
◦ 关系聚类: 对相似的关系标签进行聚类(例如,将 “born in” 和 “was born in” 统一)。
◦ 节点去重**:** 对节点生成文本描述,基于embedding(text-embedding-small)生成节点embedding向量,基于cosin的相似度分数计算召回相似节点,将top K个相似节点送入LLM,借助LLM判断是否重复。
-
图谱分析:
利用
networkx或其他图分析库(如graph-tool)执行更深入的分析,例如:
◦ 中心性分析(Centrality Analysis):找出图谱中最有影响力或连接最紧密的实体。
◦ 路径发现: 发现两个不直接连接的实体之间的最短路径,实现简单的推理。
- 持久化与大规模部署:
◦ 将结果从 networkx 内存模型迁移到专用的图数据库(Graph Database),例如 Neo4j。这将允许我们使用 Cypher 等专业查询语言,对大规模图谱进行高效的查询和复杂遍历。便于长期存储及可视化展示,可链接外部工具,如LLM等实现sql生成、子图召回、数据查询。
普通人如何抓住AI大模型的风口?
为什么要学AI大模型
当下,⼈⼯智能市场迎来了爆发期,并逐渐进⼊以⼈⼯通⽤智能(AGI)为主导的新时代。企业纷纷官宣“ AI+ ”战略,为新兴技术⼈才创造丰富的就业机会,⼈才缺⼝将达 400 万!
DeepSeek问世以来,生成式AI和大模型技术爆发式增长,让很多岗位重新成了炙手可热的新星,岗位薪资远超很多后端岗位,在程序员中稳居前列。
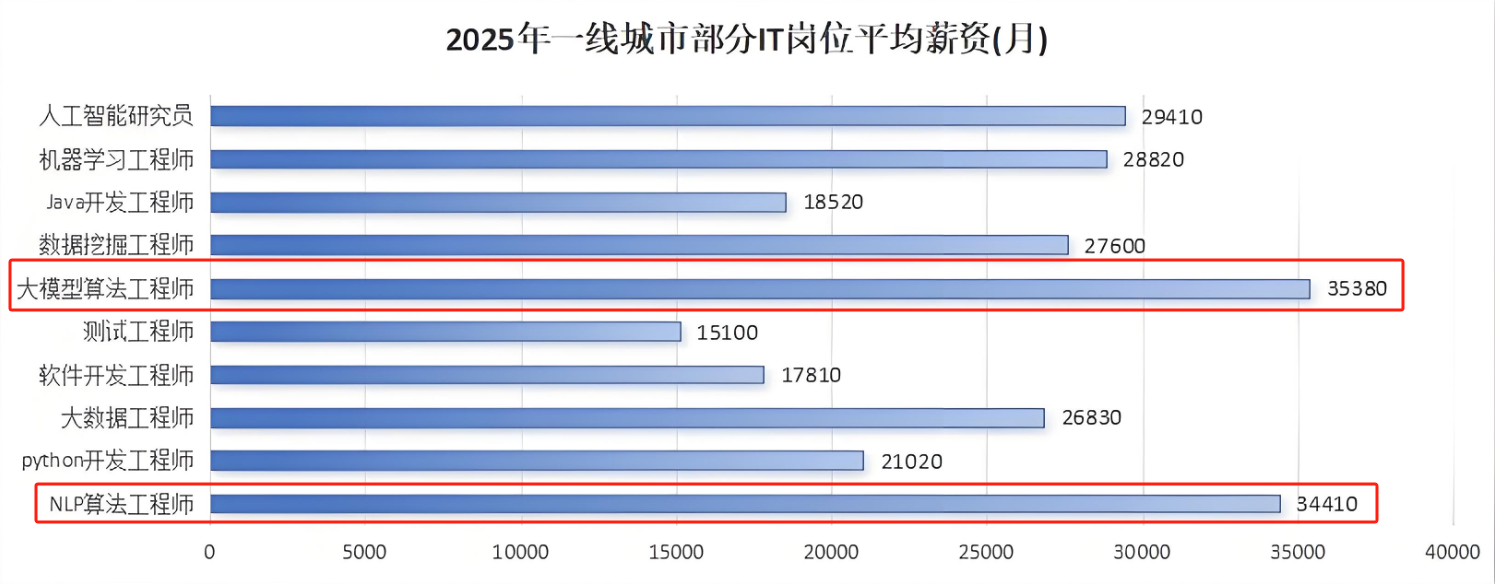
与此同时AI与各行各业深度融合,飞速发展,成为炙手可热的新风口,企业非常需要了解AI、懂AI、会用AI的员工,纷纷开出高薪招聘AI大模型相关岗位。

AI大模型开发工程师对AI大模型需要了解到什么程度呢?我们先看一下招聘需求:

知道人家要什么能力,一切就好办了!我整理了AI大模型开发工程师需要掌握的知识如下:
大模型基础知识
你得知道市面上的大模型产品生态和产品线;还要了解Llama、Qwen等开源大模型与OpenAI等闭源模型的能力差异;以及了解开源模型的二次开发优势,以及闭源模型的商业化限制,等等。

了解这些技术的目的在于建立与算法工程师的共通语言,确保能够沟通项目需求,同时具备管理AI项目进展、合理分配项目资源、把握和控制项目成本的能力。
产品经理还需要有业务sense,这其实就又回到了产品人的看家本领上。我们知道先阶段AI的局限性还非常大,模型生成的内容不理想甚至错误的情况屡见不鲜。因此AI产品经理看技术,更多的是从技术边界、成本等角度出发,选择合适的技术方案来实现需求,甚至用业务来补足技术的短板。
AI Agent
现阶段,AI Agent的发展可谓是百花齐放,甚至有人说,Agent就是未来应用该有的样子,所以这个LLM的重要分支,必须要掌握。
Agent,中文名为“智能体”,由控制端(Brain)、感知端(Perception)和行动端(Action)组成,是一种能够在特定环境中自主行动、感知环境、做出决策并与其他Agent或人类进行交互的计算机程序或实体。简单来说就是给大模型这个大脑装上“记忆”、装上“手”和“脚”,让它自动完成工作。
Agent的核心特性
自主性: 能够独立做出决策,不依赖人类的直接控制。
适应性: 能够根据环境的变化调整其行为。
交互性: 能够与人类或其他系统进行有效沟通和交互。

对于大模型开发工程师来说,学习Agent更多的是理解它的设计理念和工作方式。零代码的大模型应用开发平台也有很多,比如dify、coze,拿来做一个小项目,你就会发现,其实并不难。
AI 应用项目开发流程
如果产品形态和开发模式都和过去不一样了,那还画啥原型?怎么排项目周期?这将深刻影响产品经理这个岗位本身的价值构成,所以每个AI产品经理都必须要了解它。

看着都是新词,其实接触起来,也不难。
从0到1的大模型系统学习籽料
最近很多程序员朋友都已经学习或者准备学习 AI 大模型,后台也经常会有小伙伴咨询学习路线和学习资料,我特别拜托北京清华大学学士和美国加州理工学院博士学位的鲁为民老师(吴文俊奖得主)

给大家准备了一份涵盖了AI大模型入门学习思维导图、精品AI大模型学习书籍手册、视频教程、实战学习等录播视频 全系列的学习资料,这些学习资料不仅深入浅出,而且非常实用,让大家系统而高效地掌握AI大模型的各个知识点。
这份完整版的大模型 AI 学习资料已经上传优快云,朋友们如果需要可以微信扫描下方优快云官方认证二维码免费领取【保证100%免费】
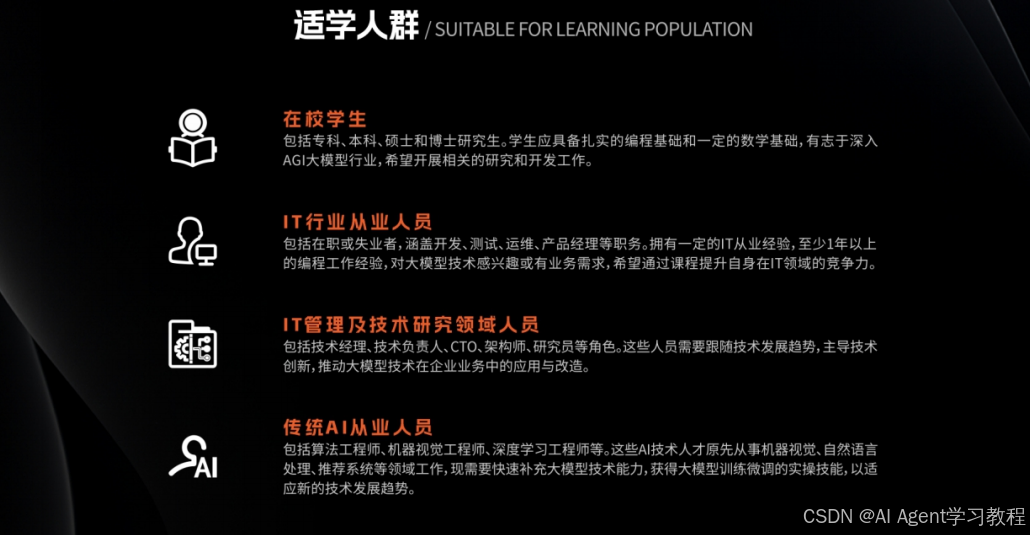
适学人群
应届毕业生: 无工作经验但想要系统学习AI大模型技术,期待通过实战项目掌握核心技术。
零基础转型: 非技术背景但关注AI应用场景,计划通过低代码工具实现“AI+行业”跨界。
业务赋能突破瓶颈: 传统开发者(Java/前端等)学习Transformer架构与LangChain框架,向AI全栈工程师转型。
AI大模型系统学习路线
在面对AI大模型开发领域的复杂与深入,精准学习显得尤为重要。一份系统的技术路线图,不仅能够帮助开发者清晰地了解从入门到精通所需掌握的知识点,还能提供一条高效、有序的学习路径。
- 基础篇,包括了大模型的基本情况,核心原理,带你认识了解大模型提示词,Transformer架构,预训练、SFT、RLHF等一些基础概念,用最易懂的方式带你入门AI大模型
- 进阶篇,你将掌握RAG,Langchain、Agent的核心原理和应用,学习如何微调大模型,让大模型更适合自己的行业需求,私有化部署大模型,让自己的数据更加安全
- 项目实战篇,会手把手一步步带着大家练习企业级落地项目,比如电商行业的智能客服、智能销售项目,教育行业的智慧校园、智能辅导项目等等

但知道是一回事,做又是另一回事,初学者最常遇到的问题主要是理论知识缺乏、资源和工具的限制、模型理解和调试的复杂性,在这基础上,找到高质量的学习资源,不浪费时间、不走弯路,又是重中之重。
AI大模型入门到实战的视频教程+项目包
看视频学习是一种高效、直观、灵活且富有吸引力的学习方式,可以更直观地展示过程,能有效提升学习兴趣和理解力,是现在获取知识的重要途径

光学理论是没用的,要学会跟着一起敲,要动手实操,才能将自己的所学运用到实际当中去,这时候可以搞点实战案例来学习。
海量AI大模型必读的经典书籍(PDF)
阅读AI大模型经典书籍可以帮助读者提高技术水平,开拓视野,掌握核心技术,提高解决问题的能力,同时也可以借鉴他人的经验。对于想要深入学习AI大模型开发的读者来说,阅读经典书籍是非常有必要的。

600+AI大模型报告(实时更新)
这套包含640份报告的合集,涵盖了AI大模型的理论研究、技术实现、行业应用等多个方面。无论您是科研人员、工程师,还是对AI大模型感兴趣的爱好者,这套报告合集都将为您提供宝贵的信息和启示。

AI大模型面试真题+答案解析
我们学习AI大模型必然是想找到高薪的工作,下面这些面试题都是总结当前最新、最热、最高频的面试题,并且每道题都有详细的答案,面试前刷完这套面试题资料,小小offer,不在话下


AI时代,企业最需要的是既懂技术、又有实战经验的复合型人才,**当前人工智能岗位需求多,薪资高,前景好。**在职场里,选对赛道就能赢在起跑线。抓住AI这个风口,相信下一个人生赢家就是你!机会,永远留给有准备的人。
如何获取?
这份完整版的大模型 AI 学习资料已经上传优快云,朋友们如果需要可以微信扫描下方优快云官方认证二维码免费领取【保证100%免费】


 1249
1249

 被折叠的 条评论
为什么被折叠?
被折叠的 条评论
为什么被折叠?
 到【灌水乐园】发言


