HarmonyOS Scroll横向和竖向滚动

不多说,直接上代码实例,细节部分如果有时间再完善,没有时间宝子们就自己官网看一看。

实现:scroll组件基础横向和竖向滚动
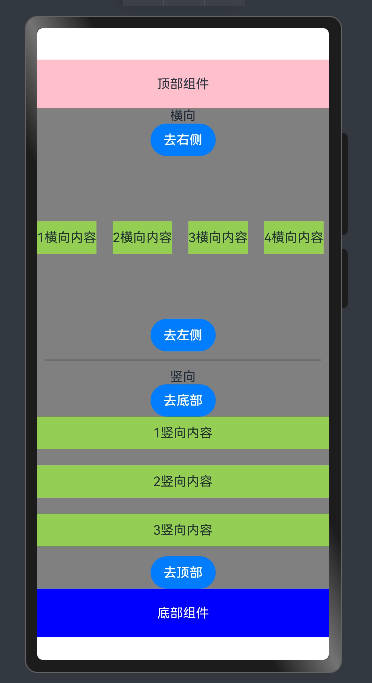
图片

视频演示

harmonyOS Scroll横向和竖向滚动

代码

@Entry
@Component
struct ScrollExample {
  @State message: string = 'Hello World';

  build() {
    Column() {
      ScrollTop()
      ScrollMainHorizontal() // 横向
      ScrollMainVertical() // 竖向
      ScrollBottom()
    }
    .height('100%')
    .width('100%')
  }
}


// 组件在同一个文件中时不用导出、导入
@Component
struct ScrollTop {
  build() {
    Row() {
      Text('顶部组件')
    }
    .width("100%")
    .height(60)
    .justifyContent(FlexAlign.Center)
    .alignItems(VerticalAlign.Center)
    .backgroundColor(Color.Pink)
  }
}

@Component
struct ScrollMainHorizontal {
  arr: Array<number> =
    [1, 2, 3, 4, 5, 6, 7, 8, 9, 10, 11, 12, 13, 14, 15, 16, 17, 18, 19, 20, 21, 22, 23, 24, 25, 26, 27, 28, 29, 30]
  scroller: Scroller = new Scroller() // 滚动控制器

  build() {
    // Scroll 滚动组件
    Column() {
      Text("横向")
      Button('去右侧')
        .onClick(() => {
          // 滚动到底部
          this.scroller.scrollEdge(Edge.Bottom)
        })


      // 滚动区域
      Scroll(this.scroller) {
        Row({ space: 20 }) {
          ForEach(this.arr, (item: number) => {
            Row() {
              // 自定义展示:图片、视频、组件...
              Text(item + '横向内容')
            }
            .height(40)
            .justifyContent(FlexAlign.Center)
            .backgroundColor("#94ce53")

          })
        }
      }
      .height(200)
      .scrollable(ScrollDirection.Horizontal)

      Button('去左侧').onClick(() => {
        // 滚动到顶部
        this.scroller.scrollEdge(Edge.Top)
      })

    }
    .width("100%")
    .height(300)
    .backgroundColor(Color.Grey)
    .justifyContent(FlexAlign.SpaceBetween)

  }
}


@Component
struct ScrollMainVertical {
  arr: Array<number> =
    [1, 2, 3, 4, 5, 6, 7, 8, 9, 10, 11, 12, 13, 14, 15, 16, 17, 18, 19, 20, 21, 22, 23, 24, 25, 26, 27, 18, 19, 30]
  scroller: Scroller = new Scroller() // 滚动控制器

  build() {
    // Scroll 滚动组件
    Column() {
      Divider().strokeWidth(2).margin(10)
      Text("竖向")
      Button('去底部')
        .onClick(() => {
          // 滚动到底部
          this.scroller.scrollEdge(Edge.Bottom)
        })


      // 滚动区域
      Scroll(this.scroller) {
        Column({ space: 20 }) {
          ForEach(this.arr, (item: number) => {
            Row() {
              // 自定义展示:图片、视频、组件...
              Text(item + '竖向内容')
            }
            .width("100%")
            .height(40)
            .justifyContent(FlexAlign.Center)
            .backgroundColor("#94ce53")

          })
        }
      }
      .layoutWeight(1)

      Button('去顶部').onClick(() => {
        // 滚动到顶部
        this.scroller.scrollEdge(Edge.Top)
      })

    }
    .width("100%")
    .layoutWeight(1)
    .backgroundColor(Color.Grey)
    .justifyContent(FlexAlign.SpaceBetween)

  }
}


@Component
struct ScrollBottom {
  build() {
    Row() {
      Text('底部组件')
        .fontColor(Color.White)
    }
    .width("100%")
    .height(60)
    .justifyContent(FlexAlign.Center)
    .alignItems(VerticalAlign.Center)
    .backgroundColor(Color.Blue)

  }
}

根据原作 https://pan.quark.cn/s/0ed355622f0f 的源码改编 野火IM解决方案 野火IM是专业级即时通讯实时音视频整体解决方案,由北京野火无限网络科技有限公司维护支持。 主要特性有:私有部署安全可靠,性能强大,功能齐全,全平台支持,开源率高,部署运维简单,二次开发友好,方便与第三方系统对接或者嵌入现有系统中。 详细情况请参考在线文档。 主要包括一下项目: 野火IM Vue Electron Demo,演示如何将野火IM的能力集成到Vue Electron项目。 前置说明 本项目所使用的是需要付费的,价格请参考费用详情 支持试用,具体请看试用说明 本项目默认只能连接到官方服务,购买或申请试用之后,替换,即可连到自行部署的服务 分支说明 :基于开发,是未来的开发重心 :基于开发,进入维护模式,不再开发新功能,鉴于已经终止支持且不再维护,建议客户升级到版本 环境依赖 mac系统 最新版本的Xcode nodejs v18.19.0 npm v10.2.3 python 2.7.x git npm install -g node-gyp@8.3.0 windows系统 nodejs v18.19.0 python 2.7.x git npm 6.14.15 npm install --global --vs2019 --production windows-build-tools 本步安装windows开发环境的安装内容较多,如果网络情况不好可能需要等较长时间,选择早上网络较好时安装是个好的选择 或参考手动安装 windows-build-tools进行安装 npm install -g node-gyp@8.3.0 linux系统 nodej...
HarmonyOS(鸿蒙系统)中,如果你想要创建一个类似的效果,让用户在横向滑动时逐个显示照片,你可以使用Scroller组件结合ViewGroup的onHorizontalScrollListener。首先,你需要在布局文件中设置一个RecyclerView或ScrollView作为承载图片的容器,并为每个照片项设置滑动监听。 1. 在XML布局中,配置RecyclerView或ScrollView: ```xml <RecyclerView android:id="@+id/image_recycler_view" android:layout_width="match_parent" android:layout_height="match_parent" android:nestedScrollingEnabled="false" /> <!-- 或者如果是ScrollView --> <ScrollView android:id="@+id/image_scroll_view" android:scrollbars="horizontal" android:layout_width="match_parent" android:layout_height="match_parent"> <LinearLayout android:orientation="horizontal" android:layout_width="wrap_content" android:layout_height="0dp"/> </ScrollView> ``` 2. 在Activity或Fragment中,初始化并设置滚动监听: ```java RecyclerView recyclerView = findViewById(R.id.image_recycler_view); recyclerView.setLayoutManager(new LinearLayoutManager(this, LinearLayoutManager.HORIZONTAL, false)); // 或者对于ScrollView ScrollView scrollView = findViewById(R.id.image_scroll_view); scrollView.setOnTouchListener(new View.OnTouchListener() { @Override public boolean onTouch(View v, MotionEvent event) { // 检查是否为水平滑动事件 if (event.getActionMasked() == MotionEvent.ACTION_SCROLL && event.getAxis() == MotionEvent.AXIS_HORIZ) { int xDiff = (int) event.getX() - scrollView.getX(); // 实现平移效果,这里只是一个示例,实际需要配合数据源调整展示的照片 // updateCurrentImageIndex(xDiff); } return false; } }); // 更新当前显示的照片的方法 private void updateCurrentImageIndex(int offset) { // 根据偏移量计算要显示的照片索引,并切换相应的视图或item int currentIndex = calculateCurrentImageIndex(offset); showPhoto(currentIndex); } // 具体的计算方法,根据你的数据结构实现 private int calculateCurrentImageIndex(int offset) { // ... } ```
评论
添加红包

请填写红包祝福语或标题

红包个数最小为10个

红包金额最低5元

当前余额3.43前往充值 >
需支付:10.00
成就一亿技术人!
领取后你会自动成为博主和红包主的粉丝 规则
hope_wisdom
发出的红包
实付
使用余额支付
点击重新获取
扫码支付
钱包余额 0

抵扣说明:

1.余额是钱包充值的虚拟货币,按照1:1的比例进行支付金额的抵扣。
2.余额无法直接购买下载,可以购买VIP、付费专栏及课程。

余额充值