


 本文分享基于Python Web(Django)框架开发的链家网新房房源数据可视化分析项目。项目功能包括用Python爬虫(Xpath)获取数据、用户登录注册、个人信息编辑、数据收藏,还能对数据字段进行可视化图表分析展示,介绍了各功能实现要点。
1 前言:
今天再和大家分享一个基于PythonWeb(Django)框架开发的一个可视化项目(基于Django的链家网新房房源数据可视化分析),为什么是在呢,因为这已经连续几天分享的都是可视化的项目,没办法哈最近写这方面的内容比较多,秉着资源效益最大化的原则就简单分享一下吧。
项目名称:基于Django的链家网新房房源数据可视化分析,项目实现功能:Python爬虫(Xpath)获取数据源,用户登陆注册(带缓存),用户个人信息的编辑修改,数据库数据总览(带分页)和数据的收藏,针对数据库中每一则数据的字段(单价,总价,绿化面积,服务设施,容积率......)来对数据进行可视化图表分析展示(Echarts)~
2 项目简述分析:
2.1 爬虫:使用Xpath路径解析获取
from itertools import count
import django
import pymysql
import requests
from lxml import etree
cy='zz'
header={'user-agent': 'Mozilla/5.0 (Windows NT 10.0; Win64; x64) AppleWebKit/537.36 (KHTML, like Gecko) Chrome/101.0.4951.64 Safari/537.36'}
cnx = pymysql.connect(
host="localhost",
user="root",
password="123456",
database="ljwsql"
)
# 创建游标对象
cursor = cnx.cursor()
for i in range(5,7):
url = 'https://'+cy+'.fang.lianjia.com/loupan/nhs1pg{}/'.format(i)
response = requests.get(url, headers=header)
tree = etree.HTML(response.text)
url_list = tree.xpath('/html/body/div[3]/ul[2]/li/div/div[1]/a/@href')
# print(url_list)
# print('第'+str(i)+'页爬取完毕')
for url in url_list:
u='https://'+cy+'.fang.lianjia.com/'+url
responseres = requests.get(u, headers=header)
tree1 = etree.HTML(responseres.text)
averPrice = tree1.xpath('//div[@class="price"]/span[@class="price-number"]/text()')[0]
if '-' in averPrice:
averPrice = averPrice.split('-')[0]
else:
averPrice =averPrice
print(averPrice) # 新房房源每平方米均价
totalPrice = tree1.xpath('//div[@class="price"]/span[@class="price-number"]/text()')[1]
if '-' in totalPrice:
totalPrice = totalPrice.split('-')[0]
else:
totalPrice =totalPrice
print(totalPrice) # 新房全款价钱
content_list = tree1.xpath('/html/body/div[2]/div[3]/div[2]/div/div[3]/div[2]/a/@href')
for content in content_list:
content='https://'+cy+'.fang.lianjia.com/'+content # 房源详情
print(content)
responseres1 = requests.get(content, headers=header)
tree2 = etree.HTML(responseres1.text)
title = tree2.xpath('/html/body/div[2]/div/div/a[5]/text()')[0] # 房源名称
print(title)
type=tree2.xpath('/html/body/div[4]/div[1]/ul[1]/li[1]/span[2]/text()')[0]
print(type)
city = tree2.xpath('/html/body/div[4]/div[1]/ul[1]/li[4]/span[2]/text()')[0].replace('-','')
print(city)
address=tree2.xpath('/html/body/div[4]/div[1]/ul[1]/li[5]/span[2]/text()')[0]
print(address)
placearea=tree2.xpath('/html/body/div[4]/div[1]/ul[3]/li[3]/span[2]/text()')[0].strip().replace(',','') # 占地面积
placearea=placearea[0:len(placearea)-2]
print(placearea)
buildingarea=tree2.xpath('/html/body/div[4]/div[1]/ul[3]/li[5]/span[2]/text()')[0].strip().replace(',','') # 建筑面积
buildingarea=buildingarea[0:len(buildingarea)-2]
print(buildingarea)
plantrate=tree2.xpath('/html/body/div[4]/div[1]/ul[3]/li[2]/span[2]/text()')[0].strip().replace('%','')
print(plantrate)
containrate=tree2.xpath('/html/body/div[4]/div[1]/ul[3]/li[4]/span[2]/text()')[0].strip()
print(containrate)
service=tree2.xpath('//*[@id="around_txt"]/div/text()')
print(service)
insert_query = "INSERT INTO House (title, placearea,buildingarea,averPrice,totalPrice,type,address,city,plantrate,containrate,link,service) VALUES (%s, %s, %s,%s, %s, %s,%s, %s, %s,%s, %s, %s)"
data = (title, placearea,buildingarea,averPrice,totalPrice,type,address,city,plantrate,containrate,content,str(service))
cursor.execute(insert_query, data)
cnx.commit()
data = ()
cursor.close()
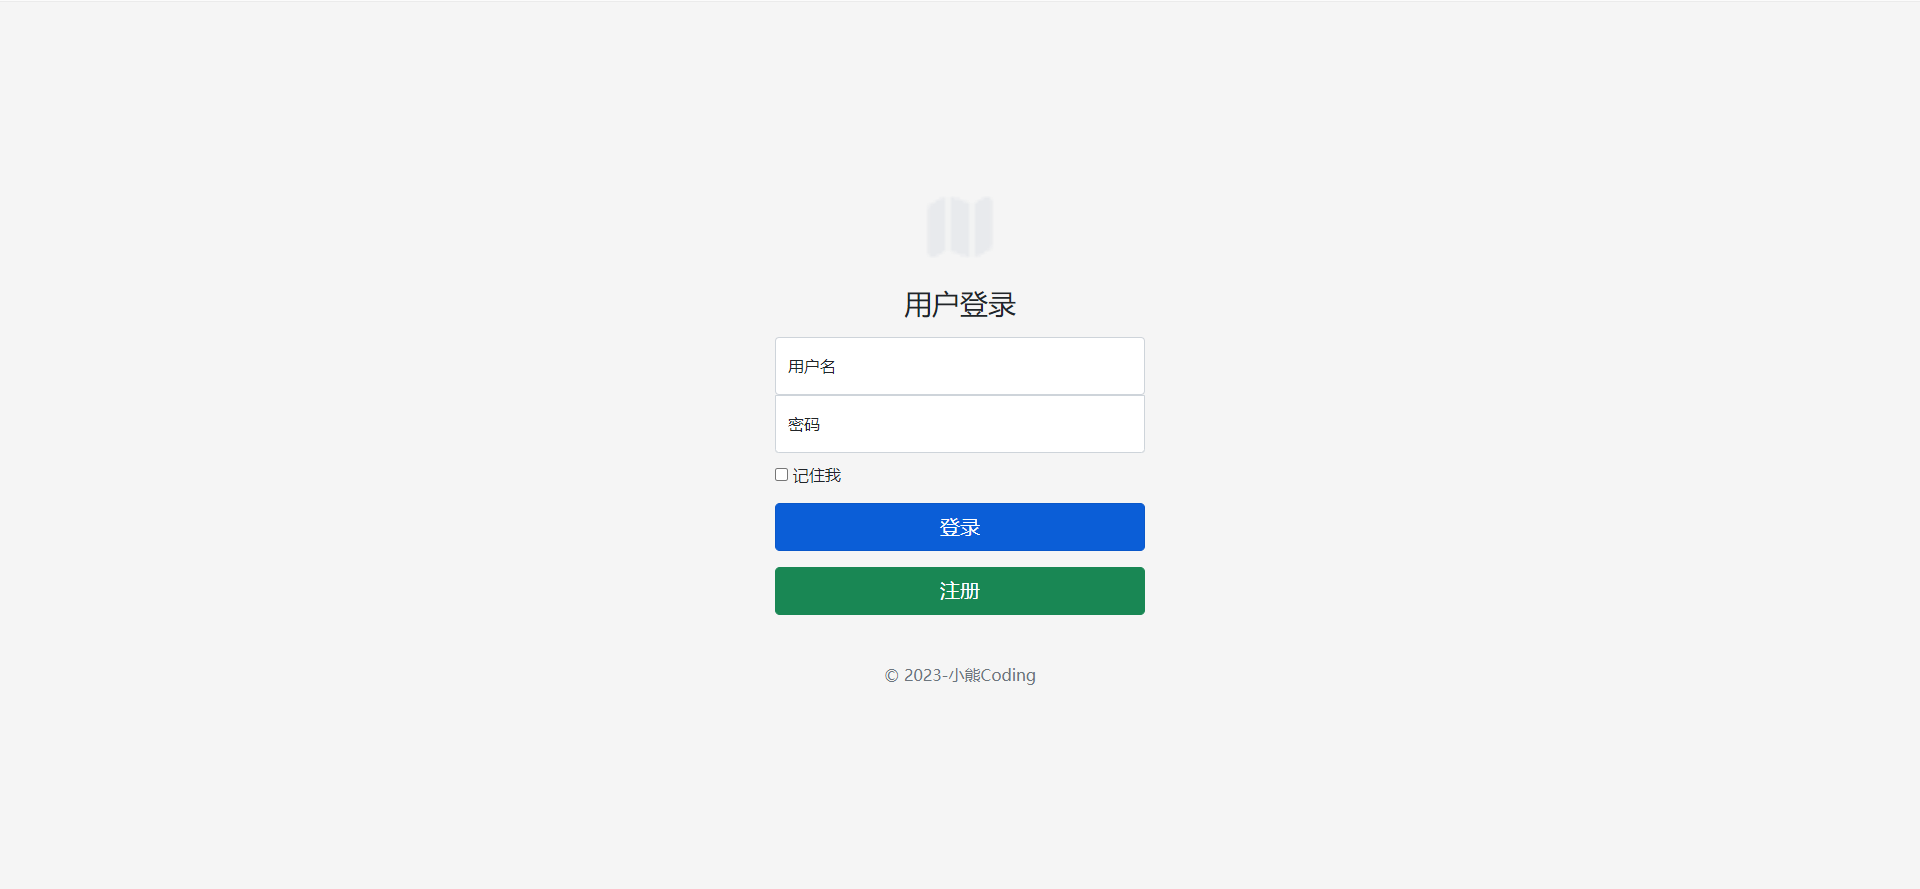
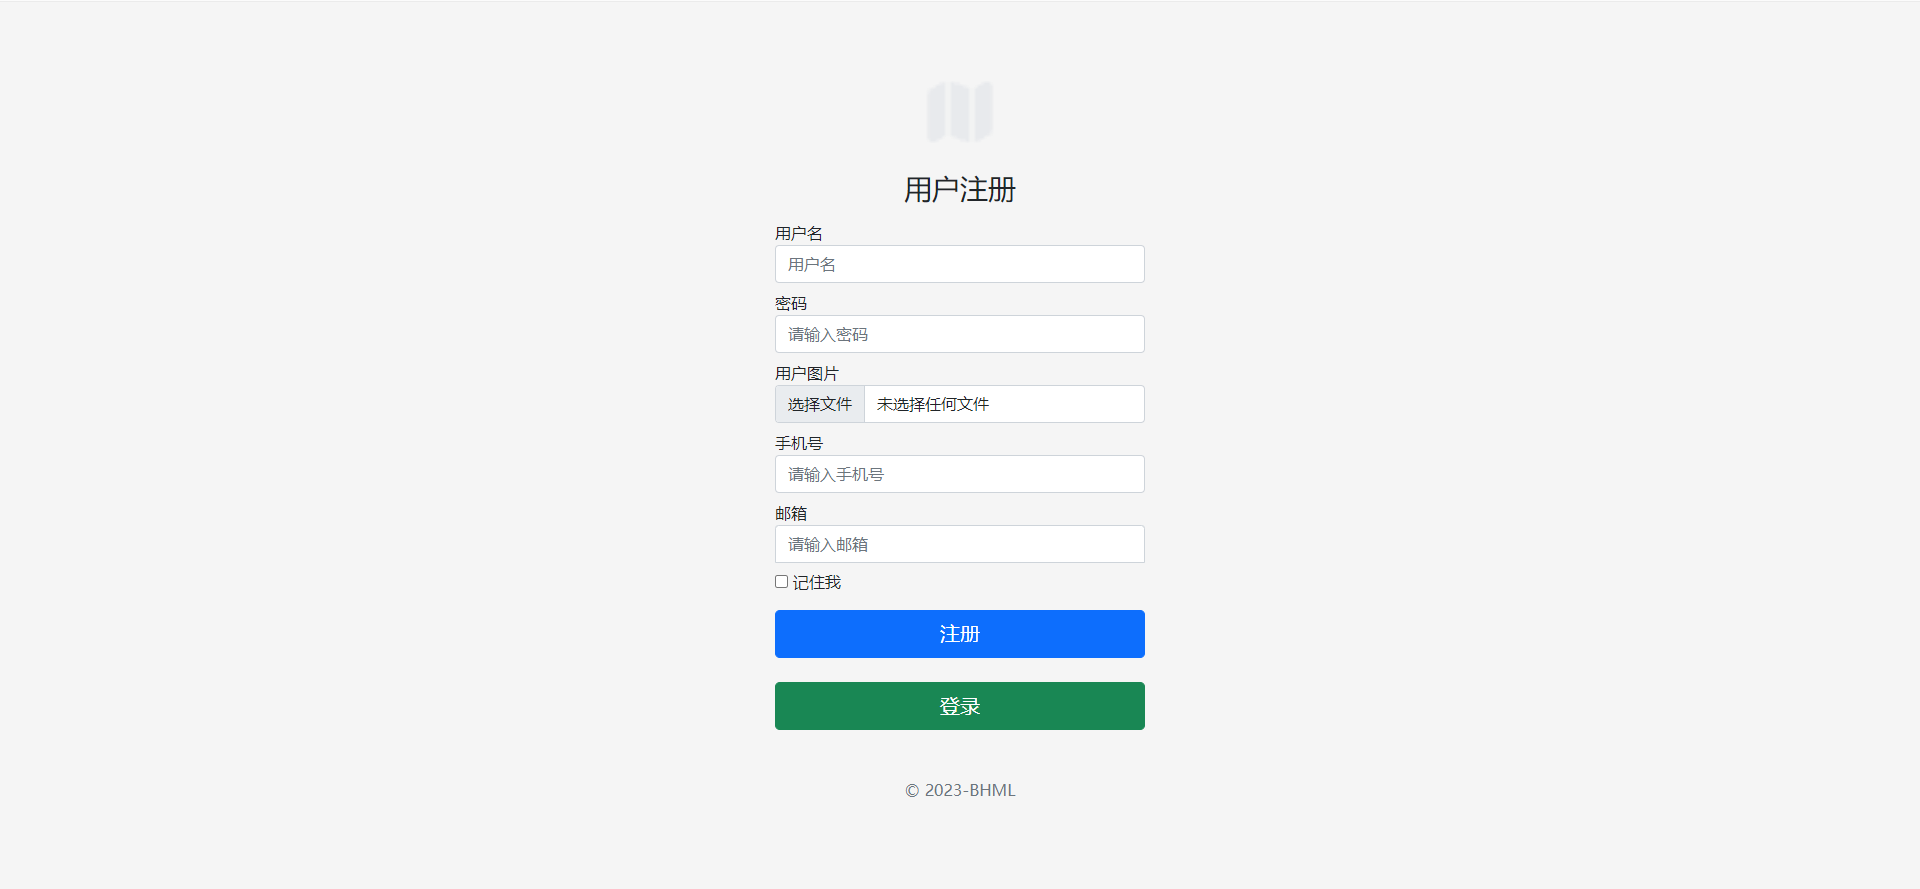
cnx.close()2.2 登陆注册:
这一块就不用多说啦,都已经写了很多次啦,想必这一块同学们也都不陌生,但是有一点就是session缓存的内容要注意,因为我们是将用户注册的信息放在缓存数据里面的,为什么要引入缓存,简单来说引入缓存可以提高网站的安全性和便捷性,至于怎么使用缓存,同学们可以参考我这边博Django的request.session缓存的广发用法-优快云博客,我这边就直接把登录注册的效果图黏贴过来就好了,大家也可以自己写一些UI美观的登录注册的页面,这些很多网站上都有的/
2.3 个人信息编辑:
这一块其实和登录注册很相近,就是在Form表单进行Post进行获取到文本框上的内容,然后将其用户对象,获取用户对象的数据库的get()就可以让用户名字段等于我们缓存中的用户名,的字段值进行重覆盖保存即可。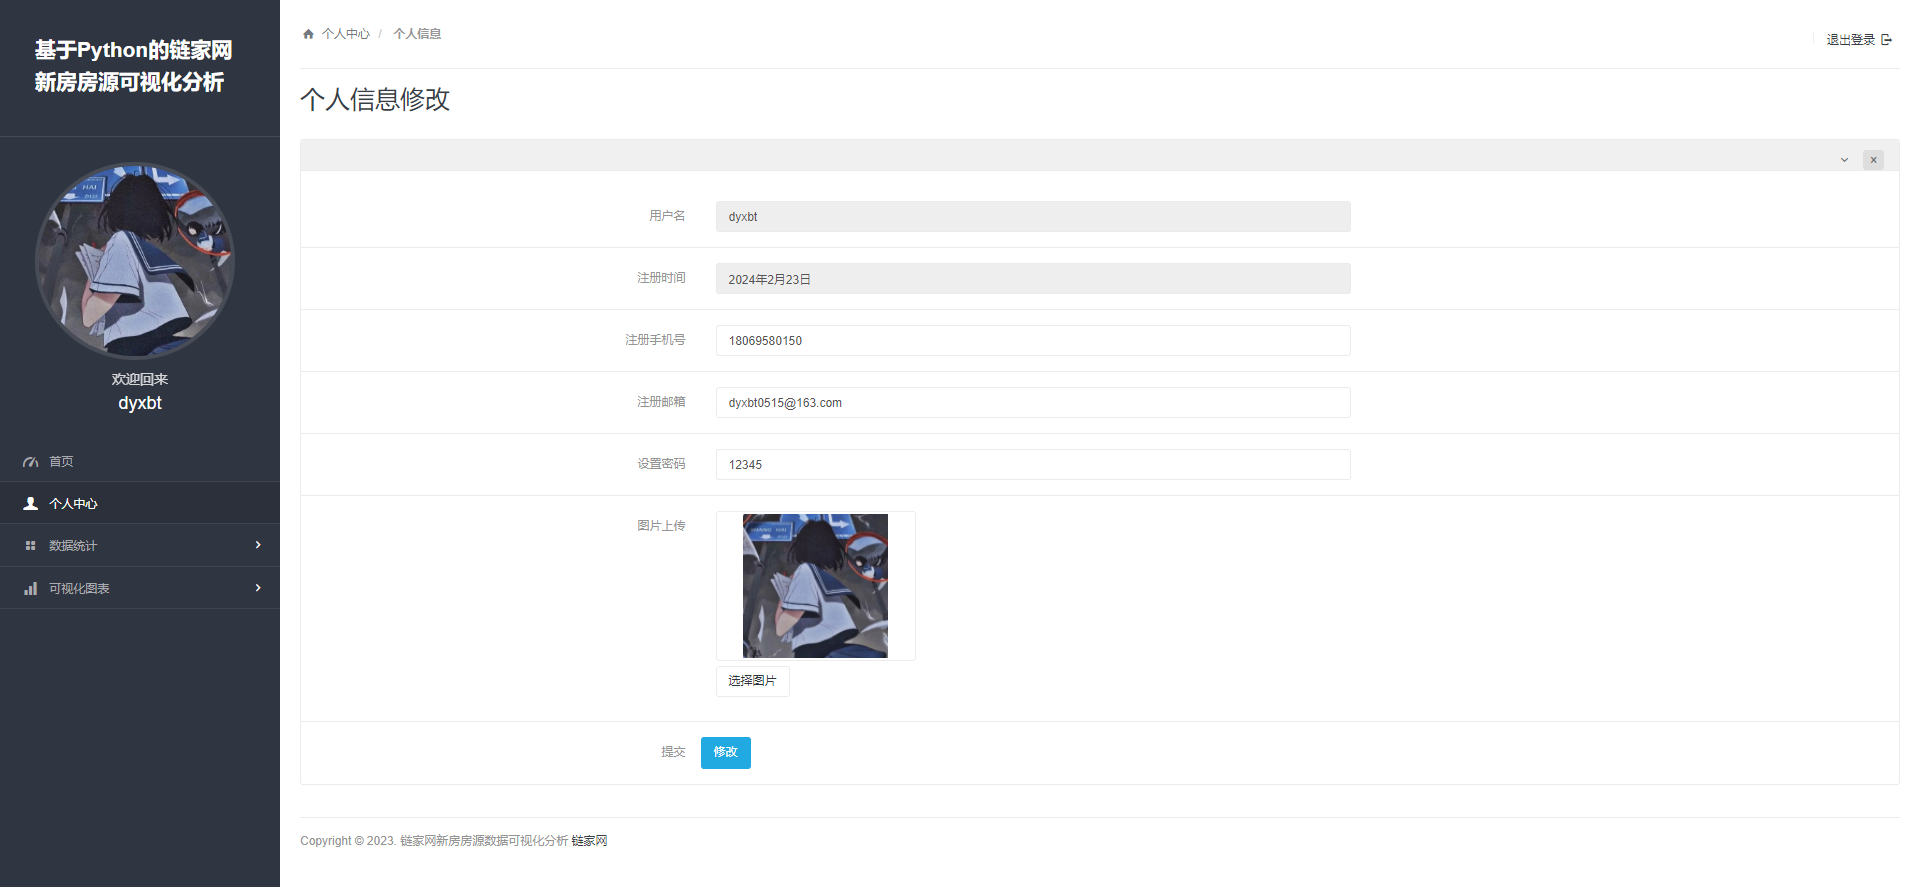
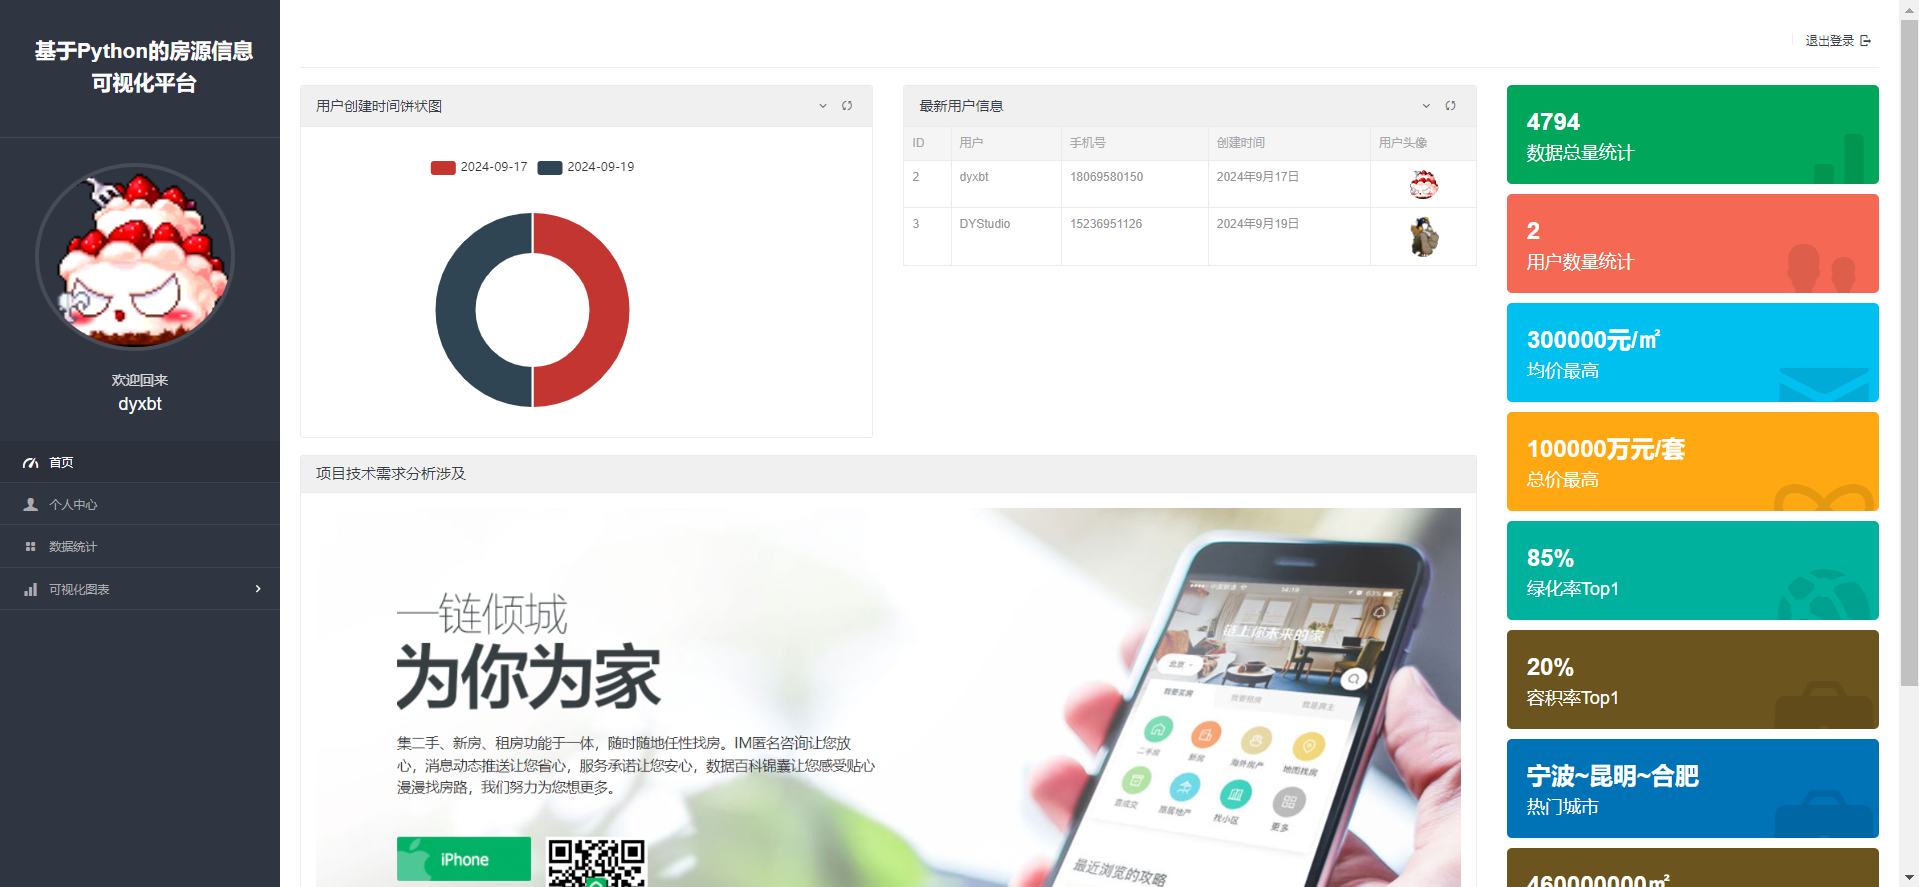
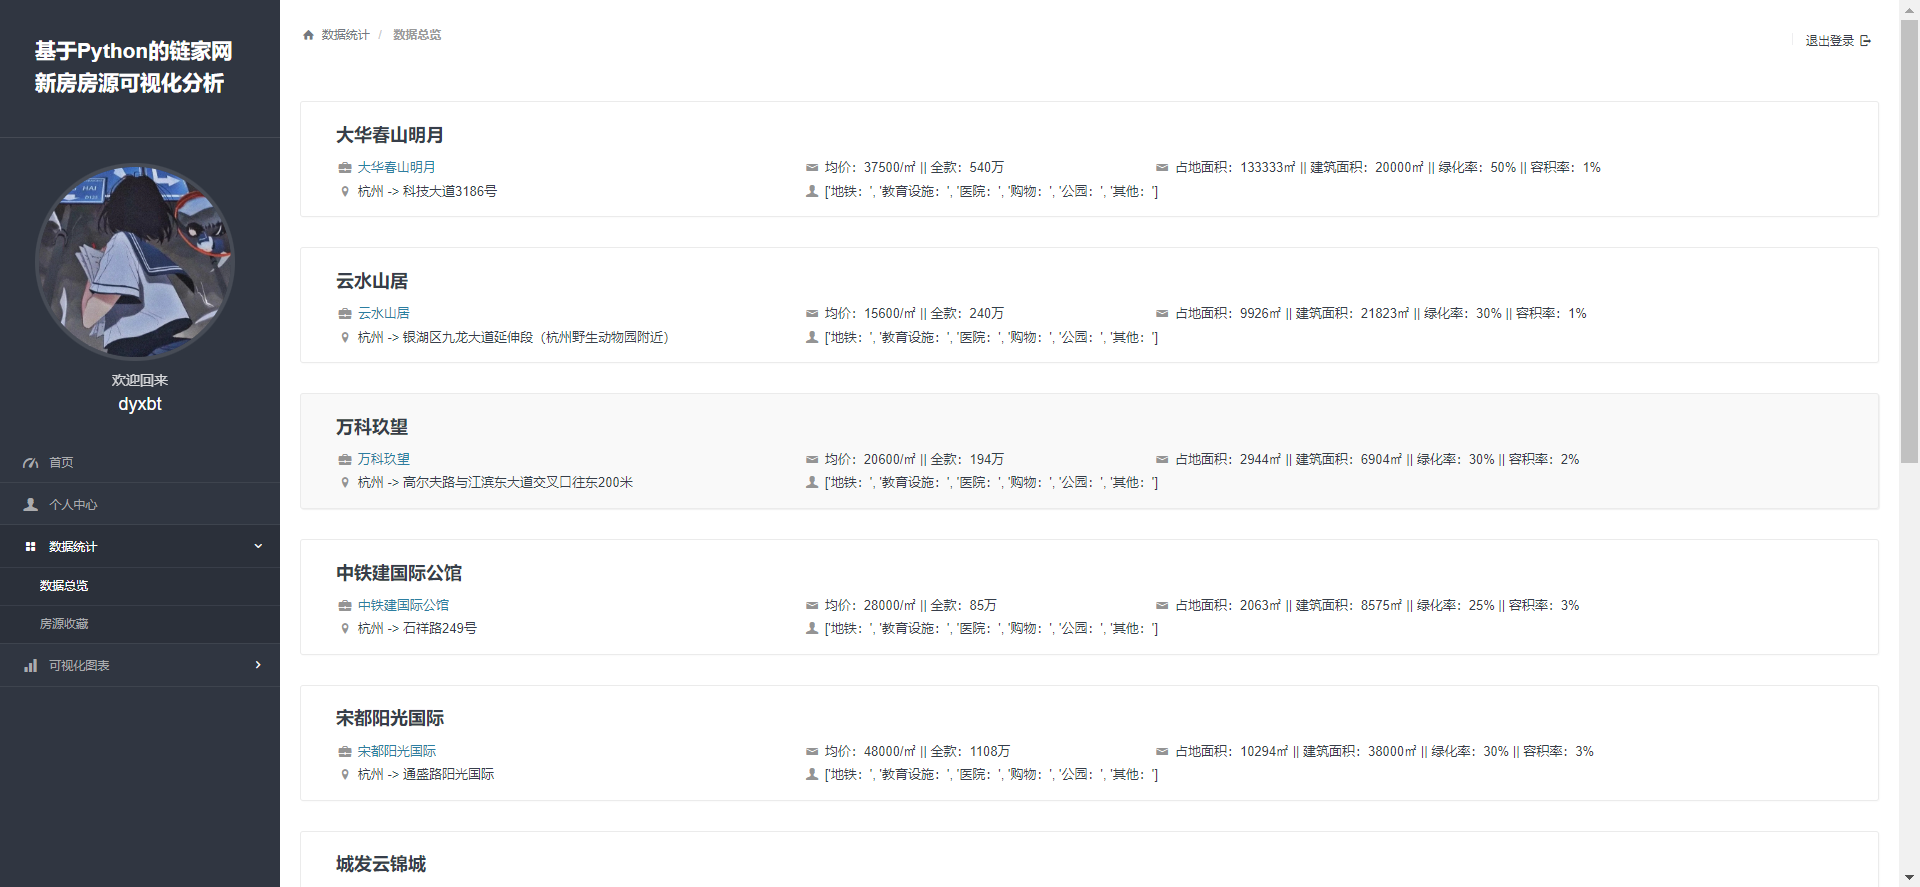
首页:这一个页面涉及到的数据比较多,也是该可视化的一个设计算法处理最多的一个页面,我主要针对这个页面的部分数据去讲一下,比如左侧的这个事件注册分布图表就是使用time模块的时间戳来处理的,右侧的数据总量就是使用数据库.account(),均价最高就是按照这个均价字段来排序就好了使用数据库.sort('-均价字段')获取到均价最高的这个新房房源对象,然后再.均价字段即可获取,其他的Top都一样,下面的热门城市我是按照数据库里那个城市包含最多的房源数据筛选定义的,代码如下:
dict1={};str1=""
    for i in House.objects.all():
        if dict1.get(i.city,-1)==-1:
            dict1[i.city]=1
        else:
            dict1[i.city]+=1
    sorted_items = sorted(dict1.items(), key=lambda x: x[1], reverse=True)
    top_3_keys = [item[0] for item in sorted_items[:3]]
    for s in top_3_keys:
        str1=str1+s+"~"
str1=str1[:-1]-
dict1={};str1="": 创建一个空字典dict1和一个空字符串str1。 -
for i in House.objects.all():: 这个循环遍历一个名为House的 Django 模型中的所有对象。 -
if dict1.get(i.city,-1)==-1:: 检查字典dict1中是否有键i.city,如果没有则返回 -1。这里使用-1作为默认值,表示该城市还没有出现过。 -
dict1[i.city]=1: 如果字典中没有该城市的键,则将该城市添加到字典中,并将其值设置为 1,表示该城市第一次出现。 -
else: dict1[i.city]+=1: 如果字典中已经存在该城市的键,则将其对应的值加1,表示该城市再次出现。 -
sorted_items = sorted(dict1.items(), key=lambda x: x[1], reverse=True): 将字典dict1按值进行排序,并将结果存储在sorted_items中。这里key=lambda x: x[1]表示按字典的值进行排序,reverse=True表示降序排列。 -
top_3_keys = [item[0] for item in sorted_items[:3]]: 从排序后的字典中取出前三个键,并将它们存储在top_3_keys列表中。 -
for s in top_3_keys: str1=str1+s+"~": 将前三个城市的键连接成一个字符串,每个城市之间用波浪线分隔。 -
str1=str1[:-1]: 去除最后一个波浪线,因为它不是城市名的一部分。
所以,这段代码的作用是统计 House 模型中城市出现的次数,并返回出现次数最多的前三个城市的名称,用波浪线分隔。
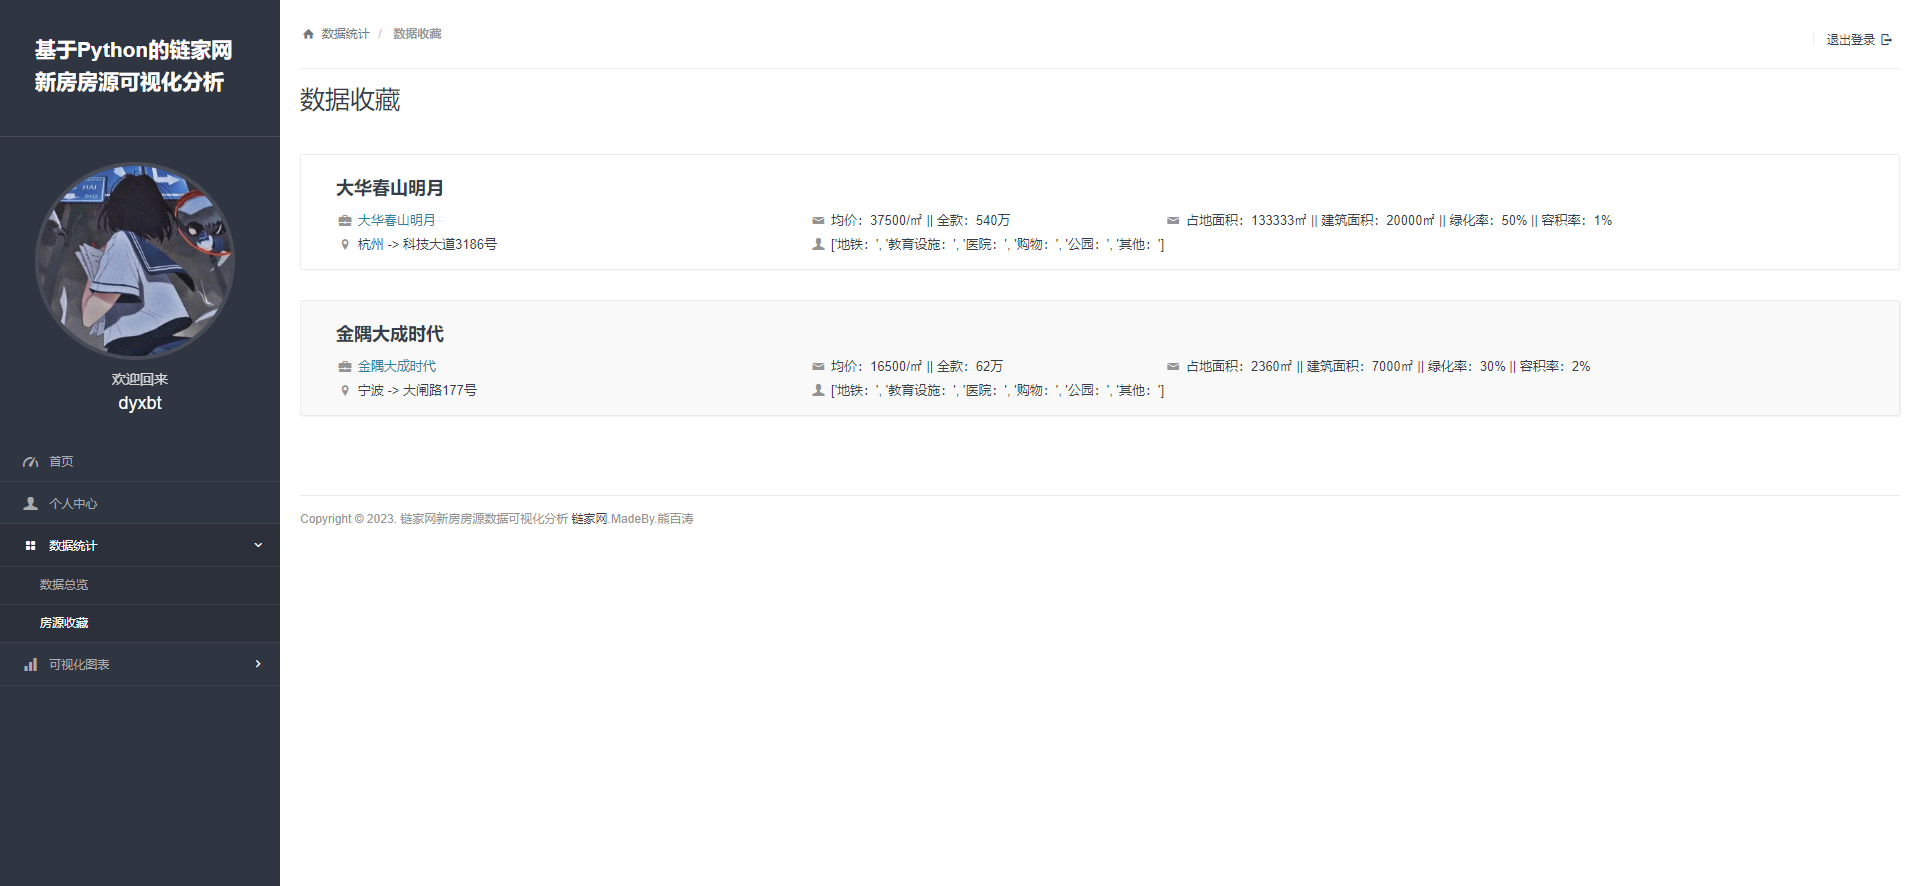
2.4 数据收藏:
我们可以看到在首页中(如下图:)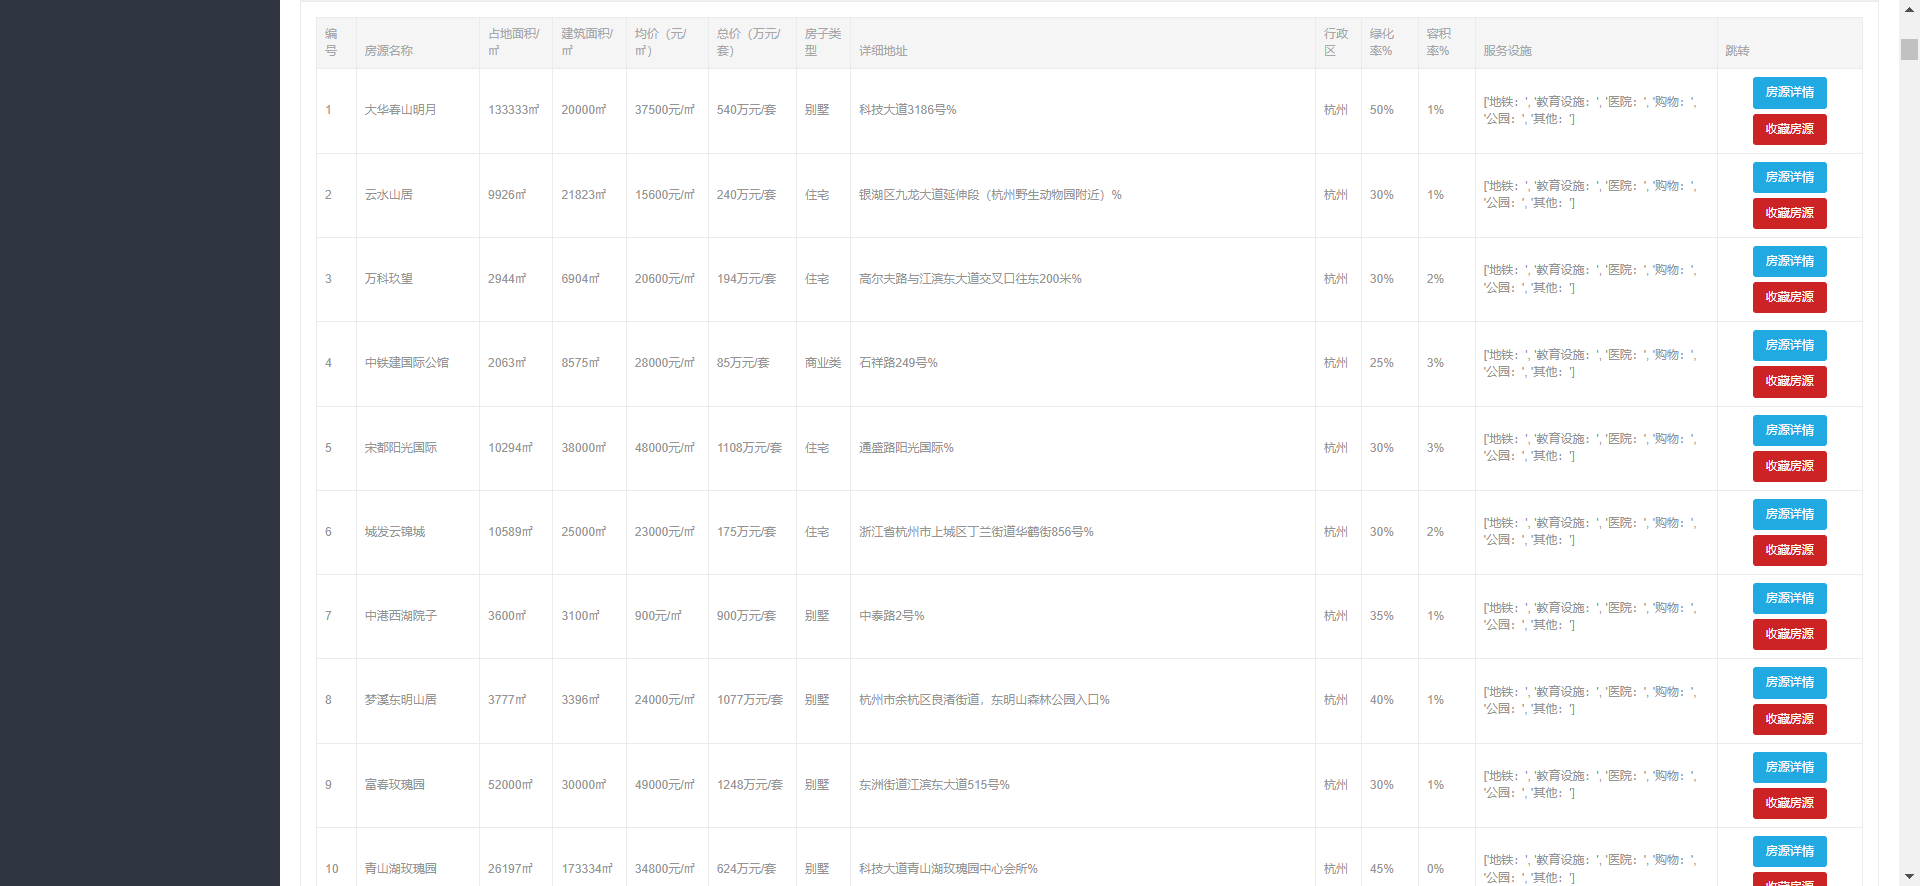
我们可以实现点击收藏房源,可以将该房源信息收藏在我们的个人收藏的页面里,这个功能的业务逻辑是这样的:
-
from django.db.models import F: 导入 Django 的 F 表达式,它允许在数据库中执行针对字段的增量更新。 -
def addHistory(userInfo, houseID):: 定义一个函数addHistory,它接受两个参数:userInfo(用户信息)和houseID(房屋 ID)。 -
hisData = Histroy.objects.filter(house_id=houseID,user=userInfo): 查询历史记录表Histroy中是否存在特定用户对特定房屋的记录。 -
if len(hisData):: 检查是否找到了历史记录。 -
hisData[0].count = F("count") + 1: 如果找到了历史记录,则使用 F 表达式增加该记录的访问次数。 -
hisData[0].save(): 保存对历史记录的更新。 -
else:: 如果未找到历史记录,则执行以下操作。 -
Histroy.objects.create(house_id=houseID, user=userInfo): 创建新的历史记录对象,记录用户对该房屋的访问。
代码如下:
from myApp.models import Histroy
import json
from django.db.models import F
def addHistory(userInfo,houseID):
    hisData = Histroy.objects.filter(house_id=houseID,user=userInfo)
    if len(hisData):
        hisData[0].count = F("count") + 1
        hisData[0].save()
    else:
        Histroy.objects.create(house_id=houseID, user=userInfo)
所以,这段代码的作用是检查用户对特定房屋的历史记录是否存在,如果存在则增加访问次数,如果不存在则创建新的历史记录。
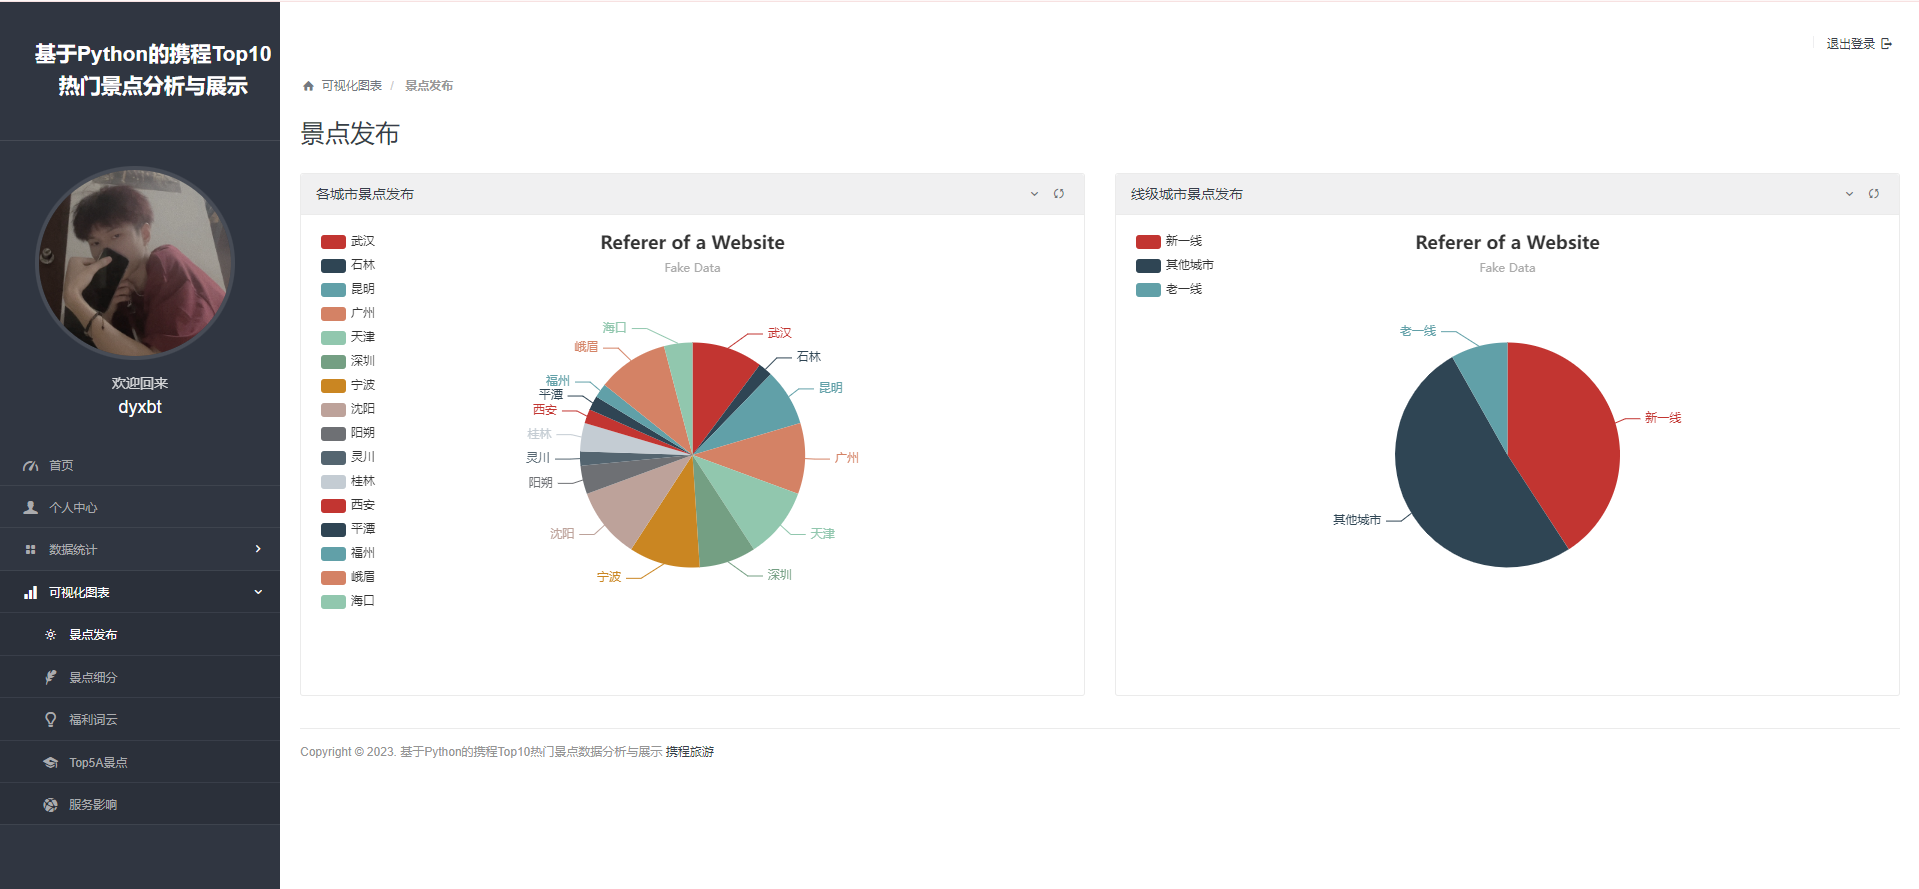
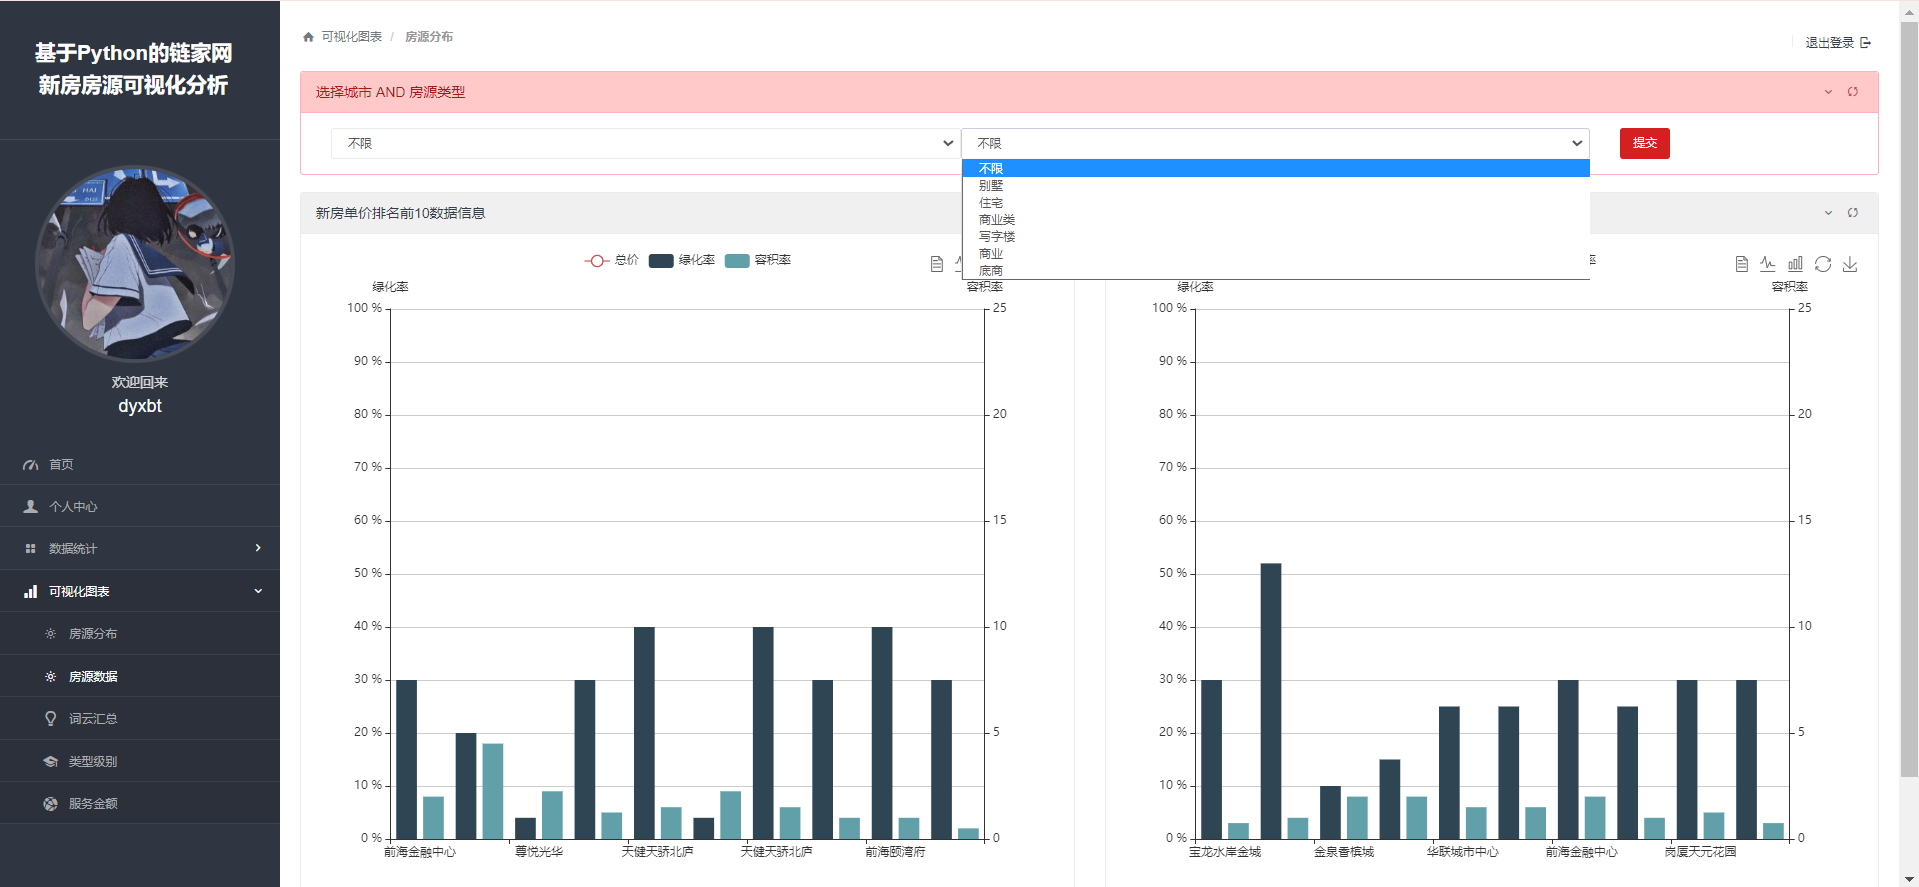
2.5 可视化图表:
这些内容已经讲过很多次了,核心思想就是从数据库拿出数据,然后处理成我们可视化工具Echarts所需要的数据类型然后从后端传递到前端渲染即可,我就直接把主要代码拿过来:
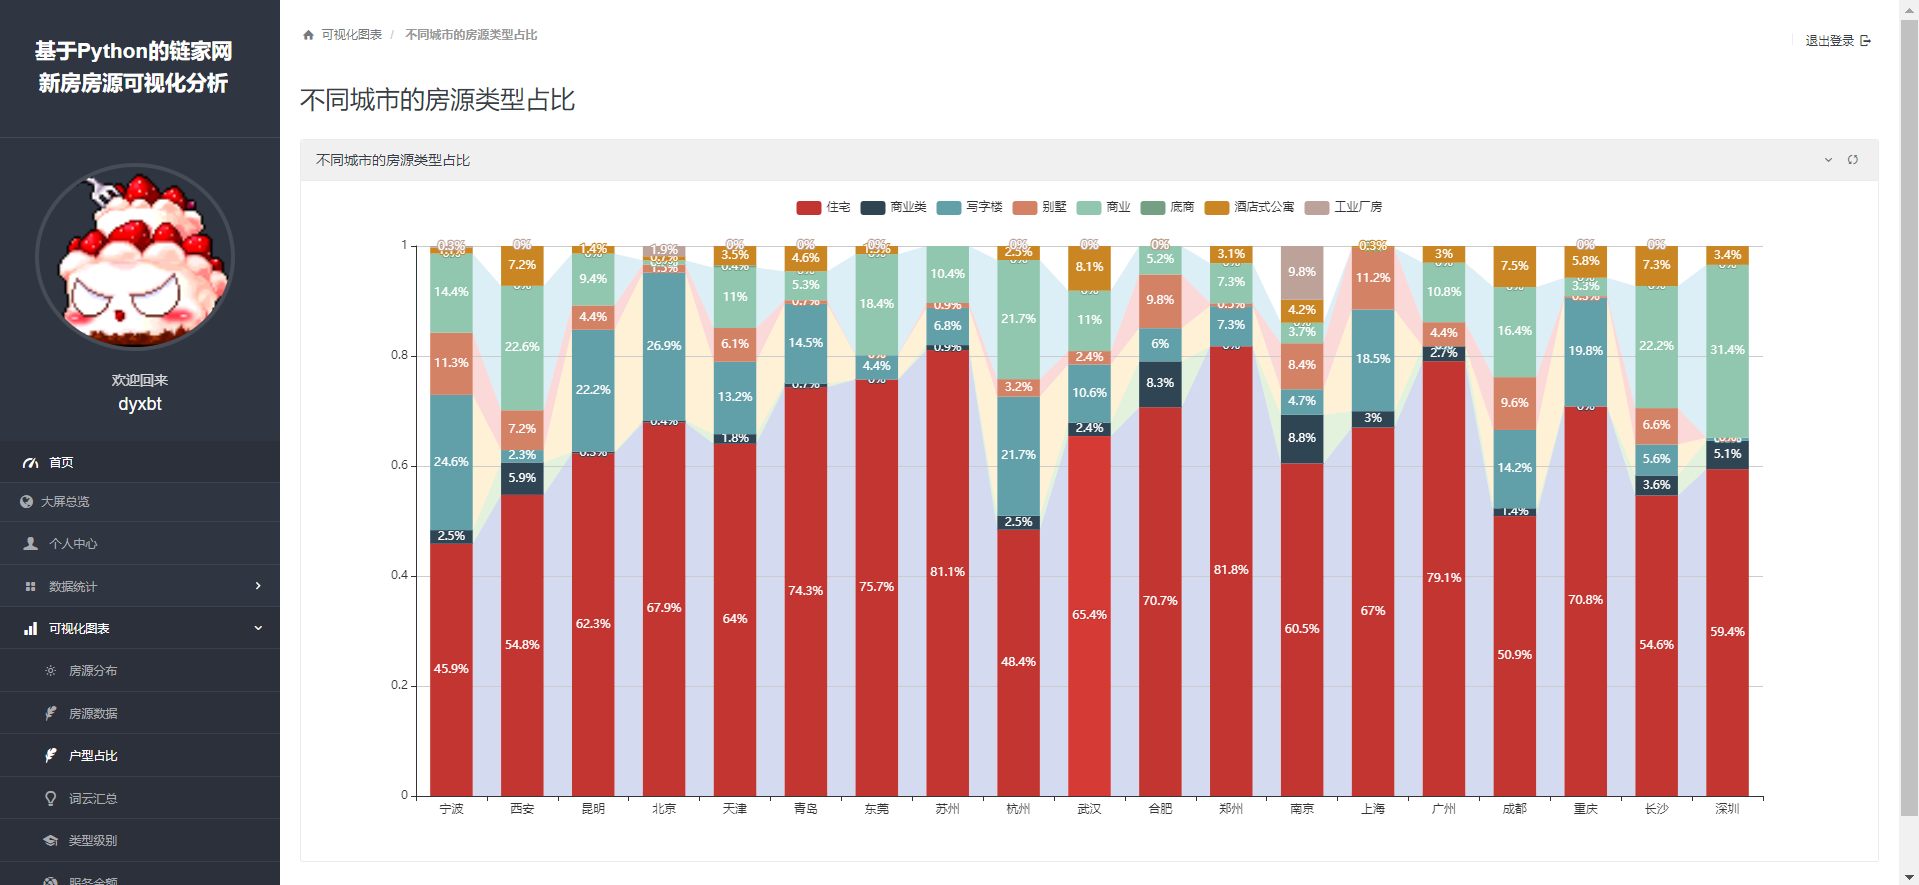
def houseDistribute(request):
username = request.session.get("username").get('username')
useravatar = request.session.get("username").get('avatar')
house = House.objects.all();dict1={};result1=[];dict2={};result2=[];
for i in house:
if dict1.get(i.city,-1)==-1:
dict1[i.city]=1
else:
dict1[i.city]+=1
for k,v in dict1.items():
result1.append({
'value': v,
"name":k
})
for i in house:
if i.city in ['北京','上海,‘广州','深圳']:
if dict2.get('老一线',-1)==-1:
dict2['老一线']=1
else:
dict2['老一线']+=1
elif i.city in ['成都','重庆','杭州','武汉','苏州','西安','南京','长沙','天津','郑州','东莞','青岛','昆明','宁波','合肥']:
if dict2.get('新一线',-1)==-1:
dict2['新一线']=1
else:
dict2['新一线']+=1
else:
if dict2.get('其他城市',-1)==-1:
dict2['其他城市']=1
else:
dict2['其他城市']+=1
for k,v in dict2.items():
result2.append({
'value': v,
"name":k
})
context={'result1':result1,'result2':result2,'username':username,'useravatar':useravatar}
return render(request,'houseDistribute.html',context)
def houseScore(request):
username = request.session.get("username").get('username')
useravatar = request.session.get("username").get('avatar')
cities = House.objects.values_list('city', flat=True).distinct()
types = House.objects.values_list('type', flat=True).distinct()
# 将城市放入列表中
citylist = list(cities);typelist=list(types)
cityname='不限';typename='不限'
cityname = request.GET.get('cityname')
typename = request.GET.get('typename')
if cityname or typename:
house1=House.objects.all().filter(city=cityname,type=typename).order_by('-averPrice')[0:10]
house2=House.objects.all().filter(city=cityname,type=typename).order_by('-totalPrice')[0:10]
else:
house1=House.objects.all().order_by('-averPrice')[0:10]
house2=House.objects.all().order_by('-totalPrice')[0:10]
data1=['总价','绿化率','容积率'];data2=['均价','绿化率','容积率']
list1=[];list2=[];list3=[];list4=[];list5=[];list6=[];list7=[];list8=[];
# 取得评分前10的景点名称
for p in house1:
list1.append(p.averPrice);list2.append(p.plantrate);list3.append(p.containrate);list4.append(p.title)
for p in house2:
list5.append(p.totalPrice);list6.append(p.plantrate);list7.append(p.containrate);list8.append(p.title)
context={'data1':data1,'data2':data2,'list1':list1,'list2':list2,'list3':list3,'list4':list4,'list5':list5,'list6':list6,'list7':list7,'list8':list8,'username':username,'useravatar':useravatar
,'citylist':citylist,'typelist':typelist}
return render(request,'houseScore.html',context)
def housewordcloud(request):
username = request.session.get("username").get('username')
useravatar = request.session.get("username").get('avatar')
# wouldCloud.wouldCloudMain()
context = {'username':username,'useravatar':useravatar}
return render(request,'housewordcloud.html',context)
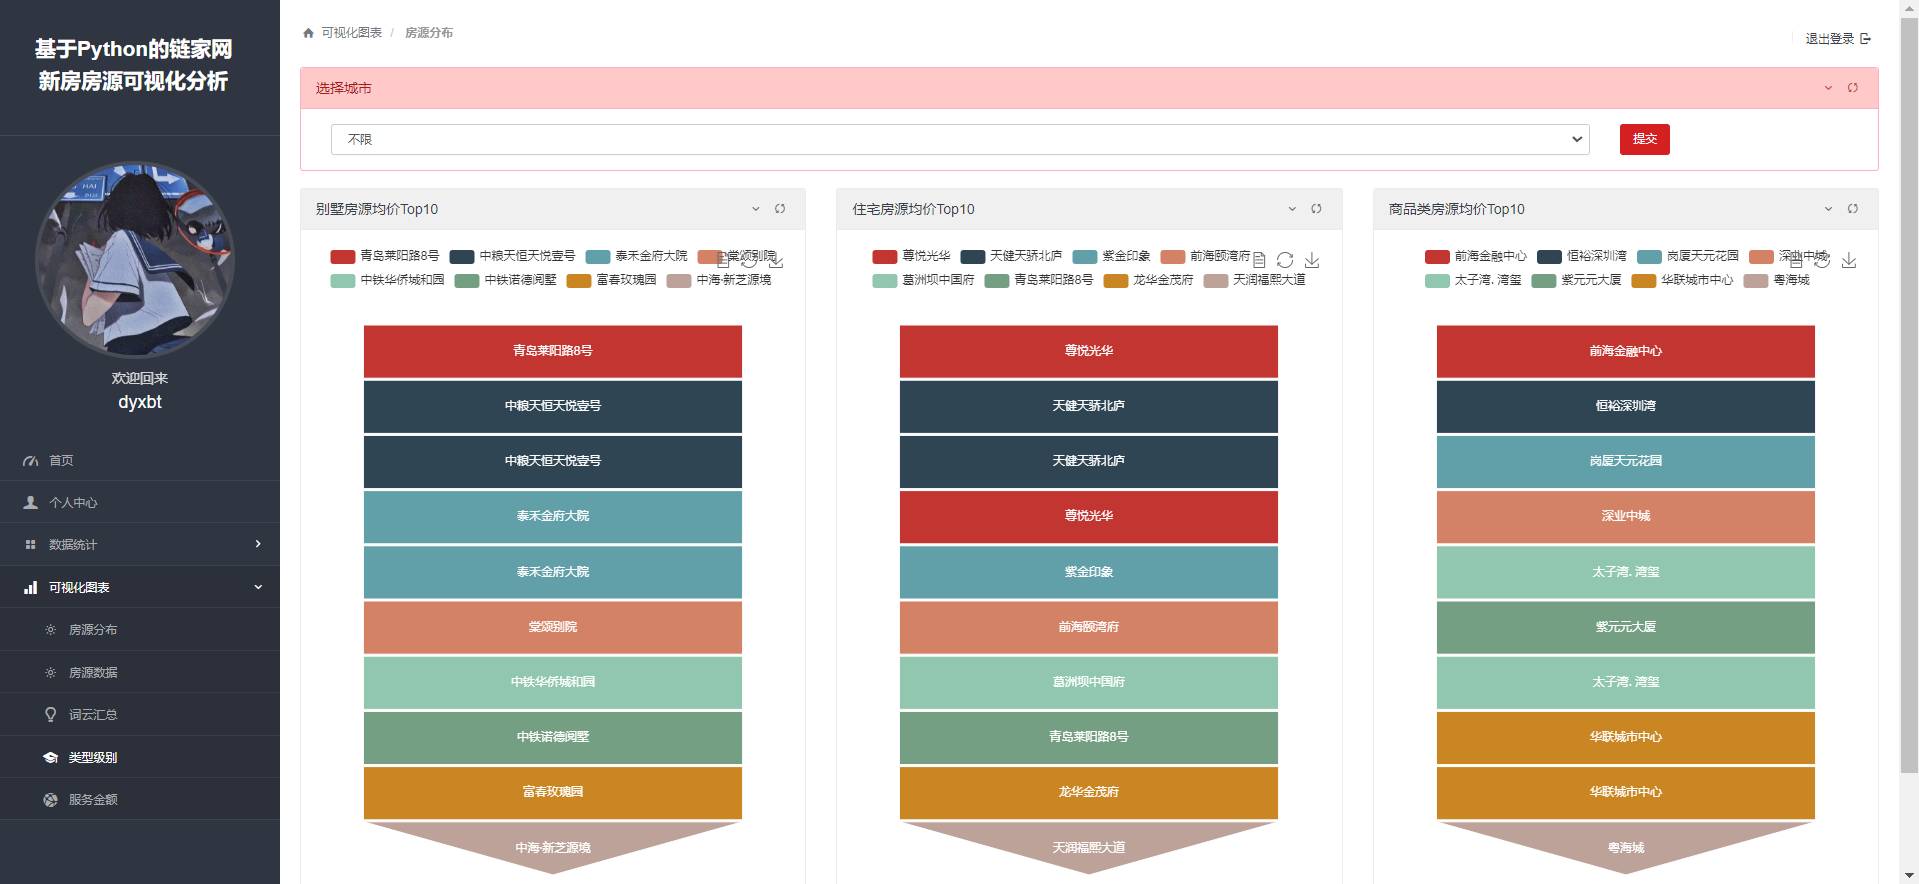
def housetyperank(request):
username = request.session.get("username").get('username')
useravatar = request.session.get("username").get('avatar')
list1_legend=[];list1=[];list2_legend=[];list2=[];list3_legend=[];list3=[]
# 查询数据库,获取所有唯一的城市
cities = House.objects.values_list('city', flat=True).distinct()
# 将城市放入列表中
citylist = list(cities)
cityname=request.GET.get("cityname")
if cityname !='不限':
type1house=House.objects.all().filter(city=cityname).filter(type='别墅').order_by('-averPrice')[:10]
type2house=House.objects.all().filter(city=cityname).filter(type='住宅').order_by('-averPrice')[:10]
type3house=House.objects.all().filter(city=cityname).filter(type='商业类').order_by('-averPrice')[:10]
for p in type1house:
list1_legend.append(p.title)
list1.append({'value':p.averPrice,'name':p.title})
for p in type2house:
list2_legend.append(p.title)
list2.append({'value':p.averPrice,'name':p.title})
for p in type3house:
list3_legend.append(p.title)
list3.append({'value':p.averPrice,'name':p.title})
context={'username':username,'useravatar':useravatar,'citylist':citylist,'list1_legend':list1_legend,'list1':list1,'list2_legend':list2_legend,'list2':list2,'list3_legend':list3_legend,'list3':list3}
if cityname not in citylist:
type1house=House.objects.all().filter(type='别墅').order_by('-averPrice')[:10]
type2house=House.objects.all().filter(type='住宅').order_by('-averPrice')[:10]
type3house=House.objects.all().filter(type='商业类').order_by('-averPrice')[:10]
for p in type1house:
list1_legend.append(p.title)
list1.append({'value':p.averPrice,'name':p.title})
for p in type2house:
list2_legend.append(p.title)
list2.append({'value':p.averPrice,'name':p.title})
for p in type3house:
list3_legend.append(p.title)
list3.append({'value':p.averPrice,'name':p.title})
context = {'username': username, 'useravatar': useravatar, 'citylist': citylist, 'list1_legend': list1_legend,'list1': list1, 'list2_legend': list2_legend, 'list2': list2, 'list3_legend': list3_legend,'list3': list3}
return render(request, 'housetyperank.html', context)
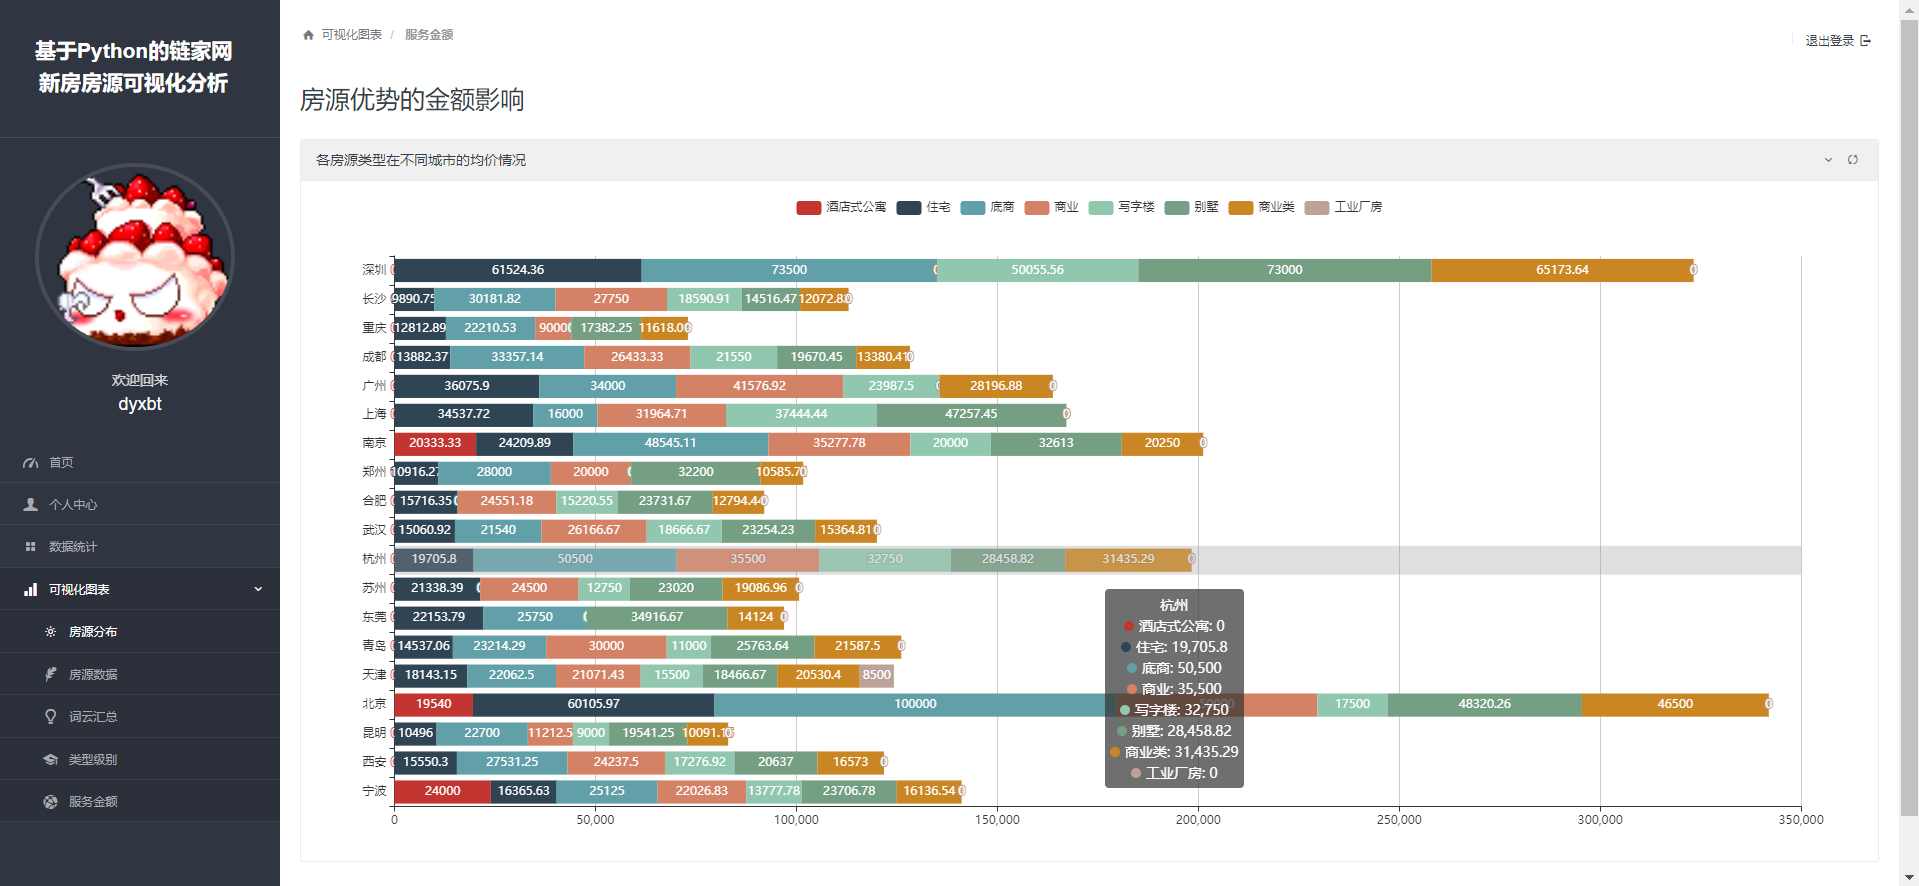
def servicemoney(request):
username = request.session.get("username").get('username')
useravatar = request.session.get("username").get('avatar')
services_data = House.objects.values('service').annotate(avg_amount=Avg('totalPrice'))
print(services_data)
# 计算服务设施的平均值总和
total_avg = sum(data['avg_amount'] for data in services_data)
print(total_avg)
# 创建结果列表
result = [['percent', 'amount', 'service']]
# 计算百分比并添加到结果列表中
for data in services_data:
percent = round((data['avg_amount'] / total_avg) * 100, 1)
result.append([percent, data['avg_amount'], data['service']])
# 返回结果列表
print(result)
context = {'username': username, 'useravatar':useravatar, 'result': result}
return render(request, 'servicemoney.html',context)可视化效果图:

最后需要项目的同学可以私信我~


 990
990

 被折叠的 条评论
为什么被折叠?
被折叠的 条评论
为什么被折叠?
 到【灌水乐园】发言


