


 本文详细介绍了清除浮动的四种方法:额外标签法、父级设置overflow、:after伪元素法和父级双伪元素法,分别阐述了各自的优缺点,并提供了相关代码示例,帮助理解在前端开发中如何有效地解决浮动元素对布局的影响。
前言
浮动的元素会脱离标准流(文档流),浮动的盒子不再保留原先的位置
清除浮动的本质就是清除浮动元素带来的影响,策略——闭合浮动
提示:以下是本篇文章正文内容,下面案例可供参考
为什么要清除浮动?
在实际开发中,一般都不给父盒子设定高度,让子盒子撑开父盒子,
但是不给父盒子高度,子盒子浮动后,父盒子高度就会为0,
则会影响后面的标准流排版,所以就需要清除浮动
一、额外标签法
额外标签法是在浮动元素的末尾添加一个空标签,例如<div>标签
优点:通俗易懂
缺点:添加无意义的标签,代码结构化差
注意:添加的空标签必须是块级元素,不能是行内元素
    <h1>额外标签法</h1>
    <!-- <div class="clear"></div>---额外标签法 -->
    <!-- 这个新增的盒子必须是块级元素,不能是行内元素 -->
    <div class="father1">
        <div class="son1">son</div>
        <div class="daughter1">daughter</div>
        <div class="clear"></div>
    </div>
    <div class="uncle1">uncle</div>
* {
margin: 0;
padding: 0;
text-align: center;
}
/* 第一种-额外标签法 */
.father1 {
width: 800px;
background-color: rgb(67, 72, 84);
margin: 0 auto;
}
.clear {
clear: both;
}
.son1,
.daughter1 {
height: 300px;
width: 360px;
line-height: 300px;
float: left;
background-color: rgb(121, 164, 92);
margin: 0 20px;
}
.uncle1 {
width: 700px;
height: 100px;
line-height: 100px;
background-color: rgb(100, 58, 126);
margin: 0 auto;
}
二、父级overflow
给父级添加overflow属性,属性值设置为hidden、auto或scroll,一般都写hidden
优点:代码简洁
缺点:无法显示出溢出部分
<h1>父级overflow</h1>
<div class="father2">
<div class="son2">son</div>
<div class="daughter2">daughter</div>
</div>
<div class="uncle2">uncle</div> /* 第二种-父级overflow */
.father2 {
width: 800px;
background-color: rgb(7, 144, 155);
margin: 0 auto;
/* 可以给父级添加overflow属性,将其属性设置为hidden、auto或sroll,通常用hidden。 */
overflow: hidden;
}
.son2,
.daughter2 {
height: 300px;
width: 360px;
line-height: 300px;
float: left;
background-color: rgb(209, 168, 123);
margin: 0 20px;
}
.uncle2 {
width: 700px;
height: 100px;
line-height: 100px;
background-color: rgb(141, 95, 46);
margin: 0 auto;
}
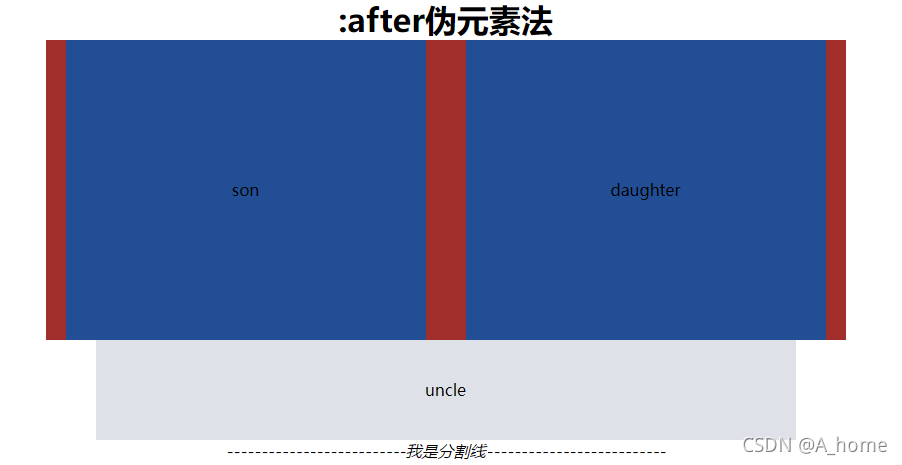
三 、:after伪元素法
额外标签法的升级版
优点:没有增加标签,结构更优化
缺点:需要照顾低版本浏览器
<h1>:after伪元素法</h1>
<!-- 额外标签法的升级版 -->
<div class="father3 clearfix1">
<div class="son3">son</div>
<div class="daughter3">daughter</div>
</div>
<div class="uncle3">uncle</div> /* 第三种-:after伪元素法 */
.father3 {
width: 800px;
background-color: rgb(161, 46, 42);
margin: 0 auto;
}
/* 额外标签法的升级版,也是给父级添加 */
/* 优点:没有新增标签,结构更优化 */
.clearfix1:after {
content: "";
display: block;
height: 0;
clear: both;
visibility: hidden;
}
/* 缺点:需要照顾低版本浏览器 */
.clearfix1 {
*zoom: 1;
/*IE6、7专有 */
}
.son3,
.daughter3 {
height: 300px;
width: 360px;
line-height: 300px;
float: left;
background-color: rgb(34, 78, 149);
margin: 0 20px;
}
.uncle3 {
width: 700px;
height: 100px;
line-height: 100px;
background-color: rgb(222, 225, 231);
margin: 0 auto;
}
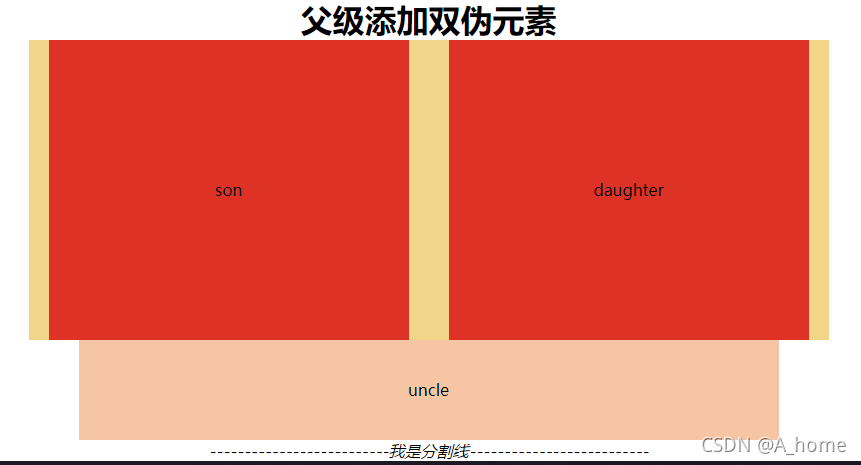
四、父级双伪元素
给父元素添加前后双伪元素
优点:代码更简洁
缺点:需要照顾低版本浏览器
<h1>父级添加双伪元素</h1>
<!-- 给父级添加了前后双伪类元素 -->
<div class="father4 clearfix2">
<div class="son4">son</div>
<div class="daughter4">daughter</div>
</div>
<div class="uncle4">uncle</div> /* 第四种-父级添加双伪元素 */
.father4 {
width: 800px;
background-color: rgb(241, 213, 137);
margin: 0 auto;
}
/* 额外标签法的升级版Pro,也是给父级添加 (前后添加)*/
/* 优点:代码更简洁*/
.clearfix2:before,
.clearfix2:after {
content: "";
display: table;
/*是table,不是block*/
}
.clearfix2:after {
clear: both;
}
/* 缺点:需要照顾低版本浏览器 */
.clearfix2 {
*zoom: 1;
/*IE6、7专有 */
}
.son4,
.daughter4 {
height: 300px;
width: 360px;
line-height: 300px;
float: left;
background-color: rgb(222, 50, 38);
margin: 0 20px;
}
.uncle4 {
width: 700px;
height: 100px;
line-height: 100px;
background-color: rgb(245, 197, 164);
margin: 0 auto;
}
完整代码
仅供参考,如有错误,欢迎指出
<!DOCTYPE html>
<html lang="zh-cn">
<head>
<meta charset="UTF-8">
<meta http-equiv="X-UA-Compatible" content="IE=edge">
<meta name="viewport" content="width=device-width, initial-scale=1.0">
<title>清除浮动的四种方法</title>
<style>
        * {
            margin: 0;
            padding: 0;
            text-align: center;
        }

        /* 第一种-额外标签法 */
        .father1 {
            width: 800px;
            background-color: rgb(67, 72, 84);
            margin: 0 auto;
        }

        .clear {
            clear: both;
        }

        .son1,
        .daughter1 {
            height: 300px;
            width: 360px;
            line-height: 300px;
            float: left;
            background-color: rgb(121, 164, 92);
            margin: 0 20px;

        }

        .uncle1 {
            width: 700px;
            height: 100px;
            line-height: 100px;
            background-color: rgb(100, 58, 126);
            margin: 0 auto;
        }
/* 第二种-父级overflow */
.father2 {
width: 800px;
background-color: rgb(7, 144, 155);
margin: 0 auto;
/* 可以给父级添加overflow属性,将其属性设置为hidden、auto或sroll,通常用hidden。 */
overflow: hidden;
}
.son2,
.daughter2 {
height: 300px;
width: 360px;
line-height: 300px;
float: left;
background-color: rgb(209, 168, 123);
margin: 0 20px;
}
.uncle2 {
width: 700px;
height: 100px;
line-height: 100px;
background-color: rgb(141, 95, 46);
margin: 0 auto;
}
/* 第三种-:after伪元素法 */
.father3 {
width: 800px;
background-color: rgb(161, 46, 42);
margin: 0 auto;
}
/* 额外标签法的升级版,也是给父级添加 */
/* 优点:没有新增标签,结构更优化 */
.clearfix1:after {
content: "";
display: block;
height: 0;
clear: both;
visibility: hidden;
}
/* 缺点:需要照顾低版本浏览器 */
.clearfix1 {
*zoom: 1;
/*IE6、7专有 */
}
.son3,
.daughter3 {
height: 300px;
width: 360px;
line-height: 300px;
float: left;
background-color: rgb(34, 78, 149);
margin: 0 20px;
}
.uncle3 {
width: 700px;
height: 100px;
line-height: 100px;
background-color: rgb(222, 225, 231);
margin: 0 auto;
}
/* 第四种-父级添加双伪元素 */
.father4 {
width: 800px;
background-color: rgb(241, 213, 137);
margin: 0 auto;
}
/* 额外标签法的升级版Pro,也是给父级添加 (前后添加)*/
/* 优点:代码更简洁*/
.clearfix2:before,
.clearfix2:after {
content: "";
display: table;
/*是table,不是block*/
}
.clearfix2:after {
clear: both;
}
/* 缺点:需要照顾低版本浏览器 */
.clearfix2 {
*zoom: 1;
/*IE6、7专有 */
}
.son4,
.daughter4 {
height: 300px;
width: 360px;
line-height: 300px;
float: left;
background-color: rgb(222, 50, 38);
margin: 0 20px;
}
.uncle4 {
width: 700px;
height: 100px;
line-height: 100px;
background-color: rgb(245, 197, 164);
margin: 0 auto;
}
</style>
</head>
<body>
<h1>额外标签法</h1>
<!-- <div class="clear"></div>---额外标签法 -->
<!-- 这个新增的盒子必须是块级元素,不能是行内元素 -->
<div class="father1">
<div class="son1">son</div>
<div class="daughter1">daughter</div>
<div class="clear"></div>
</div>
<div class="uncle1">uncle</div>
<em>--------------------------我是分割线--------------------------</em>
    <h1>父级overflow</h1>
    <div class="father2">
        <div class="son2">son</div>
        <div class="daughter2">daughter</div>
    </div>
    <div class="uncle2">uncle</div>
<em>--------------------------我是分割线--------------------------</em>
    <h1>:after伪元素法</h1>
    <!-- 额外标签法的升级版 -->
    <div class="father3 clearfix1">
        <div class="son3">son</div>
        <div class="daughter3">daughter</div>
    </div>
    <div class="uncle3">uncle</div>
<em>--------------------------我是分割线--------------------------</em>
    <h1>父级添加双伪元素</h1>
    <!-- 给父级添加了前后双伪类元素 -->
    <div class="father4 clearfix2">
        <div class="son4">son</div>
        <div class="daughter4">daughter</div>
    </div>
    <div class="uncle4">uncle</div>
<em>--------------------------我是分割线--------------------------</em>
</body>
</html>


 725
725

 被折叠的 条评论
为什么被折叠?
被折叠的 条评论
为什么被折叠?
 到【灌水乐园】发言


