


项目背景与需求
数据库的备份通常需要定时和手动两种方式。传统的备份方式往往需要在命令行中输入复杂的命令,或者依赖于第三方工具。为了让备份操作更加简便和直观,我们可以设计一个基于Web界面的备份系统,用户通过填写Web表单,系统自动完成备份并上传至远程服务器。
项目功能
- Web表单界面:通过简单的Web界面,用户可以填写MySQL数据库连接信息和远程服务器的存储路径。
- 数据库备份:系统会执行
mysqldump命令进行数据库备份,并将备份文件存储在本地。 - 远程传输:系统能够通过SCP协议将备份文件传输到指定的远程服务器。
- 状态反馈:备份完成后,系统会提供详细的操作状态反馈,告知用户备份是否成功。
系统结构
该系统主要由前端、后端和Shell脚本三部分组成。
-
前端(HTML + CSS + JavaScript)
- 用户通过表单提交数据库连接信息和远程服务器信息。
- 提交时,前端使用AJAX技术向后端发起请求,避免页面刷新。
- 在备份过程中,前端提供了加载提示,操作结果会实时反馈给用户。
-
后端(PHP)
- PHP接收前端提交的表单数据,并通过调用Shell脚本来执行实际的备份操作。
- PHP代码会通过
popenshell函数启动备份脚本,并实时获取备份结果。
-
Shell脚本(Bash)
- Shell脚本负责数据库备份操作,调用
mysqldump命令进行数据备份,并将备份文件保存至本地。 - 备份完成后,脚本使用SCP协议将文件上传至远程服务器。
- Shell脚本负责数据库备份操作,调用
系统代码解析
1. 前端HTML结构
前端HTML页面通过表单输入数据库和远程服务器的配置信息。如下所示:
<!DOCTYPE html>
<html lang="zh-CN">
<head>
    <meta charset="UTF-8">
    <meta name="viewport" content="width=device-width, initial-scale=1.0">
    <title>MySQL Web Backup</title>
    <link rel="stylesheet" href="styles.css">
    <link rel="icon" href="imgs/biaoq.jpg" type="image/x-icon">
</head>
<body>
    <div class="form-container">
        <h1>MySQL backup system</h1>

        <form id="myForm" method="post">
            <div class="input-section">
                <h2>备份端信息</h2>
                <div class="input-group">
                    <label for="db_ip">数据库 IP:</label>
                    <input type="text" id="db_ip" name="db_ip" required>
                </div>
                <div class="input-group">
                    <label for="db_port">数据库端口:</label>
                    <input type="text" id="db_port" name="db_port" required>
                </div>
                <div class="input-group">
                    <label for="db_name">数据库名称:</label>
                    <input type="text" id="db_name" name="db_name" required>
                </div>
                <div class="input-group">
                    <label for="db_user">数据库用户名:</label>
                    <input type="text" id="db_user" name="db_user" required>
                </div>
                <div class="input-group">
                    <label for="db_password">数据库密码:</label>
                    <input type="password" id="db_password" name="db_password" required>
                </div>
            </div>

            <div class="input-section">
                <h2>存储端信息</h2>
                <div class="input-group">
                    <label for="remote_server">远程服务器 IP:</label>
                    <input type="text" id="remote_server" name="remote_server" required>
                </div>
                <div class="input-group">
                    <label for="remote_path">远程路径:</label>
                    <input type="text" id="remote_path" name="remote_path" required>
                </div>
                <div class="input-group">
                    <label for="remote_user">远程用户名:</label>
                    <input type="text" id="remote_user" name="remote_user" required>
                </div>
                <div class="input-group">
                    <label for="remote_password">远程服务器密码:</label>
                    <input type="password" id="remote_password" name="remote_password" required>
                </div>
            </div>

        </form>
        <h3>注:服务器之间需网络互通</h3>

        <button id="submitButton" type="button">执行备份</button>
        <div id="resultMessage"></div>
    </div>

    <!-- 加载提示 -->
    <div id="loadingMessage">正在执行备份,请稍等...</div>

<script>
    const form = document.getElementById('myForm');
    const submitButton = document.getElementById('submitButton');
    const resultMessage = document.getElementById('resultMessage');
    const loadingMessage = document.getElementById('loadingMessage');

    submitButton.addEventListener('click', function() {
        loadingMessage.style.display = "block";  // 显示加载提示
        resultMessage.innerHTML = '';  // 清空上次结果

        const formData = new FormData(form);

        // 使用 Fetch API 进行 AJAX 提交
        fetch('backup_process.php', {
            method: 'POST',
            body: formData,
        })
        .then(response => response.text())  // 获取返回的文本数据
        .then(data => {
            console.log('返回的数据:', data);  // 输出返回的数据

            // 判断返回结果,显示不同的提示
            if (data.includes("备份操作成功")) {
                resultMessage.innerHTML = '<span style="color: green;">' + data + '</span>';
            } else {
                resultMessage.innerHTML = '<span style="color: red;">' + data + '</span>';
            }

            loadingMessage.style.display = "none";  // 隐藏加载提示
        })
        .catch(error => {
            console.error('请求失败:', error);  // 输出请求错误
            resultMessage.innerHTML = '提交失败,请稍后再试。';
            loadingMessage.style.display = "none";
        });
    });
</script>

</body>
</html>
2. 后端PHP逻辑
在后端,PHP负责接收前端提交的表单数据,并调用Shell脚本执行数据库备份:
<?php
// 禁用输出缓冲,确保信息实时发送到浏览器
ob_implicit_flush(true);
ob_end_flush();

// 设置 header 来禁用缓存并确保实时输出
header('Content-Type: text/html; charset=utf-8');

// 获取表单数据并进行合法性验证
$db_ip = $_POST['db_ip'] ?? '';  // 数据库 IP 地址
$db_port = $_POST['db_port'] ?? '';  // 数据库端口
$db_name = $_POST['db_name'] ?? '';  // 数据库名称
$db_user = $_POST['db_user'] ?? '';  // 数据库用户名
$db_password = $_POST['db_password'] ?? '';  // 数据库密码
$remote_server = $_POST['remote_server'] ?? '';  // 远程服务器 IP
$remote_path = $_POST['remote_path'] ?? '';  // 远程服务器备份路径
$remote_user = $_POST['remote_user'] ?? '';  // 远程服务器用户名
$remote_password = $_POST['remote_password'] ?? '';  // 远程服务器密码

// 检查必填字段是否为空
if (empty($db_ip) || empty($db_port) || empty($db_name) || empty($db_user) || empty($db_password)) {
    echo "备份端字段都必须填写,请返回并填写完整的表单。";
    exit(1);  // 输入不合法,退出脚本
}

// 使用 escapeshellarg() 函数转义表单数据,避免命令注入
$db_ip = escapeshellarg($db_ip);
$db_port = escapeshellarg($db_port);
$db_name = escapeshellarg($db_name);
$db_user = escapeshellarg($db_user);
$db_password = escapeshellarg($db_password);
$remote_server = escapeshellarg($remote_server);
$remote_path = escapeshellarg($remote_path);
$remote_user = escapeshellarg($remote_user);
$remote_password = escapeshellarg($remote_password);


// 获取当前目录路径
$currentDir = dirname(__FILE__);

// 构造命令行参数
$script_path = 'bak.sh';  // 备份脚本路径
$command = "$currentDir/$script_path $db_ip $db_port $db_name $db_user $db_password $remote_server $remote_path $remote_user $remote_password";

// 执行备份脚本并获取状态码
$process = popen($command, 'r');
if (!$process) {
    echo "无法启动备份脚本,请检查服务器配置。";
    flush();
    exit(1);  // 返回非零状态码,表示启动失败
}

// 获取命令输出并过滤,只输出错误信息
$output = '';
$output2 = '';
while ($line = fgets($process)) {
    // 如果包含 "ERROR" 字符串,则视为错误输出
    if (strpos($line, 'ERROR') !== false) {
        $output .= $line;
    } else if (strpos($line, 'incomplete') !== false) {
        $output2 .= $line;// 如果有备份完成的提示信息,输出成功提示
    }
}

pclose($process);

// 根据输出结果返回信息
if (!empty($output)) {
    echo $output;  // 如果有错误信息,输出错误内容
} else if (!empty($output2)) {
    echo "备份操作成功! " . $output2;  // 如果有备份完成的提示信息,输出成功提示
} else {
    echo "备份操作成功!";  // 如果没有错误,返回成功消息
}
?>
3. Shell脚本(Bash)
Shell脚本负责执行数据库备份、传输备份文件到远程服务器,并记录日志。以下是Shell脚本代码:
#!/bin/bash

# 获取传入的参数
DB_HOST=$1  # 数据库主机
DB_PORT=$2  # 数据库端口
DB_NAME=$3  # 数据库名称
DB_USER=$4  # 数据库用户名
DB_PASSWORD=$5  # 数据库密码
REMOTE_SERVER=$6  # 远程服务器地址
REMOTE_PATH=$7  # 远程备份路径
REMOTE_USER=$8  # 远程服务器用户名
REMOTE_PASS=$9  # 远程服务器密码

# 当前时间,用于命名备份文件
TIMESTAMP=$(date +"%Y%m%d_%H%M%S")

# 当前路径
SHDIR=$(cd "$(dirname "$0")" && pwd)

# 备份文件保存路径
BACKUP_DIR="$SHDIR/bak"

#日志文件保存路径
LOG_FILE="$SHDIR/backup.log"

# 备份文件名
BACKUP_FILE="$BACKUP_DIR/$DB_NAME-$TIMESTAMP.sql"
REMOTE_FILE="$REMOTE_PATH/$DB_NAME-$TIMESTAMP.sql"

# 写入日志函数
log_message() {
    echo "$(date +'%Y-%m-%d %H:%M:%S') - $1" >> $LOG_FILE  # 写入日志文件
    echo "$1"  # 同时输出到标准输出
}

# 检查数据库是否存在,设置连接超时时间为2秒
DB_EXISTS=$(timeout 2 mysql -h $DB_HOST -P $DB_PORT -u $DB_USER -p$DB_PASSWORD -e "SHOW DATABASES LIKE '$DB_NAME';" 2>> $LOG_FILE)

# 如果数据库不存在或连接失败,返回错误信息
if [[ -z "$DB_EXISTS" ]]; then
    log_message "ERROR: Database '$DB_NAME' does not exist on host '$DB_HOST' or could not connect."
    log_message "ERROR: Unable to find database '$DB_NAME'. Please check the database connection."
    exit 1  # 设置非零退出状态
fi

# 开始备份,给出反馈
log_message "Starting database backup for $DB_NAME at $DB_HOST"

# 执行备份
mysqldump -h $DB_HOST -P $DB_PORT -u $DB_USER -p$DB_PASSWORD $DB_NAME > $BACKUP_FILE 2>> $LOG_FILE

# 检查备份是否成功
if [ $? -eq 0 ]; then
    log_message "Database backup successful! Backup file saved to: $BACKUP_FILE"
else
    log_message "ERROR: Database backup failed!"
    exit 1
fi

# 如果需要传输文件到远程服务器
if [[ -n "$REMOTE_SERVER" && -n "$REMOTE_PATH" && -n "$REMOTE_USER" && -n "$REMOTE_PASS" ]]; then
    log_message "Starting file transfer to remote server $REMOTE_SERVER:$REMOTE_PATH"

    # 使用 SSH 检查远程路径是否存在,如果不存在,则创建该目录
    sshpass -p "$REMOTE_PASS" ssh -o StrictHostKeyChecking=no $REMOTE_USER@$REMOTE_SERVER "mkdir -p $REMOTE_PATH"

    # 使用 timeout 限制文件传输最大时间为10秒
    timeout 10 sshpass -p "$REMOTE_PASS" scp -o StrictHostKeyChecking=no $BACKUP_FILE $REMOTE_USER@$REMOTE_SERVER:$REMOTE_PATH

    if [[ $? -eq 0 ]]; then
        log_message "File successfully transferred to $REMOTE_SERVER:$REMOTE_PATH"
        rm -f $BACKUP_FILE  # 传输成功后删除本地备份文件
        log_message "Backup file $BACKUP_FILE deleted after successful transfer."
    else
        log_message "ERROR: Unable to connect to remote server $REMOTE_SERVER, file transfer failed or timed out! The backup was completed successfully in the path of $BACKUP_FILE."
        exit 2
    fi
else
    log_message "The remote server information is incomplete, the backup has been completed successfully, and the path is the backup server: $BACKUP_FILE."
    exit 0  # 正常退出
fi
4. CSS样式
给web端添加样式,更加美观。以下面是CSS代码:
/* 基本样式重置 */
* {
    margin: 0;
    padding: 0;
    box-sizing: border-box;  /* 设置盒模型为 border-box,包含 padding 和 border */
}

/* 页面基本样式 */
body {
    font-family: 'Arial', sans-serif;  /* 设置字体 */
    background: linear-gradient(135deg, #2174ff, #f1f1f6); /* 背景渐变效果 */
    color: #e5e5e5;  /* 字体颜色 */
    display: flex;
    justify-content: center;  /* 页面内容水平居中 */
    align-items: center;  /* 页面内容垂直居中 */
    height: 100vh;  /* 设置页面高度为视口高度 */
    text-align: center;  /* 文字居中 */
}

h1 {
    color: #c5c5c7;  /* 标题颜色 */
    margin-bottom: 25px;  /* 标题底部间距 */
    font-size: 2rem;  /* 字体大小 */
    text-align: center;  /* 标题居中 */
}

h3 {
    color: #ffffff;  /* 小标题颜色 */
    margin-bottom: 10px;  /* 小标题底部间距 */
    font-size: 1rem;  /* 小标题字体大小 */
    text-align: center;  /* 小标题居中 */
}

/* 表单容器,保持 16:9 宽高比 */
.form-container {
    width: 80vw;  /* 宽度占视口宽度的 80% */
    height: 45vw; /* 高度根据 16:9 比例计算,约为 45% 宽度 */
    max-width: 1900px;  /* 最大宽度限制 */
    max-height: 750px;  /* 最大高度限制 */
    position: relative;
    background: rgba(0, 0, 0, 0.7);  /* 半透明背景 */
    padding: 20px;
    border-radius: 10px;  /* 圆角边框 */
    box-shadow: 0 4px 10px rgba(0, 0, 0, 0.3);  /* 阴影效果 */
    display: flex;
    flex-direction: column;  /* 垂直排列 */
    justify-content: space-between;  /* 内容分布均匀 */
}

/* 表单样式 */
form {
    flex-grow: 1;  /* 使表单容器填满剩余空间 */
    display: flex;
    flex-direction: row;  /* 水平排列输入部分 */
    justify-content: space-between;  /* 左右对齐 */
    overflow-y: auto;  /* 允许竖向滚动 */
}

/* 输入框部分样式 */
.input-section {
    display: flex;
    max-width: 800px;  /* 最大宽度 */
    max-height: 450px;  /* 最大高度 */
    flex-direction: column;  /* 输入框竖排 */
    gap: 15px;  /* 每个输入框之间的间距 */
    padding: 20px;
    border: 2px solid #202020;  /* 边框颜色 */
    border-radius: 10px;  /* 圆角边框 */
    background-color: rgba(0, 0, 0, 0.8);  /* 背景色 */
    width: 48%;  /* 占据父容器宽度的 48% */
}

/* 输入框和标签同一行排列 */
.input-group {
    display: flex;
    align-items: center;  /* 标签和输入框在同一行 */
}

/* 标签样式 */
.input-group label {
    width: 30%;  /* 标签宽度 */
    text-align: right;  /* 标签右对齐 */
    margin-right: 10px;  /* 标签与输入框之间的间距 */
    font-size: 1rem;
    color: #d4def6;  /* 标签字体颜色 */
}

/* 输入框样式 */
.input-group input[type="text"],
.input-group input[type="password"] {
    width: 70%;  /* 输入框宽度 */
    padding: 10px;  /* 内边距 */
    margin-bottom: 15px;  /* 输入框底部间距 */
    border: 2px solid #323748;  /* 边框颜色 */
    background-color: #c9d2f5;  /* 输入框背景色 */
    color: #ecf0f1;  /* 输入框文字颜色 */
    border-radius: 8px;  /* 圆角边框 */
    font-size: 1rem;  /* 字体大小 */
    transition: border-color 0.3s ease;  /* 边框颜色过渡 */
}

/* 输入框获得焦点时的样式 */
.input-group input[type="text"]:focus,
.input-group input[type="password"]:focus {
    border-color: #c0392b;  /* 聚焦时边框颜色 */
    outline: none;  /* 去掉聚焦时的外边框 */
    background-color: #333;  /* 聚焦后背景变黑 */
}

/* 按钮样式 */
button {
    background: linear-gradient(45deg, #2174ff, #ebecf5);  /* 按钮背景渐变 */
    color: white;
    font-size: 1.1rem;  /* 字体大小 */
    padding: 20px 60px;  /* 内边距 */
    border: none;  /* 去掉边框 */
    border-radius: 25px;  /* 圆角边框 */
    cursor: pointer;  /* 鼠标悬停时变为手指图标 */
    transition: all 0.3s ease;  /* 按钮效果过渡 */
    margin: 10px auto;  /* 水平居中 */
    display: block;  /* 使按钮为块级元素 */
}

/* 按钮的悬停效果 */
button:hover {
    transform: translateY(-3px);  /* 向上移动 */
    box-shadow: 0 4px 20px rgba(52, 152, 219, 0.6);  /* 添加阴影 */
}

/* 按钮的点击效果 */
button:active {
    transform: translateY(0);  /* 恢复原位 */
    box-shadow: none;  /* 去掉阴影 */
}

/* 加载提示样式 */
#loadingMessage {
    position: fixed;
    bottom: 20px;  /* 固定在页面底部 */
    left: 50%;  /* 居中显示 */
    transform: translateX(-50%);  /* 水平居中 */
    background-color: rgba(0, 0, 0, 0.7);  /* 半透明背景 */
    color: #fff;  /* 白色文字 */
    padding: 10px 20px;  /* 内边距 */
    border-radius: 5px;  /* 圆角边框 */
    font-size: 16px;  /* 字体大小 */
    display: none;  /* 默认隐藏 */
    z-index: 9999;  /* 显示在最上层 */
    box-shadow: 0 0 10px rgba(0, 0, 0, 0.3);  /* 阴影效果 */
}

/* 结果信息样式 */
#resultMessage {
    margin-top: 20px;  /* 结果与上方间距 */
    font-family: Arial, sans-serif;  /* 设置字体 */
}

/* 响应式设计 */
@media (max-width: 600px) {
    h1 {
        font-size: 1.8rem;  /* 小屏幕下标题字体大小调整 */
    }

    .form-container {
        width: 95vw;  /* 小屏幕下宽度为 95% */
        height: 53.4375vw;  /* 高度根据 16:9 比例调整 */
    }

    form {
        flex-direction: column;  /* 小屏幕上表单内容竖向排列 */
    }

    .input-section {
        width: 100%;  /* 小屏幕上输入部分占满宽度 */
    }

    .input-group {
        flex-direction: column;  /* 标签和输入框竖排 */
        align-items: flex-start;  /* 左对齐 */
    }

    .input-group label {
        width: 100%;  /* 标签宽度 100% */
        margin-right: 0;  /* 去掉标签与输入框间距 */
    }

    .input-group input[type="text"],
    .input-group input[type="password"] {
        width: 100%;  /* 输入框宽度 100% */
    }
}
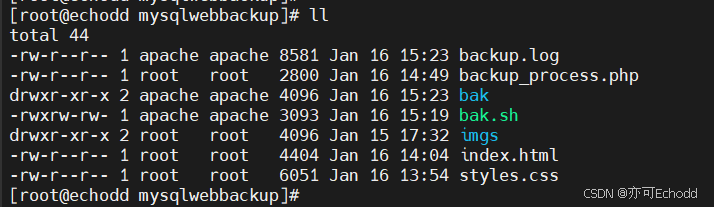
5. 各文件位置及权限
为保证脚本能运行,日志文件、bak文件夹、脚本需要是apache拥有:
6. 项目资源代码
链接: https://pan.baidu.com/s/1TGzT_22F6VsJ4IfNJ1Nxtw?pwd=1q8q 提取码: 1q8q
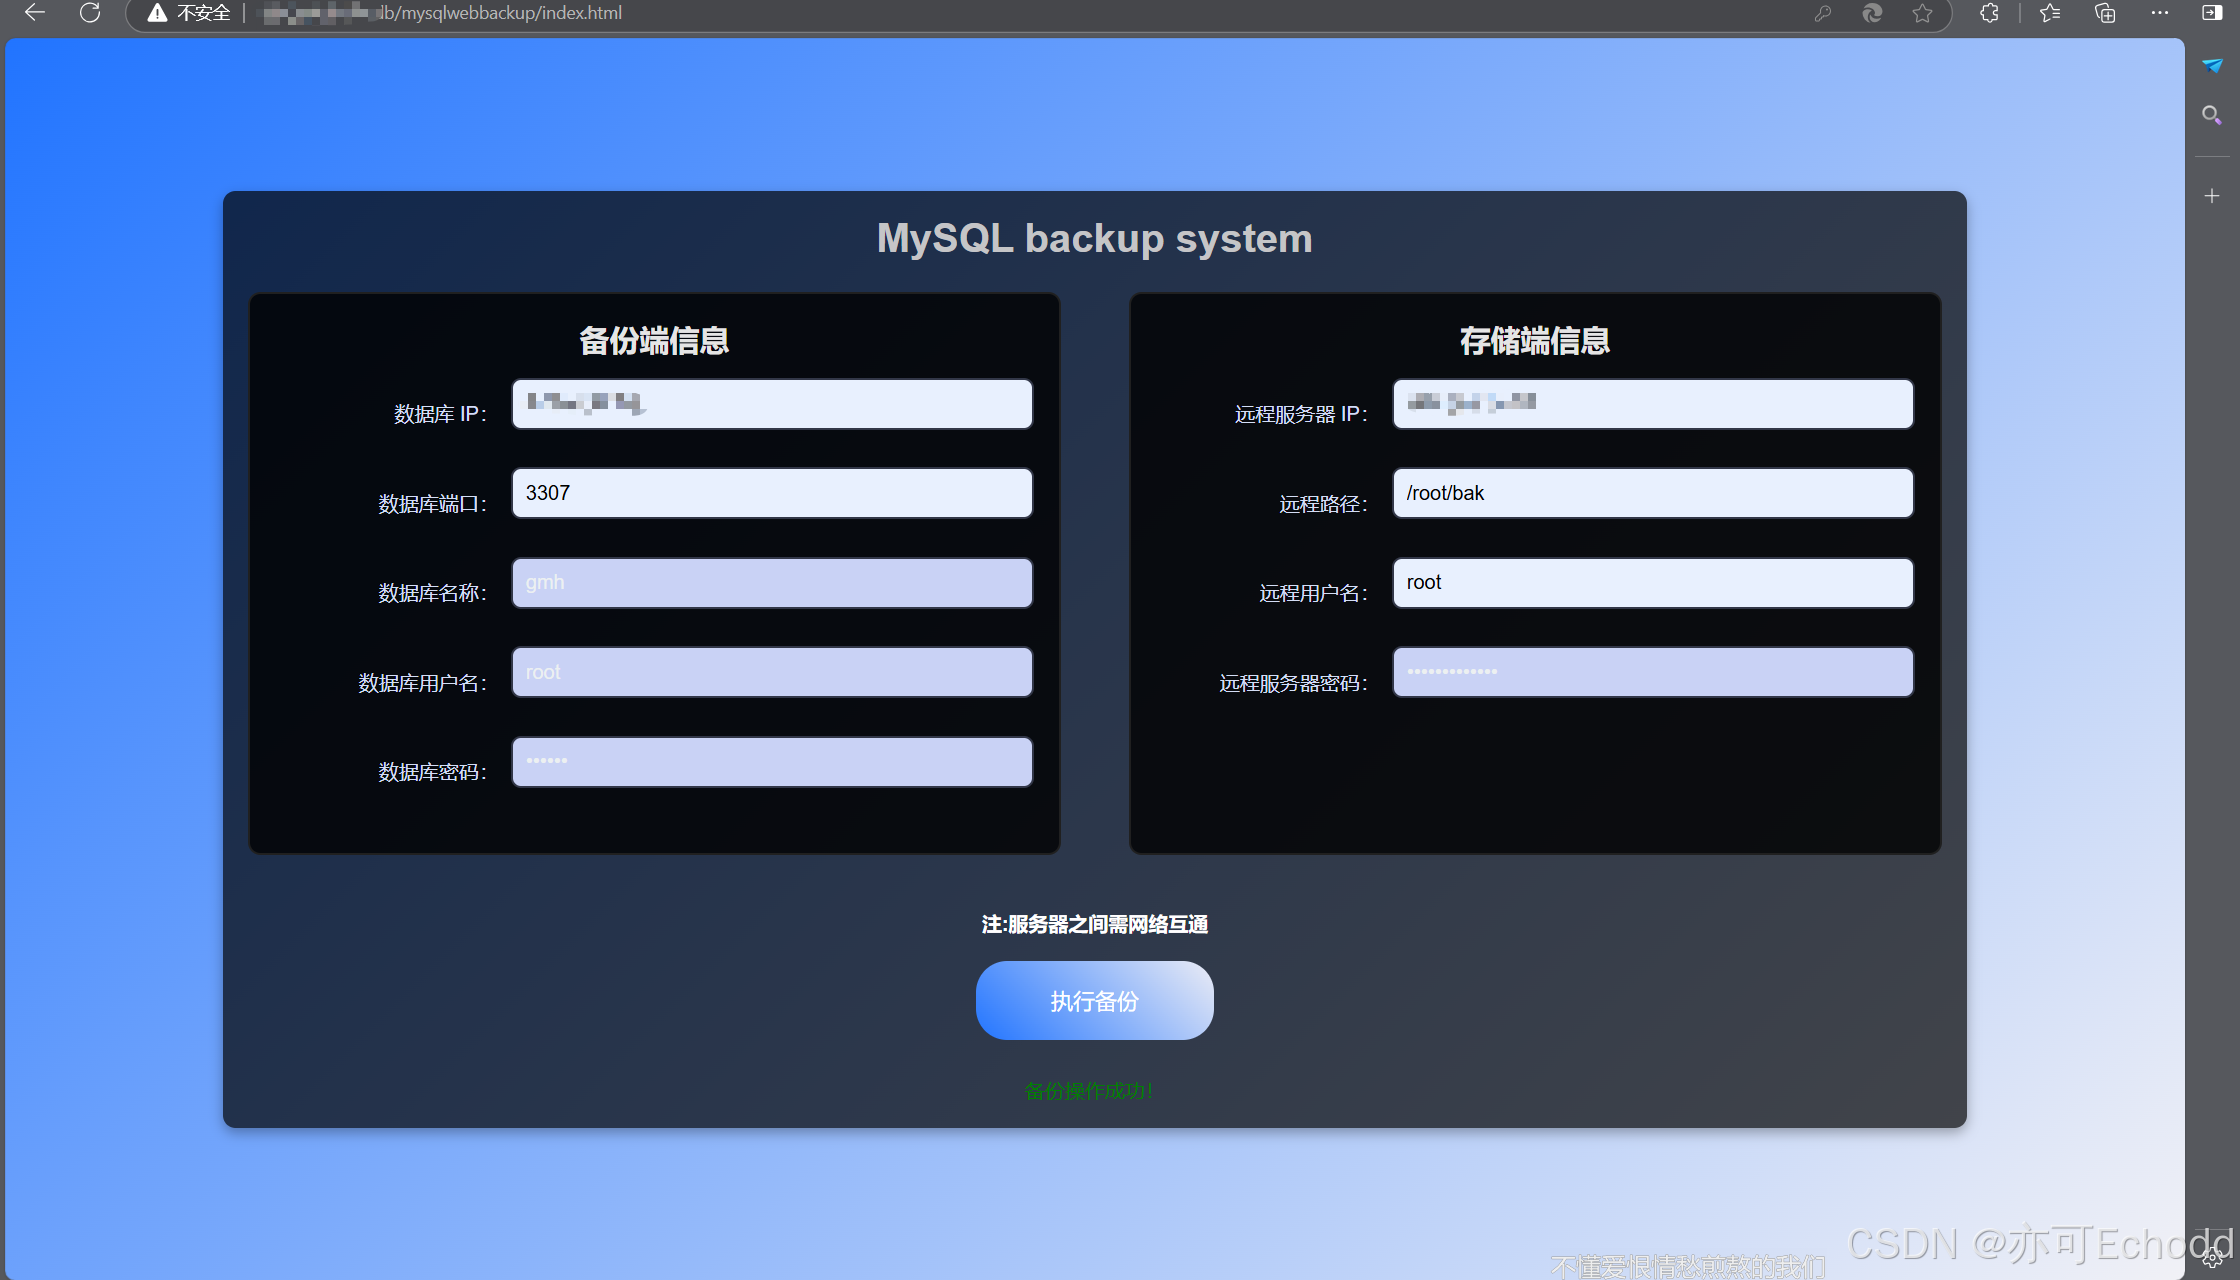
7. 效果


 2302
2302

 被折叠的 条评论
为什么被折叠?
被折叠的 条评论
为什么被折叠?
 到【灌水乐园】发言


