


ETL(Extract, Transform, Load)
ETL,是英文Extract-Transform-Load的缩写,用来描述将数据从来源端经过抽取(extract)、转换(transform)、加载(load)至目的端的过程。ETL一词较常用在数据仓库,但其对象并不限于数据仓库。
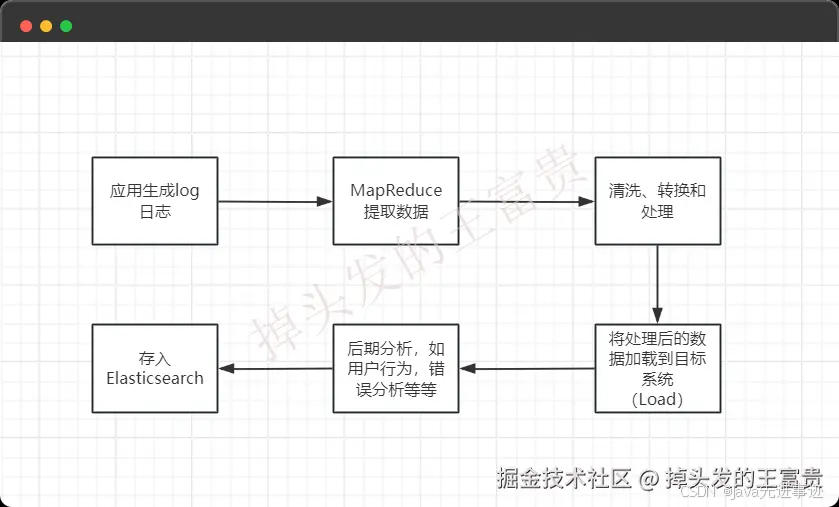
在大数据环境中,MapReduce 常用于数据仓库的 ETL 过程:
- 从数据源中提取数据(Extract)。
- 对数据进行清洗、转换和处理(Transform)。
- 将处理后的数据加载到目标系统(Load),如 Hive、HBase 或 Elasticsearch。
不知道大家之前有没有听说过ELT,那么在这次文章中我们使用Hadoop+MapReduce +ElasticSearch 来实现这个功能。
Hadoop 介绍
在实现之前我们要先知道Hadoop是什么?
Hadoop 是一个开源的分布式计算框架,主要用于处理大规模数据集的存储和计算。它最初由 Doug Cutting 和 Mike Cafarella 开发,目的是为搜索引擎提供一种高效、可靠的方式来处理大量数据。Hadoop 的设计灵感来源于 Google 发表的关于分布式文件系统(GFS)和 MapReduce 论文。
Hadoop 主要由以下几个核心组件组成:
-
Hadoop Distributed File System (HDFS):
HDFS 是 Hadoop 的分布式文件系统,设计用于存储大量的数据,并且能够处理单个文件达到 TB 级别。
-
MapReduce:
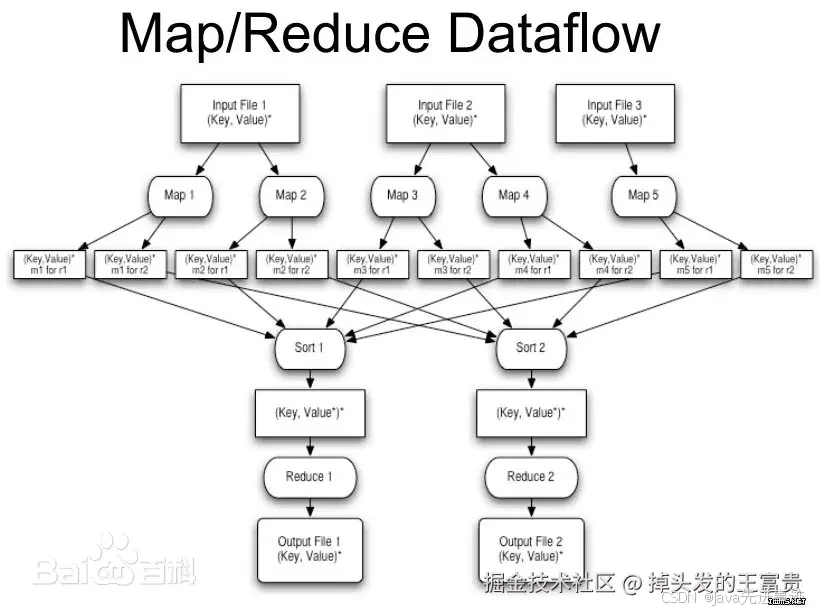
MapReduce 是一种编程模型,用于处理和生成大规模数据集。它将任务分解为两个主要阶段:Map 和 Reduce。
-
Map 阶段:输入数据被分割成多个块,每个块由一个 Map 任务处理。Map 任务将输入数据转换为键值对。
-
Shuffle 和 Sort 阶段:Map 任务产生的中间结果会被排序和分组,然后发送到 Reduce 任务。
-
Reduce 阶段:Reduce 任务接收中间结果,并进行聚合或汇总操作,生成最终结果。
-
-
YARN (Yet Another Resource Negotiator):
- YARN 是 Hadoop 的资源管理和调度框架,负责管理集群中的资源分配和任务调度。
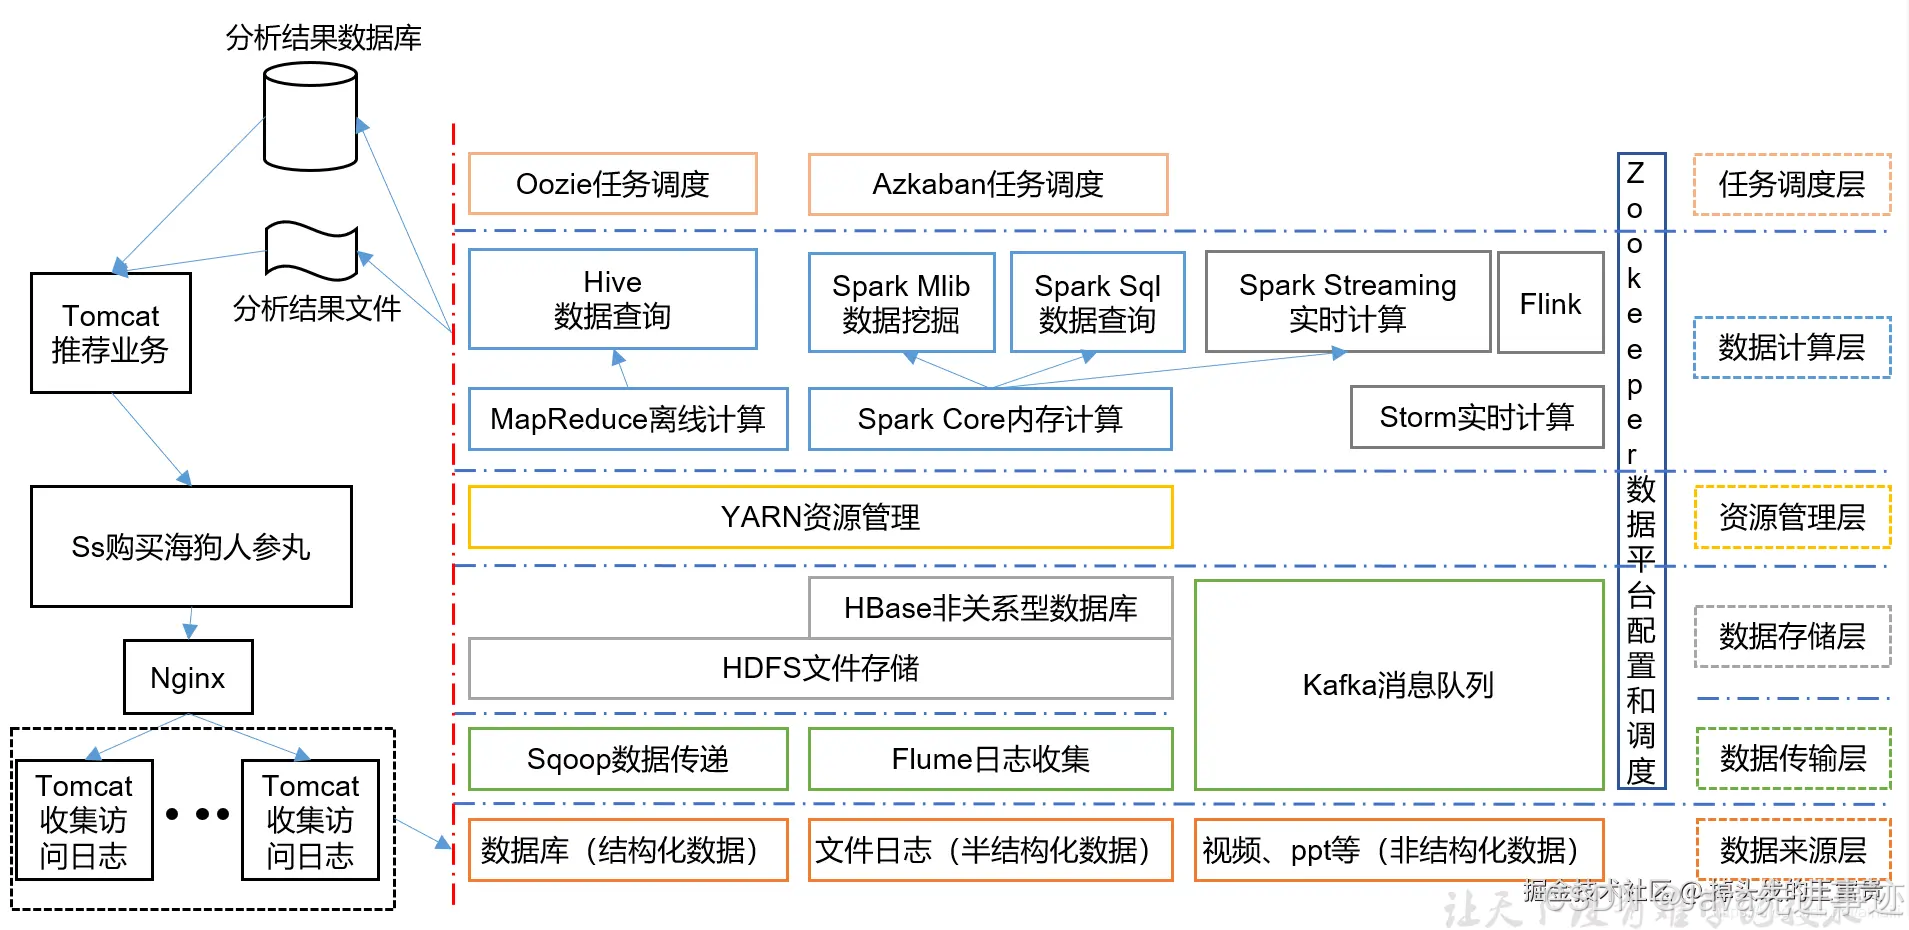
图片来源网上
这张图可以很清晰的看到Hadoop在企业中的应用,那我们废话不多说,直接上手
环境准备:
Hadoop环境安装
这里我们简单讲一下文字版,如果需要更详细的内容可以去上面的(图文解说版)看看
第一步,下载安装包
第二步,下载bin
把整个项目clone下来,就会有一个文件夹,而我们找到我们下载版本对应的版本,例如hadoop-3.3.6,把里面的bin文件夹全部copy覆盖bin到我们第一步解压的文件夹中
第三步,配置环境变量
HADOOP_HOME 对应的值填上面我们记下的安装路径
path里面填 %HADOOP_HOME%\bin
第四步,配置文件
在cmd下运行 hadoop version 看看情况,我们首先在D:\hadoop-3.3.6创建一个data文件夹,然后在data文件夹下面创建三个文件夹,分别是 datanode、namenode、tmp
core-site.xml
xml
代码解读
复制代码
<configuration> <property> <name>hadoop.tmp.dir</name> <value>/D:/hadoop-3.3.6/data/tmp</value> </property> <property> <name>fs.defaultFS</name> <value>hdfs://localhost:9000</value> </property> </configuration>
mapred-site.xml
xml
代码解读
复制代码
<configuration> <property> <name>mapreduce.framework.name</name> <value>yarn</value> </property> <property> <name>mapred.job.tracker</name> <value>hdfs://localhost:9000</value> </property> </configuration>
yarn-site.xml
xml
代码解读
复制代码
<configuration> <property> <name>yarn.nodemanager.aux-services</name> <value>mapreduce_shuffle</value> </property> <property> <name>yarn.nodemanager.aux-services.mapreduce.shuffle.class</name> <value>org.apache.hahoop.mapred.ShuffleHandler</value> </property> </configuration>
hdfs-site.xml
xml
代码解读
复制代码
<configuration> <property> <name>dfs.replication</name> <value>1</value> </property> <property> <name>dfs.namenode.name.dir</name> <value>/D:/hadoop-3.3.6/data/namenode</value> </property> <property> <name>dfs.datanode.data.dir</name> <value>/D:/hadoop-3.3.6/data/datanode</value> </property> </configuration>
hadoop-env.sh
配置java环境变量
bash
代码解读
复制代码
export JAVA_HOME=D:\env\java\jdk8
这里和你本地的的JAVA环境变量一样
第五步,启动服务
注意我们执行的路径,而且一定一定一定要用管理员模式的cmd运行!!
lua
代码解读
复制代码
hdfs namenode -format
css
代码解读
复制代码
start-all.cmd
这时候会弹出四个弹窗,不要关闭!
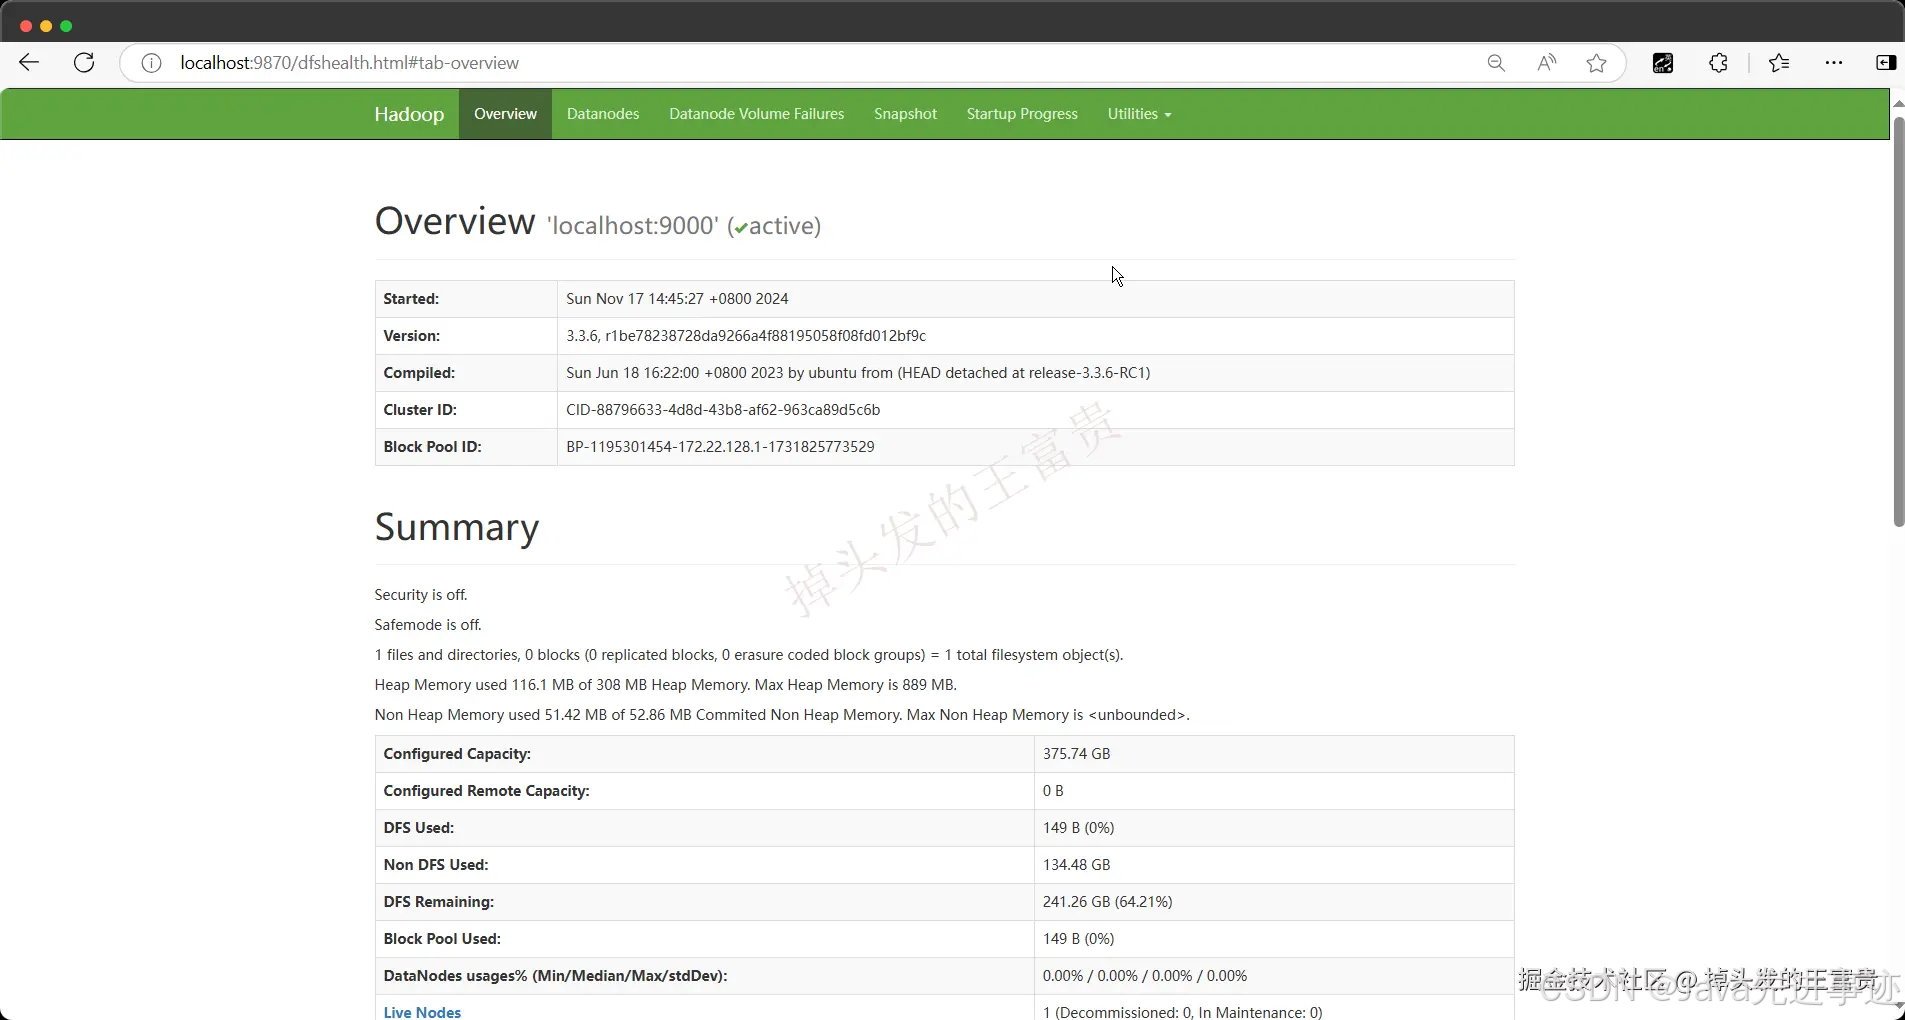
概览页面:http://localhost:9870/ 而出现这个页面,说明我们的Hadoop已经安装完成了。
Java代码实战
我们这里需要编写一个MapReduce 的代码,而我们的代码中的流程大概就是这样:
统计每个词出现的次数
那么我们先来一个非常非常经典的MapReduce 代码demo:统计每个词出现的次数。
第一步,准备一个文档
testWord.txt
代码解读
复制代码
wfg wfg hhh hhh masiyi masiyi msy
这个文档就是我们后面要用到的源文档,因为我们的文档在本地是没用的,所以我们需要上传到hadoop的hdfs中,首先我们要在hdfs中创建一个文件夹:
arduino
代码解读
复制代码
hadoop fs -mkdir -p hdfs://127.0.0.1:9000/wordCount
然后再把我们刚刚的文件上传到这个文件夹中
arduino
代码解读
复制代码
hadoop fs -put testWord.txt /wordCount
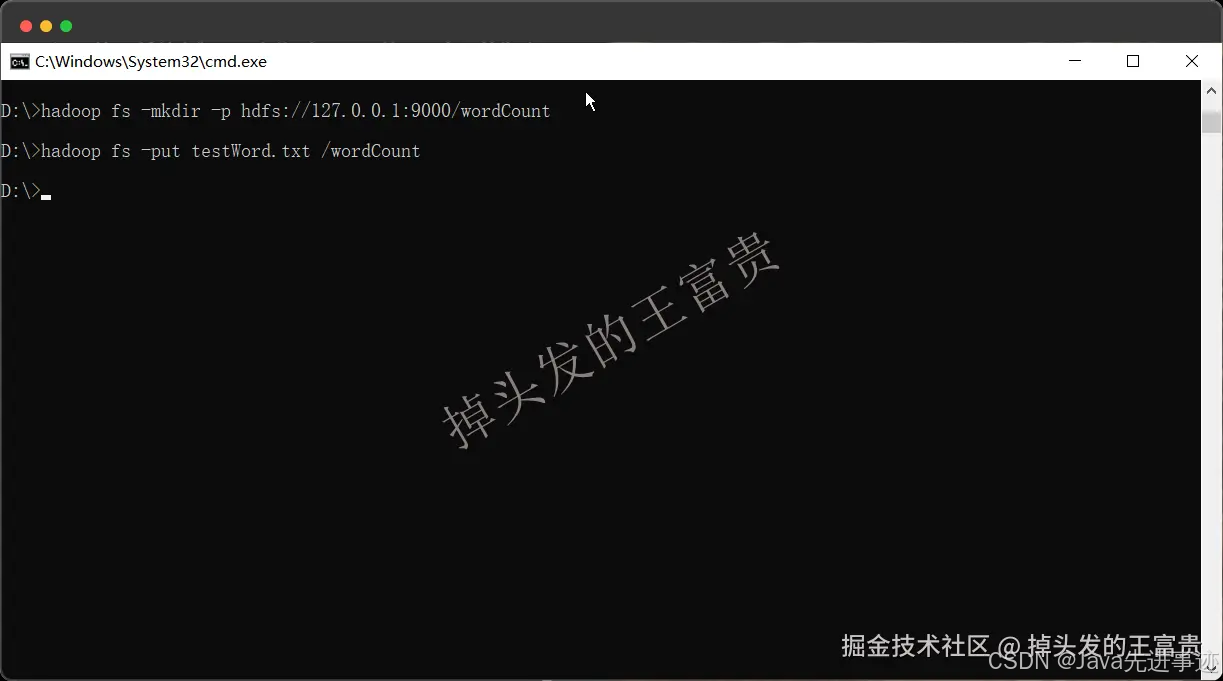
有了这两步,我们就可以在web管理端页面看到了我们的文档了
http://localhost:9870/explorer.html#/wordCount

第二步,导入jar包
xml
代码解读
复制代码
<dependency> <groupId>org.apache.hadoop</groupId> <artifactId>hadoop-mapreduce-client-jobclient</artifactId> <version>3.3.6</version> </dependency> <dependency> <groupId>org.apache.hadoop</groupId> <artifactId>hadoop-common</artifactId> <version>3.3.6</version> </dependency> <dependency> <groupId>org.apache.hadoop</groupId> <artifactId>hadoop-hdfs-client</artifactId> <version>3.3.6</version> </dependency>
注意版本号,和你本地安装的一致就行了
导入打包的maven插件,否则打出来的jar包没有main方法入口,在下面的mainClass标签中指定你的main方法的类
xml
代码解读
复制代码
<build> <plugins> <plugin> <groupId>org.apache.maven.plugins</groupId> <artifactId>maven-jar-plugin</artifactId> <version>3.2.2</version> <configuration> <archive> <manifest> <mainClass>WordCount</mainClass> </manifest> </archive> </configuration> </plugin> </plugins> </build>
第三步,编写Mapper
java
代码解读
复制代码
import org.apache.hadoop.io.IntWritable; import org.apache.hadoop.io.Text; import org.apache.hadoop.mapreduce.Mapper; import java.io.IOException; import java.util.StringTokenizer; public class TokenizerMapper extends Mapper<Object, Text, Text, IntWritable> { private final static IntWritable one = new IntWritable(1); private Text word = new Text(); public void map(Object key, Text value, Context context ) throws IOException, InterruptedException { StringTokenizer itr = new StringTokenizer(value.toString()); while (itr.hasMoreTokens()) { word.set(itr.nextToken()); System.out.println("进来了"); context.write(word, one); } } }
map方法:重写Mapper类的map方法,用于处理输入数据并生成中间键值对。key:输入数据的键,类型为Object,通常是行号。value:输入数据的值,类型为Text,通常是文本行。context:上下文对象,用于与 Hadoop 框架交互,传递中间结果。
StringTokenizer itr = new StringTokenizer(value.toString());:- 将输入的文本行拆分为单词。
while (itr.hasMoreTokens()) {:- 遍历所有单词。
word.set(itr.nextToken());:- 获取下一个单词,并将其设置到
word对象中。
- 获取下一个单词,并将其设置到
System.out.println("进来了");:- 打印调试信息,表示进入了
map方法的循环。
- 打印调试信息,表示进入了
context.write(word, one);:- 将当前单词和计数值 1 写入上下文,生成中间键值对。
第四步,编写Reducer
java
代码解读
复制代码
import org.apache.hadoop.io.IntWritable; import org.apache.hadoop.io.Text; import org.apache.hadoop.mapreduce.Reducer; import java.io.IOException; public class IntSumReducer extends Reducer<Text, IntWritable,Text,IntWritable> { private IntWritable result = new IntWritable(); public void reduce(Text key, Iterable<IntWritable> values, Context context ) throws IOException, InterruptedException { int sum = 0; for (IntWritable val : values) { sum += val.get(); } System.out.println("进来了2"); result.set(sum); context.write(key, result); } }
- public void reduce方法
key: 输入的键,这里表示一个单词。values: 与这个键相关的所有值的集合,在WordCount例子中,这些值都是整数1。context: 上下文对象,通过它可以将结果写入到后续阶段或最终输出。
- 在方法内部,遍历所有的
values并将它们累加起来得到总和。 - 使用
System.out.println("进来了2");打印调试信息,表明进入了reduce方法。 - 将累加的结果设置到
result对象中,并通过context.write(key, result);将其写出。
第五步,编写主方法
java
代码解读
复制代码
import org.apache.hadoop.conf.Configuration; import org.apache.hadoop.fs.Path; import org.apache.hadoop.io.IntWritable; import org.apache.hadoop.io.Text; import org.apache.hadoop.mapreduce.Job; import org.apache.hadoop.mapreduce.lib.input.FileInputFormat; import org.apache.hadoop.mapreduce.lib.output.FileOutputFormat; import org.apache.hadoop.util.GenericOptionsParser; public class WordCount { public static void main(String[] args) throws Exception { Configuration conf = new Configuration(); String[] otherArgs = new GenericOptionsParser(conf, args).getRemainingArgs(); if (otherArgs.length < 2) { System.exit(2); } Job job = Job.getInstance(conf, "word count"); job.setJarByClass(WordCount.class); job.setMapperClass(TokenizerMapper.class); job.setCombinerClass(IntSumReducer.class); job.setReducerClass(IntSumReducer.class); job.setOutputKeyClass(Text.class); job.setOutputValueClass(IntWritable.class); for (int i = 0; i < otherArgs.length - 1; ++i) { FileInputFormat.addInputPath(job, new Path(otherArgs[i])); } FileOutputFormat.setOutputPath(job, new Path(otherArgs[otherArgs.length - 1])); System.exit(job.waitForCompletion(true) ? 0 : 1); } }
- 创建一个
Job实例job,并设置作业名称为"word count"。 - 设置作业的JAR文件由
WordCount类所在的位置决定。 - 设置Mapper类为
TokenizerMapper.class - 设置Combiner类为
IntSumReducer.class。Combiner是在Mapper端进行局部聚合,减少传输到Reducer的数据量。 - 设置Reducer类为
IntSumReducer.class。
而main方法的args就接受我们运行jar包的时候传入的参数,例如在我们的例子中后面会用到输入路径和输出路径作为参数值传入。
第六步,hadoop运行jar包
我们使用maven打成一个jar包:
xml
代码解读
复制代码
mvn clean package
然后用下面的命令执行:
xml
代码解读
复制代码
hadoop jar hadoop-1.0-SNAPSHOT.jar /wordCount /wordCountResult
第一个参数是我们文件所在的hdfs的输入路径,第二个参数是我们要输出路径(注意不能再hdfs中存在)
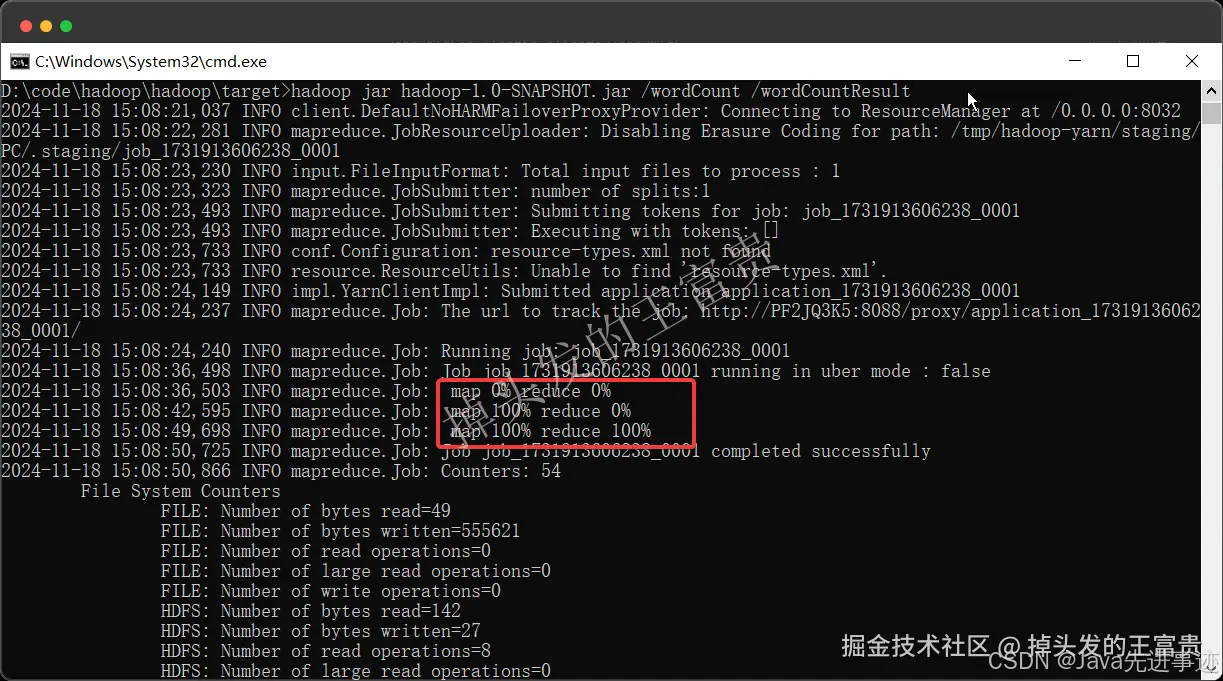
这样我们就可以看到命令行已经在MapReduce了。
第七步,查看输出文件
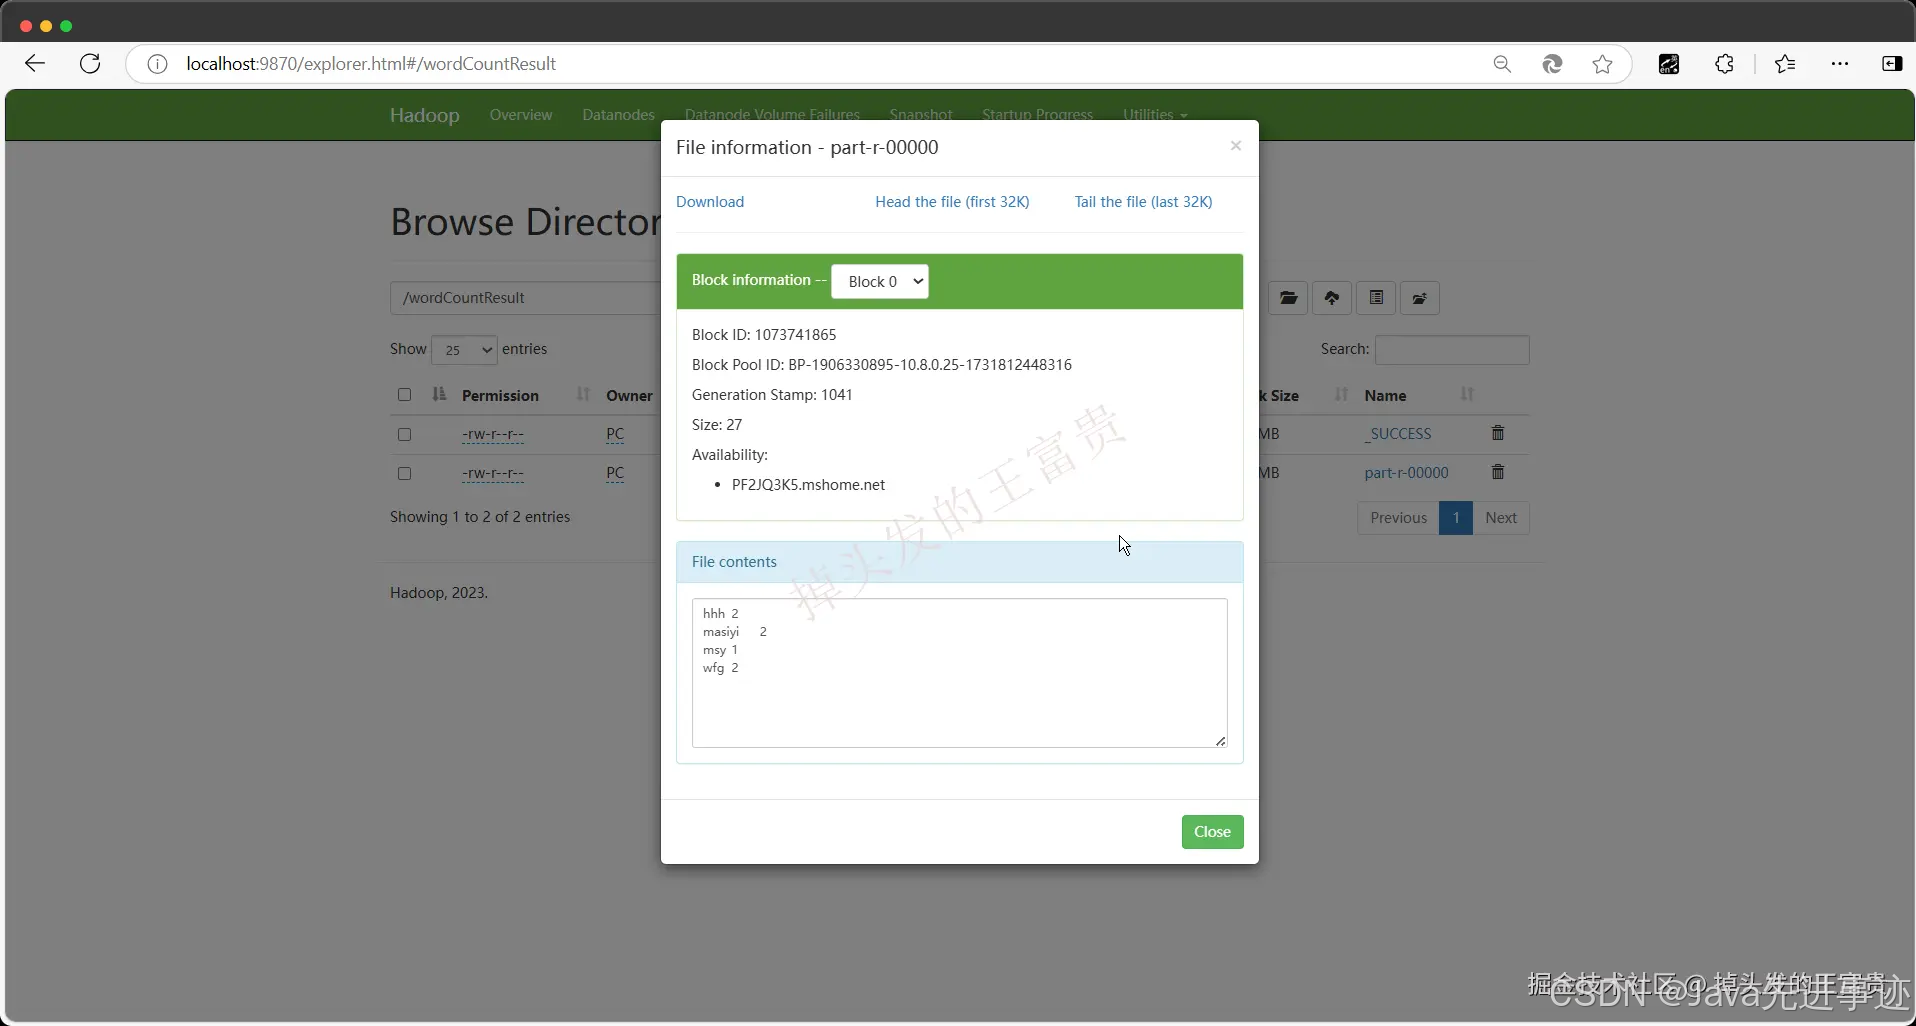
输出的文件在这里:/wordCountResult/part-r-00000。 没错,成功统计到我们的输出文件里面
这就是一个非常简单的一个MapReduce的Demo,怎么样,你学会了吗?
ETL,数据处理落库ES
好了,现在进入我们的主题,那么MapReduce除了统计次数还能干什么呢?没错,还能分析应用日志,有了我们前面统计次数的demo,我们上手就很快了:
假设我们现在有一些java应用跑出来的日志(部分):
xml
代码解读
复制代码
2024-09-18 17:08:06 [not.a.Spring.bean-1] INFO traceID:29b865bb-e329-47dd-9e7d-13cceee0bf41 com.masiyi.product.aigc.async.listener.VoiceCloneListener:143 用户购买了一个人声克隆商品: CustomizedVoiceSubmitRequest(voiceId=1021105282584940557) 2024-09-18 17:08:07 [not.a.Spring.bean-1] INFO traceID:29b865bb-e329-47dd-9e7d-13cceee0bf42 com.masiyi.product.aigc.async.listener.VoiceCloneListener:143 用户提交人声克隆任务参数: CustomizedVoiceSubmitRequest(voiceId=1021105282584940557)
我们现在要分析用户的行为,但是日志太大太大了,我们只能通过人工去一一比对,而且是txt文件,很难用,所以我们现在就通过etl的操作,聚合到我们的es中进行用户行为分析,或者做一些其他的事情
第一步,导入jar包
xml
代码解读
复制代码
<dependency> <groupId>co.elastic.clients</groupId> <artifactId>elasticsearch-java</artifactId> <version>8.9.0</version> </dependency> <dependency> <groupId>com.alibaba.fastjson2</groupId> <artifactId>fastjson2</artifactId> <version>2.0.27</version> </dependency>
第二步,编写Mapper
java
代码解读
复制代码
import org.apache.hadoop.io.LongWritable; import org.apache.hadoop.io.Text; import org.apache.hadoop.mapreduce.Mapper; import java.io.IOException; import java.util.regex.Matcher; import java.util.regex.Pattern; public class LogMapper extends Mapper<LongWritable, Text, Text, Text> { private static final Pattern LOG_PATTERN = Pattern.compile( "(\\d{4}-\\d{2}-\\d{2} \\d{2}:\\d{2}:\\d{2}) \\[(.*?)\\] (\\w+)\\s+traceID:([a-f0-9-]+)\\s+(\\S+):(\\d+)\\s+(.*)" ); @Override protected void map(LongWritable key, Text value, Context context) throws IOException, InterruptedException { String line = value.toString(); Matcher matcher = LOG_PATTERN.matcher(line); if (matcher.matches()) { String timestamp = matcher.group(1); String thread = matcher.group(2); String level = matcher.group(3); String traceId = matcher.group(4); String className = matcher.group(5); String lineNumber = matcher.group(6); String message = matcher.group(7); String json = String.format( "{ \"timestamp\": \"%s\", \"thread\": \"%s\", \"level\": \"%s\", \"traceId\": \"%s\", \"class\": \"%s\", \"line\": \"%s\", \"message\": \"%s\" }", timestamp, thread, level, traceId, className, lineNumber, message ); context.write(new Text(traceId), new Text(json)); } else { System.err.println("Line did not match: " + line); // 输出未匹配的行 } } }
-
LOG_PATTERN:正则表达式,用于匹配日志行。
(\\d{4}-\\d{2}-\\d{2} \\d{2}:\\d{2}:\\d{2}):匹配日期和时间,格式为YYYY-MM-DD HH:MM:SS。\$(.\*?)\$:匹配方括号内的内容,即线程名。(\\w+):匹配日志级别(如INFO,ERROR)。traceID:([a-f0-9-]+):匹配traceID,格式为十六进制字符串。(\\S+):(\\d+):匹配类名和行号。(.\*):匹配日志消息。
-
String line = value.toString();:将输入的Text对象转换为字符串。 -
Matcher matcher = LOG_PATTERN.matcher(line);:创建一个Matcher对象,用于匹配输入的字符串。 -
if (matcher.matches()) { ... }:如果输入字符串匹配日志模式,则提取各个字段。 -
String json = String.format(...);:将提取的字段格式化为 JSON 字符串。 -
context.write(new Text(traceId), new Text(json));:将traceId作为键,JSON 字符串作为值,写入上下文中,生成中间键值对。
第三步,编写Reducer
java
代码解读
复制代码
import org.apache.hadoop.io.Text; import org.apache.hadoop.mapreduce.Reducer; import java.io.IOException; public class LogReducer extends Reducer<Text, Text, Text, Text> { @Override protected void reduce(Text key, Iterable<Text> values, Context context) throws IOException, InterruptedException { // 按 traceID 输出所有日志 for (Text value : values) { context.write(key, value); } } }
reduce方法:重写Reducer类的reduce方法,用于处理中间键值对并生成最终输出。key:输入数据的键,类型为Text,是traceID。values:输入数据的值,类型为Iterable<Text>,包含所有与key相关的日志记录。
for (Text value : values) { ... }:遍历所有与key相关的日志记录。context.write(key, value);:将key和value写入上下文中,生成最终的键值对输出。
第四步,编写主程序
java
代码解读
复制代码
import org.apache.hadoop.conf.Configuration; import org.apache.hadoop.fs.Path; import org.apache.hadoop.io.Text; import org.apache.hadoop.mapreduce.Job; import org.apache.hadoop.mapreduce.lib.input.FileInputFormat; import org.apache.hadoop.mapreduce.lib.output.FileOutputFormat; public class LogProcessor { public static void main(String[] args) throws Exception { if (args.length != 2) { System.err.println("Usage: LogProcessor <input path> <output path>"); System.exit(-1); } Configuration conf = new Configuration(); Job job = Job.getInstance(conf, "Log Processor"); job.setJarByClass(LogProcessor.class); job.setMapperClass(LogMapper.class); job.setReducerClass(LogReducer.class); job.setOutputKeyClass(Text.class); job.setOutputValueClass(Text.class); FileInputFormat.addInputPath(job, new Path(args[0])); FileOutputFormat.setOutputPath(job, new Path(args[1])); System.exit(job.waitForCompletion(true) ? 0 : 1); } }
这里就不做解释了,之后改一下maven依赖入口,打包上传,用hadooppao一下,我们就得到了一个文件。
xml
代码解读
复制代码
mvn clean package
xml
代码解读
复制代码
hadoop jar hadoop-1.0-SNAPSHOT.jar /log /logResult
我们打开看一下:

已经是被我们清洗整理成json的文本了,这个时候就可以进行下一步操作:入库es
第五步,入库ES
xml
代码解读
复制代码
import co.elastic.clients.elasticsearch.ElasticsearchClient; import co.elastic.clients.elasticsearch.core.IndexRequest; import co.elastic.clients.elasticsearch.core.IndexResponse; import co.elastic.clients.json.jackson.JacksonJsonpMapper; import co.elastic.clients.transport.rest_client.RestClientTransport; import com.alibaba.fastjson2.JSONObject; import org.apache.http.Header; import org.apache.http.HeaderElement; import org.apache.http.HttpHost; import org.apache.http.ParseException; import org.elasticsearch.client.RestClient; import java.io.IOException; import java.nio.file.Files; import java.nio.file.Paths; import java.util.HashMap; import java.util.Map; import java.util.stream.Stream; public class ElasticsearchLogWriter { public static void main(String[] args) throws IOException { // 创建 RestClient 和 Transport Header header = new Header() { @Override public String getName() { return "Authorization"; } @Override public String getValue() { return "Basic sdfasfdwefsdfafwe="; } @Override public HeaderElement[] getElements() throws ParseException { return new HeaderElement[0]; } }; RestClient restClient = RestClient.builder( new HttpHost("127.0.0.1", 9200, "http") // 修改为你的 Elasticsearch 地址 ).setDefaultHeaders(new Header[]{header}).build(); try (Stream<String> stream = Files.lines(Paths.get("D:\\xiazai\\part-r-00000"))) { stream.forEach(line -> { try { indexLog(restClient, line); // 逐行写入 Elasticsearch } catch (IOException e) { e.printStackTrace(); } }); } } private static void indexLog(RestClient restClient, String line) throws IOException { String substring = line.substring(2); JSONObject jsonObject = JSONObject.parseObject(substring); // 使用 Jackson 作为 JSON 序列化器 RestClientTransport transport = new RestClientTransport(restClient, new JacksonJsonpMapper()); // 创建 Elasticsearch 客户端 ElasticsearchClient client = new ElasticsearchClient(transport); // 准备日志数据 Map<String, Object> logData = new HashMap<>(); logData.put("timestamp", jsonObject.getString("timestamp")); logData.put("thread", jsonObject.getString("thread")); logData.put("level", jsonObject.getString("level")); logData.put("traceId", jsonObject.getString("traceId")); logData.put("class", jsonObject.getString("class")); logData.put("line", jsonObject.getInteger("line")); logData.put("message", jsonObject.getString("message")); // 将日志写入 Elasticsearch IndexResponse response = client.index(IndexRequest.of(builder -> builder .index("log-index") // 索引名称 .document(logData) // 日志数据 )); // 输出结果 System.out.println("Indexed document with ID: " + response.id()); // 关闭客户端 restClient.close(); } }
我们读取本地的文件,并且把他写入到es中去
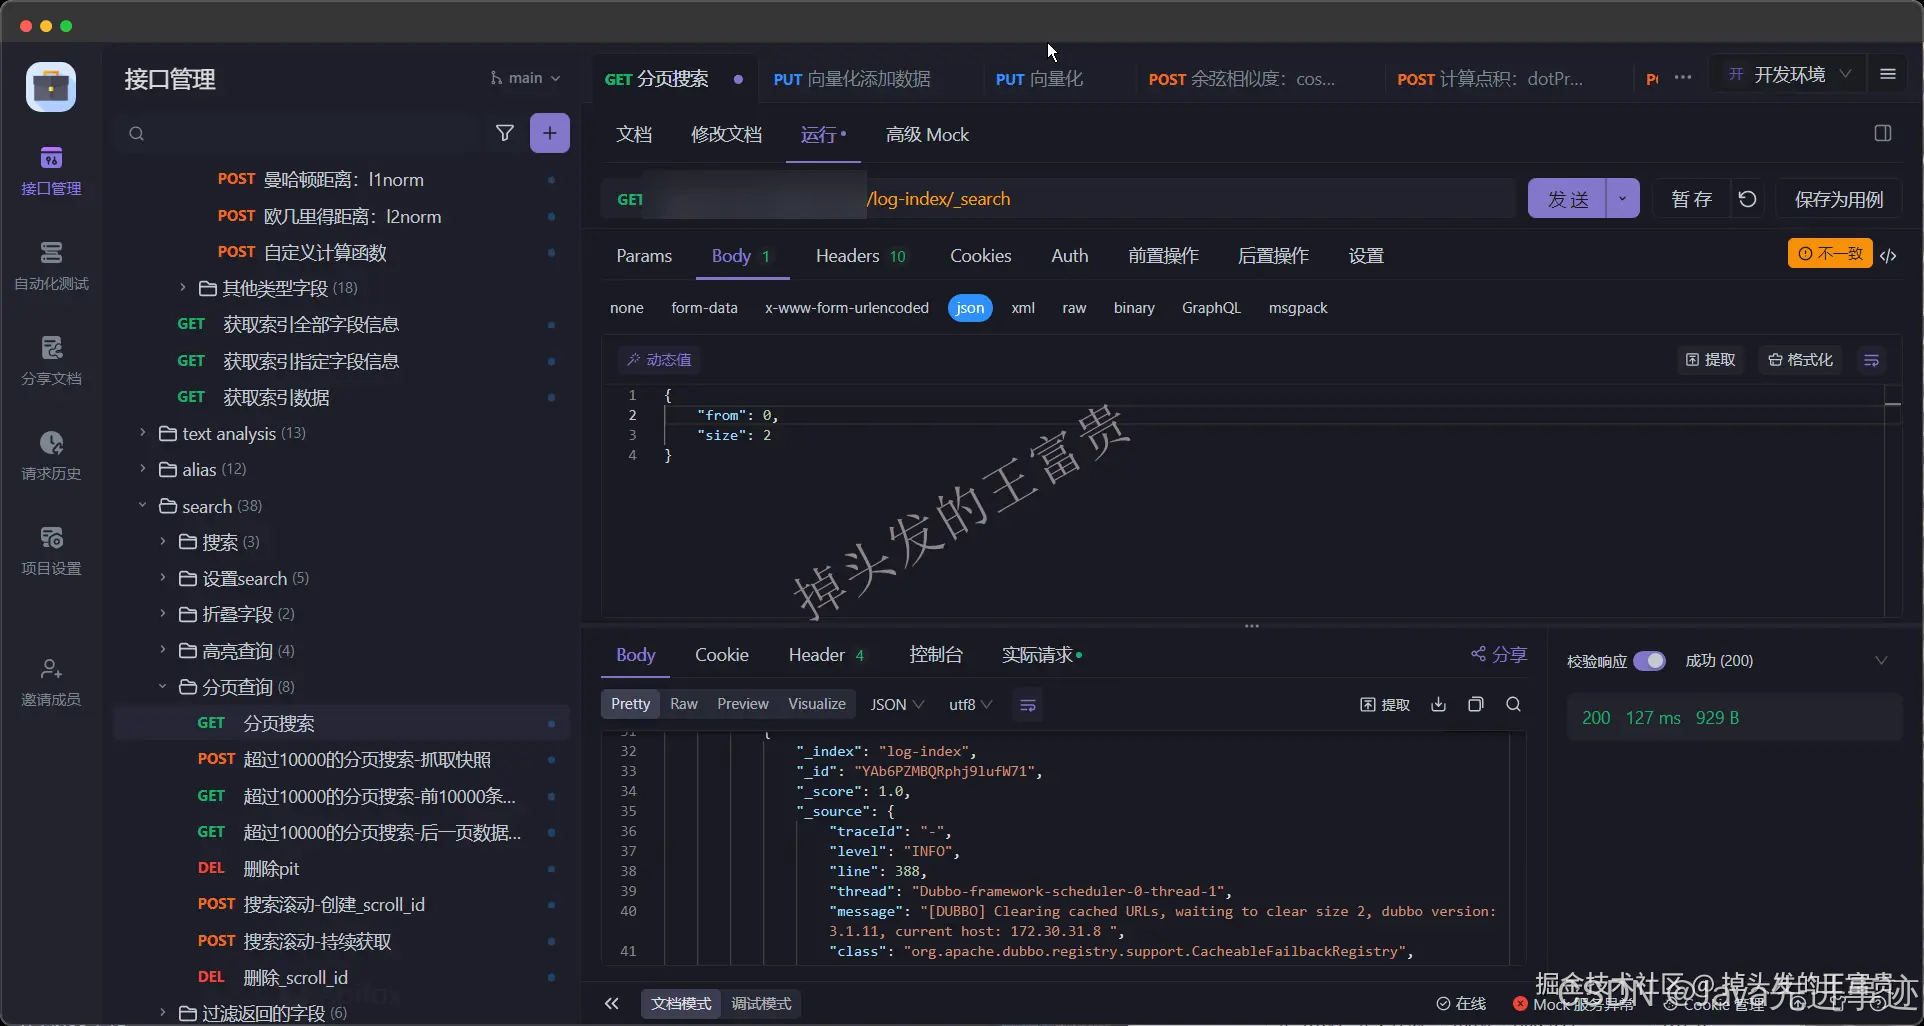
可以看到,完全没问题,应用的日志经过我们一系列的操作已经入库到ES中,至于你以后拿ES的数据干什么,就不管我的事情啦!!
优化
在 Reducer 中直接调用 Elasticsearch 的客户端来插入数据。为了提高性能,可以在 Reducer 的 setup 方法中初始化 RestClient,并在 cleanup 方法中关闭它:
java
代码解读
复制代码
public class LogReducer extends Reducer<Text, Text, Text, Text> { private static final ObjectMapper objectMapper = new ObjectMapper(); private static final String ES_HOST = "localhost"; private static final int ES_PORT = 9200; private RestClient restClient; private ElasticsearchClient client; @Override protected void setup(Context context) throws IOException, InterruptedException { restClient = RestClient.builder(new HttpHost(ES_HOST, ES_PORT, "http")).build(); RestClientTransport transport = new RestClientTransport(restClient, new JacksonJsonpMapper()); client = new ElasticsearchClient(transport); } @Override public void reduce(Text key, Iterable<Text> values, Context context) throws IOException, InterruptedException { for (Text value : values) { indexLog(key.toString(), value.toString(), context); } } private void indexLog(String key, String line, Context context) throws IOException { String substring = line.substring(2); Map<String, Object> logData = objectMapper.readValue(substring, Map.class); // 将日志写入 Elasticsearch IndexResponse response = client.index(i -> i .index("log-index") // 索引名称 .document(logData) // 日志数据 ); // 输出结果 context.getCounter("Logs Indexed").increment(1); System.out.println("Indexed document with ID: " + response.id()); } @Override protected void cleanup(Context context) throws IOException, InterruptedException { if (restClient != null) { restClient.close(); } } }
总结
至此,我们展示了如何利用 Hadoop 和 MapReduce 进行日志数据的高效处理,并结合 Elasticsearch 实现日志数据的实时存储和查询。这种方法不仅能够提高数据处理的效率,还能够提供强大的数据检索和分析能力。希望本文的内容能够帮助大家更好地理解和应用这些技术,提升数据处理和分析的能力
Hadoop 自从 2006 年正式发布以来,已经在大数据处理领域占据了重要地位。然而,随着技术的不断发展,Hadoop 面临着新的挑战和机遇。尽管传统 MapReduce 不适合实时处理,但 Hadoop 生态系统中的其他组件,如 Spark Streaming 和 Flink,已经能够很好地支持实时数据处理。尽管面临挑战,Hadoop 仍在持续演进。社区和企业都在积极开发新的功能和优化现有组件,以满足不断变化的需求。
总体来看,Hadoop 仍然是大数据处理领域的重要工具!!!


 被折叠的 条评论
为什么被折叠?
被折叠的 条评论
为什么被折叠?
 到【灌水乐园】发言


