


马铃薯叶片病害检测,使用深度学习模型如YOLOv5或YOLOv7来训练一个定制化的检测器。
如何从准备数据集开始,到最终部署一个简单的用户界面进行图像和视频的病害检测。
文章目录
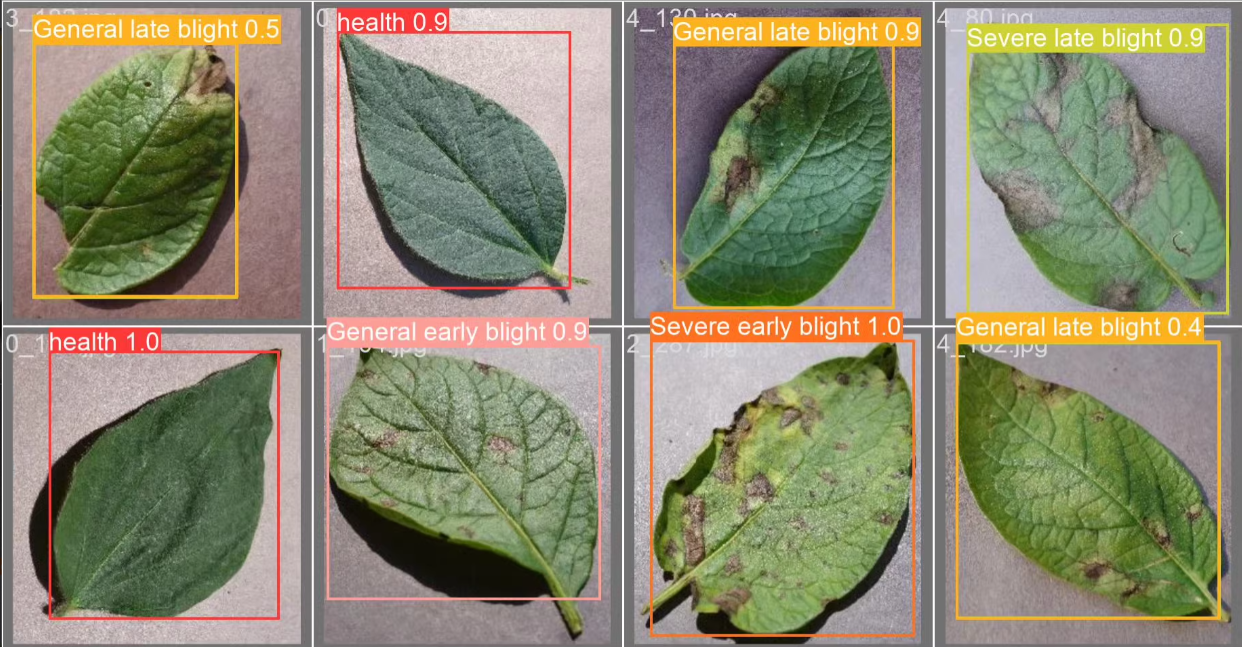
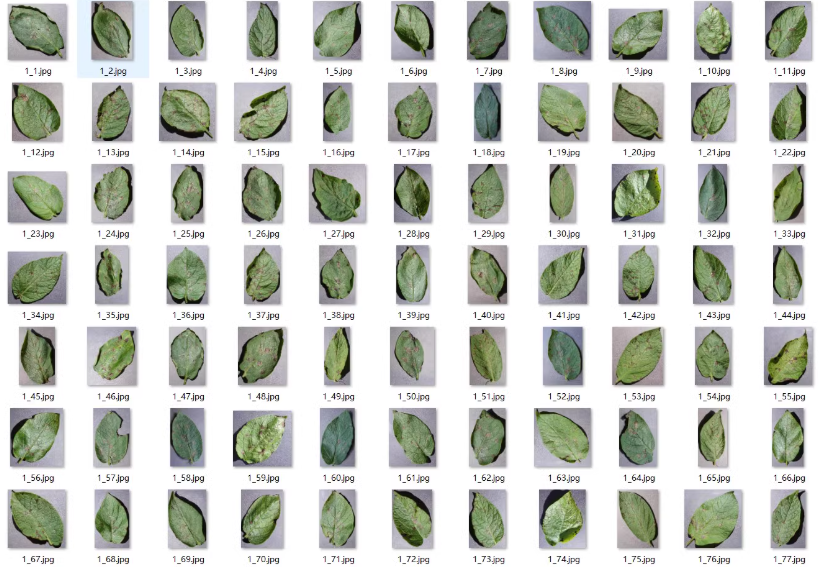
马铃薯叶片病害检测数据集 土豆叶片病害检测
:
1912张图,txt格式,5类
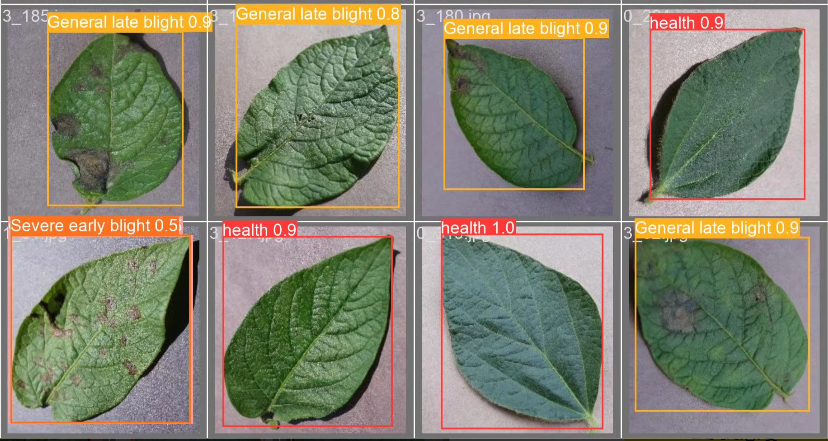
类别:
①General early blight
②General late blight
③health
④Severe early blight
⑤Severe late blight
① 一般早疫病
② 一般晚疫病
③ 健康(状态)
④ 严重早疫病
⑤ 严重晚疫病
马铃薯叶片病害检测,使用深度学习模型如YOLOv5或YOLOv7来训练一个定制化的检测器。
如何从准备数据集开始,到最终部署一个简单的用户界面进行图像和视频的病害检测。
标题:基于YOLOv5的马铃薯叶片病害检测系统
1. 安装依赖
首先,确保安装了必要的Python库和工具:
pip install torch torchvision torchaudio --extra-index-url https://download.pytorch.org/whl/cu113  # 根据CUDA版本选择
git clone https://github.com/ultralytics/yolov5  # 克隆YOLOv5仓库
cd yolov5
pip install -r requirements.txt
此外,如果你计划开发GUI应用程序,还需要安装以下库:
pip install opencv-python-headless PyQt5 streamlit
2. 数据集准备
根据你的描述,数据集包括1912张图片,标注文件为YOLO格式(txt文件),共有5类病害。请按照以下结构组织你的数据集:
数据集结构示例
potato_leaf_disease_dataset/
├── images/
│   ├── train/
│   │   ├── img1.jpg
│   │   └── ...
│   ├── val/
│   │   ├── img801.jpg
│   │   └── ...
│   └── test/
│       ├── img1601.jpg
│       └── ...
└── labels/
    ├── train/
    │   ├── img1.txt
    │   └── ...
    ├── val/
    │   ├── img801.txt
    │   └── ...
    └── test/
        ├── img1601.txt
        └── ...
创建data.yaml文件
在YOLOv5项目的根目录下创建一个名为data.yaml的数据配置文件,内容如下:
train: ./path/to/potato_leaf_disease_dataset/images/train/
val: ./path/to/potato_leaf_disease_dataset/images/val/

nc: 5  # 类别数量
names: ['General early blight', 'General late blight', 'health', 'Severe early blight', 'Severe late blight']  # 类别名称
请将路径替换为你实际的数据集路径。
3. 配置并训练YOLOv5模型
训练模型
使用YOLOv5的预训练模型开始训练。这里我们以YOLOv5s为例:
python train.py --img 640 --batch 16 --epochs 50 --data data.yaml --weights yolov5s.pt
--img 640: 输入图像尺寸。--batch 16: 批次大小。--epochs 50: 训练轮数。--data data.yaml: 数据配置文件。--weights yolov5s.pt: 使用YOLOv5s预训练权重。
模型评估
训练完成后,可以对验证集进行评估:
python val.py --weights runs/train/exp/weights/best.pt --data data.yaml --img 640
这会输出模型在验证集上的性能指标(如mAP)。
4. 推理代码
编写推理代码用于预测新图片中的病害情况:
from pathlib import Path
import cv2
import torch
from models.experimental import attempt_load
from utils.general import non_max_suppression, scale_coords
from utils.datasets import letterbox

def detect(image_path, model, img_size=640):
    device = 'cuda' if torch.cuda.is_available() else 'cpu'
    names = model.module.names if hasattr(model, 'module') else model.names

    # 读取图像
    img0 = cv2.imread(image_path)
    img = letterbox(img0, new_shape=img_size)[0]
    img = img[:, :, ::-1].transpose(2, 0, 1)  # BGR to RGB, to 3x416x416
    img = np.ascontiguousarray(img)

    # 转换为tensor
    img = torch.from_numpy(img).to(device)
    img = img.float() / 255.0
    if img.ndimension() == 3:
        img = img.unsqueeze(0)

    # 推理
    with torch.no_grad():
        pred = model(img)[0]
    pred = non_max_suppression(pred, 0.25, 0.45, classes=None, agnostic=False)

    # 处理预测结果
    for i, det in enumerate(pred):  # detections per image
        if len(det):
            det[:, :4] = scale_coords(img.shape[2:], det[:, :4], img0.shape).round()
            for *xyxy, conf, cls in reversed(det):
                label = f'{names[int(cls)]} {conf:.2f}'
                plot_one_box(xyxy, img0, label=label, color=(0, 255, 0), line_thickness=3)

    return img0

# 辅助函数:绘制边界框
def plot_one_box(x, img, color=None, label=None, line_thickness=None):
    tl = line_thickness or round(0.002 * (img.shape[0] + img.shape[1]) / 2) + 1  # line/font thickness
    color = color or [random.randint(0, 255) for _ in range(3)]
    c1, c2 = (int(x[0]), int(x[1])), (int(x[2]), int(x[3]))
    cv2.rectangle(img, c1, c2, color, thickness=tl, lineType=cv2.LINE_AA)
    if label:
        tf = max(tl - 1, 1)  # font thickness
        t_size = cv2.getTextSize(label, 0, fontScale=tl / 3, thickness=tf)[0]
        c2 = c1[0] + t_size[0], c1[1] - t_size[1] - 3
        cv2.rectangle(img, c1, c2, color, -1, cv2.LINE_AA)  # filled
        cv2.putText(img, label, (c1[0], c1[1] - 2), 0, tl / 3, [225, 255, 255], thickness=tf, lineType=cv2.LINE_AA)

# 示例用法
image_path = './path/to/test/image.jpg'
model = attempt_load('runs/train/exp/weights/best.pt', map_location='cuda')
result_image = detect(image_path, model)
cv2.imshow('Result Image', result_image)
cv2.waitKey(0)
cv2.destroyAllWindows()
5. 构建GUI应用程序
GUI 1: 基于PyQt5
import sys
from PyQt5.QtWidgets import QApplication, QWidget, QVBoxLayout, QPushButton, QLabel, QFileDialog
from PyQt5.QtGui import QPixmap
from PyQt5.QtCore import Qt
import cv2

class App(QWidget):
    def __init__(self, model):
        super().__init__()
        self.model = model
        self.initUI()

    def initUI(self):
        self.setWindowTitle('马铃薯叶片病害检测系统')

        layout = QVBoxLayout()

        self.image_label = QLabel(self)
        layout.addWidget(self.image_label)

        self.select_button = QPushButton('选择图片', self)
        self.select_button.clicked.connect(self.select_image)
        layout.addWidget(self.select_button)

        self.setLayout(layout)
        self.show()

    def select_image(self):
        options = QFileDialog.Options()
        file_name, _ = QFileDialog.getOpenFileName(self, "选择图片", "", "Image Files (*.jpg *.jpeg *.png)", options=options)
        if file_name:
            self.detect_and_show(file_name)

    def detect_and_show(self, image_path):
        detected_image = detect(image_path, self.model)
        height, width, channel = detected_image.shape
        bytes_per_line = 3 * width
        q_img = QImage(detected_image.data, width, height, bytes_per_line, QImage.Format_RGB888).rgbSwapped()
        pixmap = QPixmap.fromImage(q_img)
        self.image_label.setPixmap(pixmap)

if __name__ == '__main__':
    app = QApplication(sys.argv)
    ex = App(model)  # 将训练好的模型传入
    sys.exit(app.exec_())
GUI 2: 基于Streamlit
import streamlit as st
import cv2
import numpy as np
from PIL import Image
import tempfile

# 加载模型
@st.cache(allow_output_mutation=True)
def load_model():
    return attempt_load('runs/train/exp/weights/best.pt', map_location='cuda')

# 主函数
def main():
    st.title("马铃薯叶片病害检测系统")
    model = load_model()

    option = st.selectbox("选择输入类型", ("图片", "视频", "摄像头"))

    if option == "图片":
        uploaded_file = st.file_uploader("上传图片", type=["jpg", "jpeg", "png"])
        if uploaded_file is not None:
            image = Image.open(uploaded_file)
            result_image = detect(np.array(image), model)
            st.image(result_image, caption="检测结果")

    elif option == "视频":
        uploaded_file = st.file_uploader("上传视频", type=["mp4"])
        if uploaded_file is not None:
            tfile = tempfile.NamedTemporaryFile(delete=False)
            tfile.write(uploaded_file.read())
            output_video_path = predict_video(tfile.name, model)
            st.video(output_video_path)

    elif option == "摄像头":
        st.write("摄像头功能暂时未实现,请稍后关注更新。")

if __name__ == "__main__":
    main()
仅供参考,同学
从安装依赖、准备数据集、配置YOLOv5、训练模型、推理代码到构建GUI应用程序的完整实现流程。通过这个流程,你可以有效地使用YOLOv5模型来完成马铃薯叶片病害检测任务,,哎来通过直观的Web界面与之交互。


 719
719

 被折叠的 条评论
为什么被折叠?
被折叠的 条评论
为什么被折叠?
 到【灌水乐园】发言


