


网上学习资料一大堆,但如果学到的知识不成体系,遇到问题时只是浅尝辄止,不再深入研究,那么很难做到真正的技术提升。
一个人可以走的很快,但一群人才能走的更远!不论你是正从事IT行业的老鸟或是对IT行业感兴趣的新人,都欢迎加入我们的的圈子(技术交流、学习资源、职场吐槽、大厂内推、面试辅导),让我们一起学习成长!
{
umask(0);
int fd1 = open(“log1.txt”, O_WRONLY | O_CREAT | O_TRUNC, 0666);
int fd2 = open(“log2.txt”, O_WRONLY | O_CREAT | O_TRUNC, 0666);
int fd3 = open(“log3.txt”, O_WRONLY | O_CREAT | O_TRUNC, 0666);
int fd4 = open(“log4.txt”, O_WRONLY | O_CREAT | O_TRUNC, 0666);
printf(“%d %d %d %d\n”, fd1, fd2, fd3, fd4);
close(fd1);
close(fd2);
close(fd3);
close(fd4);
return 0;
}
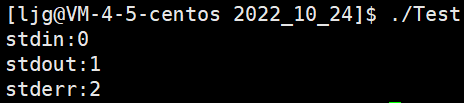
运行截图:

此时查看open的返回值描述:

如果返回-1就说明错误发生了,只有当fd>=0才说明文件打开成功。
>
> 为什么从3开始?0 1 2是什么?
>
>
> 0 1 2被默认打开了:
>
>
> 0:标准输入:键盘
>
>
> 1:标准输出:显示器
>
>
> 2:标准输出:显示器
>
>
> 上面的可以类比C语言中的stdin,stdout,stderr
>
>
> 两者有什么区别呢?0 1 2是针对系统接口的概念,而stdin,stdout,stderr是C语言中的概念。
>
>
> C语言中有FILE\*类型的文件指针,那么FILE是什么呢?FILE是一个结构体,封装了很多成员,其中就封装了fd。
>
>
>
>
> 下面进行验证:
>
>
>
> ```
> #include<stdio.h>
> #include<string.h>
> #include<sys/types.h>
> #include<sys/stat.h>
> #include<fcntl.h>
> #include<unistd.h>
> int main()
> {
> //先验证0 1 2就是标准IO
> char buffer[1024];
> ssize\_t s = read(0, buffer, sizeof(buffer)- 1);//从标准输入中读数据到buffer中
> if(s > 0)
> {
> buffer[s] = '\0';
> printf("echo:%s", buffer);
> }
> return 0;
> }
>
> ```
>
> 运行截图:
>
>
> 
>
>
>
> ```
> #include<stdio.h>
> #include<string.h>
> #include<sys/types.h>
> #include<sys/stat.h>
> #include<fcntl.h>
> #include<unistd.h>
> int main()
> {
> const char\* str = "hello world\n";
> write(1, str, strlen(str));//将str字符串中的内容写到标准输出(stdout)中去
> write(2, str, strlen(str));//将str字符串中的内容写到标准错误(stderr)中去
> return 0;
> }
>
> ```
>
> 
>
>
>
>
> 下面再次进行验证stdin stdout stderror和0 1 2之间的对应关系:
>
>
> 代码:
>
>
>
> ```
> #include<stdio.h>
> #include<string.h>
> #include<sys/types.h>
> #include<sys/stat.h>
> #include<fcntl.h>
> #include<unistd.h>
> int main()
> {
> printf("stdin:%d\n", stdin->_fileno);
> printf("stdout:%d\n", stdout->_fileno);
> printf("stderr:%d\n", stderr->_fileno);
> return 0;
> }
>
> ```
>
> 
>
>
>
>
> 总结:
>
>
> 函数接口的对应:
>
>
> fopen/fwrite/fread… -> open/write/read/…
>
>
> 数据类型的对应:
>
>
> FILE -> fd
>
>
>
### 理解0 1 2 3 4…
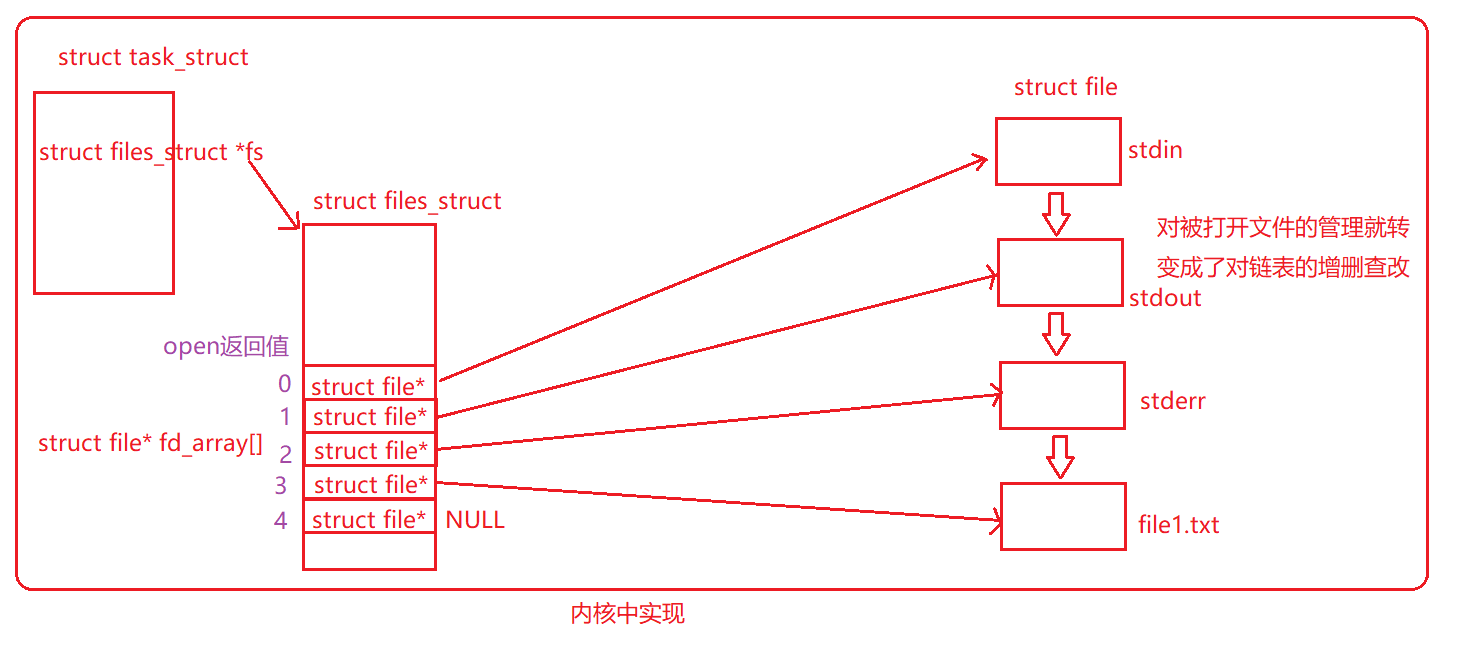
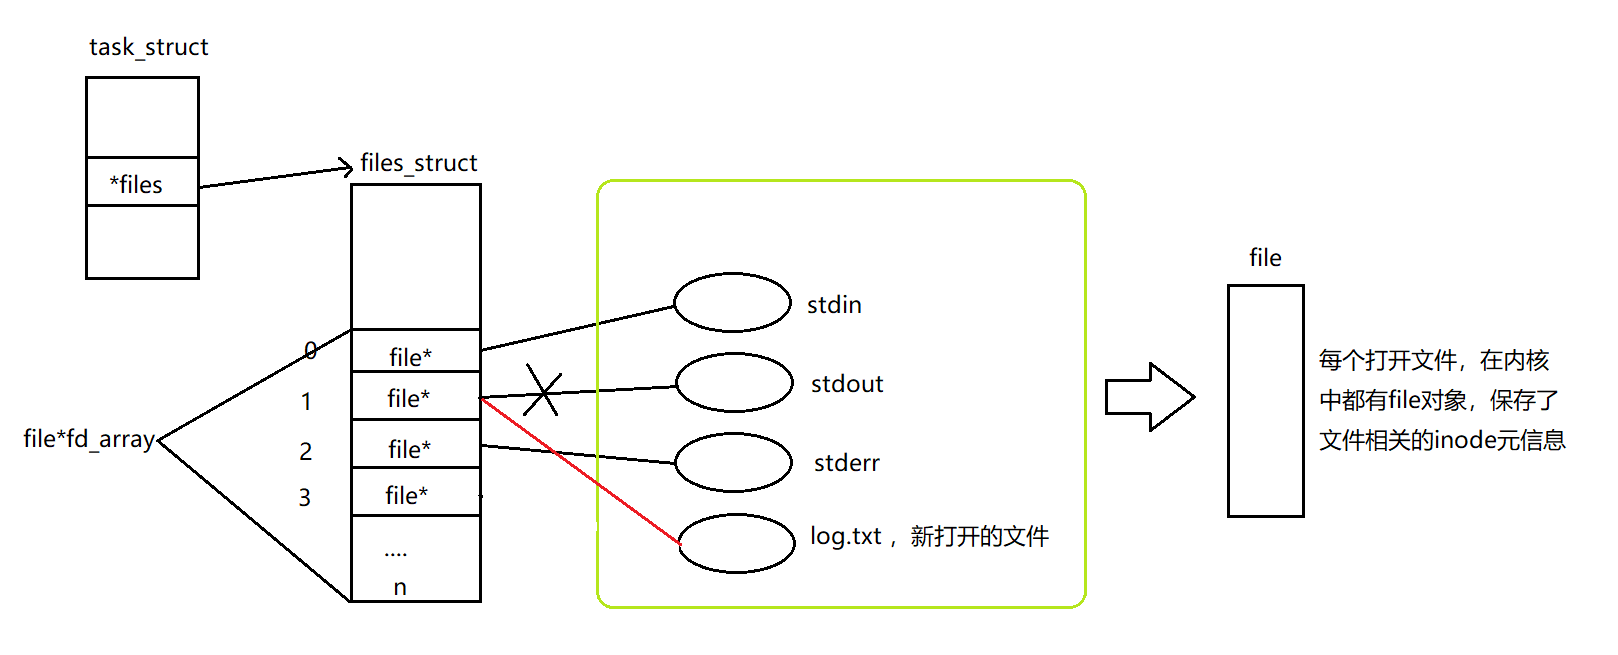
一个进程可以打开文件,包括标准输入、标准输出、标准错误还有其它文件(打开的文件在内存中),进程 : 打开的文件 = 1 : n ,所以系统在运行中有大量被打开的文件,OS要对这些文件进行管理,所以就要先描述后组织。所以一个文件被打开,在内核中就要创建该被打开的文件的内核数据结构,这是描述的过程。
struct file
{
//包含了文件的大部分内容和属性
struct file* next;
struct file* prev;
//只是为了方便描述,实际上内核数据结构有自己的链接方式和结构,但是相互链接是确定的
}
**理解Linux下一切皆文件**
首先先理解一下C语言是如何实现面向对象中的多态的?
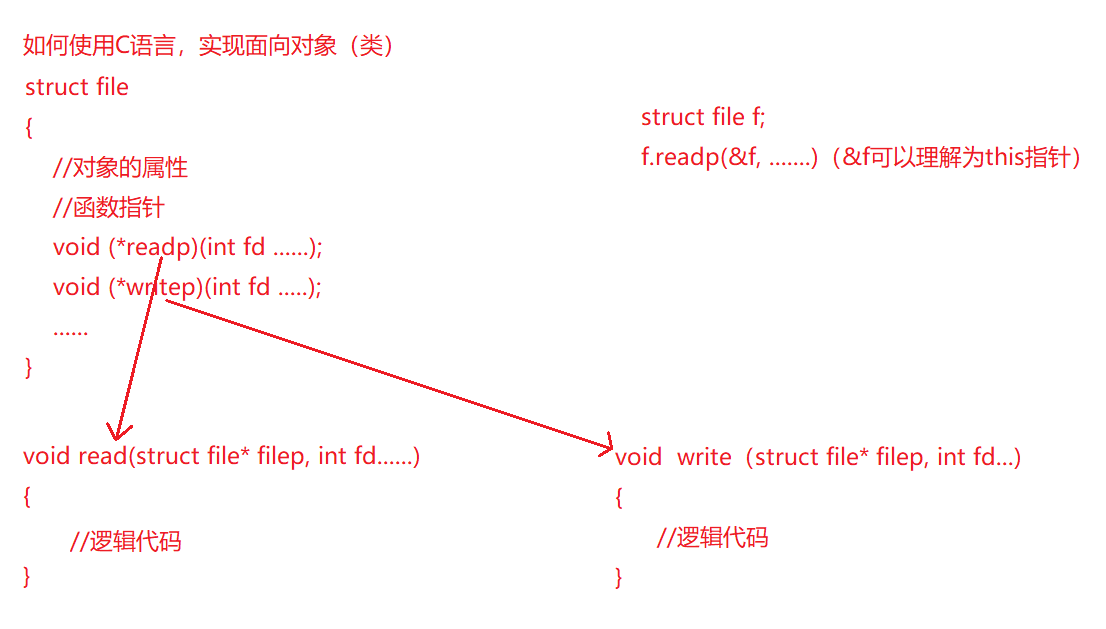
一切皆文件的理解:
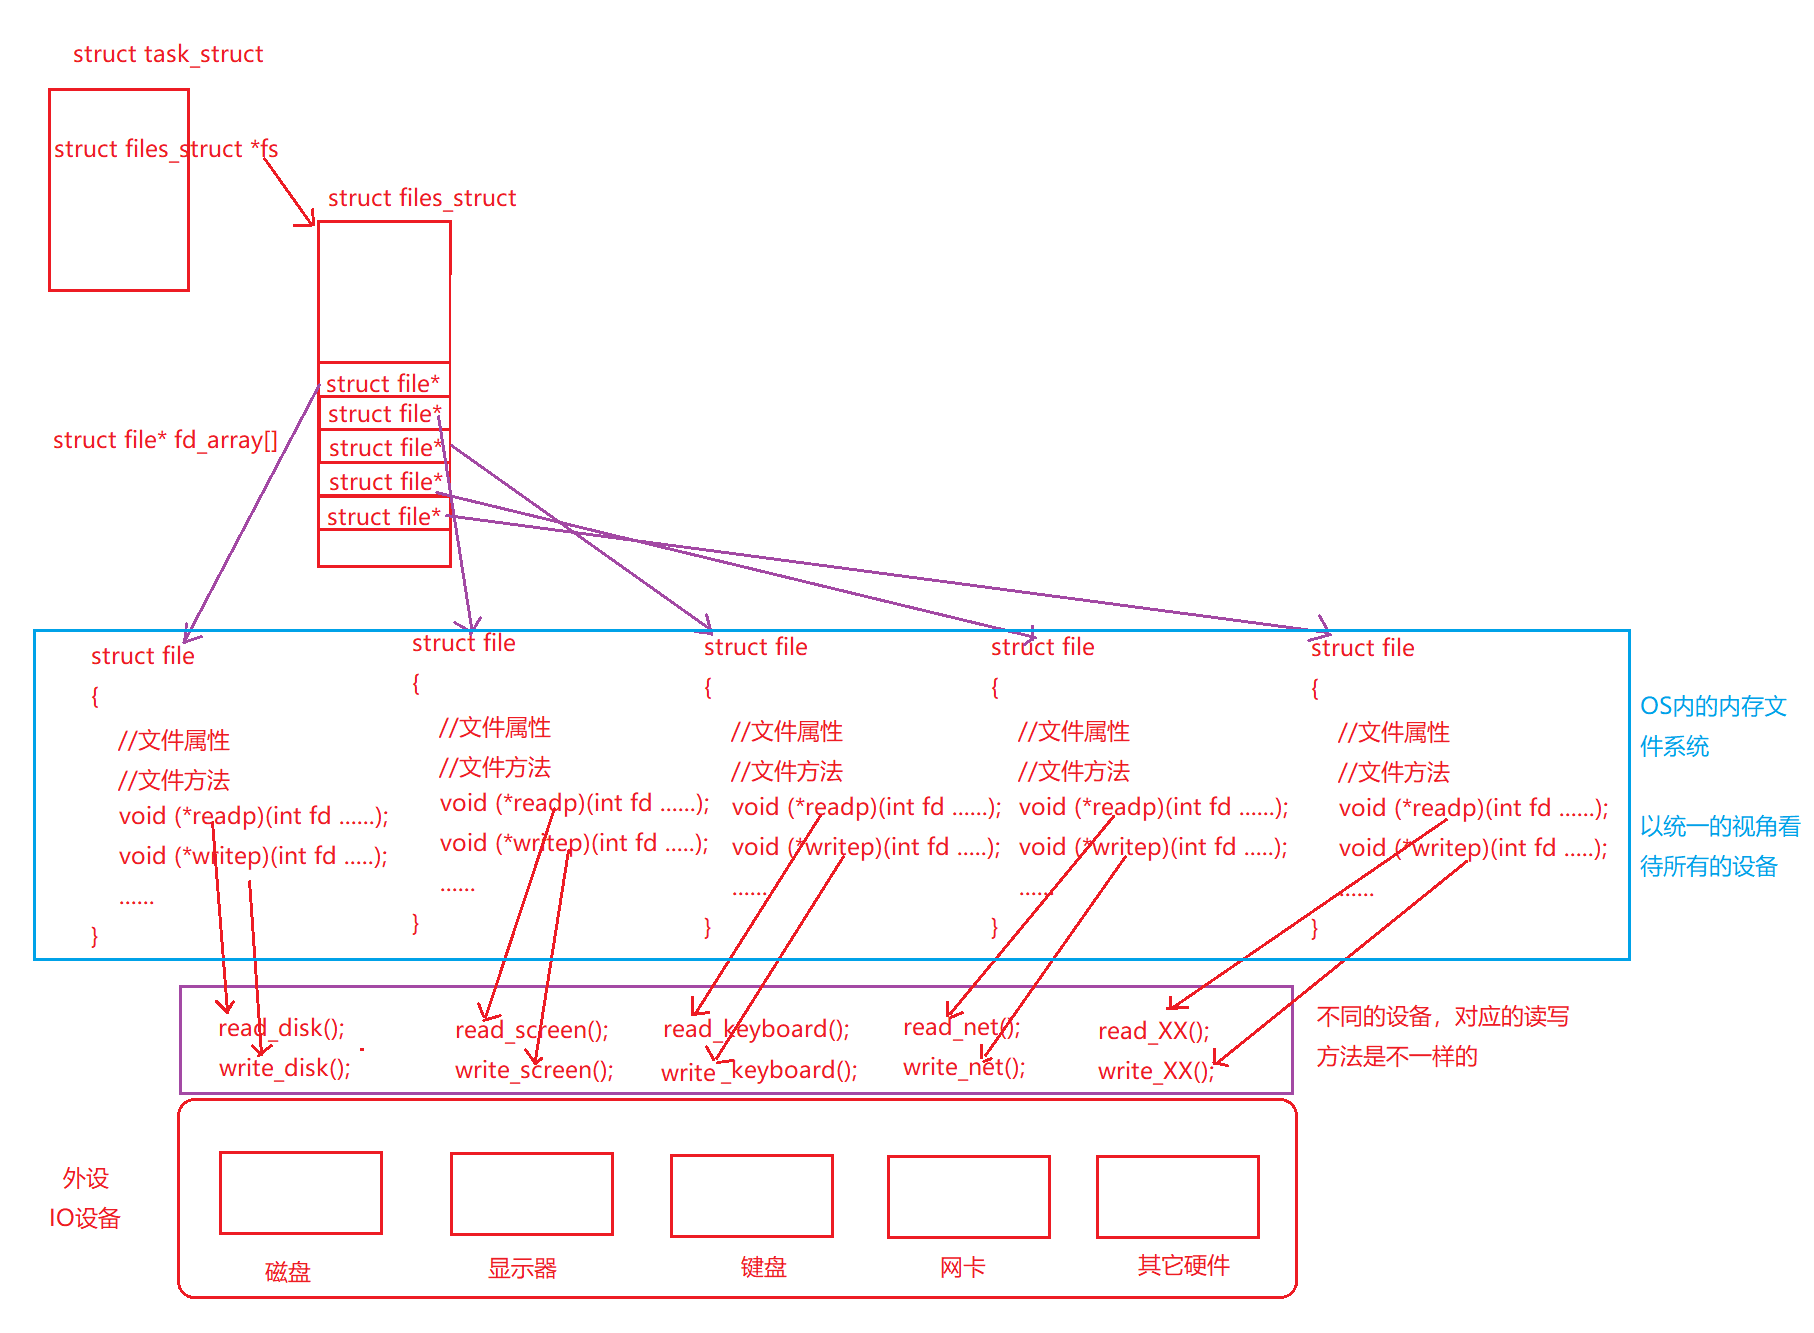
**注意:磁盘、显示器、键盘、网卡等的read和write的具体方法是驱动负责的。**
**注意:OS内的文件系统也叫做VFS,即虚拟文件系统。**
我们可以通过`ulimit -a`指令来查看打开文件的个数:

### 文件描述符的分配规则
**从头遍历fd\_array数组,找到一个最小的且没有被使用的下标分配给新的文件**。
代码:
#include<stdio.h>
#include<string.h>
#include<sys/types.h>
#include<sys/stat.h>
#include<fcntl.h>
#include<unistd.h>
int main()
{
close(0);
int fd = open(“log.txt”, O_WRONLY | O_CREAT | O_TRUNC, 0666);
if(fd < 0)
{
perror(“open\n”);
return 1;
}
printf(“fd:%d\n”, fd);
close(fd);
}
运行截图:

## 重定向的本质及相关操作
### 认识重定向
下面以一个小例子来了解重定向:
#include<stdio.h>
#include<string.h>
#include<sys/types.h>
#include<sys/stat.h>
#include<fcntl.h>
#include<unistd.h>
int main()
{
close(1);
int fd = open(“log.txt”, O_WRONLY | O_CREAT | O_TRUNC, 0666);
//此时fd等于1,即文件log.txt的文件描述符是1,stdout默认就是1,所以此时如果我们向stdout中进行输出,其实是输出到了文件log.txt中
if(fd < 0)
{
perror(“open\n”);
return 1;
}
//本来应该要往显示器打印,最终变成了向log.txt文件中打印
printf(“fd:%d\n”, fd);
fflush(stdout);//刷新缓冲区
close(fd);
return 0;
}
运行截图:

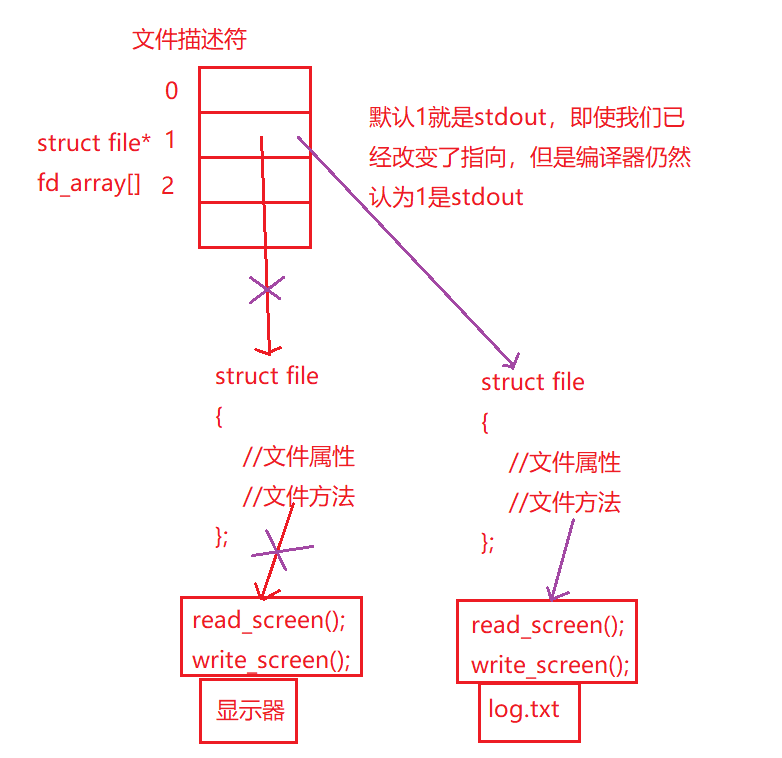
如果我们要进行重定向,上层只任0,1,2,3,4,5这样的fd,我们可以在OS内部,,通过这一方式调整数组的特定下标的内容(指向),我们就可以完成重定向操作。
**总结:本来应该向显示器打印,最终变成了向指定文件打印,这就是重定向**。
### 重定向的具体原理

**如果我们要进行重定向,操作系统只认识0 1 2 3…这样的fd,我们可以在OS内部,通过一定的方式调整数组特定下标的内容(指向),我们就可以完成重定向操作**。
在上面的例子中,就像下面这样进行改变:
printf是向1(log.txt文件)中进行写入,操作系统仍然认为1是stdout,所以程序运行的结果是向log.txt文件中进行写入。
### 重定向的操作
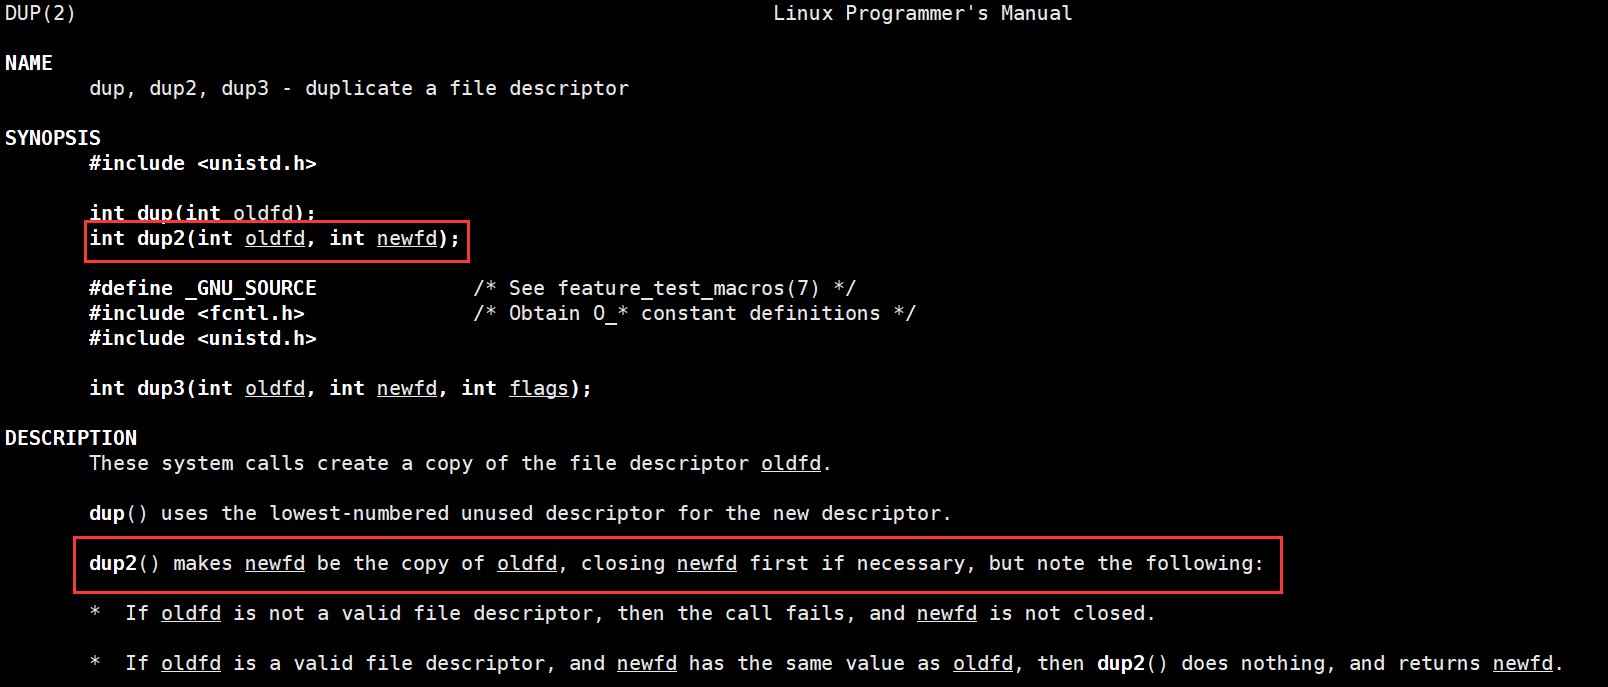
dup2作用:让新的fd称为旧的fd的拷贝,最终只剩下了旧的fd,如果必要的话,新的fd会被关闭。
**注意:拷贝的不是数组下标,而是相应的数组下标所存储的内容,即struct file**\*。
**返回值**:

**返回的是新的,即new文件描述符**。
>
> 问:一个文件是怎么做到被打开多次的呢?
>
>
> 答:是通过类似引用计数的方式,当被打开一次的时候,引用计数就+1,close之后,引用计数就-1,当引用计数变成0的时候,文件才会彻底关闭。
>
>
>
### 追加重定向和输入重定向
#### 追加重定向
代码:
#include<stdio.h>
#include<string.h>
#include<sys/types.h>
#include<sys/stat.h>
#include<fcntl.h>
#include<unistd.h>
int main()
{
int fd = open(“log.txt”, O_WRONLY | O_CREAT | O_APPEND, 0666);//把O_TRUNC换成O_APPEND即可实现追加重定向
if(fd < 0)
{
perror(“open\n”);
return 1;
}
dup2(fd, 1);
printf(“fd:%d\n”, fd);
fflush(stdout);
close(fd);
return 0;
}
运行截图:

#### 输入重定向
代码:
#include<stdio.h>
#include<string.h>
#include<sys/types.h>
#include<sys/stat.h>
#include<fcntl.h>
#include<unistd.h>
int main()
{
int fd = open(“log.txt”, O_RDONLY);
if(fd < 0)
{
perror(“open\n”);
return 1;
}
dup2(fd, 0);//输入重定向
char str[64];
while(fgets(str, sizeof(str) - 1, stdin))
{
printf(“%s”, str);
}
close(fd);
return 0;
}
运行截图:

## 缓冲区的理解
### 什么是缓冲区
缓冲区的本质:就是一段内存。
### 为什么要有缓冲区
* **解放当前使用缓冲区的进程的时间**(即解放当前进程的时间,因为如果当前进程要直接将数据传输到外设中的话,,这个过程要花费很多的时间,且无法处理后面的代码)
* **缓冲区的存在可以集中处理数据刷新,减少IO的次数,从而达到提高整机的效率**
### 缓冲区在哪里
代码测试:
#include<stdio.h>
#include<string.h>
#include<sys/types.h>
#include<sys/stat.h>
#include<fcntl.h>
#include<unistd.h>
int main()
{
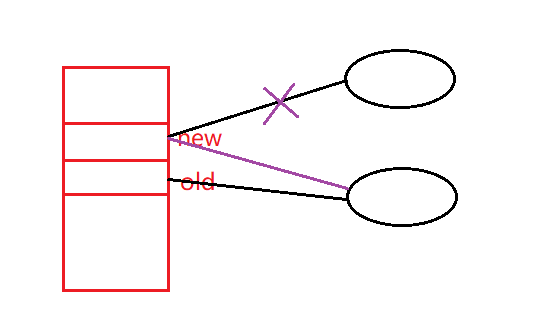
printf(“hello printf\n”);
const char* str = “hello write\n”;
write(1, str, strlen(str));
sleep(5);
return 0;
}
sleep前:
sleep后:

将上面的代码进行如下修改:
#include<stdio.h>
#include<string.h>
#include<sys/types.h>
#include<sys/stat.h>
#include<fcntl.h>
#include<unistd.h>
int main()
{
printf(“hello printf”);
const char* str = “hello write”;
write(1, str, strlen(str));
sleep(5);
return 0;
}
运行截图:
sleep前:

sleep后:

分析:首先printf封装了write,write是立即刷新的,即一旦有数据传给write就会立即在显示器上打印出来,`hello printf`没有先显示的原因是被存放到了缓冲区中,缓冲区没有被刷新,即缓冲区中的数据没有被传给write函数,所以没有被打印出来,当进程结束的时候,会将数据直接传给write函数,数据被立即刷新,所以最后`hello printf`被打印了出来。
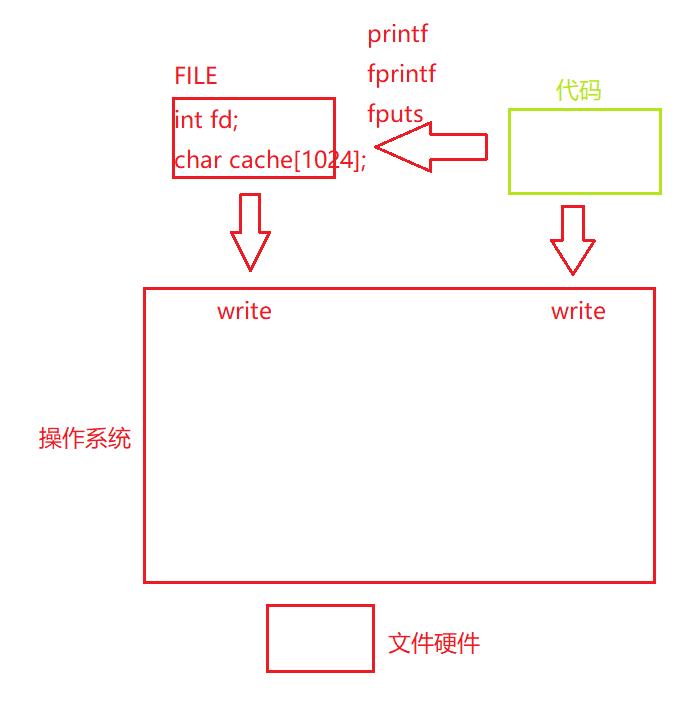
总结:缓冲区在哪里呢,只能是由特定的语言提供的,**stdout的类型是FILE类型的,缓冲区就封装在这个结构体中**,**缓冲区不是内核级别的**。缓冲区在FILE内部,在C语言中,每一次打开一个文件,都要有一个FILE\*会返回,意味着每一个文件都有一个fd和属于它自己的语言级别的缓冲区。所以open函数在打开文件的时候创建了一个FILE类型的结构体对象。
//在 / usr / include / libio.h
struct _IO_FILE {
int _flags; /* High-order word is _IO_MAGIC; rest is flags. */
#define _IO_file_flags _flags
//缓冲区相关
/* The following pointers correspond to the C++ streambuf protocol. */
/* Note: Tk uses the _IO_read_ptr and _IO_read_end fields directly. */
char* _IO_read_ptr; /* Current read pointer */
char* _IO_read_end; /* End of get area. */
char* _IO_read_base; /* Start of putback+get area. */
char* _IO_write_base; /* Start of put area. */
char* _IO_write_ptr; /* Current put pointer. */
char* _IO_write_end; /* End of put area. */
char* _IO_buf_base; /* Start of reserve area. */
char* _IO_buf_end; /* End of reserve area. */
/* The following fields are used to support backing up and undo. */
char* _IO_save_base; /* Pointer to start of non-current get area. */
char* _IO_backup_base; /* Pointer to first valid character of backup area */
char* _IO_save_end; /* Pointer to end of non-current get area. */
struct _IO_marker* _markers;
struct _IO_FILE* _chain;
int _fileno; //封装的文件描述符
#if 0
int _blksize;
#else
int _flags2;
#endif
_IO_off_t _old_offset; /* This used to be _offset but it’s too small. */
#define __HAVE_COLUMN /* temporary */
/* 1+column number of pbase(); 0 is unknown. */
unsigned short _cur_column;
signed char _vtable_offset;
char _shortbuf[1];
/* char* _save_gptr; char* _save_egptr; */
_IO_lock_t* _lock;
#ifdef _IO_USE_OLD_IO_FILE
};
>
> 问:在上面的例子中,如果关闭了1会发生什么情况?
>
>
> 答:
>
>
> 代码:
>
>
>
> ```
> #include<stdio.h>
> #include<string.h>
> #include<sys/types.h>
> #include<sys/stat.h>
> #include<fcntl.h>
> #include<unistd.h>
>
> int main()
> {
> printf("hello printf");
> const char\* str = "hello write";
> write(1, str, strlen(str));
> close(1);
> sleep(5);
> return 0;
> }
>
> ```
>
> 运行截图:
>
>
> 
>
>
> 
>
>
> 问:为什么会出现这样的情况呢?
>
>
> 答:因为下标1的file\*指针已经不再指向stdout的file结构体了,自然无法找到之前的缓冲区然后调用write去刷新数据了。
>
>
>
### 刷新策略
>
> 什么时候刷新?
>
>
> 常规:
>
>
> * 无缓冲(立即刷新)
> * 行缓冲(逐行刷新):显示器文件
> * 全缓冲(缓冲区写满才刷新):块设备(磁盘文件)
>
>
> 特殊情况:
>
>
> * 进程退出
> * 用户强制刷新(fflush)
>
>
> 注意:exit()和\_exit()的区别,exit()会刷新缓冲区,\_exit会清空缓冲区。
>
>
>
### 奇怪的代码(和子进程相关)
代码:
#include<stdio.h>
#include<string.h>
#include<sys/types.h>
#include<sys/stat.h>
#include<fcntl.h>
#include<unistd.h>
int main()
{
const char* str1 = “hello printf\n”;
const char* str2 = “hello fprintf\n”;
const char* str3 = “hello fputs\n”;
const char* str4 = “hello write\n”;
//C库函数
printf(“%s”, str1);
fprintf(stdout, “%s”, str2);
fputs(str3, stdout);
既有适合小白学习的零基础资料,也有适合3年以上经验的小伙伴深入学习提升的进阶课程,涵盖了95%以上C C++开发知识点,真正体系化!
由于文件比较多,这里只是将部分目录截图出来,全套包含大厂面经、学习笔记、源码讲义、实战项目、大纲路线、讲解视频,并且后续会持续更新
代码:
#include<stdio.h>
#include<string.h>
#include<sys/types.h>
#include<sys/stat.h>
#include<fcntl.h>
#include<unistd.h>

int main()
{
  const char\* str1 = "hello printf\n";
  const char\* str2 = "hello fprintf\n";
  const char\* str3 = "hello fputs\n";
  const char\* str4 = "hello write\n";
  //C库函数
  printf("%s", str1);
  fprintf(stdout, "%s", str2);
  fputs(str3, stdout);


[外链图片转存中...(img-stAvpoSF-1715760653761)]
[外链图片转存中...(img-PCuBLtmg-1715760653761)]

**既有适合小白学习的零基础资料,也有适合3年以上经验的小伙伴深入学习提升的进阶课程,涵盖了95%以上C C++开发知识点,真正体系化!**

**由于文件比较多,这里只是将部分目录截图出来,全套包含大厂面经、学习笔记、源码讲义、实战项目、大纲路线、讲解视频,并且后续会持续更新**

**[如果你需要这些资料,可以戳这里获取](https://bbs.youkuaiyun.com/topics/618668825)**


 1247
1247

 被折叠的 条评论
为什么被折叠?
被折叠的 条评论
为什么被折叠?
 到【灌水乐园】发言


