


目录
1、作用及使用场景


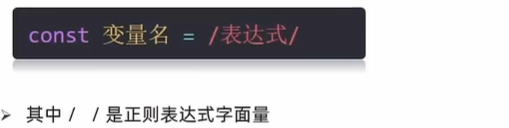
2、语法
步骤:定义规则+查找
1)定义语法
2)判断是否有符合规则的字符串
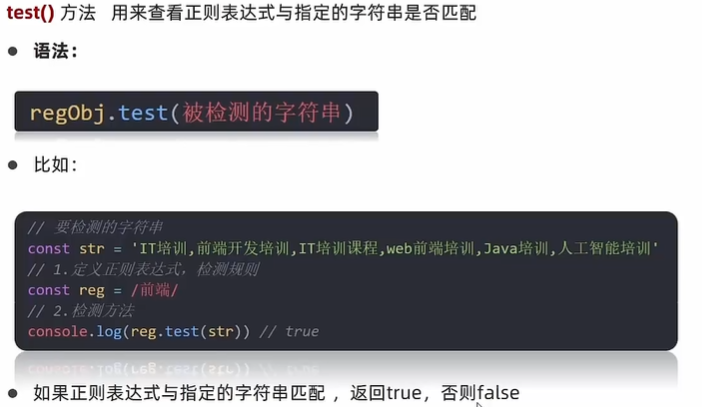
<script>
const str = 'abcdefghijklmn'
const reg = /fgh/
console.log(reg.test(str)); // true
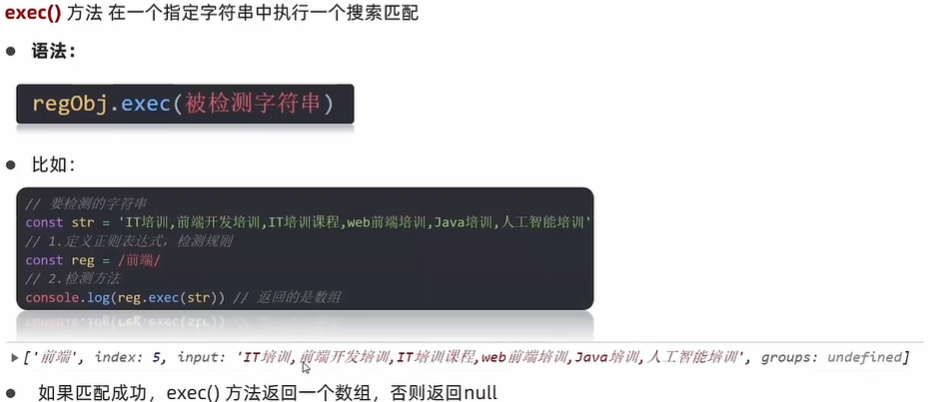
</script>3)检索(查找)符合规则的字符串
3、元字符
1)好处
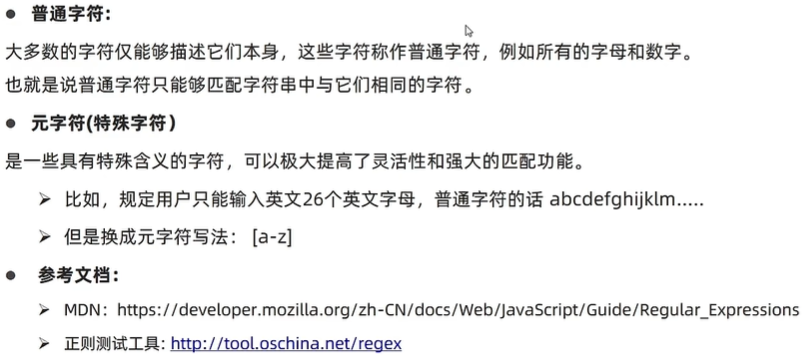
2)分类

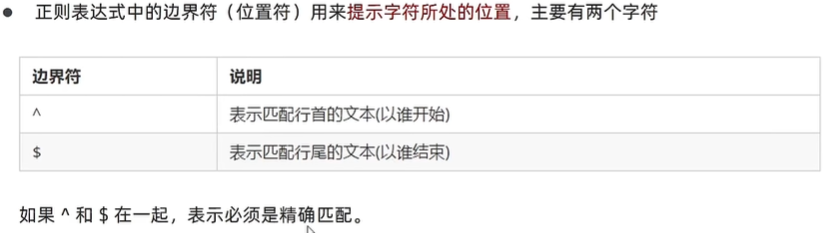
(1)边界符
<script>
console.log(/^a/.test('a')); // true
console.log(/^a/.test('aa')); // true
console.log(/^a/.test('ab')); // true
console.log(/^a/.test('b')); // false
console.log(/^a$/.test('a')); // true 只有这种情况为 true
console.log(/^a$/.test('aa')); // false
console.log('-------------------');
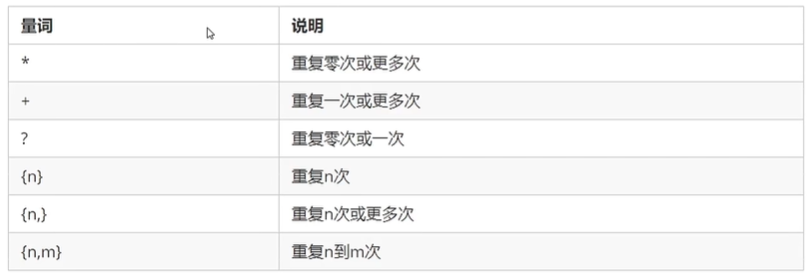
</script>(2)量词
用来设定某个模式出现的次数
<script>
console.log(/^a$/.test('a')); // true 只有这种情况为 true
// * >=0次为 true
console.log(/^a*$/.test('aa')); // true
console.log(/^a*$/.test('')); // true
console.log(/^a*$/.test('ab')); // false
console.log(/^a*$/.test('b')); // false
console.log(/^a*$/.test(' ')); // false
console.log('-------------------');
// + >0次为 true
console.log(/^a+$/.test('aa')); // true
console.log(/^a+$/.test('')); // false
console.log(/^a+$/.test('ab')); // false
console.log(/^a+$/.test('b')); // false
console.log(/^a+$/.test(' ')); // false
console.log('-------------------');
// ? 0 || 1 次为 true
console.log(/^a?$/.test('a')); // true
console.log(/^a?$/.test('aa')); // false
console.log(/^a?$/.test('')); // true
console.log(/^a?$/.test('ab')); // false
console.log(/^a?$/.test('b')); // false
console.log(/^a?$/.test(' ')); // false
console.log('-------------------');
// {n} n为几就出现几次
console.log(/^a{3}$/.test('')); // false
console.log(/^a{3}$/.test('a')); // false
console.log(/^a{3}$/.test('aa')); // false
console.log(/^a{3}$/.test('aaa')); // true
console.log(/^a{3}$/.test('aaaa')); // false
console.log(/^a{3}$/.test('aaaaa')); // false
console.log('-------------------');
// {n,} >=n次
console.log(/^a{3,}$/.test('')); // false
console.log(/^a{3,}$/.test('a')); // false
console.log(/^a{3,}$/.test('aa')); // false
console.log(/^a{3,}$/.test('aaa')); // true
console.log(/^a{3,}$/.test('aaaa')); // true
console.log(/^a{3,}$/.test('aaaaa')); // true
console.log('-------------------');
// {n,m} n~m次 逗号左右不能有空格
console.log(/^a{2,4}$/.test('')); // false
console.log(/^a{2,4}$/.test('a')); // false
console.log(/^a{2,4}$/.test('aa')); // true
console.log(/^a{2,4}$/.test('aaa')); // true
console.log(/^a{2,4}$/.test('aaaa')); // true
console.log(/^a{2,4}$/.test('aaaaa')); // false
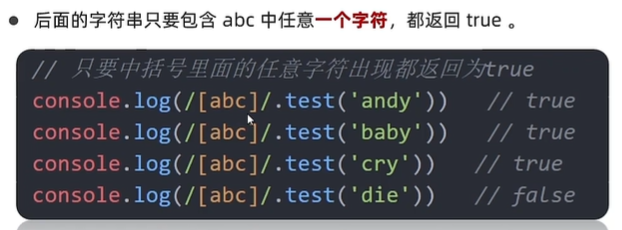
</script>(3)字符类
a.[ ]匹配字符集合
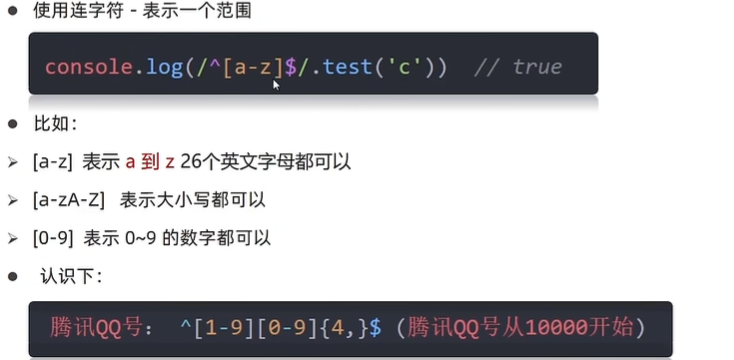
b.[ ]里面加上 - 连字符
c. [ ]里面加上 ^ 取反符号

![]()
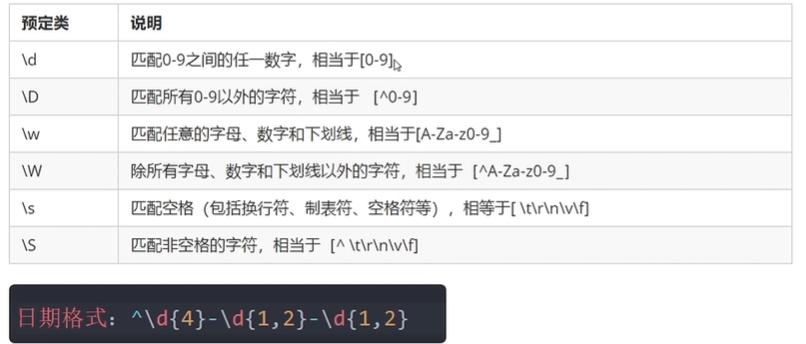
d.预定义
指的是某些常见模式的简写方式。
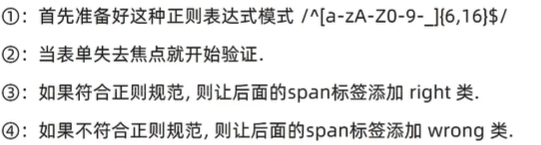
4、案例:验证用户名
<!DOCTYPE html>
<html lang="en">
<head>
<meta charset="UTF-8">
<meta name="viewport" content="width=device-width, initial-scale=1.0">
<title>Document</title>
<style>
span {
display: inline-block;
width: 250px;
height: 30px;
vertical-align: middle;
line-height: 30px;
padding-left: 15px;
}
.error {
color: red;
background: url(/images/error1.png) no-repeat left center;
}
.right {
color: green;
background: url(/images/right.png) no-repeat left center;
}
</style>
</head>
<body>
<input type="text">
<span></span>
<script>
const reg = /^[a-zA-Z0-9-_]{6,16}$/
const input = document.querySelector('input')
const span = document.querySelector('span')
input.addEventListener('blur', function () {
if (reg.test(this.value)) {
span.innerHTML = '输入正确'
// className 会覆盖类名
span.className = 'right'
} else {
span.innerHTML = '请输入6~16位的英文数字下划线'
span.className = 'error'
}
})
</script>
</body>
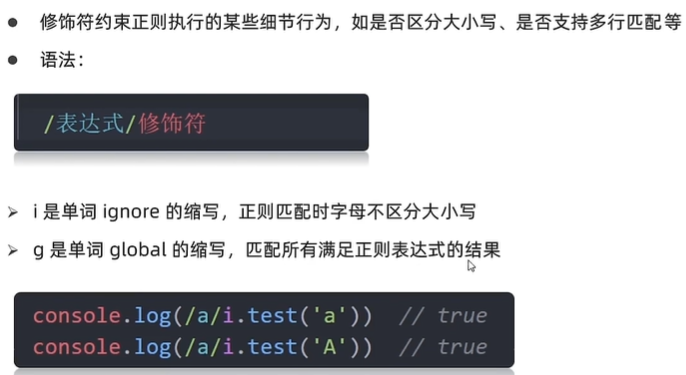
</html>5、修饰符
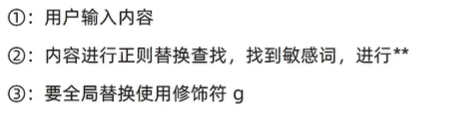
案例:过滤敏感词
<body>
  <textarea name="" id="" cols="30" rows="10"></textarea>
  <button>发布</button>
  <div></div>
  <script>
    const tx = document.querySelector('textarea')
    const btn = document.querySelector('button')
    const div = document.querySelector('div')
    btn.addEventListener('click', function () {
      // console.log(tx.value)
      div.innerHTML = tx.value.replace(/敏感词/g, '***')
      tx.value = ''
    })
  </script>
</body>
6、案例
1)注册页面
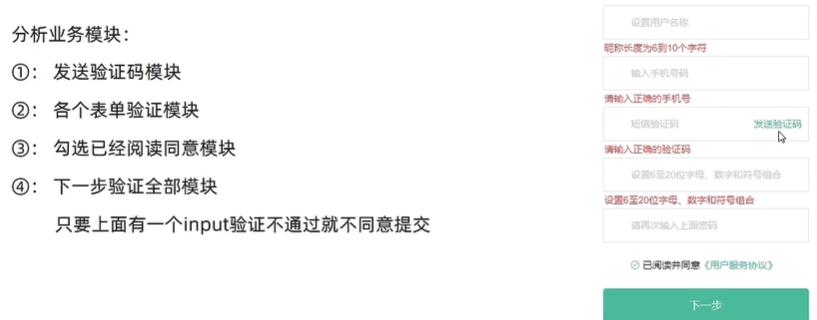
  <script>
    (function () {
      //  发送短信验证码模块
      const code = document.querySelector('.code')
      let flag = true  // 通过一个变量来控制   节流阀
      //  点击事件
      code.addEventListener('click', function () {
        if (flag) {
          // 取反了,不能马上第二次点击
          flag = false
          let i = 5
          // 点击完毕之后立马触发
          code.innerHTML = `0${i}秒后重新获取`
          // 开启定时器
          let timerId = setInterval(function () {
            i--
            code.innerHTML = `0${i}秒后重新获取`
            if (i === 0) {
              // 清除定时器
              clearInterval(timerId)
              // 从新获取
              code.innerHTML = `重新获取`
              // 到时间了,可以开启 flag了
              flag = true
            }
          }, 1000)
        }
      })
    })();

    //  验证用户名
    const username = document.querySelector('[name=username]')
    //  使用change事件  值发生变化的时候
    username.addEventListener('change', verifyName)
    //  封装verifyName函数
    function verifyName() {
      const span = username.nextElementSibling
      // 定规则  用户名
      const reg = /^[a-zA-Z0-9-_]{6,10}$/
      if (!reg.test(username.value)) {
        span.innerText = '输入不合法,请输入6~10位'
        return false
      }
      // 合法 就清空span
      span.innerText = ''
      return true
    }

    //  获取手机表单
    const phone = document.querySelector('[name=phone]')
    //  使用change事件  值发生变化的时候
    phone.addEventListener('change', verifyPhone)

    function verifyPhone() {
      const span = phone.nextElementSibling
      const reg = /^1(3\d|4[5-9]|5[0-35-9]|6[567]|7[0-8]|8\d|9[0-35-9])\d{8}$/
      if (!reg.test(phone.value)) { // !取反
        // console.log(11)
        span.innerText = '输入不合法,请输入正确的11位手机号码'
        return false
      }
      //  合法 就清空span
      span.innerText = ''
      return true
    }

    // 获取验证码表单
    const codeInput = document.querySelector('[name=code]')
    // 使用change事件  值发生变化的时候
    codeInput.addEventListener('change', verifyCode)
    function verifyCode() {
      const span = codeInput.nextElementSibling
      //  定规则
      const reg = /^\d{6}$/
      if (!reg.test(codeInput.value)) {
        span.innerText = '输入不合法,6 位数字'
        return false
      }
      // 4.5 合法就清空span
      span.innerText = ''
      return true
    }

    //  验证密码框
    const password = document.querySelector('[name=password]')
    // 使用change事件  值发生变化的时候
    password.addEventListener('change', verifyPwd)
    function verifyPwd() {
      const span = password.nextElementSibling
      //  定规则
      const reg = /^[a-zA-Z0-9-_]{6,20}$/
      if (!reg.test(password.value)) {
        span.innerText = '输入不合法,6~20位数字字母符号组成'
        return false
      }
      //  合法 就清空span
      span.innerText = ''
      return true
    }

    //  密码再次验证
    const confirm = document.querySelector('[name=confirm]')
    confirm.addEventListener('change', verifyConfirm)
    function verifyConfirm() {
      const span = confirm.nextElementSibling
      //  当前表单的值不等于 密码框的值就是错误的
      if (confirm.value !== password.value) {
        // console.log(11)
        span.innerText = '两次密码输入不一致'
        return false
      }
      // 6.5 合法 就清空span
      span.innerText = ''
      return true
    }

    //  我同意
    const queren = document.querySelector('.icon-queren')
    queren.addEventListener('click', function () {
      // 切换类  原来有的就删掉,原来没有就添加
      this.classList.toggle('icon-queren2')
    })

    //  提交模块
    const form = document.querySelector('form')
    form.addEventListener('submit', function (e) {
      // 判断是否勾选我同意模块 ,如果有 icon-queren2说明就勾选了,否则没勾选
      if (!queren.classList.contains('icon-queren2')) {
        alert('请勾选同意协议')
        // 阻止提交
        e.preventDefault()
      }
      // 依次判断上面的每个框框 是否通过,只要有一个没有通过的就阻止
      // console.log(verifyName())
      if (!verifyName()) e.preventDefault()
      if (!verifyPhone()) e.preventDefault()
      if (!verifyCode()) e.preventDefault()
      if (!verifyPwd()) e.preventDefault()
      if (!verifyConfirm()) e.preventDefault()
    })
  </script>
2)登录页面
  <script>
    // tab栏切换  事件委托
    const tab_nav = document.querySelector('.tab-nav')
    const pane = document.querySelectorAll('.tab-pane')
    // 事件监听
    tab_nav.addEventListener('click', function (e) {
      if (e.target.tagName === 'A') {
        // 取消上一个active
        tab_nav.querySelector('.active').classList.remove('active')
        // 当前元素添加active
        e.target.classList.add('active')

        // 先干掉所有人  for循环
        for (let i = 0; i < pane.length; i++) {
          pane[i].style.display = 'none'
        }
        // 让对应序号的 大pane 显示
        pane[e.target.dataset.id].style.display = 'block'
      }
    })

    // 点击提交模块
    const form = document.querySelector('form')
    const agree = document.querySelector('[name=agree]')
    const username = document.querySelector('[name=username]')
    form.addEventListener('submit', function (e) {
      e.preventDefault()
      // 判断是否勾选同意协议
      if (!agree.checked) {
        return alert('请勾选同意协议')
      }

      // 记录用户名到本地存储
      localStorage.setItem('xtx-uname', username.value)
      // 跳转到首页
      location.href = './index.html'
    })
  </script>
3)首页制作
  <script>
    // 1、 获取第一个小li
    const li1 = document.querySelector('.xtx_navs li:first-child')
    const li2 = li1.nextElementSibling
    // 2. 最好做个渲染函数 因为退出登录需要重新渲染
    function render() {
      // 2.1 读取本地存储的用户名
      const uname = localStorage.getItem('xtx-uname')
      // console.log(uname)
      if (uname) {
        li1.innerHTML = `<a href="javascript:;"><i class="iconfont icon-user">${uname
          }</i></a>
        `
        li2.innerHTML = '<a href="javascript:;">退出登录</a>'
      } else {
        li1.innerHTML = '<a href="./login.html">请先登录</a>'
        li2.innerHTML = '<a href="./register.html">免费注册</a>'
      }
    }
    render()  // 调用函数

    //  点击退出登录模块
    li2.addEventListener('click', function () {
      // 删除本地存储的数据
      localStorage.removeItem('xtx-uname')
      // 重新渲染
      render()
    })
  </script>
7、PC端网页特效
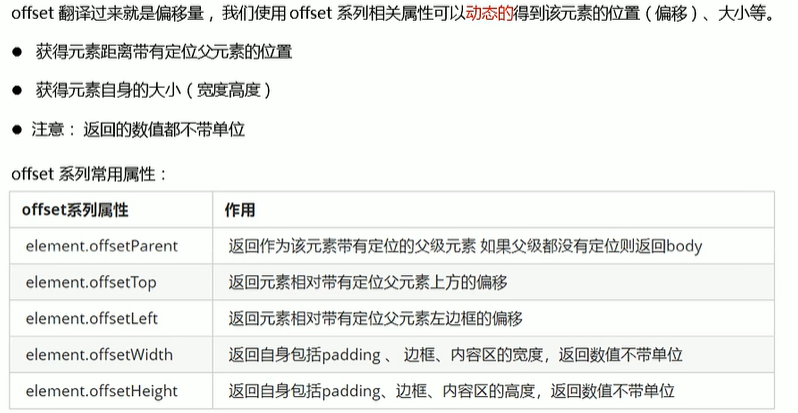
1)元素偏移量offset系列
注意:offset以带有定位的父亲为准,如果没有父亲或者父亲没有定位,则以body为准
parentNode返回的是最近一级的父亲,不管父亲有没有定位;offsetParent返回带有定位的父亲,否则返回body。
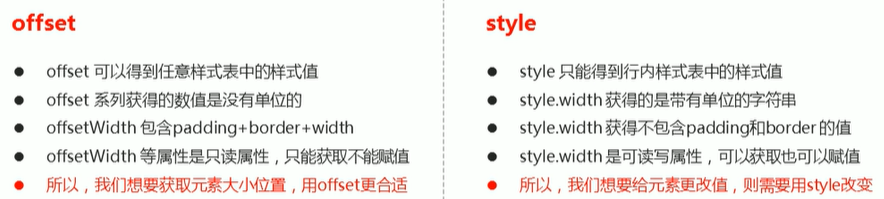
与style的区别:
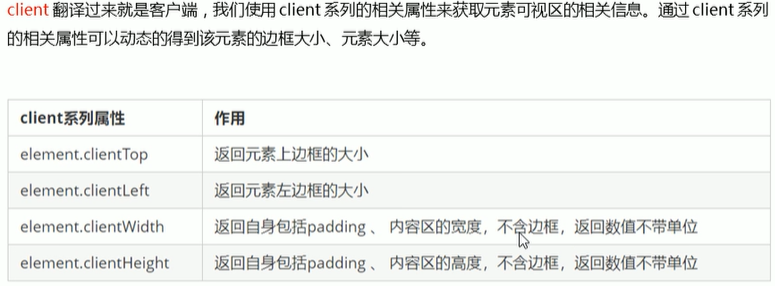
2)元素可视区client系列
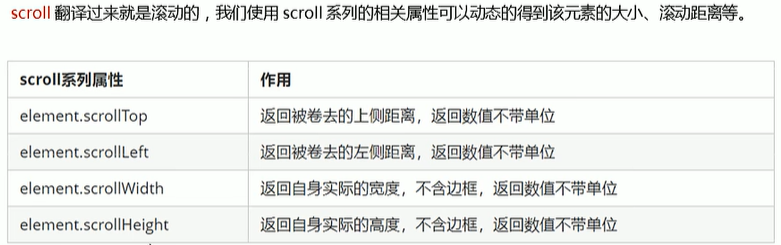
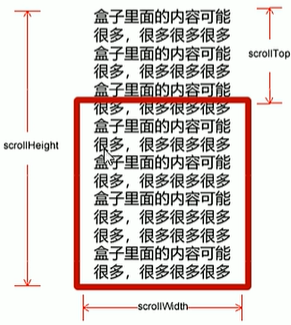
3)元素滚动scroll系列

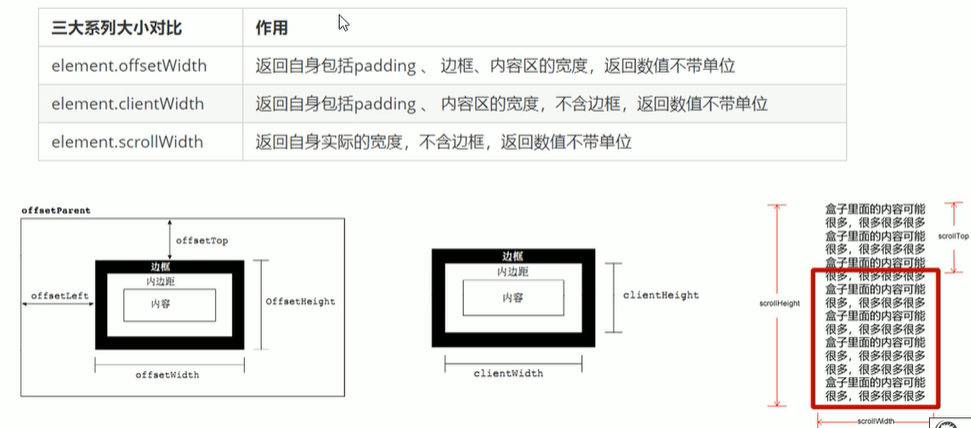
4)三大系列总结
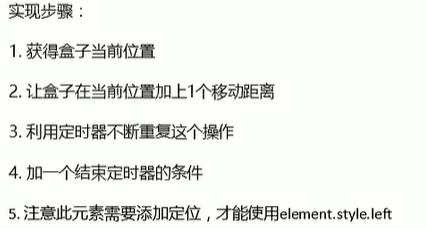
5)动画函数封装
(1)动画函数
核心原理:通过定时器setInterval()不断移动盒子位置
<!DOCTYPE html>
<html lang="en">
<head>
<meta charset="UTF-8">
<meta name="viewport" content="width=device-width, initial-scale=1.0">
<title>Document</title>
<style>
div {
position: absolute;
width: 100px;
height: 100px;
background-color: skyblue;
}
</style>
</head>
<body>
<div></div>
<script>
function movLeft(obj, target) {
clearInterval(obj.timerId)
obj.timerId = setInterval(function () {
if (obj.offsetLeft > target) clearInterval(obj.timerId)
obj.style.left = obj.offsetLeft + 1 + 'px'
}, 20)
}
const div = document.querySelector('div')
movLeft(div, 500)
</script>
</body>
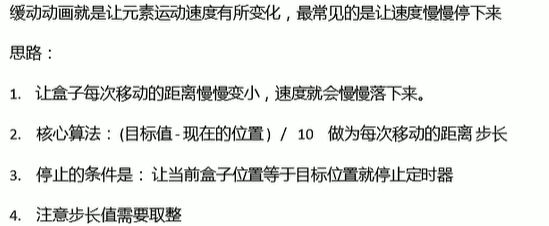
</html>(2)缓动效果原理
<!DOCTYPE html>
<html lang="en">

<head>
  <meta charset="UTF-8">
  <meta name="viewport" content="width=device-width, initial-scale=1.0">
  <title>Document</title>
  <style>
    * {
      margin: 0;
      padding: 0;
    }

    div {
      position: absolute;
      width: 100px;
      height: 100px;
      background-color: skyblue;
    }

    span {
      position: absolute;
      top: 200px;
      width: 100px;
      height: 100px;
      background-color: pink;
    }

    button {
      width: 100px;
      height: 30px;
      background-color: #fff;
    }
  </style>
</head>

<body>
  <!-- <div></div> -->
  <span></span>
  <button class="btn500">点击到500</button>
  <button class="btn1000">点击到1000</button>
  <script>
    function movLeft(obj, target) {
      clearInterval(obj.timerId)
      obj.timerId = setInterval(function () {
        // 缓动动画公式:(目标值 - 当前位置) / 10 + 'px'
        // 把步长值改为整数
        let step = ((target - obj.offsetLeft) / 10)
        step = step > 0 ? Math.ceil(step) : Math.floor(step)
        if (obj.offsetLeft === target) clearInterval(obj.timerId)
        obj.style.left = obj.offsetLeft + step + 'px'
      }, 15)
    }
    const div = document.querySelector('div')
    const span = document.querySelector('span')
    const btn500 = document.querySelector('.btn500')
    const btn1000 = document.querySelector('.btn1000')
    // movLeft(div, 1000)
    btn500.addEventListener('click', function () {
      movLeft(span, 500)
    })
    btn1000.addEventListener('click', function () {
      movLeft(span, 1000)
    })
  </script>
</body>

</html>
(3)动画函数添加回调函数

<!DOCTYPE html>
<html lang="en">

<head>
  <meta charset="UTF-8">
  <meta name="viewport" content="width=device-width, initial-scale=1.0">
  <title>Document</title>
  <style>
    * {
      margin: 0;
      padding: 0;
    }

    div {
      position: absolute;
      width: 100px;
      height: 100px;
      background-color: skyblue;
    }

    span {
      position: absolute;
      top: 200px;
      width: 100px;
      height: 100px;
      background-color: pink;
    }

    button {
      width: 100px;
      height: 30px;
      background-color: #fff;
    }
  </style>
</head>

<body>
  <!-- <div></div> -->
  <span></span>
  <button class="btn500">点击到500</button>
  <button class="btn1000">点击到1000</button>
  <script>
    function movLeft(obj, target, callback) {
      clearInterval(obj.timerId)
      obj.timerId = setInterval(function () {
        // 缓动动画公式:(目标值 - 当前位置) / 10 + 'px'
        // 把步长值改为整数
        let step = ((target - obj.offsetLeft) / 10)
        step = step > 0 ? Math.ceil(step) : Math.floor(step)
        if (obj.offsetLeft === target) {
          clearInterval(obj.timerId)
          if (callback) callback()
        }
        obj.style.left = obj.offsetLeft + step + 'px'
      }, 15)
    }
    const div = document.querySelector('div')
    const span = document.querySelector('span')
    const btn500 = document.querySelector('.btn500')
    const btn1000 = document.querySelector('.btn1000')
    // movLeft(div, 1000)
    btn500.addEventListener('click', function () {
      movLeft(span, 500)
    })
    btn1000.addEventListener('click', function () {
      movLeft(span, 1000, function () {
        // alert('!!!')
        span.style.backgroundColor = 'blue'
      })
    })
  </script>
</body>

</html>
8、案例:放大镜效果
<script>
//顶部导航栏自动滑出
(function () {
const sticky = document.querySelector('.sticky');
const header = document.querySelector('.xtx_header .wrapper');
const headerTop = header.offsetTop;
const heaerHeight = header.clientHeight;
const top = headerTop + heaerHeight;
window.addEventListener('scroll', function () {
const n = document.documentElement.scrollTop;
if (n >= top) {
sticky.style.top = '0px';
} else {
sticky.style.top = '-80px';
}
})
})();
// 放大镜效果
(function () {
// 获取三个盒子
// 小盒子 图片切换效果
const small = document.querySelector('.small')
// 中盒子
const middle = document.querySelector('.middle')
// 大盒子 放大镜
const large = document.querySelector('.large')
// 采取事件委托形式,监听鼠标经过小盒子里面的图片,要使用mouseover事件,因为需要事件冒泡触发small
// mouseover 有冒泡,相反mouseenter没有冒泡
small.addEventListener('mouseover', function (e) {
// console.log(e.target.tagName)
if (e.target.tagName === 'IMG') {
// 排他 干掉以前的 active li 上面
this.querySelector('.active').classList.remove('active')
// 当前元素的父级添加 active
e.target.parentNode.classList.add('active')
// 拿到当前小图片的 src
// console.log(e.target.src)
// 让中等盒子里面图片的src 更换为小图片的src
middle.querySelector('img').src = e.target.src
// 大盒子更换背景图片
large.style.backgroundImage = `url(${e.target.src})`
}
})
// 鼠标经过中等盒子, 显示隐藏 大盒子
middle.addEventListener('mouseenter', show)
middle.addEventListener('mouseleave', hide)
let timeId = null
// 显示函数 显示大盒子
function show() {
// 先清除定时器
clearTimeout(timeId)
large.style.display = 'block'
}
// 隐藏函数 隐藏大盒子
function hide() {
timeId = setTimeout(function () {
large.style.display = 'none'
}, 200)
}
// 鼠标经过大盒子, 显示隐藏 大盒子
large.addEventListener('mouseenter', show)
large.addEventListener('mouseleave', hide)
// 鼠标经过中等盒子,显示隐藏 黑色遮罩层
const layer = document.querySelector('.layer')
middle.addEventListener('mouseenter', function () {
layer.style.display = 'block'
})
middle.addEventListener('mouseleave', function () {
layer.style.display = 'none'
})
// 移动黑色遮罩盒子
middle.addEventListener('mousemove', function (e) {
// let x = 10, y = 20
// console.log(11)
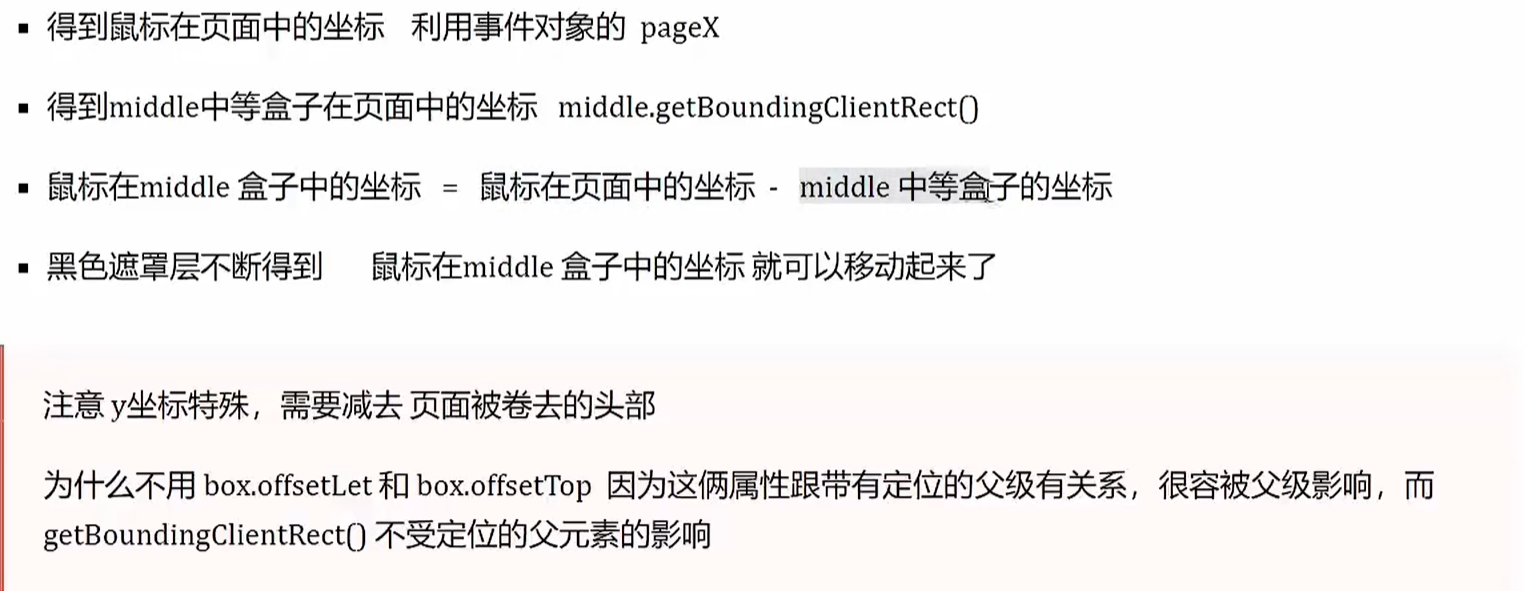
// 鼠标在middle 盒子里面的坐标 = 鼠标在页面中的坐标 - middle 中等盒子的坐标
// console.log(e.pageX)鼠标在页面中的坐标
// middle 中等盒子的坐标
// console.log(middle.getBoundingClientRect().left)
let x = e.pageX - middle.getBoundingClientRect().left
let y = e.pageY - middle.getBoundingClientRect().top - document.documentElement.scrollTop
// console.log(x, y)
// 黑色遮罩移动 在 middle 盒子内 限定移动的距离
if (x >= 0 && x <= 400 && y >= 0 && y <= 400) {
// 黑色盒子不是一直移动的
// 声明2个变量 黑色盒子移动的 mx my变量
let mx = 0, my = 0
if (x < 100) mx = 0
if (x >= 100 && x <= 300) mx = x - 100
if (x > 300) mx = 200
if (y < 100) my = 0
if (y >= 100 && y <= 300) my = y - 100
if (y > 300) my = 200
layer.style.left = mx + 'px'
layer.style.top = my + 'px'
// 大盒子的背景图片要跟随 中等盒子移动 存在的关系是 2倍
large.style.backgroundPositionX = -2 * mx + 'px'
large.style.backgroundPositionY = -2 * my + 'px'
}
})
})();
//商品详情和商品评价切换
(function () {
const tabHead = document.querySelector('.tab-head');
tabHead.addEventListener('click', function (e) {
if (e.target.tagName == 'A') {
const active = document.querySelector('.tab-head .active');
if (active) active.classList.remove('active');
e.target.classList.add('active');
const id = e.target.dataset.id;
const a = id == 2 ? 3 : 2;
document.querySelector('.main .cont>div:nth-child(' + id + ')').style.display = 'block';
document.querySelector('.main .cont>div:nth-child(' + a + ')').style.display = 'none';
}
})
})();
//点击尺寸
(function () {
const dd = document.querySelector('.item #size');
dd.addEventListener('click', function (e) {
if (e.target.tagName == 'SPAN') {
const active = document.querySelector('.item #size .active');
if (active) active.classList.remove('active');
e.target.classList.add('active');
}
});
})();
//点击颜色
(function () {
const dd = document.querySelector('.item #color');
dd.addEventListener('click', function (e) {
if (e.target.tagName == 'IMG') {
const active = document.querySelector('.item #color img.active');
if (active) active.classList.remove('active');
e.target.classList.add('active');
}
});
})();
</script>


 1547
1547

 被折叠的 条评论
为什么被折叠?
被折叠的 条评论
为什么被折叠?
 到【灌水乐园】发言


