


 本文详细介绍了微信小程序的开发流程,包括环境搭建、开发工具使用、数据绑定、事件绑定、路由跳转、用户信息获取以及实战项目如商城、网易云音乐项目的开发。此外,还涉及到服务器配置Redis和MySQL、前后端数据交互等内容,适合初学者入门。
Step01.微信小程序开发环境
百度
Step02.了解开发工具
sitemap.json(项目规则配置)
{
    "desc": "关于本文件的更多信息,请参考文档 https://developers.weixin.qq.com/miniprogram/dev/framework/sitemap.html",
    "rules": [{
        "action": "allow",
        "page": "*"
    }]
}
project.config.json(项目全局配置)
项目的主配置文件
- 这个配置文件除了
appid和projectname经常要修改,其他的都不要动,相当于小程序的系统文件 - 而且就算要修改,也有可视化工具
三个app文件
- 项目根目录下有三个app为文件名的文件,分别为
app.js``````app.json以及app.wxss - app,就是项目
必须有这三个文件,内容都在这里面写,到时候渲染也是渲染这几个app页面
app.js-> 注册整个小程序应用
- 里面存放
- 初始化数据
- 事件触发、监听事件等一系列方法
// app.js
// app.js里必须有 App({})
App({})
app.json-> 页面配置
- 里面存放
- pages:文件路由
- window:当前页面全局样式(导航栏)
{
    "pages": [
        "pages/index/index" // 页面文件路径
    ],
    "window": {
        "backgroundTextStyle": "light", //
        "navigationBarBackgroundColor": "#fba",
        "navigationBarTitleText": "Weixin",
        "navigationBarTextStyle": "black"
    },
    "style": "v2",
    "sitemapLocation": "sitemap.json"
}
pages
用于指定小程序由哪些页面组成,每一项都对应一个页面的 路径(含文件名) 信息。文件名不需要写文件后缀,框架会自动去寻找对应位置的 .json, .js, .wxml, .wxss 四个文件进行处理(一个页面需要json、js、wxml以及wxss四个文件组合)
未指定 entryPagePath 时,数组的第一项代表小程序的初始页面(首页)。
小程序中新增/减少页面,都需要对 pages 数组进行修改。
如开发目录为:
├── app.js
├── app.json
├── app.wxss
├── pages
│   │── index
│   │   ├── index.wxml
│   │   ├── index.js
│   │   ├── index.json
│   │   └── index.wxss
│   └── logs
│       ├── logs.wxml
│       └── logs.js
└── utils
window
| 属性 | 类型 | 默认值 | 描述 | 最低版本 |
|---|---|---|---|---|
| navigationBarBackgroundColor | HexColor | #000000 | 导航栏背景颜色,如 #000000 | |
| navigationBarTextStyle | string | white | 导航栏标题颜色,仅支持 black / white | |
| navigationBarTitleText | string | 导航栏标题文字内容 | ||
| navigationStyle | string | default | 导航栏样式,仅支持以下值: default 默认样式 custom 自定义导航栏,只保留右上角胶囊按钮。参见注 2。 | iOS/Android 微信客户端 6.6.0,Windows 微信客户端不支持 |
| backgroundColor | HexColor | #ffffff | 窗口的背景色 | |
| backgroundTextStyle | string | dark | 下拉 loading 的样式,仅支持 dark / light | |
| backgroundColorTop | string | #ffffff | 顶部窗口的背景色,仅 iOS 支持 | 微信客户端 6.5.16 |
| backgroundColorBottom | string | #ffffff | 底部窗口的背景色,仅 iOS 支持 | 微信客户端 6.5.16 |
| enablePullDownRefresh | boolean | false | 是否开启全局的下拉刷新。 详见 Page.onPullDownRefresh | |
| onReachBottomDistance | number | 50 | 页面上拉触底事件触发时距页面底部距离,单位为 px。 详见 Page.onReachBottom | |
| pageOrientation | string | portrait | 屏幕旋转设置,支持 auto / portrait / landscape 详见 响应显示区域变化 | 2.4.0 (auto) / 2.5.0 (landscape) |
| restartStrategy | string | homePage | 重新启动策略配置 | 2.8.0 |
| initialRenderingCache | string | 页面初始渲染缓存配置,支持 static / dynamic | 2.11.1 | |
| visualEffectInBackground | string | none | 切入系统后台时,隐藏页面内容,保护用户隐私。支持 hidden / none | 2.15.0 |
app.wxss-> 公共样式
/**app.wxss**/
.container {
  height: 100%;
  display: flex;
  flex-direction: column;
  align-items: center;
  justify-content: space-between;
  padding: 200rpx 0;
  box-sizing: border-box;
}
pages目录
wxml就是html,wxss就是css
- 存放页面文件
index.js
- 注册当前页面的实例
- 里面可以存储变量
// pages/index/index.js
// 首字母大写,注册当前页面的实例
Page({...})
index.wxml
- 页面文件
<!--pages/index/index.wxml-->
<text>HelloWorld</text>
index.wxss
…
index.json
…
Step03.数据绑定
-
1.小程序
-
data中初始化数据
-
修改数据
this.setData();修改数据的行为始终是同步的
-
数据流
单项: Model -> View
-
-
2.Vue
-
data中初始化数据
-
修改数据
this.key = value -
数据流
Vue是单向数据流:Model -> View
Vue实现了双向绑定 v-model
-
-
3.React
-
state中初始化数据
-
修改数据
this.setState()- 自身钩子函数中(componentDidMount)是异步的
- 非自身的钩子函数(定时器的回调)是同步的
-
数据流
单向 Model -> View
-
先写个页面
-
将项目中除了三个
app文件和sitemap.json以及project.config.json外,其余的全部删掉 -
在
App.js中输入App,敲击提示回车,自动生成框架App.js// app.js // 注册整个小程序应用 App({ /** * 当小程序初始化完成时,会触发 onLaunch(全局只触发一次) */ onLaunch: function () { }, /** * 当小程序启动,或从后台进入前台显示,会触发 onShow */ onShow: function (options) { }, /** * 当小程序从前台进入后台,会触发 onHide */ onHide: function () { }, /** * 当小程序发生脚本错误,或者 api 调用失败时,会触发 onError 并带上错误信息 */ onError: function (msg) { } }) -
在app.json中
- 输入pages和windows
- 分别根据提示生成代码
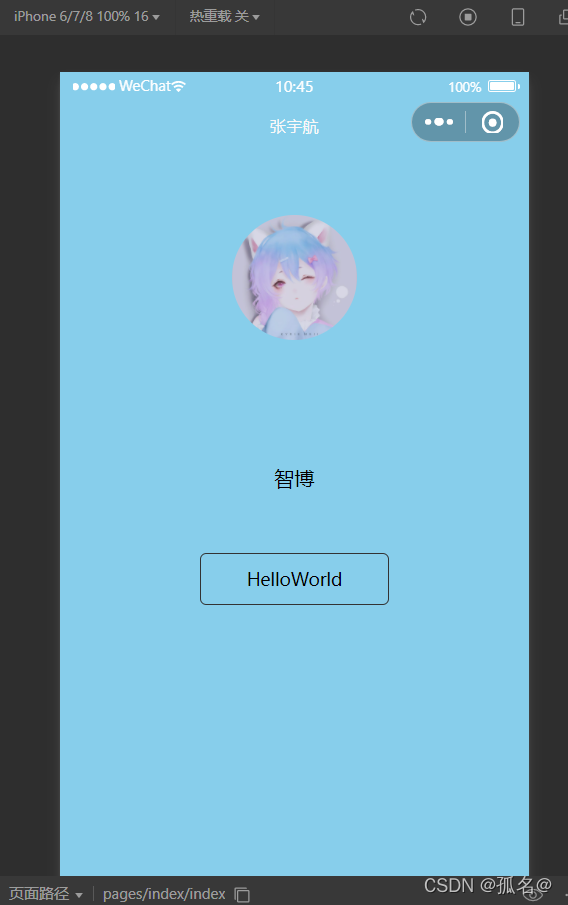
app.json{ "pages": [ "pages/index/index" ], "window": { "navigationBarBackgroundColor": "#87ceeb", "navigationBarTextStyle": "white", "navigationBarTitleText": "张宇航" } }- navigationBarBackgroundColor是页面顶部导航栏背景颜色
- navigationBarTextStyle是页面顶部导航栏文字颜色
- navigationBarTitleText是页面顶部导航栏标题内容
-
创建pages目录
-
右键pages目录,有个
新建page -
命名为index
- 它就会自动生成index.js、index.json、index.wxml以及index.wxss四个文件
-
编辑
index.wxmlindex.wxml<view class="indexContainer"> <image class="avatorUrl" src=""></image> <text class="userName">root</text> <view class="goStudy"> <text>HelloWorld</text> </view> </view>- 关于图像引入,在根目录中创建一个
static目录- 在static下创建images目录
- 将图片拖入到images下
- 然后使用相对路径引入就好
index.wxml<view class="indexContainer"> <image class="avatorUrl" src="../../static/images/header.jpg"></image> <text class="userName">root</text> <view class="goStudy"> <text>HelloWorld</text> </view> </view> - 关于图像引入,在根目录中创建一个
-
编辑
index.wxss,编辑index.wxml的样式index.wxss/* 因为要使用flex布局 最外层的尺寸是被内部元素撑开的 所以这里需要让背景颜色撑开整个页面 就需要将整个页面的尺寸设置为100% */ page{ height: 100%; } /* index样式 */ .indexContainer{ display:flex; flex-direction: column; /* 指定子元素在父元素中的排列方向 */ align-items: center; /* 控制纵轴对齐方式 */ background-color: skyblue; /* height: 100vh; 100%是继承父元素宽度的100% */ height:100%; } /* 头像 */ .avatorUrl{ /* 1rpx = 0.5px,这个根据手机屏幕自适应 */ width: 200rpx; height:200rpx; border-radius: 50%; margin:100rpx 0; } .userName{ font-size: 32rpx; margin:100rpx 0; } .goStudy{ width: 300rpx; height: 80rpx; /* 设置view内部文本样式,如果内部是文本标签,则自动继承文本样式 */ line-height: 80rpx; text-align: center; font-size: 28rpx; border: 1rpx solid #333; border-radius: 10rpx; } -
绑定数据
-
index中
-
有个名为Page的json组
-
第一个就是
data{} -
这里面存储的是页面的初始数据,也就是init变量常量等
-
将变量键值对存储在这里,在前端页面index.wxml中就可以使用el语法
{}直接取值index.js// pages/index/index.js Page({ /** * 页面的初始数据 */ data: { username: '哈哈哈' }, /** * 生命周期函数--监听页面加载 */ onLoad: function (options) { }, /** * 生命周期函数--监听页面初次渲染完成 */ onReady: function () { }, /** * 生命周期函数--监听页面显示 */ onShow: function () { }, /** * 生命周期函数--监听页面隐藏 */ onHide: function () { }, /** * 生命周期函数--监听页面卸载 */ onUnload: function () { }, /** * 页面相关事件处理函数--监听用户下拉动作 */ onPullDownRefresh: function () { }, /** * 页面上拉触底事件的处理函数 */ onReachBottom: function () { }, /** * 用户点击右上角分享 */ onShareAppMessage: function () { } })index.wxml<view class="indexContainer"> <image class="avatorUrl" src="../../static/images/header.jpg"></image> <!-- 通过{{}}el语法引用js文件中的初始化数据 --> <text class="userName">{{ username }}</text> <view class="goStudy"> <text>HelloWorld</text> </view> </view>
Step04.js模拟Vue的数据劫持
-
数据劫持主要是为了修改js对象的数据时
-
使用get和set方法,对修改进行实时监听
VueHiJack.html<!DOCTYPE html> <html lang="en"> <head> <meta charset="UTF-8"> <meta http-equiv="X-UA-Compatible" content="IE=edge"> <meta name="viewport" content="width=device-width, initial-scale=1.0"> <title>VueHijack</title> </head> <body> <script src="../js/VueHijack.js"></script> </body> </html>VueHiJack.js// Vue数据劫持代理 // 模拟Vue的data选项 let data = { username: 'curry', age: 33 } // 模拟组件实例 let _this = { } for (let item in data) { // 利用defineProperty // 第一个参数为要赋值的变量,第二个参数为源数据,第三个为json方法组 Object.defineProperty(_this, item, { // get方法用于获取 get() { console.log('get()'); return data[item] }, set(newValue) { console.log('set()', newValue); // 更改this后,将传进来的数据赋值给data对应的属性 // 实现实时更新data data[item] = newValue; } }) } console.log(_this.username); // 更改this属性一定要在外部,如果同时在外部和内部更改 // 外部更改执行this.set方法,set内部再进行更改调用自身进入死循环 _this.username = 'zhixing'; console.log(_this.username);
Step05.事件绑定
-
事件流的三个阶段
- 1.捕获,从外向内
- 2.执行目标阶段
- 3.冒泡,从内向外
-
例如:
<a href="#"> <div> <p> 我是按钮 </p> </div> </a> -
为什么点击a,能传递到p
-
说a包含p是自己的主观判断
-
因为点击a后,a捕获到了点击事件,捕获是从外向内的,a传给div,div传给p,向内没有之后
-
开始触发最内层元素的点击事件
-
然后开始冒泡,外层的元素都继承了最内层元素的冒泡事件
-
直到a标签终止冒泡
小程序的事件绑定
-
bindtap默认冒泡
-
catchtap取消冒泡
index.wxml<view class="indexContainer"> <image class="avatorUrl" src="../../static/images/header.jpg"></image> <!-- 通过{{}}el语法引用js文件中的初始化数据 --> <text class="userName">{{ username }}</text> <view class="goStudy" bindtap="handleParent"> <text bindtap="handleChild">HelloWorld</text> </view> </view> -
在index.js中创建点击事件对应的方法
index.js// pages/index/index.js Page({ /** * 页面的初始数据 */ data: { username: '智行' }, handleParent(){ console.log('parent'); }, handleChild(){ console.log('child'); }, /** * 生命周期函数--监听页面加载 */ onLoad: function (options) { // 钩子函数,小程序是同步的,React是异步的 this.setData({ username: '智博' }); }, /** * 生命周期函数--监听页面初次渲染完成 */ onReady: function () { }, /** * 生命周期函数--监听页面显示 */ onShow: function () { }, /** * 生命周期函数--监听页面隐藏 */ onHide: function () { }, /** * 生命周期函数--监听页面卸载 */ onUnload: function () { }, /** * 页面相关事件处理函数--监听用户下拉动作 */ onPullDownRefresh: function () { }, /** * 页面上拉触底事件的处理函数 */ onReachBottom: function () { }, /** * 用户点击右上角分享 */ onShareAppMessage: function () { } }) -
点击按钮,会发现先打印子元素(child),后打印父元素(parent)
-
将bindtap换成catchtap
-
点击外层打印parent,点击子元素打印child,二者点击事件互不影响
Step06.路由跳转
-
在pages下创建一个logs
index.html<view class="indexContainer"> <image class="avatorUrl" src="../../static/images/header.jpg"></image> <!-- 通过{{}}el语法引用js文件中的初始化数据 --> <text class="userName">{{ username }}</text> <view class="goStudy" bindtap="toLogs"> <text bindtap="toLogs">HelloWorld</text> </view> </view> -
官方文档的API中给出了几种路由跳转的方法
-
wx.reLaunch(Object object)参数
- Object object
属性 类型 默认值 必填 说明 url string 是 需要跳转的应用内页面路径 (代码包路径),路径后可以带参数。参数与路径之间使用?分隔,参数键与参数值用=相连,不同参数用&分隔;如 ‘path?key=value&key2=value2’ success function 否 接口调用成功的回调函数 fail function 否 接口调用失败的回调函数 complete function 否 接口调用结束的回调函数(调用成功、失败都会执行) -
wx.redirectTo(Object object)
参数
- Object object
属性 类型 默认值 必填 说明 url string 是 需要跳转的应用内非 tabBar 的页面的路径 (代码包路径), 路径后可以带参数。参数与路径之间使用 ?分隔,参数键与参数值用=相连,不同参数用&分隔;如 ‘path?key=value&key2=value2’success function 否 接口调用成功的回调函数 fail function 否 接口调用失败的回调函数 complete function 否 接口调用结束的回调函数(调用成功、失败都会执行) -
wx.navigateTo(Object object)
参数
- Object object
属性 类型 默认值 必填 说明 url string 是 需要跳转的应用内非 tabBar 的页面的路径 (代码包路径), 路径后可以带参数。参数与路径之间使用 ?分隔,参数键与参数值用=相连,不同参数用&分隔;如 ‘path?key=value&key2=value2’events Object 否 页面间通信接口,用于监听被打开页面发送到当前页面的数据。基础库 2.7.3 开始支持。 success function 否 接口调用成功的回调函数 fail function 否 接口调用失败的回调函数 complete function 否 接口调用结束的回调函数(调用成功、失败都会执行) -
wx.switchTab(Object object)
以 Promise 风格 调用:支持
需要页面权限:当前是插件页面时,宿主小程序不能调用该接口,反之亦然
小程序插件:支持,需要小程序基础库版本不低于 2.3.1
在小程序插件中使用时,只能在当前插件的页面中调用
微信 Windows 版:支持
微信 Mac 版:支持
跳转到 tabBar 页面,并关闭其他所有非 tabBar 页面
参数
- Object object
属性 类型 默认值 必填 说明 url string 是 需要跳转的 tabBar 页面的路径 (代码包路径)(需在 app.json 的 tabBar 字段定义的页面),路径后不能带参数。 success function 否 接口调用成功的回调函数 fail function 否 接口调用失败的回调函数 complete function 否 接口调用结束的回调函数(调用成功、失败都会执行) 示例代码
// app.json
{
  "tabBar": {
    "list": [{
      "pagePath": "index",
      "text": "首页"
    },{
      "pagePath": "other",
      "text": "其他"
    }]
  }
}
wx.switchTab({
  url: '/index'
})
-
-
在index.js中创建toLogs方法
index.js// pages/index/index.js Page({ /** * 页面的初始数据 */ data: { username: '智行' }, handleParent(){ console.log('parent'); }, handleChild(){ console.log('child'); }, toLogs(){ wx.reLaunch({ url: '/pages/logs/logs', }) }, /** * 生命周期函数--监听页面加载 */ onLoad: function (options) { }, /** * 生命周期函数--监听页面初次渲染完成 */ onReady: function () { }, /** * 生命周期函数--监听页面显示 */ onShow: function () { }, /** * 生命周期函数--监听页面隐藏 */ onHide: function () { }, /** * 生命周期函数--监听页面卸载 */ onUnload: function () { }, /** * 页面相关事件处理函数--监听用户下拉动作 */ onPullDownRefresh: function () { }, /** * 页面上拉触底事件的处理函数 */ onReachBottom: function () { }, /** * 用户点击右上角分享 */ onShareAppMessage: function () { } })
Step07.生命周期
-
页面的js文件中自动生成了这些函数
index.js// pages/index/index.js Page({ /** * 页面的初始数据 */ data: { }, /** * 生命周期函数--监听页面加载 */ onLoad: function (options) { console.log('onLoad'); }, /** * 生命周期函数--监听页面初次渲染完成 */ onReady: function () { console.log('onReady'); // debugger; }, /** * 生命周期函数--监听页面显示 * 执行多次 */ onShow: function () { console.log('onShow'); }, /** * 生命周期函数--监听页面隐藏 */ onHide: function () { console.log('onHide'); }, /** * 生命周期函数--监听页面卸载 */ onUnload: function () { console.log('onUnload'); }, /** * 页面相关事件处理函数--监听用户下拉动作 */ onPullDownRefresh: function () { console.log('onPullDownRefresh'); }, /** * 页面上拉触底事件的处理函数 */ onReachBottom: function () { console.log('onReachBottom'); }, /** * 用户点击右上角分享 */ onShareAppMessage: function () { console.log('onShareAppMessage'); } }) -
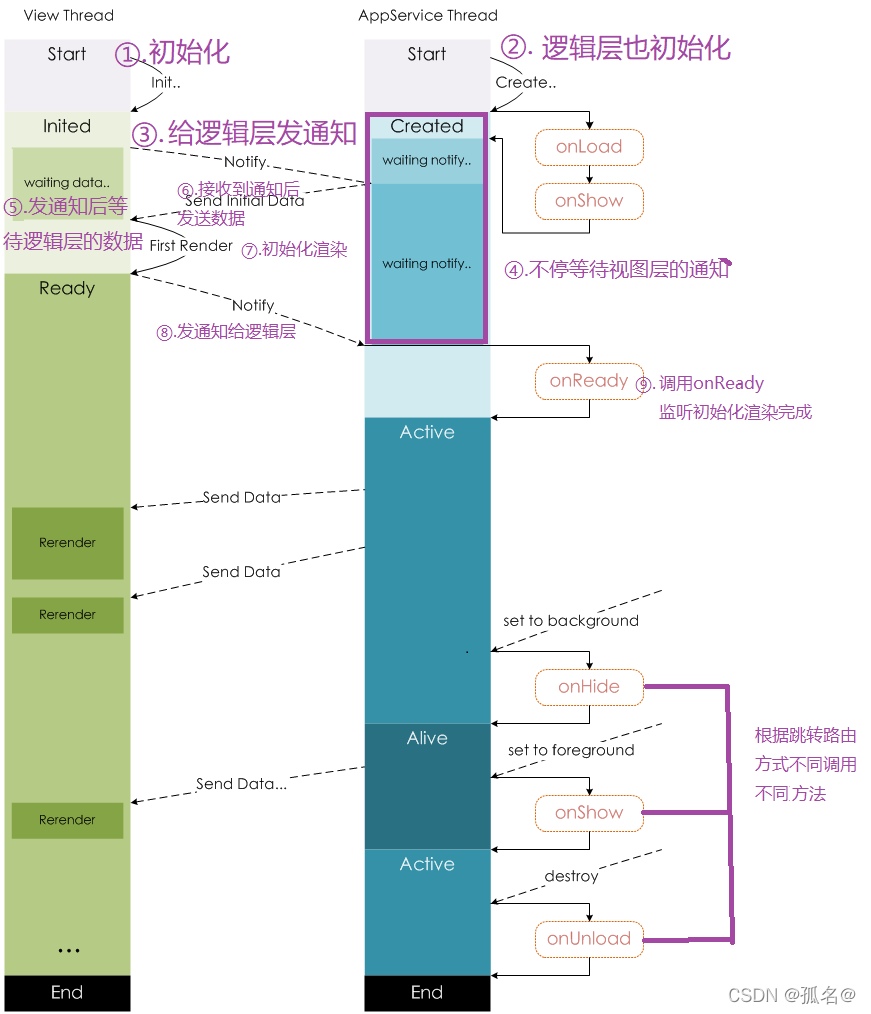
一个页面的生命周期- ①.当
视图层初始化后,逻辑层也开始初始化,进行创建逻辑,调用onLoad和onShow方法 - ②.
视图层和逻辑层都初始化后,视图层给逻辑层发通知,在发送通知后等待逻辑层传递过来的数据 - ③.
逻辑层接收到视图层的通知后,发送数据给视图层,视图层接收到来自逻辑层的数据后,进行第一次渲染(first Render) - ④.
视图层进行第一次渲染后给逻辑层发送通知,逻辑层接收到视图层的通知后调用onReady方法(onReady方法用于监听初始化渲染的完成)
- ①.当
-
当前页面,如果不是销毁页面而是隐藏跳转,跳转后返回前页面,则onLoad和onReady只执行一次,onShow执行多次,这样可以节约资源
-
onShow方法用于监听显示页面
-
onHide方法用于监听
页面的隐藏 -
onUnload方法用于监听页面的
销毁事件 -
Step08.获取用户信息
-
旧版本,直接写个button,然后用open-type属性搞一下就好了
<button wx:else open-type="getUserInfo" bindgetuserinfo="getUserInfo"> 获取用户信息 </button> -
新版本**
官方**进行了更新- 视图模块
<view class="container"> <view class="userinfo"> <block wx:if="{{!hasUserInfo}}"> <button wx:if="{{canIUseGetUserProfile}}" bindtap="getUserProfile"> 获取头像昵称 </button> <button wx:else open-type="getUserInfo" bindgetuserinfo="getUserInfo"> 获取头像昵称 </button> </block> <block wx:else> <image bindtap="bindViewTap" class="userinfo-avatar" src="{{userInfo.avatarUrl}}" mode="cover"></image> <text class="userinfo-nickname">{{userInfo.nickName}}</text> </block> </view> </view>- js部分
Page({ data: { userInfo: {}, hasUserInfo: false, canIUseGetUserProfile: false, }, onLoad() { if (wx.getUserProfile) { this.setData({ canIUseGetUserProfile: true }) } }, getUserProfile(e) { // 推荐使用wx.getUserProfile获取用户信息,开发者每次通过该接口获取用户个人信息均需用户确认 // 开发者妥善保管用户快速填写的头像昵称,避免重复弹窗 wx.getUserProfile({ desc: '用于完善会员资料', // 声明获取用户个人信息后的用途,后续会展示在弹窗中,请谨慎填写 success: (res) => { this.setData({ userInfo: res.userInfo, hasUserInfo: true }) } }) }, getUserInfo(e) { // 不推荐使用getUserInfo获取用户信息,预计自2021年4月13日起,getUserInfo将不再弹出弹窗,并直接返回匿名的用户个人信息 this.setData({ userInfo: e.detail.userInfo, hasUserInfo: true }) }, }) -
下面是我进行的配置
index.wxml<view class="indexContainer"> <!-- 如果没有获取用户信息,那么js中的data.userInfo默认为空,wx.if为false,不显示 --> <image wx:if="{{userInfo.avatarUrl}}" class="avatorUrl" src="{{userInfo.avatarUrl}}"></image> <!-- 获取用户信息 --> <!-- hasUserInfo: 当获取用户信息后,js中将该属性设置为true,该标签将不再显示 --> <view wx:if="{{!hasUserInfo}}"> <!-- 根据index.js中的脚本,如果wx.getUserProfile可以使用,该按钮则被显示 --> <button wx:if="{{canIUseGetUserProfile}}" bindtap="getUserProfile"> 获取用户信息 </button> <!-- 否则使用旧版本的 open-type="getUserInfo" , 该组件不需要在js中声明任何数据 但如果在js中声明函数并在前端视图绑定,则也会将数据注入到绑定的方法中 --> <button wx:else open-type="getUserInfo" bindgetuserinfo="getUserInfo"> 获取用户信息 </button> </view> <!-- 通过{{}}el语法引用js文件中的初始化数据 --> <text class="userName">{{userInfo.nickName}}</text> <!-- <view class="goStudy" bindtap="handleParent"> <text bindtap="handleChild">HelloWorld</text> </view> --> <!-- <view class="goStudy" catchtap="handleParent"> <text catchtap="handleChild">HelloWorld</text> </view> --> <view class="goStudy" bindtap="toLogs"> <text bindtap="toLogs">HelloWorld</text> </view> </view>
index.js// pages/index/index.js Page({ /** * 页面的初始数据 */ data: { username: '智行', userInfo: {}, // 存储用户信息,用于视图判断是否显示标签 hasUserInfo: false, // 前端外层是!hasUserInfo,也就是默认显示获取用户信息按钮 canIUseGetUserProfile: false, // 默认认为无法使用getUserProfile }, // 用于测试冒泡事件 handleParent() { console.log('parent'); }, handleChild() { console.log('child'); }, // 用于测试页面跳转 toLogs() { wx.navigateTo({ url: '/pages/logs/logs', }) }, /** * 生命周期函数--监听页面加载 */ onLoad: function (options) { // console.log('onLoad'); // 加载页面时判断wx.getUserProfile是否可用 if (wx.getUserProfile) { // 如果可用 this.setData({ // 将 canIUseGetUserProfile 设置为true,说明wx.getUserProfile可用 canIUseGetUserProfile: true }) } }, getUserProfile(e) { // 推荐使用wx.getUserProfile获取用户信息,开发者每次通过该接口获取用户个人信息均需用户确认 // 开发者妥善保管用户快速填写的头像昵称,避免重复弹窗 // wx.getUserProfile需要自定义 wx.getUserProfile({ desc: '用于完善会员资料', // 声明获取用户个人信息后的用途,后续会展示在弹窗中,请谨慎填写 // 当点击 "同意" 后,微信小程序会向success方法注入一个参数,这个参数中携带着用户信息 success: (res) => { this.setData({ userInfo: res.userInfo, hasUserInfo: true // 点击同意后不再显示用户信息按钮 }); console.log(res.userInfo); }, // 当点击 "拒绝" 后,微信小程序会向fail方法注入一个参数,这个参数中只有一条错误信息 fail: (res) => { console.log(res); } }); }, // 这个方法 getUserInfo(e) { // 不推荐使用getUserInfo获取用户信息,预计自2021年4月13日起,getUserInfo将不再弹出弹窗,并直接返回匿名的用户个人信息 this.setData({ userInfo: e.detail.userInfo, hasUserInfo: true // 点击同意后不再显示用户信息按钮 }); console.log(e); }, /** * 生命周期函数--监听页面初次渲染完成 */ onReady: function () { console.log('onReady'); // debugger; }, /** * 生命周期函数--监听页面显示 * 执行多次 */ onShow: function () { console.log('onShow'); }, /** * 生命周期函数--监听页面隐藏 */ onHide: function () { console.log('onHide'); }, /** * 生命周期函数--监听页面卸载 */ onUnload: function () { console.log('onUnload'); }, /** * 页面相关事件处理函数--监听用户下拉动作 */ onPullDownRefresh: function () { console.log('onPullDownRefresh'); }, /** * 页面上拉触底事件的处理函数 */ onReachBottom: function () { console.log('onReachBottom'); }, /** * 用户点击右上角分享 */ onShareAppMessage: function () { console.log('onShareAppMessage'); } })
index.wxss/* 因为要使用flex布局 最外层的尺寸是被内部元素撑开的 所以这里需要让背景颜色撑开整个页面 就需要将整个页面的尺寸设置为100% */ page{ height: 100%; } /* index样式 */ .indexContainer{ display:flex; flex-direction: column; /* 指定子元素在父元素中的排列方向 */ align-items: center; /* 控制纵轴对齐方式 */ background-color: skyblue; /* height: 100vh; 100%是继承父元素宽度的100% */ height:100%; } /* 头像 */ .avatorUrl{ /* 1rpx = 0.5px,这个根据手机屏幕自适应 */ width: 200rpx; height:200rpx; border-radius: 50%; margin:100rpx 0; } /* 用户名 */ .userName{ font-size: 32rpx; margin:100rpx 0; } /* 底部HelloWorld块样式 */ .goStudy{ width: 300rpx; height: 80rpx; /* 设置view内部文本样式,如果内部是文本标签,则自动继承文本样式 */ line-height: 80rpx; text-align: center; font-size: 28rpx; border: 1rpx solid #333; border-radius: 10rpx; } /* 用于获取用户信息的头部按钮样式 */ button{ /* 1rpx = 0.5px,这个根据手机屏幕自适应 */ width: 200rpx; height:200rpx; border-radius: 50%; margin:100rpx 0; font-size: 24rpx; color: white; line-height: 200rpx; text-align: center; background-color: rgba(0, 0, 0, .5); } -
解析:
-
js的data中有一些数据
/* * 页面的初始数据 */ data: { username: '智行', userInfo: {}, // 存储用户信息,用于视图判断是否显示标签 hasUserInfo: false, // 前端外层是!hasUserInfo,也就是默认显示获取用户信息按钮 canIUseGetUserProfile: false, // 默认认为无法使用getUserProfile },userInfo用于存储点击"确定"按钮后获取的用户信息
hasUserInfo用于控制当点击完获取信息按钮后按钮的消失
canIUseGetUserProfile用于判断getUserProfile在当前版本是否可用
-
js的onLoad方法中对当前版本的用户信息获取进行适配
如果wx.getUserProfile为true
证明在当前版本可用
那么将canIUseGetUserProfile设置为true
前端需要这个数据,来判断使用哪种方式获取用户信息
/* * 生命周期函数--监听页面加载 */ onLoad: function (options) { // console.log('onLoad'); // 加载页面时判断wx.getUserProfile是否可用 if (wx.getUserProfile) { // 如果可用 this.setData({ // 将 canIUseGetUserProfile 设置为true,说明wx.getUserProfile可用 canIUseGetUserProfile: true }) } }, -
当点击头像(获取用户信息的按钮)后,根据js中判断的canIUseGetUserProfile决定是使用
open-type还是getUserProfile<!-- 获取用户信息 --> <!-- hasUserInfo: 当获取用户信息后,js中将该属性设置为true,该标签将不再显示 --> <view wx:if="{{!hasUserInfo}}"> <!-- 根据index.js中的脚本,如果wx.getUserProfile可以使用,该按钮则被显示 --> <button wx:if="{{canIUseGetUserProfile}}" bindtap="getUserProfile"> 获取用户信息 </button> <!-- 否则使用旧版本的 open-type="getUserInfo" , 该组件不需要在js中声明任何数据 但如果在js中声明函数并在前端视图绑定,则也会将数据注入到绑定的方法中 --> <button wx:else open-type="getUserInfo" bindgetuserinfo="getUserInfo"> 获取用户信息 </button> </view> -
如果是getUserProfile
-
绑定了getUserProfile方法
getUserProfile(e) {
    // 推荐使用wx.getUserProfile获取用户信息,开发者每次通过该接口获取用户个人信息均需用户确认
    // 开发者妥善保管用户快速填写的头像昵称,避免重复弹窗

    // wx.getUserProfile需要自定义
    wx.getUserProfile({
        desc: '用于完善会员资料', // 声明获取用户个人信息后的用途,后续会展示在弹窗中,请谨慎填写

        // 当点击 "同意" 后,微信小程序会向success方法注入一个参数,这个参数中携带着用户信息
        success: (res) => {
            this.setData({
                userInfo: res.userInfo,
                hasUserInfo: true // 点击同意后不再显示用户信息按钮
            });
            console.log(res.userInfo);
        },
        // 当点击 "拒绝" 后,微信小程序会向fail方法注入一个参数,这个参数中只有一条错误信息
        fail: (res) => {
            console.log(res);
        }
    });
},
在方法中调用了wx.getUserProfile方法,就会弹出
获取用户信息选项框当点击
同意,调用success回调函数,并将一个json对象注入到success方法中作为参数,json对象中存储着用户信息- 这里我在成功后,将获取到的用户信息(success参数.userInfo)赋值给我在data中声明的userInfo对象,因为前端视图层,当点击
同意按钮时,需要显示用户头像和用户名,所以需要将这些数据存储到data中,才能在前端通过el表达式{}直接使用 - 还将hasUserInfo设置为true,因为前端是
!hasUserInfo,data中默认声明为false,也就是结果是true.当点击获取信息按钮后,将这个值设置为true,也就是结果为false,获取用户信息按钮就不会再显示
object.success 回调函数
参数
Object res
属性 类型 说明 最低版本 userInfo UserInfo 用户信息对象 2.10.4 rawData string 不包括敏感信息的原始数据字符串,用于计算签名 2.10.4 signature string 使用 sha1( rawData + sessionkey ) 得到字符串,用于校验用户信息,详见 用户数据的签名验证和加解密 2.10.4 encryptedData string 包括敏感数据在内的完整用户信息的加密数据,详见 用户数据的签名验证和加解密 2.10.4 iv string 加密算法的初始向量,详见 用户数据的签名验证和加解密 2.10.4 cloudID string 敏感数据对应的云 ID,开通云开发的小程序才会返回,可通过云调用直接获取开放数据,详细见云调用直接获取开放数据 2.10.4 当点击
拒绝,调用fail回调函数,也是向fail方法注入一个json对象作为参数,不过这个json对象中只有一条错误数据,用于声明获取失败 - 这里我在成功后,将获取到的用户信息(success参数.userInfo)赋值给我在data中声明的userInfo对象,因为前端视图层,当点击
-
-
如果是
open-type-
button的
open-type="getUserInfo"属性会直接调用微信小程序内部API,弹出获取用户信息弹框 -
绑定函数不是必要的,但如果要在页面中显示用户名和用户头像则是必要的
-
我绑定了getUserInfo函数
-
但注意:open-type属性值的getUserInfo和我自定义的完全不是一码事
-
open-type的是内部API
-
而绑定的完全是自定义的
-
当点击获取用户信息按钮后
-
直接赋值就好了
// 这个方法
getUserInfo(e) {
    // 不推荐使用getUserInfo获取用户信息,预计自2021年4月13日起,getUserInfo将不再弹出弹窗,并直接返回匿名的用户个人信息
    this.setData({
        userInfo: e.detail.userInfo,
        hasUserInfo: true // 点击同意后不再显示用户信息按钮
    });
    console.log(e);
},
-
-
Step09.网易云音乐项目
-
创建一个js项目
-
除了四个app,剩下的全删掉
-
在
pages下创建index的page -
初始化一下
app.jsonapp.json{ "pages": [ "pages/index/index" // 导入index页面,如果pages为空会报错 ], "window": { "navigationBarBackgroundColor": "#e14b30", // 导航栏颜色,类红色 "navigationBarTextStyle": "white", "navigationBarTitleText": "云音乐" }, "style": "v2", "sitemapLocation": "sitemap.json" }
开发主页
顶部轮播图
-
在项目根目录下创建
static目录 -
将资源包中的
static/images拖入到刚才创建的static目录下 -
index.wxml<view class="indexContainer"> <!-- 轮播图区域 --> <!-- 微信小程序轮播图使用swiper标签实现自动轮播 外部用一个swipper标签包裹 内部使用一些swiper-item组件,一个swiper-item内部放置一张图片代表轮播图中的一张 swiper标签有一些属性: + indicator-dots : 是否显示切换图标小点 + indicator-color : 轮播图标小点的颜色 --> <swiper class="banners" indicator-dots indicator-color='ivory'> <swiper-item> <image src="/static/images/recommendSong/02.jpg"></image> </swiper-item> <swiper-item> <image src="/static/images/recommendSong/02.jpg"></image> </swiper-item> <swiper-item> <image src="/static/images/recommendSong/02.jpg"></image> </swiper-item> <swiper-item> <image src="/static/images/recommendSong/02.jpg"></image> </swiper-item> </swiper> </view> -
index.wxss/* 整个轮播图 让它宽度铺满整个屏幕 高度为150px */ .banners{ width:100%; height: 300rpx; } /* 图片默认不会继承父元素的尺寸,所以需要手动设置 让其长宽为父元素的100% */ .banners image{ width: 100%; height: 100%; } -
关于视图容器
swiperswiper
基础库 1.0.0 开始支持,低版本需做兼容处理。
滑块视图容器。其中只可放置swiper-item组件,否则会导致未定义的行为。
属性 类型 默认值 必填 说明 最低版本 indicator-dots boolean false 否 是否显示面板指示点 1.0.0 indicator-color color rgba(0, 0, 0, .3) 否 指示点颜色 1.1.0 indicator-active-color color #000000 否 当前选中的指示点颜色 1.1.0 autoplay boolean false 否 是否自动切换 1.0.0 current number 0 否 当前所在滑块的 index 1.0.0 interval number 5000 否 自动切换时间间隔 1.0.0 duration number 500 否 滑动动画时长 1.0.0 circular boolean false 否 是否采用衔接滑动 1.0.0 vertical boolean false 否 滑动方向是否为纵向 1.0.0 previous-margin string “0px” 否 前边距,可用于露出前一项的一小部分,接受 px 和 rpx 值 1.9.0 next-margin string “0px” 否 后边距,可用于露出后一项的一小部分,接受 px 和 rpx 值 1.9.0 snap-to-edge boolean false 否 当 swiper-item 的个数大于等于 2,关闭 circular 并且开启 previous-margin 或 next-margin 的时候,可以指定这个边距是否应用到第一个、最后一个元素 2.12.1 display-multiple-items number 1 否 同时显示的滑块数量 1.9.0 easing-function string “default” 否 指定 swiper 切换缓动动画类型 2.6.5
选项导航菜单
-
先写出标签框架
index.wxml<view class="indexContainer"> <!-- 轮播图区域 --> <!-- 微信小程序轮播图使用swiper标签实现自动轮播 外部用一个swipper标签包裹 内部使用一些swiper-item组件,一个swiper-item内部放置一张图片代表轮播图中的一张 swiper标签有一些属性: + indicator-dots : 是否显示切换图标小点 + indicator-color : 轮播图标小点的颜色 --> <swiper class="banners" indicator-dots indicator-color='ivory'> <swiper-item> <image src="/static/images/recommendSong/02.jpg"></image> </swiper-item> <swiper-item> <image src="/static/images/recommendSong/02.jpg"></image> </swiper-item> <swiper-item> <image src="/static/images/recommendSong/02.jpg"></image> </swiper-item> <swiper-item> <image src="/static/images/recommendSong/02.jpg"></image> </swiper-item> </swiper> <!-- 导航栏板块,5个标签 --> <view class="navContainer"> <view class="navItem"> <text></text> <text>每日推荐</text> </view> <view class="navItem"> <text>测试</text> <text>歌单</text> </view> <view class="navItem"> <text>测试</text> <text>排行榜</text> </view> <view class="navItem"> <text>测试</text> <text>电台</text> </view> <view class="navItem"> <text>测试</text> <text>直播</text> </view> </view> </view>index.wxss/* 整个轮播图 让它宽度铺满整个屏幕 高度为150px */ .banners{ width:100%; height: 300rpx; } /* 图片默认不会继承父元素的尺寸,所以需要手动设置 让其长宽为父元素的100% */ .banners image{ width: 100%; height: 100%; } /* flex默认是横向布局 */ .navContainer{ display: flex; } /* 导航栏中每个菜单都是纵向布局 */ .navItem{ display:flex; flex-direction: column; align-items: center; width: 20%; /* 五个导航标签 */ } -
导航栏需要字体
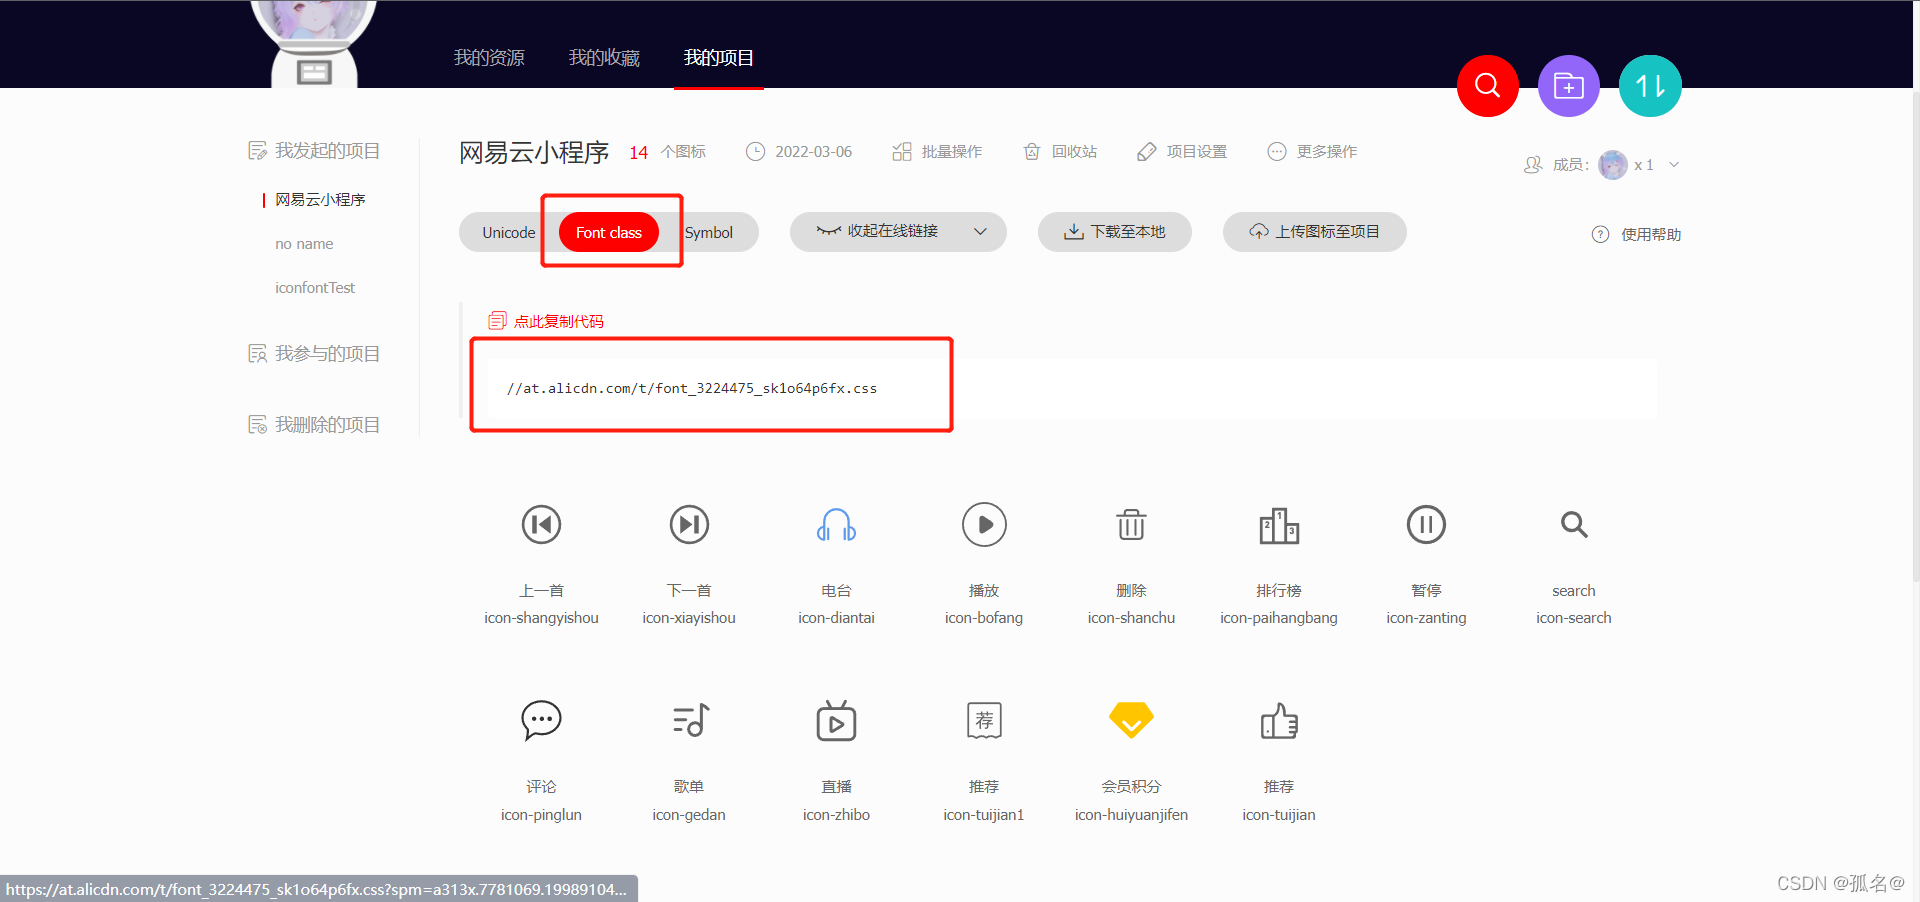
到阿里巴巴矢量图标网向项目中导入一些图标
-
然后点击项目中的font class,通过引用字体类的方式使用图标
-
打开css链接
-
复制图标代码
-
在static下创建
iconfont目录 -
在iconfont下创建iconfont.wxss文件
-
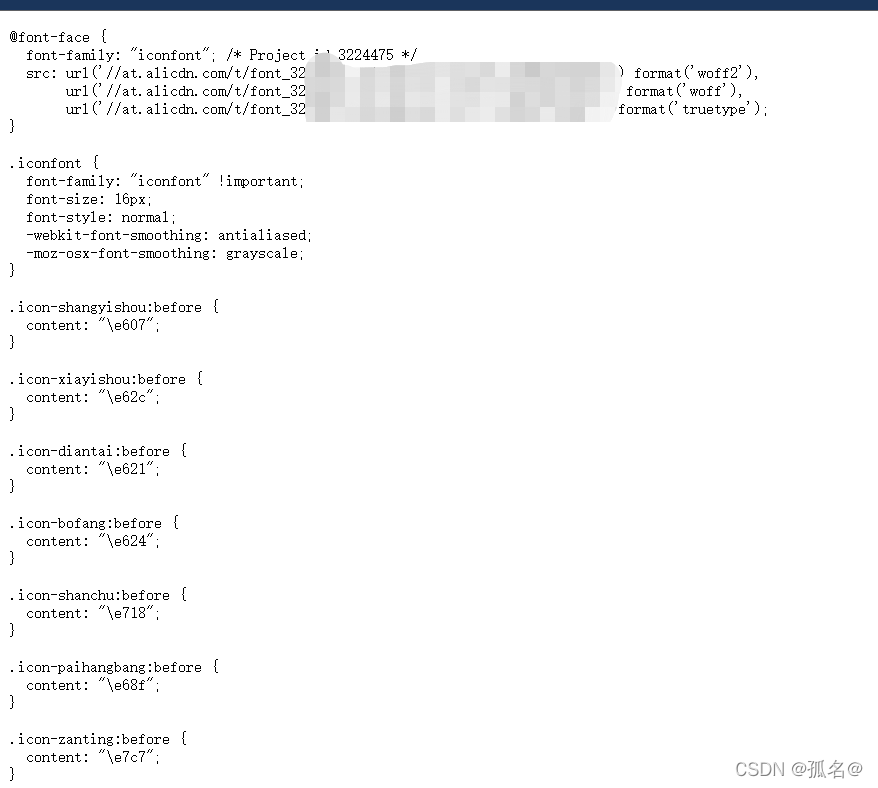
将刚才复制的代码复制进去
@font-face { font-family: "iconfont"; /* Project id 3224475 */ src: url('//at.alicdn.com/t/font_3224475_sk1o64p6fx.woff2?t=1646545726461') format('woff2'), url('//at.alicdn.com/t/font_3224475_sk1o64p6fx.woff?t=1646545726461') format('woff'), url('//at.alicdn.com/t/font_3224475_sk1o64p6fx.ttf?t=1646545726461') format('truetype'); } .iconfont { font-family: "iconfont" !important; font-size: 16px; font-style: normal; -webkit-font-smoothing: antialiased; -moz-osx-font-smoothing: grayscale; } .icon-shangyishou:before { content: "\e607"; } .icon-xiayishou:before { content: "\e62c"; } .icon-diantai:before { content: "\e621"; } .icon-bofang:before { content: "\e624"; } .icon-shanchu:before { content: "\e718"; } .icon-paihangbang:before { content: "\e68f"; } .icon-zanting:before { content: "\e7c7"; } .icon-search:before { content: "\e6c7"; } .icon-pinglun:before { content: "\e614"; } .icon-gedan:before { content: "\e636"; } .icon-zhibo:before { content: "\e74f"; } .icon-tuijian1:before { content: "\e6ad"; } .icon-huiyuanjifen:before { content: "\e6b0"; } .icon-tuijian:before { content: "\e627"; } -
因为不只是index中使用图标,其他页面也需要图标
-
所以在
app.js中全局引用@import "/static/iconfont/iconfont.wxss"; page{ height: 100%; }这尼玛又是抄袭Vue
-
然后在代码里使用
-
例如
<text class="iconfont xxx"></text>xxx就是导入图标中的图标类
-
在网站项目中,点击图标就可以复制图标类

-
然后在代码中使用
index.wxml<view class="indexContainer"> <!-- 轮播图区域 --> <!-- 微信小程序轮播图使用swiper标签实现自动轮播 外部用一个swipper标签包裹 内部使用一些swiper-item组件,一个swiper-item内部放置一张图片代表轮播图中的一张 swiper标签有一些属性: + indicator-dots : 是否显示切换图标小点 + indicator-color : 轮播图标小点的颜色 --> <swiper class="banners" indicator-dots indicator-color='ivory'> <swiper-item> <image src="/static/images/recommendSong/02.jpg"></image> </swiper-item> <swiper-item> <image src="/static/images/recommendSong/02.jpg"></image> </swiper-item> <swiper-item> <image src="/static/images/recommendSong/02.jpg"></image> </swiper-item> <swiper-item> <image src="/static/images/recommendSong/02.jpg"></image> </swiper-item> </swiper> <!-- 导航栏板块,5个标签 --> <view class="navContainer"> <view class="navItem"> <text class="iconfont icon-tuijian1"></text> <text>每日推荐</text> </view> <view class="navItem"> <text class="iconfont icon-gedan"></text> <text>歌单</text> </view> <view class="navItem"> <text class="iconfont icon-paihangbang"></text> <text>排行榜</text> </view> <view class="navItem"> <text class="iconfont icon-diantai"></text> <text>电台</text> </view> <view class="navItem"> <text class="iconfont icon-zhibo"></text> <text>直播</text> </view> </view> <!-- 推荐歌曲区域 --> <view class="recommendContainer"> <view class="header"> <!-- 这里不用text直接用view 如果用text,上面会有一大块白条 如果是view则不会发生 可能是因为傻逼微信更新版本没事搞标签造成的 --> <view class="title"> 推荐歌曲 </view> <view> <text>为你精心推荐</text> <text class="more">查看更多</text> </view> </view> </view> </view> -
会有效果,但是字体大小和颜色会有出入
-
写样式更改一下
index.wxss/* -------------------------------------- --整个轮播图 ---------------------------------------- */ /* 让它宽度铺满整个屏幕,高度为150px */ .banners{ width:100%; height: 300rpx; } /* 图片默认不会继承父元素的尺寸,所以需要手动设置 让其长宽为父元素的100% */ .banners image{ width: 100%; height: 100%; } /* 导航栏最外层容器,设置内部为flex布局,flex布局默认为横向布局 */ .navContainer{ display: flex; } /* 导航栏内部每个组件,设置flex纵向布局,让它上面是图标下面是文字 */ .navItem{ display:flex; flex-direction: column; align-items: center; width: 20%; /* 容器中一共有5个组件,一个20% */ } /* 设置引入的图标样式 */ /* navItem下有iconfont和text 如果设置为.iconfont和.navItem text,则text字体大小会将iconfont的覆盖掉 需要独立设置 .navItem text .navItem .iconfont */ .navItem .iconfont{ width: 100rpx; height: 100rpx; border-radius: 50%; margin:20rpx 0; text-align: center; line-height: 100rpx; background-color: #fe2a10; color: #fff; font-size: 50rpx; } .navItem text{ font-size:26rpx; } /* ------------------------------------------- 推荐歌曲样式 ------------------------------------------- */ .recommendContainer{ padding: 20rpx;
}
.recommendContainer .header .title{
font-size: 32rpx;
line-height: 80rpx;
color:#666;
}
/* 右侧查看更多按钮 */
.recommendContainer .header .more{
float: right;
border: 1rpx solid #333;
padding: 10rpx 20rpx;
border-radius: 30rpx;
}
---

### 滚动菜单

```scroll-view标签```

> 基础库 1.0.0 开始支持,低版本需做[兼容处理](https://developers.weixin.qq.com/miniprogram/dev/framework/compatibility.html)。

可滚动视图区域。使用竖向滚动时,需要给[scroll-view](https://developers.weixin.qq.com/miniprogram/dev/component/scroll-view.html)一个固定高度,通过 WXSS 设置 height。组件属性的长度单位默认为px,[2.4.0](https://developers.weixin.qq.com/miniprogram/dev/framework/compatibility.html)起支持传入单位(rpx/px)。

| 属性                    | 类型          | 默认值  | 必填 | 说明                                                         | 最低版本                                                     |
| :---------------------- | :------------ | :------ | :--- | :----------------------------------------------------------- | :----------------------------------------------------------- |
| scroll-x                | boolean       | false   | 否   | 允许横向滚动                                                 | [1.0.0](https://developers.weixin.qq.com/miniprogram/dev/framework/compatibility.html) |
| scroll-y                | boolean       | false   | 否   | 允许纵向滚动                                                 | [1.0.0](https://developers.weixin.qq.com/miniprogram/dev/framework/compatibility.html) |
| upper-threshold         | number/string | 50      | 否   | 距顶部/左边多远时,触发 scrolltoupper 事件                   | [1.0.0](https://developers.weixin.qq.com/miniprogram/dev/framework/compatibility.html) |
| lower-threshold         | number/string | 50      | 否   | 距底部/右边多远时,触发 scrolltolower 事件                   | [1.0.0](https://developers.weixin.qq.com/miniprogram/dev/framework/compatibility.html) |
| scroll-top              | number/string |         | 否   | 设置竖向滚动条位置                                           | [1.0.0](https://developers.weixin.qq.com/miniprogram/dev/framework/compatibility.html) |
| scroll-left             | number/string |         | 否   | 设置横向滚动条位置                                           | [1.0.0](https://developers.weixin.qq.com/miniprogram/dev/framework/compatibility.html) |
| scroll-into-view        | string        |         | 否   | 值应为某子元素id(id不能以数字开头)。设置哪个方向可滚动,则在哪个方向滚动到该元素 | [1.0.0](https://developers.weixin.qq.com/miniprogram/dev/framework/compatibility.html) |
| scroll-with-animation   | boolean       | false   | 否   | 在设置滚动条位置时使用动画过渡                               | [1.0.0](https://developers.weixin.qq.com/miniprogram/dev/framework/compatibility.html) |
| enable-back-to-top      | boolean       | false   | 否   | iOS点击顶部状态栏、安卓双击标题栏时,滚动条返回顶部,只支持竖向 | [1.0.0](https://developers.weixin.qq.com/miniprogram/dev/framework/compatibility.html) |
| enable-flex             | boolean       | false   | 否   | 启用 flexbox 布局。开启后,当前节点声明了 `display: flex` 就会成为 flex container,并作用于其孩子节点。 | [2.7.3](https://developers.weixin.qq.com/miniprogram/dev/framework/compatibility.html) |
| scroll-anchoring        | boolean       | false   | 否   | 开启 scroll anchoring 特性,即控制滚动位置不随内容变化而抖动,仅在 iOS 下生效,安卓下可参考 CSS `overflow-anchor` 属性。 | [2.8.2](https://developers.weixin.qq.com/miniprogram/dev/framework/compatibility.html) |
| refresher-enabled       | boolean       | false   | 否   | 开启自定义下拉刷新                                           | [2.10.1](https://developers.weixin.qq.com/miniprogram/dev/framework/compatibility.html) |
| refresher-threshold     | number        | 45      | 否   | 设置自定义下拉刷新阈值                                       | [2.10.1](https://developers.weixin.qq.com/miniprogram/dev/framework/compatibility.html) |
| refresher-default-style | string        | "black" | 否   | 设置自定义下拉刷新默认样式,支持设置 `black | white | none`, none 表示不使用默认样式 | [2.10.1](https://developers.weixin.qq.com/miniprogram/dev/framework/compatibility.html) |
| refresher-background    | string        | "#FFF"  | 否   | 设置自定义下拉刷新区域背景颜色                               | [2.10.1](https://developers.weixin.qq.com/miniprogram/dev/framework/compatibility.html) |
| refresher-triggered     | boolean       | false   | 否   | 设置当前下拉刷新状态,true 表示下拉刷新已经被触发,false 表示下拉刷新未被触发 | [2.10.1](https://developers.weixin.qq.com/miniprogram/dev/framework/compatibility.html) |
| enhanced                | boolean       | false   | 否   | 启用 scroll-view 增强特性,启用后可通过 [ScrollViewContext](https://developers.weixin.qq.com/miniprogram/dev/api/ui/scroll/ScrollViewContext.html) 操作 scroll-view | [2.12.0](https://developers.weixin.qq.com/miniprogram/dev/framework/compatibility.html) |
| bounces                 | boolean       | true    | 否   | iOS 下 scroll-view 边界弹性控制 (同时开启 enhanced 属性后生效) | [2.12.0](https://developers.weixin.qq.com/miniprogram/dev/framework/compatibility.html) |
| show-scrollbar          | boolean       | true    | 否   | 滚动条显隐控制 (同时开启 enhanced 属性后生效)                | [2.12.0](https://developers.weixin.qq.com/miniprogram/dev/framework/compatibility.html) |
| paging-enabled          | boolean       | false   | 否   | 分页滑动效果 (同时开启 enhanced 属性后生效)                  | [2.12.0](https://developers.weixin.qq.com/miniprogram/dev/framework/compatibility.html) |
| fast-deceleration       | boolean       | false   | 否   | 滑动减速速率控制 (同时开启 enhanced 属性后生效)              | [2.12.0](https://developers.weixin.qq.com/miniprogram/dev/framework/compatibility.html) |
| binddragstart           | eventhandle   |         | 否   | 滑动开始事件 (同时开启 enhanced 属性后生效) detail { scrollTop, scrollLeft } | [2.12.0](https://developers.weixin.qq.com/miniprogram/dev/framework/compatibility.html) |
| binddragging            | eventhandle   |         | 否   | 滑动事件 (同时开启 enhanced 属性后生效) detail { scrollTop, scrollLeft } | [2.12.0](https://developers.weixin.qq.com/miniprogram/dev/framework/compatibility.html) |
| binddragend             | eventhandle   |         | 否   | 滑动结束事件 (同时开启 enhanced 属性后生效) detail { scrollTop, scrollLeft, velocity } | [2.12.0](https://developers.weixin.qq.com/miniprogram/dev/framework/compatibility.html) |
| bindscrolltoupper       | eventhandle   |         | 否   | 滚动到顶部/左边时触发                                        | [1.0.0](https://developers.weixin.qq.com/miniprogram/dev/framework/compatibility.html) |
| bindscrolltolower       | eventhandle   |         | 否   | 滚动到底部/右边时触发                                        | [1.0.0](https://developers.weixin.qq.com/miniprogram/dev/framework/compatibility.html) |
| bindscroll              | eventhandle   |         | 否   | 滚动时触发,event.detail = {scrollLeft, scrollTop, scrollHeight, scrollWidth, deltaX, deltaY} | [1.0.0](https://developers.weixin.qq.com/miniprogram/dev/framework/compatibility.html) |
| bindrefresherpulling    | eventhandle   |         | 否   | 自定义下拉刷新控件被下拉                                     | [2.10.1](https://developers.weixin.qq.com/miniprogram/dev/framework/compatibility.html) |
| bindrefresherrefresh    | eventhandle   |         | 否   | 自定义下拉刷新被触发                                         | [2.10.1](https://developers.weixin.qq.com/miniprogram/dev/framework/compatibility.html) |
| bindrefresherrestore    | eventhandle   |         | 否   | 自定义下拉刷新被复位                                         | [2.10.1](https://developers.weixin.qq.com/miniprogram/dev/framework/compatibility.html) |
| bindrefresherabort      | eventhandle   |         | 否   | 自定义下拉刷新被中止                                         | [2.10.1](https://developers.weixin.qq.com/miniprogram/dev/framework/compatibility.html) |

---

```index.wxml```

```html
<view class="indexContainer">
  <!-- 轮播图区域 -->
  <!--
      微信小程序轮播图使用swiper标签实现自动轮播
      外部用一个swipper标签包裹
      内部使用一些swiper-item组件,一个swiper-item内部放置一张图片代表轮播图中的一张

      swiper标签有一些属性:
          + indicator-dots : 是否显示切换图标小点
          + indicator-color : 轮播图标小点的颜色
  -->
  <swiper class="banners" indicator-dots indicator-color='ivory'>
      <swiper-item>
          <image src="/static/images/recommendSong/02.jpg"></image>
      </swiper-item>
      <swiper-item>
          <image src="/static/images/recommendSong/02.jpg"></image>
      </swiper-item>
      <swiper-item>
          <image src="/static/images/recommendSong/02.jpg"></image>
      </swiper-item>
      <swiper-item>
          <image src="/static/images/recommendSong/02.jpg"></image>
      </swiper-item>
  </swiper>


  <!-- 导航栏板块,5个标签 -->
  <view class="navContainer">
      <view class="navItem">
          <text class="iconfont icon-tuijian1"></text>
          <text>每日推荐</text>
      </view>
      <view class="navItem">
          <text class="iconfont icon-gedan"></text>
          <text>歌单</text>
      </view>
      <view class="navItem">
          <text class="iconfont icon-paihangbang"></text>
          <text>排行榜</text>
      </view>
      <view class="navItem">
          <text class="iconfont icon-diantai"></text>
          <text>电台</text>
      </view>
      <view class="navItem">
          <text class="iconfont icon-zhibo"></text>
          <text>直播</text>
      </view>
  </view>

  <!-- 推荐歌曲区域 -->
  <view class="recommendContainer">
      <view class="header">
          <!--
              这里不用text直接用view
              如果用text,上面会有一大块白条
              如果是view则不会发生
                  可能是因为傻逼微信更新版本没事搞标签造成的
           -->
          <view class="title">
              推荐歌曲
          </view>
          <view>
              <text>为你精心推荐</text>
              <text class="more">查看更多</text>
          </view>
      </view>
  </view>

  <!-- 滚动图片区域 -->
  <!--
      scroll-view标签用于创建滚动区域
      enable-flex:scroll-view默认禁用flex,enable-flex使得标签可以使用flex布局
      scroll-x是开启横向滚动
  -->
  <scroll-view class="recommendScroll" enable-flex scroll-x>
      <view class="scrollItem">
          <image src="/static/images/recommendSong/02.jpg"></image>
          <text>我现在喜欢赚钱和看美女,喜欢旅游和孤独</text>
      </view>
      <view class="scrollItem">
          <image src="/static/images/recommendSong/02.jpg"></image>
          <text>我现在喜欢赚钱和看美女,喜欢旅游和孤独</text>
      </view>
      <view class="scrollItem">
          <image src="/static/images/recommendSong/02.jpg"></image>
          <text>我现在喜欢赚钱和看美女,喜欢旅游和孤独</text>
      </view>
      <view class="scrollItem">
          <image src="/static/images/recommendSong/02.jpg"></image>
          <text>我现在喜欢赚钱和看美女,喜欢旅游和孤独</text>
      </view>
      <view class="scrollItem">
          <image src="/static/images/recommendSong/02.jpg"></image>
          <text>我现在喜欢赚钱和看美女,喜欢旅游和孤独</text>
      </view>
      <view class="scrollItem">
          <image src="/static/images/recommendSong/02.jpg"></image>
          <text>我现在喜欢赚钱和看美女,喜欢旅游和孤独</text>
      </view>
      <view class="scrollItem">
          <image src="/static/images/recommendSong/02.jpg"></image>
          <text>我现在喜欢赚钱和看美女,喜欢旅游和孤独</text>
      </view>
  </scroll-view>
</view>
index.wxss
/* -------------------------------------- --整个轮播图 ---------------------------------------- */
/* 让它宽度铺满整个屏幕,高度为150px */
.banners{
    width:100%;
    height: 300rpx;
}

/*
    图片默认不会继承父元素的尺寸,所以需要手动设置
    让其长宽为父元素的100%
*/
.banners image{
    width: 100%;
    height: 100%;
}

/* 导航栏最外层容器,设置内部为flex布局,flex布局默认为横向布局 */
.navContainer{
    display: flex;
}

/* 导航栏内部每个组件,设置flex纵向布局,让它上面是图标下面是文字 */
.navItem{
    display:flex;
    flex-direction: column;
    align-items: center;
    width: 20%; /* 容器中一共有5个组件,一个20% */
}

/* 设置引入的图标样式 */
/*
    navItem下有iconfont和text
    如果设置为.iconfont和.navItem text,则text字体大小会将iconfont的覆盖掉
    需要独立设置
        .navItem text
        .navItem .iconfont
*/
.navItem .iconfont{
    width: 100rpx;
    height: 100rpx;
    border-radius: 50%;
    margin:20rpx 0;

    text-align: center;
    line-height: 100rpx;
    background-color: #fe2a10;
    color: #fff;
    font-size: 50rpx;
}

.navItem text{
    font-size:26rpx;
}

/* ------------------------------------------- 推荐歌曲样式 ------------------------------------------- */
/* 整个盒子和外面保持一些距离 */
.recommendContainer{
    padding: 20rpx;
}

/* 推荐歌曲 四个字的样式 */
.recommendContainer .header .title{
    font-size: 32rpx;
    line-height: 80rpx;
    color:#666;
}

/* 右侧查看更多按钮 */
.recommendContainer .header .more{
    float: right;
    border: 1rpx solid #333;
    padding: 10rpx 20rpx;
    border-radius: 30rpx;
}

/* --------------------------------------------- 滚动图片区域 -------------------------------------------*/
/* 整个滚动框内部开启flex横向布局 */
.recommendScroll{
    display: flex;
}

/* 每个滚动块整体 */
.scrollItem{
    width: 200rpx;
    margin-right: 20rpx;
    text-align: center;
}

/* 每个内容块中图片 */
.scrollItem image{
    width: 200rpx;
    height: 200rpx;
    /* 给点圆角 */
    border-radius: 20rpx;
}

/* 每个内容块中图片底下文字 */
.scrollItem text{
    font-size: 26rpx;

    /* 单行文本溢出隐藏,省略号代替 */
    overflow: hidden;
    text-overflow: ellipsis;
    display: -webkit-box;
    -webkit-box-orient: vertical; /* 设置对其模式 */
    -webkit-line-clamp: 2; /* 设置行数 */
}
这个项目没法做了,傻逼,录个网课弄个NodeJS服务器来也不讲解怎么用
Step10.不知名项目(到时候再补充)
CentOS服务器配置Redis、MySQL
Redis
一、安装gcc依赖
由于 redis 是用 C 语言开发,安装之前必先确认是否安装 gcc 环境(gcc -v),如果没有安装,执行以下命令进行安装
yum install -y gcc
二、下载并解压安装包
wget http://download.redis.io/releases/redis-5.0.3.tar.gz

tar -zxvf redis-5.0.3.tar.gz
三、cd切换到redis解压目录下,执行编译
cd redis-5.0.3
make
四、安装并指定安装目录
make install PREFIX=/usr/local/redis
五、启动服务
- 5.1前台启动
cd /usr/local/redis/bin/

./redis-server
- 5.2后台启动
从 redis 的源码目录中复制 redis.conf 到 redis 的安装目录
cp /usr/local/redis-5.0.3/redis.conf /usr/local/redis/bin/
- 修改 redis.conf 文件,把 daemonize no 改为 daemonize yes
vi redis.conf
- 后台启动
./redis-server redis.conf
六、设置开机启动
- 添加开机启动服务
vi /etc/systemd/system/redis.service
- 复制粘贴以下内容:
[Unit]
Description=redis-server
After=network.target

[Service]
Type=forking
ExecStart=/usr/local/redis/bin/redis-server /usr/local/redis/bin/redis.conf
PrivateTmp=true

[Install]
WantedBy=multi-user.target
注意:ExecStart配置成自己的路径
- 设置开机启动
systemctl daemon-reload
systemctl start redis.service
systemctl enable redis.service
七、创建 redis 命令软链接
ln -s /usr/local/redis/bin/redis-cli /usr/bin/redis
- 测试 redis
redis
- 服务操作命令
systemctl start redis.service  #启动redis服务

systemctl stop redis.service  #停止redis服务

systemctl restart redis.service  #重新启动服务

systemctl status redis.service  #查看服务当前状态

systemctl enable redis.service  #设置开机自启动

systemctl disable redis.service  #停止开机自启动
我自己启动
-
后台
# 后台启动redis
cd /usr/local/redis/bin
./redis-server redis.conf

# 建立终端连接
redis
redis设置密码
-
启动并连接mysql
-
设置密码
config set requirepass 密码 -
退出
-
关闭redis服务
-
重新连接
-
连接后ping,会失败
-
输入
auth 密码
MySQL
- CentOS7配置MySQL之路道阻且长…
- 反正现在也不用
前后端数据交互
创建SpringBoot项目
-
导入依赖
<?xml version="1.0" encoding="UTF-8"?>
<project xmlns="http://maven.apache.org/POM/4.0.0" xmlns:xsi="http://www.w3.org/2001/XMLSchema-instance"
         xsi:schemaLocation="http://maven.apache.org/POM/4.0.0 https://maven.apache.org/xsd/maven-4.0.0.xsd">
    <modelVersion>4.0.0</modelVersion>
    <parent>
        <groupId>org.springframework.boot</groupId>
        <artifactId>spring-boot-starter-parent</artifactId>
        <version>2.6.4</version>
        <relativePath/> <!-- lookup parent from repository -->
    </parent>
    <groupId>com.weixin</groupId>
    <artifactId>code01</artifactId>
    <version>0.0.1-SNAPSHOT</version>
    <name>code01</name>
    <description>Demo project for Spring Boot</description>
    <properties>
        <java.version>1.8</java.version>
    </properties>
    <dependencies>
        <dependency>
            <groupId>org.springframework.boot</groupId>
            <artifactId>spring-boot-starter</artifactId>
        </dependency>
        <dependency>
            <groupId>org.springframework.boot</groupId>
            <artifactId>spring-boot-starter-web</artifactId>
        </dependency>
        <dependency>
            <groupId>com.qcloud</groupId>
            <artifactId>cos_api</artifactId>
            <version>5.6.15</version>
        </dependency>
        <dependency>
            <groupId>com.alibaba</groupId>
            <artifactId>fastjson</artifactId>
            <version>1.2.4</version>
        </dependency>
        <dependency>
            <groupId>commons-io</groupId>
            <artifactId>commons-io</artifactId>
            <version>2.6</version>
        </dependency>
        <dependency>
            <groupId>org.springframework.boot</groupId>
            <artifactId>spring-boot-starter-test</artifactId>
            <scope>test</scope>
        </dependency>
        <dependency>
            <groupId>commons-codec</groupId>
            <artifactId>commons-codec</artifactId>
        </dependency>
    </dependencies>

    <build>
        <plugins>
            <plugin>
                <groupId>org.springframework.boot</groupId>
                <artifactId>spring-boot-maven-plugin</artifactId>
            </plugin>
        </plugins>
    </build>
</project>
测试
-
后端
TestController.javapackage com.weixin.controller; import com.alibaba.fastjson.JSONObject; import org.springframework.web.bind.annotation.*; @RestController @RequestMapping("/api/test") public class TestController { @GetMapping("/hello") public String func(){ return "hello world"; } @PostMapping("/upload") public int getResult(@RequestBody JSONObject req){ int a = req.getInteger("num1"); int b = req.getInteger("num2"); return a + b; } } -
前端小程序
test.jsonLoad: function (options) { // 微信对指定url发起请求 wx.request({ // url: 'http://localhost:8080/api/test/hello', // method: 'GET', // success(e){ // console.log(e.data); // } url: 'http://localhost:8080/api/test/upload', method: 'POST', data: { num1: 15, num2: 105 }, success(e) { console.log(e.data); } }) },
登录注册功能
导入依赖
<dependency>
    <groupId>org.springframework.boot</groupId>
    <artifactId>spring-boot-starter-jdbc</artifactId>
</dependency>
<dependency>
    <groupId>mysql</groupId>
	<artifactId>mysql-connector-java</artifactId>
</dependency>
创建数据库
- 创建数据库名为
springbootweixin01 - 创建表
users
连接数据库
spring.datasource.username=root
spring.datasource.password=123456
spring.datasource.url=jdbc:mysql://localhost:3306/springbootweixin01?useUnicode=true&characterEncoding=utf-8
spring.datasource.driver-class-name=com.mysql.cj.jdbc.Driver
注册
- 获取前端数据,添加到数据库
login.wxml
<!-- 输入框绑定方法 -->
<view>用户名 <input bindinput="getUsername"></input></view>
<view>密码 <input bindinput="getPassword"></input></view>

<!-- 按钮绑定方法 -->
<button bindtap="login">登录</button>
<button bindtap="register">注册</button>
login.js
-
点击
登录按钮,触发login方法获取触发该方法的输入框的值,并将它保存到js的data中
-
点击
注册按钮,触发register方法获取触发该方法的输入框的值,并将它保存到js的data中
// pages/login/login.js
Page({

    /**
     * 页面的初始数据
     */
    data: {
        // 用户名和密码
        username: '',
        password: ''
    },

    /**
     * 生命周期函数--监听页面加载
     */
    onLoad: function (options) {

    },

    // 获取用户名和密码的方法
    getUsername(e){
        this.setData({
            // 输入框取值是 方法的参数对象.detal.value
            // 将输入框中输入的数据设置为data属性值
            username:e.detail.value
        })
    },
    getPassword(e){
        this.setData({
            password:e.detail.value
        })
    },
    login(){
        console.log(this.data.username + " " + this.data.password);
        // 如果输入为空
        if(!this.data.username || !this.data.password){
            // 弹出微信小程序自带提示框,并终止代码运行
            wx.showModal({
              title: '用户名和密码不能为空'
            })
        }
        // 和后台建立连接,可以向后台发送数据,也可以接受后台返回的数据
        wx.request({
            url: 'http://localhost:8080/api/sql/login',
            method: 'POST',
            // 登录方法和注册方法都是将输入框中的数据传到后台
            // 如果是注册,后台就insert
            // 如果是登录,后台就queryForxxx一系列判断
            data: {
                username: this.data.username,
                password: this.data.password
            },
            // 后台返回的数据
            success(e){
                console.log(e.data);
            }
        })
    },
    register(){
        // console.log("register");
        console.log(this.data.username + " " + this.data.password);

        if(!this.data.username || !this.data.password){
            wx.showModal({
              title: '用户名和密码不能为空'
            })
        }
        wx.request({
            url: 'http://localhost:8080/api/sql/register',
            method: 'POST',
            data: {
                username: this.data.username,
                password: this.data.password
            },
            success(e){
                console.log(e.data);
            }
        })
    },
    /**
     * 生命周期函数--监听页面初次渲染完成
     */
    onReady: function () {

    },

    /**
     * 生命周期函数--监听页面显示
     */
    onShow: function () {

    },

    /**
     * 生命周期函数--监听页面隐藏
     */
    onHide: function () {

    },

    /**
     * 生命周期函数--监听页面卸载
     */
    onUnload: function () {

    },

    /**
     * 页面相关事件处理函数--监听用户下拉动作
     */
    onPullDownRefresh: function () {

    },

    /**
     * 页面上拉触底事件的处理函数
     */
    onReachBottom: function () {

    },

    /**
     * 用户点击右上角分享
     */
    onShareAppMessage: function () {

    }
})
后台处理
JdbcController.java
package com.weixin.controller;

import com.alibaba.fastjson.JSONObject;
import org.springframework.beans.factory.annotation.Autowired;
import org.springframework.jdbc.core.JdbcTemplate;
import org.springframework.web.bind.annotation.PostMapping;
import org.springframework.web.bind.annotation.RequestBody;
import org.springframework.web.bind.annotation.RequestMapping;
import org.springframework.web.bind.annotation.RestController;

import java.util.List;
import java.util.Map;

@RestController
@RequestMapping("/api/sql")
public class JdbcController {
    @Autowired
    private JdbcTemplate jdbcTemplate;

    @PostMapping("/register")
    public String register(@RequestBody JSONObject req){
        String username = req.getString("username");
        String password = req.getString("password");

        try {
            String sql = "insert into users (username,password) value (?,?)";
            jdbcTemplate.update(sql,username,password);
            return "success";
        } catch (Exception e){
            return "failed";
        }
    }

    @PostMapping("/login")
    public String login(@RequestBody JSONObject req){
        // 获取前端传递过来的数据
        String username = req.getString("username");
        String password = req.getString("password");

        try {
            // 根据用户名查询
            String sql = "select * from users where username=" + username;
            // 对象为<username,password>的List
            List<Map<String,Object>> maps = jdbcTemplate.queryForList(sql);
            // 如果根据用户名查询什么都查不到
            if(maps.size() == 0){
                // 直接返回没这个用户
                return "no user";
            }

            // 如果查到一个用户
            // 说明有这个用户
            if(maps.size() == 1){
                // 获取这个用户在数据库中的密码
                String passwordJudge = (String) maps.get(0).get("password");
                // 如果数据库中的密码等于前端传递过来的
                if(passwordJudge.equals(password)){
                    // 返回登录成功
                    return "success";
                    // 否则说明密码错误
                }else{
                    // 登录失败
                    return "password error";
                }
            // 如果查到1个以上
            }else{
                // 直接报错,说明数据库中用户名重复了,需要维护
                return "error";
            }
        } catch (Exception e){
            return "failed";
        }
    }
}
Springboot和redis做微信小程序交互
测试连接服务器上的Redis
-
确保阿里云开启
6379端口号 -
找到Redis配置文件
redis.conf注释掉
127.0.0.1protected-mode yes改为protected-mode no -
使用
RedisManager可视化工具测试
SpringBoot测试Redis增删改查
-
导入redis依赖
<dependency> <groupId>org.springframework.boot</groupId> <artifactId>spring-boot-starter-data-redis</artifactId> </dependency> -
配置文件中导入redis配置
# redis spring.redis.host=101.43.20.197 spring.redis.port=6379 spring.redis.password=123456 # 连接池最大连接数(使用负值表示没有限制) spring.redis.lettuce.pool.max-active=5 # 连接池中的最大空闲连接 spring.redis.lettuce.pool.max-idle=1 # 连接池中的最小空闲连接 spring.redis.lettuce.pool.min-idle=1 # 连接池最大阻塞等待时间(使用负值表示没有限制) spring.redis.lettuce.pool.max-wait=5000 # 关闭超时时间 spring.redis.timeout=30000 -
增删改查代码
RedisController.javapackage com.weixin.controller; import com.alibaba.fastjson.JSONObject; import org.springframework.beans.factory.annotation.Autowired; import org.springframework.data.redis.core.StringRedisTemplate; import org.springframework.web.bind.annotation.PostMapping; import org.springframework.web.bind.annotation.RequestBody; import org.springframework.web.bind.annotation.RequestMapping; import org.springframework.web.bind.annotation.RestController; @RestController @RequestMapping("/api/redis") public class RedisController { @Autowired private StringRedisTemplate redisTemplate; @PostMapping("/add") public String add(@RequestBody JSONObject req){ String key = req.getString("key"); String value = req.getString("value"); try { redisTemplate.opsForValue().set(key,value); return "add success"; }catch(Exception e){ return "add failed"; } } @PostMapping("/delete") public String delete(@RequestBody JSONObject req){ String key = req.getString("key"); try { redisTemplate.delete(key); return "delete success"; }catch(Exception e){ return "delete failed"; } } @PostMapping("/change") public String change(@RequestBody JSONObject req){ String key = req.getString("key"); String value = req.getString("value"); try { redisTemplate.opsForValue().set(key,value); return "change success"; }catch(Exception e){ return "change failed"; } } @PostMapping("/find") public String find(@RequestBody JSONObject req){ String key = req.getString("key"); try { String value = redisTemplate.opsForValue().get(key); return "find success value:" + value; }catch(Exception e){ return "find failed"; } } } -
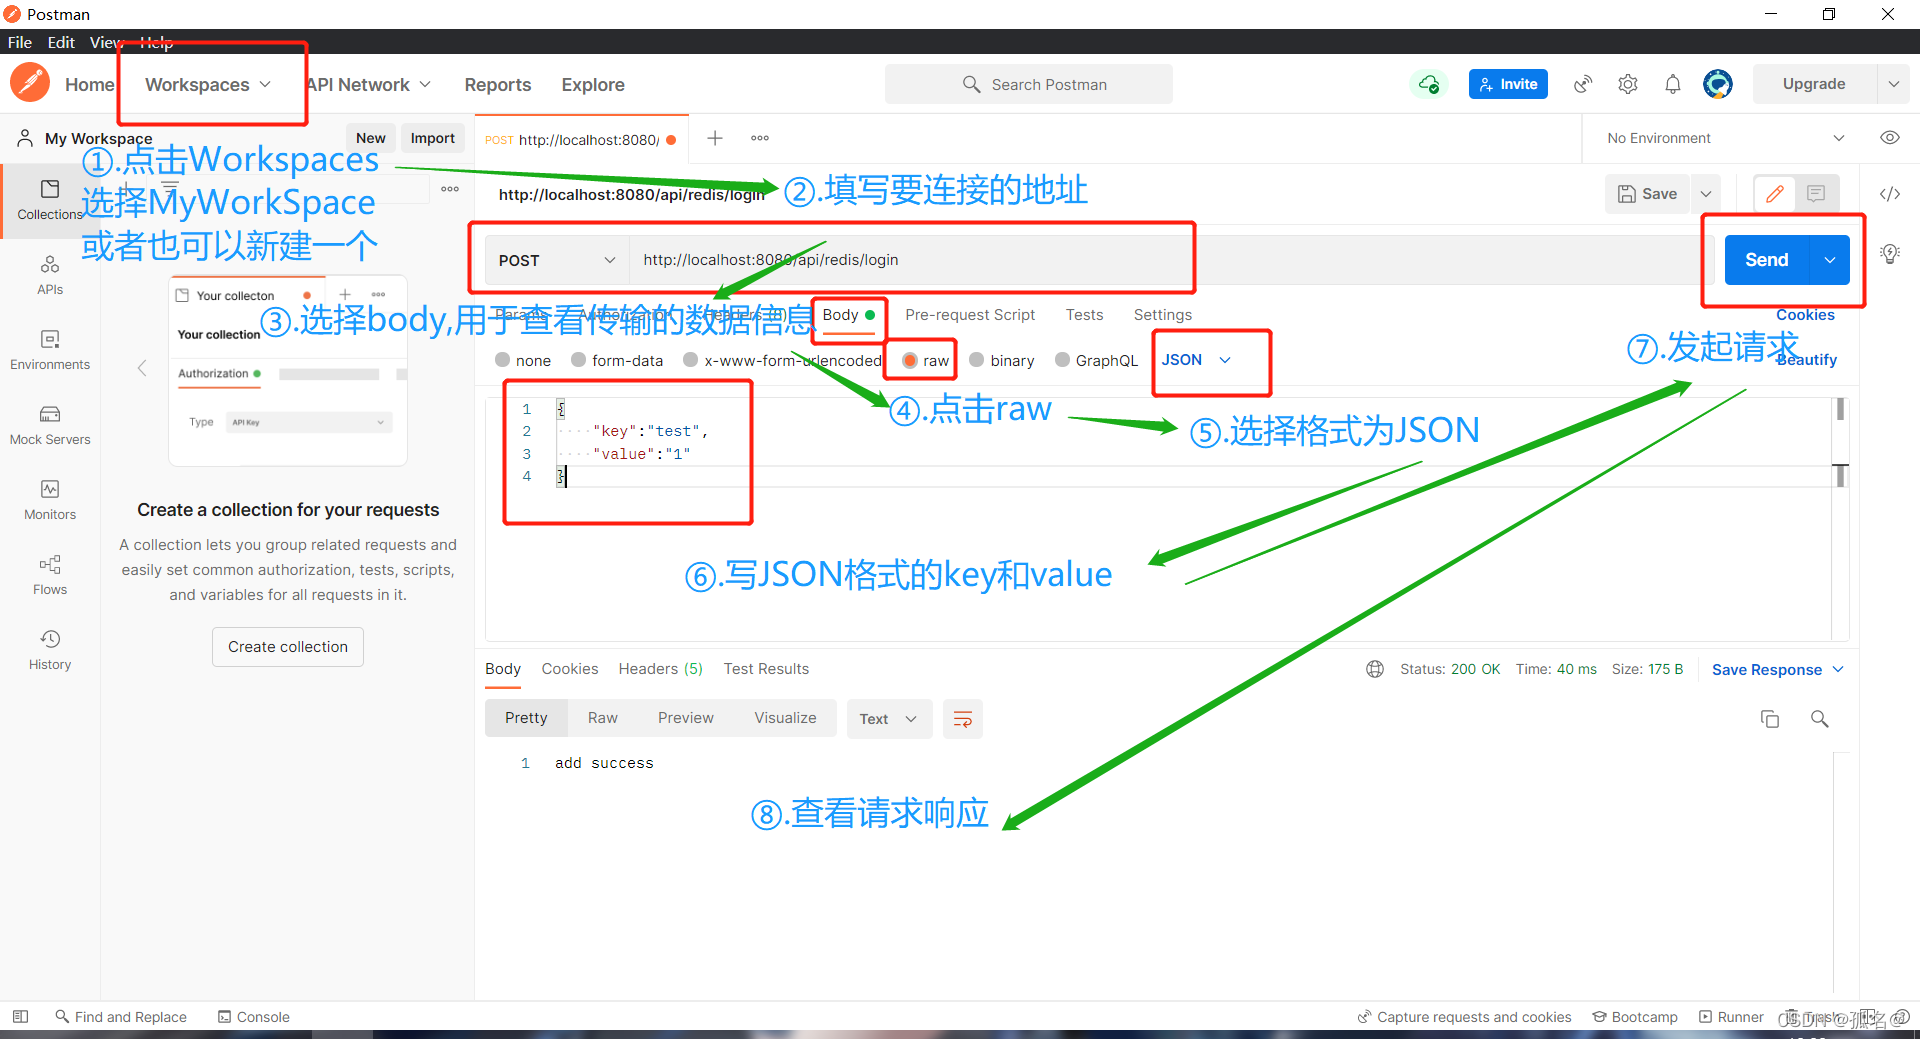
使用PostMan测试工具测试连接
- 官网下载
-
实现Redis登录微信小程序
-
后端
RedisController.javapackage com.weixin.controller; import com.alibaba.fastjson.JSONObject; import org.springframework.beans.factory.annotation.Autowired; import org.springframework.data.redis.core.StringRedisTemplate; import org.springframework.web.bind.annotation.PostMapping; import org.springframework.web.bind.annotation.RequestBody; import org.springframework.web.bind.annotation.RequestMapping; import org.springframework.web.bind.annotation.RestController; @RestController @RequestMapping("/api/redis") public class RedisController { @Autowired private StringRedisTemplate redisTemplate; @PostMapping("/add") public String add(@RequestBody JSONObject req){ String key = req.getString("key"); String value = req.getString("value"); try { redisTemplate.opsForValue().set(key,value); return "add success"; }catch(Exception e){ return "add failed"; } } @PostMapping("/delete") public String delete(@RequestBody JSONObject req){ String key = req.getString("key"); try { redisTemplate.delete(key); return "delete success"; }catch(Exception e){ return "delete failed"; } } @PostMapping("/change") public String change(@RequestBody JSONObject req){ String key = req.getString("key"); String value = req.getString("value"); try { redisTemplate.opsForValue().set(key,value); return "change success"; }catch(Exception e){ return "change failed"; } } @PostMapping("/find") public String find(@RequestBody JSONObject req){ String key = req.getString("key"); try { String value = redisTemplate.opsForValue().get(key); return "find success value:" + value; }catch(Exception e){ return "find failed"; } } // 注册,非空直接添加 @PostMapping("/register") public String register(@RequestBody JSONObject req){ String username = req.getString("username"); String password = req.getString("password"); try { if(username != null && password != null){ redisTemplate.opsForValue().set(username,password); } return "register success"; } catch (Exception e){ return "register failed"; } } // 登录 @PostMapping("/login") public String login(@RequestBody JSONObject req){ // 获取前端传递过来的数据 String username = req.getString("username"); String password = req.getString("password"); try { // redis中 , key(username) : value(password) // 根据指定用户名查询密码 String passwordJudge = redisTemplate.opsForValue().get(username); assert passwordJudge != null; // 如果查询出来的密码和用户输入的相同 if (passwordJudge.equals(password)){ // 登录成功 return "login success"; }else{ return "login error"; } } catch (Exception e){ return "login failed"; } } } -
前台
改前面mysql登录的url即可
这个项目缺shiro源码,暂时停掉,不是永远停止
Step11.商城项目
1.1 登录页面
-
创建一个名为login的
page -
写登录页面
<view class="container"> <text class="title">欢迎登录智博商城</text> <!-- bindblur方法 : 输入框失去聚焦后触发 --> <input type="number" class="phone_number" bindblur="getPhone" placeholder="请输入手机号码"/> <view class="code"> <input class="code_number" bindblur="getCode" placeholder="请输入验证码"/> <button class="getCodeButton">获取验证码</button> </view> <!-- hover-class : html中的hover,一个独立于当前标签class的类,当点击后,触发该类在css中声明的样式变化 --> <view> <button class="login" bindtap="login" hover-class="buttonClick">商城登录</button> </view> </view>login.wxss.container{ display: flex; flex-direction: column; } .container .title{ color:rgba(0, 0,0, .6); font-weight: bold; font-size: 50rpx; } .container .phone_number{ margin: 100rpx 0; width: 500rpx; height: 80rpx; border:#576b95 3rpx solid; border-radius: 5rpx; } .container .code{ display: flex; flex-direction:row; align-items: center; width: 500rpx; height: 80rpx; border:#576b95 3rpx solid; border-radius: 5rpx; } .container .code .getCodeButton{ width: 350rpx; height: 100%; font-size: 30rpx; color: rgba(0, 0,0, .6); background-color: transparent; } .container .login{ margin-top: 100rpx; background-color: #42b883; color: #ffffff; transition: 0.2s; } .container .buttonClick{ opacity: 0.6; }login.js// pages/login/login.js Page({ /** * 页面的初始数据 */ data: { phone_number:'', code:'' }, getPhone:function(e){ this.setData({ phone_number: e.detail.value }); console.log(this.data.phone_number); }, getCode:function(e){ this.setData({ code: e.detail.value }) console.log(this.data.code); }, // 登录,请求本地SpringBoot + Redis服务器 login:function(){ wx.request({ method: 'POST', url: 'http://localhost:8080/api/redis/login', data: ({ phone_number: this.data.phone_number, code: this.data.code }), success(res){ console.log(res.data); } }) }, /** * 生命周期函数--监听页面加载 */ onLoad: function (options) { }, /** * 生命周期函数--监听页面初次渲染完成 */ onReady: function () { }, /** * 生命周期函数--监听页面显示 */ onShow: function () { }, /** * 生命周期函数--监听页面隐藏 */ onHide: function () { }, /** * 生命周期函数--监听页面卸载 */ onUnload: function () { }, /** * 页面相关事件处理函数--监听用户下拉动作 */ onPullDownRefresh: function () { }, /** * 页面上拉触底事件的处理函数 */ onReachBottom: function () { }, /** * 用户点击右上角分享 */ onShareAppMessage: function () { } })
1.2 Tabbar导航栏
-
创建两个page,分别为:
shopping和index -
导入6张图,分别为主页的Tabbar、个人中心和购物页面,以及他们被选中后的图标
-
在app.json设置Tabbar
app.json"tabBar": { "list": [ { "text": "主页", "pagePath": "pages/index/index", "iconPath": "images/home.png", "selectedIconPath": "images/home_select.png" }, { "text": "购物车", "pagePath": "pages/shopping/shopping", "iconPath": "images/shopping.png", "selectedIconPath": "images/shopping_select.png" },{ "text": "分类", "pagePath": "pages/group/group", "iconPath": "images/group.png", "selectedIconPath": "images/group_select.png" },{ "text": "个人中心", "pagePath": "pages/login/login", "iconPath": "images/my.png", "selectedIconPath": "images/my_select.png" } ] }, -
app.json的page属性中的路由必须和tabbar的list对应(数量和地址,顺序随意)
app.json"pages": [ "pages/login/login", "pages/index/index", "pages/shopping/shopping", "pages/group/group" ],
1.3 路由跳转
-
登录成功后跳转到主页
-
修改
login.js的login方法login.js// 登录,请求本地SpringBoot + Redis服务器 login:function(){ wx.request({ method: 'POST', url: 'http://localhost:8080/api/redis/login', data: ({ phone_number: this.data.phone_number, code: this.data.code }), success(res){ console.log(res.data); // 弹出框 wx.showToast({ title: '登录成功', }); // Tabbar跳转,关闭所有非Tabbar页面 wx.switchTab({ url: '/pages/index/index', }) } }) },
2.1 头部轮播图
index.wxml
<view class="container">
    <!-- autoplay:自动播放轮播图
         circular:循环播放
         indicator-dots:显示轮播排点 -->
    <swiper autoplay circular indicator-dots>
        <!-- 仅可放置在swiper组件中,宽高自动为100% -->
        <swiper-item>
            <!-- mode:widthFix
                 图片裁剪、缩放的方式
                 widthFix:缩放模式,宽度不变,高度自动变化,保持原图宽高比不变
                 用于解决某些图片溢出、边距等问题 -->
            <image src="/images/swiper/banner1.jpg" mode="widthFix"></image>
        </swiper-item>
        <swiper-item>
            <image src="/images/swiper/banner2.jpg" mode="widthFix"></image>
        </swiper-item>
        <swiper-item>
            <image src="/images/swiper/banner3.jpg" mode="widthFix"></image>
        </swiper-item>
        <swiper-item>
            <image src="/images/swiper/banner4.jpg" mode="widthFix"></image>
        </swiper-item>
    </swiper>
</view>
index.wxss
.container{
    display: flex;
    flex-direction: column;
    padding: 10rpx 16rpx;
}

swiper{
    width: 100%;
    height: 370rpx;
}

swiper image{
    width: 100%;
    border-radius: 16rpx;
}
2.2 中间菜单
- 菜单栏中的图片资源是通过js请求后台服务器,后台服务器查询数据库
- 后端将查询信息返回给js,js将后台返回的数据保存到data中
- 前端就可以直接使用el表达式取值了
index.wxml
<view class="container">
    <!-- 首页轮播图 -->
    <!-- autoplay:自动播放轮播图
         circular:循环播放
         indicator-dots:显示轮播排点 -->
    <swiper autoplay circular indicator-dots>
        <!-- 仅可放置在swiper组件中,宽高自动为100% -->
        <swiper-item>
            <!-- mode:widthFix
                 图片裁剪、缩放的方式
                 widthFix:缩放模式,宽度不变,高度自动变化,保持原图宽高比不变
                 用于解决某些图片溢出、边距等问题 -->
            <image src="/images/swiper/banner1.jpg" mode="widthFix"></image>
        </swiper-item>
        <swiper-item>
            <image src="/images/swiper/banner2.jpg" mode="widthFix"></image>
        </swiper-item>
        <swiper-item>
            <image src="/images/swiper/banner3.jpg" mode="widthFix"></image>
        </swiper-item>
        <swiper-item>
            <image src="/images/swiper/banner4.jpg" mode="widthFix"></image>
        </swiper-item>
    </swiper>

    <view class="nav">
        <view class="menu" wx:for="{{navList}}" wx:key="{{index1}}">
            <image src="{{item.src}}"></image>
            <text>{{item.title}}</text>
        </view>
    </view>
</view>
index.js
// pages/index/index.js
Page({

    /**
     * 页面的初始数据
     */
    data: {
        navList:[]
    },

    getNavList:function(){
        let that1 = this;
        wx.request({
          method: 'POST',
          url: 'http://localhost:8080/api/sql/navList',
          success(res){
            //   console.log(res.data);
            that1.setData({
                navList: res.data
            })
          }
        })
    },

    /**
     * 生命周期函数--监听页面加载
     */
    onLoad: function (options) {
        this.getNavList();
        this.hotProductList();
    },

    /**
     * 生命周期函数--监听页面初次渲染完成
     */
    onReady: function () {

    },

    /**
     * 生命周期函数--监听页面显示
     */
    onShow: function () {

    },

    /**
     * 生命周期函数--监听页面隐藏
     */
    onHide: function () {

    },

    /**
     * 生命周期函数--监听页面卸载
     */
    onUnload: function () {

    },

    /**
     * 页面相关事件处理函数--监听用户下拉动作
     */
    onPullDownRefresh: function () {

    },

    /**
     * 页面上拉触底事件的处理函数
     */
    onReachBottom: function () {

    },

    /**
     * 用户点击右上角分享
     */
    onShareAppMessage: function () {

    }
})
index.wxss
/* ---------------------------- 顶部轮播图 ------------------------ */
.container{
    display: flex;
    flex-direction: column;
    padding: 10rpx 16rpx;
    background-color: #576b95;
}

swiper{
    width: 100%;
    height: 370rpx;
}

swiper image{
    width: 100%;
    border-radius: 16rpx;
}

/* ------------------------------------------------------------------ */

/* -------------------------------- 菜单------------------------------- */
.nav{
    display: flex;
    flex-direction: row;
    flex-wrap: wrap;
    justify-content: space-between;
    background-color: #ffffff;

    /* 整个nav菜单圆角 */
    border-radius: 20rpx;

    /* 外部nav和内部元素保持点距离好看 */
    padding: 20rpx;

    margin: 10rpx 0;
}

/* nav内部的每个组件,一个组件中有图片和标题 */
.nav .menu{
    /* 列,内部居中 */
    display: flex;
    flex-direction: column;
    justify-content: center;
    align-items: center;

    width: 25%; /* 八个,四个一行,所以25%正好 */
    margin:20rpx 0; /* 上下两行保持点距离 */
}

/* 图片:圆 */
.nav .menu image{
    width: 100rpx;
    height: 100rpx;
    border-radius: 50%;
}

/* 文字 */
.nav .menu text{
    font-size: 20rpx;
    color: #666;

    /* 和上方图片保持点距离 */
    margin-top: 15rpx;
}
2.3 热门产品块
- 和菜单栏一样,图片和文字也是数据库资源
index.wxml
<view class="container">
    <!-- 首页轮播图 -->
    <!-- autoplay:自动播放轮播图
         circular:循环播放
         indicator-dots:显示轮播排点 -->
    <swiper autoplay circular indicator-dots>
        <!-- 仅可放置在swiper组件中,宽高自动为100% -->
        <swiper-item>
            <!-- mode:widthFix
                 图片裁剪、缩放的方式
                 widthFix:缩放模式,宽度不变,高度自动变化,保持原图宽高比不变
                 用于解决某些图片溢出、边距等问题 -->
            <image src="/images/swiper/banner1.jpg" mode="widthFix"></image>
        </swiper-item>
        <swiper-item>
            <image src="/images/swiper/banner2.jpg" mode="widthFix"></image>
        </swiper-item>
        <swiper-item>
            <image src="/images/swiper/banner3.jpg" mode="widthFix"></image>
        </swiper-item>
        <swiper-item>
            <image src="/images/swiper/banner4.jpg" mode="widthFix"></image>
        </swiper-item>
    </swiper>

    <!-- 菜单栏 -->
    <view class="nav">
        <view class="menu" wx:for="{{navList}}" wx:key="{{index1}}">
            <image src="{{item.src}}"></image>
            <text>{{item.title}}</text>
        </view>
    </view>
</view>

<!-- 热门商品栏的标题 -->
<view class="header">
    <view class="line"></view>
        <text class="hot">热门产品</text>
    <view class="line"></view>
</view>

<!-- 热门商品栏的图片列表 -->
<view class="wrap">
    <!-- 一个产品块 -->
    <view class="product" wx:for="{{hotProductList}}" wx:key="{{index2}}">
        <!-- 图片 -->
        <image src="{{item.src}}" mode="widthFix"></image>
        <!-- 产品信息 -->
        <view class="info">
            <text class="name">{{item.name}}</text>
            <text class="price">{{item.price}}</text>
        </view>
    </view>
</view>
index.wxss
/* ---------------------------- 顶部轮播图 ------------------------ */
.container{
    display: flex;
    flex-direction: column;
    padding: 10rpx 16rpx;
    background-color: #576b95;
}

swiper{
    width: 100%;
    height: 370rpx;
}

swiper image{
    width: 100%;
    border-radius: 16rpx;
}

/* ------------------------------------------------------------------ */

/* -------------------------------- 菜单------------------------------- */
.nav{
    display: flex;
    flex-direction: row;
    flex-wrap: wrap;
    justify-content: space-between;
    background-color: #ffffff;

    /* 整个nav菜单圆角 */
    border-radius: 20rpx;

    /* 外部nav和内部元素保持点距离好看 */
    padding: 20rpx;

    margin: 10rpx 0;
}

/* nav内部的每个组件,一个组件中有图片和标题 */
.nav .menu{
    /* 列,内部居中 */
    display: flex;
    flex-direction: column;
    justify-content: center;
    align-items: center;

    width: 25%; /* 八个,四个一行,所以25%正好 */
    margin:20rpx 0; /* 上下两行保持点距离 */
}

/* 图片:圆 */
.nav .menu image{
    width: 100rpx;
    height: 100rpx;
    border-radius: 50%;
}

/* 文字 */
.nav .menu text{
    font-size: 20rpx;
    color: #666;

    /* 和上方图片保持点距离 */
    margin-top: 15rpx;
}

/* --------------------------------------------------------------------- */

/* --------------------------------产品列表------------------------------ */
.header{
    display: flex;
    justify-content: center;
    align-items: center;
}

.header .line{
    width: 60rpx;
    height: 2rpx;
    background-color: #666;

    margin: 0 20rpx;
}

.header .line .hot{
    font-size: 40rpx;
}

.wrap{
    display: flex;
    flex-direction: row;
    flex-wrap: wrap;
    background-color:#576b95;
}

.wrap .product{
    display: flex;
    flex-direction: column;
    justify-content: center;
    align-items: center;

    width: 46%;
    margin:15rpx;

    background-color: #ffffff;
}

.wrap .product image{
    width: 100%;
}

.wrap .product .info{
    display: flex;
    flex-direction: row;
    justify-content: space-around;

    width: 100%;
    background-color: #666;
}

.wrap .product .info .price{
    color: red;
}
index.js
// pages/index/index.js
Page({

    /**
     * 页面的初始数据
     */
    data: {
        navList:[],
        hotProductList:[]
    },

    getNavList:function(){
        let that1 = this;
        wx.request({
          method: 'POST',
          url: 'http://localhost:8080/api/sql/navList',
          success(res){
            //   console.log(res.data);
            that1.setData({
                navList: res.data
            })
          }
        })
    },

    hotProductList:function(){
        let that2 = this;
        wx.request({
          method: 'POST',
          url: 'http://localhost:8080/api/sql/hotProductList',
          success(res){
              that2.setData({
                hotProductList:res.data
              })
          }
        });
        console.log(this.hotProductList);
    },

    /**
     * 生命周期函数--监听页面加载
     */
    onLoad: function (options) {
        this.getNavList();
        this.hotProductList();
    },

    /**
     * 生命周期函数--监听页面初次渲染完成
     */
    onReady: function () {

    },

    /**
     * 生命周期函数--监听页面显示
     */
    onShow: function () {

    },

    /**
     * 生命周期函数--监听页面隐藏
     */
    onHide: function () {

    },

    /**
     * 生命周期函数--监听页面卸载
     */
    onUnload: function () {

    },

    /**
     * 页面相关事件处理函数--监听用户下拉动作
     */
    onPullDownRefresh: function () {

    },

    /**
     * 页面上拉触底事件的处理函数
     */
    onReachBottom: function () {

    },

    /**
     * 用户点击右上角分享
     */
    onShareAppMessage: function () {

    }
})
2.4 产品详情页
-
将主页中的商品块,view改成navigator,通过url跳转页面,url的值是页面路由
<!-- 一个产品块 --> <!-- js的onLoad方法可以使用options.id获取到params --> <navigator url="/pages/detail/detail?id={{item.id}}" class="product" wx:for="{{hotProductList}}" wx:key="{{index}}"> -
编写详情页
detail.wxml<!-- y轴滚动条 --> <scroll-view scroll-y> <!-- 标题 --> <view> <text class="title"> 产品详情 </text> </view> <!-- 商品轮播图 --> <!-- autoplay:自动播放 circular:循环播放 indicator-dots:开启flex布局 --> <swiper autoplay circular indicator-dots> <!-- 仅可放置在swiper组件中,宽高自动为100% --> <swiper-item> <!-- video组件,controls='true'开启播放控制按钮 --> <video src="http://wxsnsdy.tc.qq.com/105/20210/snsdyvideodownload?filekey=30280201010421301f0201690402534804102ca905ce620b1241b726bc41dcff44e00204012882540400&bizid=1023&hy=SH&fileparam=302c020101042530230204136ffd93020457e3c4ff02024ef202031e8d7f02030f42400204045a320a0201000400" controls="true"></video> </swiper-item> <swiper-item> <!-- mode:widthFix 图片裁剪、缩放的方式 widthFix:缩放模式,宽度不变,高度自动变化,保持原图宽高比不变 用于解决某些图片溢出、边距等问题 --> <image src="/images/detail/swiper/mate30pro01.jpg" mode="widthFix"></image> </swiper-item> <swiper-item> <image src="/images/detail/swiper/mate30pro02.jpg" mode="widthFix"></image> </swiper-item> <swiper-item> <image src="/images/detail/swiper/mate30pro03.jpg" mode="widthFix"></image> </swiper-item> </swiper> <!-- 商品信息 --> <view class="info"> <text class="name">华为mate30pro</text> <text class="price">¥6099元</text> </view> <!-- 详情图 --> <text class="title">详情介绍</text> <view class="wrap"> <image src="/images/detail/info/detail01.png" mode="widthFix"></image> <image src="/images/detail/info/detail02.png" mode="widthFix"></image> <image src="/images/detail/info/detail03.png" mode="widthFix"></image> </view> </scroll-view> <!-- 底部添加购物车及购买按钮 --> <view class="bottom"> <button bindtap="addCar">添加到购物车</button> <button bindtap="buy">立即购买</button> </view>detail.wxss/* ----------------------------------------- 标题 ---------------------------------------------- */ .title{ display: block; text-align: center; font-size: 50rpx; margin-bottom: 40rpx; } /* --------------------------------------------------------------------------------------------- */ /* ------------------------------------------- 轮播图 ------------------------------------------- */ /* 滚动条 */ scroll-view{ width: 100%; height: 100vh; /* 高度为可视区域的100% */ } swiper{ width: 96%; /* 给margin留点空隙 */ height: 490rpx; /* 高度经过调整发现这个数值是最合适的 */ margin: 0 16rpx; } /* html中video是写在image前面,如果这里写反了则会有问题 */ /* swiper-item宽高自动为swiper的100%,所以不用设置 */ swiper video,image{ width: 100%; border-radius: 16rpx; } /* ---------------------------------------------------------------------------------------------- */ /* ----------------------------------------- 轮播图产品介绍 -------------------------------------- */ .info{ width: 95%; background-color: teal; border-radius: 6rpx; /* 让商品名和价格分开,两边还能平分空白区域 */ display: flex; flex-direction: row; justify-content: space-around; margin: 20rpx; } .info text{ font-size: 40rpx; color: white; line-height: 80rpx; } /* ----------------------------------------------------------------------------------------------- */ /* ------------------------------------------ 添加购物车和购买 ------------------------------------- */ .bottom{ /* 加上bottom就出问题,不知道怎么回事 */ position: absolute; /* bottom: 0; */ /* left: 0; */ width: 100%; display: flex; flex-direction: row; } .bottom button{ width: 50%; color: #ffffff; border-radius: 0; } .bottom .addCar{ background-color: orange; } .bottom .buy{ background-color: red; } /* ------------------------------------------------------------------------------------------------ */detail.js// pages/detail/detail.js Page({ /** * 页面的初始数据 */ data: { productId:"" }, // 添加到购物车功能 addCar:function(){ // 获取该商品的id var id = this.data.productId // wx.setStorageSync('key', data)方法将数据以key-value形式存储到本地缓存 // 其他页面可以通过wxwx.getStorageSync('key')方法取值 wx.setStorageSync("id", id); // showModal和showTotal不同的是,showModal有取消确定选项,对用户友好 wx.showModal({ title: '提示', content: '是否添加到购物车', }) }, /** * 生命周期函数--监听页面加载 */ onLoad: function (options) { // 获取前端传过来的商品id,这个id是前端首页加载时从数据库中获取的商品列表,每个商品有个id属性 this.setData({ productId: options.id }) }, /** * 生命周期函数--监听页面初次渲染完成 */ onReady: function () { }, /** * 生命周期函数--监听页面显示 */ onShow: function () { }, /** * 生命周期函数--监听页面隐藏 */ onHide: function () { }, /** * 生命周期函数--监听页面卸载 */ onUnload: function () { }, /** * 页面相关事件处理函数--监听用户下拉动作 */ onPullDownRefresh: function () { }, /** * 页面上拉触底事件的处理函数 */ onReachBottom: function () { }, /** * 用户点击右上角分享 */ onShareAppMessage: function () { } })
关于微信小程序的wx.request
-
wx.request发起的全部是异步请求
-
这里的
productList:function(){ var that = this; wx.request({ method: 'POST', url: 'http://localhost:8080/api/sql/hotProductList', success(res) { this.setData({ productList: res.data }) console.log(this.data.productList) } }); }, -
wx.request赋值有两种操作
-
第一种就是复制一份this
如果是success(res),则无法使用this,因为这是回调函数,此时的this已经不是this了,需要将this复制一份
就如上面的例子
-
第二种是使用ES6,可以使用this
productList:function(){ wx.request({ method: 'POST', url: 'http://localhost:8080/api/sql/hotProductList', success:res=> { this.setData({ productList: res.data }) console.log(this.data.productList) } }); }, -
如果在wx.request的success中修改data数值,在wx.request外部打印修改的值
-
结果会为空
-
因为wx.request方法是异步的,没等wx.request内部执行完,程序也会继续向下执行
-
所以就在success方法中,设置完数据后直接获取就行
3.1 购物车页
-
前面虽然使用wx.setStorageSync和wx.getStorageSync将数据保存到本地并可以在不同页面实现设置和取值
-
但是这里只是为了开发模板,真正从详情页向购物车页添加商品,具体项目再设置
-
编写购物车页面
cart.wxml<!-- 商品列表栏 --> <scroll-view scroll-y> <!-- 一个view是一个商品 --> <view class="product" wx:for="{{productList}}" wx:key="{{index}}"> <image src="{{item.src}}" mode="widthFix"></image> <view class="info"> <text>{{item.name}}</text> <text class="price">¥{{item.price}}</text> </view> <!-- 复选框,绑定change事件 --> <checkbox-group id="{{item.id}}" bindchange="change"> <!-- 当点击任意复选框组中任意一个选项框时,都会触发bindchange方法 --> <!-- js可以通过 函数参数.currentTarget.id获取到value中的属性值 --> <checkbox value="{{item.id}}"></checkbox> </checkbox-group> </view> </scroll-view> <!-- 底部付款汇总块,price实时价格通过js实现计算 --> <view class="bottom"> <button> 去付款 <text>¥{{price}}</text> </button> </view>cart.css/* ------------------------------------- 滚动条 ----------------------------------------- */ /* 正常设计师宽度100%,高度为可视化区域的100% */ scroll-view{ width: 100%; height: 100vh; } /* ----------------------------------- 商品列表中每个块 ---------------------------------- */ .product{ width: 100%; display: flex; flex-direction: row; justify-content: center; align-items: center; border-bottom: 1px solid #666666; } /* 前端中高度自适应 mode:widthFix; */ .product image{ width: 200rpx; } .product .info{ width: 80%; /* 信息,名称和价格垂直排列 */ display: flex; flex-direction: column; } .product .info .price{ color: red; } /* 最后一个商品条元素 */ /* 因为底部按钮开启了定位,如果不设置margin-bottom底部按钮会盖住最后一个商品 */ .product:last-child{ margin-bottom: 60rpx; } /* ----------------------------------------------------------------------------------------- */ /* ---------------------------------------- 底部按钮 ---------------------------------------- */ .bottom{ width: 100%; /* 一直在屏幕最底部 */ position: absolute; bottom: 0; left: 0; } /* 按钮,新版本按钮被写死了,所以许多样式设置需要 !important */ button{ width: 100% !important; border-radius: 0 !important; background-color: orangered; color: #ffffff; } /* ---------------------------------------------------------------------------------------- */cart.js// pages/cart/cart.js Page({ /** * 页面的初始数据 */ data: { product:[], productList:[], price: 0 }, // 商品列表 productList:function(){ wx.request({ method: 'POST', url: 'http://localhost:8080/api/sql/hotProductList', success:res=> { this.setData({ productList: res.data }) console.log(this.data.productList) } }); }, // 计算当前总价格的函数 change(e){ var sumPrice = 0; // 每次点击的总价格 var num = e.detail.value; // 点击的复选框的value var p = this.data.productList; // 购物车的商品列表 // 如果点击的复选框value不为空字符串 if(num != ''){ // 遍历产品列表,找出当前点击的id for(var i = 0;i < p.length;i++){ // 找到了,加在当前对象中的price(当前总价格)中,并将当前总和赋值给函数中的sumPrice if(p[i].id == num){ sumPrice = this.data.price + parseInt(p[i].price); } } }else{ for(var i = 0;i < p.length;i++){ if(p[i].id == num){ // 找到了,将当前点击的商品价格从当前对象的price(当前总价格)中减去,并将当前总和赋值给函数中的sumPrice sumPrice = this.data.price - parseInt(p[i].price); } } } // 最后将实际总和赋值给data的price this.setData({ price:sumPrice }) }, /** * 生命周期函数--监听页面加载 */ onLoad: function (options) { this.productList(); }, /** * 生命周期函数--监听页面初次渲染完成 */ onReady: function () { }, /** * 生命周期函数--监听页面显示 */ onShow: function () { }, /** * 生命周期函数--监听页面隐藏 */ onHide: function () { }, /** * 生命周期函数--监听页面卸载 */ onUnload: function () { }, /** * 页面相关事件处理函数--监听用户下拉动作 */ onPullDownRefresh: function () { }, /** * 页面上拉触底事件的处理函数 */ onReachBottom: function () { }, /** * 用户点击右上角分享 */ onShareAppMessage: function () { } })
3.2 分类页
group.wxml
<view class="container">
    <!-- 左侧导航菜单 -->
    <view class="menu">
        <!-- 绑定搜索类型, -->
        <view id="{{item.id}}" class="classType" bindtap="searchTab" wx:for="{{classType}}" wx:key="{{index}}">
            <text>{{item.name}}</text>
        </view>
    </view>

    <!-- 产品列表 -->
    <view class="list">
        <!-- 如果是初始化页面或者没有搜索类型,默认显示全部,否则显示通过js搜索的指定类别的所有商品 -->
        <view class="productList" wx:for="{{productList==''?productAll:productList}}" wx:key="{{index}}">
            <image src="{{item.src}}" mode="widthFix"></image>
            <view class="info">
                <text>{{item.name}}</text>
                <text class="price">¥{{item.price}}</text>
            </view>
        </view>
    </view>
</view>
group.wxss
.container{
    width: 100%;
    display: flex; /* 左侧导航栏和中间商品列表横向布局 */
}

/* ------------------------------------------- 左侧菜单 ------------------------------------ */
.container .menu{
    /* 占全宽的20% */
    width: 20%;

    /* 里面的item纵向排列 */
    display: flex;
    flex-direction: column;

    /* 高度最短为100vh,防止选项过多 */
    min-height: 100vh;
    background-color: rgba(75, 101, 132,0.3);


}

/* 导航栏中样式 */
.container .menu .classType{
    /* 里面的文字横向居中显示 */
    display: flex;
    justify-content: center;

    /* 宽度为100% */
    width: 100%;
    /* 上下相邻item保持距离 */
    margin: 20rpx 0;
}

/* 导航栏中item字体样式 */
.container .menu .classType text{
    color: rgba(0, 0, 0, .5);
    font-weight: bold;
    font-weight: 500;
}

/* ---------------------------------------- 商品列表 ----------------------------------------  */

.container .list{
    /* 导航栏占20%,商品列表占80% */
    width: 80%;

    /* 纵向排列 */
    display: flex;
    flex-direction: column;
}

/* 商品列表中的单个组件 */
.container .list .productList{
    width: 100%;

    /* 横向排列,居中显示 */
    display: flex;
    flex-direction: row;
    justify-content: center;
    align-items: center;
}

/* 商品列表 -> 单个组件 -> 图片 */
.container .list .productList image{
    /* 宽度设置适当,前端高度自适应 */
    width: 300rpx;
}

/* 商品列表 -> 单个组件 -> 信息 */
.container .list .productList .info{
    /* 垂直排列 */
    width: 100%;
    display: flex;
    flex-direction: column;
    justify-content: space-around;
}


.container .list .productList .info .price{
    color: red;
}

/* -------------------------------------------------------------------------------------------- */
group.js
// pages/group/group.js
Page({

    /**
     * 页面的初始数据
     */
    data: {
        // 产品类别
        classType: [
            {
                "id": 1,
                "name": "手机"
            }, {
                "id": 2,
                "name": "电脑"
            }, {
                "id": 3,
                "name": "软件"
            }, {
                "id": 4,
                "name": "图书"
            }
        ], // 分类
        productList: [], // 产品列表

        // 设置一些初始数据,默认显示全部商品,productList用于存储当前搜索的分类数据
        // classid是分类id
        productAll: [
            {src: "/images/product/cate1.jpg", name: "华为nova100 5G", price: "1000", id: 1,"classid":1},
            {src: "/images/product/cate2.jpg", name: "华为nova200 5G", price: "2000", id: 2,"classid":2},
            {src: "/images/product/cate3.jpg", name: "华为Mate100 5G", price: "3000", id: 3,"classid":3},
            {src: "/images/product/cate4.jpg", name: "华为Mate200 5G", price: "4000", id: 4,"classid":1},
            {src: "/images/product/cate5.jpg", name: "华为nova100 5G", price: "1000", id: 5,"classid":3},
            {src: "/images/product/cate6.jpg", name: "华为nova200 5G", price: "2000", id: 6,"classid":2},
            {src: "/images/product/cate7.jpg", name: "华为Mate100 5G", price: "3000", id: 7,"classid":1},
            {src: "/images/product/cate8.jpg", name: "华为Mate200 5G", price: "4000", id: 8,"classid":2},
            {src: "/images/product/cate9.jpg", name: "华为nova100 5G", price: "1000", id: 9,"classid":3},
            {src: "/images/product/cate10.jpg", name: "华为nova200 5G", price: "2000", id: 10,"classid":4},
            {src: "/images/product/cate11.jpg", name: "华为Mate100 5G", price: "3000", id: 11,"classid":3},
            {src: "/images/product/cate12.jpg", name: "华为Mate200 5G", price: "4000", id: 12,"classid":1}
        ] // 初始数据
    },

    // 搜索商品分类
    searchTab(e){
        // 全部商品数组
        var p = this.data.productAll;

        // 复选框可以通过这个方法获取value
        // 视图可以通过点击获取id
        var id = e.currentTarget.id;

        // 当前搜索的指定类型的商品
        var list = [];

        // 遍历全部商品
        for(var i = 0;i < p.length;i++){
            // 将指定类型的全部保存到列表中
            if(p[i].classid == id){
                list.push(p[i]);
            }
        }

        // list是搜索出来的商品列表,设置到productList中
        this.setData({
            productList:list
        })
    },

    /**
     * 生命周期函数--监听页面加载
     */
    onLoad: function (options) {

    },

    /**
     * 生命周期函数--监听页面初次渲染完成
     */
    onReady: function () {

    },

    /**
     * 生命周期函数--监听页面显示
     */
    onShow: function () {

    },

    /**
     * 生命周期函数--监听页面隐藏
     */
    onHide: function () {

    },

    /**
     * 生命周期函数--监听页面卸载
     */
    onUnload: function () {

    },

    /**
     * 页面相关事件处理函数--监听用户下拉动作
     */
    onPullDownRefresh: function () {

    },

    /**
     * 页面上拉触底事件的处理函数
     */
    onReachBottom: function () {

    },

    /**
     * 用户点击右上角分享
     */
    onShareAppMessage: function () {

    }
})
Step12.输入框组件详解
input
基础库 1.0.0 开始支持,低版本需做兼容处理。
输入框。该组件是原生组件,使用时请注意相关限制
| 属性 | 类型 | 默认值 | 必填 | 说明 | 最低版本 |
|---|---|---|---|---|---|
| value | string | 是 | 输入框的初始内容 | 1.0.0 | |
| type | string | text | 否 | input 的类型 | 1.0.0 |
| 合法值说明最低版本text文本输入键盘number数字输入键盘idcard身份证输入键盘digit带小数点的数字键盘safe-password密码安全输入键盘 指引2.18.0nickname昵称输入键盘2.21.2 | |||||
| password | boolean | false | 否 | 是否是密码类型 | 1.0.0 |
| placeholder | string | 是 | 输入框为空时占位符 | 1.0.0 | |
| placeholder-style | string | 是 | 指定 placeholder 的样式 | 1.0.0 | |
| placeholder-class | string | input-placeholder | 否 | 指定 placeholder 的样式类 | 1.0.0 |
| disabled | boolean | false | 否 | 是否禁用 | 1.0.0 |
| maxlength | number | 140 | 否 | 最大输入长度,设置为 -1 的时候不限制最大长度 | 1.0.0 |
| cursor-spacing | number | 0 | 否 | 指定光标与键盘的距离,取 input 距离底部的距离和 cursor-spacing 指定的距离的最小值作为光标与键盘的距离 | 1.0.0 |
| auto-focus | boolean | false | 否 | (即将废弃,请直接使用 focus )自动聚焦,拉起键盘 | 1.0.0 |
| focus | boolean | false | 否 | 获取焦点 | 1.0.0 |
| confirm-type | string | done | 否 | 设置键盘右下角按钮的文字,仅在type='text’时生效 | 1.1.0 |
| 合法值说明send右下角按钮为“发送”search右下角按钮为“搜索”next右下角按钮为“下一个”go右下角按钮为“前往”done右下角按钮为“完成” | |||||
| always-embed | boolean | false | 否 | 强制 input 处于同层状态,默认 focus 时 input 会切到非同层状态 (仅在 iOS 下生效) | 2.10.4 |
| confirm-hold | boolean | false | 否 | 点击键盘右下角按钮时是否保持键盘不收起 | 1.1.0 |
| cursor | number | 是 | 指定focus时的光标位置 | 1.5.0 | |
| selection-start | number | -1 | 否 | 光标起始位置,自动聚集时有效,需与selection-end搭配使用 | 1.9.0 |
| selection-end | number | -1 | 否 | 光标结束位置,自动聚集时有效,需与selection-start搭配使用 | 1.9.0 |
| adjust-position | boolean | true | 否 | 键盘弹起时,是否自动上推页面 | 1.9.90 |
| hold-keyboard | boolean | false | 否 | focus时,点击页面的时候不收起键盘 | 2.8.2 |
| safe-password-cert-path | string | 否 | 安全键盘加密公钥的路径,只支持包内路径 | 2.18.0 | |
| safe-password-length | number | 否 | 安全键盘输入密码长度 | 2.18.0 | |
| safe-password-time-stamp | number | 否 | 安全键盘加密时间戳 | 2.18.0 | |
| safe-password-nonce | string | 否 | 安全键盘加密盐值 | 2.18.0 | |
| safe-password-salt | string | 否 | 安全键盘计算hash盐值,若指定custom-hash 则无效 | 2.18.0 | |
| safe-password-custom-hash | string | 否 | 安全键盘计算hash的算法表达式,如 md5(sha1('foo' + sha256(sm3(password + 'bar')))) | 2.18.0 | |
| bindinput | eventhandle | 是 | 键盘输入时触发,event.detail = {value, cursor, keyCode},keyCode 为键值,2.1.0 起支持,处理函数可以直接 return 一个字符串,将替换输入框的内容。 | 1.0.0 | |
| bindfocus | eventhandle | 是 | 输入框聚焦时触发,event.detail = { value, height },height 为键盘高度,在基础库 1.9.90 起支持 | 1.0.0 | |
| bindblur | eventhandle | 是 | 输入框失去焦点时触发,event.detail = { value, encryptedValue, encryptError } | 1.0.0 | |
| bindconfirm | eventhandle | 是 | 点击完成按钮时触发,event.detail = { value } | 1.0.0 | |
| bindkeyboardheightchange | eventhandle | 是 | 键盘高度发生变化的时候触发此事件,event.detail = {height: height, duration: duration} |
Step13.弹窗组件 page-container
-
属性
- show:控制弹窗的显示与否
<page-container :show="showBounceWindow">
	111
</page-container>
Step14.微信小程序获取用户信息
-
方式一:open-data展示用户信息
https://developers.weixin.qq.com/community/develop/doc/000e881c7046a8fa1f4d464105b001<!-- 如果只是展示用户头像昵称,可以使用 <open-data /> 组件 --> <open-data type="userAvatarUrl"></open-data> <open-data type="userNickName"></open-data> -
wx.getUserInfo
https://developers.weixin.qq.com/community/develop/doc/000cacfa20ce88df04cb468bc52801Page({ onLoad: function (options) { this.getUserInfo(); }, async getUserInfo() { // 可以直接调用,无需用户授权 const res = await wx.getUserInfo(); console.log(res); }, });获取的数据{ userInfo{ avatarUrl: "https://thirdwx.qlogo.cn/mmopen/vi_32/POgEwh4mIHO4nibH0KlMECNjjGxQUq24ZEaGT4poC6icRiccVGKSyXwibcPq4BWmiaIGuG1icwxaQX6grC9VemZoJ8rg/132" city: "" country: "" gender: 0 language: "" nickName: "微信用户" province: "" } } -
方式三:open-type=“getUserInfo”
https://developers.weixin.qq.com/miniprogram/dev/api/open-api/user-info/wx.getUserProfile.html#Bug-Tip-
<button open-type="getUserInfo" bind:getuserinfo="handleGetUserinfo">获取用户信息</button> -
js
Page({ handleGetUserinfo(e) { console.log(e); }, }); -
输出
{
	detail{
		userInfo:{
			avatarUrl: "https://thirdwx.qlogo.cn/mmopen/vi_32/POgEwh4mIHO4nibH0KlMECNjjGxQUq24ZEaGT4poC6icRiccVGKSyXwibcPq4BWmiaIGuG1icwxaQX6grC9VemZoJ8rg/132"
			city: ""
			country: ""
			gender: 0
			language: ""
			nickName: "微信用户"
			province: ""
			}
	}
}
-
-
方式四:wx.getUserProfile
文档:https://developers.weixin.qq.com/miniprogram/dev/api/open-api/user-info/wx.getUserProfile.html用户数据结构 UserInfo : https://developers.weixin.qq.com/miniprogram/dev/api/open-api/user-info/UserInfo.html<button bindtap="getUserProfile">获取头像昵称</button>Page({ async getUserProfile(e) { const res = await wx.getUserProfile({ desc: '用于完善会员资料', }); console.log(res); }, });-
输出
{
	detail{
		userInfo:{
			avatarUrl: "https://thirdwx.qlogo.cn/mmopen/vi_32/POgEwh4mIHO4nibH0KlMECNjjGxQUq24ZEaGT4poC6icRiccVGKSyXwibcPq4BWmiaIGuG1icwxaQX6grC9VemZoJ8rg/132"
			city: ""
			country: ""
			gender: 0
			language: ""
			nickName: "真实昵称"
			province: ""
			}
	}
}
-


 被折叠的 条评论
为什么被折叠?
被折叠的 条评论
为什么被折叠?
 到【灌水乐园】发言


