


一、LinearLayout(线性布局)
特点:按水平或垂直方向排列子视图,通过android:orientation控制方向。
适用场景:列表项、表单布局等简单排列需求
<LinearLayout
    android:layout_width="match_parent"
    android:layout_height="wrap_content"
    android:orientation="vertical"
    android:gravity="center"> <!-- 子视图整体居中 -->

    <TextView
        android:layout_width="0dp"
        android:layout_height="wrap_content"
        android:layout_weight="1"  <!-- 水平方向占1/2宽度 -->
        android:text="左侧文本"/>

    <Button
        android:layout_width="0dp"
        android:layout_height="wrap_content"
        android:layout_weight="1"
        android:text="右侧按钮"/>
</LinearLayout>
1.常用属性
orientation:控制布局方向。

  vertical:垂直方向布局。

  horizontal 水平方向布局。

gravity:控制组件所包含的子元素的对其方式。

  center:子容器相对于父容器所在的位置为正中心。

  cente_verticalr: 子容器相对于父容器所在的位置为垂直方向的正中心。

  center_horizontal:子容器相对于父容器所在的位置为水平方向的正中心。

  top/bottom/left/right:子容器相对于父容器所在的位置为上/下(默认)/左/右。

1.layout_gravity:控制该组件在父容器里的对齐方式。

  left:子视图相对于其容器左侧对齐。

  right:子视图相对于其容器右侧对齐。

  top:子视图相对于其容器顶部对齐。

  bottom:子视图相对于其容器底部对齐。

  center_horizontal:子视图在其容器的水平方向上居中对齐。

  center_vertical:子视图在其容器的垂直方向上居中对齐。

  center:子视图在其容器的水平和垂直方向上都居中对齐,等价于同时设置

  center_horizontal和center_vertical。

 2.layout_width、layout_heigth:布局宽度、高度。

  布局的宽度通常不直接写数字的。

  用wrap_content(组件实际大小)fill_parent或者match_parent填满父容器。

3.background:为组件设置背景。

  background=“#xxxx” :指定线性布局的背景颜色

  background=“@color/colorPrimary” :指定自设置的颜色。

4.layout_weight:权重,用来分配当前控件在剩余空间的大小。

  一般要把分配该权重方向的长度设置为零。

  比如在水平方向分配权重,就把width设置为零。
二、RelativeLayout(相对布局)
特点:通过相对位置(相对于父容器或兄弟视图)定位子视图。
适用场景:复杂界面元素叠加(如登录框居中)
<RelativeLayout
    android:layout_width="match_parent"
    android:layout_height="300dp">

    <Button
        android:id="@+id/btn_center"
        android:layout_width="wrap_content"
        android:layout_height="wrap_content"
        android:layout_centerInParent="true" <!-- 完全居中 -->
        android:text="居中按钮"/>

    <TextView
        android:layout_width="wrap_content"
        android:layout_height="wrap_content"
        android:layout_above="@id/btn_center" <!-- 位于按钮上方 -->
        android:text="上方文本"/>
</RelativeLayout>
1.常用属性
margin:偏移量(外边距)

设置组件与父容器的边距,又叫偏移
设置组件上下左右的偏移量:layout margin
设置组件离左边的偏移量:layout marginLeft
设置组件离右边的偏移量:layout_marginRight
设置组件离上面的偏移量:layout_marginTop
设置组件离下面的偏移量:layout marginBottom

padding:填充(内边距)

设置组件内部元素间的边距(比如Textview里的字体位置)
往内部元素的上下左右填充一定边距:android:padding
往内部元素的左边填充一定边距:paddingLeft
往内部元素的右边填充一定边距:paddingRight
往内部元素的上方填充一定边距:paddingTop
往内部元素的下方填充一定边距:paddingBottom
三、ConstraintLayout(约束布局)
特点:通过视图间约束关系定位,减少嵌套层级,性能最优。
适用场景:响应式复杂界面(适配多种屏幕)
<androidx.constraintlayout.widget.ConstraintLayout
    android:layout_width="match_parent"
    android:layout_height="match_parent">

    <Button
        android:id="@+id/btn_submit"
        android:layout_width="wrap_content"
        android:layout_height="wrap_content"
        app:layout_constraintBottom_toBottomOf="parent"
        app:layout_constraintEnd_toEndOf="parent"
        app:layout_constraintStart_toStartOf="parent"
        android:text="提交"/>

    <EditText
        android:layout_width="0dp"
        android:layout_height="wrap_content"
        app:layout_constraintTop_toTopOf="parent"
        app:layout_constraintStart_toStartOf="parent"
        app:layout_constraintEnd_toEndOf="parent"
        android:hint="输入内容"/>
</androidx.constraintlayout.widget.ConstraintLayout>
四、FrameLayout(帧布局)
特点:子视图叠加显示,后添加的覆盖在先前的之上。
适用场景:图层叠加(如Fragment容器、悬浮按钮)
<FrameLayout
    android:layout_width="200dp"
    android:layout_height="200dp">

    <ImageView
        android:layout_width="match_parent"
        android:layout_height="match_parent"
        android:src="@drawable/background"/>

    <Button
        android:layout_width="wrap_content"
        android:layout_height="wrap_content"
        android:layout_gravity="bottom|end" <!-- 右下角 -->
        android:text="悬浮按钮"/>
</FrameLayout>
五、GridLayout(网格布局)
特点:按行列排布子视图,支持跨行/列。
适用场景:九宫格、仪表盘等网格状布局
<GridLayout
    android:layout_width="match_parent"
    android:layout_height="wrap_content"
    android:columnCount="2" <!-- 2列 -->
    android:rowCount="2">  <!-- 2行 -->

    <Button
        android:layout_row="0"
        android:layout_column="0"
        android:text="单元格1"/>

    <Button
        android:layout_row="0"
        android:layout_column="1"
        android:text="单元格2"/>

    <Button
        android:layout_row="1"
        android:layout_columnSpan="2" <!-- 跨2列 -->
        android:layout_gravity="fill"
        android:text="跨列按钮"/>
</GridLayout>
六、TableLayout(表格布局)
特点:通过TableRow管理行,每行包含多个单元格。
适用场景:数据表(如设置页的键值对)
<TableLayout
    android:layout_width="match_parent"
    android:layout_height="wrap_content"
    android:stretchColumns="1"> <!-- 拉伸第2列 -->

    <TableRow>
        <TextView android:text="用户名:"/>
        <EditText android:hint="输入用户名"/>
    </TableRow>

    <TableRow>
        <TextView android:text="密码:"/>
        <EditText android:inputType="textPassword"/>
    </TableRow>
</TableLayout>
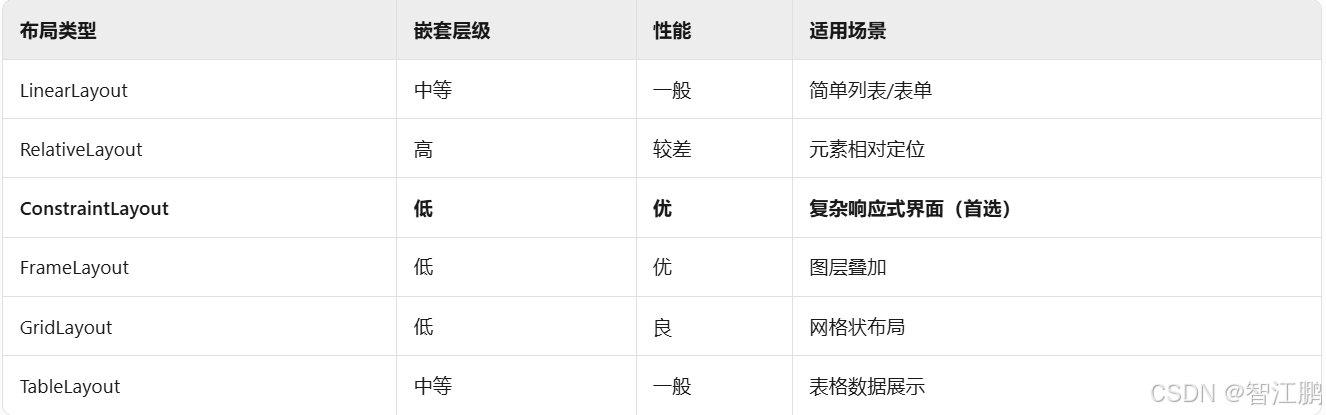
七.布局对比与选型建议


 1634
1634

 被折叠的 条评论
为什么被折叠?
被折叠的 条评论
为什么被折叠?
 到【灌水乐园】发言


