


背景介绍
客户需要将项目前后端作为一个整体打包成jar,不使用nginx方式转发。使用框架是若依前后端分离,后端springboot,前端vue,目的就是把vue打入jar。
前端修改
- ruoyi-ui/src/router/index.js文件 ,将 mode: ‘history’ 改成 mode: ‘hash’
export default new Router({
  mode: 'hash',
  scrollBehavior: () => ({ y: 0 }),
  routes: constantRoutes
})
- 修改ruoyi-ui/.env.production文件 将’/prod-api’ 改成’/’
# 生产环境
VUE_APP_BASE_API = '/'
- 去bin里build前端项目
后端修改
- 引入依赖spring-boot-starter-thymeleaf
        <dependency>
		<groupId>org.springframework.boot</groupId>
		<artifactId>spring-boot-starter-thymeleaf</artifactId>
        </dependency>
- 修改yml文件配置(dev和local可以都改),增加thymeleaf配置
# Spring配置
spring:
  thymeleaf:
    prefix: classpath:/dist/
    mode: HTML
    encoding: utf-8
    cache: false
- 修改ResourcesConfig文件内容,新增以下部分addViewControllers
    @Override
    public void addViewControllers(ViewControllerRegistry registry) {
        registry.addViewController("/index").setViewName("index.html");
        registry.addViewController("/").setViewName("index.html");
        registry.setOrder(Ordered.HIGHEST_PRECEDENCE);
    }
- 修改ResourcesConfig文件内容,替换addResourceHandlers内容如下:
@Override
public void addResourceHandlers(ResourceHandlerRegistry registry) {
    /** 本地文件上传路径 */
    registry.addResourceHandler(Constants.RESOURCE_PREFIX + "/**").addResourceLocations("file:" + RuoYiConfig.getProfile() + "/");
    /** 页面静态化 */
    registry.addResourceHandler("/static/**").addResourceLocations("classpath:/dist/static/");
    /** swagger配置 */
    registry.addResourceHandler("swagger-ui.html").addResourceLocations("classpath:/META-INF/resources/");
    registry.addResourceHandler("doc.html").addResourceLocations("classpath:/META-INF/resources/");
    registry.addResourceHandler("/webjars/**").addResourceLocations("classpath:/META-INF/resources/webjars/");
}
- 根据情况配置访问权限修改ruoyi-framework项目中的SecurityConfig.java类,配置静态资源访问权限
如果全放行可以不用管,可以把代码中的.anyRequest().authenticated()那行注释掉
package com.ruoyi.framework.config;

@EnableGlobalMethodSecurity(prePostEnabled = true, securedEnabled = true)
public class SecurityConfig extends WebSecurityConfigurerAdapter{
    @Override
    protected void configure(HttpSecurity httpSecurity) throws Exception    {
        httpSecurity
                // CSRF禁用,因为不使用session
                .csrf().disable()
                // 认证失败处理类
                .exceptionHandling().authenticationEntryPoint(unauthorizedHandler).and()
                // 基于token,所以不需要session
                .sessionManagement().sessionCreationPolicy(SessionCreationPolicy.STATELESS).and()
                // 过滤请求
                .authorizeRequests()
                // 对于登录login 验证码captchaImage 允许匿名访问
                .antMatchers("/login", "/captchaImage").anonymous()
                .antMatchers(
                        HttpMethod.GET,
                        "/*.html",
                        "/**/*.html",
                        "/**/*.css",
                        "/**/*.js",
                        "/static/**",
                        "/",
                        "/index"
                ).permitAll()
                .antMatchers("/profile/**").anonymous()
                .antMatchers("/common/download**").anonymous()
                .antMatchers("/common/download/resource**").anonymous()
                .antMatchers("/swagger-ui.html").anonymous()
                .antMatchers("/doc.html").anonymous()
                .antMatchers("/swagger-resources/**").anonymous()
                .antMatchers("/webjars/**").anonymous()
                .antMatchers("/*/api-docs").anonymous()
                .antMatchers("/druid/**").anonymous()
                // 除上面外的所有请求全部需要鉴权认证
                .anyRequest().authenticated()
                .and()
                .headers().frameOptions().disable();
        httpSecurity.logout().logoutUrl("/logout").logoutSuccessHandler(logoutSuccessHandler);
        // 添加JWT filter
        httpSecurity.addFilterBefore(authenticationTokenFilter, UsernamePasswordAuthenticationFilter.class);
        // 添加CORS filter
        httpSecurity.addFilterBefore(corsFilter, JwtAuthenticationTokenFilter.class);
        httpSecurity.addFilterBefore(corsFilter, LogoutFilter.class);
    }
}
- 把前端build完成的dist目录放到ruoyi-admin项目的resources目录下
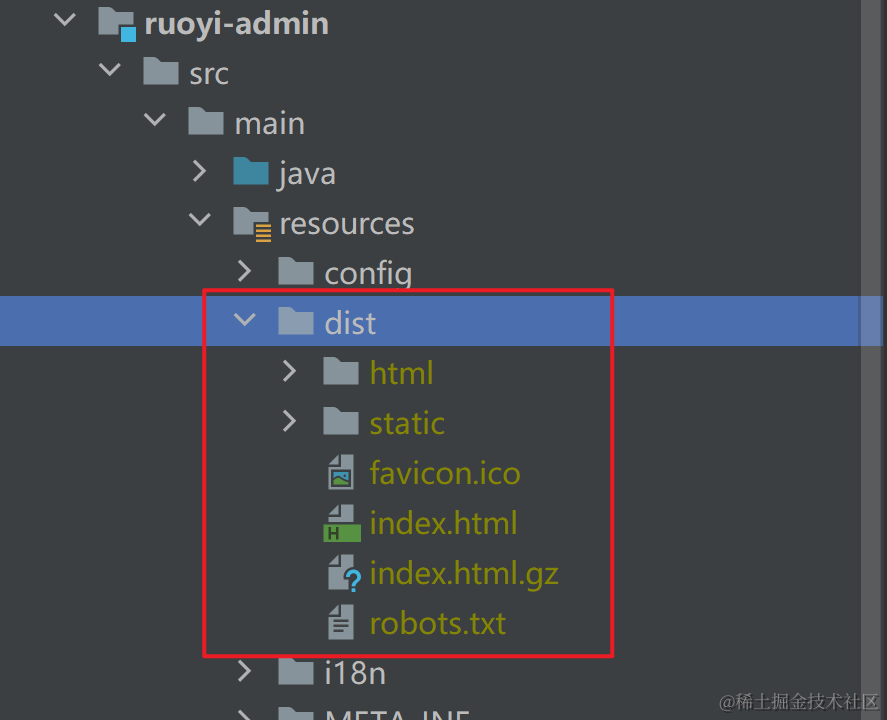
7. 最后去后端打包编译 package.bat,java -jar运行项目,浏览器访问http://localhost:8080


 5158
5158

 被折叠的 条评论
为什么被折叠?
被折叠的 条评论
为什么被折叠?
 到【灌水乐园】发言


