


开发环境:
Ubuntu20,ns-3.43(使用最新版ns-3,修复/补充了一些传输层协议算法)
1,新建传输层协议模块
在ns-3.43目录下的utils目录下有自动化脚本可用
#transport-protocol为模块名
./utils/create-module.py transport-protocol
默认情况下,新模块建立在ns-3.43/contrib中,可手动挪到src/目录下
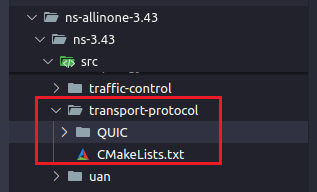
2,调整协议模块结构
我们不需要model, helper, test等目录,可以删去,并新建以新协议命名的文件夹,模块结构如下:
3,CMakeLists.txt修改
自动生成的cmake文件比较复杂,可以简写为以下格式:
build_lib(
LIBNAME transport-protocol
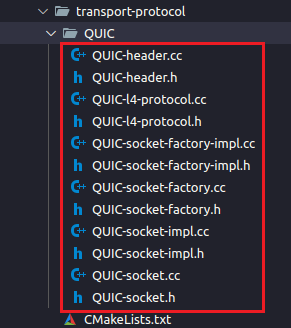
SOURCE_FILES QUIC/QUIC-header.cc
QUIC/QUIC-l4-protocol.cc
QUIC/QUIC-socket-factory-impl.cc
QUIC/QUIC-socket-factory.cc
QUIC/QUIC-socket-impl.cc
QUIC/QUIC-socket.cc
HEADER_FILES QUIC/QUIC-header.h
QUIC/QUIC-l4-protocol.h
QUIC/QUIC-socket-factory-impl.h
QUIC/QUIC-socket-factory.h
QUIC/QUIC-socket-impl.h
QUIC/QUIC-socket.h
LIBRARIES_TO_LINK ${libcore}
)
注:ns-3新版本均采用cmake文件编译模块,但实际内容和用法和旧版本的wscript配置文件几乎相同,每次在模块中新加入代码文件均需要在配置文件中增加
4,协议代码开发
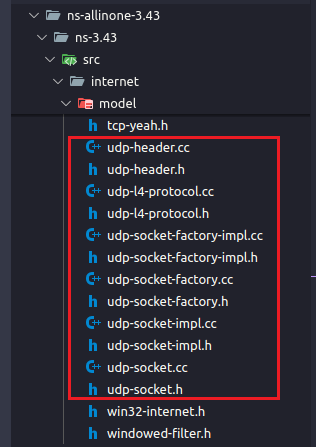
这里将复制版UDP命名为QUIC.
新协议一般是基于TCP/UDP进行开发,以UDP为例,可以直接将internet/model/目录下的UDP相关文件复制到新模块的文件夹中,并将UDP替换为QUIC即可
若重新开发协议,具体来说有以下步骤:
4.2 创建 QUIC Socket 类
// src/quic/model/quic-socket.h
#ifndef QUIC_SOCKET_H
#define QUIC_SOCKET_H

#include "ns3/socket.h"

namespace ns3 {

class QUICSocket : public Socket
{
public:
    static TypeId GetTypeId (void);

    QUICSocket ();
    virtual ~QUICSocket ();

    // Override Socket methods
    virtual int Bind (void);
    virtual int Bind (const Address &address);
    virtual int Connect (const Address &address);
    virtual int Listen (void);
    virtual Ptr<Packet> Recv (uint32_t maxSize, uint32_t flags);
    // ... 其他必要的方法
};

} // namespace ns3

#endif /* QUIC_SOCKET_H */
4.1 创建 QUIC Socket Factory
创建一个 Socket Factory 类,用于创建 QUIC Socket 实例,主要功能为注册 QUIC Socket Factory:
#include "QUIC-socket-factory.h"

#include "ns3/socket.h"
#include "ns3/uinteger.h"

namespace ns3
{

NS_OBJECT_ENSURE_REGISTERED(QUICSocketFactory);

TypeId
QUICSocketFactory::GetTypeId()
{
    static TypeId tid =
        TypeId("ns3::QUICSocketFactory").SetParent<SocketFactory>().SetGroupName("Internet");
    return tid;
}

} // namespace ns3
4.2 功能实现
QUIC L4 协议 (QUIC-l4-protocol.h 和 QUIC-l4-protocol.cc)
QUICL4Protocol 类继承自 IpL4Protocol,实现 QUIC 协议的 L4 层功能,包括:
- 处理接收到的 QUIC 数据包。
- 管理 QUIC 端点
QUIC Header (QUIC-header.h 和 QUIC-header.cc)
QUICHeader 类用于封装 QUIC 数据包的头部信息,包括源端口、目的端口和长度等字段。
3,协议栈注册
在完成上述步骤后,新协议QUIC已有完备运行代码,但在运行中会遇到找不到ns3::QUICSocketFactory的报错

排查后发现是因为QUICL4Protocol没有在internet-stack中写入,QUIC 协议未正确安装到节点,需要在节点上安装 QUIC 协议,类似于 TcpL4Protocol 或 UdpL4Protocol 的安装方式
在 internet-stack-helper.cc 中增加新协议
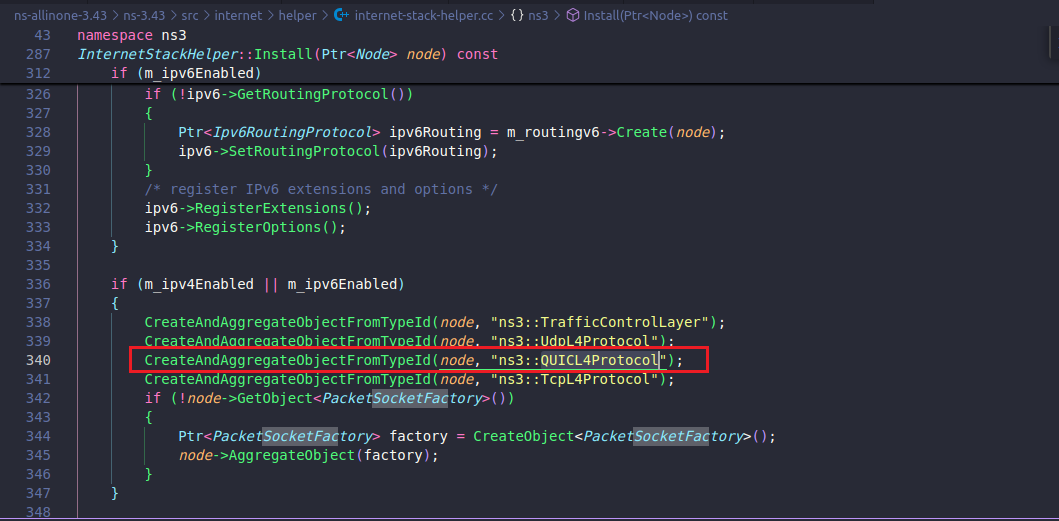
CreateAndAggregateObjectFromTypeId(node, "ns3::QUICL4Protocol");
4,协议测试
这里写了一个简单的测试脚本,测试是否可以通过"ns3::QUICSocketFactory"正确选择到我们新建的协议:
// #include "ns3/QUIC-header.h"
// #include "ns3/QUIC-l4-protocol.h"
// #include "ns3/QUIC-socket-factory-impl.h"
// #include "ns3/QUIC-socket-factory.h"
// #include "ns3/QUIC-socket-impl.h"
// #include "ns3/QUIC-socket.h"
#include "ns3/applications-module.h"
#include "ns3/core-module.h"
#include "ns3/internet-module.h"
#include "ns3/network-module.h"
#include "ns3/point-to-point-module.h"
#include "ns3/transport-protocol-module.h"

// Default Network Topology
//
//       10.1.1.0
// n0 -------------- n1
//    point-to-point
//

using namespace ns3;

NS_LOG_COMPONENT_DEFINE("TCP_UDP_OnOff_Test");

int
main(int argc, char* argv[])
{
    CommandLine cmd(__FILE__);
    cmd.Parse(argc, argv);

    Time::SetResolution(Time::NS);
    LogComponentEnable("OnOffApplication", LOG_LEVEL_INFO);
    LogComponentEnable("PacketSink", LOG_LEVEL_INFO);

    // 创建节点
    NodeContainer nodes;
    nodes.Create(2);

    // 配置点对点链路
    PointToPointHelper pointToPoint;
    pointToPoint.SetDeviceAttribute("DataRate", StringValue("5Mbps"));
    pointToPoint.SetChannelAttribute("Delay", StringValue("2ms"));

    NetDeviceContainer devices;
    devices = pointToPoint.Install(nodes);

    // 安装互联网协议栈
    InternetStackHelper stack;
    stack.Install(nodes);

    // 分配 IP 地址
    Ipv4AddressHelper address;
    address.SetBase("10.1.1.0", "255.255.255.0");

    Ipv4InterfaceContainer interfaces = address.Assign(devices);

    // 选择传输协议(TCP 或 UDP)
    std::string protocol = "ns3::QUICSocketFactory";

    // 创建接收端应用(PacketSink)
    uint16_t port = 9;
    PacketSinkHelper packetSinkHelper(protocol, InetSocketAddress(Ipv4Address::GetAny(), port));
    ApplicationContainer sinkApps = packetSinkHelper.Install(nodes.Get(1));
    sinkApps.Start(Seconds(1.0));
    sinkApps.Stop(Seconds(10.0));

    // 创建发送端应用(OnOffApplication)
    OnOffHelper onOffHelper(protocol, InetSocketAddress(interfaces.GetAddress(1), port));
    onOffHelper.SetAttribute("OnTime", StringValue("ns3::ConstantRandomVariable[Constant=1]"));
    onOffHelper.SetAttribute("OffTime", StringValue("ns3::ConstantRandomVariable[Constant=0]"));
    onOffHelper.SetAttribute("DataRate", DataRateValue(DataRate("1Mbps")));
    onOffHelper.SetAttribute("PacketSize", UintegerValue(1024));

    ApplicationContainer sourceApps = onOffHelper.Install(nodes.Get(0));
    sourceApps.Start(Seconds(2.0));
    sourceApps.Stop(Seconds(3.0));

    // 运行模拟器
    Simulator::Run();
    Simulator::Destroy();
    return 0;
}


 7838
7838

 被折叠的 条评论
为什么被折叠?
被折叠的 条评论
为什么被折叠?
 到【灌水乐园】发言


