


 本文详细剖析了Android消息机制,包括ThreadLocal的set和get方法,弱引用防止内存泄漏,MessageQueue的enqueueMessage、Message的obtain与next方法,Looper的prepare、loop和quit操作,以及Handler的构造、dispatchMessage和sendMessage方法。通过对源码的解析,揭示了Handler、Looper、MessageQueue协同工作的核心原理。
Android消息机制
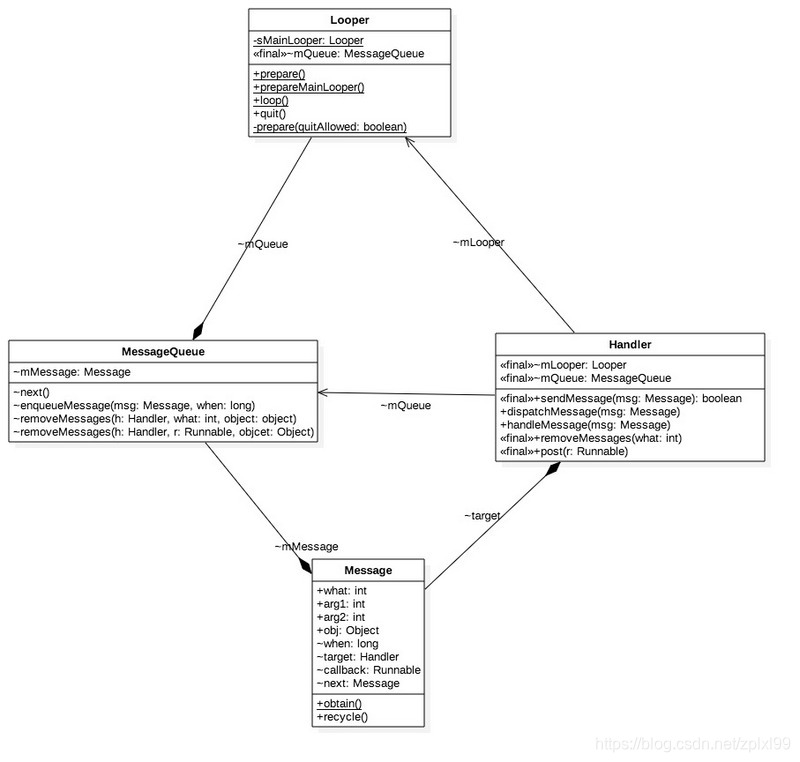
Android消息机制主要是指Handler的运行机制。而对应的就是以Handler、Looper、MessageQueue为主的一套消息机制。
一.ThreadLocal
首先,ThreadLocal不是一个线程,他是一个线程内部的数据存储类,通过它可以在指定的线程中存储数据,数据存储以后,只有在指定线程中可以获取到存储的数据,对于其他线程来说则无法获取到数据。(摘自《开发艺术探索》)。
ThreadLocal主要方法有两个,一个是set用来存储线程私有变量,一个是get用来获取线程私有变量。
1.set方法
set源码如下:
public void set(T value) {
    	//获取当前线程实例t;
        Thread t = Thread.currentThread();
    	//通过线程实例t得到一个threadloacalmap;
        ThreadLocalMap map = getMap(t);
    	//如果这个threadlocalmap为null,先创建一个threadlocalmap;
    	//然后key为当前这个threadlocalmap,value为要存储的变量值 存储到threadlocalmap中;
        if (map != null)
            map.set(this, value);
        else
            createMap(t, value);
    }

ThreadLocalMap getMap(Thread t) {
        return t.threadLocals;
    }

void createMap(Thread t, T firstValue) {
        t.threadLocals = new ThreadLocalMap(this, firstValue);
    }
2.get方法
get源码如下:
public T get() {
    	//获取当前线程实例t;
        Thread t = Thread.currentThread();
    	//通过线程实例t得到一个threadlocalmap;
        ThreadLocalMap map = getMap(t);
    	//若这个map不为空,则以threadlocal为key获取线程私有变量;
    	//否则执行setInitialValue方法
        if (map != null) {
            ThreadLocalMap.Entry e = map.getEntry(this);
            if (e != null) {
                @SuppressWarnings("unchecked")
                T result = (T)e.value;
                return result;
            }
        }
        return setInitialValue();
    }

 private T setInitialValue() {
     	//获取threadlocal的初始化值,默认为null;
        T value = initialValue();
        Thread t = Thread.currentThread();
        ThreadLocalMap map = getMap(t);
        if (map != null)
            map.set(this, value);
        else
            createMap(t, value);
     	//返回初始化值
        return value;
    }

protected T initialValue() {
    return null;
}
当不同的线程调用同一个 ThreadLocal 对象的 get() 方法时,内部其实是会先获取当前线程的对象,然后通过包权限直接获取对象的数据存储容器 ThreadLocalMap 对象,如果容器为空,那么会新建个容器,并将初始值和当前 ThreadLocal 对象绑定存储进去,同时返回初始值;如果容器不为空,那么会以当前 ThreadLocal 对象作为 key 值去容器中寻找,有找到直接返回,没找到,那么以同样的操作先存入容器再返回初始值。
3.ThreadLocalMap
在上面的set和get方法中我们有看到,变量实际存储在线程实例的内部一个叫ThreadLocalMap的数据结构中。ThreadLocalMap是一个类HashMap的数据结构,key为threadlocal对象(弱引用),value为要存储的变量。
我们先来看ThreadLocalMap的构造函数:
 static class ThreadLocalMap {

       /**
         * The entries in this hash map extend WeakReference, using
         * its main ref field as the key (which is always a
         * ThreadLocal object).  Note that null keys (i.e. entry.get()
         * == null) mean that the key is no longer referenced, so the
         * entry can be expunged from table.  Such entries are referred to
         * as "stale entries" in the code that follows.
         */
        static class Entry extends WeakReference<ThreadLocal> {
            /** The value associated with this ThreadLocal. */
            Object value;

            Entry(ThreadLocal k, Object v) {
                super(k);
                value = v;
            }
        }

        /**
         * The initial capacity -- MUST be a power of two.
         */
        private static final int INITIAL_CAPACITY = 16;

        /**
         * The table, resized as necessary.
         * table.length MUST always be a power of two.
         */
        private Entry[] table;

        /**
         * The number of entries in the table.
         */
        private int size = 0;

        /**
         * The next size value at which to resize.
         */
        private int threshold; // Default to 0

        // ...

        ThreadLocalMap(ThreadLocal firstKey, Object firstValue) {
            table = new Entry[INITIAL_CAPACITY];
            int i = firstKey.threadLocalHashCode & (INITIAL_CAPACITY - 1);
            table[i] = new Entry(firstKey, firstValue);
            size = 1;
            setThreshold(INITIAL_CAPACITY);
       }

       /**
         * Set the resize threshold to maintain at worst a 2/3 load factor.
         */
        private void setThreshold(int len) {
            threshold = len * 2 / 3;
        }
}
可以看到ThreadLocalMap是ThreadLocal的一个匿名内部类。
Entry对象包含key和value,key是ThreadLocal,value是ThreadLocal对应的值,同时ThreadLocal对象是一个弱引用对象。(如果一个对象只被弱引用引用到,那么下次垃圾收集的时候就会被回收掉)
a.为什么用弱引用?
原因是为了减少内存泄漏。如果存储一个ThreadLocal对象到ThreadLocalMap中,但是后来不需要这个对象了,只有ThreadLocalMap中的key还引用了该对象。如果这个是一个强引用的话,该对象一直无法回收。因为已经失去了其他所有该对象的外部引用,这个ThreadLocal对象将一直存在,而我们却无法访问也无法回收它,导致了内存泄漏。而ThreadLocalMap的生命周期和线程实例的生命周期一致的,只要线程一直不退出,那这种泄漏问题将会不断积累,直至导致系统奔溃。
如果是弱引用的话,当ThreadLocal失去所有外部引用的话,下次垃圾收集该ThreadLocal对象将被回收,对应的ThreadLocalMap中的key将为null。下次get和set方法被执行的时候会将key为null的Entry进行清理。这就有效地减少内存泄漏的可能和影响。
b.如何避免内存泄漏?
弱引用只存在于key上,所以key会被回收,但当线程还在运行的情况下,value还是在被线程强引用而无法释放,只有当线程结束之后或者我们调用set、get方法的时候回去移除已被回收的Entry( replaceStaleEntry这个方法),给出的建议是,当ThreadLocal使用完成的时候,调用remove方法将value移除掉,这样就不会存在内存泄漏了。
因此,及时调用ThreadLocal的remove方法或者及时销毁线程实例。才能真正避免内存泄漏。
二.消息队列
MessageQueue,以队列形式提供插入和删除。Handler将message发送到消息队列中,消息队列会按照一定的规则取出要执行的Message。
1.MessageQueue源码解析
源码路径在:/frameworks/base/core/java/android/os/MessageQueue.java
我们先来看他的成员变量:
    // True if the message queue can be quit.
    // 用于标识消息队列是否可以被关闭,主线程的消息队列不可关闭
    @UnsupportedAppUsage
    private final boolean mQuitAllowed;

    @UnsupportedAppUsage
    @SuppressWarnings("unused")
    // 该变量用来保存native代码中的MessageQueue的指针
    private long mPtr; // used by native code

    //在MessageQueue中,所有的Message是以链表的形式组织在一起的,该变量保存了链表的第一个元素,也可以说它就是链表的本身
    @UnsupportedAppUsage
    Message mMessages;
    // 当Handler线程处于空闲状态的时候
    @UnsupportedAppUsage
    private final ArrayList<IdleHandler> mIdleHandlers = new ArrayList<IdleHandler>();
    private SparseArray<FileDescriptorRecord> mFileDescriptorRecords;
    // 用于保存将要被执行的IdleHandler
    private IdleHandler[] mPendingIdleHandlers;
    // 标识MessageQueue是否正在关闭。
    private boolean mQuitting;

    // Indicates whether next() is blocked waiting in pollOnce() with a non-zero timeout.
    // 标识MessageQueue是否阻塞
    private boolean mBlocked;

    // The next barrier token.
    // Barriers are indicated by messages with a null target whose arg1 field carries the token.
    // 在MessageQueue里面有一个概念叫做障栅,它用于拦截同步的Message,阻止这些消息被执行,
    // 只有异步Message才会放行。障栅本身也是一个Message,只是它的target为null并且arg1用于区分不同的障栅,
    // 所以该变量就是用于不断累加生成不同的障栅。
    @UnsupportedAppUsage
    private int mNextBarrierToken;

    private native static long nativeInit();
    private native static void nativeDestroy(long ptr);
    @UnsupportedAppUsage
    private native void nativePollOnce(long ptr, int timeoutMillis); /*non-static for callbacks*/
    private native static void nativeWake(long ptr);
    private native static boolean nativeIsPolling(long ptr);
    private native static void nativeSetFileDescriptorEvents(long ptr, int fd, int events);
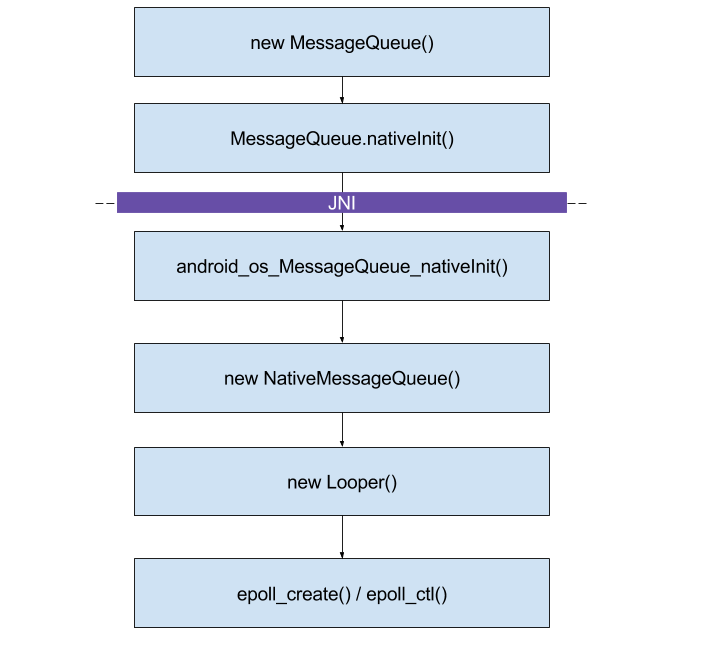
接着看MessageQueue的构造函数。MessageQueue只有一个构造函数,该构造函数主要做了两件事:一是设置MessageQueue是否可退出;另一个是native层代码的初始化。
    MessageQueue(boolean quitAllowed) {
        mQuitAllowed = quitAllowed;
        mPtr = nativeInit();
    }
看nativeInit方法的实现,这就需要通过JNI知识找到对应的native方法实现,实现在/frameworks/base/core/jni/android_os_MessageQueue.cpp:
static const JNINativeMethod gMessageQueueMethods[] = {
    /* name, signature, funcPtr */
    { "nativeInit", "()J", (void*)android_os_MessageQueue_nativeInit },
    { "nativeDestroy", "(J)V", (void*)android_os_MessageQueue_nativeDestroy },
    { "nativePollOnce", "(JI)V", (void*)android_os_MessageQueue_nativePollOnce },
    { "nativeWake", "(J)V", (void*)android_os_MessageQueue_nativeWake },
    { "nativeIsPolling", "(J)Z", (void*)android_os_MessageQueue_nativeIsPolling },
    { "nativeSetFileDescriptorEvents", "(JII)V",
            (void*)android_os_MessageQueue_nativeSetFileDescriptorEvents },
};
android_os_MessageQueue_nativeInit的实现:
static jlong android_os_MessageQueue_nativeInit(JNIEnv* env, jclass clazz) {
    // 在native层又创建NativeMessageQueue
    NativeMessageQueue* nativeMessageQueue = new NativeMessageQueue();
    if (!nativeMessageQueue) {
        jniThrowRuntimeException(env, "Unable to allocate native queue");
        return 0;
    }

    nativeMessageQueue->incStrong(env);
    // 返回指针变量
    return reinterpret_cast<jlong>(nativeMessageQueue);
}
NativeMessageQueue无参构造函数:
NativeMessageQueue::NativeMessageQueue() :
        mPollEnv(NULL), mPollObj(NULL), mExceptionObj(NULL) {
    // 获取TLS中的Looper对象
    mLooper = Looper::getForThread();
    if (mLooper == NULL) {
        // 创建native层的Looper对象
        mLooper = new Looper(false);
        // 保存native层的Looper到TLS中
        Looper::setForThread(mLooper);
    }
}
Looper.cpp中的构造函数:
Looper::Looper(bool allowNonCallbacks)
    : mAllowNonCallbacks(allowNonCallbacks),
      mSendingMessage(false),
      mPolling(false),
      mEpollRebuildRequired(false),
      mNextRequestSeq(0),
      mResponseIndex(0),
      mNextMessageUptime(LLONG_MAX) {
    // 唤醒fd
    mWakeEventFd.reset(eventfd(0, EFD_NONBLOCK | EFD_CLOEXEC));
    LOG_ALWAYS_FATAL_IF(mWakeEventFd.get() < 0, "Could not make wake event fd: %s", strerror(errno));

    AutoMutex _l(mLock);
    rebuildEpollLocked();
}
rebuildEpollLocked的实现:
void Looper::rebuildEpollLocked() {
    // Close old epoll instance if we have one.
    // 关闭老的epoll实例
    if (mEpollFd >= 0) {
#if DEBUG_CALLBACKS
        ALOGD("%p ~ rebuildEpollLocked - rebuilding epoll set", this);
#endif
        mEpollFd.reset();
    }

    // Allocate the new epoll instance and register the wake pipe.
    // 创建一个epoll实例
    mEpollFd.reset(epoll_create1(EPOLL_CLOEXEC));
    LOG_ALWAYS_FATAL_IF(mEpollFd < 0, "Could not create epoll instance: %s", strerror(errno));

    struct epoll_event eventItem;
    // 清空,把未使用的数据区域进行置0操作
    memset(& eventItem, 0, sizeof(epoll_event)); // zero out unused members of data field union
    // EPOLLIN可读
    eventItem.events = EPOLLIN;
    // 设置fd
    eventItem.data.fd = mWakeEventFd.get();
    // 将唤醒事件(mWakeEventFd)添加到epoll实例(mEpollFd)
    int result = epoll_ctl(mEpollFd.get(), EPOLL_CTL_ADD, mWakeEventFd.get(), &eventItem);
    LOG_ALWAYS_FATAL_IF(result != 0, "Could not add wake event fd to epoll instance: %s",
                        strerror(errno));

    .......
}
上面除了mWakeEventFd负责解除阻塞让程序继续运行,从而处理native层和java层的Message。
综上。整个MessageQueue的流程:
a.enqueueMessage
将消息添加到消息队列中,源码如下:
    boolean enqueueMessage(Message msg, long when) {
        // msg 必须有target也就是必须有handler
        if (msg.target == null) {
            throw new IllegalArgumentException("Message must have a target.");
        }
        if (msg.isInUse()) {
            throw new IllegalStateException(msg + " This message is already in use.");
        }

        // 加上同步锁
        synchronized (this) {
            if (mQuitting) {
                IllegalStateException e = new IllegalStateException(
                        msg.target + " sending message to a Handler on a dead thread");
                Log.w(TAG, e.getMessage(), e);
                msg.recycle();
                return false;
            }

            msg.markInUse();
            msg.when = when;
            Message p = mMessages;
            boolean needWake;
            // 消息队列为空/执行时间为0/新消息的when时间比消息队列中的when时间要早
            if (p == null || when == 0 || when < p.when) {
                // New head, wake up the event queue if blocked.
                // 把消息插入到队列头,等待loop的轮询
                msg.next = p;
                mMessages = msg;
                needWake = mBlocked;
            } else {
                // Inserted within the middle of the queue.  Usually we don't have to wake
                // up the event queue unless there is a barrier at the head of the queue
                // and the message is the earliest asynchronous message in the queue.
                // 消息队列不为空
                needWake = mBlocked && p.target == null && msg.isAsynchronous();
                Message prev;
                // 循环遍历将消息放入到消息队列,消息是按照when时间排序
                for (;;) {
                    prev = p;
                    p = p.next;
                    if (p == null || when < p.when) {
                        break;
                    }
                    if (needWake && p.isAsynchronous()) {
                        needWake = false;
                    }
                }
                msg.next = p; // invariant: p == prev.next
                prev.next = msg;
            }

            // We can assume mPtr != 0 because mQuitting is false.
            // 唤醒looper等待的线程
            if (needWake) {
                nativeWake(mPtr);
            }
        }
        return true;
    }
2.Message
Message的源码路径:/frameworks/base/core/java/android/os/Message.java。先来看他的成员变量:
    // 消息唯一的标识,用来区分不同消息
    public int what;

    // 消息支持的参数
    public int arg1;
    // 消息支持的参数
    public int arg2;

    // 消息的内容
    public Object obj;

    // 回复跨进程的Messenger
    public Messenger replyTo;

    // 正在使用的标志值,表示当前Message正处于使用状态
    /*package*/ static final int FLAG_IN_USE = 1 << 0;

    // 异步标志值,表示当前Message是异步的
    /*package*/ static final int FLAG_ASYNCHRONOUS = 1 << 1;

    // 消息标志值
    /*package*/ static final int FLAGS_TO_CLEAR_ON_COPY_FROM = FLAG_IN_USE;

    // 消息标志,对应上面的三个标志值
    @UnsupportedAppUsage
    /*package*/ int flags;

    // 消息触发的时间
    @UnsupportedAppUsage
    @VisibleForTesting(visibility = VisibleForTesting.Visibility.PACKAGE)
    public long when;

    // 存储比较复杂的数据
    /*package*/ Bundle data;

    // 用于存储发送当前Message的Handler对象
    @UnsupportedAppUsage
    /*package*/ Handler target;

    // 用于存储将会执行的Runnable对象
    @UnsupportedAppUsage
    /*package*/ Runnable callback;

    // sometimes we store linked lists of these things
    // 该消息的下一个消息
    @UnsupportedAppUsage
    /*package*/ Message next;

    // 消息对象池相关
    /** @hide */
    public static final Object sPoolSync = new Object();
    private static Message sPool;
    private static int sPoolSize = 0;

    private static final int MAX_POOL_SIZE = 50;

    private static boolean gCheckRecycle = true;
a.Message.obtain()
我们看Message类的构造函数:
    /** Constructor (but the preferred way to get a Message is to call {@link #obtain() Message.obtain()}).
    */
    public Message() {
    }
构造函数中是空实现,从注释上可以看到获取Message对象的方式是通过调用Message.obtain()
接着我们看obtain方法的调用,Message类中有8种obtain函数:
public static Message obtain() {
public static Message obtain(Message orig) {
public static Message obtain(Handler h) {
public static Message obtain(Handler h, Runnable callback) {
public static Message obtain(Handler h, int what) {
public static Message obtain(Handler h, int what, Object obj) {
public static Message obtain(Handler h, int what, int arg1, int arg2) {
public static Message obtain(Handler h, int what,int arg1, int arg2, Object obj){
分为无参和有参obtain()方法。先来看无参的:
    /**
     * Return a new Message instance from the global pool. Allows us to
     * avoid allocating new objects in many cases.
     */
    public static Message obtain() {
        // 保证线程安全
        synchronized (sPoolSync) {
            // 判断sPool是否为空,如果为空,则直接new Message并返回
            if (sPool != null) {
                // 将消息对象池中的对象取出,赋值给m
                Message m = sPool;
                // 将消息对象池中的下一个可以复用的Message对象(m.next)赋值为消息对象池中的当前对象
                sPool = m.next;
                // 将m.next置为null
                m.next = null;
                // 设置m的标志位
                m.flags = 0; // clear in-use flag
                // m已取出,将消息对象池的容量减一
                sPoolSize--;
                return m;
            }
        }
        return new Message();
    }
有参函数,仅以其中一个为例:
    public static Message obtain(Message orig) {
        Message m = obtain();
        m.what = orig.what;
        m.arg1 = orig.arg1;
        m.arg2 = orig.arg2;
        m.obj = orig.obj;
        m.replyTo = orig.replyTo;
        m.sendingUid = orig.sendingUid;
        m.workSourceUid = orig.workSourceUid;
        if (orig.data != null) {
            m.data = new Bundle(orig.data);
        }
        m.target = orig.target;
        m.callback = orig.callback;

        return m;
    }
首先调用obtain()从消息对象池中获取一个Message对象,然后把orig中所有属性赋给这个对象。
综上,有参的obtain函数的第一行都是调用无参的obtain函数,只不过有参的obtain函数可以通过入参来修改一些成员变量而已。
b.copyFrom
Message的浅拷贝。本质上是从一个消息体复制到另一个消息体。
    public void copyFrom(Message o) {
        this.flags = o.flags & ~FLAGS_TO_CLEAR_ON_COPY_FROM;
        this.what = o.what;
        this.arg1 = o.arg1;
        this.arg2 = o.arg2;
        this.obj = o.obj;
        this.replyTo = o.replyTo;
        this.sendingUid = o.sendingUid;
        this.workSourceUid = o.workSourceUid;

        if (o.data != null) {
            this.data = (Bundle) o.data.clone();
        } else {
            this.data = null;
        }
    }
c.next
获取消息的方式就是调用next()方法。看他的源码实现:
    @UnsupportedAppUsage
    Message next() {
        // Return here if the message loop has already quit and been disposed.
        // This can happen if the application tries to restart a looper after quit
        // which is not supported.
        // 如果消息循环已经退出了。则直接在这里return。因为调用disposed()方法后mPtr=0
        final long ptr = mPtr;
        if (ptr == 0) {
            return null;
        }

        // 记录空闲时处理的IdleHandler的数量
        int pendingIdleHandlerCount = -1; // -1 only during first iteration
        // 表示距离该消息处理事件的总时长
        int nextPollTimeoutMillis = 0;
        for (;;) {
            if (nextPollTimeoutMillis != 0) {
                // 刷新下Binder命令,一般在阻塞前调用
                Binder.flushPendingCommands();
            }
            // 调用native层进行消息标识,nextPollTimeoutMillis=0立即返回,-1则表示阻塞等待
            nativePollOnce(ptr, nextPollTimeoutMillis);
            // 加上同步锁
            synchronized (this) {
                // Try to retrieve the next message.  Return if found.
                final long now = SystemClock.uptimeMillis();
                Message prevMsg = null;
                // 获取MessageQueue的链表表头的第一个元素
                Message msg = mMessages;
                // 判断Message是否是障栅,如果是则执行循环,拦截所有同步消息,直到取到第一个异步消息为止
                if (msg != null && msg.target == null) {
                    // Stalled by a barrier.  Find the next asynchronous message in the queue.
                    // 如果能进入这个if,则表面MessageQueue的第一个元素就是障栅(barrier)
                    // 循环遍历出第一个异步消息,这段代码可以看出障栅会拦截所有同步消息
                    do {
                        prevMsg = msg;
                        msg = msg.next;
                         //如果msg==null或者msg是异步消息则退出循环,msg==null则意味着已经循环结束
                    } while (msg != null && !msg.isAsynchronous());
                }
                // 判断是否有可执行的Message
                if (msg != null) {
                    // 判断该Mesage是否到了被执行的时间。
                    if (now < msg.when) {
                        // Next message is not ready.  Set a timeout to wake up when it is ready.
                        // 当Message还没有到被执行时间的时候,记录下一次要执行的Message的时间点
                        nextPollTimeoutMillis = (int) Math.min(msg.when - now, Integer.MAX_VALUE);
                    } else {
                        // Got a message.
                        mBlocked = false;
                        // 如果还有上一个元素
                        if (prevMsg != null) {
                            //上一个元素的next(越过自己)直接指向下一个元素
                            prevMsg.next = msg.next;
                        } else {
                            //如果没有上一个元素,则说明是消息队列中的头元素,直接让第二个元素变成头元素
                            mMessages = msg.next;
                        }
                        // 因为要取出msg,所以msg的next不能指向链表的任何元素,所以next要置为null
                        msg.next = null;
                        if (DEBUG) Log.v(TAG, "Returning message: " + msg);
                        // 标记该Message为正处于使用状态,然后返回Message
                        msg.markInUse();
                        return msg;
                    }
                } else {
                    // No more messages.
                    // 没有任何可执行的Message,重置时间
                    nextPollTimeoutMillis = -1;
                }

                // Process the quit message now that all pending messages have been handled.
                // 关闭消息队列,返回null,通知Looper停止循环
                if (mQuitting) {
                    dispose();
                    return null;
                }

                // If first time idle, then get the number of idlers to run.
                // Idle handles only run if the queue is empty or if the first message
                // in the queue (possibly a barrier) is due to be handled in the future.
                if (pendingIdleHandlerCount < 0
                        && (mMessages == null || now < mMessages.when)) {
                    pendingIdleHandlerCount = mIdleHandlers.size();
                }
                if (pendingIdleHandlerCount <= 0) {
                    // No idle handlers to run.  Loop and wait some more.
                    mBlocked = true;
                    continue;
                }

                // 初始化要被执行的IdleHandler,最少4个
                if (mPendingIdleHandlers == null) {
                    mPendingIdleHandlers = new IdleHandler[Math.max(pendingIdleHandlerCount, 4)];
                }
                mPendingIdleHandlers = mIdleHandlers.toArray(mPendingIdleHandlers);
            }

            // Run the idle handlers.
            // We only ever reach this code block during the first iteration.
            // 开始循环执行所有的IdleHandler,并且根据返回值判断是否保留IdleHandler
            for (int i = 0; i < pendingIdleHandlerCount; i++) {
                final IdleHandler idler = mPendingIdleHandlers[i];
                mPendingIdleHandlers[i] = null; // release the reference to the handler

                boolean keep = false;
                try {
                    keep = idler.queueIdle();
                } catch (Throwable t) {
                    Log.wtf(TAG, "IdleHandler threw exception", t);
                }

                if (!keep) {
                    synchronized (this) {
                        mIdleHandlers.remove(idler);
                    }
                }
            }

            // Reset the idle handler count to 0 so we do not run them again.
            // IdleHandler只会在消息队列阻塞之前执行一次,执行之后改标示设置为0,
            // 之后就不会再执行,一直到下一次调用MessageQueue.next() 方法。
            pendingIdleHandlerCount = 0;

            // While calling an idle handler, a new message could have been delivered
            // so go back and look again for a pending message without waiting.
            nextPollTimeoutMillis = 0;
        }
    }
next是一个无限循环的方法。如果消息队列中没有消息,那么next方法就会一直阻塞,直到有新的消息到来,next方法会返回这条消息并将其从单链表中删除。
d.quit
关闭消息。来看方法的源码实现:
    void quit(boolean safe) {
        // 1
        if (!mQuitAllowed) {
            throw new IllegalStateException("Main thread not allowed to quit.");
        }

        // 2
        synchronized (this) {
            // 3
            if (mQuitting) {
                return;
            }
            mQuitting = true;

            // 4
            if (safe) {
                removeAllFutureMessagesLocked();
            } else {
                removeAllMessagesLocked();
            }

            // We can assume mPtr != 0 because mQuitting was previously false.
            // 5
            nativeWake(mPtr);
        }
    }
- mQuitAllowed在MessageQueue的构造函数中传入的参数。为rue表示可以退出消息队列,false表示不可以退出;
- 加上同步锁;
- 加上一个mQuitting变量表示是否退出,防止重复退出;
- 如果方法传参safe为true,则删除以当前时间点为界限的未来所有消息;若为false,则删除所有消息
- 调用native层的nativeWake函数,触发nativePollOnce函数,结束等待。
三.Looper
Looper是用于线程运行消息循环的类。在运行循环的线程中调用prepare(),然后调用loop()让Looper循环处理消息,直至循环停止
1.prepare/prepareMainLooper
这两个方法顾名思义是Looper的初始化。不同的区别是前者给线程调用,后者给UI线程调用。来看他们源码:
    public static void prepare() {
        prepare(true);
    }

    /**
     * Initialize the current thread as a looper, marking it as an
     * application's main looper. The main looper for your application
     * is created by the Android environment, so you should never need
     * to call this function yourself.  See also: {@link #prepare()}
     */
    public static void prepareMainLooper() {
        prepare(false);
        synchronized (Looper.class) {
            if (sMainLooper != null) {
                throw new IllegalStateException("The main Looper has already been prepared.");
            }
            sMainLooper = myLooper();
        }
    }
看到首先都会调用带有内参的prepare()方法,不同的是传入参数,一个是true,一个是false。而prepareMainLoope中将looper对象赋值给静态私有变量sMainLooper。接着看含参prepare的实现:
    private static void prepare(boolean quitAllowed) {
        if (sThreadLocal.get() != null) {
            throw new RuntimeException("Only one Looper may be created per thread");
        }
        sThreadLocal.set(new Looper(quitAllowed));
    }
首先是TLS的获取和设置,一个线程只能有一个Looper对象,然后将创建的Looper对象设置到TLS中。看Looper的构造函数:
    private Looper(boolean quitAllowed) {
        mQueue = new MessageQueue(quitAllowed);
        mThread = Thread.currentThread();
    }
创建一个MessageQueue对象,结合之前MessageQueue的构造函数,可以明白传入的布尔值参数代表的意义:true表示可以退出消息队列,false表示不可以退出。
2.loop
loop是Looper的核心方法,循环进行消息的处理和派发工作。
    public static void loop() {
        // 获取TLS的唯一looper对象
        final Looper me = myLooper();
        if (me == null) {
            throw new RuntimeException("No Looper; Looper.prepare() wasn't called on this thread.");
        }
        // 获取Looper中的消息队列
        final MessageQueue queue = me.mQueue;

        // Make sure the identity of this thread is that of the local process,
        // and keep track of what that identity token actually is.
        Binder.clearCallingIdentity();
        final long ident = Binder.clearCallingIdentity();

        // Allow overriding a threshold with a system prop. e.g.
        // adb shell 'setprop log.looper.1000.main.slow 1 && stop && start'
        final int thresholdOverride =
                SystemProperties.getInt("log.looper."
                        + Process.myUid() + "."
                        + Thread.currentThread().getName()
                        + ".slow", 0);

        boolean slowDeliveryDetected = false;

        // 无限循环
        for (;;) {
            // 获取一个待处理的消息,有可能会阻塞
            Message msg = queue.next(); // might block
            if (msg == null) {
                // No message indicates that the message queue is quitting.
                return;
            }

            // This must be in a local variable, in case a UI event sets the logger
            final Printer logging = me.mLogging;
            if (logging != null) {
                logging.println(">>>>> Dispatching to " + msg.target + " " +
                        msg.callback + ": " + msg.what);
            }
            // Make sure the observer won't change while processing a transaction.
            final Observer observer = sObserver;

            // 跟踪消息
            final long traceTag = me.mTraceTag;
            long slowDispatchThresholdMs = me.mSlowDispatchThresholdMs;
            long slowDeliveryThresholdMs = me.mSlowDeliveryThresholdMs;
            if (thresholdOverride > 0) {
                slowDispatchThresholdMs = thresholdOverride;
                slowDeliveryThresholdMs = thresholdOverride;
            }
            final boolean logSlowDelivery = (slowDeliveryThresholdMs > 0) && (msg.when > 0);
            final boolean logSlowDispatch = (slowDispatchThresholdMs > 0);

            final boolean needStartTime = logSlowDelivery || logSlowDispatch;
            final boolean needEndTime = logSlowDispatch;

            if (traceTag != 0 && Trace.isTagEnabled(traceTag)) {
                Trace.traceBegin(traceTag, msg.target.getTraceName(msg));
            }

            final long dispatchStart = needStartTime ? SystemClock.uptimeMillis() : 0;
            final long dispatchEnd;
            Object token = null;
            if (observer != null) {
                token = observer.messageDispatchStarting();
            }
            long origWorkSource = ThreadLocalWorkSource.setUid(msg.workSourceUid);
            // 处理消息的派发
            try {
                msg.target.dispatchMessage(msg);
                if (observer != null) {
                    observer.messageDispatched(token, msg);
                }
                dispatchEnd = needEndTime ? SystemClock.uptimeMillis() : 0;
            } catch (Exception exception) {
                if (observer != null) {
                    observer.dispatchingThrewException(token, msg, exception);
                }
                throw exception;
            } finally {
                ThreadLocalWorkSource.restore(origWorkSource);
                if (traceTag != 0) {
                    Trace.traceEnd(traceTag);
                }
            }
            if (logSlowDelivery) {
                if (slowDeliveryDetected) {
                    if ((dispatchStart - msg.when) <= 10) {
                        Slog.w(TAG, "Drained");
                        slowDeliveryDetected = false;
                    }
                } else {
                    if (showSlowLog(slowDeliveryThresholdMs, msg.when, dispatchStart, "delivery",
                            msg)) {
                        // Once we write a slow delivery log, suppress until the queue drains.
                        slowDeliveryDetected = true;
                    }
                }
            }
            if (logSlowDispatch) {
                showSlowLog(slowDispatchThresholdMs, dispatchStart, dispatchEnd, "dispatch", msg);
            }

            if (logging != null) {
                logging.println("<<<<< Finished to " + msg.target + " " + msg.callback);
            }

            // Make sure that during the course of dispatching the
            // identity of the thread wasn't corrupted.
            final long newIdent = Binder.clearCallingIdentity();
            if (ident != newIdent) {
                Log.wtf(TAG, "Thread identity changed from 0x"
                        + Long.toHexString(ident) + " to 0x"
                        + Long.toHexString(newIdent) + " while dispatching to "
                        + msg.target.getClass().getName() + " "
                        + msg.callback + " what=" + msg.what);
            }

            // 回收处理后的消息,将其放入消息对象池中复用
            msg.recycleUnchecked();
        }
    }
3.quit/quitSafely
退出。分别是正常退出和安全退出。
    public void quit() {
        mQueue.quit(false);
    }

    public void quitSafely() {
        mQueue.quit(true);
    }
在之前MessageQueue的quit()方法分析中已经说明:当传参safe为true的时候,删除以当前时间点为界限的未来所有消息;若为false,则删除所有消息。这就是quit和quitSafely的区别。
四.Handler
Handler类提供接口向消息池中发送消息,并提供相应消息的机制。我们一般的用法都是先new一个Handler出来,重载handleMessage方法,来对应的消息会触发并在这个方法中进行处理。我们需要的是在合适的时机调用sendMessage发送消息即可。
1.Handler构造函数
Handler的构造函数有好几个:
public Handler() {
public Handler(@Nullable Callback callback) {
public Handler(@NonNull Looper looper) {
public Handler(@NonNull Looper looper, @Nullable Callback callback) {
public Handler(boolean async) {
public Handler(@Nullable Callback callback, boolean async) {
public Handler(@NonNull Looper looper, @Nullable Callback callback, boolean async) {
最终的入口其实是如下两个:
    public Handler(@Nullable Callback callback, boolean async) {
        if (FIND_POTENTIAL_LEAKS) {
            final Class<? extends Handler> klass = getClass();
            if ((klass.isAnonymousClass() || klass.isMemberClass() || klass.isLocalClass()) &&
                    (klass.getModifiers() & Modifier.STATIC) == 0) {
                Log.w(TAG, "The following Handler class should be static or leaks might occur: " +
                    klass.getCanonicalName());
            }
        }

        // 赋值本线程的looper
        mLooper = Looper.myLooper();
        if (mLooper == null) {
            throw new RuntimeException(
                "Can't create handler inside thread " + Thread.currentThread()
                        + " that has not called Looper.prepare()");
        }
        mQueue = mLooper.mQueue;
        mCallback = callback;
        mAsynchronous = async;
    }

    @UnsupportedAppUsage
    public Handler(@NonNull Looper looper, @Nullable Callback callback, boolean async) {
        // handler要执行在哪个线程的looper上
        mLooper = looper;
        // 赋值该looper中的消息队列
        mQueue = looper.mQueue;
        // 消息的回调
        mCallback = callback;
        // 是否异步执行
        mAsynchronous = async;
    }
主要是根据传入的参数进行赋值。looper、callback、queue、async。
2.dispatchMessage
分发消息。源码如下:
    private static void handleCallback(Message message) {
        message.callback.run();
    }

    public void dispatchMessage(@NonNull Message msg) {
        // 1
        if (msg.callback != null) {
            handleCallback(msg);
        } else {
            // 2
            if (mCallback != null) {
                if (mCallback.handleMessage(msg)) {
                    return;
                }
            }
            // 3
            handleMessage(msg);
        }
    }
1.首先判断message的callback是否存在,如果存在,调用这个callback。这个callback是一个Runnable;
2.若不存在,判断之前构造函数中的被赋值的mCallback是否为空,不为空,调用mCallback的handleMessage方法;
3.如果也不存在,则调用自身的handleMessage
3.sendMessage
发送消息。源码如下:
    public final boolean sendMessage(@NonNull Message msg) {
        return sendMessageDelayed(msg, 0);
    }
看sendMessageDelayed方法实现:
    public final boolean sendMessageDelayed(@NonNull Message msg, long delayMillis) {
        if (delayMillis < 0) {
            delayMillis = 0;
        }
        return sendMessageAtTime(msg, SystemClock.uptimeMillis() + delayMillis);
    }
调用的是sendMessageAtTime方法:
    public boolean sendMessageAtTime(@NonNull Message msg, long uptimeMillis) {
        MessageQueue queue = mQueue;
        if (queue == null) {
            RuntimeException e = new RuntimeException(
                    this + " sendMessageAtTime() called with no mQueue");
            Log.w("Looper", e.getMessage(), e);
            return false;
        }
        return enqueueMessage(queue, msg, uptimeMillis);
    }
如果消息队列不为空,则返回调用enqueueMessage:
    private boolean enqueueMessage(@NonNull MessageQueue queue, @NonNull Message msg,
            long uptimeMillis) {
        msg.target = this;
        msg.workSourceUid = ThreadLocalWorkSource.getUid();

        if (mAsynchronous) {
            msg.setAsynchronous(true);
        }
        return queue.enqueueMessage(msg, uptimeMillis);
    }
最终走到MessageQueue的enqueueMessage方法中。
4.post
也是发送消息的方式,看源码:
    public final boolean post(@NonNull Runnable r) {
       return  sendMessageDelayed(getPostMessage(r), 0);
    }
调用到sendMessageDelayed,之后的流程和sendMessage方法一致,最终也是走到MessageQueue的enqueueMessage方法中。
五.总结
他们之间的关系就是Looper使用MessageQueue提供机制,Handler提供调用接口和回调处理,Message作为载体数据传递。


 被折叠的 条评论
为什么被折叠?
被折叠的 条评论
为什么被折叠?
 到【灌水乐园】发言


