


目录
2.5配置和运行带有 URI 统计信息的 Pinpoint Collector 和 Web
一、安装前准备
1.1 官方安装说明:
https://pinpoint-apm.gitbook.io/pinpoint/documents/uri_statistics
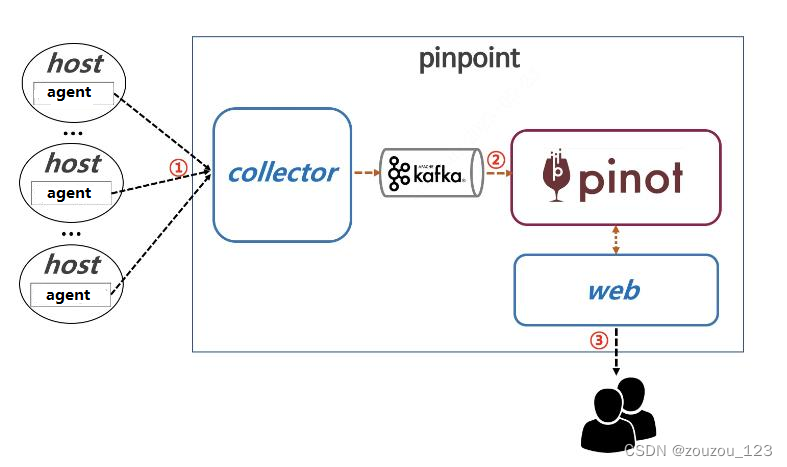
URI 统计菜单是 Pinpoint v2.5.0 中新增的功能。Pinpoint 代理聚合 URI 模板,并通过 GRPC 发送它们到 Pinpoint 收集器。Pinpoint 收集器将数据通过 Apache Kafka 保存到 Pinot 中,而 Pinpoint Web 则访问 Pinot 显示数据
架构图:
1.2 常规的pinpoint2.5.1安装步骤可参考(部署包换成2.5.1),描述的很详细:
https://blog.youkuaiyun.com/jianghaijun552683/article/details/129814933
二、安装和配置
2.1 安装ZK和KAFKA
ZK版本:apache-zookeeper-3.7.1
KAFKA版本: kafka_2.13-3.4.0
ZK和KAFKA的安装步骤网上有很多,单实例的安装步骤可参考下面(建议生产环境安装集群):
https://blog.youkuaiyun.com/Loiterer_Y/article/details/104496841
2.2 创建 Kafka 主题
使用名称 uri-stat 创建一个主题(在kafka服务器)。
bin/kafka-topics.sh --create --topic uri-stat --bootstrap-server localhost:9092验证KAFKA:
bin/kafka-console-consumer.sh --topic uri-stat --from-beginning --bootstrap-server localhost:9092
bin/kafka-console-producer.sh --topic uri-stat --bootstrap-server localhost:9092
2.3安装pinot(local安装)
官方文档:
https://docs.pinot.apache.org/basics/getting-started/running-pinot-locally
先决条件
安装JDK11或更高版本(不支持JDK16)。
1)下载pinot
https://downloads.apache.org/pinot/apache-pinot-0.12.1/apache-pinot-0.12.1-bin.tar.gz
2)解压下载的压缩包
tar -xzvf apache-pinot-0.12.1-bin.tar.gz
3)手动设置集群
在部署Pinot服务时,最好按照顺序进行启动,避免其他问题。
顺序如下:
a) pinot-controller
b) pinot-broker
c) pinot-server
d) pinot-minion
注意事项:如果本机有多个JDK,可在start-XXX.sh 文件需添加下面配置进行启动:
export JAVA_HOME=/opt/pinot/jdk-11.0.0.1
export CLASSPATH=.:$JAVA_HOME/lib/dt.jar:$JAVA_HOME/lib/tools.jar
启动命令参考:
controllerIP,brokerIP,serverIP,ZKIP需更换成自己的服务器IP,端口也可以换成其他
启动controller
nohup ./start-controller.sh -clusterName uriPinotCluster -controllerHost controllerIP -controllerPort 9000 -dataDir /opt/pinot/apache-pinot-0.12.1-bin/data/PinotController -zkAddress ZKIP:2181 >/opt/pinot/apache-pinot-0.12.1-bin/logs/controller.log 2>&1 &启动broker
nohup ./start-broker.sh -clusterName uriPinotCluster -brokerHost brokerIP -brokerPort 8099 -zkAddress ZKIP:2181 >/opt/pinot/apache-pinot-0.12.1-bin/logs/broker.log 2>&1 &启动server
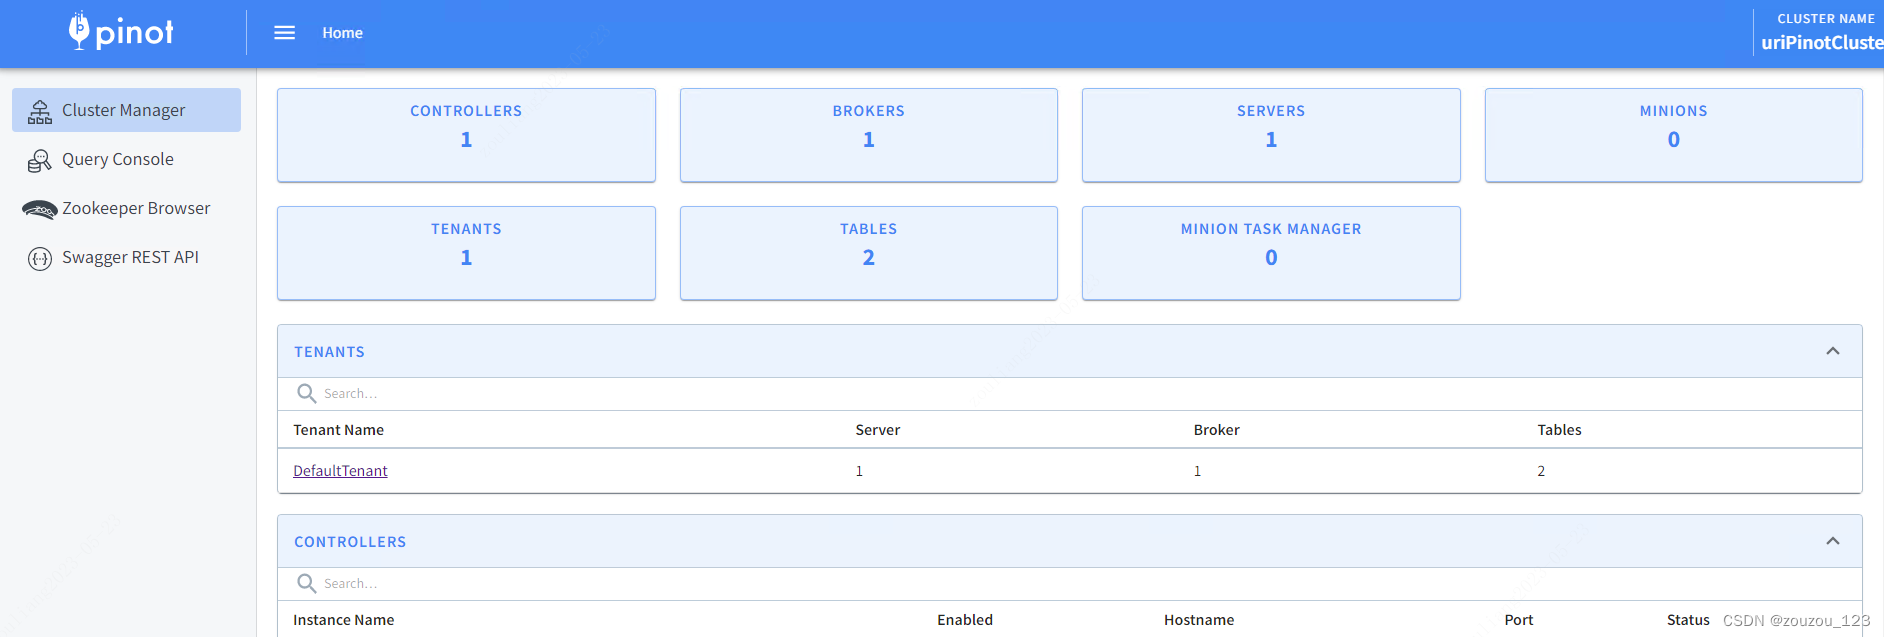
nohup ./start-server.sh -clusterName uriPinotCluster -serverHost serverIP -serverPort 7000 -serverAdminPort 7500 -dataDir /opt/pinot/apache-pinot-0.12.1-bin/data/PinotServerData -segmentDir /opt/pinot/apache-pinot-0.12.1-bin/data/PinotServerSegment -zkAddress ZKIP:2181 >/opt/pinot/apache-pinot-0.12.1-bin/logs/server.log 2>&1 &启动完成后可以登录到controller页面:http://controllerip:9000 进行查看,默认会创建“DefaultTenant”
2.4创建 Pinot 表
Pinpoint URI 统计的 Pinot 表json文件提供在 github 存储库中:
https://github.com/pinpoint-apm/pinpoint/tree/master/uristat/uristat-common/src/main/pinot
参考 Pinot 文档创建您 Pinot 集群中所需的表。
https://docs.pinot.apache.org/basics/components/table#streaming-table-creation
需要创建 uriStat 混合表,即创建 REALTIME 和 OFFLINE 两个表。
创建混合表命令参考:
1)创建offline表
cd /opt/pinot/apache-pinot-0.12.1-bin

bin/pinot-admin.sh AddTable \

    -schemaFile /opt/pinot/creat_table/pinot-uriStat-schema.json \

    -tableConfigFile /opt/pinot/creat_table/pinot-uriStat-offline-table.json \

    -exec
2)创建realtime表
cd /opt/pinot/creat_table

curl -i -X POST -H 'Content-Type: application/json' \

    -d @pinot-uriStat-realtime-table.json localhost:9000/tables
2.5配置和运行带有 URI 统计信息的 Pinpoint Collector 和 Web
说明:带有URI指标的Pinpoint web和collector的JAR包需要自己进行编译
编译步骤:
1)下载2.5.1版本的包到本地
git clone --branch v2.5.1 https://github.com/pinpoint-apm/pinpoint.git
2)修改构建项目模块的顺序(模块太多了):
修改文件:pinpoint/pom.xml,将pinot和metric-module模块放置到最前面进行构建,把需要的构建完成了就可以停止,否则全部构建完成需要比较长的时间。
<modules>

        <module>pinot</module>

        <module>metric-module</module>

        <module>annotations</module>

        <module>agent</module>

        <module>agent-sdk</module>
......
3)执行项目构建
cd pinpoint

./mvnw install -DskipTests=true
如果构建项目时提示JDK版本异常,则可以执行:
export JAVA_11_HOME=/home/pinpoint-2.5.1/jdk-11.0.0.1
export JAVA_8_HOME=/hlapp/jdk1.8.0_311
4)搭载系统指标的Collector目录
pinpoint/metric-module/collector-starter/target/deploy/pinpoint-collector-starter-boot-2.5.1.jar
5)搭载系统指标的Web目录
pinpoint/metric-module/web-starter/target/deploy/pinpoint-web-starter-boot-2.5.1.jar
将原来运行的collector和web程序关闭,使用这两个新构建的jar包进行启动
6)collector 和web的配置
在官方的按照说明里面有很多相关的配置说明,这里就不逐个说明,参考配置项如下:
web.properties
spring.profiles.active=release
#hbase的zk地址
pinpoint.zookeeper.address=localhost
cluster.zookeeper.sessiontimeout=10000#配置连接pinot,需替换IP,默认未开启用户认证
pinpoint.pinot.jdbc.url=jdbc:pinot://pinot-IP:9000
pinpoint.pinot.jdbc.username=userId
pinpoint.pinot.jdbc.password=password#配置web页面显示,如果想加入systemmetric,可看官方文档
config.show.systemMetric=false
config.show.urlStat=true
#配置tenantid
pinpoint.pinot.tenantId=DefaultTenant
collector.properties
spring.profiles.active=release
pinpoint.zookeeper.address=localhost#配置连接pinot,需替换IP,默认未开启用户认证
pinpoint.pinot.jdbc.url=jdbc:pinot://pinot-IP:9000(需替换IP)
pinpoint.pinot.jdbc.username=userId
pinpoint.pinot.jdbc.password=password
pinpoint.metric.kafka.bootstrap.servers=KAFKA-IP:9092(需替换IP)pinpoint.collector.type=ALL
collector.stat.uri=true
kafka.uri.topic=uri-stat
pinpoint.pinot.tenantId=DefaultTenant
在启动web服务和collector服务的时候需要分别引用这两个配置文件
2.6 agent的URI 统计的配置值
以下是 URI 统计的默认代理配置值。
###########################################################
# URI Stat
###########################################################
profiler.uri.stat.enable=true
profiler.uri.stat.spring.webmvc.enable=true
profiler.uri.stat.spring.webmvc.useuserinput=false
profiler.uri.stat.spring.webflux.enable=true
profiler.uri.stat.spring.webflux.useuserinput=false
profiler.uri.stat.vertx.enable=true
profiler.uri.stat.vertx.useuserinput=false
如果需要更改这些配置,需要重新构建agent的项目,或者启动agent的时候自定义配置文件,如果没有特殊的需求可保持默认设置。
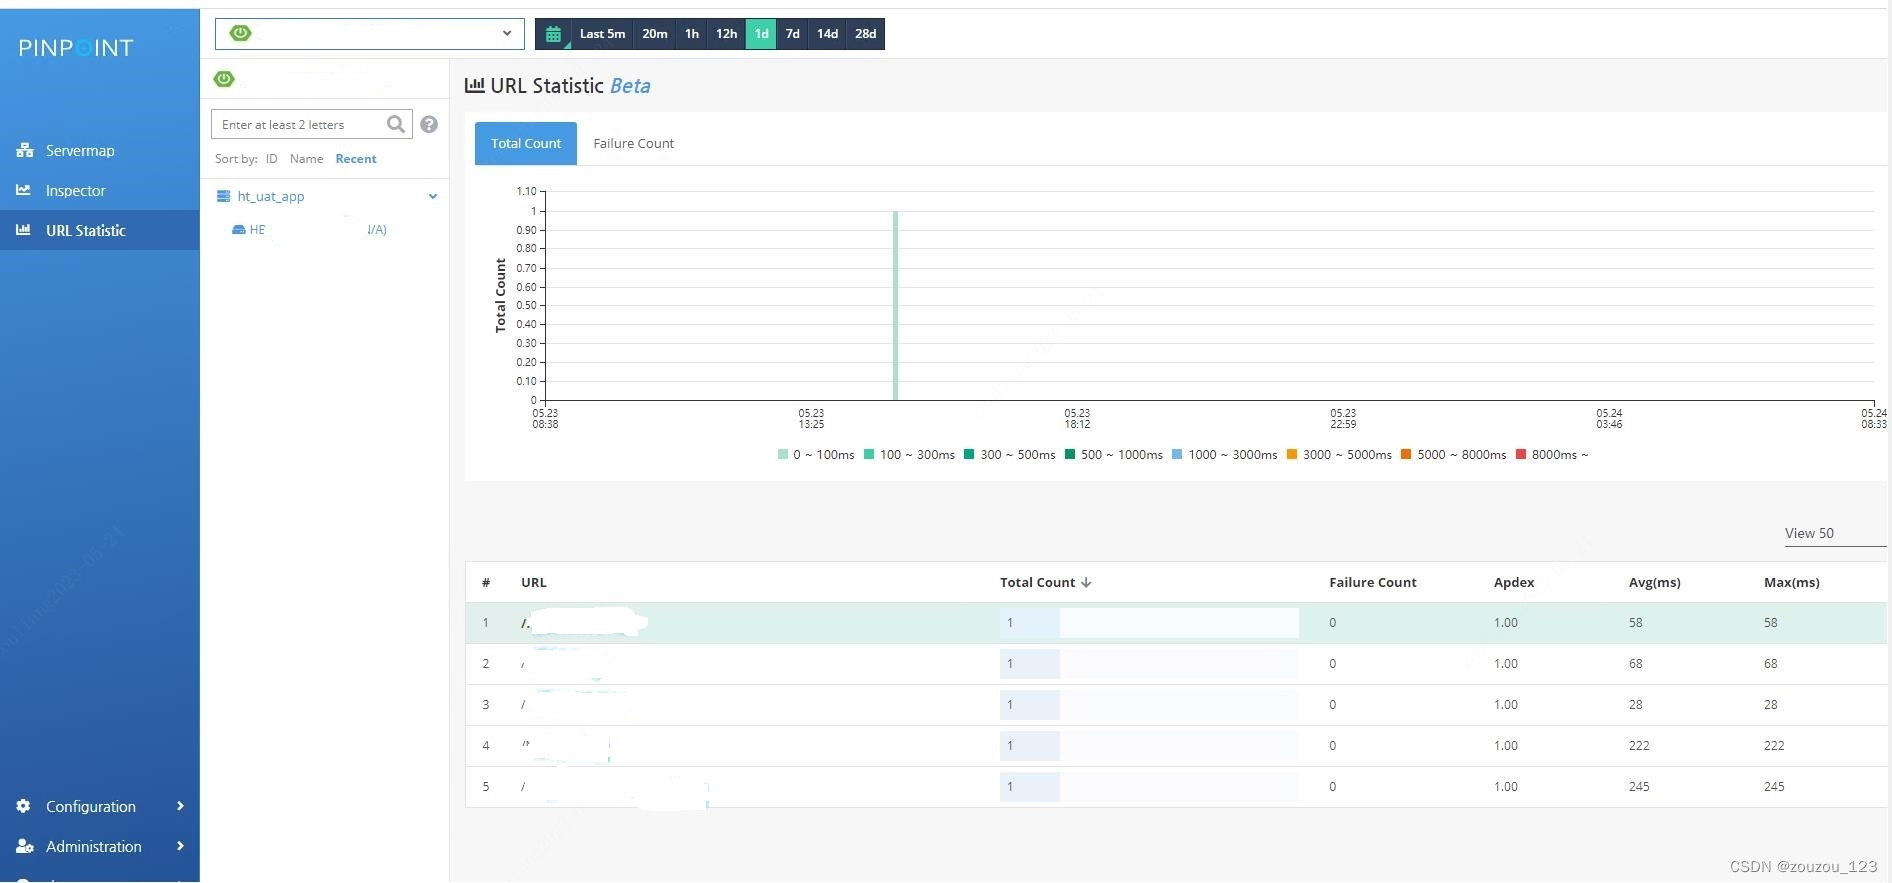
都安装完成后,可以在pinpoint的web页面查看url Statistic的统计


 474
474

 被折叠的 条评论
为什么被折叠?
被折叠的 条评论
为什么被折叠?
 到【灌水乐园】发言


