


 本文介绍了如何从零开始手写Spring框架,包括创建自定义注解(@Target和@Retention),配置类(MyConfiguration和MyComponentScan)以及Spring容器的实现,重点在于注解的使用和类扫描机制。
目录
前言
在看大佬的博客的时候被大佬的能力深深折服,想尝试着和大佬一样手写一个Spring框架,记录手写框架过程。每写一个步骤我都会将我不懂的地方进行解释。
根据Spring框架我们需要创建出一个Spring容器,一个SpringConfig配置类来代替xml文件。以及一些必要的注解。
创建自定义注解
观察Spring框架中的注解,对元注解@Target与@Retention进行解释
@Target该注解说明了自定义的Annotation修饰的对象范围:Annotation可被用于 packages、types(类、接口、枚举、Annotation类型)、类型成员(方法、构造方法、成员变量、枚举值)、方法参数和本地变量(如循环变量、catch参数)。
@Retention该注解作用是设置Annotation的保留时间。一共有三种策略。SOURCE(被编译器忽略)、CLASS(被保存在Class文件中,但在运行时不会被JVM保留,这是默认值)、RUNTIME(被保留在程序运行,可以通过反射获取到该注解)
了解过元注解后,接下来创建Spring框架中常见的注解如下
- @Component:会被Spring当作Bean进行扫描加载
- @Service:Component的派生注解,添加在Service的实现类上
- @Controller:Component的派生注解,添加在Controller类上
- @Repository:Component的派生注解,添加在Dao实现类上
- @Configuration:用来标记配置类,在启动时会被扫描
- @ComponentScan:指定需要扫描的包
但是暂时我们先不需要定义那么多衍生注解,只定义如下注解即可
@Target(ElementType.TYPE)
@Retention(RetentionPolicy.RUNTIME)
public @interface MyComponent {
    String value() default  "";
}
@Target(ElementType.TYPE)
@Retention(RetentionPolicy.RUNTIME)
public @interface MyConfiguration {
String value() default "";
}@Target(ElementType.TYPE)
@Retention(RetentionPolicy.RUNTIME)
public @interface MyComponentScan {
String[] value() default "";
}
创建配置类
创建出MySpringConfig配置类来代替xml文件,并添加扫描包注解。
@MyConfiguration
@MyComponentScan("com.zmt")
public class MySpringConfig {
}
创建Spirng容器
接下来创建出SpringApplicationContext容器,只添加必要的属性,实现包扫描即可
public class SpringApplicationContext {
    //要传入的配置类
    private Class<?> configClass;
    //单例对象池,创建出的bean对线均存放在该Map集合中,方便自动装配时获取
    private final ConcurrentHashMap<String, Object> singletonObjects;

    {
        //容器被创建时进行初始化
        singletonObjects = new ConcurrentHashMap<>();
    }
}
接下来分析在Spring容器在启动时,会进行哪些操作。首先是根据配置类上的扫描注解去扫描指定包下的所有类,然后去将所有的bean对象加载到单例池中。那么我们定义一个init()方法去做这些事情
在扫描包路径时,去查看Spring是如何实现的

通过遍历注解中的包路径逐个扫描添加有注解的bean对象。那么我们模仿原生Spring的实现方式。
    private void init() throws Exception {
        //判断该类是否是配置类
        MyConfiguration configuration = configClass.getAnnotation(MyConfiguration.class);
        if (configuration == null) {
            //说明不是配置类
            throw new RuntimeException("该类不是配置类,目前只支持传入配置类");
        }
        //如果是配置类,那么获取需要扫描的类路径
        MyComponentScan scan = configClass.getAnnotation(MyComponentScan.class);
        if (scan == null) {
            throw new RuntimeException("不存在扫描注解");
        }
        String[] paths = scan.value();
        //遍历需要扫描的路径
        for (String path : paths) {
            path = URLDecoder.decode(path, "UTF-8");
            //path这里还有作用,因此不建议将path接收replace的结果
            // com/zmt
            String newPath = path.replace(".", "/");
            //获取根路径,并去除最前面的/
            String classPath = configClass.getResource("/").getPath().substring(1);
            classPath = URLDecoder.decode(classPath,"UTF-8");
            System.out.println("classPath:"+classPath);


            //获取被扫描包的绝对路径
            String absolutePath = configClass.getResource("/" + newPath).getPath();
            absolutePath = URLDecoder.decode(absolutePath, "UTF-8");
            System.out.println(absolutePath);

            //遍历绝对路径的子包,寻找.class结尾的文件
            File rootFile = new File(absolutePath);
            if (rootFile.isFile()) {
                throw new RuntimeException("不支持扫描具体类");
            }
            //说明指定路径是一个文件夹
            //获取所有的类名称
            List<String> listClass = dirFile(rootFile);
            for (String absoluteClassPath : listClass) {
                //完整类名,通过Class.forName()创建出该类
                String fullClassName = absoluteClassPath.replace(classPath, "").replace("/",".");
                //加载出该类
//                Class<?> aClass = Class.forName(fullClassName);
                ClassLoader classLoader = configClass.getClassLoader();
                Class<?> aClass = classLoader.loadClass(fullClassName);
                MyComponent myComponent = aClass.getAnnotation(MyComponent.class);
                if (myComponent==null){
                    //该类不应该被加载
                    continue;
                }
                loadSingletonObjects(fullClassName, aClass, myComponent);
            }

        }
    }
首先是要对指定的配置类进行判断是否添加了@Configuration与@ComponentScan注解,其次我们要扫描指定包下的所有文件,为了实现遍历所有文件,我使用了递归的方法获取所有class文件的绝对路径。这两个方法的具体实现为
    /**
     * 遍历文件夹,获取所有类绝对路径集合
     * @param rootFile
     * @return
     */
    private List<String> dirFile(File rootFile) {
        List<String> fileList = new ArrayList<>();
        if (rootFile.isDirectory()) {
            File[] files = rootFile.listFiles();
            for (File file : files) {
                fileList.addAll(dirFile(file));
            }
        } else {
            //走到这说明已经不是文件夹了
            String filePath = rootFile.getPath();
            if (filePath.endsWith(".class")) {
                //类的绝对路径
                String classPath = filePath.replace("\\", "/").replace(".class","");
                System.out.println(classPath);
                fileList.add(classPath);
            }
        }
        return fileList;
    }
获取了全部的class文件后,我们再去遍历全路径去判断哪些类上添加了bean注解,对需要被加载到单例池的对象,需要进一步处理,loadSingletonObjects方法如下
    private void loadSingletonObjects(String fullClassName, Class<?> aClass, MyComponent myComponent) throws InstantiationException, IllegalAccessException {
        //创建对象,加载到单例池中
        Object o = aClass.newInstance();
        //如果注解中没有没有给定值,那么采用类名首字母小写的方式
        String beanName = myComponent.value();
        if ("".equals(beanName)){
            System.out.println(o+"没有指定bean名称");
        }
        String className = fullClassName.substring(fullClassName.lastIndexOf(".") + 1);
        beanName = className.substring(0, 1).toLowerCase() + className.substring(1);
        singletonObjects.put(beanName,o);
    }
提供最基本的getBean方法用于测试
    public Object getBean(String beanName){
        Object o = this.singletonObjects.get(beanName);
        if (o==null){
            throw new RuntimeException("不存在bean为:"+beanName);
        }
        return o;
    }
至此,Spring容器创建完成,接下来是SpringApplicaitonContext的完整代码
public class SpringApplication {
    //配置类属性
    private Class<?> configClass;
    //单例池
    private ConcurrentHashMap<String, Object> singletonObjects;

    //每创建一个容器都会有各自的单例池
    {
        singletonObjects = new ConcurrentHashMap<>(256);
    }

    public SpringApplication(Class<?> configClass) throws Exception {
        this.configClass = configClass;
        this.init();
    }

    private void init() throws Exception {
        //判断该类是否是配置类
        MyConfiguration configuration = configClass.getAnnotation(MyConfiguration.class);
        if (configuration == null) {
            //说明不是配置类
            throw new RuntimeException("该类不是配置类,目前只支持传入配置类");
        }
        //如果是配置类,那么获取需要扫描的类路径
        MyComponentScan scan = configClass.getAnnotation(MyComponentScan.class);
        if (scan == null) {
            throw new RuntimeException("不存在扫描注解");
        }
        String[] paths = scan.value();
        //遍历需要扫描的路径
        for (String path : paths) {
            path = URLDecoder.decode(path, "UTF-8");
            //path这里还有作用,因此不建议将path接收replace的结果
            // com/zmt
            String newPath = path.replace(".", "/");
            //获取根路径,并去除最前面的/
            String classPath = configClass.getResource("/").getPath().substring(1);
            classPath = URLDecoder.decode(classPath,"UTF-8");
            System.out.println("classPath:"+classPath);

            //获取被扫描包的绝对路径
            String absolutePath = configClass.getResource("/" + newPath).getPath();
            absolutePath = URLDecoder.decode(absolutePath, "UTF-8");
            System.out.println(absolutePath);

            //遍历绝对路径的子包,寻找.class结尾的文件
            File rootFile = new File(absolutePath);
            if (rootFile.isFile()) {
                throw new RuntimeException("不支持扫描具体类");
            }
            //说明指定路径是一个文件夹
            //获取所有的类名称
            List<String> listClass = dirFile(rootFile);
            for (String absoluteClassPath : listClass) {
                //完整类名,通过Class.forName()创建出该类
                String fullClassName = absoluteClassPath.replace(classPath, "").replace("/",".");
                //加载出该类
//                Class<?> aClass = Class.forName(fullClassName);
                ClassLoader classLoader = configClass.getClassLoader();
                Class<?> aClass = classLoader.loadClass(fullClassName);
                MyComponent myComponent = aClass.getAnnotation(MyComponent.class);
                if (myComponent==null){
                    //该类不应该被加载
                    continue;
                }
                loadSingletonObjects(fullClassName, aClass, myComponent);
            }

        }
    }

    private void loadSingletonObjects(String fullClassName, Class<?> aClass, MyComponent myComponent) throws InstantiationException, IllegalAccessException {
        //创建对象,加载到单例池中
        Object o = aClass.newInstance();
        //如果注解中没有没有给定值,那么采用类名首字母小写的方式
        String beanName = myComponent.value();
        if ("".equals(beanName)){
            System.out.println(o+"没有指定bean名称");
        }
        String className = fullClassName.substring(fullClassName.lastIndexOf(".") + 1);
        beanName = className.substring(0, 1).toLowerCase() + className.substring(1);
        singletonObjects.put(beanName,o);
    }

    /**
     * 遍历文件夹,获取所有类绝对路径集合
     * @param rootFile
     * @return
     */
    private List<String> dirFile(File rootFile) {
        List<String> fileList = new ArrayList<>();
        if (rootFile.isDirectory()) {
            File[] files = rootFile.listFiles();
            for (File file : files) {
                fileList.addAll(dirFile(file));
            }
        } else {
            //走到这说明已经不是文件夹了
            String filePath = rootFile.getPath();
            if (filePath.endsWith(".class")) {
                //类的绝对路径
                String classPath = filePath.replace("\\", "/").replace(".class","");
                System.out.println(classPath);
                fileList.add(classPath);
            }
        }
        return fileList;
    }

    public Object getBean(String beanName){
        Object o = this.singletonObjects.get(beanName);
        if (o==null){
            throw new RuntimeException("不存在bean为:"+beanName);
        }
        return o;
    }
}
测试
接下来进行测试看能否成功将添加了注解的类加载到单例池中
public class SpringStart {
    public static void main(String[] args) throws Exception {
        SpringApplication springApplication = new SpringApplication(SpringConfig.class);
        UserController userController = (UserController) springApplication.getBean("userController");
        System.out.println(userController);
    }
}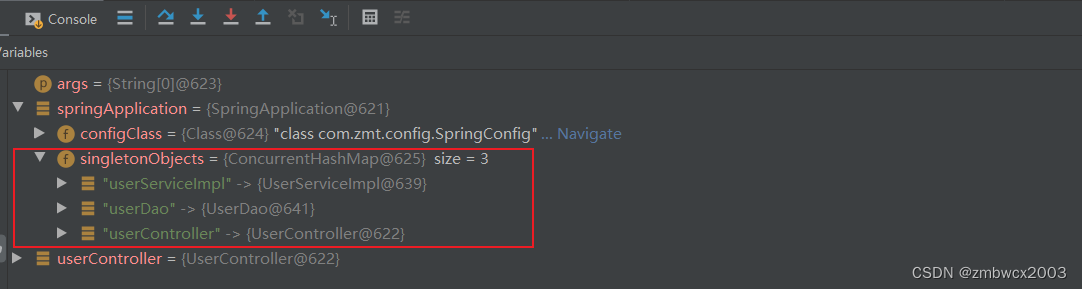
亲测可以进行多个包扫描也可以自定义bean名称。 那么我们的第一个功能就实现结束了,接下来我们需要完善我们的Spring,接下来是实现封装BeanDefinitionMap。
问题
这里最大的问题就是对文件如何进行处理,以及类名的如何获取,以及格式处理,需要注意的是,路径中存在中文的一定要对其进行编码格式转换,对于类路径获取存在疑惑的,可以去观看我的另一篇博客getResource()方法的使用以及路径问题-优快云博客


 973
973

 被折叠的 条评论
为什么被折叠?
被折叠的 条评论
为什么被折叠?
 到【灌水乐园】发言


