


QPushButton,QToolButton的区别
QToolButton 类提供了一个快速访问按钮的命令或选项, 通常在 qtoolbar 中使用。有个关联action,还可以设置快捷键;
QToolButton是一个特殊的Button, 提供快速访问特定的命令或选项。与普通命令按钮不同, QToolButton通常不显示文本标签, 而是显示图标。
QPushButton是常用按钮,一般可以提供文字,图标都在按钮上。可以设置一定的界面风格等。
QPushButton简单使用及窗口简单设置
创建按钮控件:
QPushButton() 创建一个无父控件的按钮控件
QPushButton(parent) 创建控件的同时, 设置父控件
QPushButton(text, parent) 创建控件的同时, 设置提示文本和父控件
QPushButton(icon, text, parent) 创建控件的同时, 设置图标, 提示文本和父控件
QtGuiApplication2.cpp
#include "QtGuiApplication2.h"
#include <qpushbutton.h>
//加上这三句可解决中文乱码,但是不可以和QString::fromLocal8Bit或QStringLiteral同时使用
#if _MSC_VER >= 1600
#pragma execution_character_set("utf-8")
#endif
QtGuiApplication2::QtGuiApplication2(QWidget *parent)
: QMainWindow(parent)
{
ui.setupUi(this);
//按钮
QPushButton *pb = new QPushButton;
// //pb->show(); //用顶层方式弹出 如果想在MyWidget窗口
//中显示,就需要依赖MyWidget窗口
//设置在基类中显示
pb->setParent(this);
pb->move(100, 150);
pb->resize(100, 50);
//设置文本
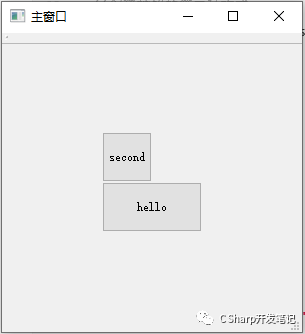
pb->setText("hello"); //将char *隐式类型转为QString
//创建按钮的第二种方式
QPushButton *btn2 = new QPushButton("second", this);
//窗口会按照btn2大小进行显示
//重置窗口大小
this->resize(300, 300);
//移动第二个按钮
btn2->move(100, 100);
//按钮重置大小
btn2->resize(50, 50);
//重置窗口标题
this->setWindowTitle("主窗口");
//设置固定窗口大小
//this->setFixedSize(600,600);
}运行结果:
label:
在QtGuiApplication2.cpp
#include <qlabel.h>
QLabel *label1 = new QLabel("test123", this);
  //label1->move(100,100);
  label1->setGeometry(50, 70, 160, 30);
在main.cpp 可以这样
QLabel label1("test123", &w);
label1.setGeometry(50, 70, 160, 30);
QT QLabelde 使用技巧总结:
https://www.cnblogs.com/wanghuixi/p/9521717.html
QLabel是Qt自带的一个显示用控件,可以用来显示图片和文本。其使用也非常方便:用setPixmap(const QPixmap &)接口来设置要显示的图片,用setText(const QString &)接口来设置要显示的文本。然而在使用过程中,我发现QLabel的setPixmap(const QPixmap &)和setText(const QString &)是互斥的,即两个同时设置时,只有一个生效(最后设置的那个生效)。
示例代码及现象如下:
QLabel *m_pLblPixmap = new QLabel("This is pixmap",this);
  m_pLblPixmap->resize(50, 50);
  m_pLblPixmap->move(0, 0);
  m_pLblPixmap->setAlignment(Qt::AlignCenter);
  m_pLblPixmap->setScaledContents(true);
  //我这边两个接口都调用,但是最后调用的setPixmap覆盖了setText
  m_pLblPixmap->setPixmap(QPixmap("icon32/timg.jpg"));
  //相当于 QPixmap pixmap(":/icon32/stop.png"); m_pLblPixmap->setPixmap(pixmap);
我的环境是vs2017 + q5.13
"icon32/timg.jpg"
这个路径写成
1. ":/icon32/timg.jpg" 或"/icon32/timg.jpg"都不能 正常显示图片
或者也可以用绝对路径
2. 其次
要被显示的图片路径含有中文,用户没有对中文进行转换的话也不能正常显示
3. 引入了paintEvent函数,引入该函数我们就没法再通过setPixmap函数显示图片了,我们只能通过QPainter显示图片了。
QPixmap(const QString &filename, const char *format = 0, Qt::ImageConversionFlags flags = Qt::AutoColor);其各个参数的含义解释如下。
1) filename:文件名。
2) format:字符串,表示图像文件的格式,如果为 0,将进行自动识别。
3) flags:表示颜色的转换模式。
如果图像文件加载失败则产生空图像,这里 flags 参数有以下取值。
1) Qt::AutoColor:由系统自动决定。
2) Qt::ColorOnly:彩色模式。
3) Qt::MonoOnly:单色模式。
详见
https://blog.youkuaiyun.com/u014552102/article/details/89608279
checkBox
ui.checkBox->setChecked(true);
ui.lineEdit->setText("123456");
if (ui.checkBox->isChecked())
{
ui.lineEdit->setEchoMode(QLineEdit::Password);
}
else
{
ui.lineEdit->setEchoMode(QLineEdit::Normal);
}


 被折叠的 条评论
为什么被折叠?
被折叠的 条评论
为什么被折叠?
 到【灌水乐园】发言


