


 本文详细介绍了Spring AOP的两种实现方式:基于Schema-based的实现和基于AspectJ的实现。在Schema-based方式中,讨论了前置、后置、环绕和异常处理四种通知类型的实现步骤及XML配置。而在AspectJ方式中,不仅包含相同的四种通知类型,还额外介绍了最终通知,并通过注解和XML配置展示了其简洁性和灵活性。
基于Schema-based方式实现
前置通知
创建一个接口
package com.zhouym.schema_based;

public interface ServiceBean {
	String doSome();
	String say();
}
创建目标实现类
package com.zhouym.schema_based;
public class ServiceBeanImpl implements ServiceBean {
@Override
public String doSome() {
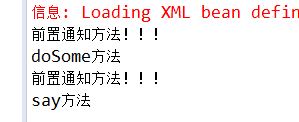
System.out.println("doSome方法");
return "hello";
}
@Override
public String say() {
System.out.println("say方法");
return null;
}
}
创建切面类
package com.zhouym.schema_based;

import java.lang.reflect.Method;

import org.springframework.aop.MethodBeforeAdvice;
//定义一个切面类实现前置通知类
public class MyMethodBeforeAdvice implements MethodBeforeAdvice{

	@Override
	public void before(Method method, Object[] args, Object target) throws Throwable {
		System.out.println("前置通知方法!!!");

	}

}
xml文件配置,需导入aop的jar包
<?xml version="1.0" encoding="UTF-8"?>
<beans xmlns="http://www.springframework.org/schema/beans"
xmlns:xsi="http://www.w3.org/2001/XMLSchema-instance"
xmlns:p="http://www.springframework.org/schema/p"
xmlns:context="http://www.springframework.org/schema/context"
xmlns:aop="http://www.springframework.org/schema/aop"
xsi:schemaLocation="http://www.springframework.org/schema/beans
http://www.springframework.org/schema/beans/spring-beans.xsd
http://www.springframework.org/schema/context
http://www.springframework.org/schema/context/spring-context-4.3.xsd
http://www.springframework.org/schema/aop
http://www.springframework.org/schema/aop/spring-aop-4.3.xsd">
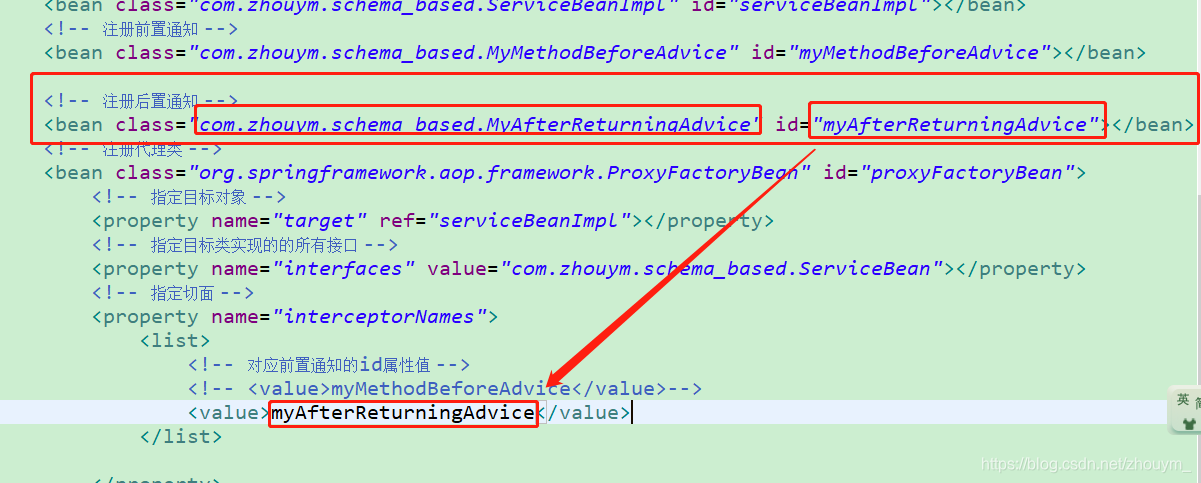
<!-- 注册目标类 -->
<bean class="com.zhouym.schema_based.ServiceBeanImpl" id="serviceBeanImpl"></bean>
<!-- 注册前置通知 -->
<bean class="com.zhouym.schema_based.MyMethodBeforeAdvice" id="myMethodBeforeAdvice"></bean>
<!-- 注册代理类 这里引入的classpath是ProxyFactoryBean,不要引入ProxyFactory,否则会create error bean -->
<bean class="org.springframework.aop.framework.ProxyFactoryBean" id="proxyFactoryBean">
<!-- 指定目标对象 -->
<property name="target" ref="serviceBeanImpl"></property>
<!-- 指定目标类实现的的所有接口 -->
<property name="interfaces" value="com.zhouym.schema_based.ServiceBean"></property>
<!-- 指定切面 -->
<property name="interceptorNames">
<list>
<!-- 对应前置通知的id属性值 -->
<value>myMethodBeforeAdvice</value>
</list>
</property>
</bean>
</beans>
测试类
package com.zhouym.JunitTest;
import org.junit.Test;
import org.springframework.context.ApplicationContext;
import org.springframework.context.support.ClassPathXmlApplicationContext;
import com.zhouym.schema_based.ServiceBean;
public class Schema_Based_Test {
@Test
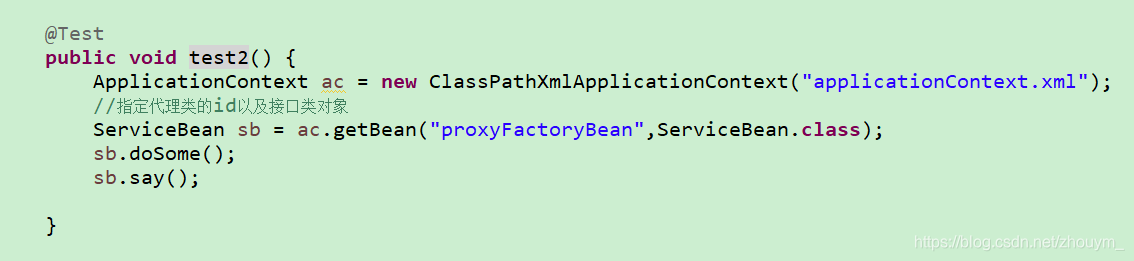
public void test() {
ApplicationContext ac = new ClassPathXmlApplicationContext("applicationContext.xml");
//指定代理类的id以及接口类对象
ServiceBean sb = ac.getBean("proxyFactoryBean",ServiceBean.class);
sb.doSome();
sb.say();
}
}
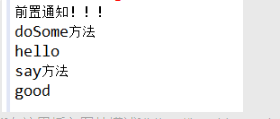
测试结果
后置通知
接口,以及实现类跟前置通知的一样,后置通知我们需要实现AfterReturningAdvice接口
package com.zhouym.schema_based;

import java.lang.reflect.Method;

import org.springframework.aop.AfterReturningAdvice;

public class MyAfterReturningAdvice implements AfterReturningAdvice {

	@Override
	public void afterReturning(Object returnValue, Method method, Object[] args, Object target) throws Throwable {
		System.out.println("后置通知方法");

	}

}
xml配置文件
测试类
测试结果
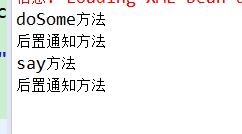
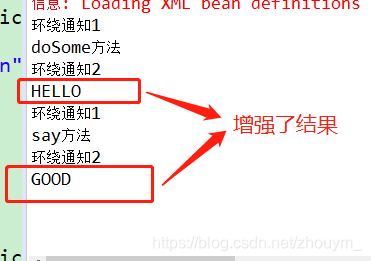
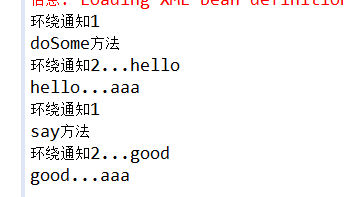
环绕通知
接口和实现类跟上面的一样,实现MethodReturningAdvice接口
package com.zhouym.schema_based;

import org.aopalliance.intercept.MethodInterceptor;
import org.aopalliance.intercept.MethodInvocation;

public class MyMethodInterceptor implements MethodInterceptor {

	@Override
	public Object invoke(MethodInvocation invocation) throws Throwable {
		System.out.println("环绕通知1");
		Object object = invocation.proceed();
		if (object != null) {
			object = ((String)object).toUpperCase();
		}
		System.out.println("环绕通知2");
		return object;
	}

}
xml文件配置
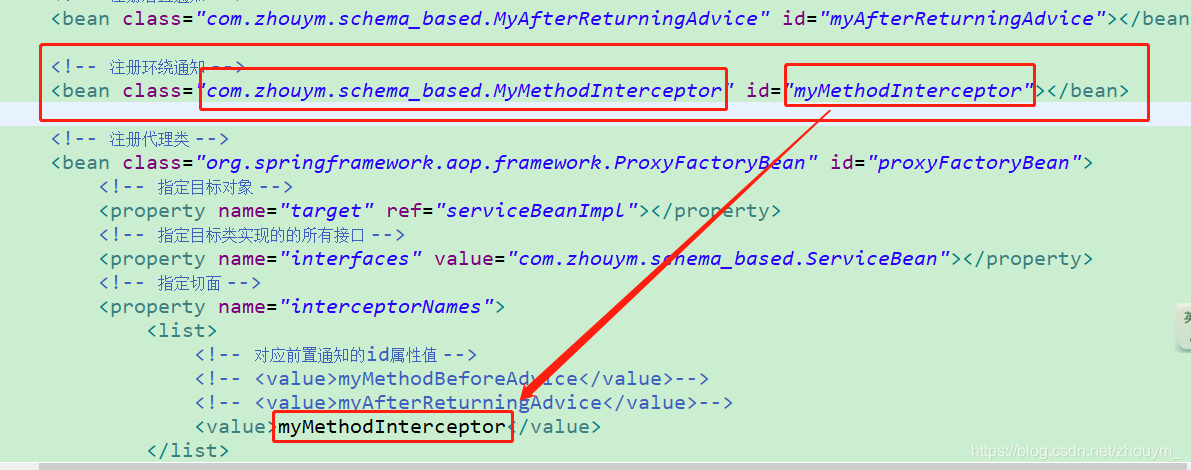
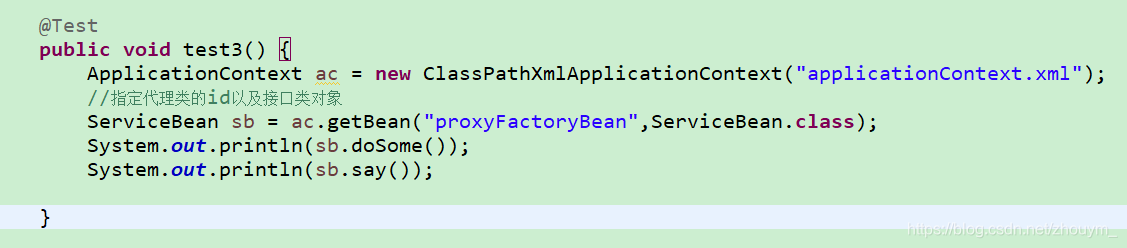
测试类
测试结果
异常处理通知
实现ThrowsAdvcice接口,它是一个标记接口,该接口下没有方法,我们自己定义方法
package com.zhouym.schema_based;

import org.springframework.aop.ThrowsAdvice;

public class MyThrowsAdvice implements ThrowsAdvice{

	public void afterThrowing(Exception ex) {
		System.out.println("异常处理通知");
	}
}
xml文件配置
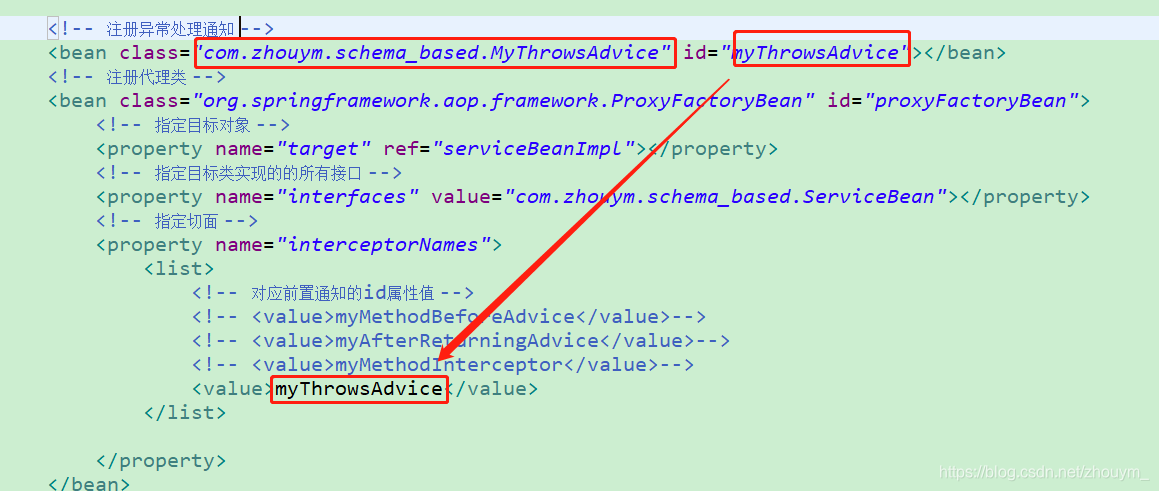
测试类
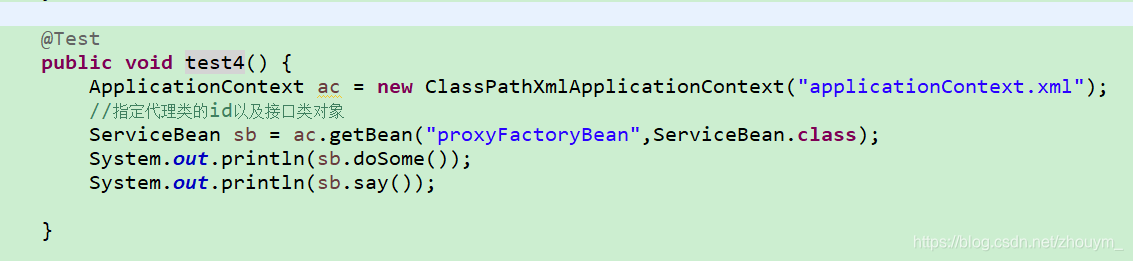
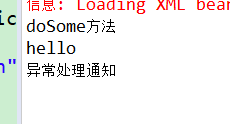
测试结果
基于aspectJ方式实现
对于AOP这种编程思想,很多框架都进行了实现。Spring就是其中之一,可以完成面向切面编程。然而,AspectJ也实现了AOP的功能,且其实现方式更为简捷,使用更为方便,而且还支持注解式开发。所以,Spring又将AspectJ的对于AOP的实现也引入到了自己的框架中。在Spring中使用AOP开发时,一般使用AspectJ的实现方式
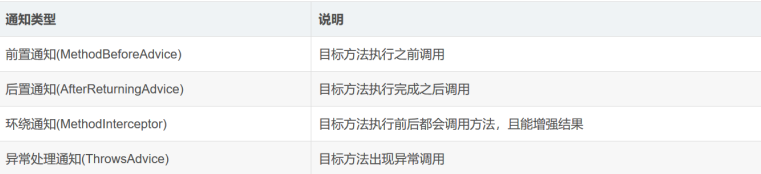
AspectJ的通知类型
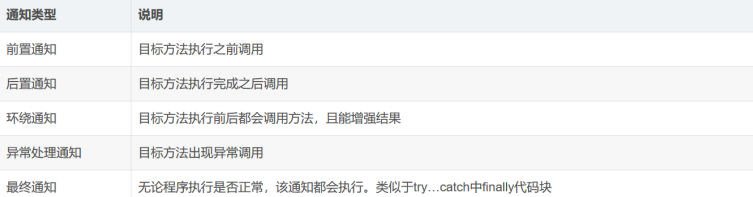
大家可以发现,相较于Schema-based的通知类型多了一个最终通知
AspectJ的切入表达式
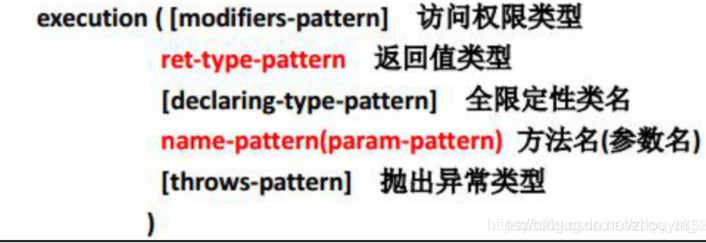 切入点表达式要匹配的对象就是目标方法的方法名。所以,execution表达式中明显就是方法的签名。注意,表达式中加[ ]的部分表示可省略部分,各部分间用空格分开。在其中可以使用以下符号

举例
execution(public * *(. .))
指定切入点为:任意公共方法。
execution(* set *(. .))
指定切入点为:任何一个以“set”开始的方法。
execution(* com.xyz.service.*.*(. .))
指定切入点为:定义在service包里的任意类的任意方法。
execution(* com.xyz.service. .*.*(. .))
指定切入点为:定义在service包或者子包里的任意类的任意方法。“..”出现在类名中时,
后面必须跟“*”,表示包、子包下的所有类。
execution(* *.service.*.*(. .))
指定只有一级包下的serivce子包下所有类(接口)中的所有方法为切入点
execution(* *. .service.*.*(. .))
指定所有包下的serivce子包下所有类(接口)中的所有方法为切入点
AspectJ对于AOP的实现有两种方式
1、注解的方式
2、配置的方式
首先引入所需的jar包
注解的方式
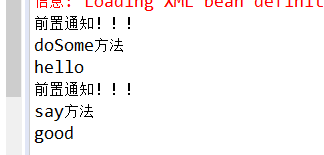
前置通知
创建接口和实现类
package com.zhouym.aspectJ;

public interface ServiceBean {
	String doSome();
	String say();
}
package com.zhouym.aspectJ;

public class ServiceBeanImpl implements ServiceBean {

	@Override
	public String doSome() {
		System.out.println("doSome方法");
		return "hello";
	}

	@Override
	public String say() {
		System.out.println("say方法");
		return "good";
	}

}
创建切面类
package com.zhouym.aspectJ;

import org.aspectj.lang.annotation.Aspect;
import org.aspectj.lang.annotation.Before;

@Aspect
public class MyAspect {
	//前置通知
	@Before("execution(* com.zhouym.aspectJ.*.doSome(..))")
	public void beforeMethod() {
		System.out.println("前置通知!!!");
	}

}
xml配置文件
<?xml version="1.0" encoding="UTF-8"?>
<beans xmlns="http://www.springframework.org/schema/beans"
	xmlns:xsi="http://www.w3.org/2001/XMLSchema-instance"
	xmlns:p="http://www.springframework.org/schema/p"
	xmlns:context="http://www.springframework.org/schema/context"
	xmlns:aop="http://www.springframework.org/schema/aop"
	xsi:schemaLocation="http://www.springframework.org/schema/beans
		http://www.springframework.org/schema/beans/spring-beans.xsd
		http://www.springframework.org/schema/context
		http://www.springframework.org/schema/context/spring-context-4.3.xsd
		http://www.springframework.org/schema/aop
		http://www.springframework.org/schema/aop/spring-aop-4.3.xsd">

		<!-- 注册目标类 -->
		<bean class="com.zhouym.aspectJ.ServiceBeanImpl" id="serviceBeanImpl"></bean>
		<!-- 注册切面类 -->
		<bean class="com.zhouym.aspectJ.MyAspect" id="myaspect"></bean>
		<!-- 注册自动代理类 -->
		<aop:aspectj-autoproxy />
</beans>
测试类
package com.zhouym.JunitTest;

import static org.junit.Assert.*;

import org.junit.Test;
import org.springframework.context.ApplicationContext;
import org.springframework.context.support.ClassPathXmlApplicationContext;

import com.zhouym.aspectJ.ServiceBean;
import com.zhouym.aspectJ.ServiceBeanImpl;

public class AspectJtest {

	@Test
	public void test() {
		ApplicationContext ac = new ClassPathXmlApplicationContext("applicationContext.xml");
		ServiceBean sb = ac.getBean(ServiceBean.class);
		System.out.println(sb.doSome());
		System.out.println(sb.say());
	}

}
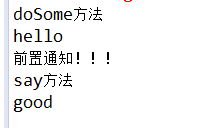
测试结果
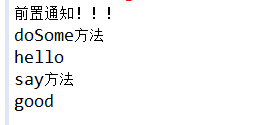
大家可以对比下基于Schema-based方式的前置通知和基于aspectJ方式的前置通知可以发现,
基于Schema-based方式的前置通知
基于aspectJ方式的前置通知
基于aspectJ方式的前置通知只会在指定的方法前调用前置通知里面的方法,而后面的则不会,如果我们把@Before注解中的方法名改成say方法来看看结果

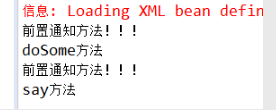
结果确实使我们推算的,如果改变@Before中方法为所有,即*,来看看结果

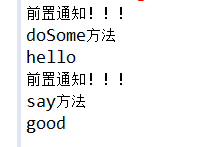
结果就和我们上面的基于Schema-Based方式的前置通知一样了
后置通知
创建切面类
package com.zhouym.aspectJ;
import org.aspectj.lang.annotation.AfterReturning;
import org.aspectj.lang.annotation.Aspect;
@Aspect
public class MyAfterReturning {
@AfterReturning("execution(* com.zhouym.aspectJ.*.doSome(..))")
public void afterMethod() {
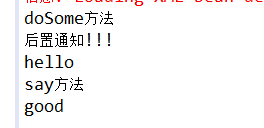
System.out.println("后置通知!!!");
}
}
xml文件配置
<?xml version="1.0" encoding="UTF-8"?>
<beans xmlns="http://www.springframework.org/schema/beans"
	xmlns:xsi="http://www.w3.org/2001/XMLSchema-instance"
	xmlns:p="http://www.springframework.org/schema/p"
	xmlns:context="http://www.springframework.org/schema/context"
	xmlns:aop="http://www.springframework.org/schema/aop"
	xsi:schemaLocation="http://www.springframework.org/schema/beans
		http://www.springframework.org/schema/beans/spring-beans.xsd
		http://www.springframework.org/schema/context
		http://www.springframework.org/schema/context/spring-context-4.3.xsd
		http://www.springframework.org/schema/aop
		http://www.springframework.org/schema/aop/spring-aop-4.3.xsd">

		<!-- 注册目标类 -->
		<bean class="com.zhouym.aspectJ.ServiceBeanImpl" id="serviceBeanImpl"></bean>
		<!-- 注册切面类 -->
		<bean class="com.zhouym.aspectJ.MyAfterReturning" id="myAfterReturning"></bean>
		<!-- 注册自动代理类 -->
		<aop:aspectj-autoproxy />
</beans>
测试类
package com.zhouym.JunitTest;

import static org.junit.Assert.*;

import org.junit.Test;
import org.springframework.context.ApplicationContext;
import org.springframework.context.support.ClassPathXmlApplicationContext;

import com.zhouym.aspectJ.ServiceBean;
import com.zhouym.aspectJ.ServiceBeanImpl;

public class AspectJtest {

	@Test
	public void test() {
		ApplicationContext ac = new ClassPathXmlApplicationContext("applicationContext.xml");
		ServiceBean sb = ac.getBean(ServiceBean.class);
		System.out.println(sb.doSome());
		System.out.println(sb.say());
	}

}
测试结果
环绕通知
创建一个切面类
package com.zhouym.aspectJ;

import org.aspectj.lang.ProceedingJoinPoint;
import org.aspectj.lang.annotation.Around;
import org.aspectj.lang.annotation.Aspect;

@Aspect
public class MyAround {

	@Around("execution(* *..aspectJ.*.*(..))")
	public Object around(ProceedingJoinPoint pjp) throws Throwable{
		System.out.println("环绕通知1");
		Object obj = pjp.proceed();
		System.out.println("环绕通知2..."+obj);
		obj += "...aaa";
		return obj;

		}
}
xml文件配置
<?xml version="1.0" encoding="UTF-8"?>
<beans xmlns="http://www.springframework.org/schema/beans"
	xmlns:xsi="http://www.w3.org/2001/XMLSchema-instance"
	xmlns:p="http://www.springframework.org/schema/p"
	xmlns:context="http://www.springframework.org/schema/context"
	xmlns:aop="http://www.springframework.org/schema/aop"
	xsi:schemaLocation="http://www.springframework.org/schema/beans
		http://www.springframework.org/schema/beans/spring-beans.xsd
		http://www.springframework.org/schema/context
		http://www.springframework.org/schema/context/spring-context-4.3.xsd
		http://www.springframework.org/schema/aop
		http://www.springframework.org/schema/aop/spring-aop-4.3.xsd">

		<!-- 注册目标类 -->
		<bean class="com.zhouym.aspectJ.ServiceBeanImpl" id="serviceBeanImpl"></bean>
		<!-- 注册切面类 -->
		<bean class="com.zhouym.aspectJ.MyAround" id="myAround"></bean>
		<!-- 注册自动代理类 -->
		<aop:aspectj-autoproxy />
</beans>
测试类
package com.zhouym.JunitTest;

import static org.junit.Assert.*;

import org.junit.Test;
import org.springframework.context.ApplicationContext;
import org.springframework.context.support.ClassPathXmlApplicationContext;

import com.zhouym.aspectJ.ServiceBean;
import com.zhouym.aspectJ.ServiceBeanImpl;

public class AspectJtest {

	@Test
	public void test() {
		ApplicationContext ac = new ClassPathXmlApplicationContext("applicationContext.xml");
		ServiceBean sb = ac.getBean(ServiceBean.class);
		System.out.println(sb.doSome());
		System.out.println(sb.say());
	}

}
测试结果
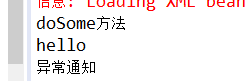
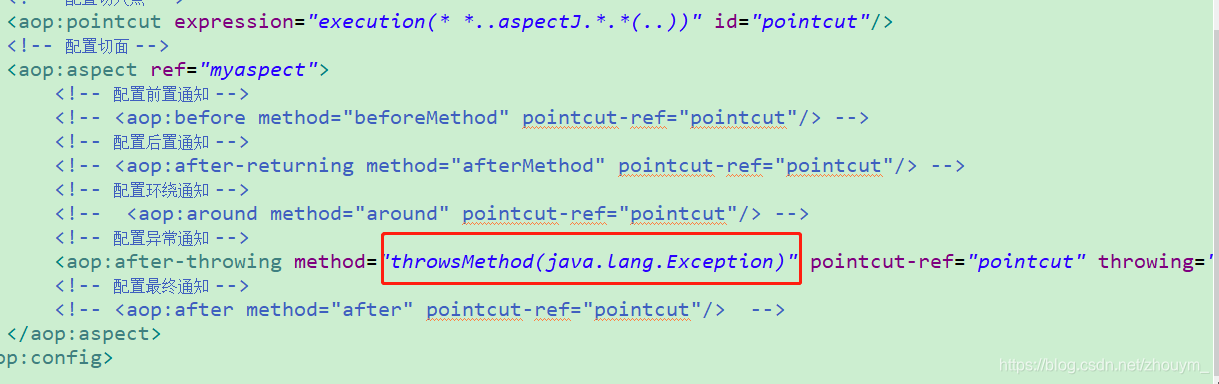
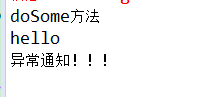
异常通知
创建一个切面类
package com.zhouym.aspectJ;

import org.aspectj.lang.annotation.AfterThrowing;
import org.aspectj.lang.annotation.Aspect;

@Aspect
public class MyAfterThrowing {

	@AfterThrowing("execution(* *..aspectJ.*.*(..))")
	public void throwsMethod() {
		System.out.println("异常通知");
	}
}
XML文件
<?xml version="1.0" encoding="UTF-8"?>
<beans xmlns="http://www.springframework.org/schema/beans"
	xmlns:xsi="http://www.w3.org/2001/XMLSchema-instance"
	xmlns:p="http://www.springframework.org/schema/p"
	xmlns:context="http://www.springframework.org/schema/context"
	xmlns:aop="http://www.springframework.org/schema/aop"
	xsi:schemaLocation="http://www.springframework.org/schema/beans
		http://www.springframework.org/schema/beans/spring-beans.xsd
		http://www.springframework.org/schema/context
		http://www.springframework.org/schema/context/spring-context-4.3.xsd
		http://www.springframework.org/schema/aop
		http://www.springframework.org/schema/aop/spring-aop-4.3.xsd">

		<!-- 注册目标类 -->
		<bean class="com.zhouym.aspectJ.ServiceBeanImpl" id="serviceBeanImpl"></bean>
		<!-- 注册切面类 -->
		<bean class="com.zhouym.aspectJ.MyAfterThrowing" id="myAfterThrowing"></bean>
		<!-- 注册自动代理类 -->
		<aop:aspectj-autoproxy />
</beans>
测试类
package com.zhouym.JunitTest;

import static org.junit.Assert.*;

import org.junit.Test;
import org.springframework.context.ApplicationContext;
import org.springframework.context.support.ClassPathXmlApplicationContext;

import com.zhouym.aspectJ.ServiceBean;
import com.zhouym.aspectJ.ServiceBeanImpl;

public class AspectJtest {

	@Test
	public void test() {
		ApplicationContext ac = new ClassPathXmlApplicationContext("applicationContext.xml");
		ServiceBean sb = ac.getBean(ServiceBean.class);
		System.out.println(sb.doSome());
		System.out.println(sb.say());
	}

}
测试结果
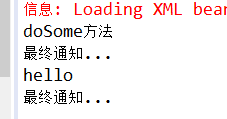
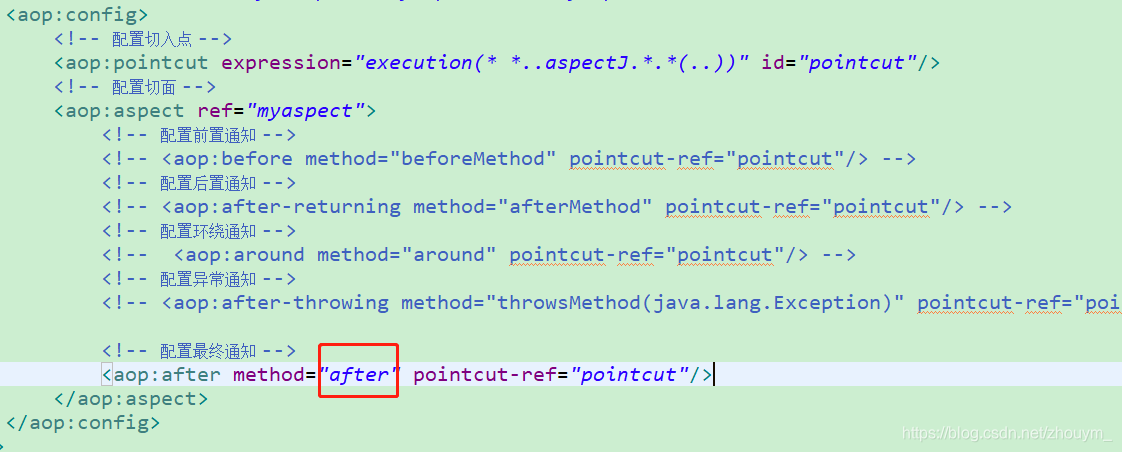
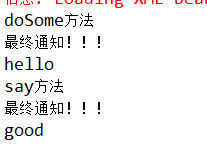
最终通知
创建一个切面类
package com.zhouym.aspectJ;

import org.aspectj.lang.annotation.After;
import org.aspectj.lang.annotation.Aspect;

@Aspect
public class MyAfter {
	@After("execution(* *..aspectJ.*.*(..))")
	public void after() {
		System.out.println("最终通知...");
	}
}
xml文件配置
<?xml version="1.0" encoding="UTF-8"?>
<beans xmlns="http://www.springframework.org/schema/beans"
	xmlns:xsi="http://www.w3.org/2001/XMLSchema-instance"
	xmlns:p="http://www.springframework.org/schema/p"
	xmlns:context="http://www.springframework.org/schema/context"
	xmlns:aop="http://www.springframework.org/schema/aop"
	xsi:schemaLocation="http://www.springframework.org/schema/beans
		http://www.springframework.org/schema/beans/spring-beans.xsd
		http://www.springframework.org/schema/context
		http://www.springframework.org/schema/context/spring-context-4.3.xsd
		http://www.springframework.org/schema/aop
		http://www.springframework.org/schema/aop/spring-aop-4.3.xsd">

		<!-- 注册目标类 -->
		<bean class="com.zhouym.aspectJ.ServiceBeanImpl" id="serviceBeanImpl"></bean>
		<!-- 注册切面类 -->
		<bean class="com.zhouym.aspectJ.MyAfter" id="myAfter"></bean>
		<!-- 注册自动代理类 -->
		<aop:aspectj-autoproxy />
</beans>
测试类
package com.zhouym.JunitTest;

import static org.junit.Assert.*;

import org.junit.Test;
import org.springframework.context.ApplicationContext;
import org.springframework.context.support.ClassPathXmlApplicationContext;

import com.zhouym.aspectJ.ServiceBean;
import com.zhouym.aspectJ.ServiceBeanImpl;

public class AspectJtest {

	@Test
	public void test() {
		ApplicationContext ac = new ClassPathXmlApplicationContext("applicationContext.xml");
		ServiceBean sb = ac.getBean(ServiceBean.class);
		System.out.println(sb.doSome());
		System.out.println(sb.say());
	}

}
测试结果
XML方式
接口和实现类使用上面的
创建切面类
package com.zhouym.aspectJ;

import org.aspectj.lang.ProceedingJoinPoint;

public class MyAspect {

	public void beforeMethod() {
		System.out.println("前置通知!!!");
	}

	public void afterMethod() {
		System.out.println("后置通知!!!");
	}

	public Object around(ProceedingJoinPoint pjp) throws Throwable{
		System.out.println("环绕通知1");
		Object obj = pjp.proceed();
		System.out.println("环绕通知2..."+obj);
		obj += "...aaa";
		return obj;

	}

	public void throwsMethod(Exception ex) {
		System.out.println("异常通知!!!");
	}

	public void after() {
		System.out.println("最终通知!!!");
	}

}
xml配置
<?xml version="1.0" encoding="UTF-8"?>
<beans xmlns="http://www.springframework.org/schema/beans"
	xmlns:xsi="http://www.w3.org/2001/XMLSchema-instance"
	xmlns:p="http://www.springframework.org/schema/p"
	xmlns:context="http://www.springframework.org/schema/context"
	xmlns:aop="http://www.springframework.org/schema/aop"
	xsi:schemaLocation="http://www.springframework.org/schema/beans
		http://www.springframework.org/schema/beans/spring-beans.xsd
		http://www.springframework.org/schema/context
		http://www.springframework.org/schema/context/spring-context-4.3.xsd
		http://www.springframework.org/schema/aop
		http://www.springframework.org/schema/aop/spring-aop-4.3.xsd">

		<!-- 注册目标类 -->
		<bean class="com.zhouym.aspectJ.ServiceBeanImpl" id="serviceBeanImpl"></bean>
		<!-- 注册切面类 -->
		<bean class="com.zhouym.aspectJ.MyAspect" id="myaspect"></bean>
		<aop:config>
			<!-- 配置切入点 -->
			<aop:pointcut expression="execution(* *..aspectJ.*.*(..))" id="pointcut"/>
			<!-- 配置切面 -->
			<aop:aspect ref="myaspect">
				<!-- 配置通知 -->
				<aop:before method="beforeMethod" pointcut-ref="pointcut"/>
			</aop:aspect>
		</aop:config>
</beans>
测试类
package com.zhouym.JunitTest;

import static org.junit.Assert.*;

import org.junit.Test;
import org.springframework.context.ApplicationContext;
import org.springframework.context.support.ClassPathXmlApplicationContext;

import com.zhouym.aspectJ.ServiceBean;
import com.zhouym.aspectJ.ServiceBeanImpl;

public class AspectJtest {

	@Test
	public void test() {
		ApplicationContext ac = new ClassPathXmlApplicationContext("applicationContext.xml");
		ServiceBean sb = ac.getBean(ServiceBean.class);
		System.out.println(sb.doSome());
		System.out.println(sb.say());
	}

}
测试结果
我们只需要改变xml配置中的method
后置通知
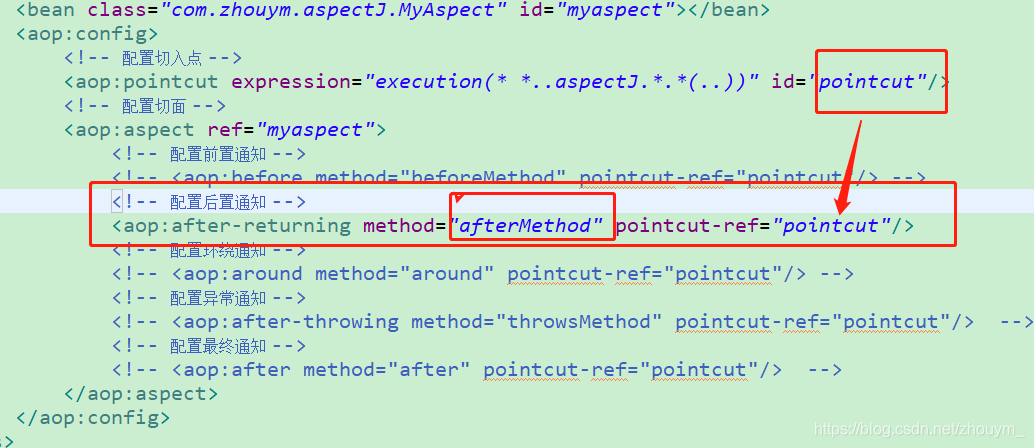
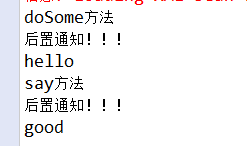
测试结果
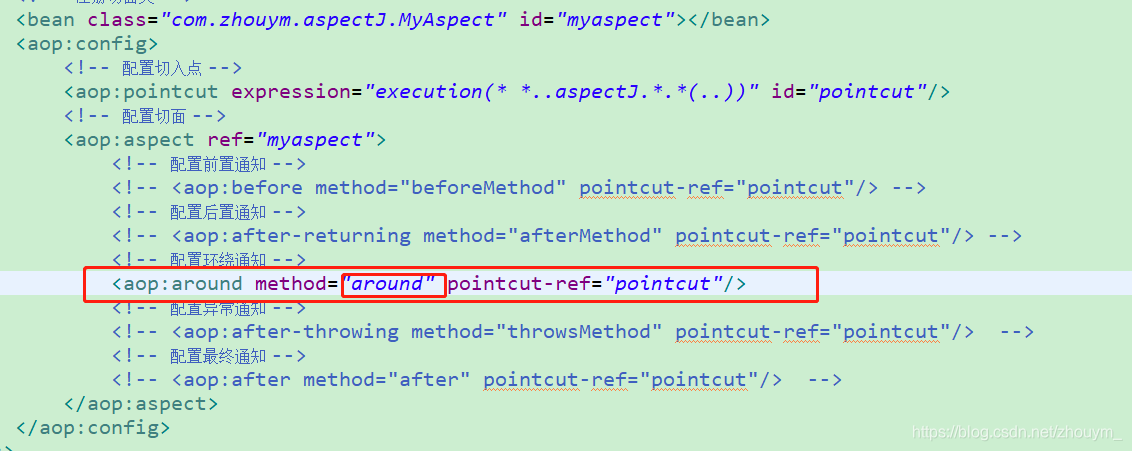
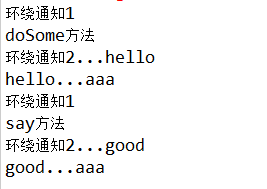
环绕通知
测试结果
异常通知
测试结果
最终通知
测试结果


 637
637

 被折叠的 条评论
为什么被折叠?
被折叠的 条评论
为什么被折叠?
 到【灌水乐园】发言


