


 本文详细介绍如何在Spring Security框架中自定义JWT Token的生成与解析流程,包括配置自定义的Token Enhancer与AccessToken Converter,以实现更丰富的用户信息封装。
先上GitHub代码:点击这里下载源码
其他关于springsecurity的配置就不啰嗦了,百度大把教程,这里记录一下我自己理解为比较重要的知识点。
这里主要介绍介绍自定义返回的jwt token,其他应用只要以同样的解密方式就能解析这串token,token里面可以自定义封装用户信息。
令牌增强器:
这个CustomTokenEnhancer 可以定义token额外信息,只要往additionalInfo 添加就行
import org.springframework.security.oauth2.common.DefaultOAuth2AccessToken;
import org.springframework.security.oauth2.common.OAuth2AccessToken;
import org.springframework.security.oauth2.provider.OAuth2Authentication;
import org.springframework.security.oauth2.provider.token.TokenEnhancer;

import java.util.HashMap;
import java.util.Map;


/**
 * token生成携带的信息 额外携带
 */
public class CustomTokenEnhancer implements TokenEnhancer {
    @Override
    public OAuth2AccessToken enhance(OAuth2AccessToken accessToken, OAuth2Authentication authentication) {
        final Map<String, Object> additionalInfo = new HashMap<>();
        //SecurityUserDetails user = (SecurityUserDetails) authentication.getUserAuthentication().getPrincipal();
       /* additionalInfo.put("username_", user.getUsername());
        additionalInfo.put("authorities_", user.getAuthorities());*/
        ((DefaultOAuth2AccessToken) accessToken).setAdditionalInformation(additionalInfo);
        return accessToken;
    }
}
通过这行代码能拿到springsecurity中用于验证用户账号密码的对象。
SecurityUserDetails user = (SecurityUserDetails) authentication.getUserAuthentication().getPrincipal();
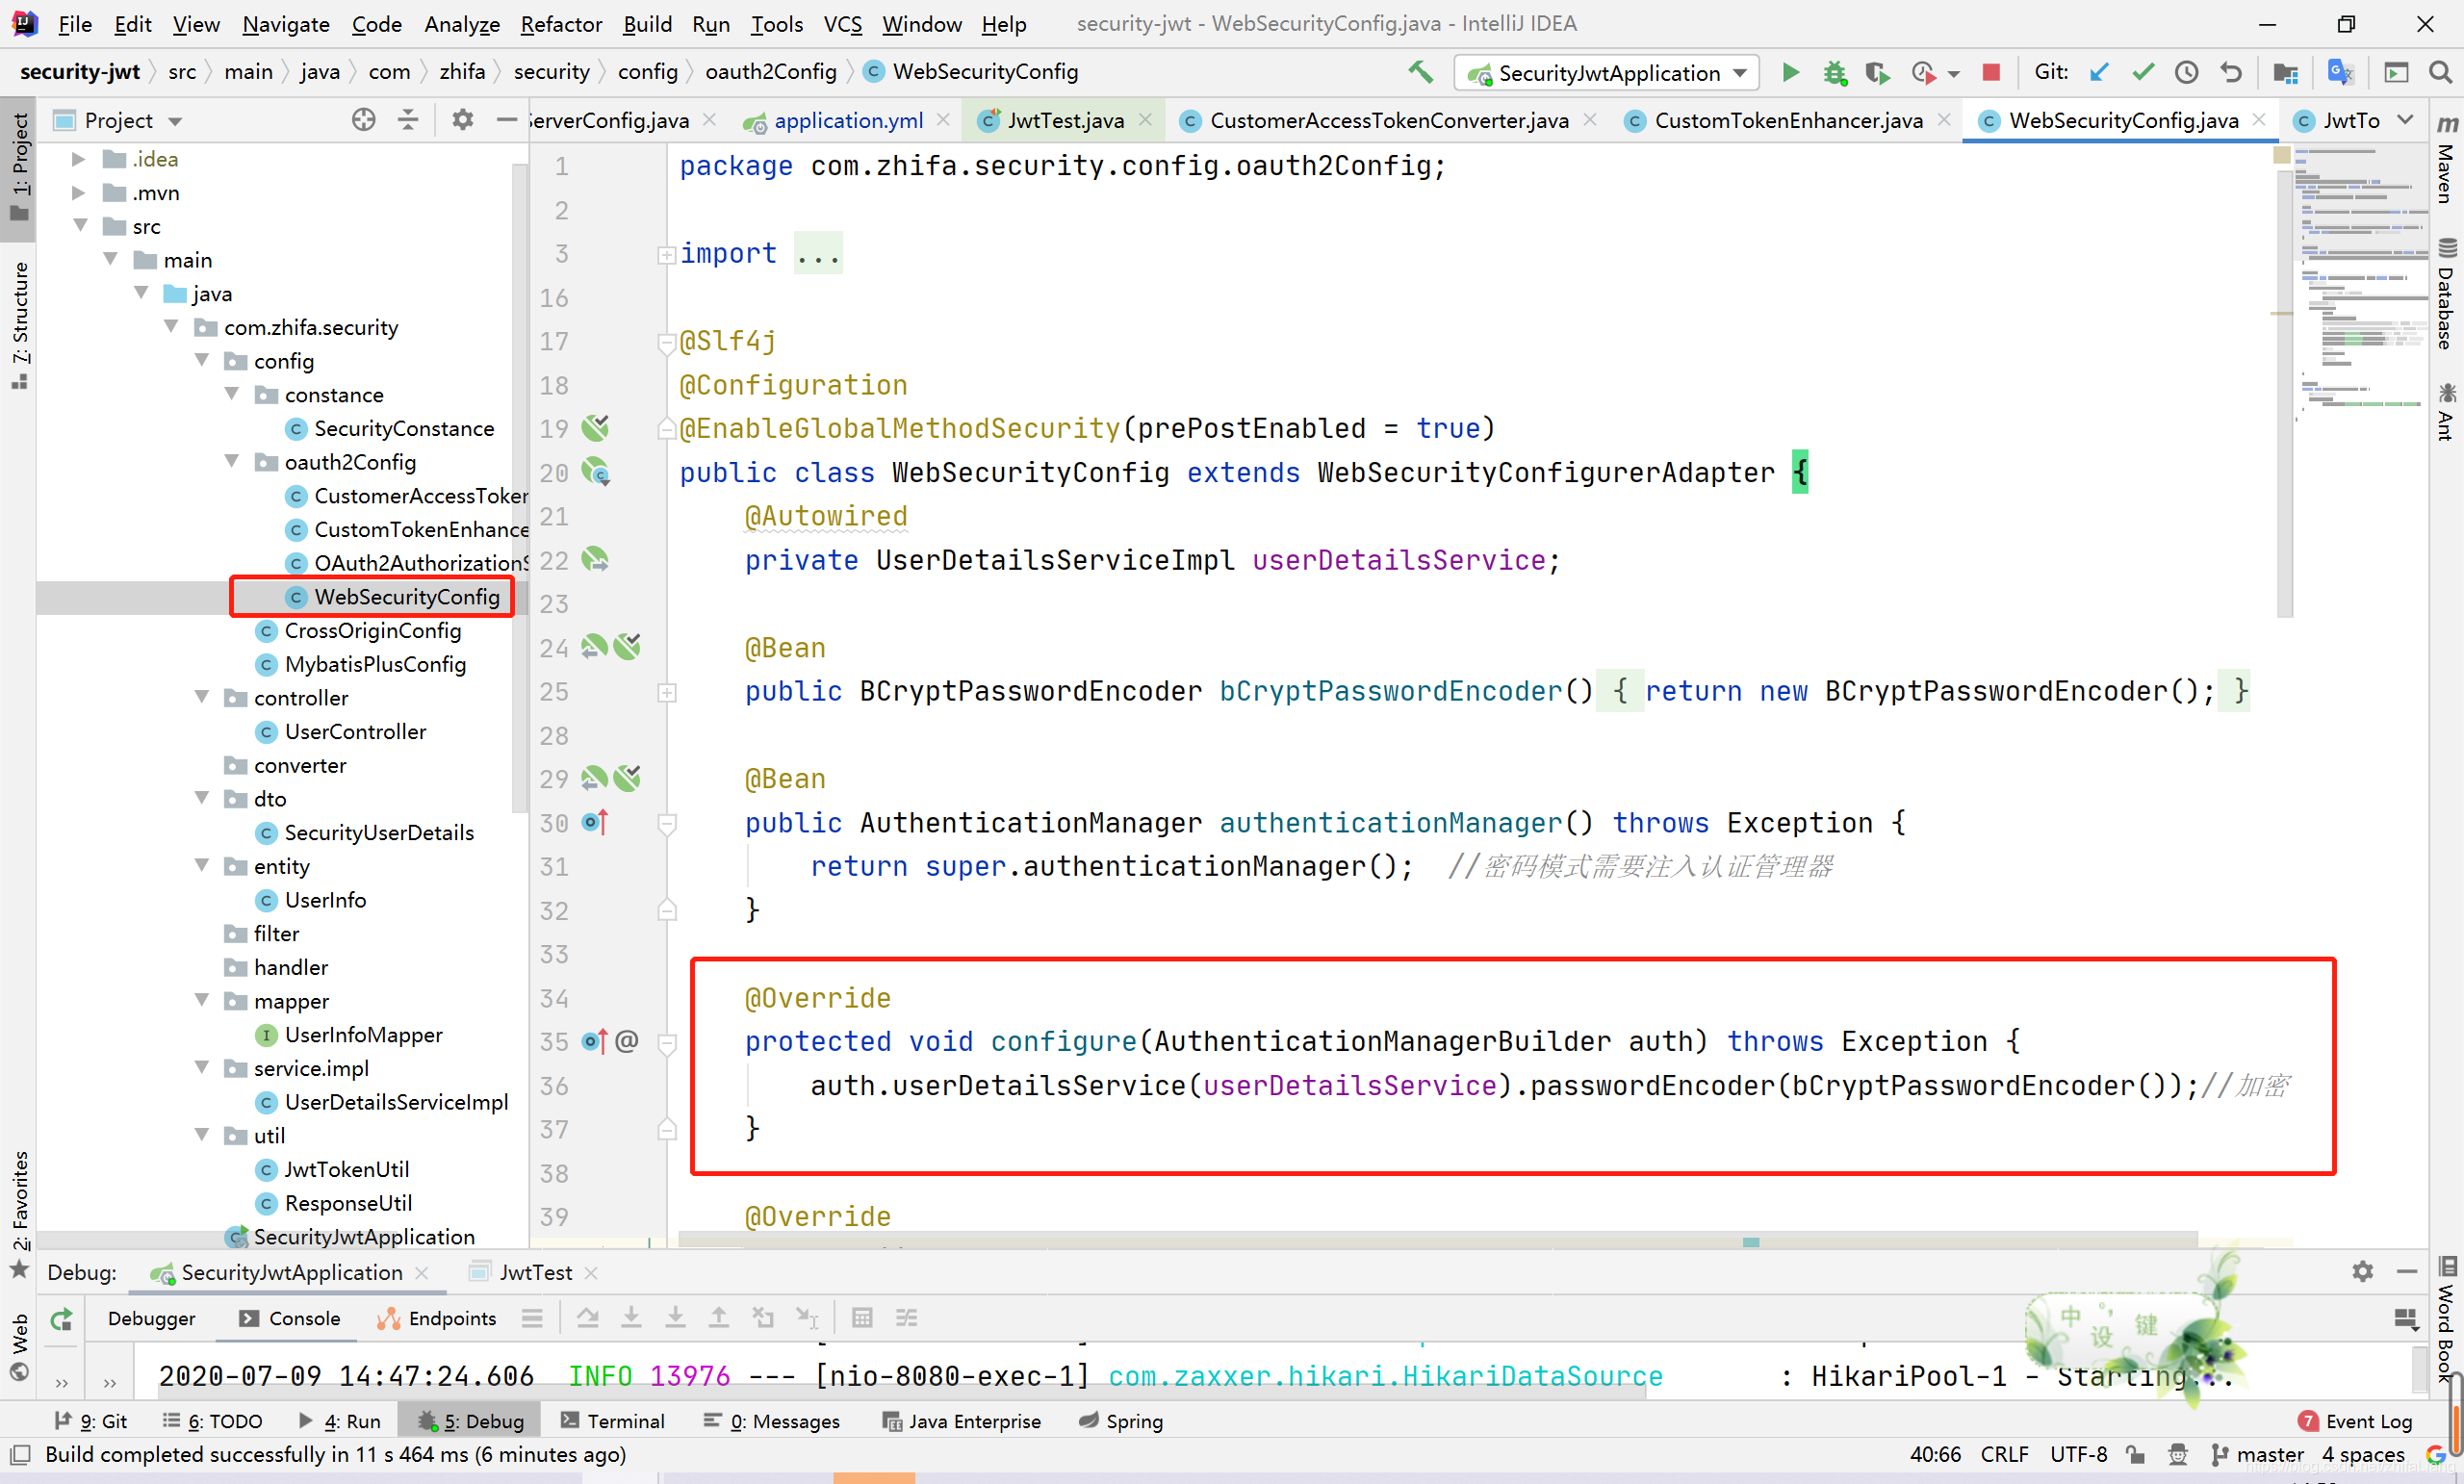
验证账号密码结束之后,在封装token时候,自定义转换器,替换默认的:
/**
 * 自定义CustomerAccessTokenConverter 这个类的作用主要用于AccessToken的转换,
 * 默认使用DefaultAccessTokenConverter 这个装换器
 * DefaultAccessTokenConverter有个UserAuthenticationConverter,这个转换器作用是把用户的信息放入token中,
 * 默认只是放入username
 * <p>
 * 自定义了下这个方法,加入了额外的信息
 * <p>
 */
public class CustomerAccessTokenConverter extends DefaultAccessTokenConverter {


    public CustomerAccessTokenConverter() {
        super.setUserTokenConverter(new CustomerUserAuthenticationConverter());
    }


    private class CustomerUserAuthenticationConverter extends DefaultUserAuthenticationConverter {

        @Override
        public Map<String, ?> convertUserAuthentication(Authentication authentication) {
            SecurityUserDetails userDetails = (SecurityUserDetails) authentication.getPrincipal();
            LinkedHashMap response = new LinkedHashMap();
            response.put("username", authentication.getName());
            response.put("id", userDetails.getId());
            if (authentication.getAuthorities() != null && !authentication.getAuthorities().isEmpty()) {
                response.put("authorities", AuthorityUtils.authorityListToSet(authentication.getAuthorities()));
            }
            return response;
        }
    }

}
然后就是把转换器设置到框架
import com.zhifa.security.config.constance.SecurityConstance;
import com.zhifa.security.service.impl.UserDetailsServiceImpl;
import org.springframework.beans.factory.annotation.Autowired;
import org.springframework.context.annotation.Bean;
import org.springframework.context.annotation.Configuration;
import org.springframework.security.authentication.AuthenticationManager;
import org.springframework.security.crypto.password.PasswordEncoder;
import org.springframework.security.oauth2.config.annotation.configurers.ClientDetailsServiceConfigurer;
import org.springframework.security.oauth2.config.annotation.web.configuration.AuthorizationServerConfigurerAdapter;
import org.springframework.security.oauth2.config.annotation.web.configuration.EnableAuthorizationServer;
import org.springframework.security.oauth2.config.annotation.web.configurers.AuthorizationServerEndpointsConfigurer;
import org.springframework.security.oauth2.config.annotation.web.configurers.AuthorizationServerSecurityConfigurer;
import org.springframework.security.oauth2.provider.token.DefaultTokenServices;
import org.springframework.security.oauth2.provider.token.TokenEnhancer;
import org.springframework.security.oauth2.provider.token.TokenEnhancerChain;
import org.springframework.security.oauth2.provider.token.TokenStore;
import org.springframework.security.oauth2.provider.token.store.JwtAccessTokenConverter;
import org.springframework.security.oauth2.provider.token.store.JwtTokenStore;
import java.util.Arrays;
import java.util.concurrent.TimeUnit;
@Configuration
@EnableAuthorizationServer// 开启认证服务 主要配置客户端的访问信息
//授权服务器
public class OAuth2AuthorizationServerConfig extends AuthorizationServerConfigurerAdapter {
@Autowired
private AuthenticationManager authenticationManager;//密码模式需要注入认证管理器
@Autowired
public PasswordEncoder passwordEncoder;
@Autowired
private UserDetailsServiceImpl userDetailsService;
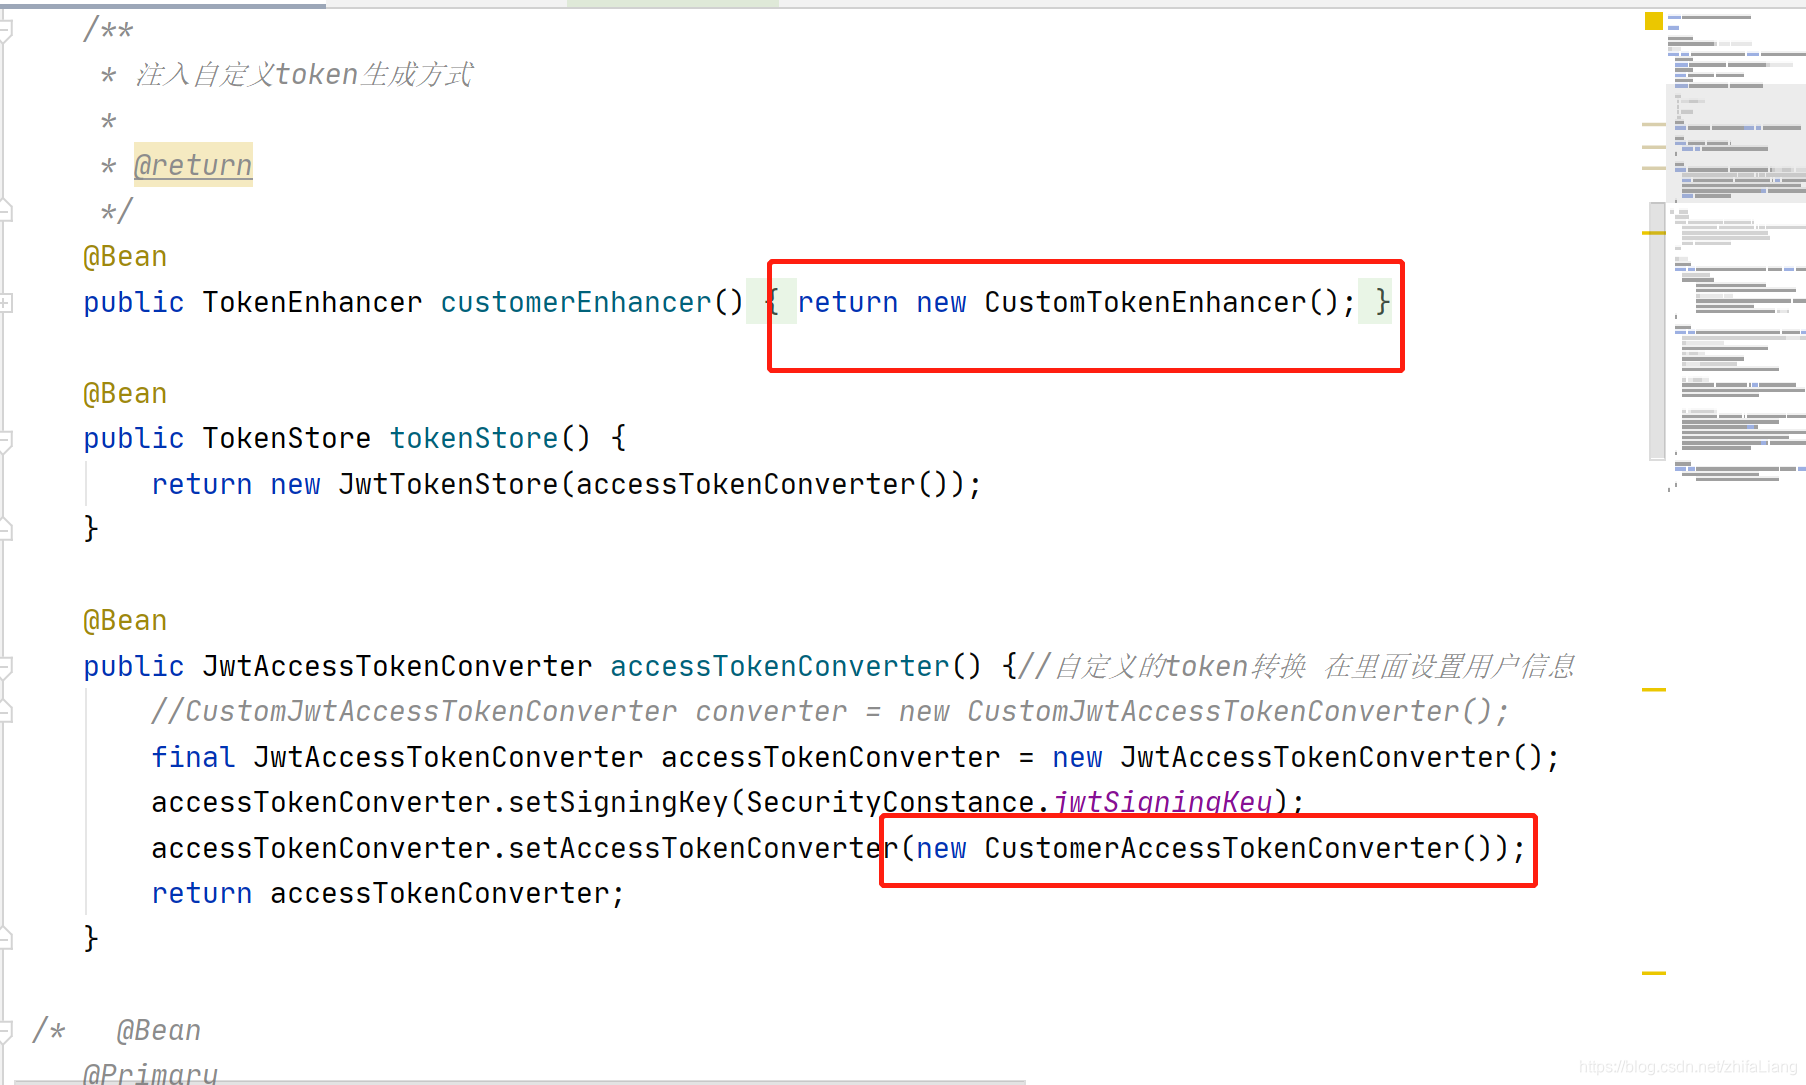
/**
* 注入自定义token生成方式
*
* @return
*/
@Bean
public TokenEnhancer customerEnhancer() {
return new CustomTokenEnhancer();
}
@Bean
public TokenStore tokenStore() {
return new JwtTokenStore(accessTokenConverter());
}
@Bean
public JwtAccessTokenConverter accessTokenConverter() {//自定义的token转换 在里面设置用户信息
//CustomJwtAccessTokenConverter converter = new CustomJwtAccessTokenConverter();
final JwtAccessTokenConverter accessTokenConverter = new JwtAccessTokenConverter();
accessTokenConverter.setSigningKey(SecurityConstance.jwtSigningKey);
accessTokenConverter.setAccessTokenConverter(new CustomerAccessTokenConverter());
return accessTokenConverter;
}
/* @Bean
@Primary
public DefaultTokenServices tokenServices() {
DefaultTokenServices defaultTokenServices = new DefaultTokenServices();
defaultTokenServices.setTokenStore(tokenStore());
defaultTokenServices.setSupportRefreshToken(true);
return defaultTokenServices;
}*/
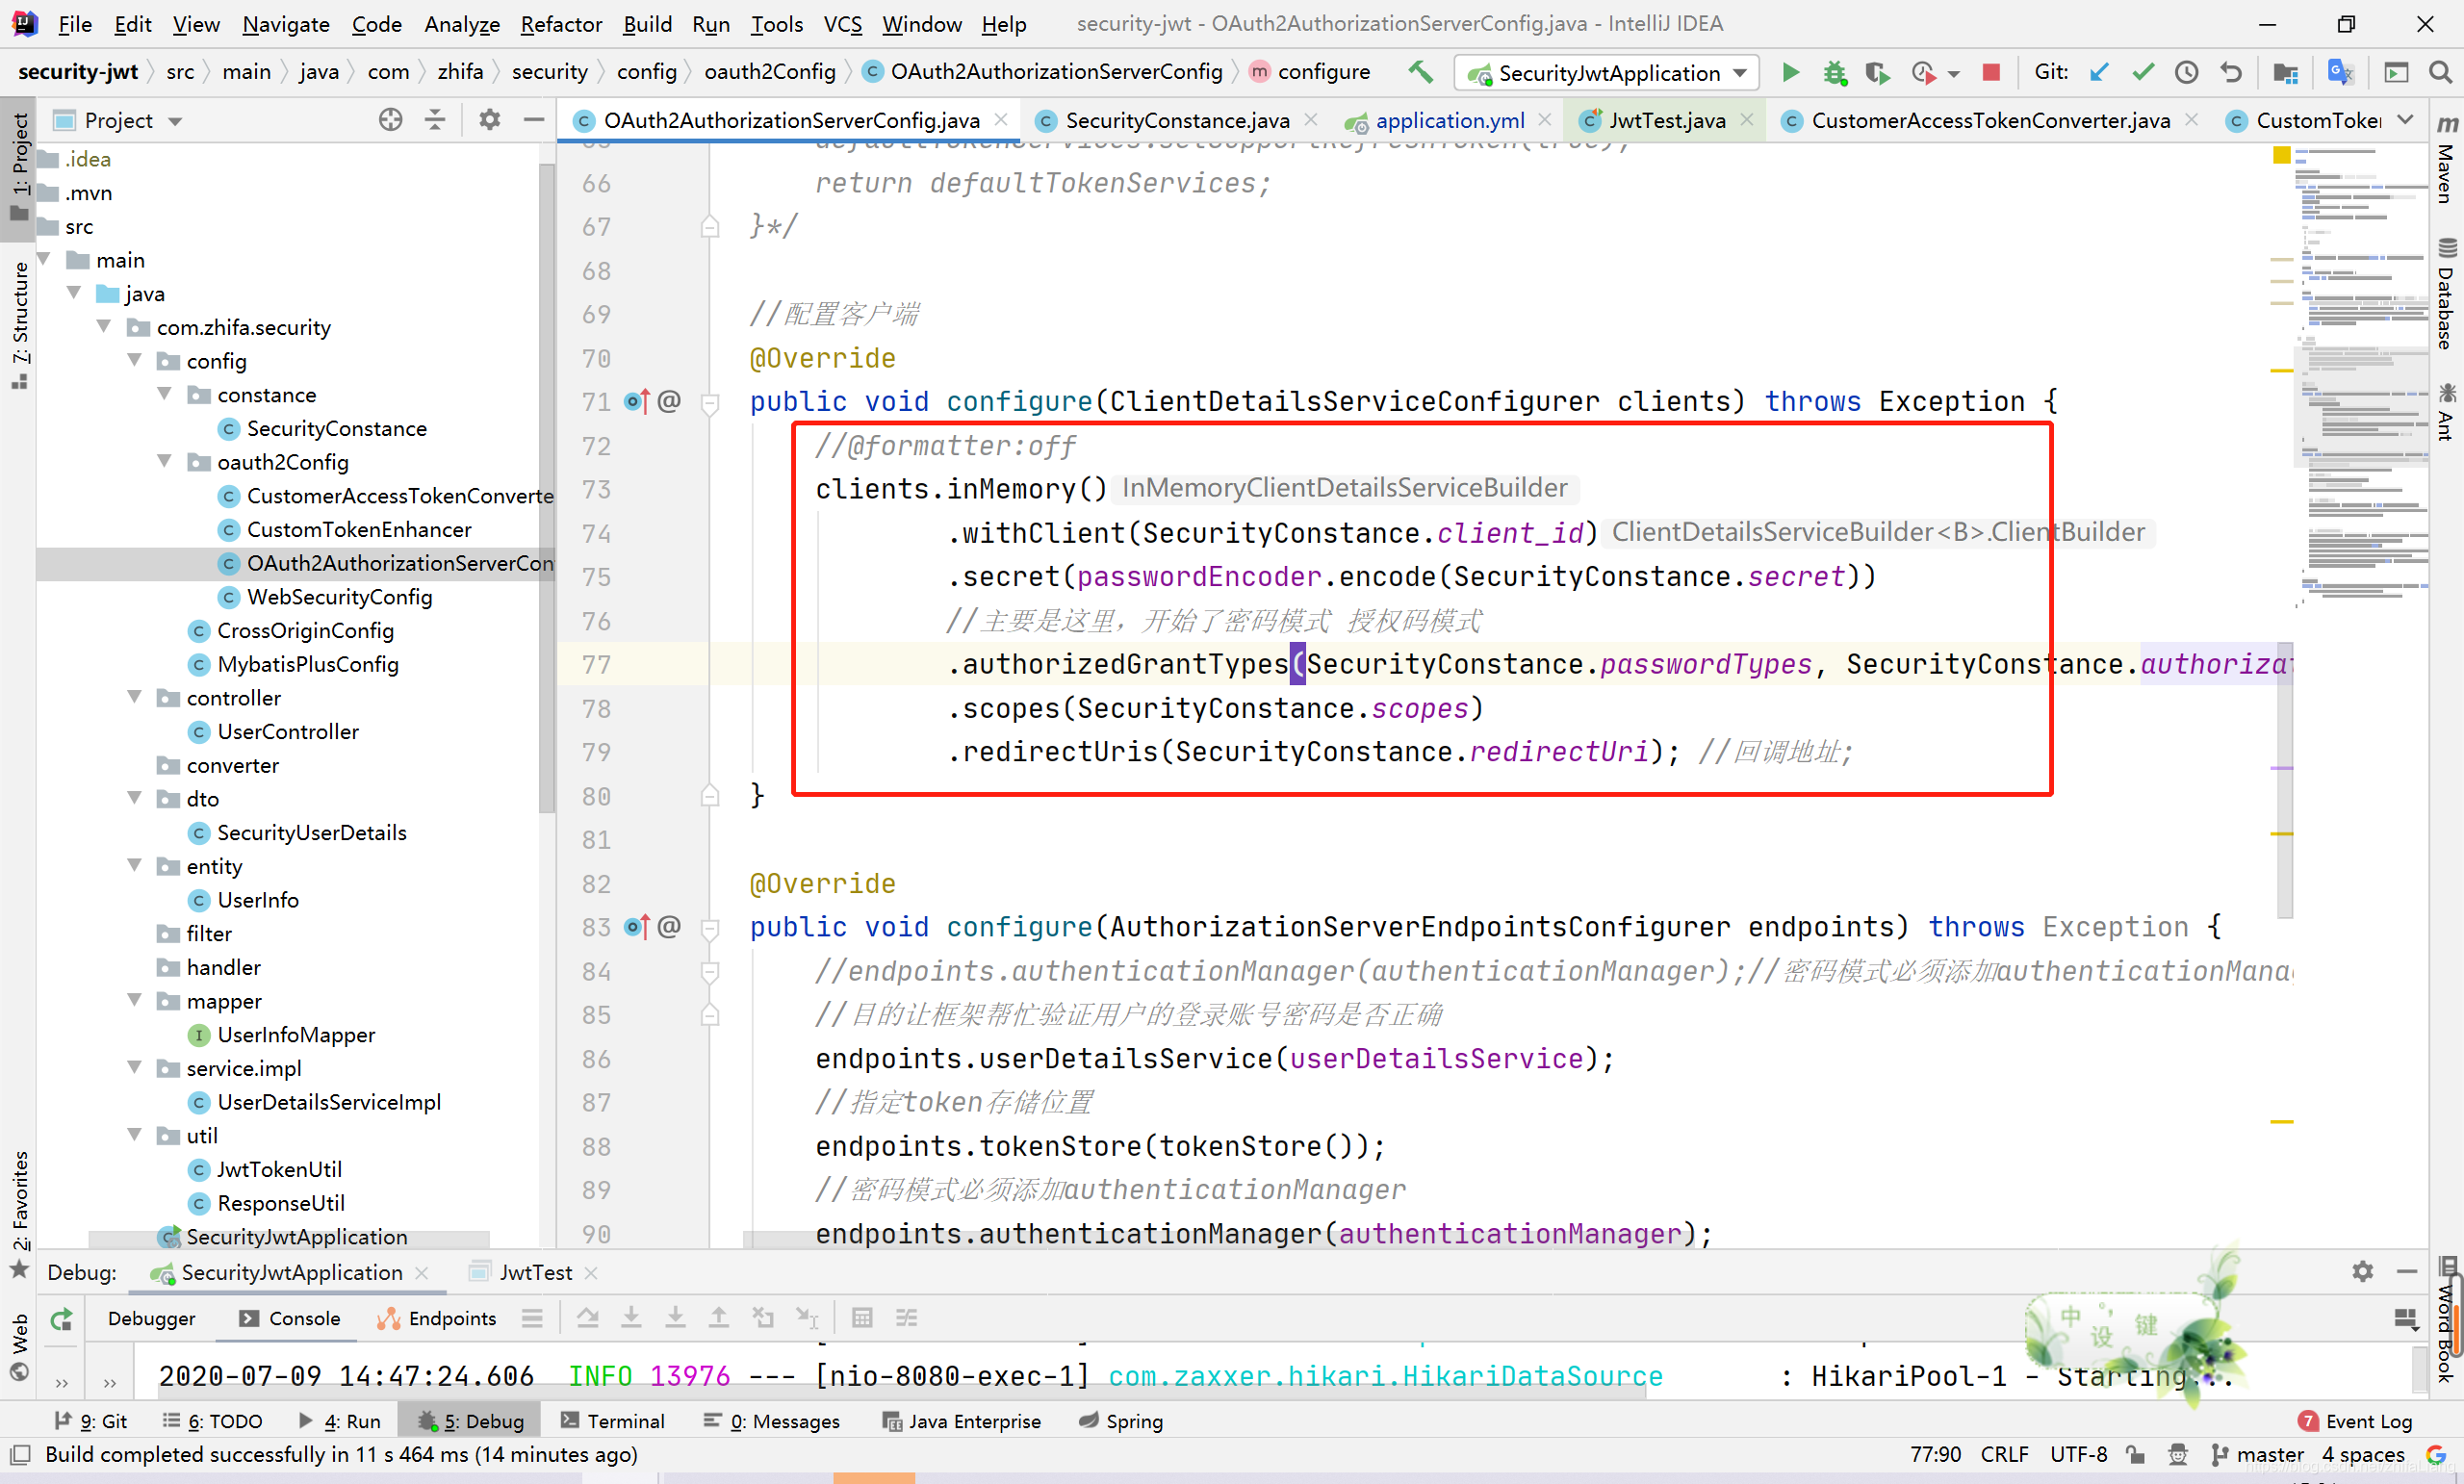
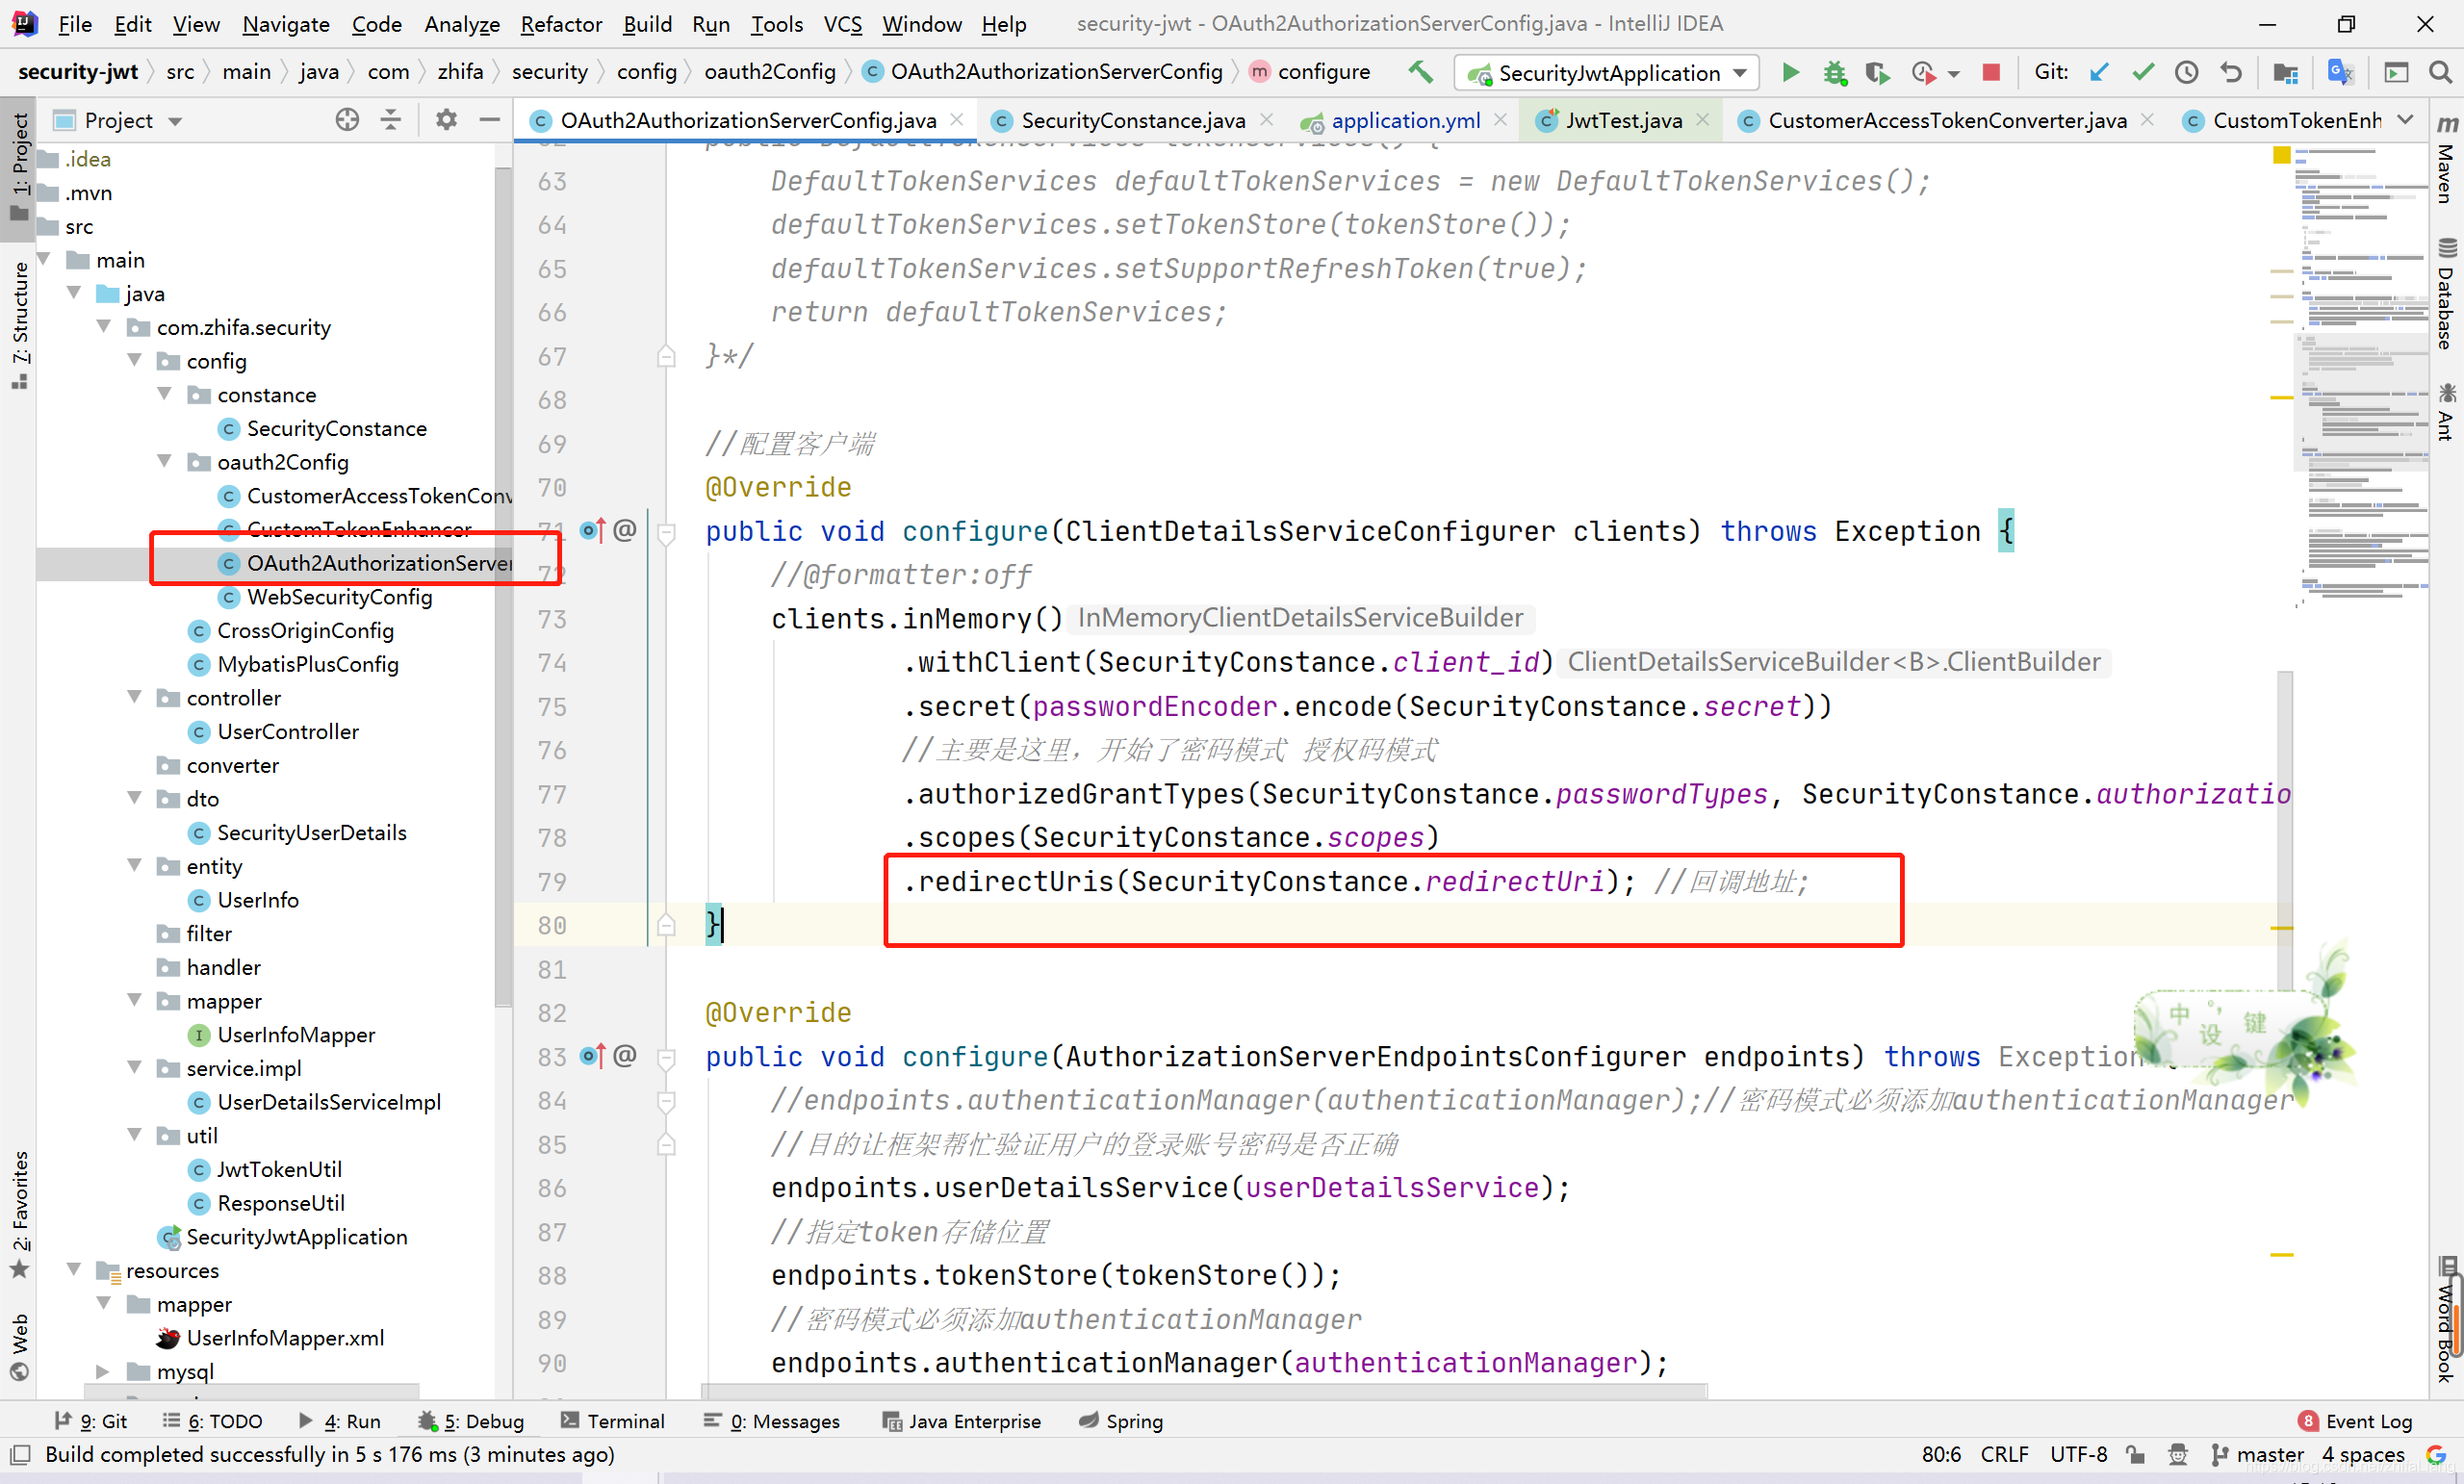
//配置客户端
@Override
public void configure(ClientDetailsServiceConfigurer clients) throws Exception {
//@formatter:off
clients.inMemory()
.withClient(SecurityConstance.client_id)
.secret(passwordEncoder.encode(SecurityConstance.secret))
//主要是这里,开始了密码模式 授权码模式
.authorizedGrantTypes(SecurityConstance.passwordTypes, SecurityConstance.authorization_codeTypes, SecurityConstance.refresh_tokenTypes)
.scopes(SecurityConstance.scopes)
.redirectUris(SecurityConstance.redirectUri); //回调地址;
}
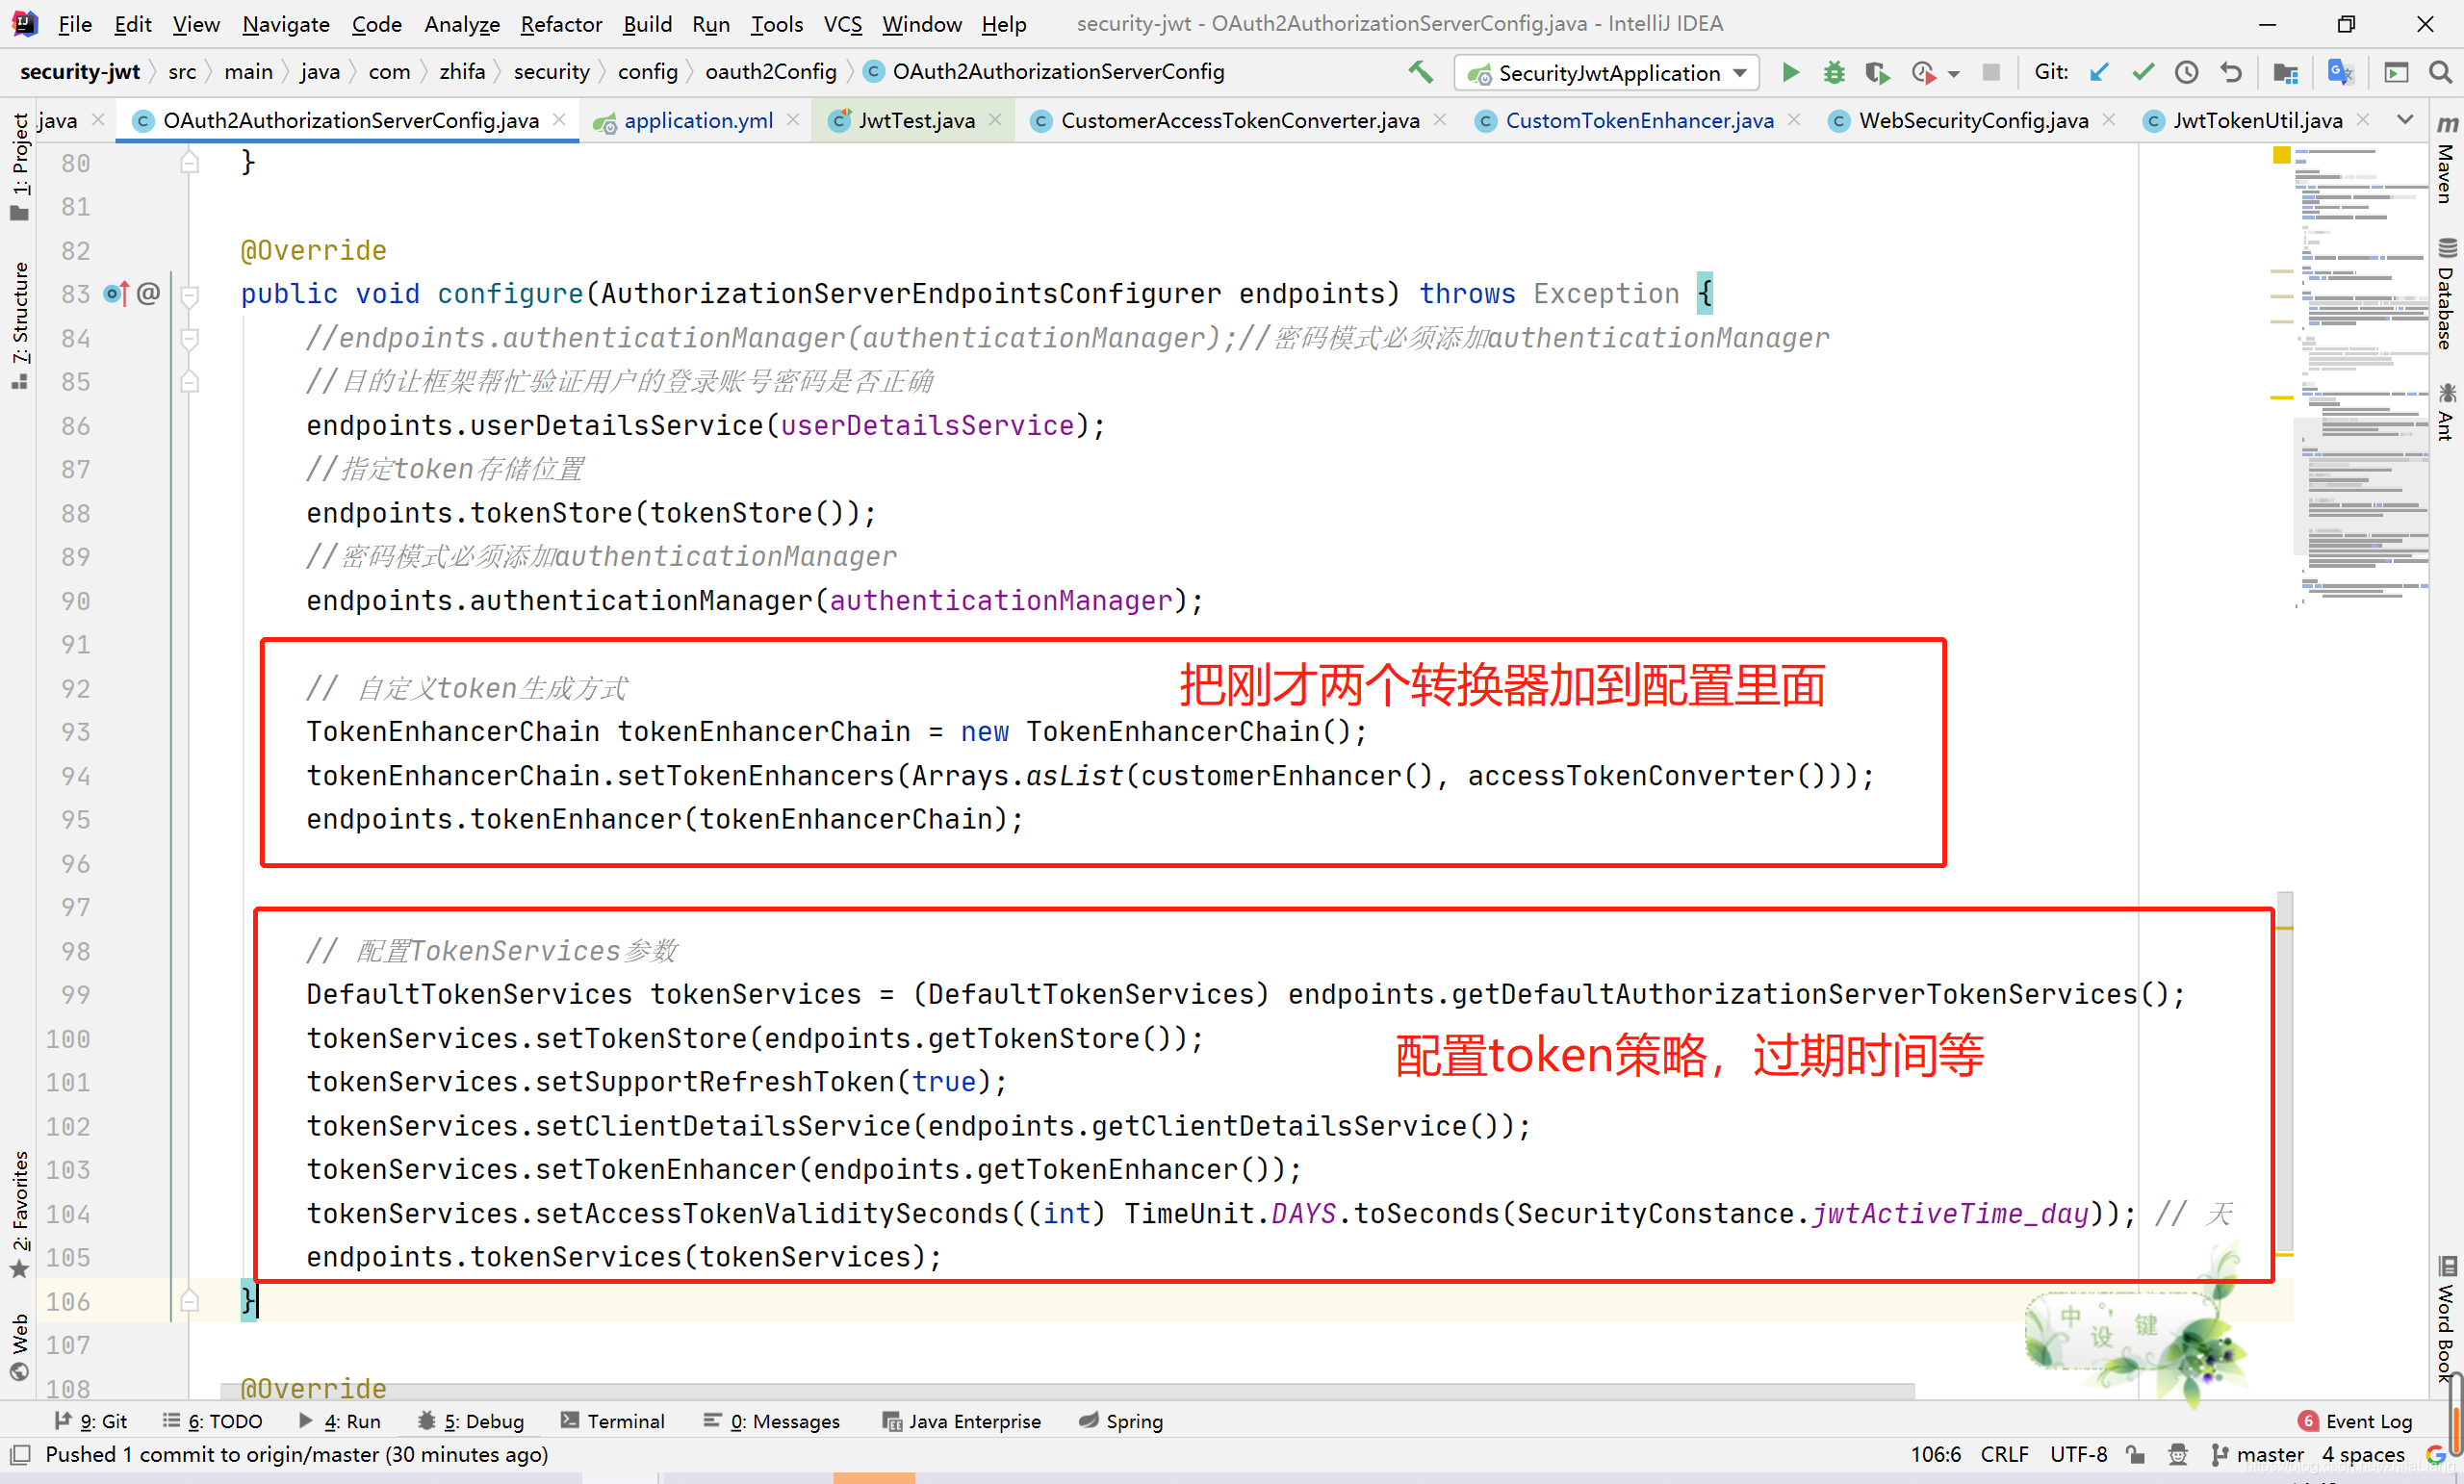
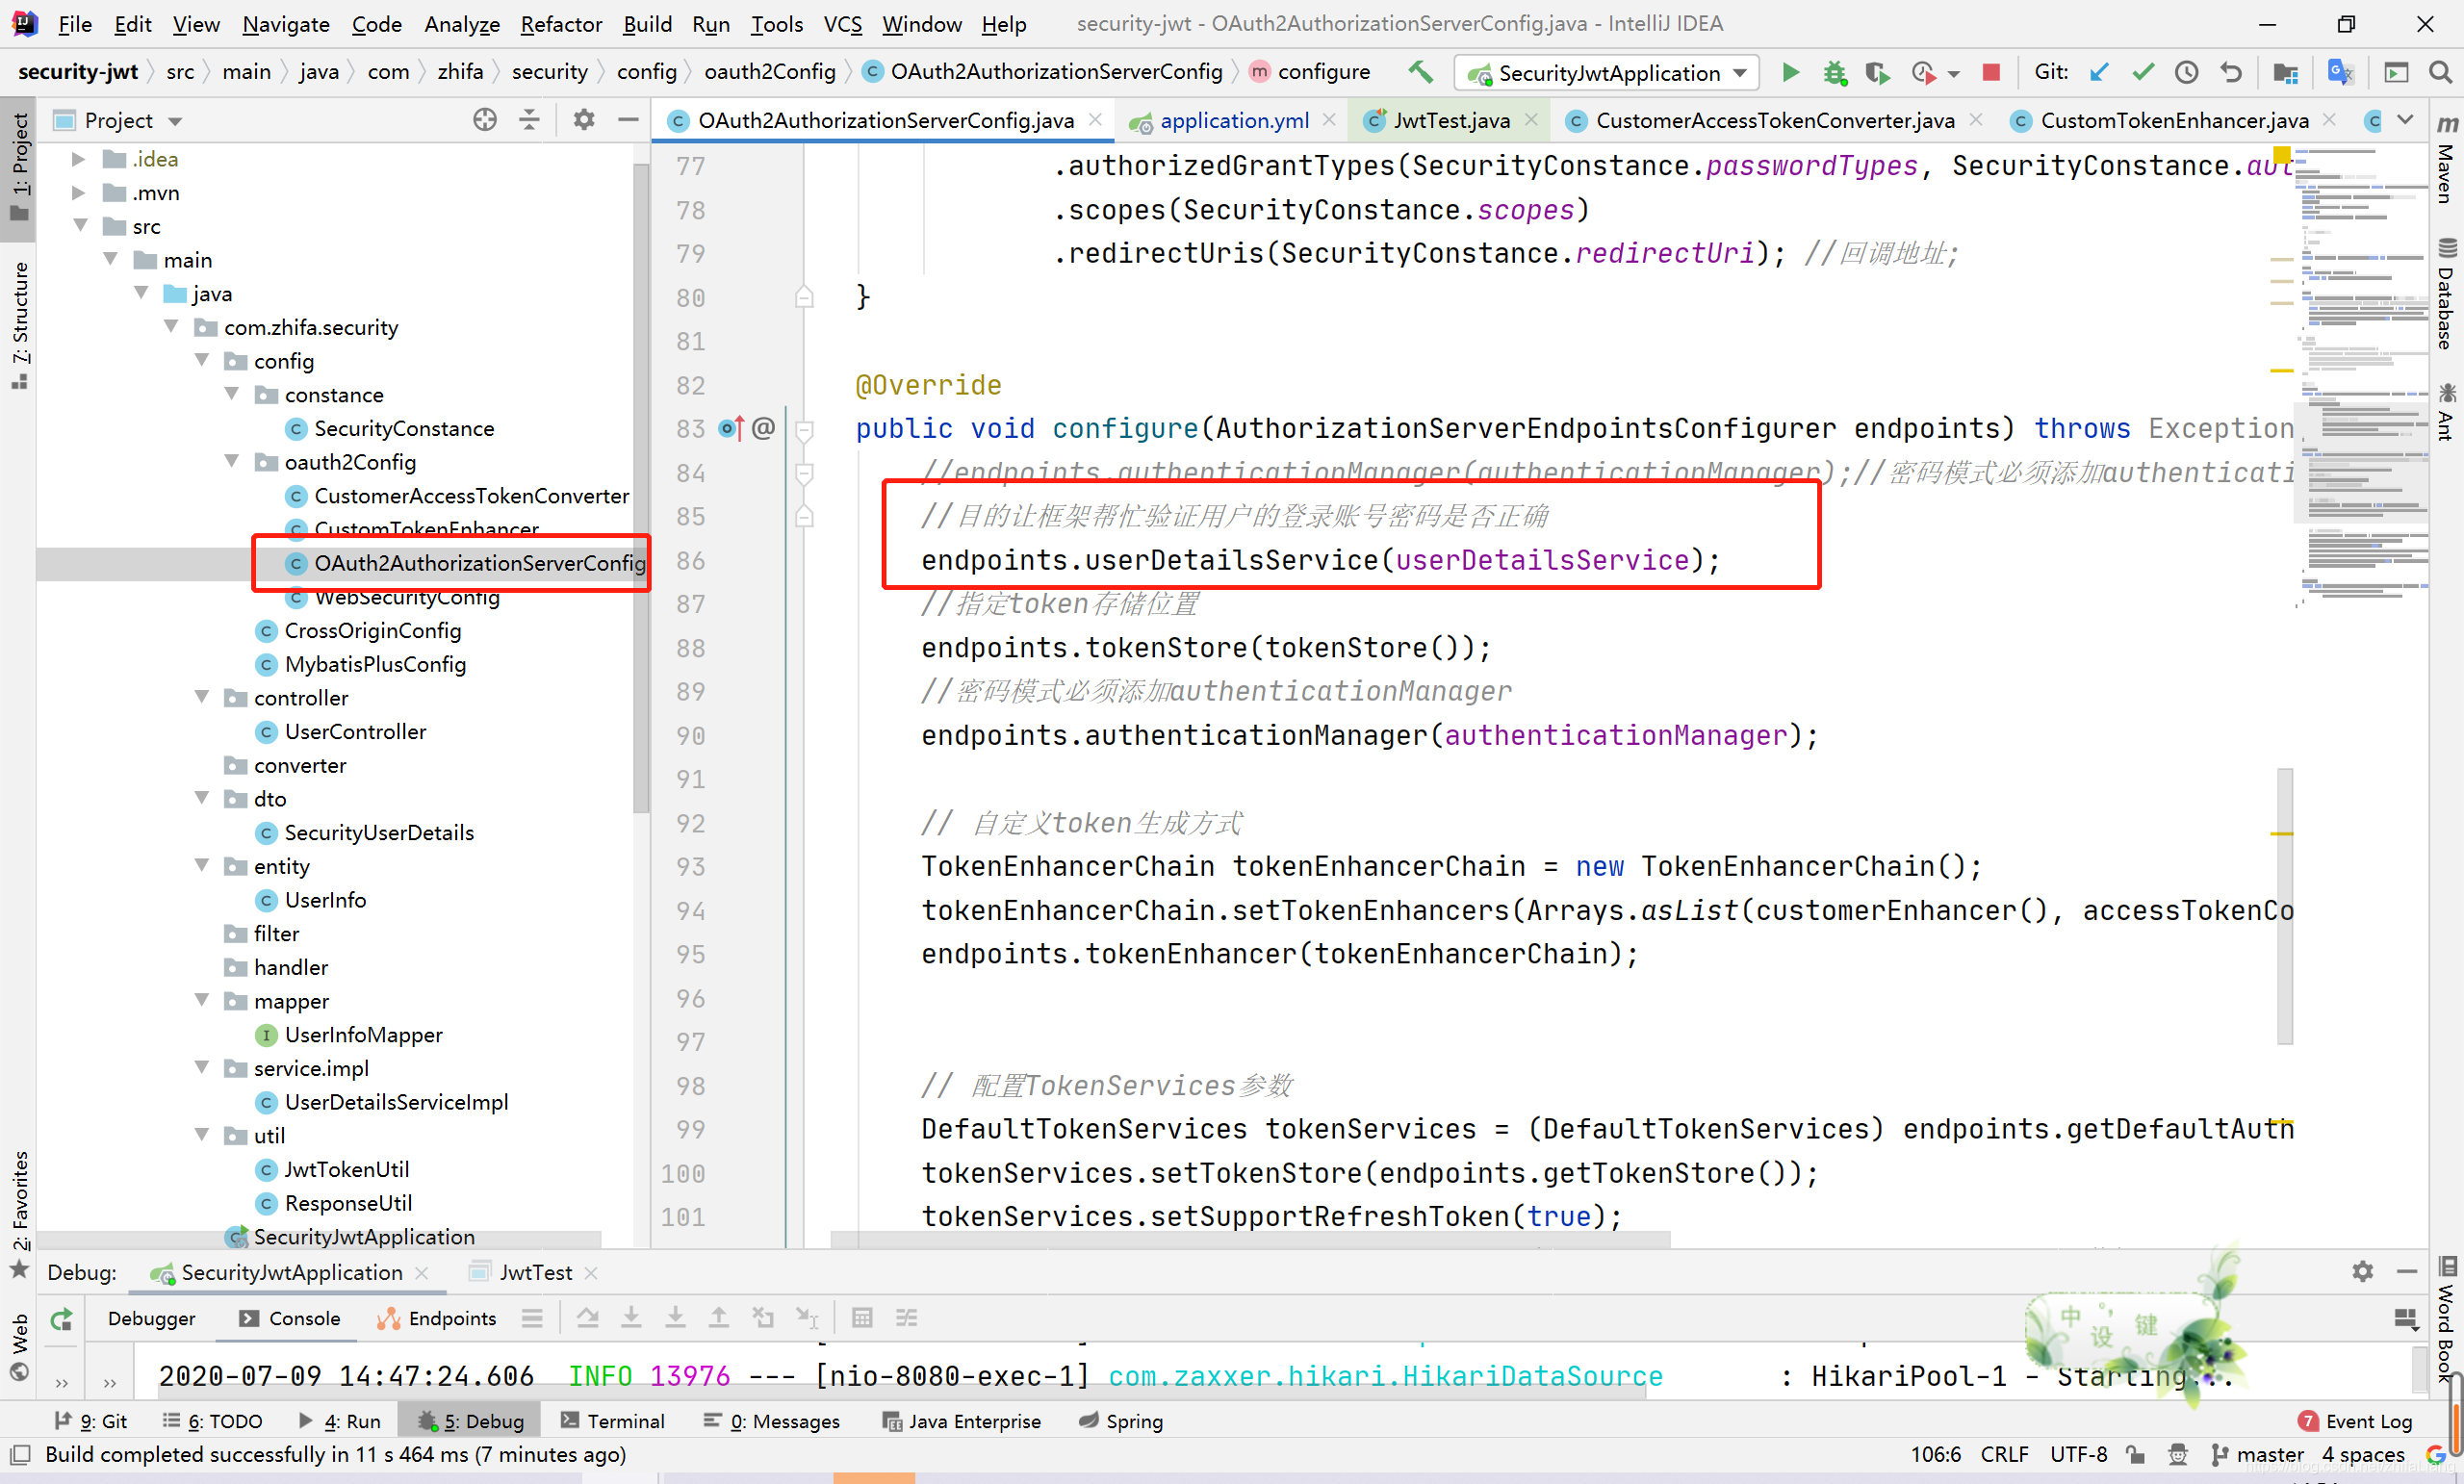
@Override
public void configure(AuthorizationServerEndpointsConfigurer endpoints) throws Exception {
//endpoints.authenticationManager(authenticationManager);//密码模式必须添加authenticationManager
//目的让框架帮忙验证用户的登录账号密码是否正确
endpoints.userDetailsService(userDetailsService);
//指定token存储位置
endpoints.tokenStore(tokenStore());
//密码模式必须添加authenticationManager
endpoints.authenticationManager(authenticationManager);
// 自定义token生成方式
TokenEnhancerChain tokenEnhancerChain = new TokenEnhancerChain();
tokenEnhancerChain.setTokenEnhancers(Arrays.asList(customerEnhancer(), accessTokenConverter()));
endpoints.tokenEnhancer(tokenEnhancerChain);
// 配置TokenServices参数
DefaultTokenServices tokenServices = (DefaultTokenServices) endpoints.getDefaultAuthorizationServerTokenServices();
tokenServices.setTokenStore(endpoints.getTokenStore());
tokenServices.setSupportRefreshToken(true);
tokenServices.setClientDetailsService(endpoints.getClientDetailsService());
tokenServices.setTokenEnhancer(endpoints.getTokenEnhancer());
tokenServices.setAccessTokenValiditySeconds((int) TimeUnit.DAYS.toSeconds(SecurityConstance.jwtActiveTime_day)); // 天
endpoints.tokenServices(tokenServices);
}
@Override
public void configure(AuthorizationServerSecurityConfigurer security) throws Exception {
security.allowFormAuthenticationForClients()
.checkTokenAccess(SecurityConstance.permitAll);
}
}
配置这两个转换器
oauth2–密码模式
http://localhost:8080/oauth/token
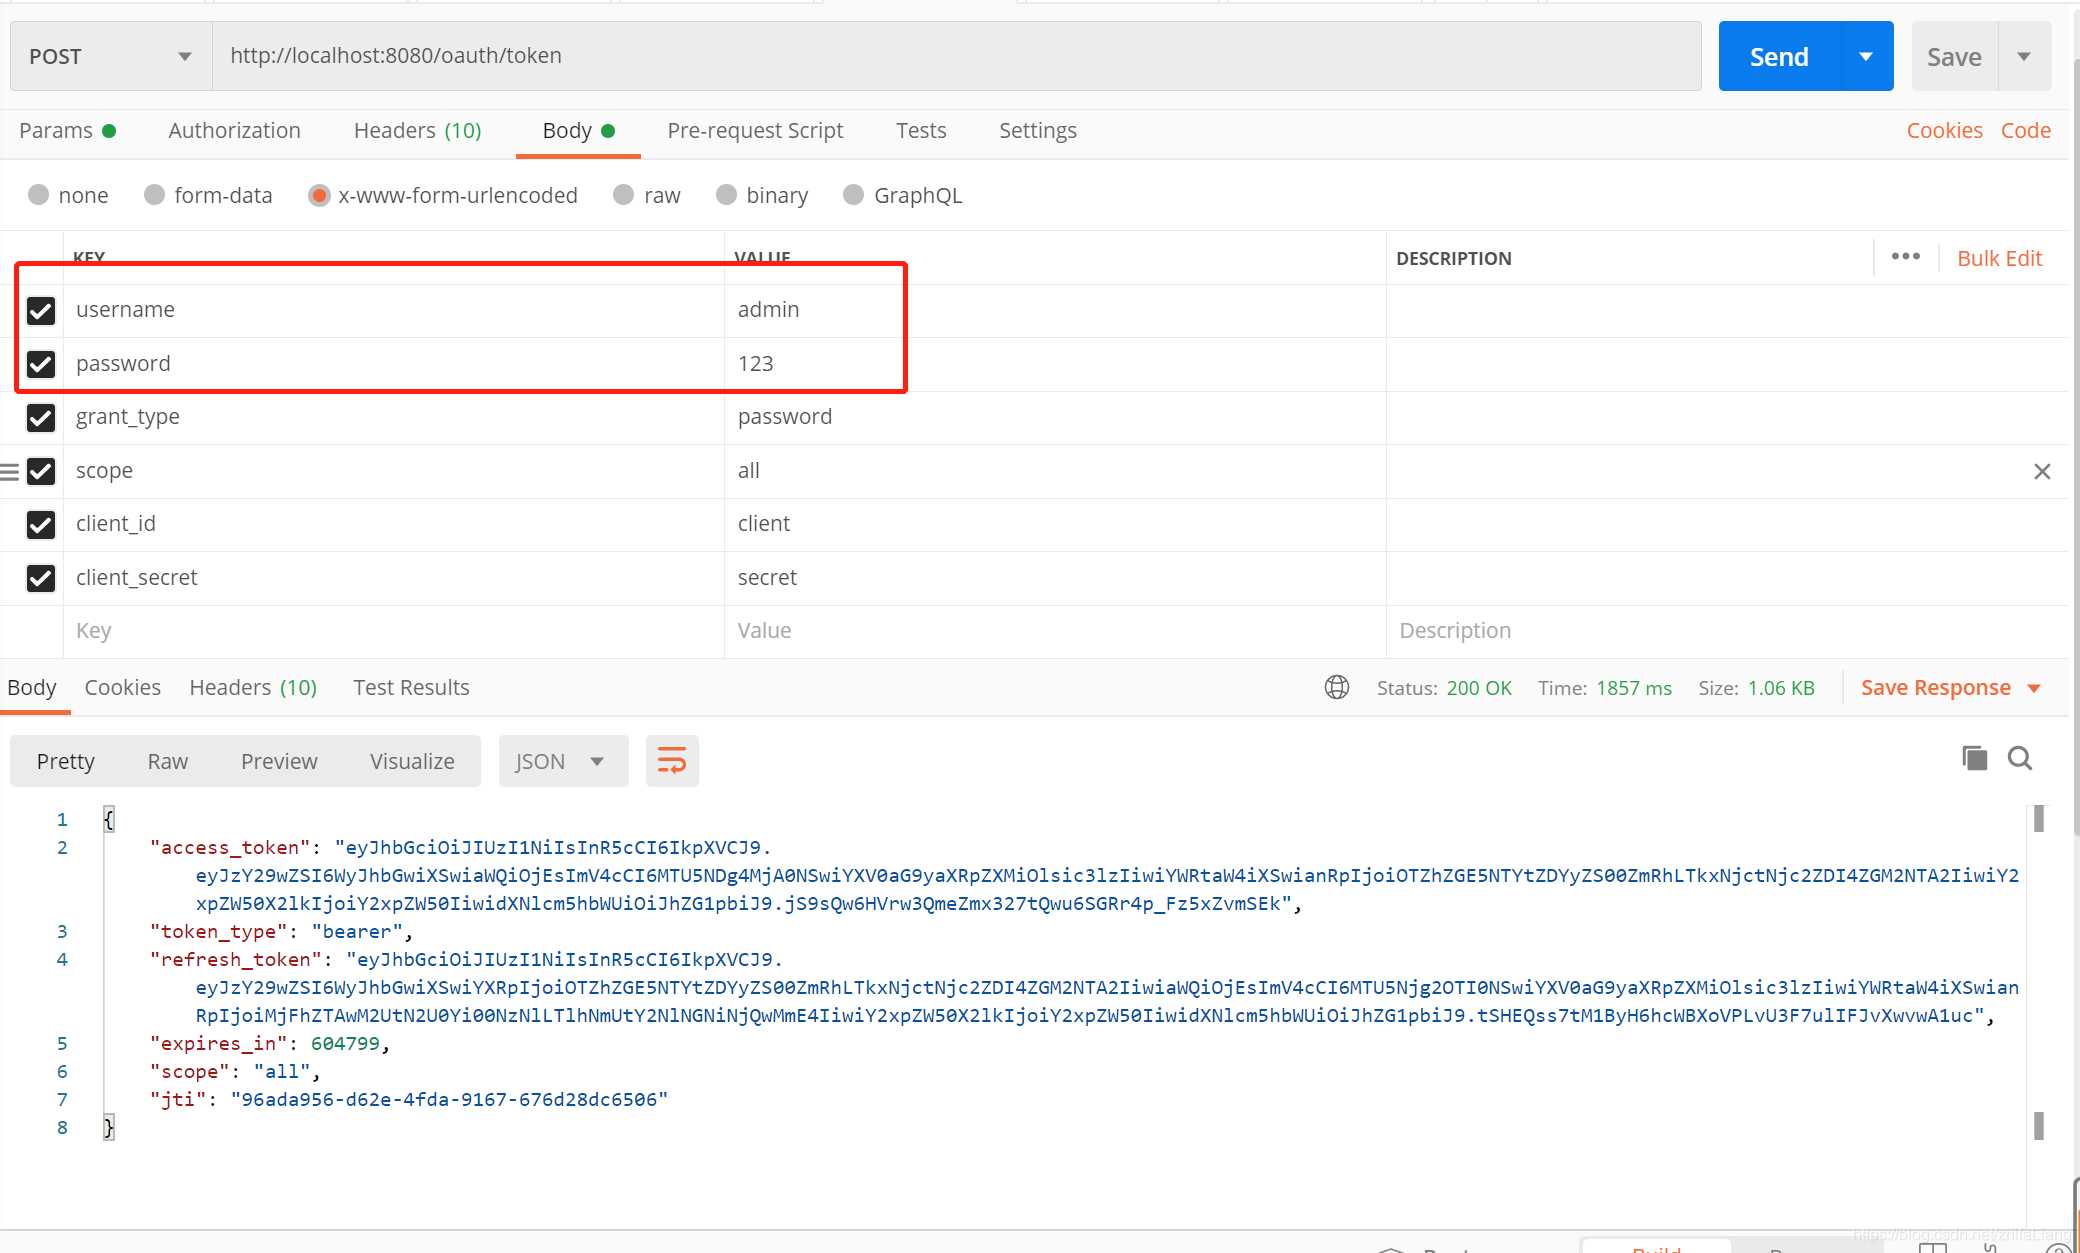
只有账号密码是自定义的,其他参数基本就是固定的(),通过账号密码登录验证账号密码过程就不啰嗦了,自己百度springsecurity教程。
实现框架提供的接口UserDetailsService ,复写 public UserDetails loadUserByUsername(String username)方法,自己通过用户名查用户。
import com.zhifa.security.dto.SecurityUserDetails;
import com.zhifa.security.entity.UserInfo;
import com.zhifa.security.mapper.UserInfoMapper;
import lombok.extern.slf4j.Slf4j;
import org.springframework.beans.factory.annotation.Autowired;
import org.springframework.security.core.userdetails.UserDetails;
import org.springframework.security.core.userdetails.UserDetailsService;
import org.springframework.security.core.userdetails.UsernameNotFoundException;
import org.springframework.security.crypto.bcrypt.BCryptPasswordEncoder;
import org.springframework.stereotype.Service;

/*
 * UserDetailsService 有安全框架提供,只要重写loadUserByUsername方法即可
 *
 * */
@Service
@Slf4j
public class UserDetailsServiceImpl implements UserDetailsService {
    @Autowired
    private UserInfoMapper userInfoMapper;
    @Autowired
    private BCryptPasswordEncoder bCryptPasswordEncoder;

    /**
     * 从数据库中获取用户信息,返回一个 UserDetails 对象,
     *
     * @param username
     * @return
     * @throws UsernameNotFoundException
     */
    @Override
    public UserDetails loadUserByUsername(String username) throws UsernameNotFoundException {
        //通过用户名获取用户
        UserInfo user = userInfoMapper.findByUsername(username);
        user.setPassword(bCryptPasswordEncoder.encode(user.getPassword()));//数据库是明文这里转换一下
        //将 user 对象转化为 UserDetails 对象
        log.warn("loadUserByUsername: {}", username);
        log.warn("user: {}", user);
        return new SecurityUserDetails(user);

    }
}
设置自定义的用户验证
再回到刚才密码模式返回的结果:
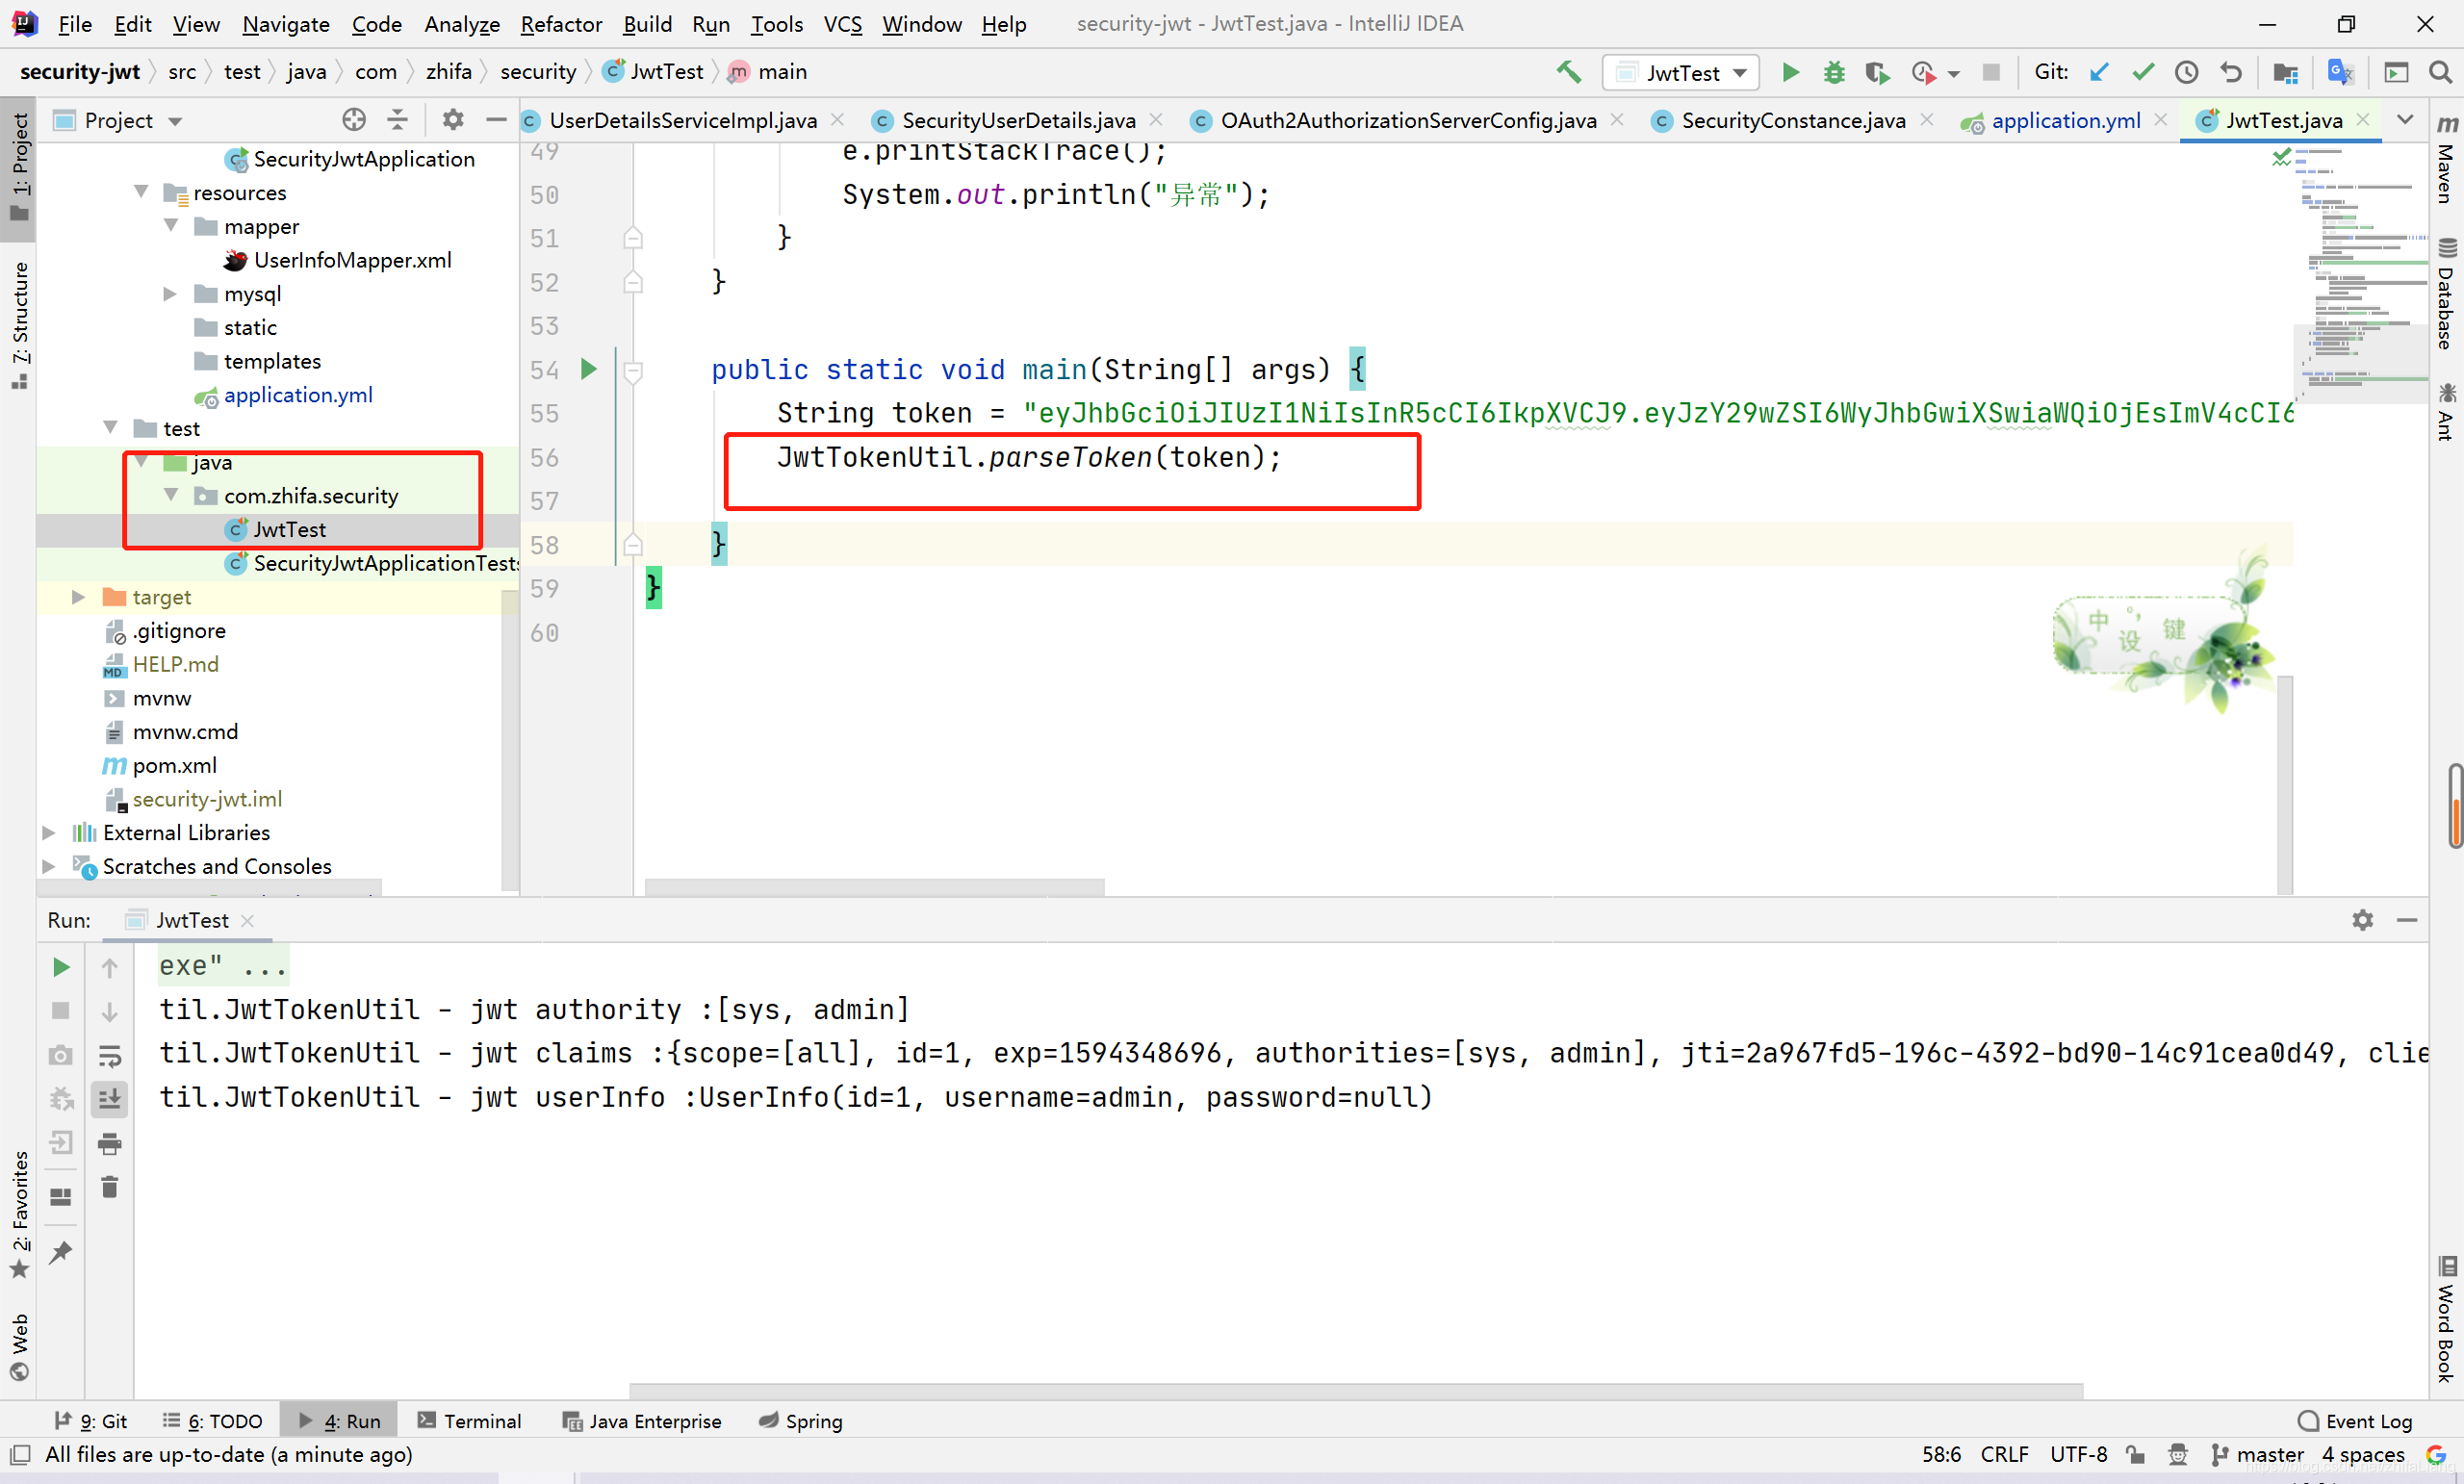
到jwt官网验证那串token(access_token) 点击jwt官网地址
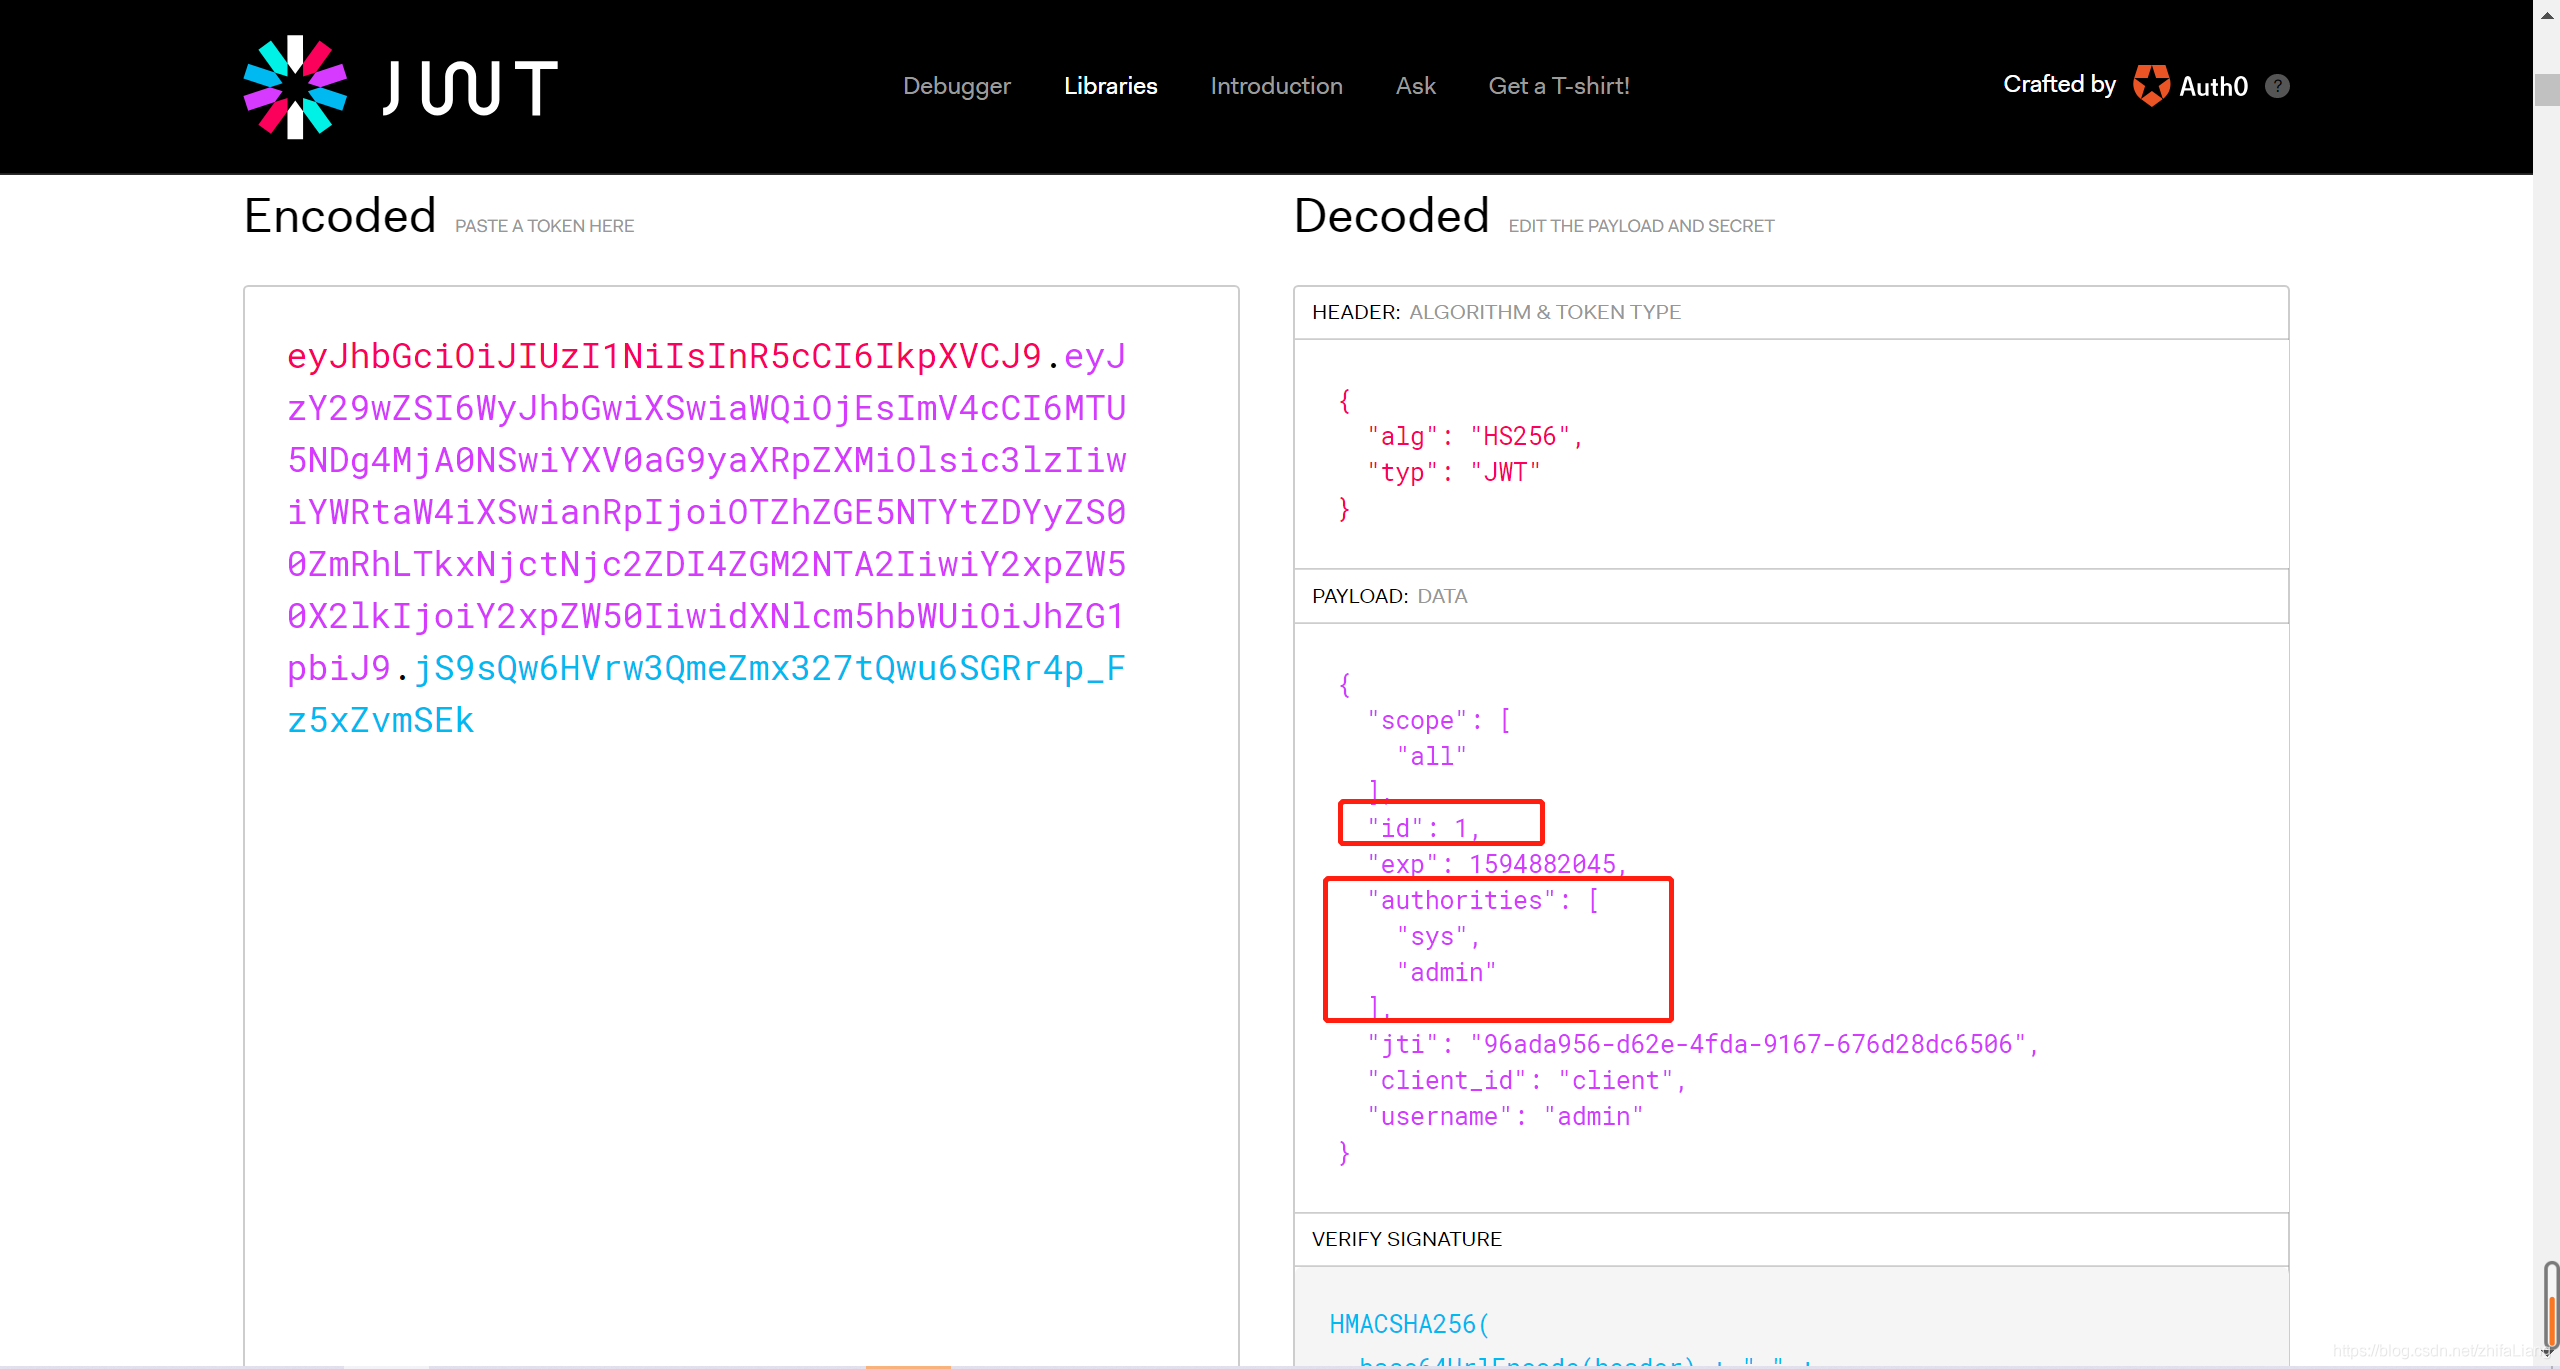
上面的token信息就是CustomerAccessTokenConverter 这个转换器里面封装过的,目的达到了。
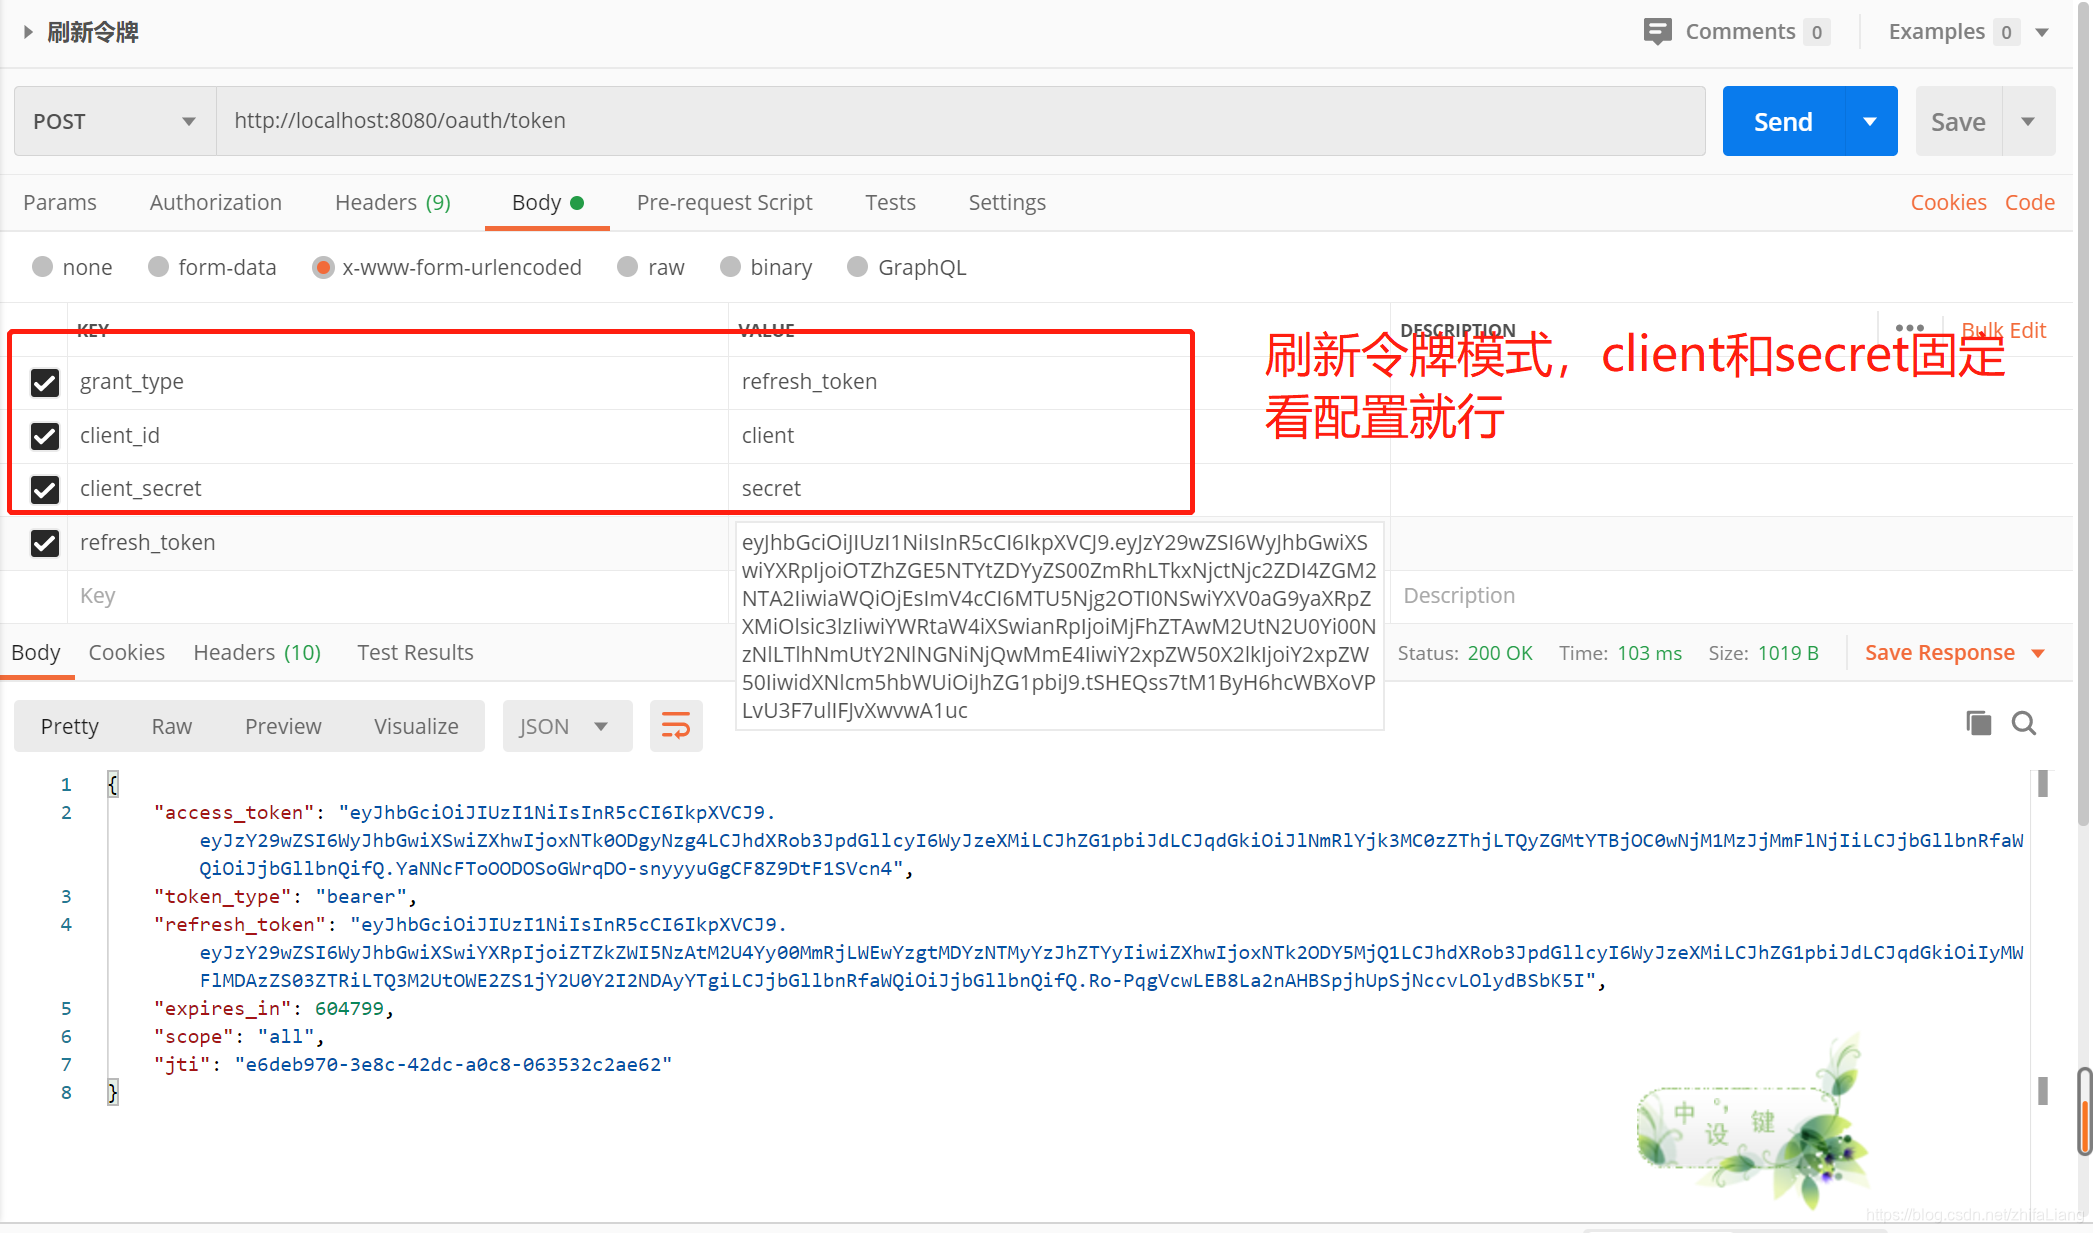
oauth2–刷新令牌
http://localhost:8080/oauth/token
拿上面的refresh_token作为参数访问springsecurity提供的访问端点就能重新获取到access_token
oauth2–授权码模式
浏览器直接访问:
http://localhost:8080/oauth/authorize?client_id=client&client_secret=secret&response_type=code
参数也是配置好的 基本固定
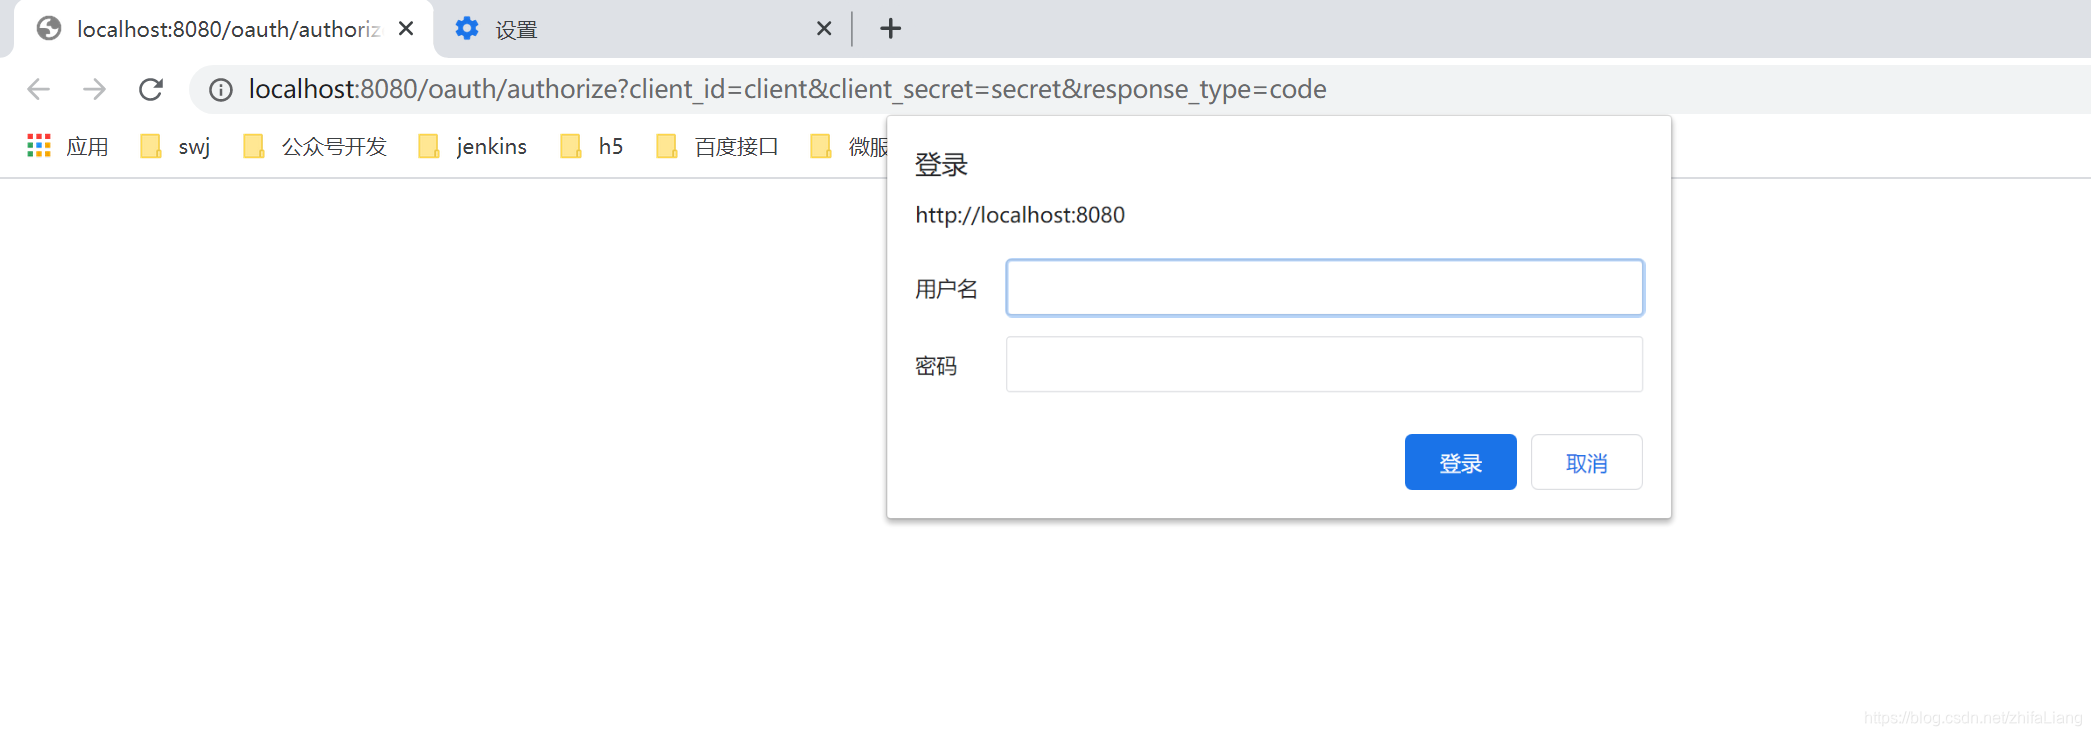
输入数据库里面的账号密码
登录之后:
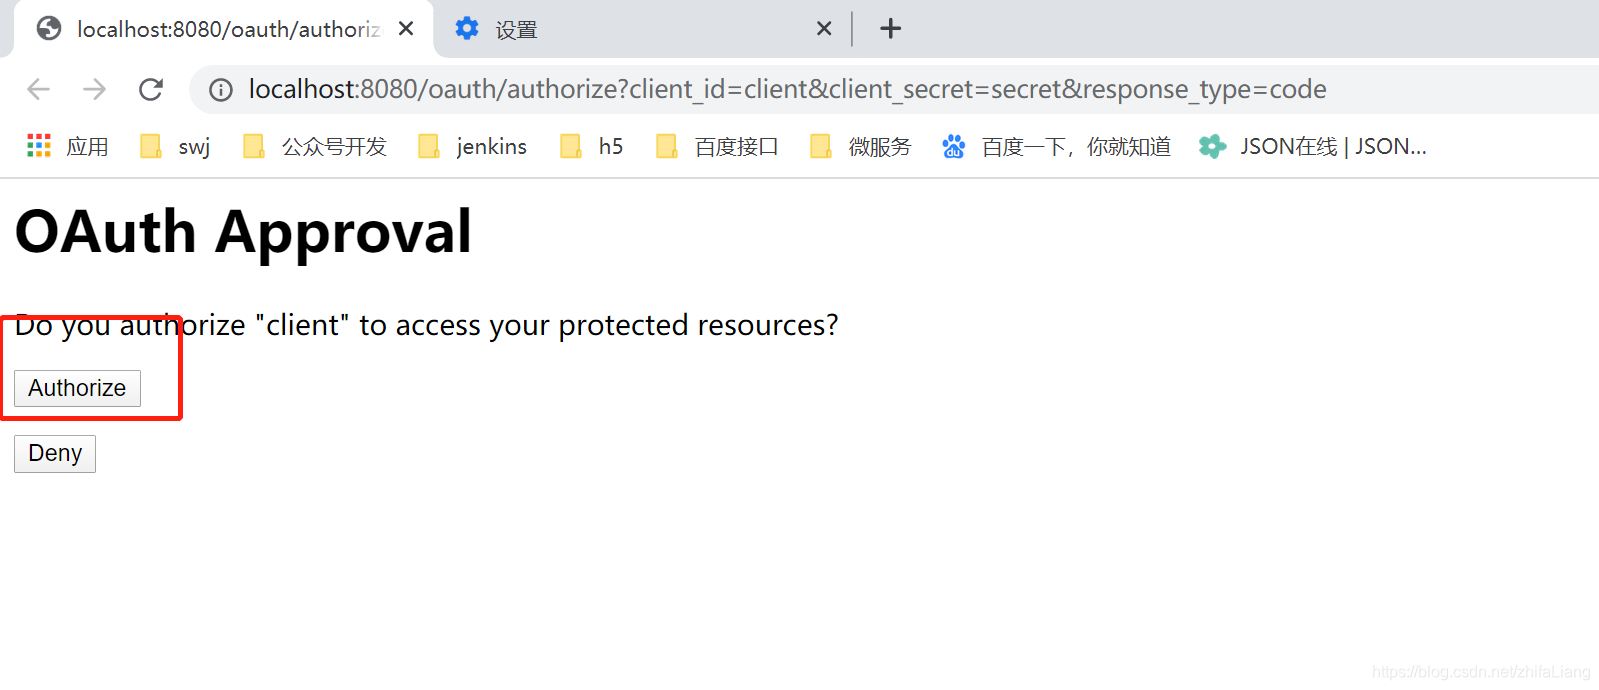
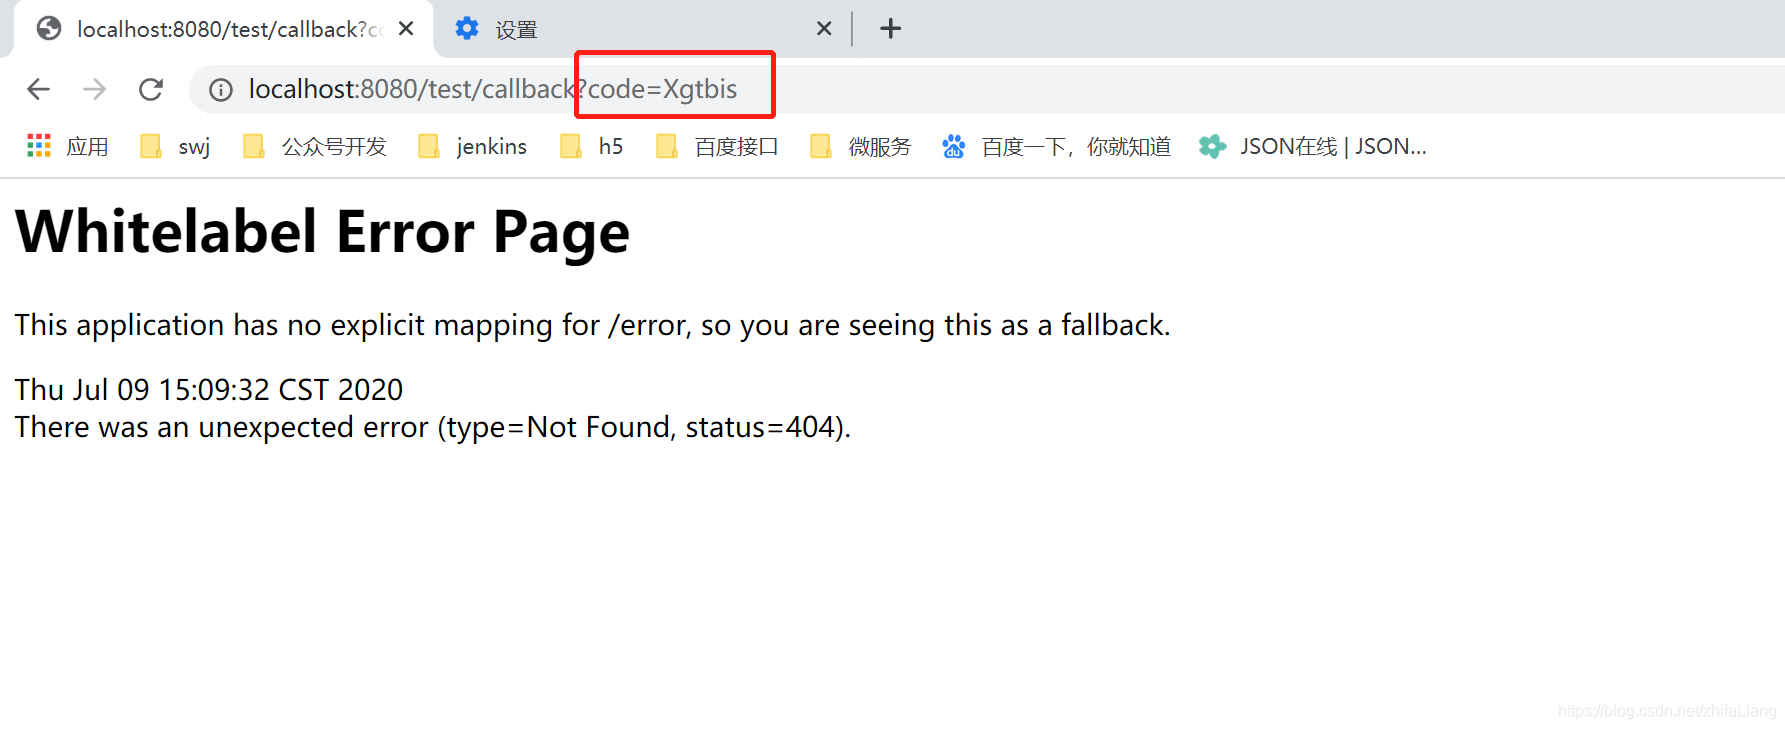
然后点击授权。之后他就会回调一个code
前面的回调地址是配置客户端时候配置的,当然你可以查资料设置读数据库
拿着刚才的code获取token:
grant_type authorization_code
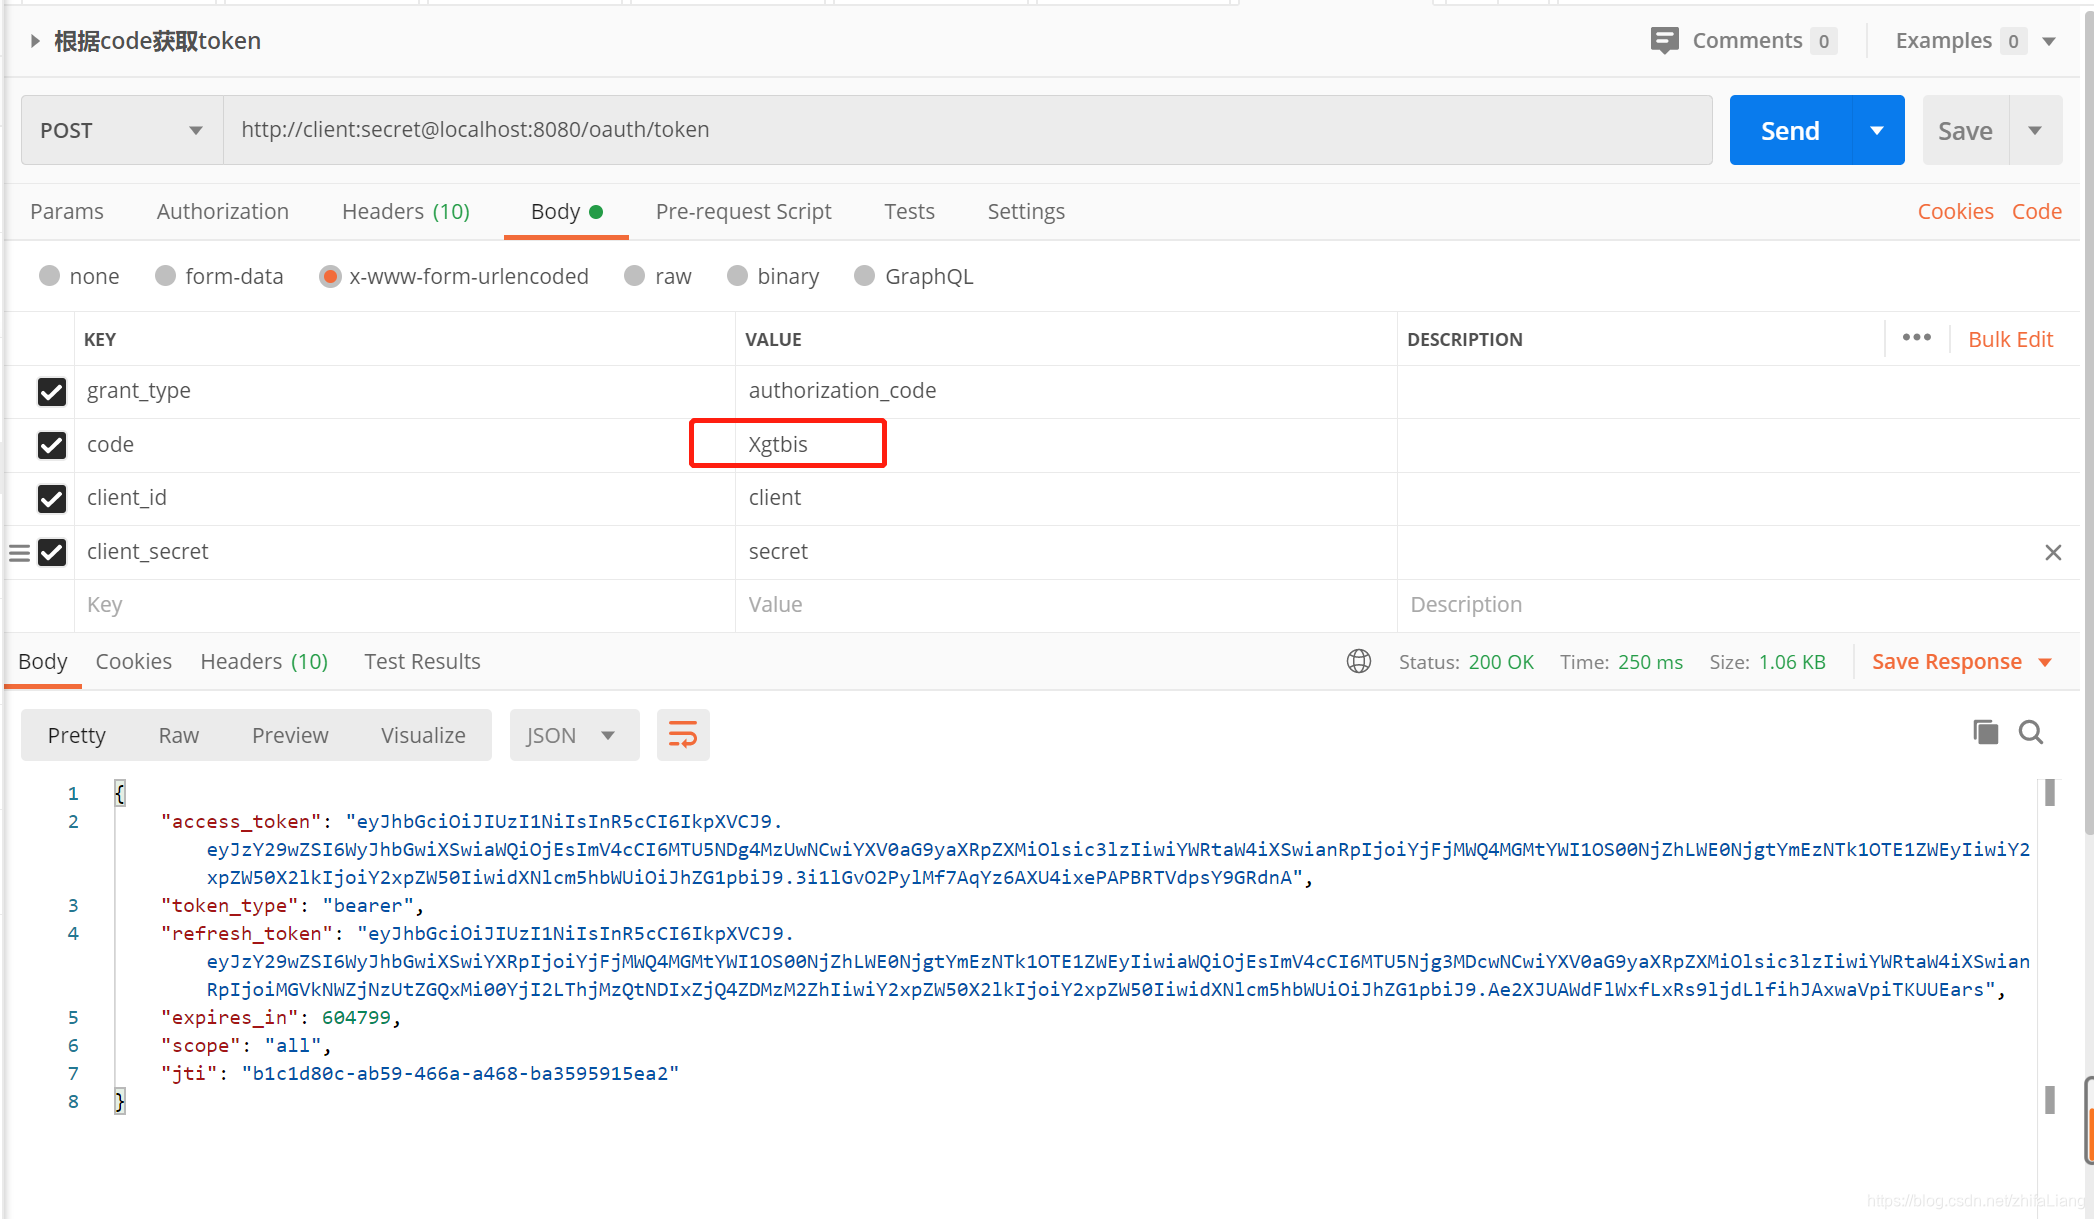
接下来就是其他资源系统解析这串token了,在微服务里面这个就单单是认证的服务,和其他服务不耦合,其他服务只要解析token就知道是谁发来的请求;
里面有工具类可以解析的,其他服务系统只要写个全局拦截器就能实现请求的拦截访问,也能拿到请求的用户信息。


 1929
1929


 到【灌水乐园】发言


