


SpringBoot自动配置源码分析-Environment
SpringBootApplication
在使用SpringBoot框架搭建项目的时候,我们很简单地在启动类上加上@SpringBootApplication注解就能实现很多自动配置的功能。文章将通过源码分析,Spring如何帮我们实现这一切。
Environment的初始化
在Spring中,我们会将各种配置属性注入到Environment中。之后我们对bean的初始化,将会从其中获取属性值。
private ConfigurableEnvironment prepareEnvironment(SpringApplicationRunListeners listeners,
			ApplicationArguments applicationArguments) {
		// Create and configure the environment
		//step-1
		ConfigurableEnvironment environment = getOrCreateEnvironment();
		//step-2
		configureEnvironment(environment, applicationArguments.getSourceArgs());
		//step-3
		ConfigurationPropertySources.attach(environment);
		//step-4
		listeners.environmentPrepared(environment);
		//step-5
		bindToSpringApplication(environment);
		//step-6
		if (!this.isCustomEnvironment) {
			environment = new EnvironmentConverter(getClassLoader()).convertEnvironmentIfNecessary(environment,
					deduceEnvironmentClass());
		}
		//step-7
		ConfigurationPropertySources.attach(environment);
		return environment;
	}
	//step-1
	private ConfigurableEnvironment getOrCreateEnvironment() {
   		if (this.environment != null) {
   			return this.environment;
   		}
   		switch (this.webApplicationType) {
   		case SERVLET:
   			return new StandardServletEnvironment();
   		case REACTIVE:
   			return new StandardReactiveWebEnvironment();
   		default:
   			return new StandardEnvironment();
   		}
   	}
以 StandardServletEnvironment 为例来分析,创建成功后,Environment中就已经包含了几个PropertySource对象,PropertySource对象可以理解为将参数根据不同的来源进行封装成不同的组。
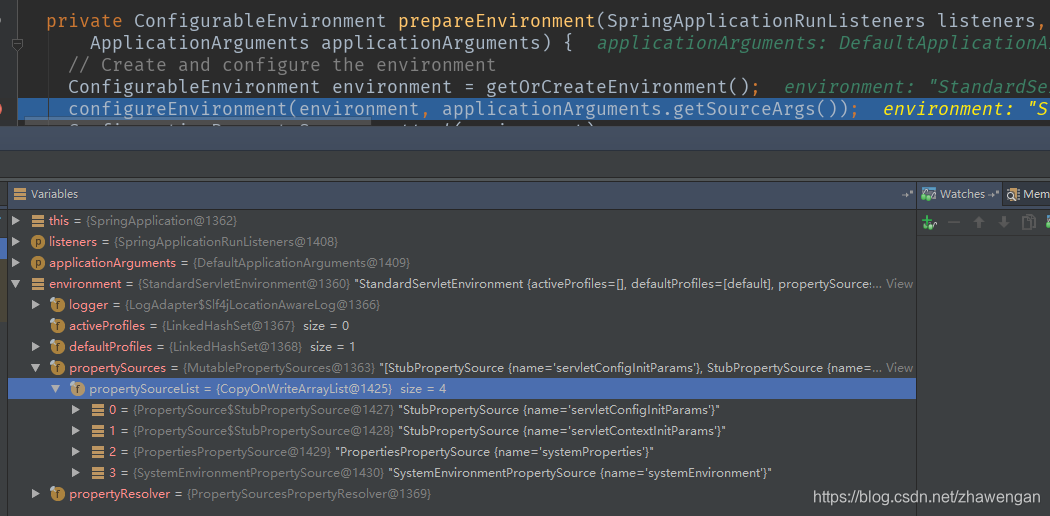
可以看到environment对象一经创建,就已经包含了4个PropertySource。
但我们看StandardServletEnvironment对象的构造函数,只是一个空函数
	public StandardServletEnvironment() {
	}
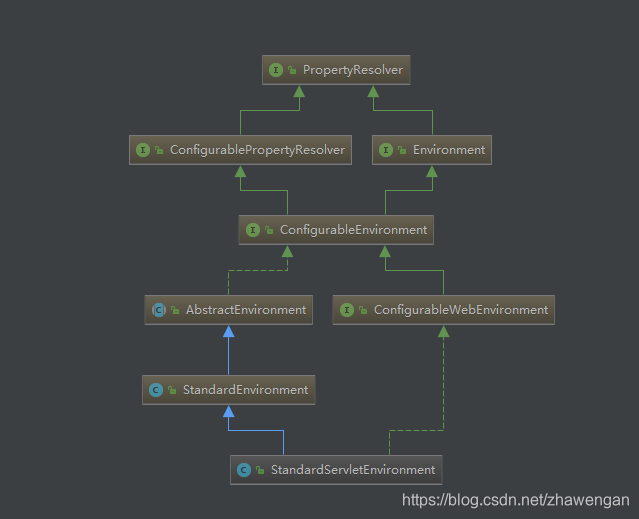
通过查看其继承结构,可以猜测其父类方法必有玄机。
继续查看StandardEnvironment类,其并没有显示的申明构造函数。继续查看AbstractEnvironment类。
	public AbstractEnvironment() {
		customizePropertySources(this.propertySources);
	}
....
	protected void customizePropertySources(MutablePropertySources propertySources) {

	}
可以看到,AbstractEnvironment类的构造函数中调用了customizePropertySources方法,虽然其本身是一个空方法,但子类完全可以在customizePropertySources中定义自己的逻辑。
	//StandardServletEnvironment类
	protected void customizePropertySources(MutablePropertySources propertySources) {
        propertySources.addLast(new StubPropertySource("servletConfigInitParams"));
        propertySources.addLast(new StubPropertySource("servletContextInitParams"));
        if(JndiLocatorDelegate.isDefaultJndiEnvironmentAvailable()) {
            propertySources.addLast(new JndiPropertySource("jndiProperties"));
        }

        super.customizePropertySources(propertySources);
    }
	//StandardEnvironment类
	@Override
	protected void customizePropertySources(MutablePropertySources propertySources) {
		propertySources.addLast(
				new PropertiesPropertySource(SYSTEM_PROPERTIES_PROPERTY_SOURCE_NAME, getSystemProperties()));
		propertySources.addLast(
				new SystemEnvironmentPropertySource(SYSTEM_ENVIRONMENT_PROPERTY_SOURCE_NAME, getSystemEnvironment()));
	}
我们可以明显的找到environment初始化后包含的4个PropertySource就在customizePropertySources的实现中。
Application.properties的加载
	//step-2
	protected void configureEnvironment(ConfigurableEnvironment environment, String[] args) {
		if (this.addConversionService) {
			ConversionService conversionService = ApplicationConversionService.getSharedInstance();
			environment.setConversionService((ConfigurableConversionService) conversionService);
		}
		configurePropertySources(environment, args);
		configureProfiles(environment, args);
	}
在step-2中,configurePropertySources(environment, args);主要作用是将args中参数进行封装,并包装在一个commandLineArgs的PropertySource中。
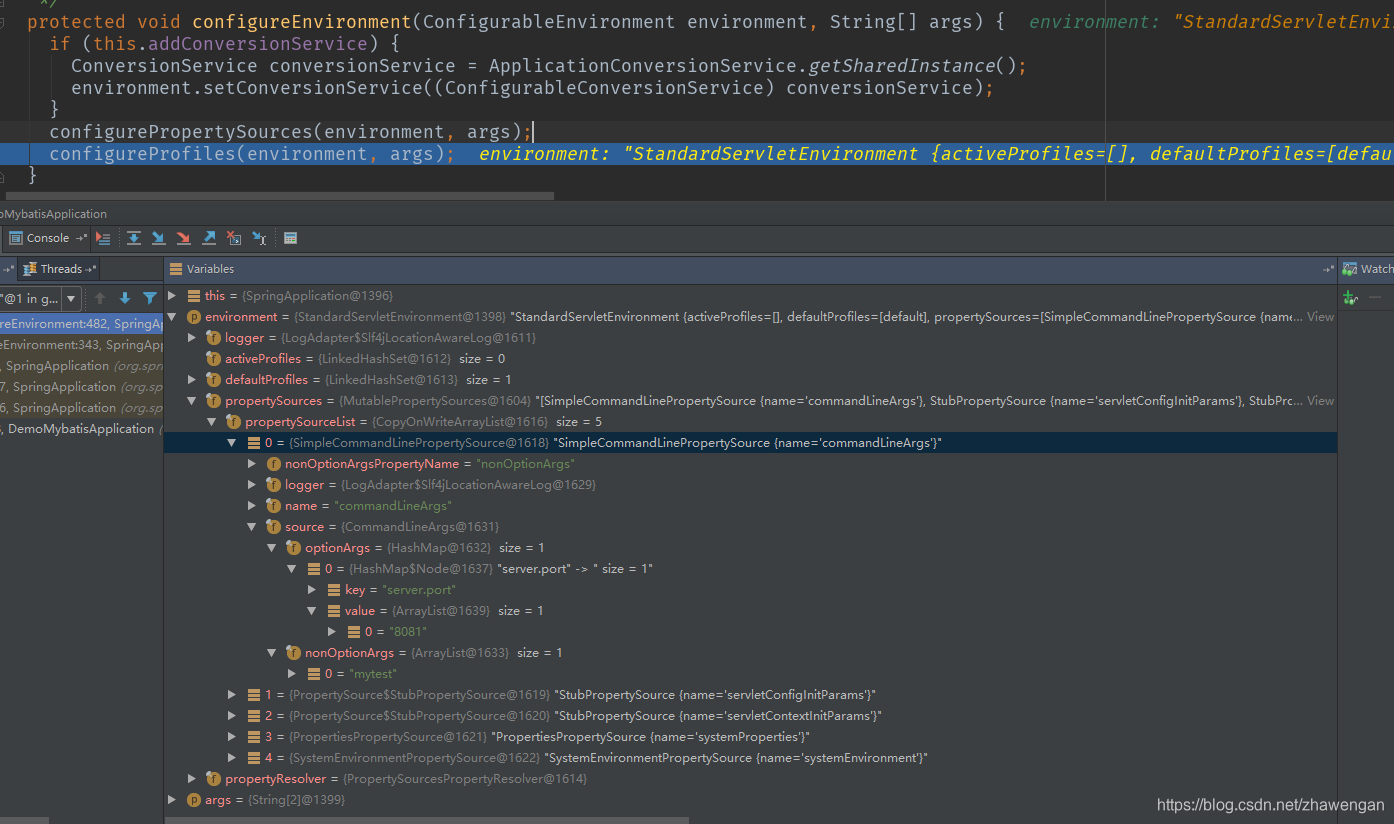
注意:args中的参数,会根据是否以 – 开头来分别放入不同map中。
	protected void configureProfiles(ConfigurableEnvironment environment, String[] args) {
		//获取SpringApplication中additionalProfiles中添加的profile
		Set<String> profiles = new LinkedHashSet<>(this.additionalProfiles);
		//获取environment中的profile。
		//注意此时,除了系统指定的4个PropertySource,我们只解析了args参数,所以此时
		//唯一能获取到的就是通过args指定的profile。因为application.properties/application.yml尚未解析
		profiles.addAll(Arrays.asList(environment.getActiveProfiles()));
		environment.setActiveProfiles(StringUtils.toStringArray(profiles));
	}
	//step-3,step-7
	//查看environment中是否存在一个configurationProperties的PropertySource,如果存在,则将其删除。
	//之后将剩余的其他PropertySource组合到一个新的PropertySource中,并添加到已有PropertySource列表中。
	//比如原有a,b,c,d,e等5个PropertySource,现在会重新创建一个PropertySource的F,F包含了a,b,c,d,e。新的PropertySource列表是:F,a,b,c,d,e
	public static void attach(Environment environment) {
   	Assert.isInstanceOf(ConfigurableEnvironment.class, environment);
   	MutablePropertySources sources = ((ConfigurableEnvironment) environment).getPropertySources();
   	PropertySource<?> attached = sources.get(ATTACHED_PROPERTY_SOURCE_NAME);
   	if (attached != null && attached.getSource() != sources) {
   		sources.remove(ATTACHED_PROPERTY_SOURCE_NAME);
   		attached = null;
   	}
   	if (attached == null) {
   		sources.addFirst(new ConfigurationPropertySourcesPropertySource(ATTACHED_PROPERTY_SOURCE_NAME,
   				new SpringConfigurationPropertySources(sources)));
   	}
   }
 //step-4,
 listeners.environmentPrepared(environment);
environment初步配置完成后,通过listeners发布一次environmentPrepared事件,之后将environment绑定到SpringApplication,然后再进行一次ConfigurationPropertySources.attach(environment),environment就创建完成。所以application.properties的解析必定在这其中。
listeners的事件发布,最终响应到ConfigFileApplicationListener的onApplicationEvent中
	@Override
	public void onApplicationEvent(ApplicationEvent event) {
		if (event instanceof ApplicationEnvironmentPreparedEvent) {
			onApplicationEnvironmentPreparedEvent((ApplicationEnvironmentPreparedEvent) event);
		}
		if (event instanceof ApplicationPreparedEvent) {
			onApplicationPreparedEvent(event);
		}
	}
	private void onApplicationEnvironmentPreparedEvent(ApplicationEnvironmentPreparedEvent event) {
		List<EnvironmentPostProcessor> postProcessors = loadPostProcessors();
		postProcessors.add(this);
		AnnotationAwareOrderComparator.sort(postProcessors);
		for (EnvironmentPostProcessor postProcessor : postProcessors) {
			postProcessor.postProcessEnvironment(event.getEnvironment(), event.getSpringApplication());
		}
	}

	List<EnvironmentPostProcessor> loadPostProcessors() {
		return SpringFactoriesLoader.loadFactories(EnvironmentPostProcessor.class, getClass().getClassLoader());
	}
通过源码分析我们知道,最终会执行一组EnvironmentPostProcessor对象的postProcessEnvironment函数,其中包括ConfigFileApplicationListener自身。
	@Override
	public void postProcessEnvironment(ConfigurableEnvironment environment, SpringApplication application) {
		addPropertySources(environment, application.getResourceLoader());
	}

	protected void addPropertySources(ConfigurableEnvironment environment, ResourceLoader resourceLoader) {
		RandomValuePropertySource.addToEnvironment(environment);
		new Loader(environment, resourceLoader).load();
	}

	//Loader.class 内部类,最终application.properties在此加载
		void load() {
			FilteredPropertySource.apply(this.environment, DEFAULT_PROPERTIES, LOAD_FILTERED_PROPERTY,
					(defaultProperties) -> {
						this.profiles = new LinkedList<>();
						this.processedProfiles = new LinkedList<>();
						this.activatedProfiles = false;
						this.loaded = new LinkedHashMap<>();
						initializeProfiles();
						while (!this.profiles.isEmpty()) {
							Profile profile = this.profiles.poll();
							if (isDefaultProfile(profile)) {
								addProfileToEnvironment(profile.getName());
							}
							load(profile, this::getPositiveProfileFilter,
									addToLoaded(MutablePropertySources::addLast, false));
							this.processedProfiles.add(profile);
						}
						load(null, this::getNegativeProfileFilter, addToLoaded(MutablePropertySources::addFirst, true));
						addLoadedPropertySources();
						applyActiveProfiles(defaultProperties);
					});
		}


 被折叠的 条评论
为什么被折叠?
被折叠的 条评论
为什么被折叠?
 到【灌水乐园】发言


