


方法一、使用 C++/CLI 创建一个桥接库
返回基础数据类型:
1.首先我们新建 一个C#的类库工程 CSharpLib
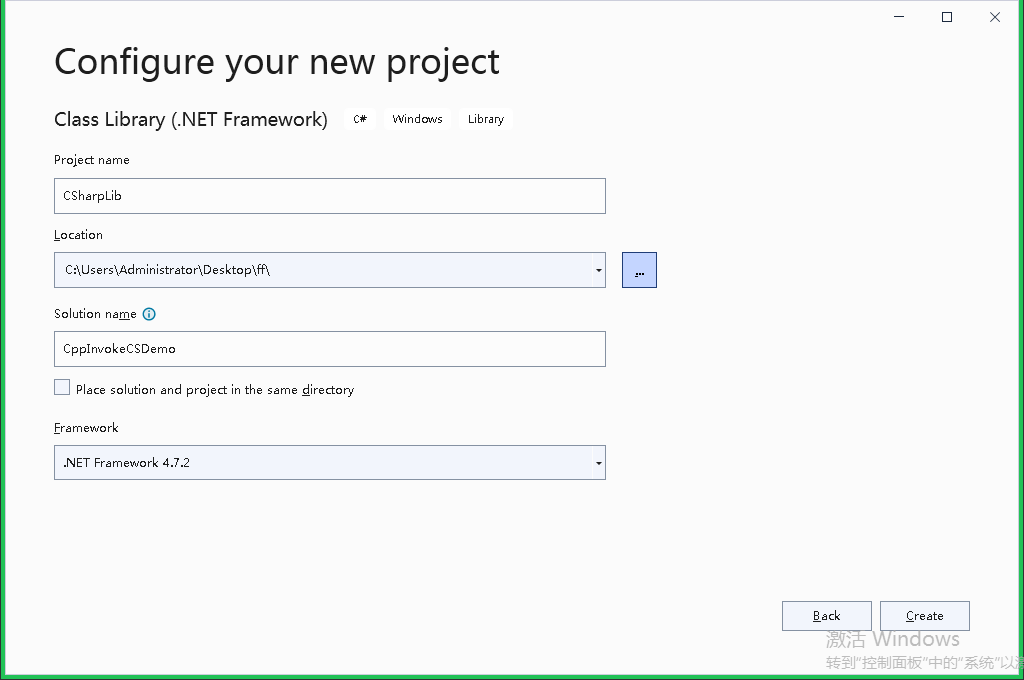
新建一个ExportClass类,增加一个GetID函数,如下:
1 public class ExplortClass
2     {
3         public int GetID()
4         {
5             return 1024;
6         }
7     }
2.新建一个CLR空工程CSBridge,这个库会作为中间桥接的库。将CSBridge工程的输出路径修改为CSharpLib工程的输出路径
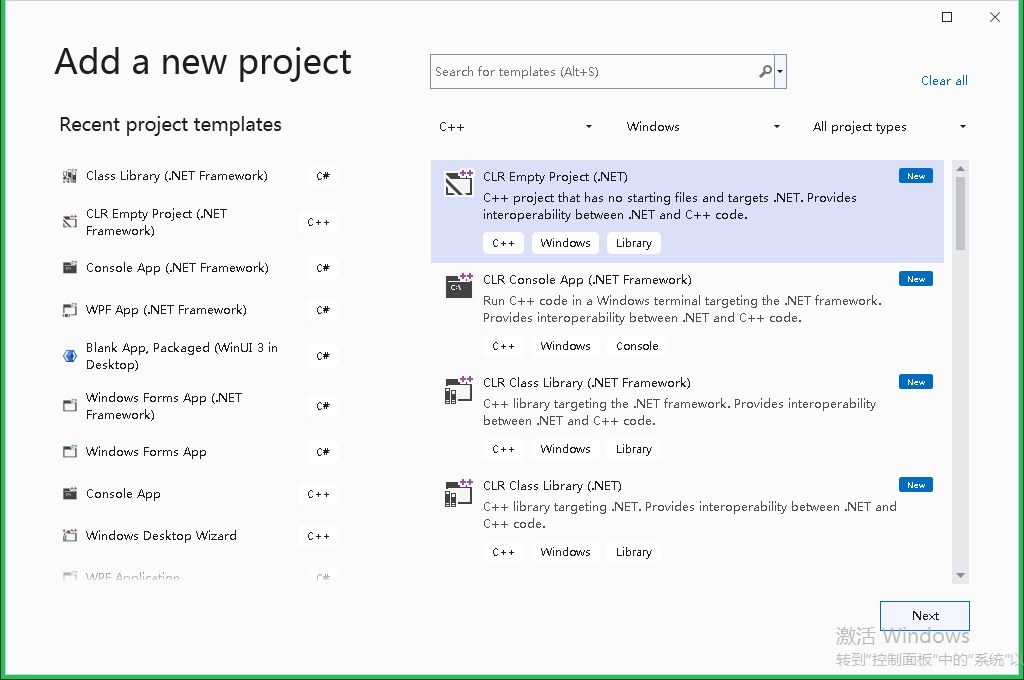
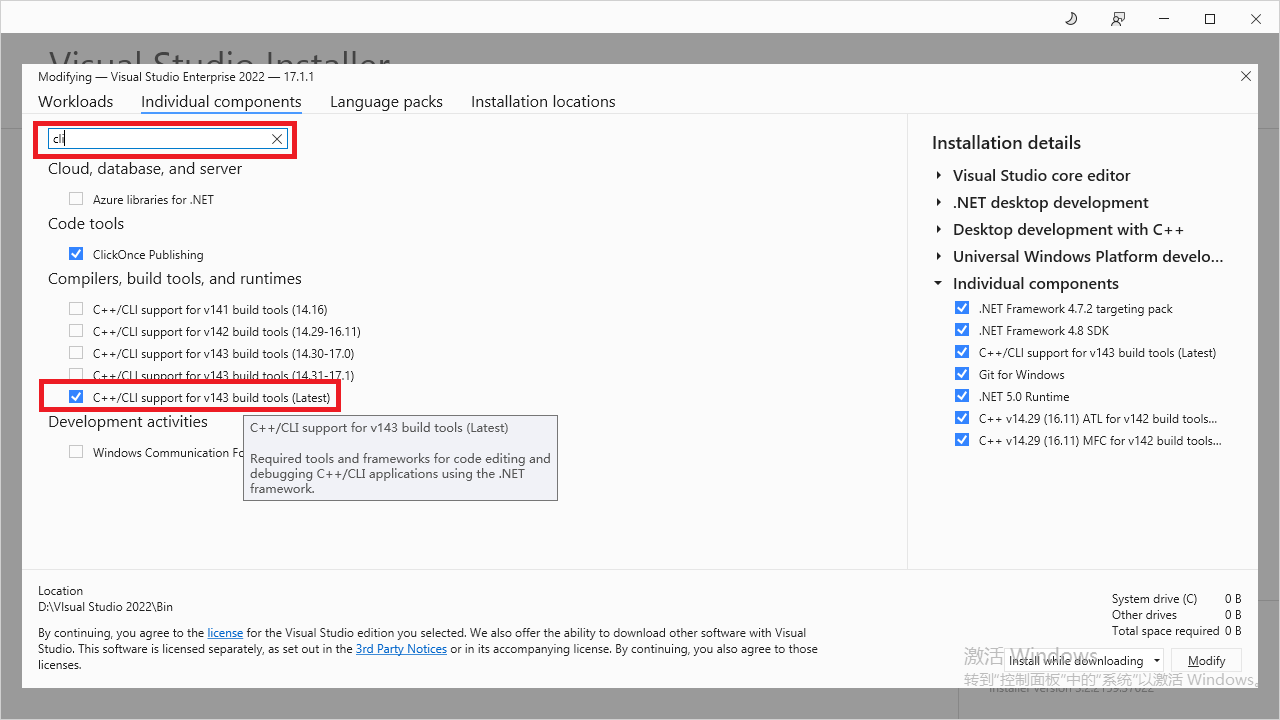
说明:如果没有看到CLR Empty,可以到Visual Studio的安装程序中钩选并安装(直接搜索cli)
新建一个bridge.cpp。输入以下代码
 1 #include <Windows.h>
 2 #include<msclr/marshal_cppstd.h>
 3
 4 //引用C# dll
 5 #using "./CSharpLib.dll"
 6
 7 //引用命名空间
 8 using namespace msclr::interop;
 9 using namespace System;
10 using namespace System::Runtime::InteropServices;
11 using namespace CSharpLib;
12
13 #define lib_export
14 #ifdef lib_export
15 #define cs_lib_api extern "C" __declspec(dllexport)
16 #else
17 #define cs_lib_api __declspec(dllimport)
18 #endif
19
20 typedef int(__stdcall* funGetId)();  //定义函数指针
21
22 //导出函数 供C++调用
23 //在这个函数里调用 C#的函数,做为中转层
24 cs_lib_api int GetID()
25 {
26     CSharpLib::ExplortClass^ c = gcnew CSharpLib::ExplortClass();
27     auto id = c->GetID();
28     return id;
29 }
这样就拥有了一个桥接工程 。
3. 新建一个C++控制台应用程序,输入以下代码测试。
// CppInvoke.cpp : This file contains the 'main' function. Program execution begins and ends there.
//

#include <iostream>
#include<Windows.h>

typedef int(__stdcall* funGetId)();

int main()
{
    HMODULE hInstance = LoadLibrary(L"CSBridge.dll");
    if (hInstance)
    {
        funGetId getId = (funGetId)GetProcAddress(hInstance, "GetID");

        if (getId)
        {
            auto result = getId();
            std::cout << result << std::endl;
        }
    }
}
可以看到输出结果为:1024
复杂一点的情况,返回一个结构体:
在CSharpLib中增加一个结构体Computer:
1     [StructLayout(LayoutKind.Sequential, CharSet = CharSet.Unicode)]
2     public struct Computer
3     {
4         public int cpuId;
5         public string cpuName;
6         public int osVersion;
7     }
增加一个获取Computer的函数
1   public Computer GetComputer()
2         {
3             Computer computer = new Computer();
4             computer.cpuId = 100000000;
5             computer.cpuName = "Intel";
6             computer.osVersion = 11;
7             return computer;
8         }
然后在CSBridge中增加一个用于和Computer交互的类型interop_Computer,这个类型是用于C++中调用时使用,使用C#中的Computer类型转换可以得到interop_Computer。
1 struct interop_Computer
2 {
3     int cpuId;
4     wchar_t* cpuName;
5     int osVersion;
6 };
再定义一个函数指针和增加一个中转层函数
 1 typedef interop_Computer(__stdcall* funGetComputer)();
 2
 3 cs_lib_api interop_Computer GetComputer()
 4 {
 5     CSharpLib::ExplortClass^ c = gcnew CSharpLib::ExplortClass();
 6     auto computer = c->GetComputer(); //调用C#中的函数
 7     System::IntPtr ptr = Marshal::AllocHGlobal(sizeof(interop_Computer));//需要提前分配空间
 8     System::Runtime::InteropServices::Marshal::StructureToPtr(computer, ptr, false);//将C#中的结构体拷贝到Intptr
 9     interop_Computer* rt = (interop_Computer*)(void*)(ptr.ToPointer());//将Intptr强制转换为interop_Computer
10     return *rt;
11 }
然后在CppInvoke中添加测试代码
HMODULE hInstance = LoadLibrary(L"CSBridge.dll");
    if (hInstance)
    {

        funGetComputer getComputer = (funGetComputer)GetProcAddress(hInstance, "GetComputer");

        if (getComputer)
        {
            auto computer = getComputer();
            std::wcout << computer.cpuId << "\t" << computer.cpuName << "\t" << computer.osVersion << std::endl;
        }

        FreeLibrary(hInstance);
    }
输出结果为:
![]()
这里还有一种情况,就 是需要 将C++中的参数传到C#中。
这种情况有两种方法可以实现:
1、将C++中的参数封送到C#中,转换方式和上面返回结构体的实现方式差不多。大概思路就是把C++结构体转换成IntPtr,再从IntPtr转换到C#中的结构体。
2、将C#中的函数转换到C++中的函数再调用。这样就可以直接使用C++中的结构体。
实现方法如下:
在C#中增加一个函数PrintComputer,需要传入一个Computer结构体。然后再增加对应的委托和获取委托的函数
1 public void PrintComputer(Computer computer)
2         {
3             Console.WriteLine(computer.cpuId);
4             Console.WriteLine(computer.cpuName);
5             Console.WriteLine(computer.osVersion);
6         }
1 public delegate void PrintComputerDelegate(Computer computer); //声明委托
2
4 public PrintComputerDelegate GetComputerDelegate() => PrintComputer;  //定义返回委托的函数
在CSBridge中定义一个函数指针,并增加一个导出函数
 1 typedef void(__stdcall* funPrintComputer)(interop_Computer computer);
 2
 3 cs_lib_api void PrintComputer(interop_Computer computer)
 4 {
 5     CSharpLib::ExplortClass^ c = gcnew CSharpLib::ExplortClass();
 6     auto printDelegate = c->GetComputerDelegate();//获取委托
 7     IntPtr ptr = Marshal::GetFunctionPointerForDelegate(printDelegate);//将委托转为IntPtr类型
 8     funPrintComputer funcPrint = (funPrintComputer)ptr.ToPointer();//将IntPtr转换为指针,再转换为funPrintComputer
 9     if (funcPrint)
10     {
11         funcPrint(computer);
12     }
13 }
这样就可以在C++中的参数传递到C#中。CppInvoke中的调用 代码如下:
1 funPrintComputer printComputer = (funPrintComputer)GetProcAddress(hInstance, "PrintComputer");
2         interop_Computer testComputer;
3         testComputer.cpuId = 18;
4         testComputer.cpuName = _tcsdup(L"AMD");
5         testComputer.osVersion = 7;
6         if (printComputer)
7         {
8             printComputer(testComputer);
9         }
输出结果为:
![]()
示例代码(需要Visual Studio 2022)
方法二、将.NET组件导出为COM
待完成


 2553
2553

 被折叠的 条评论
为什么被折叠?
被折叠的 条评论
为什么被折叠?
 到【灌水乐园】发言


