


参考:https://blog.youkuaiyun.com/qq_35794278/article/details/88662827
创建Starter
-
创建一个maven工程
-
pom.xml添加maven依赖:
<dependencies>
    <dependency>
        <groupId>org.springframework.boot</groupId>
        <artifactId>spring-boot-configuration-processor</artifactId>
        <optional>true</optional>
    </dependency>
    <dependency>
        <groupId>org.springframework.boot</groupId>
        <artifactId>spring-boot-autoconfigure</artifactId>
    </dependency>
</dependencies>
spring-boot-configuration-processor:使用properties或者xml为配置文件输入
spring-boot-autoconfigure:自动配置,可使用@Configuration等注解加载配置
- 创建配置装配类,可以加载application.properties配置:
package com.china.lan.demo;

import org.springframework.boot.context.properties.ConfigurationProperties;

/**
 * 数据装配
 */
@ConfigurationProperties("user.lanyy")
public class UserProperties {

    private String name;
    private String value;

    public String getValue() {
        return value;
    }

    public void setValue(String value) {
        this.value = value;
    }

    public String getName() {
        return name;
    }

    public void setName(String name) {
        this.name = name;
    }
}
表示加载配置文件中的:user.lanyy.name、user.lanyy.value两个配置
4.创建用户类(具体的功能):
package service;

import config.UserValue;
import org.springframework.beans.factory.annotation.Autowired;
import org.springframework.stereotype.Service;

@Service
public class UserService {

    @Autowired
    private UserValue userValue;

    public void getUserValues() {
        System.out.println("com.china.lanyy name is" + userValue.getName());
        System.out.println("com.china.lanyy value is" + userValue.getValue());
    }
}
5.创建bean:
package com.china.lan.demo;

import org.springframework.beans.factory.annotation.Autowired;
import org.springframework.boot.autoconfigure.condition.ConditionalOnClass;
import org.springframework.boot.context.properties.EnableConfigurationProperties;
import org.springframework.context.annotation.Bean;
import org.springframework.context.annotation.Configuration;

@Configuration
@EnableConfigurationProperties(UserProperties.class)
@ConditionalOnClass(UserService.class)
public class UserBean {

    @Autowired
    private UserProperties userProperties;

    @ConditionalOnClass
    @Bean
    public UserService getUserService() {
        UserService userService = new UserService(userProperties.getName(),
                userProperties.getValue());
        return userService;
    }

}
6.创建resources\META-INF\spring.factories文件
这项非常重要,自动装配的时候,会默认查找spring.factories文件
org.springframework.boot.autoconfigure.EnableAutoConfiguration=com.china.lan.demo.UserBean
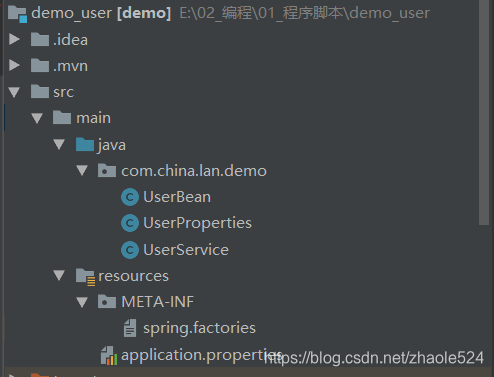
7.完成后的工程如下
8.编译并mvn install到本地:
开始测试:
- 创建一个springboot工程
- 编辑application.properties文件:
# 需要加载的两个值
user.lanyy.name=123
user.lanyy.value=456
# springboot的启动端口
server.port=8088
3.调用接口
package com.china.zl.testtool;

import com.china.lan.demo.UserService;
import org.springframework.beans.factory.annotation.Autowired;
import org.springframework.web.bind.annotation.RequestMapping;
import org.springframework.web.bind.annotation.RequestMethod;
import org.springframework.web.bind.annotation.RestController;

import java.util.Map;

@RestController
@RequestMapping("/api/v1")
public class TestUserController {

    @Autowired
    private UserService userService;

    @RequestMapping(method = RequestMethod.GET, path = "/home",
            produces = "application/json; charset=UTF-8")
    public Map<String, String> getUserInfo() {
        Map<String, String> users = userService.getUserValues();
        return users;
    }

}
4.启动springboot工程
5.WEB调用接口测试:

结论:可以看到,正确的拿到了加载的配置。至此,一个简单的Starter制作完成。


 3812
3812

 被折叠的 条评论
为什么被折叠?
被折叠的 条评论
为什么被折叠?
 到【灌水乐园】发言


