


这次的移植并不算成功,只是显示没有问题了,可以创建按钮,可以显示图片,可以触摸。但是!!!只要一使用的float型数据,就会进入硬件错误。本来以为FPU使能的不好,可以只要把触摸去掉,就可以正常使用float型数据,感觉是不是跟GUI_PID_StoreState()函数有冲突?可是之前用MDK做的没有问题呀。网上没有什么用IDE的例程,努力了好几天试了很多方法也没有成功。虽然很不甘心,但是项目进度不等人,所以只能放弃了。
希望如果有人成功了或者找到原因了,可以来告诉我。非常期待。
1、使能FPU并添加DSP库
接着上一篇文章,因为我用的stm32f407,对于STM32F4XX等M4内核的芯片移植STemwin的话,就要使能芯片的FPU,并将其DSP库添加到工程中。
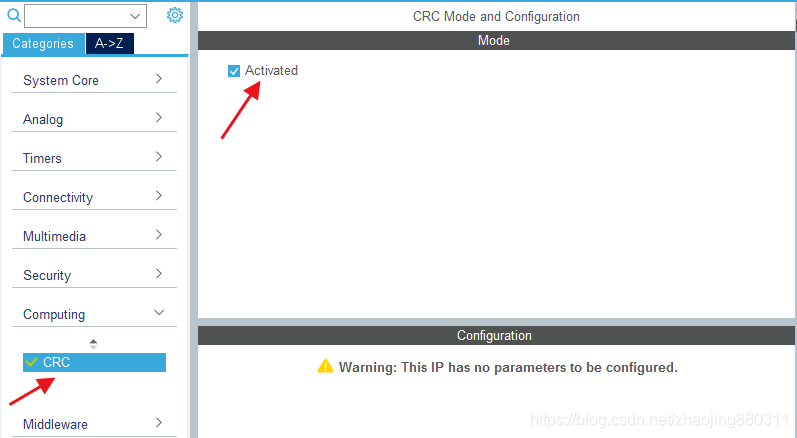
2、使能CRC校验
这一点是必须的,否则不能使用STemwin
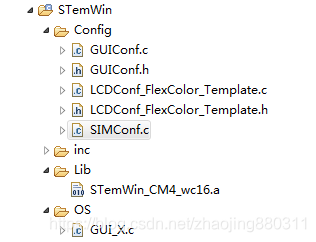
3、准备STemwin源文件
在电脑的安装目录下,有最新的源文件,我的路径为:
C:\Users\Administrator\STM32Cube\Repository\STM32Cube_FW_F4_V1.25.0\Middlewares\ST\STemWin
把相关文件添加到工程中
这里要着重说一下添加库文件,这个软件添加库文件真的好难呀!!!
STemwin5.44版本中的库文件全部变为.a 格式, 文件名中不再直接写出编译器的类型
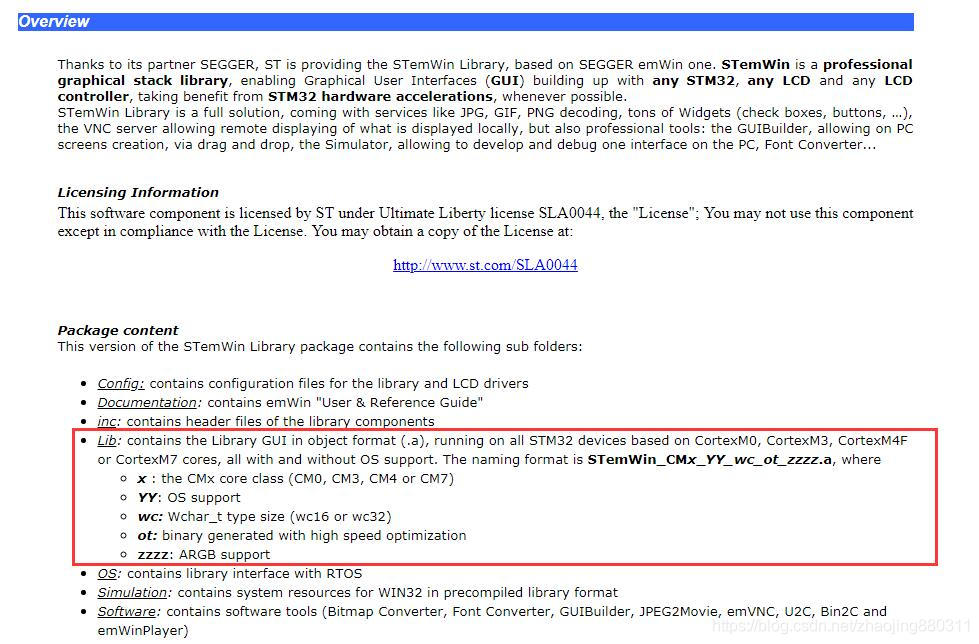
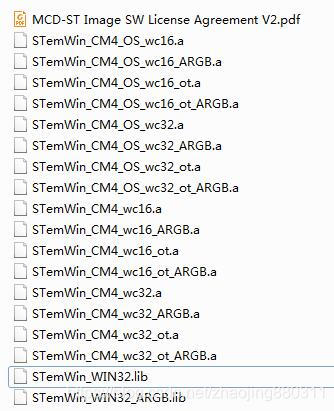
选好库文件之后,要添加到工程中,添加方式为
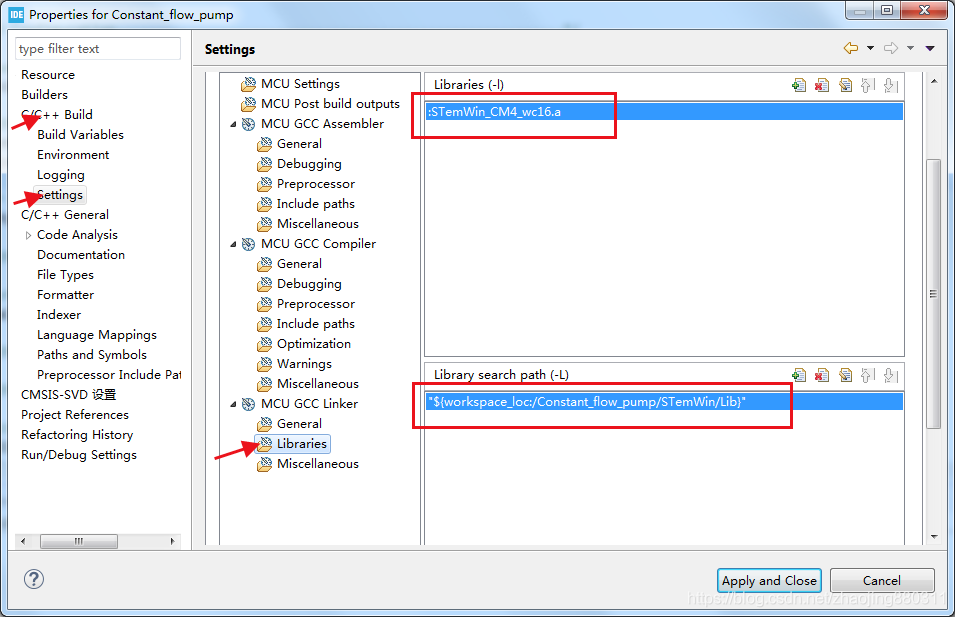
注意库文件名前面要加冒号 :STemWin_CM4_wc16.a
4、修改文件
3.1 GUIConf.c
#include "GUI.h"

/*********************************************************************
*
*       Defines
*
**********************************************************************
*/
//
// Define the available number of bytes available for the GUI
//
#define GUI_NUMBYTES  (20*1024)			//设置EMWIN内存大小
#define GUI_BLOCKSIZE 0x80				//块大小

/*********************************************************************
*
*       Public code
*
**********************************************************************
*/
/*********************************************************************
*
*       GUI_X_Config
*
* Purpose:
*   Called during the initialization process in order to set up the
*   available memory for the GUI.
*/
void GUI_X_Config(void) {
  //
  // 32 bit aligned memory area
  //
  static U32 aMemory[GUI_NUMBYTES / 4];
  //
  // Assign memory to emWin
  //
  GUI_ALLOC_AssignMemory(aMemory, GUI_NUMBYTES);
  GUI_ALLOC_SetAvBlockSize(GUI_BLOCKSIZE);
  //
  // Set default font
  //
  GUI_SetDefaultFont(GUI_FONT_6X8);
}
3.2 GUIConf.h
#ifndef GUICONF_H
#define GUICONF_H

/*********************************************************************
*
*       Multi layer/display support
*/
#define GUI_NUM_LAYERS            2    // Maximum number of available layers

/*********************************************************************
*
*       Multi tasking support
*/
#ifdef OS_SUPPORT
 #define GUI_OS                    (1)  // Compile with multitasking support
#else
 #define GUI_OS                    (0)
#endif

/*********************************************************************
*
*       Configuration of touch support
*/
#ifndef   GUI_SUPPORT_TOUCH
  #define GUI_SUPPORT_TOUCH       (1)  // Support touchscreen
#endif

/*********************************************************************
*
*       Default font
*/
#define GUI_DEFAULT_FONT          &GUI_Font6x8

/*********************************************************************
*
*         Configuration of available packages
*/
#define GUI_SUPPORT_MOUSE             (1)    /* Support a mouse */
#define GUI_WINSUPPORT                (1)    /* Use window manager */
#define GUI_SUPPORT_MEMDEV            (1)    /* Memory device package available */
#define GUI_SUPPORT_DEVICES           (1)    /* Enable use of device pointers */

#endif  /* Avoid multiple inclusion */
3.3 关于GUIDRV_Template.c文件
好多的移植教程用的都不是STemwin自带的驱动程序,所以会用到这个文件,自己写的LCD驱动程序,我这次用的是STemwin自带的驱动程序,所以用不到这个文件。
3.4LCDConf_FlexColor_Template.c
GUI的初始化函数 GUI_Init(),一次调用了三个函数,分别是GUI_X_Config()、LCD_X_Config()、LCD_X_DisplayDriver(),这三个函数都要做相应的修改。
void LCD_X_Config(void) {
GUI_DEVICE * pDevice;
CONFIG_FLEXCOLOR Config = {0};
GUI_PORT_API PortAPI = {0};
//
// Set display driver and color conversion
//
pDevice = GUI_DEVICE_CreateAndLink(GUIDRV_FLEXCOLOR, GUICC_M565, 0, 0);
//
// Display driver configuration, required for Lin-driver
//
LCD_SetSizeEx (0, XSIZE_PHYS , YSIZE_PHYS);
LCD_SetVSizeEx(0, VXSIZE_PHYS, VYSIZE_PHYS);
//
// Orientation
//
Config.Orientation = GUI_ROTATION_0;
GUIDRV_FlexColor_Config(pDevice, &Config);
//
// Set controller and operation mode
//
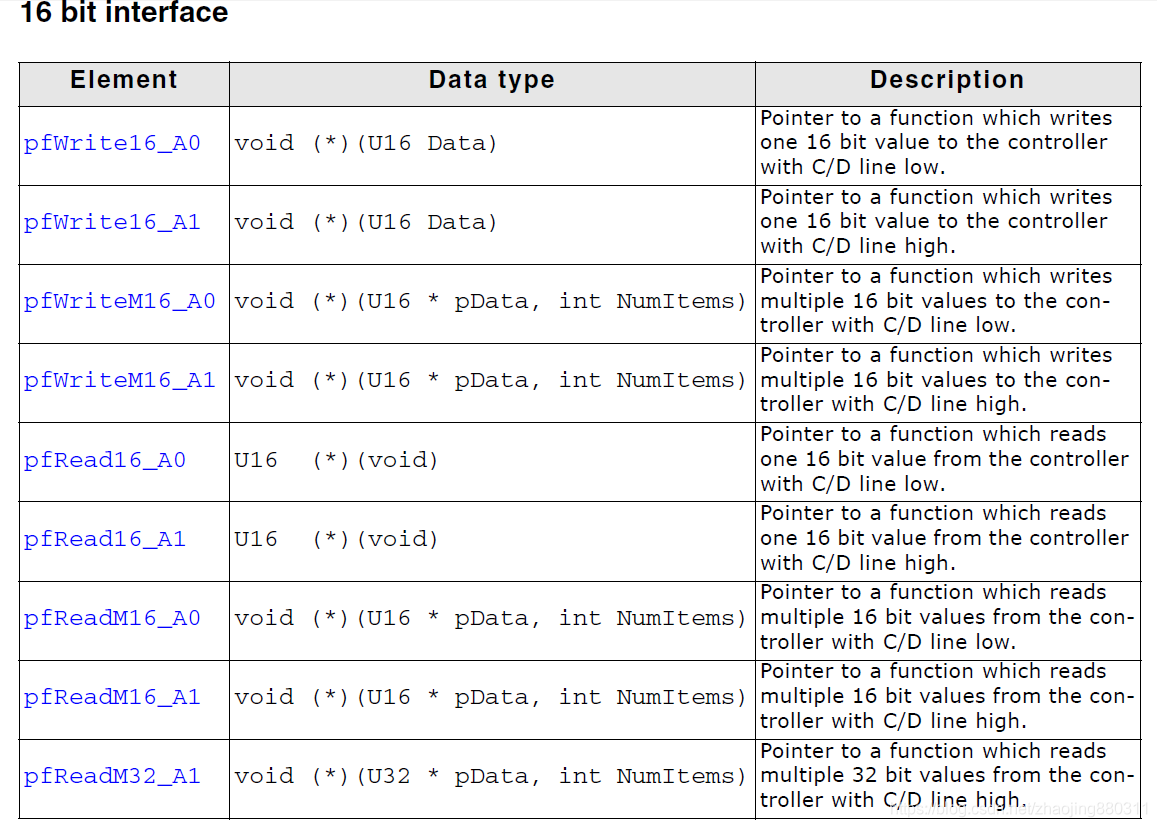
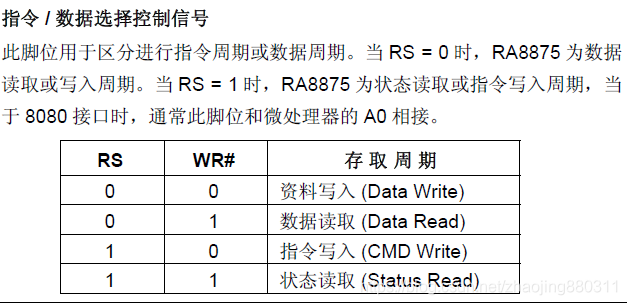
//把emWin接口函数全部实现了,RA8875不像ili9325,ili9341之类的仅需4个接口函数,RA8875必须用到其中6个接口函数(具体哪6个就忘了,所以最好全部实现)。
/*
* RS WR#
* 0 0 Data Write
* 0 1 Data Read
* 1 0 Command Write
* 1 1 Status Read
* 根据这个表格,再参考STemwin说明书中大概1163页的函数说明,实现对应的接口函数
*/
PortAPI.pfWrite16_A0 = LcdWriteData;
PortAPI.pfWrite16_A1 = LcdWriteReg;
PortAPI.pfRead16_A0 = LcdReadData;
PortAPI.pfRead16_A1 = LcdReadReg;
PortAPI.pfWriteM16_A0 = LcdWriteDataMultiple;
PortAPI.pfWriteM16_A1 = LcdWriteRegMultiple;
PortAPI.pfReadM16_A1 = LcdReadREGMultiple;
PortAPI.pfReadM16_A0 = LcdReadDataMultiple;
GUIDRV_FlexColor_SetFunc(pDevice, &PortAPI, GUIDRV_FLEXCOLOR_F66721, GUIDRV_FLEXCOLOR_M16C0B16);
}
这个函数需要注意的是:把emWin接口函数全部实现了,RA8875不像ili9325,ili9341之类的仅需4个接口函数,RA8875必须用到其中6个接口函数(具体哪6个就忘了,所以最好全部实现),我在这里面卡了很长时间,因为一般的都只实现4个接口函数,然后执行完GUI_Init()后,就会进入硬件错误,后来在其他一个论坛里面看到有网友解释,才算解决了这个问题。
/********************************************************************
*
*       LcdWriteReg
*
* Function description:
*   Sets display register A16=1
*/
void LcdWriteReg(U16 Data) {
  // ... TBD by user
	RA8875_REG = Data;
}

/********************************************************************
*
*       LcdWriteData
*
* Function description:
*   Writes a value to a display register  A16=0
*/
void LcdWriteData(U16 Data) {
  // ... TBD by user
	RA8875_RAM = Data;
}

U16 LcdReadReg(void){		//A16=1
	U16 Data;
	Data = RA8875_REG;
	return Data;
}

U16 LcdReadData(void){		//A16=0
	U16 Data;
	Data = RA8875_RAM;
	return Data;
}
/********************************************************************
*
*       LcdWriteRegMultiple
*
* Function description:
*   Writes multiple values to a display register. A16=1
*/
void LcdWriteRegMultiple(U16 * pData, int NumItems){
  while (NumItems--) {
	// ... TBD by user
	  RA8875_REG = *pData++;
  }

}

/********************************************************************
*
*       LcdWriteDataMultiple
*
* Function description:
*   Writes multiple values to a display register.  A16=0
*/
void LcdWriteDataMultiple(U16 * pData, int NumItems) {
  while (NumItems--) {
    // ... TBD by user
	  RA8875_RAM = *pData++;
  }
}

/********************************************************************
*
*       LcdReadDataMultiple
*
* Function description:
*   Reads multiple values from a display register.
*/
void LcdReadDataMultiple(U16 * pData, int NumItems) {		//A16=0
  while (NumItems--) {
    // ... TBD by user
	  *pData++ = RA8875_RAM;
  }
}

void LcdReadREGMultiple(U16 * pData, int NumItems) {		//A16=1
  while (NumItems--) {
	// ... TBD by user
	  *pData++ = RA8875_REG;
  }
}
我的程序中,用的是NE1,A16,LCD驱动器的访问地址如下:
/*把第一个区分成4个地址区
			(0x60000000 + (0 << 23))
			(0x60000000 + (1 << 23))
			(0x60000000 + (2 << 23))
			(0x60000000 + (3 << 23))*/
#define RA8875_BASE		((uint32_t)0x60000000)

#define RA8875_REG		*(volatile uint16_t *)(RA8875_BASE +  (1 << (0 + 17)))	/* FSMC 16位总线模式下 FSMC_A0口线对应物理地址A1 */  // A16
#define RA8875_RAM		*(volatile uint16_t *)(RA8875_BASE)
int LCD_X_DisplayDriver(unsigned LayerIndex, unsigned Cmd, void * pData) {
  int r;
  (void) LayerIndex;
  (void) pData;

  switch (Cmd) {
  case LCD_X_INITCONTROLLER: {
    //
    // Called during the initialization process in order to set up the
    // display controller and put it into operation. If the display
    // controller is not initialized by any external routine this needs
    // to be adapted by the customer...
    //
    // ...
	  RA8875_Init();
    return 0;
  }
  default:
    r = -1;
  }
  return r;
}
3.5 GUI_X.C
#include "GUI.h"

/*********************************************************************
*
*       Global data
*/
volatile GUI_TIMER_TIME OS_TimeMS;

/*********************************************************************
*
*      Timing:
*                 GUI_X_GetTime()
*                 GUI_X_Delay(int)

  Some timing dependent routines require a GetTime
  and delay function. Default time unit (tick), normally is
  1 ms.
*/

GUI_TIMER_TIME GUI_X_GetTime(void) {
  return OS_TimeMS;
}

void GUI_X_Delay(int ms) {
  int tEnd = OS_TimeMS + ms;
  while ((tEnd - OS_TimeMS) > 0);
}

/*********************************************************************
*
*       GUI_X_Init()
*
* Note:
*     GUI_X_Init() is called from GUI_Init is a possibility to init
*     some hardware which needs to be up and running before the GUI.
*     If not required, leave this routine blank.
*/

void GUI_X_Init(void) {}


/*********************************************************************
*
*       GUI_X_ExecIdle
*
* Note:
*  Called if WM is in idle state
*/

void GUI_X_ExecIdle(void) {}

/*********************************************************************
*
*      Logging: OS dependent

Note:
  Logging is used in higher debug levels only. The typical target
  build does not use logging and does therefor not require any of
  the logging routines below. For a release build without logging
  the routines below may be eliminated to save some space.
  (If the linker is not function aware and eliminates unreferenced
  functions automatically)

*/

void GUI_X_Log     (const char *s) { GUI_USE_PARA(s); }
void GUI_X_Warn    (const char *s) { GUI_USE_PARA(s); }
void GUI_X_ErrorOut(const char *s) { GUI_USE_PARA(s); }
4、编写主函数
static void StartupTask (void *p_arg)
{
	CPU_INT32U cpu_clk;
	OS_ERR os_err;
	(void)p_arg;
	cpu_clk = HAL_RCC_GetHCLKFreq();
	/* Initialize and enable System Tick timer */
	OS_CPU_SysTickInit(cpu_clk);
	__HAL_RCC_CRC_CLK_ENABLE();			//移植STemwin必须开启CRC校验
	GUI_Init();
	GUI_SetBkColor(GUI_WHITE);
	GUI_SetColor(GUI_RED);
	GUI_SetFont(&GUI_Font32B_1);
	GUI_DispStringAt("Hello world!", 1, 1);
	GUI_DispStringAt("Hello world!", 200, 1);
	GUI_DispStringAt("Hello world!", 100, 200);
	GUI_DispStringAt("Hello world!", 300, 200);
	while (DEF_TRUE)
	{
//		 HAL_GPIO_TogglePin(BUZZER_GPIO_Port,BUZZER_Pin);
		 OSTimeDlyHMSM(0u, 0u, 0u, 100u,OS_OPT_TIME_HMSM_STRICT,&os_err);
	}
}


 被折叠的 条评论
为什么被折叠?
被折叠的 条评论
为什么被折叠?
 到【灌水乐园】发言


