


 本文详细介绍了AOP(面向切面编程)在实际工作中的应用场景,如调用前后逻辑处理和日志记录。通过实例展示了如何在Spring中创建注解、切面逻辑,并使用@Before、@After、@AfterReturning等通知类型。同时,解释了JoinPoint和ProceedingJoinPoint的区别,特别是在@Around通知中如何使用ProceedingJoinPoint来控制方法的执行流程。最后,演示了如何从Header中获取信息并进行逻辑判断。
1.AOP的使用场景
在实际工作中,可能会存在需要在调用方法前后调用其它接口,例如:
1>调用业务方法前,需要根据头部信息来调用外部接口获取到所需的信息,来决定后续方法执行的逻辑;
2>调用业务方法后,日志信息的记录(请求参数、返回结果、执行时长等)。
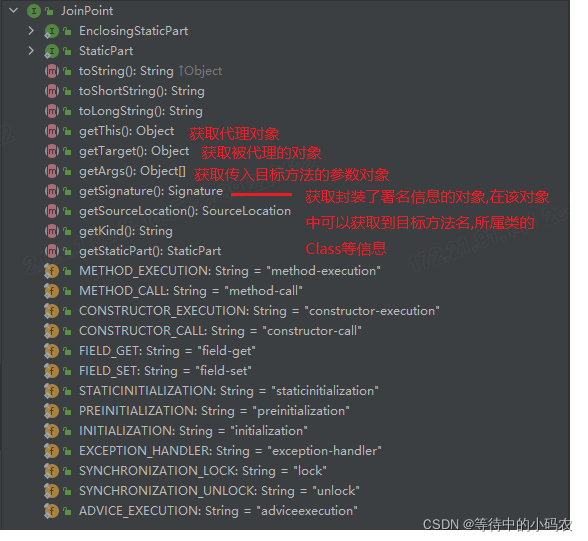
2.JoinPoint 介绍
JointPoint是程序运行过程中可识别的点,这个点可以用来作为AOP切入点。JointPoint对象则包含了和切入相关的很多信息。比如切入点的对象,方法,属性等。我们可以通过反射的方式获取这些点的状态和信息,用于追踪tracing和记录logging应用信息。
简单的使用:
1>引入注解:
   <dependency>
      <groupId>org.aspectj</groupId>
      <artifactId>aspectjweaver</artifactId>
      <version>1.9.6</version>
   </dependency>
2>创建注解:
package com.example.practice.AOP;

import java.lang.annotation.*;

@Documented
@Retention(RetentionPolicy.RUNTIME)
@Target({ElementType.TYPE,ElementType.METHOD})
public @interface TestAnno {
}
3>完成切面逻辑:
package com.example.practice.AOP;
import lombok.extern.slf4j.Slf4j;
import org.aspectj.lang.JoinPoint;
import org.aspectj.lang.annotation.*;
import org.springframework.stereotype.Component;
@Aspect
@Component
@Slf4j
public class VerifyAnnoAspect {
@Pointcut("@annotation(com.example.practice.AOP.TestAnno)")
public void validToken(){}
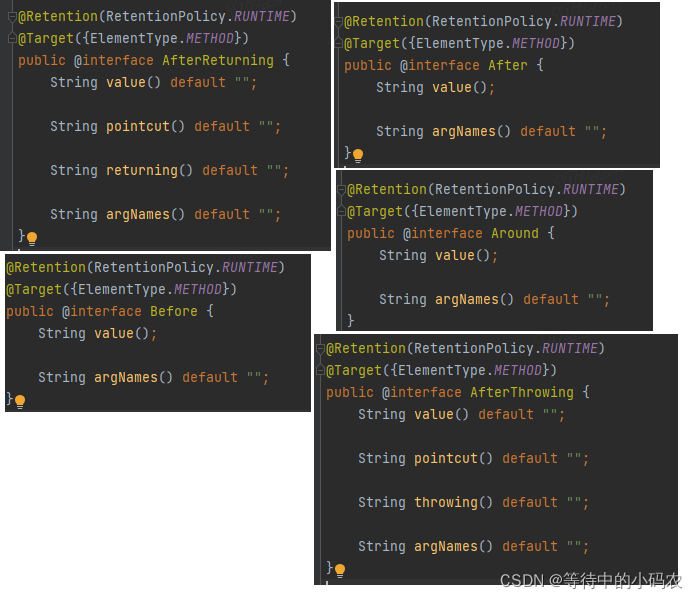
@Before(value = "validToken()")
public void before(JoinPoint joinPoint)throws Throwable{
System.out.println("调用方法前执行。。。");
}
@After(value = "validToken()")
public void after(JoinPoint joinPoint)throws Throwable{
System.out.println("调用方法后执行。。。");
}
@AfterReturning(value = "validToken()")
public void afterReturning(JoinPoint joinPoint)throws Throwable{
System.out.println("调用方法返回结果后执行。。。");
}
}
4>测试:
package com.example.practice.controller;

import com.example.practice.AOP.TestAnno;
import com.example.practice.service.IUserService;
import lombok.Getter;
import org.springframework.beans.factory.annotation.Autowired;
import org.springframework.web.bind.annotation.PostMapping;
import org.springframework.web.bind.annotation.RequestMapping;
import org.springframework.web.bind.annotation.RestController;

@RestController
@RequestMapping("/test")
@Getter
public class UserController {

    @Autowired
    private IUserService userService;

    @PostMapping(value = "/getUserList")
    @TestAnno
    public void getUserList() {
        userService.getUserInfo();
    }

}
package com.example.practice.service.impl;

import com.example.practice.service.IUserService;
import org.springframework.stereotype.Service;

@Service
public class UserServiceImpl implements IUserService {


    @Override
    public void getUserInfo() {
        System.out.println("成功获取用户信息");
    }
}
运行结果为:

还有一个就是@Around:
在VerifyAnnoAspect.java中加入:
 @Around(value = "validToken()")
    public void around(JoinPoint joinPoint)throws Throwable{
        System.out.println("环绕方法执行。。。");
    }
运行结果如下:

发现不会走我们的业务方法了
其它:
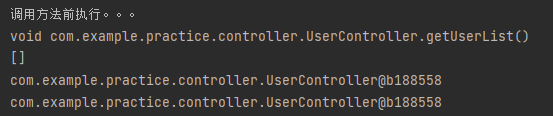
  @Before(value = "validToken()")
    public void before(JoinPoint joinPoint)throws Throwable{
        System.out.println("调用方法前执行。。。");
        System.out.println(joinPoint.getSignature());
        System.out.println(JSONObject.toJSONString(joinPoint.getArgs()));
        System.out.println(joinPoint.getTarget());
        System.out.println(joinPoint.getThis());
    }
运行结果为:
@AfterReturning可以获取到API最终的返回结果,我们可以用于调用日志的记录:
  @AfterReturning(value = "validToken()",returning = "result")
    public void afterReturning(JoinPoint joinPoint,Object result)throws Throwable{
        System.out.println("调用方法返回结果后执行。。。");
        String responseBody = JSON.toJSONString(result);
        System.out.println(responseBody);
    }

3.ProceedingJoinPoint介绍
ProceedingJoinPoint对象是JoinPoint的子接口,该对象只用在@Around的切面方法中。
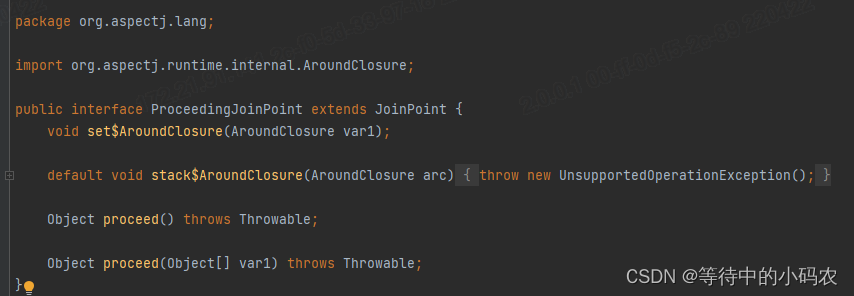
2中提到的@Around没有运行实际的业务方法,这是不行的,为此引入了ProceedingJoinPoint。
@Around(value = "validToken()")
public void around(ProceedingJoinPoint joinPoint)throws Throwable{
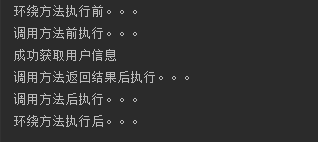
System.out.println("环绕方法执行前。。。");
joinPoint.proceed();
System.out.println("环绕方法执行后。。。");
}
执行结果为:
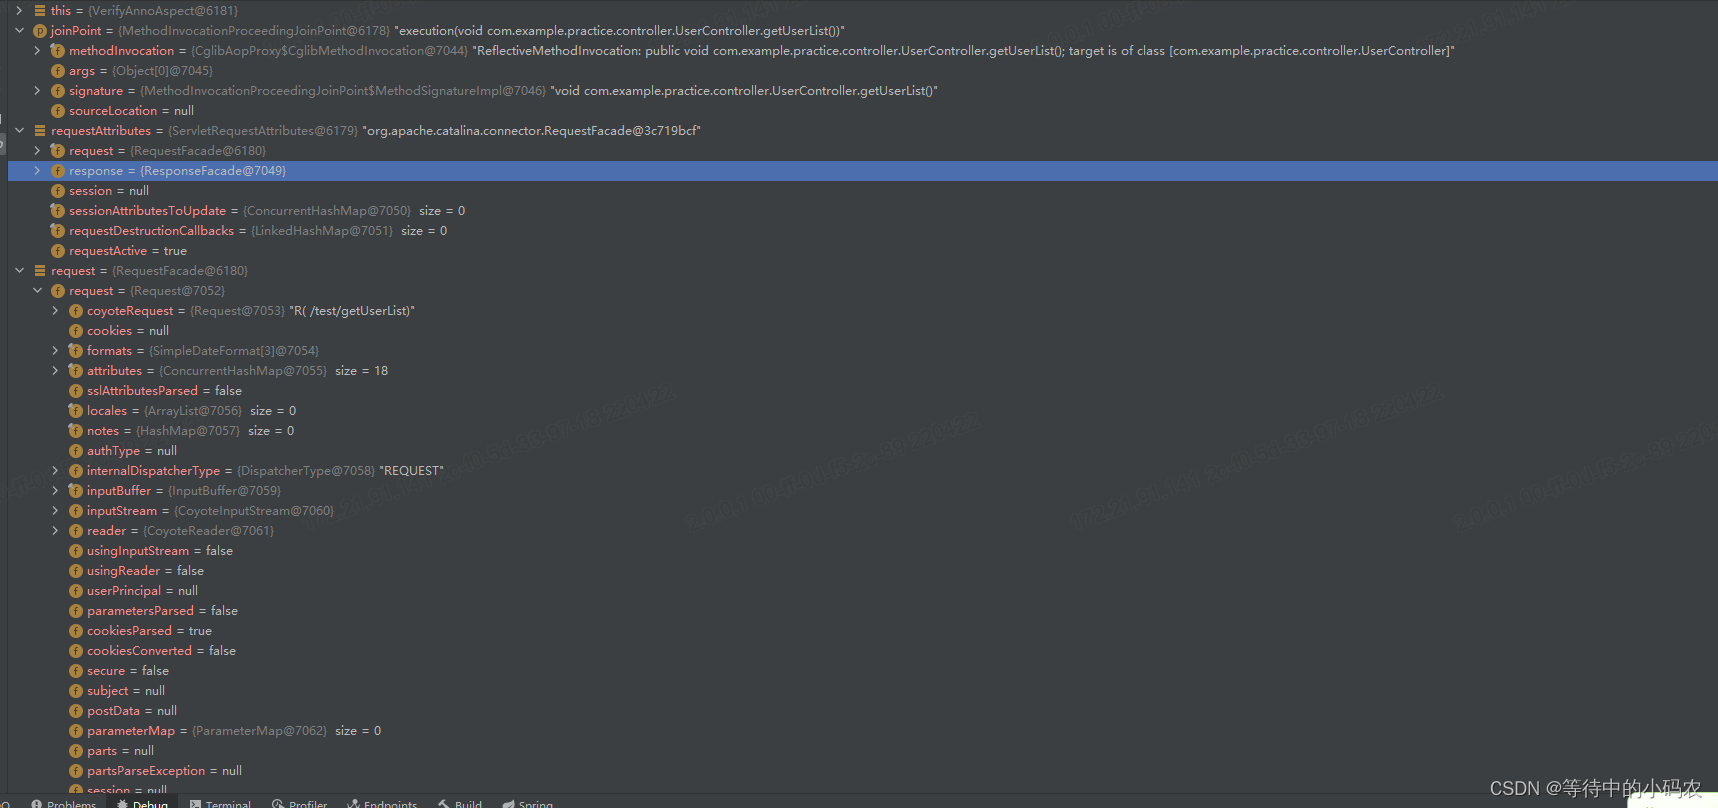
可以通过以下语句,获取到header中的信息进行逻辑判断:
  RequestAttributes requestAttributes = RequestContextHolder.getRequestAttributes();
  HttpServletRequest request = ((ServletRequestAttributes) requestAttributes).getRequest();
  String userId = request.getHeader("userId");


 843
843

 被折叠的 条评论
为什么被折叠?
被折叠的 条评论
为什么被折叠?
 到【灌水乐园】发言


