


 本文介绍如何利用IdentityServer4实现API服务的安全保护,包括配置步骤及网关服务的授权设置。
使用IdentityServer4授权中心保护API服务的安全,用户只有通过服务中心获取到正确的令牌后,通过令牌访问授权应用。
1、创建一个空的webapi项目,项目创建成功后,添加IdentityServer4依赖包
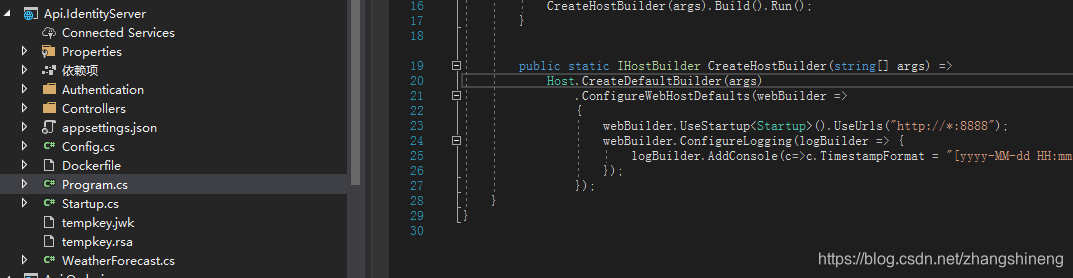
2、依赖包安装成功后,配置相关参数
添加如下类:
public class Config
    {
        public static IEnumerable<IdentityResource> GetIdentityResourceResources()
        {
            return new List<IdentityResource>
            {
                //必须要添加,否则报无效的scope错误
                new IdentityResources.OpenId()
            };
        }

        /// <summary>
        /// api资源列表
        /// </summary>
        /// <returns></returns>
        public static IEnumerable<ApiResource> GetApiResources()
        {
            //可访问的API资源(资源名,资源描述)
            return new List<ApiResource>
            {
                new ApiResource("Api.Catalog", "Api.Catalog"),
                new ApiResource("Api.Ordering", "Api.Ordering")
            };
        }

        /// <summary>
        /// 客户端列表
        /// </summary>
        /// <returns></returns>
        public static IEnumerable<Client> GetClients()
        {
            return new List<Client>
            {
                new Client
                {
                    ClientId = "client_Catalog", //访问客户端Id,必须唯一
                    //使用客户端授权模式,客户端只需要clientid和secrets就可以访问对应的api资源。
                    AllowedGrantTypes = GrantTypes.ClientCredentials,
                    ClientSecrets =
                    {
                        new Secret("secret".Sha256())
                    },
                    AllowedScopes = { "Api.Catalog", IdentityServerConstants.StandardScopes.OpenId,IdentityServerConstants.StandardScopes.Profile }
                },
                new  Client
                {
                    ClientId = "client_Ordering",
                    ClientSecrets = new [] { new Secret("secret".Sha256()) },
                    //这里使用的是通过用户名密码和ClientCredentials来换取token的方式. ClientCredentials允许Client只使用ClientSecrets来获取token. 这比较适合那种没有用户参与的api动作
                    AllowedGrantTypes = GrantTypes.ResourceOwnerPasswordAndClientCredentials,
                    AllowedScopes = { "Api.Ordering", IdentityServerConstants.StandardScopes.OpenId, IdentityServerConstants.StandardScopes.Profile }
                },
                new  Client
                {
                    ClientId = "clientid", //访问客户端Id,必须唯一
                    ClientSecrets =
                        {
                            new Secret("secret".Sha256())
                        },
                     RefreshTokenExpiration = TokenExpiration.Sliding,
                     AllowOfflineAccess = true,
                     RequireClientSecret = false,
                    //使用客户端授权模式,客户端只需要clientid和secrets就可以访问对应的api资源。
                    AllowedGrantTypes = new List<string>{ "authCode" },
                    AlwaysIncludeUserClaimsInIdToken = true,
                    AllowedScopes = {"Api.Catalog", "Api.Ordering",
                        StandardScopes.OpenId,StandardScopes.OfflineAccess}
                }
            };
        }
    }
配置自定义GrantType验证:
  public class AuthCodeValidator : IExtensionGrantValidator
    {
        public string GrantType => "authCode";

        public async Task ValidateAsync(ExtensionGrantValidationContext context)
        {
            string authCode = context.Request.Raw["code"];

            var errorValidationResult = new GrantValidationResult(TokenRequestErrors.InvalidGrant);
            if (string.IsNullOrEmpty(authCode))
            {
                context.Result = errorValidationResult;
                return;
            }

            context.Result = new GrantValidationResult(authCode,GrantType);
        }
    }
接下来,在Startup.cs里面配置依赖、中间件:
public void ConfigureServices(IServiceCollection services)
        {
            services.AddControllers();
            services.AddSwaggerGen(c =>
            {
                c.SwaggerDoc("v1", new OpenApiInfo { Title = "Api.IdentityServer", Version = "v1" });
            });

            services.AddIdentityServer()
                .AddExtensionGrantValidator<AuthCodeValidator>()    //使用自定义认证
                .AddDeveloperSigningCredential()
                .AddInMemoryIdentityResources(Config.GetIdentityResourceResources())
                .AddInMemoryApiResources(Config.GetApiResources())
                .AddInMemoryClients(Config.GetClients());
                //.AddTestUsers(Config.Users().ToList());

            services.AddAuthentication();   // 依赖注入
        }

        // This method gets called by the runtime. Use this method to configure the HTTP request pipeline.
        public void Configure(IApplicationBuilder app, IWebHostEnvironment env)
        {
            if (env.IsDevelopment())
            {
                app.UseDeveloperExceptionPage();
                app.UseSwagger();
                app.UseSwaggerUI(c => c.SwaggerEndpoint("/swagger/v1/swagger.json", "Api.IdentityServer v1"));
            }

            app.UseHttpsRedirection();

            app.UseRouting();

            app.UseIdentityServer();

            app.UseAuthentication();// 使用认证中间件
            app.UseAuthorization();

            app.UseEndpoints(endpoints =>
            {
                endpoints.MapControllers();
            });
        }
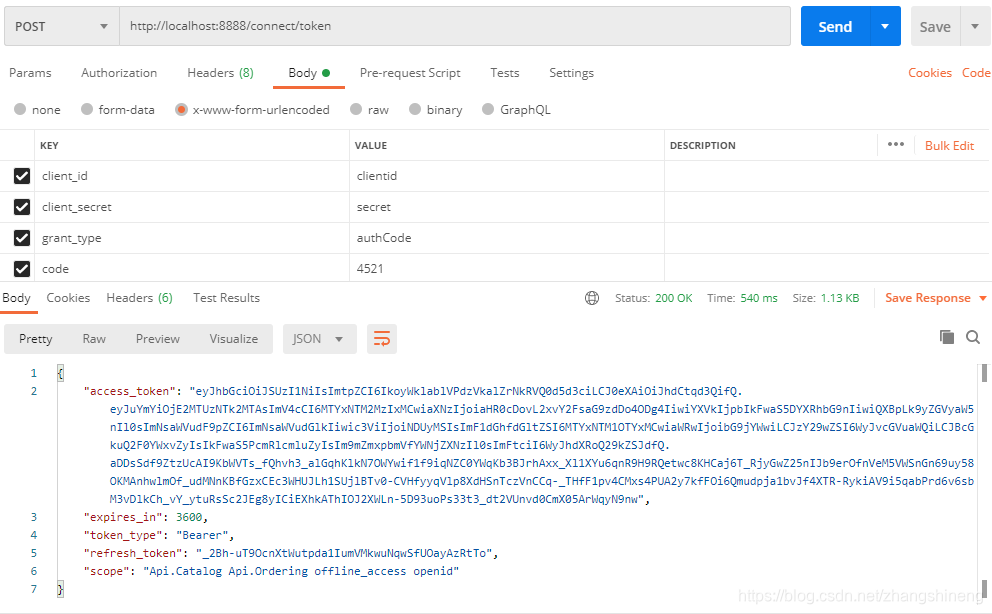
配置完成后,查看效果图:
最后,通过Ocelot提供的强大功能,配置对Api.Ordering、Api.Catelog两个接口服务添加授权访问
1.在网关服务里ocelog.json文件添加授权中心Route:
 {
        "UpstreamPathTemplate": "/identityserver4/{everything}",
        "DownstreamPathTemplate": "/{everything}",
        "UpstreamHttpMethod": ["Get", "Post" ],
        "DownstreamScheme": "http",
        "DownstreamHostAndPorts": [
          {
            "Host": "localhost",
            "Port": 8888
          }
        ]
      }
2.对需要保护的Api路由更新配置:
{
"DownstreamPathTemplate": "/{everything}",
"DownstreamScheme": "http",
"DownstreamHostAndPorts": [
{
"Host": "localhost",
"Port": 5051
}
],
"UpstreamPathTemplate": "/api1/{everything}",
"UpstreamHttpMethod": [ "Get", "Post" ],
"AuthenticationOptions": {
"AuthenticationProviderKey": "Api.Catalog",
"AllowedScopes": []
}
},
{
"DownstreamPathTemplate": "/{everything}",
"DownstreamScheme": "http",
"DownstreamHostAndPorts": [
{
"Host": "localhost",
"Port": 5052
}
],
"UpstreamPathTemplate": "/api2/{everything}",
"UpstreamHttpMethod": [ "Get", "Post" ],
"AuthenticationOptions": {
"AuthenticationProviderKey": "Api.Ordering",
"AllowedScopes": [ "Api.Ordering" ]
}
}
3.在网关服务的Startup.cs文件里添加配置:
// This method gets called by the runtime. Use this method to add services to the container.
        public void ConfigureServices(IServiceCollection services)
        {

            services.AddControllers();
            services.AddSwaggerGen(c =>
            {
                c.SwaggerDoc("v1", new OpenApiInfo { Title = "ApiGateway.Ocelot", Version = "v1" });
            });

            services.AddAuthentication()
            .AddIdentityServerAuthentication("Api.Catalog", i =>
            {
                i.Authority = "http://localhost:8888";    //配置Identityserver的授权地址
                i.RequireHttpsMetadata = false;           //不需要https
                i.ApiName = "Api.Catalog";                        //api的name,需要和config的名称相同
                i.SupportedTokens = SupportedTokens.Both;
            }).AddIdentityServerAuthentication("Api.Ordering", y =>
            {
                y.Authority = "http://localhost:8888";    //配置Identityserver的授权地址
                y.RequireHttpsMetadata = false;           //不需要https
                y.ApiName = "Api.Ordering";                        //api的name,需要和config的名称相同
                y.SupportedTokens = SupportedTokens.Both;
            });

            // 注入Ocelot服务
            services.AddOcelot();
        }

        // This method gets called by the runtime. Use this method to configure the HTTP request pipeline.
        public void Configure(IApplicationBuilder app, IWebHostEnvironment env)
        {
            if (env.IsDevelopment())
            {
                app.UseDeveloperExceptionPage();
                app.UseSwagger();
                app.UseSwaggerUI(c => c.SwaggerEndpoint("/swagger/v1/swagger.json", "ApiGateway.Ocelot v1"));
            }

            app.UseHttpsRedirection();

            app.UseOcelot().Wait();    //使用中间件

            app.UseRouting();

            app.UseAuthorization();

            app.UseEndpoints(endpoints =>
            {
                endpoints.MapControllers();
            });
        }
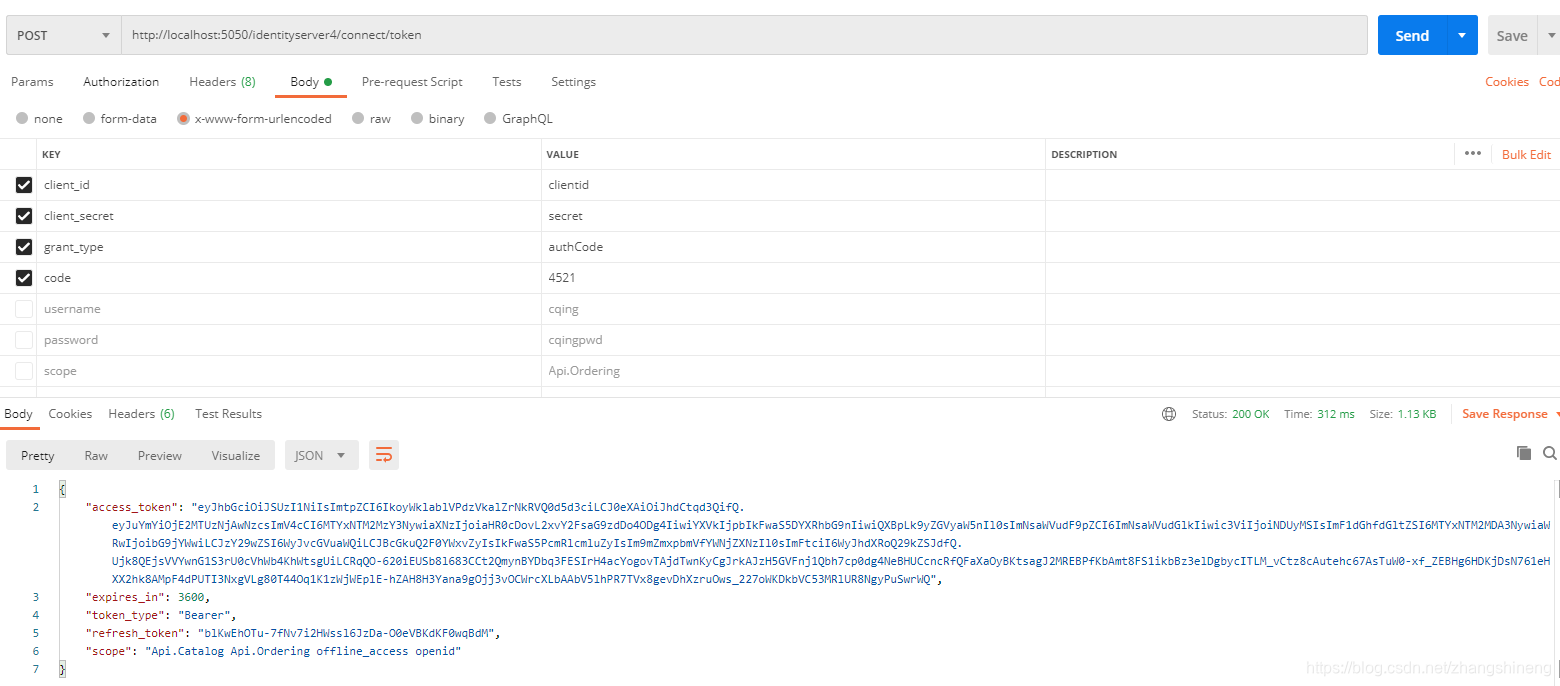
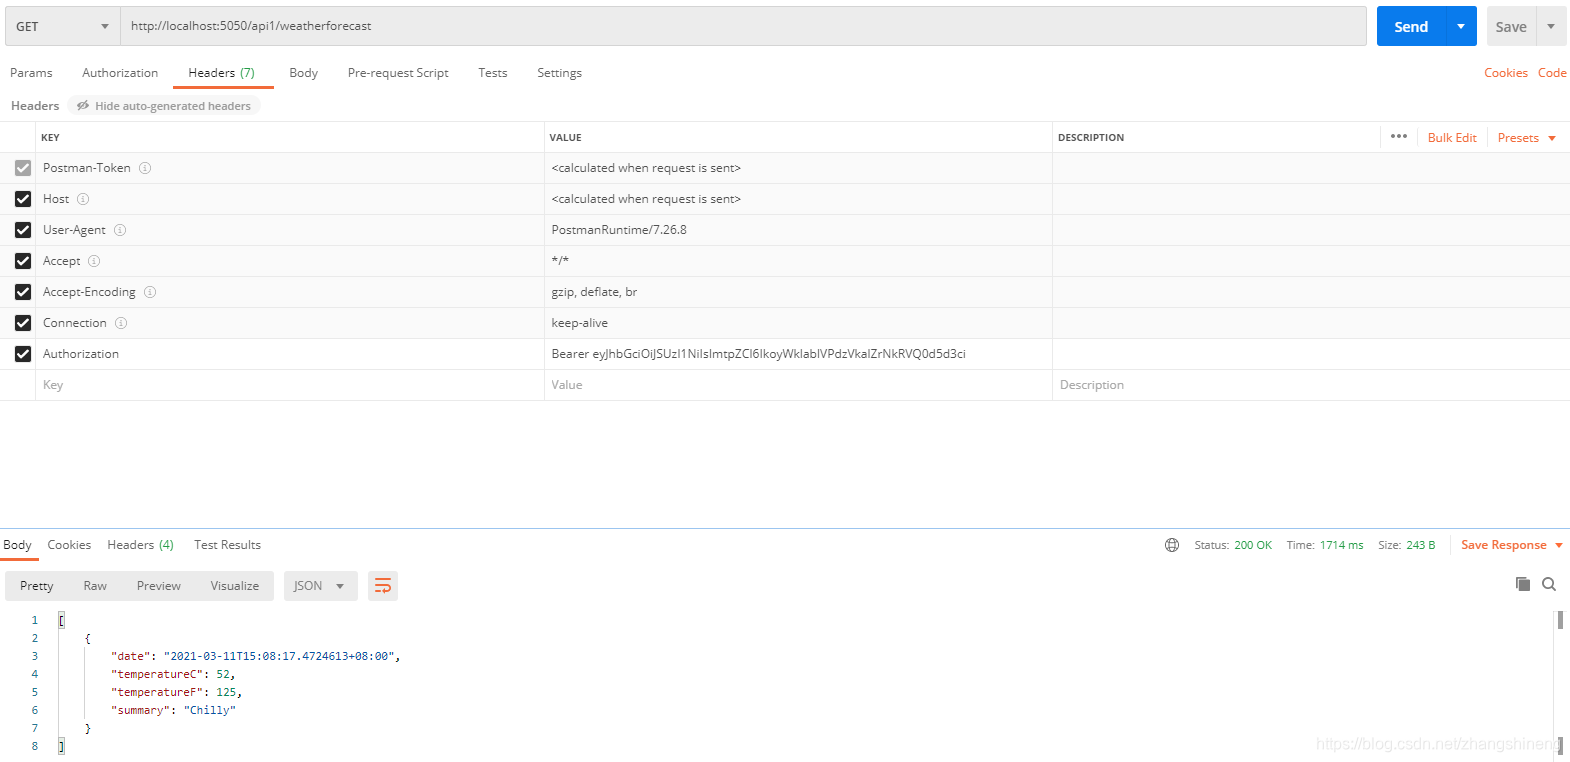
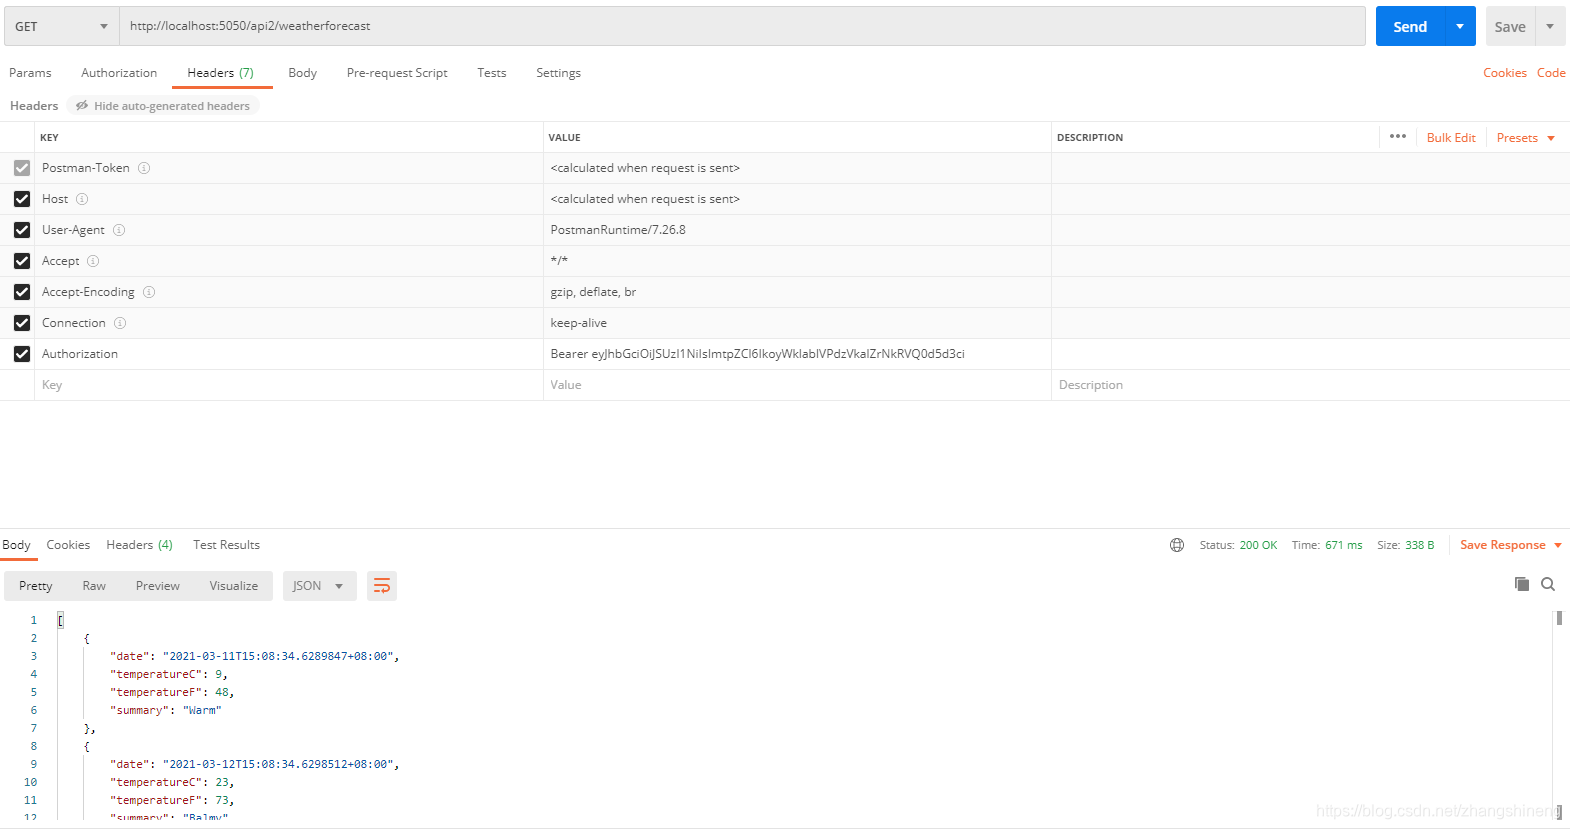
最后查看网关ocelot配置好后的效果:


 2095
2095


 到【灌水乐园】发言


