


 本文介绍如何使用IdentityServer4实现OAuth2.0和OpenId Connect认证授权,包括配置用户、资源和客户端,以及在ServiceApi项目中集成授权。
- 简介
IdentityServer4是基于oauth 2.0和OpenId的授权和身份认证中间件,基于这个中间件,你可以在你的web/webapi项目中保护访问资源的安全。
2.服务认证授权Server端
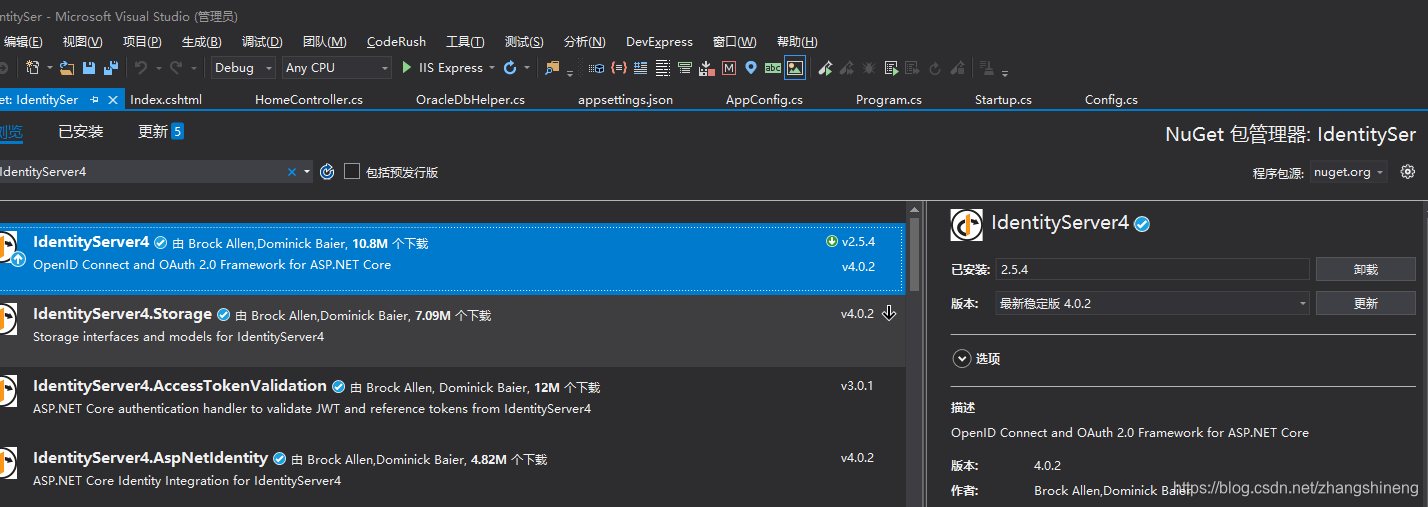
2.1 包引用,在nuget包管理中安装IdentityServer4,如下图:
包安装完成后,新建一个Config.cs配置类以进行后面的步骤:
2.2 在Config.cs里注册认证用户:
        /// <summary>
        /// 定义用户
        /// </summary>
        /// <returns></returns>
        public static List<TestUser> GetUsers()
        {
            var alluser = OracleDbHelper.Query<dynamic>($"select * from ACCOUNT_INFO t");
            Console.WriteLine(alluser.Count);
            List<TestUser> userlist = new List<TestUser>();
            alluser.ForEach(item =>
            {
                //判断当前用户是否有效
                bool isaction = Convert.ToDateTime(item.INVAILDTIME) > DateTime.Now ? true : false;
                TestUser current = new TestUser
                {
                    SubjectId = item.ACCOUNTID,
                    Username = item.ACCOUNT,
                    Password = item.PASSWORD,
                    IsActive = isaction,
                    Claims = new List<Claim>()
                    {
                        new Claim("org",(string)item.ACCOUNTORG)
                    }
                };
                userlist.Add(current);
            });
            return userlist;
        }
2.3 定义要保护的web/webapi资源
        /// <summary>
        /// 定义要保护的资源(webapi)
        /// </summary>
        /// <returns></returns>
        public static IEnumerable<ApiResource> GetApiResources()
        {
            return new List<ApiResource>
            {
                new ApiResource("api","所访问接口"),
                new ApiResource("openid","通过token拿到请求者信息")
            };
        }
2.4 定义可以访问保存资源的客户端
        /// <summary>
        /// 定义可以访问该API的客户端
        /// </summary>
        /// <returns></returns>
        public static IEnumerable<Client> GetClients()
        {
            var allclients = OracleDbHelper.Query<dynamic>($"select * from CLIENT_INFO t");
            List<Client> clients = new List<Client>();

            allclients.ForEach(client =>
            {
                string secret = client.CLIENT_SECRET;
                Client current = new Client()
                {
                    ClientId = client.CLIENT_ID,
                    //AllowedGrantTypes = GrantTypes.ClientCredentials,  //设置模式,客户端模式
                    AllowedGrantTypes = GrantTypes.ResourceOwnerPassword, //密码模式
                    AccessTokenLifetime = 3600,//token过期时间
                                               //RefreshTokenExpiration = TokenExpiration.Absolute,//刷新令牌将在固定时间点到期
                    AbsoluteRefreshTokenLifetime = 2592000,//RefreshToken的最长生命周期,默认30天
                    RefreshTokenExpiration = TokenExpiration.Sliding,//刷新令牌时,将刷新RefreshToken的生命周期。RefreshToken的总生命周期不会超过AbsoluteRefreshTokenLifetime。
                    SlidingRefreshTokenLifetime = 3600,//以秒为单位滑动刷新令牌的生命周期。
                    //按照现有的设置,如果3600内没有使用RefreshToken,那么RefreshToken将失效。即便是在3600内一直有使用RefreshToken,RefreshToken的总生命周期不会超过30天。所有的时间都可以按实际需求调整。
                    AllowOfflineAccess = true,

                    ClientSecrets =
                    {
                        new Secret(secret.Sha256())
                    },
                    AllowedScopes = { "api", StandardScopes.OpenId, StandardScopes.OfflineAccess }
                };
                clients.Add(current);
            });
            return clients;
        }
用户/访问资源/客户端都配置好后,在Startup.cs文件里注入IdentityServer4依赖:
 services.AddIdentityServer()
               .AddDeveloperSigningCredential()
               .AddInMemoryApiResources(Config.GetApiResources())  //配置资源
               .AddInMemoryClients(Config.GetClients())            //配置客户端
               .AddTestUsers(Config.GetUsers());            //配置测试用户
然后在Program.cs里配置一下启用端口(方便后面的资源项目IdentityServer4的配置):
public static IWebHostBuilder CreateWebHostBuilder(string[] args) =>
            WebHost.CreateDefaultBuilder(args).UseUrls("http://localhost:5000")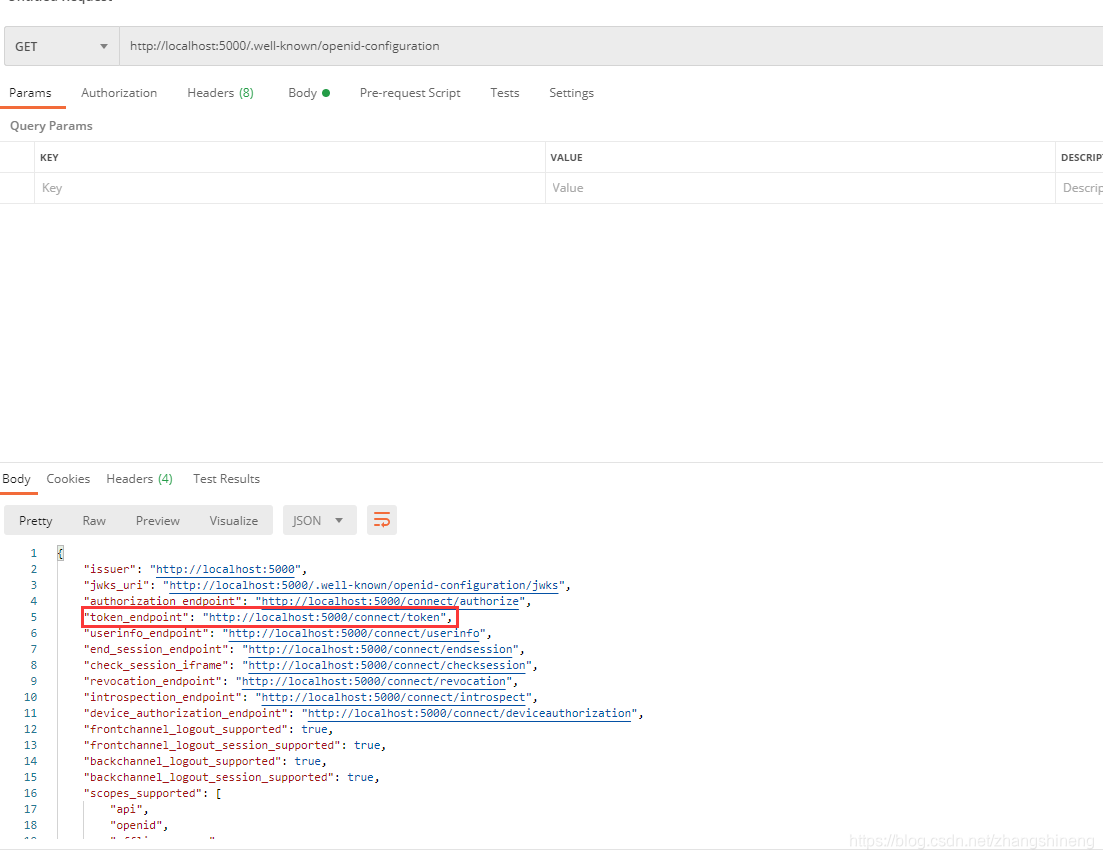
.UseStartup<Startup>();配置完成后,启动项目,使用PostMan访问http://localhost:5000/.well-known/openid-configuration
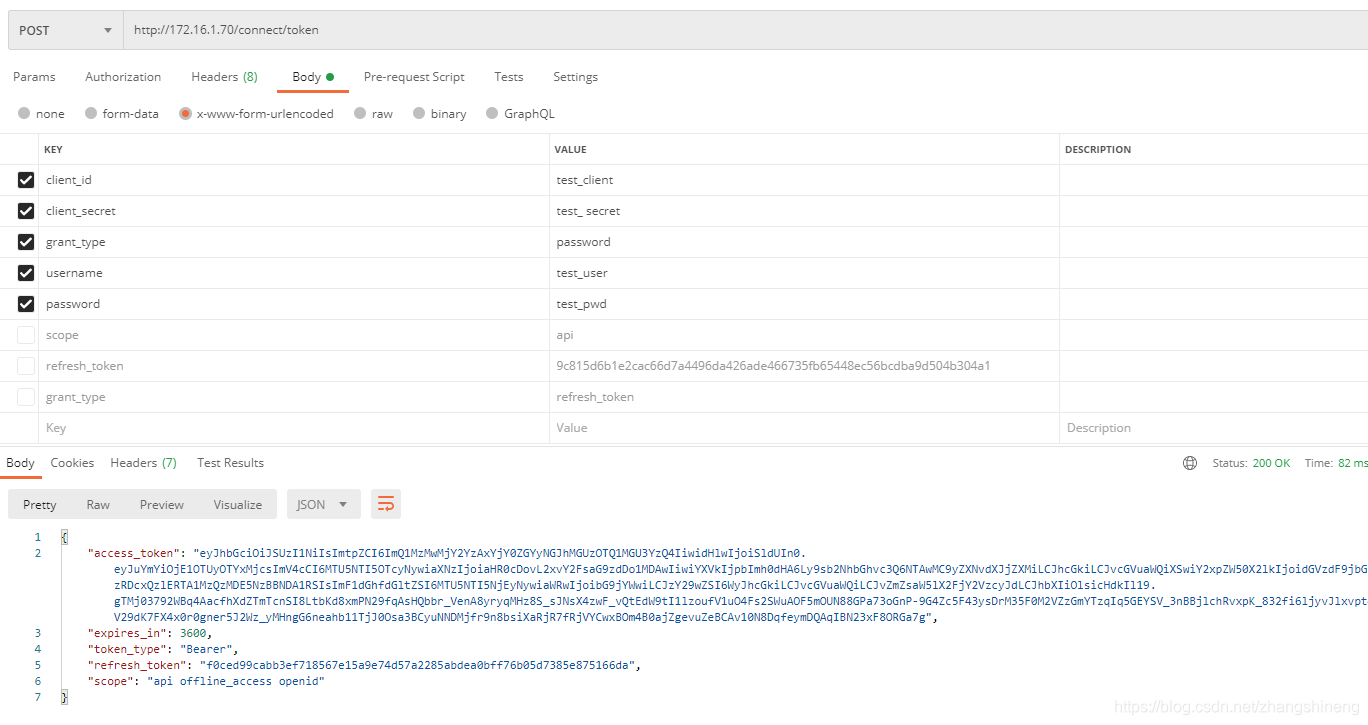
Post访问token_endpoint传入刚才配置的信息就可以拿到授权信息:
因为本地数据库问题,我直接访问了之前在服务器上部署好的,接下来开始配置service api
3. Service Api
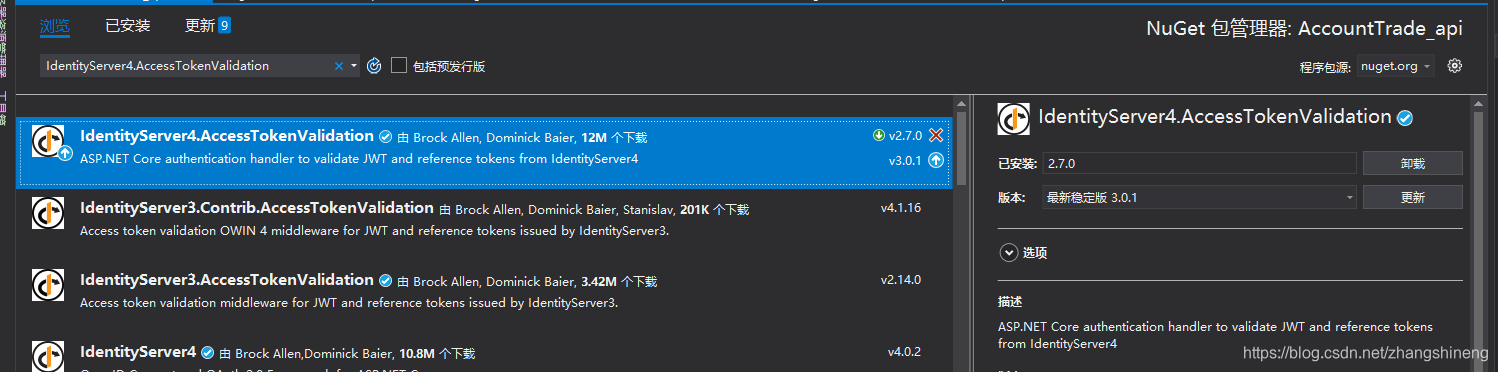
api项目创建好后,在nuget包管理中安装IdentityServer4. AccessTokenValidation
安装完成后,在Startup.cs里注册一下:
先在ConfigureService里添加如下
        services.AddAuthentication("Bearer")
             .AddIdentityServerAuthentication(options =>
             {
                 options.Authority = "http://localhost:5000";    //配置Identityserver的授权地址
                    options.RequireHttpsMetadata = false;           //不需要https
                    options.ApiName = "api";                        //api的name,需要和config的名称相同
                });
然后在Configure里使用授权中间件
app.UseAuthentication();// 添加认证中间件 在Service Api里在方法或者控制器名上加注解Authorize以启用
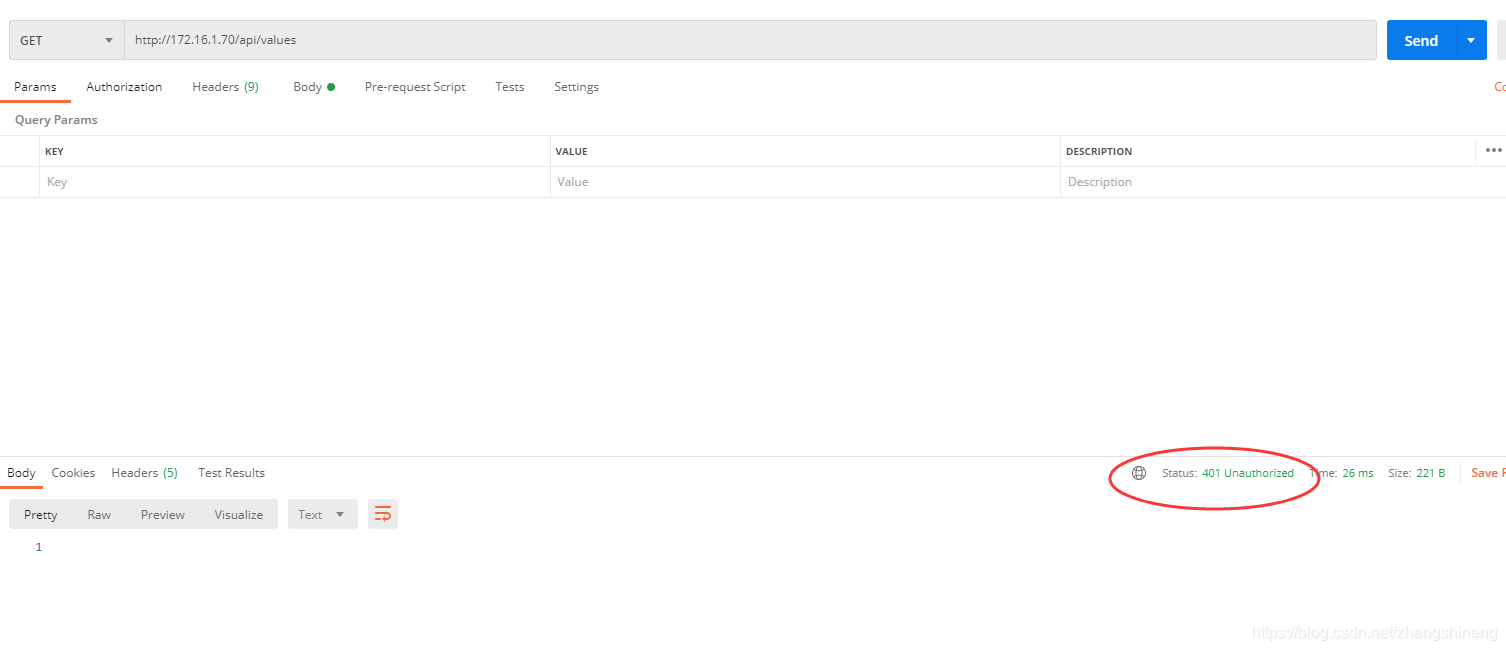 没有带token信息访问401未授权,带上token后
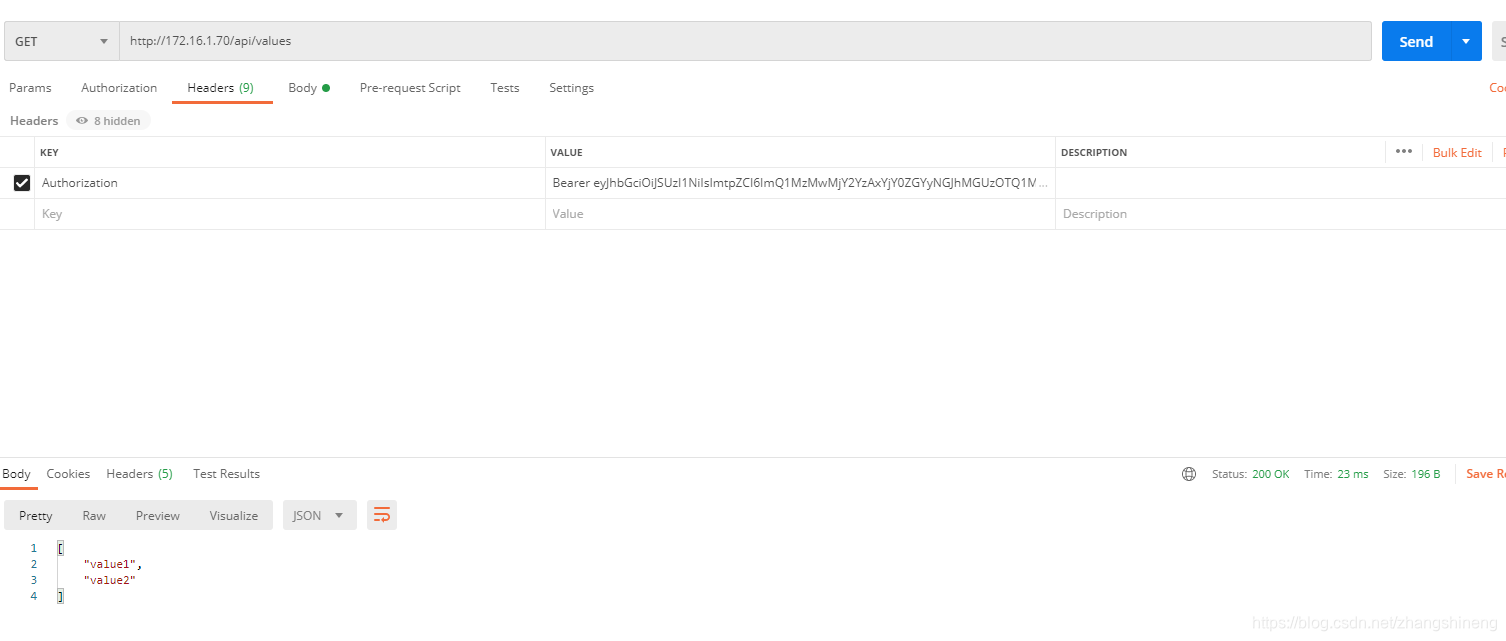


 2441
2441

 被折叠的 条评论
为什么被折叠?
被折叠的 条评论
为什么被折叠?
 到【灌水乐园】发言


