


 本文详细介绍了使用Apktool和Smalidea插件进行Smali代码调试的方法,包括配置调试环境、实现单步调试及常见问题解决技巧。
个人实战经验:
1.apktool_2.0.3.jar 之前的版本可以使用-d选项,重打包后,使用Android Studio调试,可以直接在变量窗口看到v0,v1,v2等,个人感觉可以替代Netbeans,Ecllipse.
2.apktool_2.0.3.jar之后的版本不可以使用-d选项.原生APK,不需要重打包,可以使用Android Studio调试,可以在监控窗口看到v0,v1,v2,p0等。
注意:smalidea-0.03插件在Android Studio 1.5系列,支持单步调试。Android Studio 2.0系列不可以单步调试,会发生错乱跳或者崩溃。
3.ecllipse的smali调试,必须要使用-d选项重打包。
参考:http://drops.wooyun.org/tips/7181
参考:http://www.tuicool.com/articles/uumiQfA
参考:http://www.bubuko.com/infodetail-1419699.html
smalidea是一款 IntelliJ IDEA/Android Studio的 smali 插件
已有功能
- 语法高亮/错误提示
- 字节码级别调试
- 断点
- 单步调试
- 寄存器查看
- 本地窗口 java 语法支持,debug 模式下同样支持
- 支持跳转,方便追踪变量/函数/类.(Xref也支持)
- 查找用法
- 重命名
- 从 java 代码引用 smali 类
- 错误反馈...
安装
- 下载插件smalidea 下载地址:https://github.com/JesusFreke/smali/wiki/smalidea
- 进入IntelliJ IDEA/Android Studio开始安装插件,进入Files->Settings->Plugins点击
Install plugin from disk选中下载好的压缩包. - 点击
apply
开启应用调试
要调试一个apk里面的dex代码,必须满足以下两个条件中的任何一个:
- apk中的AndroidManifest.xml文件中的Application标签包含属性android:debuggable=”true”
- /default.prop中ro.debuggable的值为1
可选方案:
- apktool 反编译app 后在AndroidManifest.xml文件中插入android:debuggable=”true”
- hook system debug (Xinstaller)
- 修改boot.img
个人觉得改 boot.img和二次打包比较麻烦,所以这里采用 hook 方式达到开启所有应用调试的目的,xposed 插件代码如下
public class Debug implements IXposedHookLoadPackage {

    public boolean debugApps = true ;
    public static final int DEBUG_ENABLE_DEBUGGER = 0x1;
    public String tag = "IDG";

    @Override
    public void handleLoadPackage(XC_LoadPackage.LoadPackageParam lpparam) throws Throwable {

        if(lpparam.appInfo == null ||
                (lpparam.appInfo.flags & (ApplicationInfo.FLAG_SYSTEM | ApplicationInfo.FLAG_UPDATED_SYSTEM_APP)) !=0){
            return;
        }

        tag = tag + lpparam.packageName;

        XposedBridge.hookAllMethods(Process.class, "start", new XC_MethodHook() {
            @Override
            protected void beforeHookedMethod(MethodHookParam param) throws Throwable {
                /*
                public static final Process.ProcessStartResult start(String processClass,
                               String niceName,
                               int uid,
                               int gid,
                               int[] gids,
                               int debugFlags,
                               int mountExternal,
                               int targetSdkVersion,
                               String seInfo,
                               String[] zygoteArgs)Start a new process.
                If processes are enabled, a new process is created and the static main() function of a processClass is
                executed there. The process will continue running after this function returns.

                If processes are not enabled, a new thread in the caller's process is created and main() of processClass
                called there.

                The niceName parameter, if not an empty string, is a custom name to give to the process instead of using
                processClass. This allows you to make easily identifyable processes even if you are using the same base
                processClass to start them.

                Parameters:
                processClass - The class to use as the process's main entry point.
                niceName - A more readable name to use for the process.
                uid - The user-id under which the process will run.
                gid - The group-id under which the process will run.
                gids - Additional group-ids associated with the process.
                debugFlags - Additional flags.
                targetSdkVersion - The target SDK version for the app.
                seInfo - null-ok SE Android information for the new process.
                zygoteArgs - Additional arguments to supply to the zygote process.
                Returns:
                An object that describes the result of the attempt to start the process.
                Throws:
                RuntimeException - on fatal start failure
                */
                int id = 5;
                int flags = (Integer) param.args[id];

                Log.d(tag,"flags is : "+flags);

                if (debugApps) {
                    if ((flags & DEBUG_ENABLE_DEBUGGER) == 0) {
                        flags |= DEBUG_ENABLE_DEBUGGER;
                    }
                }

                param.args[id] = flags;
                Log.d(tag,"flags changed : "+flags);

            }
        });
    }
}
效果如下图

如果遇到如下错误
Adb rejected connection to client
可以使用重启 adb server 来解决
adb kill-server

adb start-server
HOOK System Debug XInstaller方案
安装调试工具XInstaller
安装Xposed框架
1.下载相关工具
XposedInstaller下载
http://repo.xposed.info/module/de.robv.android.xposed.installer
XposedBridged.jar下载
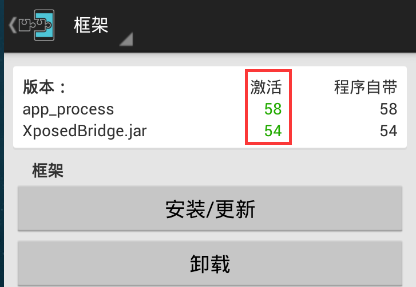
2.安装XposedInstaller并激活
激活步骤: 启动
XposedInstaller -> 框架 -> 安装更新 ->模拟器重启 (ps:模拟器会直接屏幕黑掉,直接结束进程即可,不行就反复试几下 )
激活后这里会有绿色的数字信息
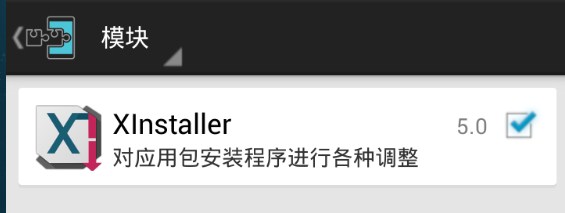
安装XInstaller
1.XInstaller下载地址
XInstaller源码
XInstaller APK下载
2.安装后启动一下,并在Xposed的模块中勾选,重启系统
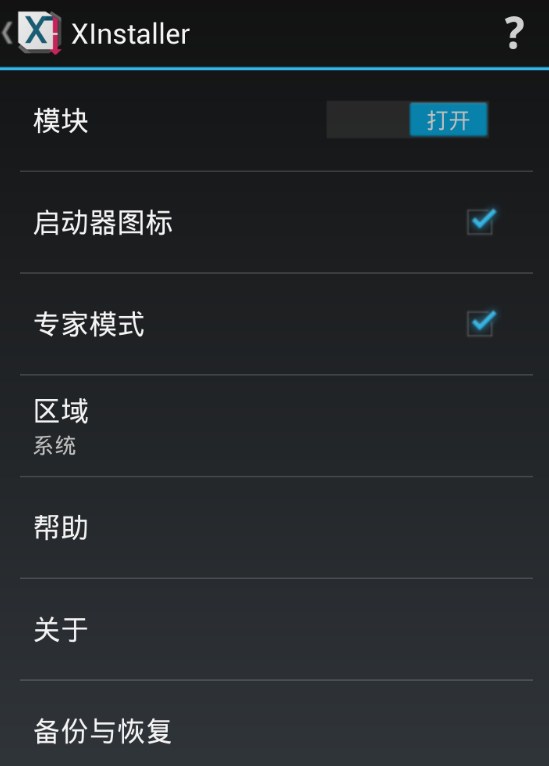
3.配置XInstaller
3.1启动砖家模式
3.2设置调试应用
其他设置->调试应用
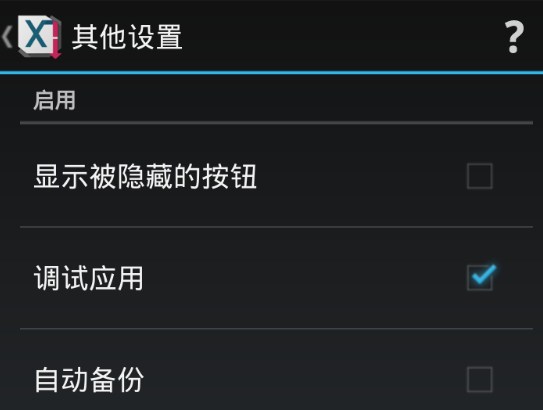
调试应用
注意:IDEA 14.1及以上版本才支持单步调试,Android Studio 1.5版本才支持单步调试
-
使用 baksmali 反编译应用
baksmali myapp.apk -o ~/projects/myapp/src
-
Android Studio导入项目
启动Android Studio->File->New->Import Project,选择上面生成的路径,选定src的上层目录~/projects/myapp -
选择
Create project from existing sources

-
成功导入工程后右键点击 src 目录,即smali的顶级目录,设定
Mark Directory As->Sources Root

-
打开
Module setting设置对应的 JDK

-
安装debug应用
adb install com.zkj.guimi.apk
-
找到debug应用进程,启动应用
如果不用 ddms 可以使用如下步骤:
» adb shell am start -D -W -n com.zkj.guimi/.ui.SplashScreen
» adb shell ps |grep guimi                                                                                                         1 ↵
u0_a157   9879  242   883420 36360 ffffffff 00000000 S com.zkj.guimi
» adb forward tcp:8700 jdwp:9879
-
在 IDEA 配置远程调试(Run->Edit Configurations),更改debug端口为8700
-
Run->Debug
Connected to the target VM, address: 'localhost:8700', transport: 'socket'
-
断点触发后就可以单步调试


reference
http://www.kanxue.com/bbs/showthread.php?p=1338639
https://github.com/JesusFreke/smali/wiki/smalidea
https://github.com/pylerSM/XInstaller


 1262
1262

 被折叠的 条评论
为什么被折叠?
被折叠的 条评论
为什么被折叠?
 到【灌水乐园】发言


