


 本文介绍如何通过命令行工具fdisk及图形界面工具Gparted来扩大Banana Pi设备上的Linux根文件系统分区,确保有足够的空间安装更新。
Most of the Linux distributions available for the Banana Pi can be downloaded as a disk image from Lemaker's web site. Most of these images take up 4GB when unpacked and copied to an SD card. There's a small Fat16 partition used for storing boot files, and a 3.7GB ext4 partition for storing the root file system.
When you install updates on a new disk image, you may find that the Linux partition fills up before all the updates have installed. It's a good idea to use an 8GB card (or larger), and resize the partition so that it fills the entire card.
If there's any important data on your SD card, you should back it up before you make any changes.
The card shouldn't be mounted while you resize it, so you need to put it in an SD card reader and plug it in to a Linux PC. If you have a spare SD card, you can boot a Banana Pi with one SD card, and use it to resize the Linux partition on a second SD card.
Use this command to view the disks and their partions:
$ sudo fdisk -l
 Disk /dev/mmcblk0: 7.4 GiB, 7948206080 bytes, 15523840 sectors
 Units: sectors of 1 * 512 = 512 bytes
 Sector size (logical/physical): 512 bytes / 512 bytes
 I/O size (minimum/optimal): 512 bytes / 512 bytes
 Disklabel type: dos
 Disk identifier: 0x59d0bd13

 Device         Boot     Start       End  Blocks  Id System
 /dev/mmcblk0p1           2048    104447   51200  83 Linux
 /dev/mmcblk0p2         104448  15523839 7709696  83 Linux

 Disk /dev/sda: 7.5 GiB, 7998537728 bytes, 15622144 sectors
 Units: sectors of 1 * 512 = 512 bytes
 Sector size (logical/physical): 512 bytes / 512 bytes
 I/O size (minimum/optimal): 512 bytes / 512 bytes
 Disklabel type: dos
 Disk identifier: 0x59d0bd13

 Device    Boot     Start       End  Blocks  Id System
 /dev/sda1           2048    104447   51200  83 Linux
 /dev/sda2         104448   7167999 3531776  83 Linux
Expand the partition with fdisk
If you're not using a desktop environment, you can resize the partition from the command line using the fdisk command:
sudo fdisk /dev/sda
Fdisk will display a prompt where you can enter simple commands. You're going to need to delete the second partition, create a new larger one, and write the changes to disk. The partition table will be updated, but the data in the partition will be untouched.
When you create the new partition you'll be prompted for a type, primary or extended. Type 'p' for primary, and enter '2' when prompted for the partition number. When prompted for the first and last sector numbers, just press enter to use the default values selected by fdisk.
The next step is to type 'w' to write the changes to the card. Fdisk will automatically quit after this.
[bananapi@lemaker ~]$ sudo fdisk /dev/sda
 Welcome to fdisk (util-linux 2.24.2).
 Changes will remain in memory only, until you decide to write them.
 Be careful before using the write command.
 Command (m for help): d
 Partition number (1,2, default 2): 2

 Partition 2 has been deleted.

 Command (m for help): n

 Partition type:
    p   primary (1 primary, 0 extended, 3 free)
    e   extended
 Select (default p): p
 Partition number (2-4, default 2): 2
 First sector (104448-15622143, default 104448):
 Last sector, +sectors or +size{K,M,G,T,P} (104448-15622143, default 15622143):

 Created a new partition 2 of type 'Linux' and of size 7.4 GiB.

 Command (m for help): w
 The partition table has been altered.
 Calling ioctl() to re-read partition table.
 Syncing disks.
Reboot your Banana Pi so that the partition table gets reloaded. At this point, the partition is much larger, but the file system only occupies half of it. The final step is to enlarge the file system so that it fills the partition. The next two commands check the integrity of the file system and then resize it:
[bananapi@lemaker ~]$ sudo e2fsck -f /dev/sda2
 e2fsck 1.42.8 (20-Jun-2013)
 Pass 1: Checking inodes, blocks, and sizes
 Pass 2: Checking directory structure
 Pass 3: Checking directory connectivity
 Pass 4: Checking reference counts
 Pass 5: Checking group summary information
 /dev/sda2: 82882/220752 files (0.1% non-contiguous), 724877/882944 blocks

 [bananapi@lemaker ~]$ sudo resize2fs /dev/sda2
 resize2fs 1.42.8 (20-Jun-2013)
 Resizing the filesystem on /dev/sda2 to 1939712 (4k) blocks.
 The filesystem on /dev/sda2 is now 1939712 blocks long.
The partition and its file system should now occupy the whole SD card.
Expand the partition with Gparted
Some Linux distributions are supplied with a graphical tool called Gparted, which is available in the Fedora image for the Banana Pi. It's available on many PC Linux distributions by default. If you're using Fedora on your Banana Pi, you can use Gparted instead of fdisk.
Before you start, make sure the card is plugged into an SD card reader, and make sure the card isn't automatically mounted. Launch Gparted by going to the Application Menu -> System -> Gparted.
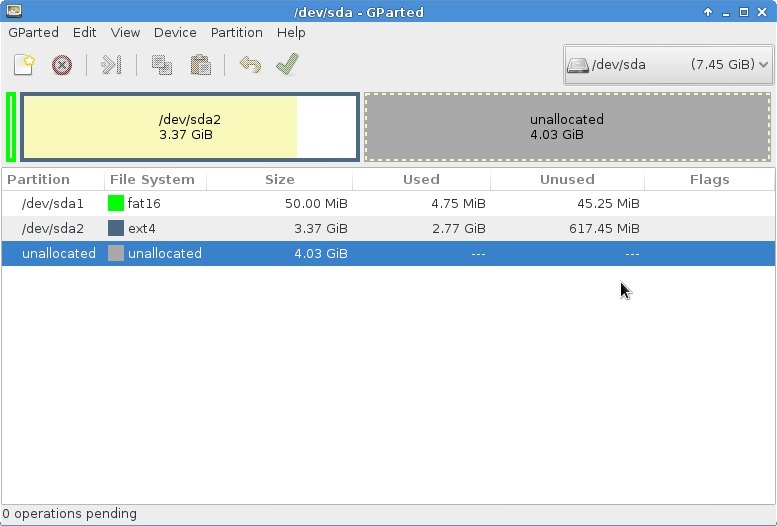
Select the card that you want to edit from the drop down menu on the right hand side of the tool bar. In this case it's /dev/sda. Click on the partition /dev/sda2, go to the Partition menu, and select Resize/Move.
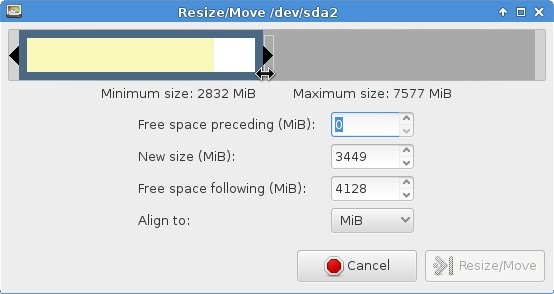
In the resize window, drag the right hand edge of the partition as far to the right as it will go, and click on the Resize button.
Click the Apply button on the Gparted tool bar to write the changes to the card. The partition will be enlarged, and the file system is automatically expanded to fill the partition.
http://banoffeepiserver.com/resize-the-root-file-system-partition.html


 542
542

 被折叠的 条评论
为什么被折叠?
被折叠的 条评论
为什么被折叠?
 到【灌水乐园】发言


