


 本文介绍了SpringBoot项目间如何实现远程调用,重点讲解了使用Feign和RestTemplate的步骤。Feign通过注解实现模板化请求,简化HTTP API的连接,而RestTemplate作为Spring自带的REST客户端,可实现客户端负载均衡。文中提供了详细的代码示例,包括服务提供方和服务调用方的配置和实现。
springboot项目间的远程调用,springboot本身封装了两种方法HTTP调用方式:
1.feign的远程调用(http接口调用)
2.RestTemplate
下面参考别的博客我自己的项目来介绍这两种方式~
1.feign实现springboot/springcloud间的远程HTTP调用
参考博文:第一篇缺少调用方法。第二篇相对详细
1.springboot feign使用
2.Spring Boot 中使用Feign作为HTTP客户端调用远程HTTP服务
Spring Cloud的Feign支持的一个中心概念就是命名客户端.Feign客户端使用@FeignClient注册组合成组件,按需调用远程服务器. Spring Cloud使用FeignClientsConfiguration创建一个新的集合作为每个命名客户端的ApplicationContext(应用上下文), 包含feign.Decoder,feign.Encoder和feign.Contract.
你可以使用 Jersey 和 CXF 这些来写一个 Rest 或 SOAP 服务的java客服端。你也可以直接使用 Apache HttpClient 来实现。但是 Feign 的目的是尽量的减少资源和代码来实现和 HTTP API 的连接。通过自定义的编码解码器以及错误处理,你可以编写任何基于文本的 HTTP API。
Feign 通过注解注入一个模板化请求进行工作。只需在发送之前关闭它,参数就可以被直接的运用到模板中。然而这也限制了 Feign,只支持文本形式的API,它在响应请求等方面极大的简化了系统。同时,它也是十分容易进行单元测试的。
Spring Cloud应用在启动时,Feign会扫描标有@FeignClient注解的接口,生成代理,并注册到Spring容器中。生成代理时Feign会为每个接口方法创建一个RequetTemplate对象,该对象封装了HTTP请求需要的全部信息,请求参数名、请求方法等信息都是在这个过程中确定的,Feign的模板化就体现在这里。
写了两个springboot项目,一个叫center-erp作为接口提供方(server),一个叫mt-task作为接口调用方(client)。
- 1.1 首先是服务方
center-erp,正常的写一个接受别的项目feign调用的公共controller层接口。
import com.alibaba.fastjson.JSONObject;
import lombok.Builder;
import lombok.Data;
import lombok.experimental.Accessors;

@Data
@Builder
@Accessors(chain = true)//bean链式操作
public class RequestJson {
	//接口名称
    private String serverName;

	//方法名称
    private String functionName;

    //请求参数,具体参数请查看对应接口
    private JSONObject jsonObject;

}

import com.base.entity.RequestJson;
import com.taobao.txc.common.TxcContext;
import org.slf4j.Logger;
import org.slf4j.LoggerFactory;
import org.springframework.web.bind.annotation.PostMapping;
import org.springframework.web.bind.annotation.RequestBody;
import org.springframework.web.bind.annotation.RequestMapping;
import org.springframework.web.bind.annotation.RestController;
@RestController
@RequestMapping("/center/erp")
public class BaseController {
    private final static Logger LOGGER = LoggerFactory.getLogger(BaseController.class);

    @PostMapping("/requestDistribute")
    public ResponseJson requestDistribute(@RequestBody RequestJson requestJson) {
        try {
            LOGGER.info("***************************center-erp:requestJson={}", requestJson.toString());
            Object obj = SpringBeanUtil.getBean(requestJson.getServerName());
            if (null == obj) {
                LOGGER.error("center-erp:请求接口不存在");
                return ResponseUtil.getResponseMsg(RESPONSE_CODE_ERROR, "请求接口不存在");
            }
            JSONObject jsonObject = requestJson.getJsonObject();
           // String xid = jsonObject.getString("xid");
           // if (StringUtil.isNotEmpty(xid)) {
           //     LOGGER.info("事务xid={}", xid);
           //     TxcContext.bind(xid, null);
           // }
            Method method = obj.getClass().getDeclaredMethod(requestJson.getFunctionName(), new Class[]{JSONObject.class});
            ResponseJson responseJson = (ResponseJson) method.invoke(obj, requestJson.getJsonObject());
            LOGGER.info("*************************center-erp:responseJson={}", responseJson.toString());
            //if (StringUtil.isNotEmpty(xid)) {
            //    TxcContext.unbind();
            //}
            return responseJson;
        } catch (Exception e) {
            LOGGER.error("center-erp:请求执行异常=", e);
            return ResponseUtil.getResponseCode(RESPONSE_CODE_ERROR);
        }
    }
}
- 1.2 服务端封好,下面是客户端
mt-task的实现
mt-task为接口调用方,需要用到feign,因此pom中需引入相关feign包。
之前是spring-cloud-starter-feign这个包名,但是现在你去maven看会发现,这个已经不推荐使用了,现在推荐用spring-cloud-starter-openfeign这个。
<dependency>
   <groupId>org.springframework.cloud</groupId>
   <artifactId>spring-cloud-starter-openfeign</artifactId>
</dependency>
- 1.3 写一个service类.下面写了两个,一个是举例,一个是实例
@FeignClient(name = “demo3”),name是你要调的那个服务的名字。fallback,这个属性是当你需要调的那个服务(本例里面的demo3)出问题了,就会走你fallback指定的实现类。
举例:
@FeignClient(name = "demo3",fallback = HelloServiceImpl.class)
public interface HelloService {
     @RequestMapping(value = "/demo3/ans",method = RequestMethod.GET)
     String todo();
}
实例:

import com.alibaba.fastjson.JSONObject;
import org.springframework.cloud.openfeign.FeignClient;
import org.springframework.web.bind.annotation.RequestBody;
import org.springframework.web.bind.annotation.RequestMapping;
import org.springframework.web.bind.annotation.RequestMethod;

/**
 * @author zhanglifeng
 */
@FeignClient(value = "center-erp", fallback = CenterErpHystrix.class)
public interface CenterErpClient {
    @RequestMapping(value = "/center/erp/requestDistribute", method = RequestMethod.POST)
    JSONObject requestDistribute(@RequestBody(required = false) JSONObject jsonObject);
}
import com.alibaba.fastjson.JSONObject;
import org.springframework.stereotype.Component;

/**
 * @author zhanglifeng
 */
@Component
public class CenterErpHystrix implements CenterErpClient {
    @Override
    public JSONObject requestDistribute(JSONObject jsonObject) {
        throw new RuntimeException("center_erp 服务异常!");
    }
}
封装调用center-erp的公共基础方法
@Override
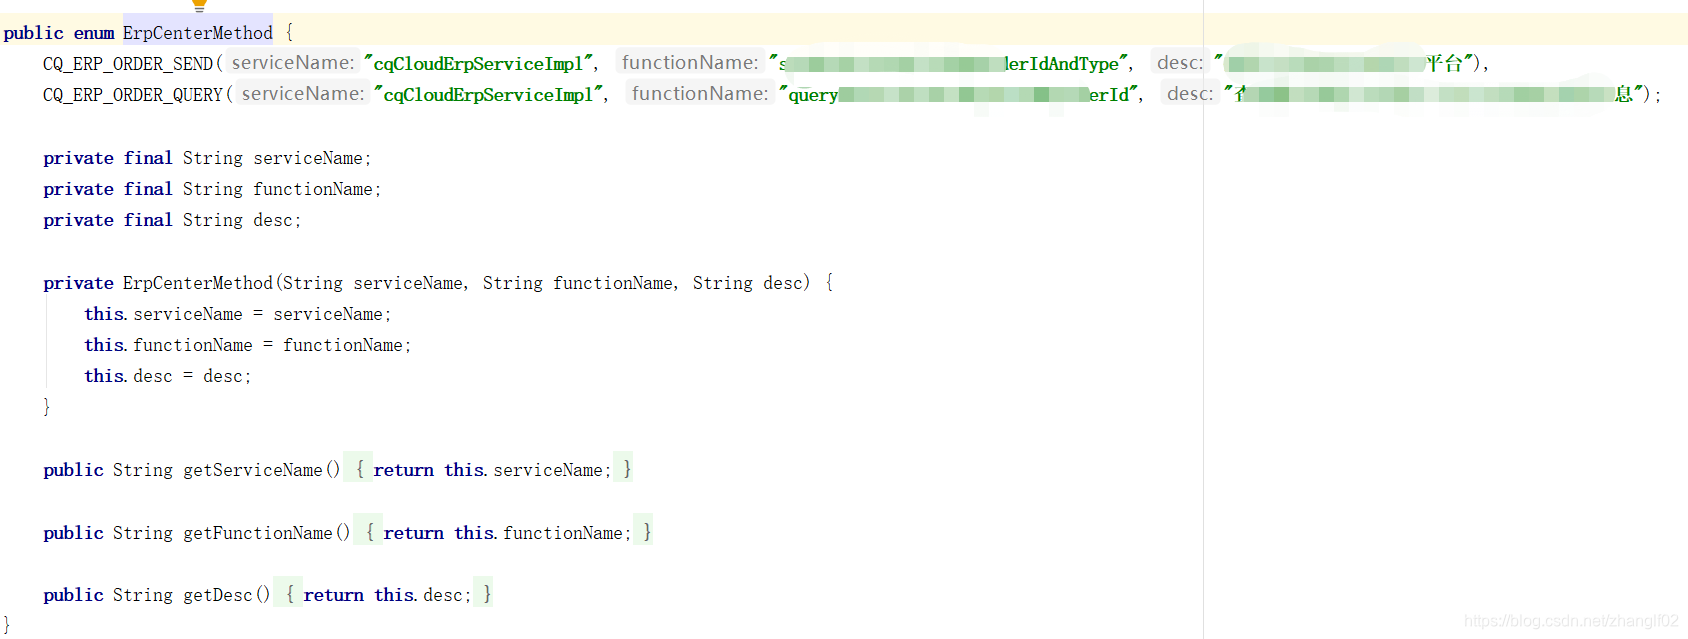
public JSONObject callCenterErp(ErpCenterMethod serverEnum, JSONObject jsonObject) {
String serviceName = serverEnum.getServiceName();
String functionName = serverEnum.getFunctionName();
try {
JSONObject json = new JSONObject();
json.put("serverName", serviceName);
json.put("functionName", functionName);
json.put("jsonObject", jsonObject);
long start = System.currentTimeMillis();
jsonObject = centerErpClient.requestDistribute(json);
long end = System.currentTimeMillis();
LOGGER.info("调用center-erp:接口={},方法={},耗时={}", serviceName, functionName, String.valueOf(end - start));
} catch (Exception e) {
LOGGER.error("调用center-erp:接口={}方法={},异常={}", serviceName, functionName, e);
}
return jsonObject;
}
在mt-task的具体项目的地方调用center-erp项目的一个方法。
    @Override
    public JSONObject sendOrderToCqErp(String orderId, String orderType) throws Exception {
        JSONObject paramJson = new JSONObject();
        paramJson.put("orderId", orderId);
        paramJson.put("orderType", orderType);
        return callCenterErp(CQ_ERP_ORDER_SEND, paramJson);
    }
上面便是feign调用的实例
2.restTemplate实现springboot/springcloud间的远程HTTP调用
- 2.1 RestTemplate介绍
RestTemplate是spring框架中自带的rest客户端工具类,具有丰富的API,并且在spring cloud中,标记@LoadBalanced注解,可以实现客户端负载均衡的rest调用.
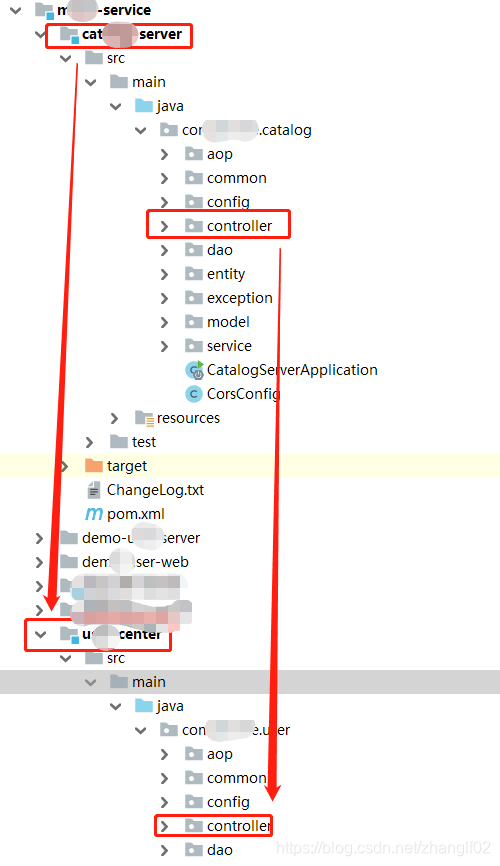
由于RestTemplate为spring框架中自带的工具类。故不用专门在pom中引入依赖。我这里以项目中的实例来做demo 讲解。如下图大致知道是上面这个springboot项目调用下面用户中这个springboot项目。
2.2 首先是下面用户中心这个springboot项目的接口(提供方的接口层)
/**
 * [用户操作接口]
 * @author zhanglifeng
 * @date 2019-03-20
 */
@RestController
@RequestMapping("/user")
@Slf4j
public class UserController {

    /**
     * [批量注册学生信息]
     * @param params
     * @return
     */

    @RequestMapping(value = "/batchSign",method = {RequestMethod.POST})
    public Result  batchSign(@RequestBody String params){
        log.info("UserController.addClassUser " + JSON.toJSONString(params));
        Map<String, Object> map = ParamUtil.parseParams(Map.class, params);
        Object paramsTemp = map.get("params");
        List<UserInfo> students = JSON.parseArray(JSON.toJSONString(paramsTemp), UserInfo.class);
        、、、、、
    }

}
2.3 接口调用方的代码。这里已经实例化注入了RestTemplate;,具体实现看2.4配置。
/**
* @Author: zhanglf
* @Date: 2019/3/28 15:28
* @Description: *
*/
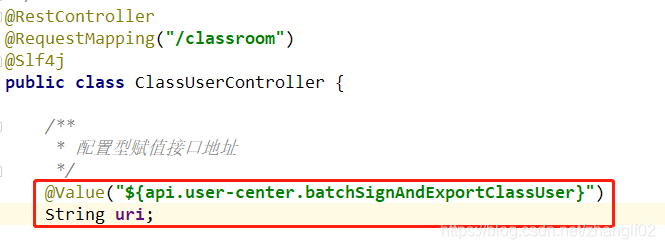
@RestController
@RequestMapping("/classroom")
@Slf4j
public class ClassUserController {
/**
* 实例化RestTemplate
*/
@Autowired
private RestTemplate restTemplate;
/**[批量导入学生信息]
* @author zhanglf
* @date 2019-04-18
* @param params
* @return
*/
@RequestMapping(value = "/batchExportClassUser")
public Result batchSignAndExportClassUser(@RequestBody String params) {
log.info("ClassUserController.addClassUser " + JSON.toJSONString(params));
Map<String, Object> map = ParamUtil.parseAndRequire(Map.class, params);
、、、、、、
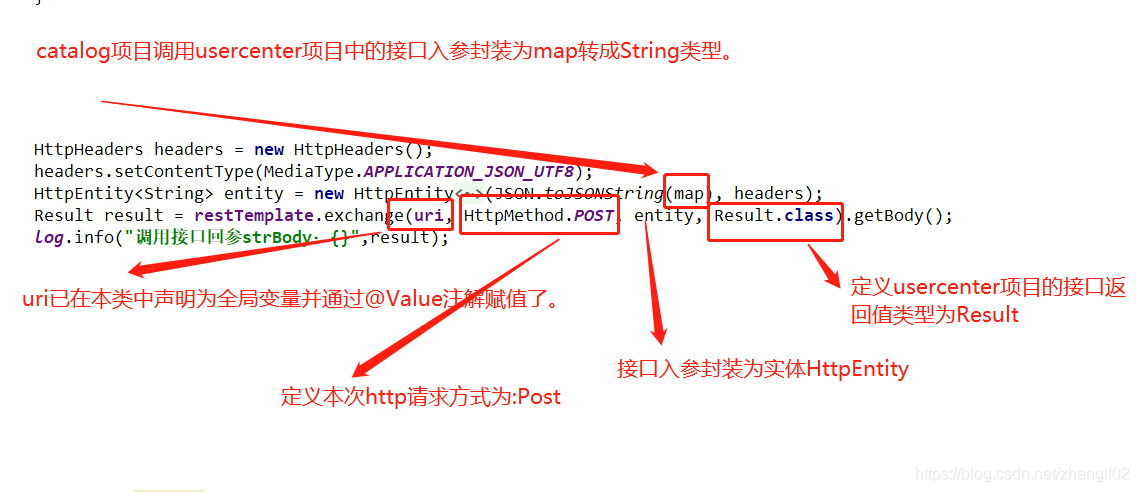
HttpHeaders headers = new HttpHeaders();
headers.setContentType(MediaType.APPLICATION_JSON_UTF8);
HttpEntity<String> entity = new HttpEntity<String>(JSON.toJSONString(map), headers);
Result result = restTemplate.exchange(uri, HttpMethod.POST, entity, Result.class).getBody();
log.info("调用接口回参strBody:{}",result);
if(result.getCode()!=CodeMsg.SUCCESS.getCode()){
log.info("调用批量注册异常:"+result.getMsg());
throw new BizException(CodeMsg.CALL_API_FAILED.fillArgs("调用批量注册异常!"));
}
、、、、、、
}
2.4 利用spring管理RestTemplate的实例。而不是通过new出一个RestTemplate对象来用。
package com.zhanglf.catalog.config;

import org.apache.http.client.HttpClient;
import org.apache.http.client.config.RequestConfig;
import org.apache.http.config.Registry;
import org.apache.http.config.RegistryBuilder;
import org.apache.http.conn.socket.ConnectionSocketFactory;
import org.apache.http.conn.socket.PlainConnectionSocketFactory;
import org.apache.http.conn.ssl.SSLConnectionSocketFactory;
import org.apache.http.impl.client.HttpClientBuilder;
import org.apache.http.impl.conn.PoolingHttpClientConnectionManager;
import org.springframework.context.annotation.Bean;
import org.springframework.context.annotation.Configuration;
import org.springframework.http.client.ClientHttpRequestFactory;
import org.springframework.http.client.HttpComponentsClientHttpRequestFactory;
import org.springframework.web.client.RestTemplate;

/**
 * @author zhanglf
 * @Description 自定义RestTemplate实例
 * @date 2019/4/17 11:40
 */
@Configuration
public class RestTemplateConfig {
    @Bean
    public RestTemplate restTemplate() {
        return new RestTemplate(httpRequestFactory());
    }

    public ClientHttpRequestFactory httpRequestFactory() {
        return new HttpComponentsClientHttpRequestFactory(httpClient());
    }

    public HttpClient httpClient() {
        Registry<ConnectionSocketFactory> registry = RegistryBuilder.<ConnectionSocketFactory>create()
                .register("http", PlainConnectionSocketFactory.getSocketFactory())
                .register("https", SSLConnectionSocketFactory.getSocketFactory())
                .build();
        PoolingHttpClientConnectionManager connectionManager = new PoolingHttpClientConnectionManager(registry);
        //设置整个连接池最大连接数 根据自己的场景决定
        connectionManager.setMaxTotal(100);
        //路由是对maxTotal的细分
        connectionManager.setDefaultMaxPerRoute(100);
        RequestConfig requestConfig = RequestConfig.custom()
                //服务器返回数据(response)的时间,超过该时间抛出read timeout
                .setSocketTimeout(10000)
                //连接上服务器(握手成功)的时间,超出该时间抛出connect timeout
                .setConnectTimeout(5000)
                //从连接池中获取连接的超时时间,超过该时间未拿到可用连接,
                // 会抛出org.apache.http.conn.ConnectionPoolTimeoutException: Timeout waiting for connection from pool
                .setConnectionRequestTimeout(1000)
                .build();
        return HttpClientBuilder.create()
                .setDefaultRequestConfig(requestConfig)
                .setConnectionManager(connectionManager)
                .build();
    }
}
通过以上即可实现springboot服务远程接口调用。下面针对调用的代码部分具体说明:
下面这两张图分别是接口地址的值声明赋值和yml文件中的配置
import org.springframework.beans.factory.annotation.Value;


 822
822

 被折叠的 条评论
为什么被折叠?
被折叠的 条评论
为什么被折叠?
 到【灌水乐园】发言


