


 本文深入剖析了Spring框架的核心功能,包括BeanFactory、BeanDefinition的解析、对象初始化和依赖注入、AOP的实现原理以及Spring事务管理。文章详细介绍了Spring如何从XML配置解析到BeanDefinition,再到Bean的创建和初始化过程,以及AOP的代理对象创建和调用流程。同时,还探讨了SpringMVC的初始化与Servlet 3.0的关系,以及Spring在实际应用中的最佳实践。
文章目录
简介
Spring是Java程序员日常开发中最长应的应用框架之一,它是如此的流行甚至对Java语言本身的发展都起到了推动作用,目前Spring可以说是Java后端开发的事实标准。Spring的优点可以总结如下:
- Spring的两个最核心功能是IoC和Aop,为模块解耦合提供了基础支持;
- 基于Aop实现的声明式缓存和声明式事务大大简化了代码逻辑;
- 基于Spring的SpringMVC为快速接入JavaEE提供支持;
- Spring的test模块解决了应用程序的单元测试问题;
- Spring可以与很多优秀的框架集成,可以说跟谁都行有一腿;
- 基于Spring构建的SpringBoot、SpringCloud使得Spring在微服务领域迎来了第二个春天;
BeanFactory
在刚开始接触Spring的时候,有人说Spring就是一个生产bean对象的工厂,底层实际上就是一个Map,直到现在对此也非常认同,Spring是一个Map,但绝不仅仅是一个Map,下面先看看Spring的BeanFactory结构

从图中的类名称可以看出,Spring从BeanFactory扩展出了具有不同能力的BeanFactory,当然这还不包含ApplicationContext,所以我个人对Spring的理解是它在HashMap的基础上扩展处理成百上千个特性,这些特性让Spring成为了一个优秀的框架产品。
如果把Spring当成是一个生产Bean的工厂,那么这个Bean工厂上产Bean的原材料就是BeanDefinition,从名字上就可以看出来,BeanDefinition是定义Bean的Bean,也就是说BeanDefinition封装了每一个能够被Spring管理的Bean的元数据,例如类型、依赖、属性、初始化方法等

从Spring中获取一个bean对象的主流程包括两步
- 加载配置文件,从中解析出BeanDefinition
- 调用getBean(beanName)触发Bean的初始(从BeanDefinition到Bean)
Spring源码-初始化BeanDefinition
这里主要说说xml的解析,主要原因是相比注解的方式更加简单,以ClasspathXmlApplication为例,下面进入源码部分。

整个Spring初始的入口是ClasspathXmlApplication的构造方法
ClasspathXmlApplication
public ClassPathXmlApplicationContext(String[] configLocations, boolean refresh, ApplicationContext parent)
		throws BeansException {

	super(parent);
	setConfigLocations(configLocations);
	if (refresh) {
	    //入口在这里
		refresh();
	}
}
@Override
protected Resource[] getConfigResources() {
	return this.configResources;
}

AbstractApplicationContext.java
@Override
public void refresh() throws BeansException, IllegalStateException {
	ConfigurableListableBeanFactory beanFactory = obtainFreshBeanFactory();
}

protected ConfigurableListableBeanFactory obtainFreshBeanFactory() {
	refreshBeanFactory();
}

AbstractRefreshableApplicationContext.java
@Override
protected final void refreshBeanFactory() throws BeansException {
    /**
      这里创建了BeanFactory的实例 - DefaultListableBeanFactory
  		所以说,我们开发中用到的ApplicationContext是BeanFactory的封装,
  		在BeanFactory的基础上提供了很多额外的功能,例如
  		事件发布与监听、组件扫描、国际化等
     **/
	DefaultListableBeanFactory beanFactory = createBeanFactory();
	//从这里开始加载配置文件,注册BeanDefinition到BeanFactory
	loadBeanDefinitions(beanFactory);
}

AbstractXmlApplicationContext.java implements ResourceLoader
 */
 @Override
protected void loadBeanDefinitions(DefaultListableBeanFactory beanFactory) throws BeansException, IOException {
        //创建一个专门从Xml中读取BeanDefinition的XmlBeanDefinitionReader
		XmlBeanDefinitionReader beanDefinitionReader = new XmlBeanDefinitionReader(beanFactory);
		beanDefinitionReader.setResourceLoader(this);
		loadBeanDefinitions(beanDefinitionReader);
}

protected void loadBeanDefinitions(XmlBeanDefinitionReader reader) throws BeansException, IOException {
        /**
			当前类中的getConfigResources方法被ClasspathXmlApplicationContext重写了,
			所以这里调用的是ClasspathXmlApplicationContext中的方法
       */
		Resource[] configResources = getConfigResources();
		reader.loadBeanDefinitions(configResources);
 }
protected Resource[] getConfigResources() {
		return null;
}

AbstractBeanDefinitionReader.java
public int loadBeanDefinitions(Resource... resources) throws BeanDefinitionStoreException {
	loadBeanDefinitions(resource);
}
XmlBeanDefinitionReader.java
public int loadBeanDefinitions(Resource resource) throws BeanDefinitionStoreException {
		return loadBeanDefinitions(new EncodedResource(resource));
}
/**
   这里是解析的核心逻辑
*/
public int loadBeanDefinitions(EncodedResource encodedResource) throws BeanDefinitionStoreException {
	//将配置文件转换成了InputStream流对象
	InputStream inputStream = encodedResource.getResource().getInputStream();
	return doLoadBeanDefinitions(inputSource, encodedResource.getResource());
}


protected int doLoadBeanDefinitions(InputSource inputSource, Resource resource) }{
    //从流对象得到Document对象
	Document doc = doLoadDocument(inputSource, resource);
    return registerBeanDefinitions(doc, resource);
}

public int registerBeanDefinitions(Document doc, Resource resource) throws BeanDefinitionStoreException {
    //创建一个从Document中获取BeanDefinition的Reader
	BeanDefinitionDocumentReader documentReader = createBeanDefinitionDocumentReader();
	documentReader.registerBeanDefinitions(doc, createReaderContext(resource));
 }

DefaultBeanDefinitionDocuemntReader.java
public void registerBeanDefinitions(Document doc, XmlReaderContext readerContext) {
	doRegisterBeanDefinitions(root);
}

protected void doRegisterBeanDefinitions(Element root) {
	parseBeanDefinitions(root, this.delegate);
}
这里就开始解析Elemnent对象了

protected void parseBeanDefinitions(Element root, BeanDefinitionParserDelegate delegate) {
		if (delegate.isDefaultNamespace(root)) {
			NodeList nl = root.getChildNodes();
			for (int i = 0; i < nl.getLength(); i++) {
				Node node = nl.item(i);
				if (node instanceof Element) {
					Element ele = (Element) node;
					if (delegate.isDefaultNamespace(ele)) {
					   //如果是spring默认的标签,就有spring内核自己来解析,例如beans、bean、<property>等等
						parseDefaultElement(ele, delegate);
					}
					else {
					    //如果是其他模块的标签或自定义的标签,例如 <aop:xxx>   <tx:xxx>
					    //就通过对应的xml名称空间,从spring.handlers中找到对应的NamespaceHandler
					    //再由NamespaceHandler设置的parser进行解析
					    //这也是其他框架与spring进行集成的一个方式,例如dubbo的DubboNamespaceHandler就是用来解析<dubbo:xxx>的
						delegate.parseCustomElement(ele);
					}
				}
			}
		}
		else {
			delegate.parseCustomElement(root);
		}
	}

public BeanDefinition parseCustomElement(Element ele, BeanDefinition containingBd) {
		String namespaceUri = getNamespaceURI(ele);
		NamespaceHandler handler = this.readerContext.getNamespaceHandlerResolver().resolve(namespaceUri);
		if (handler == null) {
			error("Unable to locate Spring NamespaceHandler for XML schema namespace [" + namespaceUri + "]", ele);
			return null;
		}
		return handler.parse(ele, new ParserContext(this.readerContext, this, containingBd));
	}

最后实际上就是将解析出来的BeanDefinition通过BeanDefinitionRegistry提供的接口能力注册到DefaultListableBeanFactory中
实际上DefaultListableBeanFactory实现了BeanDefinitionRegistry接口,而最终BeanDefinition对象就会被添加到DefaultListableBeanFactory的
private final Map<String, BeanDefinition> beanDefinitionMap = new ConcurrentHashMap<String, BeanDefinition>(256);
这个Map中。
下面我们看看BeanDefinition

可以说一目了然,我们所有的配置信息最终都会被解析到BeanDefinition中,Spring在创建Bean实例时,就会根据这些信息来执行不同的逻辑。
从这段逻辑中其实还能学点很多关于代码设计的知识点,比如在解析xml的时候通过BeanDefinitionReader/XmlBeanDefinitionDocumentReader等层层委托,遵循了面向对象设计原则的单一职责原则,再比如大量使用模板模式实现子类的灵活扩展。
Spring源码-对象初始化&依赖注入
前面讲了注册BeanDefinition的过程,有了创建Bean的原材料,接下来就是创建Bean对象了。
在Spring中创建Bean对象的入口有两个,一个是调用getBean()方法从容器中获取Bean对象,另外一个就是在Spring容器初始化的时候,会默认对单例对象进行初始化
AbstractApplicationContext.java
@Override
public void refresh() throws BeansException, IllegalStateException {

    // 这里会对非懒加载的bean进行实例化,实际上也是调用getBean,所以
    // 触发bean实例化的入口就是getBean,
	// Instantiate all remaining (non-lazy-init) singletons.
	finishBeanFactoryInitialization(beanFactory);
}
下面来看一下getBean方法的逻辑
AbstractApplicationContext.java
@Override
	public <T> T getBean(String name, Class<T> requiredType) throws BeansException {
		assertBeanFactoryActive();
		/**
			这里调用的是DefaultListableBeanFactory的getBean方法
			前面说过,ApplicationContext实际上是对BeanFactory
			的再次封装,此处还是基于BeanFactory来实现IoC容器
			所以这里也就很容易理解了
		*/
		return getBeanFactory().getBean(name, requiredType);
	}
AbstractBeanFactory中的doGetBean是Bean对象初始化的核心方法,化繁为简,以单例对象的创建过程为例来说明
protected <T> T doGetBean(
			final String name, final Class<T> requiredType, final Object[] args, boolean typeCheckOnly)
			throws BeansException {
			// Create bean instance.
				if (mbd.isSingleton()) {
					sharedInstance = getSingleton(beanName, new ObjectFactory<Object>() {
						@Override
						public Object getObject() throws BeansException {
							try {
							    /**
									Here
								**/
								return createBean(beanName, mbd, args);
							}
							catch (BeansException ex) {
								// Explicitly remove instance from singleton cache: It might have been put there
								// eagerly by the creation process, to allow for circular reference resolution.
								// Also remove any beans that received a temporary reference to the bean.
								destroySingleton(beanName);
								throw ex;
							}
						}
					});
				}
}


AbstractAwiredCapableBeanFactory.java
@Override
	protected Object createBean(String beanName, RootBeanDefinition mbd, Object[] args) throws BeanCreationException {
	   //通过beanName从BeanDefinition中得到对应的class对象
		Class<?> resolvedClass = resolveBeanClass(mbd, beanName);
		//这里调用的BeanPostProcessor的两个生命周期方法, 与Aop相关,后面再说
		// Give BeanPostProcessors a chance to return a proxy instead of the target bean instance.
		Object bean = resolveBeforeInstantiation(beanName, mbdToUse);
		//看到doXxx就说明是真正干活的方法了,在Spring中doXxx都是苦力
		Object beanInstance = doCreateBean(beanName, mbdToUse, args);
}

protected Object doCreateBean(final String beanName, final RootBeanDefinition mbd, final Object[] args)
			throws BeanCreationException {

		/**
			这里是解决循环依赖的核心逻辑,循环依赖主要包含三种常见:
			1. 构造方法之间的依赖
			2. 构造方法和setter方法之间的依赖
			3. setter方法之间的依赖

			由于java本身不允许一个对象被创建一半,所以第一种循环依赖的场景没办法解决
			第二种场景,解决方案是选初始化构造方法依赖的对象,然后将这个对象应用在构造函数上,
			最后通过setter方法再将当前对象注入到被依赖对象中
			第三种场景的解决方案与第二种基本一致

			spring中使用了三级缓存来解决问题,这是个老生常谈的问题了,就不在详细说了
		*/
		boolean earlySingletonExposure = (mbd.isSingleton() && this.allowCircularReferences &&
				isSingletonCurrentlyInCreation(beanName));
		if (earlySingletonExposure) {
			if (logger.isDebugEnabled()) {
				logger.debug("Eagerly caching bean '" + beanName +
						"' to allow for resolving potential circular references");
			}
			addSingletonFactory(beanName, new ObjectFactory<Object>() {
				@Override
				public Object getObject() throws BeansException {
					return getEarlyBeanReference(beanName, mbd, bean);
				}
			});
		}
		/**
			这里是进行属性赋值
			主要分为@Autowired注释的属性,@Value注释的属性
			如果是引用类型,则调用getBean先对其进行初始化,在通过反射设置到当前对象中
			如果是@Value属性,通过PropertyPlaceHolderConfigurer进行设置
		*/
		populateBean(beanName, mbd, instanceWrapper);

		/**
			这里是对Bean进行初始化,这个方法比较重要,主要涉及到了bean
			的生命周期管理,Aop代理对象的创建也是发生在这一步
		*/
		exposedObject = initializeBean(beanName, exposedObject, mbd);
 }


protected Object initializeBean(final String beanName, final Object bean, RootBeanDefinition mbd) {
	/**
			调用所有XxxAware的回调方法,例如BeanNameAware、BeanFactoryAware、ApplicationContextAware等
			注入相关的属性值
	*/
	invokeAwareMethods(beanName, bean);
	/**
		这里调用BeanPostProcessor的前置方法postProcessBeforeInitialization
	*/
	wrappedBean = applyBeanPostProcessorsBeforeInitialization(wrappedBean, beanName);

	/**
		这里调用初始化方法
		首先会调用InitializingBean接口的afterPropertiesSet方法
		然后再调用<bean init-method=“”>指定的方法
		这里涉及到优先级问题,使用的时候需要注意以下
	*/
	invokeInitMethods(beanName, wrappedBean, mbd);
	/**
		这里调用BeanPostProcessor的后置方法postProcessAfterInitialization
		Aop代理对象就是在这里创建的,是整个Aop的入口,涉及到我们常说的
		Cglib动态代理和Jdk 动态代理,	后面再详细分析
	*/
	·wrappedBean = applyBeanPostProcessorsAfterInitialization(wrappedBean, beanName);
}

// 这个方法会从IoC容器中获取所有的BeanPostProcessor,并调用后置方法
@Override
	public Object applyBeanPostProcessorsAfterInitialization(Object existingBean, String beanName)
			throws BeansException {

		Object result = existingBean;
		for (BeanPostProcessor beanProcessor : getBeanPostProcessors()) {
			result = beanProcessor.postProcessAfterInitialization(result, beanName);
			if (result == null) {
				return result;
			}
		}
		return result;
	}
到这儿其实创建Bean的过程就执行完了,Bean对象实例化主要分为三个步骤
- 通过反射创建Bean对象
- 对对象中的属性进行复制,这里如果是引用类型,会递归触发getBean的调用
- 最后就是调用Bean对象的生命周期钩子方法,管理Bean对象的生命周期
实际上Bean的创建过程还涉及到了Aop的整个初始化流程,相对比较复杂,放到后面分析Aop的时候再详细看,不过,可以先有一个印象,就是Spring Aop是通过BeanPostProcesser实现的。
Spring源码-AOP
SpringAop是核心功能模块之一,提供了面向切面编程的支持,在Aop领域涉及到一些晦涩难懂的概念:
- 目标对象:只被代理的对象,一般是业务对象;
- 连接点:插入切面的地方,在Spring Aop中指的是方法;
- 切点:指连接点的集合;
- 切面:切面逻辑,例如日志记录、事务;
- 织入:简单理解就是生成代理对象的过程;
- 通知:定义了在连接点如何织入切面(前置通知、后置通知、环绕通知、异常通知、返回通知);
下面分别来简单看一下Aop的xml和注解两种应用实例
- xml方式
业务类
public class UserService {
	public void queryUser() {
        System.out.println("Query User");
    }
}

切面类
public class LogAspectj {
	//前置通知方法
	public void beforeLog() {
        System.out.println("before log");
    }
    //环绕通知方法
    public Object aroundLog(ProceedingJoinPoint joinPoint) throws Throwable {
        System.out.println("around before");
        System.out.println("" + joinPoint.getSignature().getName() + ", args:" + Arrays.asList(joinPoint.getArgs()));
        Object re = joinPoint.proceed();
        System.out.println("around after");
        return  re;
    }
    //后置通知方法
	public void afterLog() {
        System.out.println("after log");
    }
    //返回通知方法
	public void returningLog() {
        System.out.println("returning log");
    }
    //异常通知方法
    public void exceptionLog(Exception ex) {
        System.out.println("exception log");
    }
}

配置文件
	<context:component-scan base-package="spring"/>
    <bean id="userService" class="spring.service.UserService"/>
    <!-- 切面 -->
    <bean id="logAdvice" class="spring.log.LogAspectj"/>
    <aop:config>
        <!-- 切点 -->
        <aop:pointcut id="servicePointCut" expression="execution(* spring.service.UserService.*(..))"/>
        <aop:aspect ref="logAdvice">
            <aop:before method="beforeLog" pointcut-ref="servicePointCut"/>
            <aop:around method="aroundLog" pointcut-ref="servicePointCut"/>
            <aop:after method="afterLog" pointcut-ref="servicePointCut"/>
            <aop:after-returning method="returningLog" pointcut-ref="servicePointCut"/>
            <aop:after-throwing method="exceptionLog" pointcut-ref="servicePointCut" throwing="ex"/>
        </aop:aspect>
    </aop:config>
- 注解方式
@Aspect
@Component
public class LogAspectj {


    @Pointcut("execution(* spring.service.*.*(..))")
    public void pointCut() { }

    @Before("pointCut()")
    public void beforeLog() {
        System.out.println("before log");
    }

    @Around("pointCut()")
    public Object aroundLog(ProceedingJoinPoint joinPoint) throws Throwable {
        System.out.println("around before");
        System.out.println("" + joinPoint.getSignature().getName() + ", args:" + Arrays.asList(joinPoint.getArgs()));
        Object re = joinPoint.proceed();
        System.out.println("around after");
        return  re;
    }

    @After("pointCut()")
    public void afterLog() {
        System.out.println("after log");
    }

    @AfterReturning("pointCut()")
    public void returningLog() {
        System.out.println("returning log");
    }

    @AfterThrowing(value = "pointCut()", throwing = "ex")
    public void exceptionLog(Exception ex) {
        System.out.println("exception log");
    }
}

@ComponentScan("spring.service")
@Configuration
//开启注解切面支持
@EnableAspectJAutoProxy
public class SpringConfig { }
以上就是Spring Aop的简单实用示例,下面进入源码,Spring Aop的逻辑相对复杂些,为了简化逻辑,以注解Aop为基础来看Aop的原理。
面试时,常问的一道题就是Spring Aop的实现原理,我们经常会回答Jdk 动态代理和Cglib动态代理,然后就大眼瞪小眼,一首《凉凉》送给你。那么,再往下说的话,说点什么呢,其实可以聊聊是在什么时候创建的代理对象,以及具体的调用过程,对于五种类型的通知是怎支持的,再比如Spring是如何解析我们的配置的等等。
对于配置解析这块,由于不是核心逻辑,就大致说一下,也没必要深究,简单来说,我们配置的各种通知,最后会被Spring解析成不同Advisor实例,注册到IoC容器中。下面我们着重来看代理对象的创建和调用流程。
前面在说Bean的初始化的时候,说到在对bean对象进行初始化时,会调用Bean生命周期的钩子方法,比如我们常见的BeanNameAware、BeanFactoryAware、ApplicationContextAware、BeanPostProcessor、InitializingBean等,而Spring Aop正是依赖于BeanPostProcessor来创建待对象的
AbstractAutowireCapableBeanFactory.java
// 这是Bean实例化的一个核心方法
@Override
protected Object createBean(String beanName, RootBeanDefinition mbd, Object[] args) throws BeanCreationException {
	/**
		从注释看,是说这里是一个创建代理对象的前置方法,内部逻辑就是调用BeanPostProcessor
		的before和after方法,但是从调制结果来看,一般情况下这里都是返回null,
		所以可以先暂时忽略,往后看
	*/
	// Give BeanPostProcessors a chance to return a proxy instead of the target bean instance.
    Object bean = resolveBeforeInstantiation(beanName, mbdToUse);
    Object beanInstance = doCreateBean(beanName, mbdToUse, args);
}

/**
   这方法前面已经说过了,是创建Bean的核心方法
   包括bean对象的创建
   属性赋值、依赖注入
   生命周期管理
*/
protected Object doCreateBean(final String beanName, final RootBeanDefinition mbd, final Object[] args)
			throws BeanCreationException {
	instanceWrapper = createBeanInstance(beanName, mbd, args);
	populateBean(beanName, mbd, instanceWrapper);
	exposedObject = initializeBean(beanName, exposedObject, mbd);
}

protected Object initializeBean(final String beanName, final Object bean, RootBeanDefinition mbd) {
	//调用XxxAware钩子方法
	invokeAwareMethods(beanName, bean);
	//调用BeanPostProcessor的before方法
	wrappedBean = applyBeanPostProcessorsBeforeInitialization(wrappedBean, beanName);
	//调用初始化方法
	invokeInitMethods(beanName, wrappedBean, mbd);
	//调用BeanPostProcessor的after方法,Aop代理对的创建就发生在这里
	wrappedBean = applyBeanPostProcessorsAfterInitialization(wrappedBean, beanName);
}
上面简单回顾了一些Bean实例化的过程,说到Aop是基于BeanPostProcessor实现的,那是怎么回事呢?我们看一期用于开启Aop支持的注解实现
@EnableAspectJAutoProxy

@Import(AspectJAutoProxyRegistrar.class)
public @interface EnableAspectJAutoProxy { }

class AspectJAutoProxyRegistrar implements ImportBeanDefinitionRegistrar {
/**
	启动容器时,会调用这个方法,这个方法的作用是向SpringIoC中注册
	一个指定的BeanDefinition对象
*/
@Override
	public void registerBeanDefinitions(
		AopConfigUtils.registerAspectJAnnotationAutoProxyCreatorIfNecessary(registry);
	}
}

AopConfigUtils
public static BeanDefinition registerAspectJAnnotationAutoProxyCreatorIfNecessary(BeanDefinitionRegistry registry) {
		return registerAspectJAnnotationAutoProxyCreatorIfNecessary(registry, null);
}
public static BeanDefinition registerAspectJAnnotationAutoProxyCreatorIfNecessary(BeanDefinitionRegistry registry, Object source) {
        /**
				重点来了,这个被注册到IoC容器的对象就是AnnotationAwareAspectJAutoProxyCreator
		*/
		return registerOrEscalateApcAsRequired(AnnotationAwareAspectJAutoProxyCreator.class, registry, source);
}
来看看AnnotationAwareAspectJAutoProxyCreator的继承关系
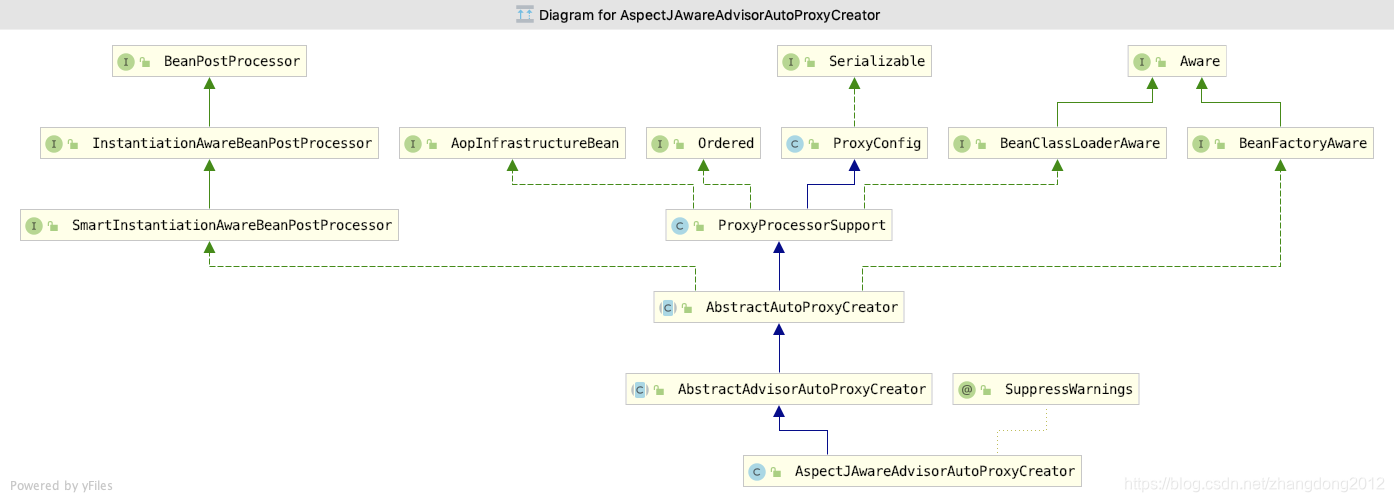
图中有两个接口重点关注一下,分别是BeanPostProcessor和Ordered接口。既然它是一个BeanPostProcessor,那么在Bean初始化触发生命周期时,对应的方法就一定会被调用,看下下面的方法
public Object applyBeanPostProcessorsAfterInitialization(Object existingBean, String beanName)
			throws BeansException {

		Object result = existingBean;
		/**
			 这个方法时bean生命周期的一个回调入口,处理BeanPostProcessor的after方法
			 看一看到,这里是获取了所有的BeanPostProcessor,然后回调其postProcessAfterInitialization
			 方法,那么,我们就看看AnnotationAwareAspectJAutoProxyCreator这个类的
			 postProcessAfterInitialization做了什么事情
			*/
		for (BeanPostProcessor beanProcessor : getBeanPostProcessors()) {
			result = beanProcessor.postProcessAfterInitialization(result, beanName);
			if (result == null) {
				return result;
			}
		}
		return result;
	}

/**
AbstractAutoProxyCreator是AnnotationAwareAspectJAutoProxyCreator的父类,并且实现了
postProcessAfterInitialization方法
**/
@Override
	public Object postProcessAfterInitialization(Object bean, String beanName) throws BeansException {
		if (bean != null) {
			Object cacheKey = getCacheKey(bean.getClass(), beanName);
			if (!this.earlyProxyReferences.contains(cacheKey)) {
				return wrapIfNecessary(bean, beanName, cacheKey);
			}
		}
		return bean;
}

protected Object wrapIfNecessary(Object bean, String beanName, Object cacheKey) {
    /**
			这里也是核心逻辑,简单来说,就是获取与当前Bean相匹配的所有Advisor对象
			前面我们说过,对应的切面配置会被Spring解析成多个Advisor实例并注册到Ioc容器中
	*/
	Object[] specificInterceptors = getAdvicesAndAdvisorsForBean(bean.getClass(), beanName, null);
	if (specificInterceptors != DO_NOT_PROXY) {
			this.advisedBeans.put(cacheKey, Boolean.TRUE);
			/**
				重点来了,这里就是你对面试官说的Jdk动态代理||Cglib动态代理
			*/
			Object proxy = createProxy(
					bean.getClass(), beanName, specificInterceptors, new SingletonTargetSource(bean));
			this.proxyTypes.put(cacheKey, proxy.getClass());
			return proxy;
		}

		this.advisedBeans.put(cacheKey, Boolean.FALSE);
		return bean;
 }

//getAdvicesAndAdvisorsForBean的实现类,方法
protected Object[] getAdvicesAndAdvisorsForBean(Class<?> beanClass, String beanName, TargetSource targetSource) {
		List<Advisor> advisors = findEligibleAdvisors(beanClass, beanName);
		if (advisors.isEmpty()) {
			return DO_NOT_PROXY;
		}
	return advisors.toArray();
}


protected List<Advisor> findEligibleAdvisors(Class<?> beanClass, String beanName) {
		//这里是获取所有的Advisor
		List<Advisor> candidateAdvisors = findCandidateAdvisors();
		//根据当前bean对象对Advisor做进一步过滤
		List<Advisor> eligibleAdvisors = findAdvisorsThatCanApply(candidateAdvisors, beanClass, beanName);
		extendAdvisors(eligibleAdvisors);
		if (!eligibleAdvisors.isEmpty()) {
			/**
				这里是一个重点,是对匹配到的Advisor列表进行排序,排序后的顺序为:
				1. AfterThrowAdvisor  异常通知
				2. AfterReturningAdvisor  返回通知
				3. AfterAdvisor 后置通知
				4. AroundAdvisor 环绕通知
				5. BeforeAdvisor 前置通知

				这个顺序大家需要记一下,后面说aop调用的时候还会涉及到
			*/
			eligibleAdvisors = sortAdvisors(eligibleAdvisors);
		}
		return eligibleAdvisors;
}


下面看看创建代理对象的过程
protected Object createProxy(
			Class<?> beanClass, String beanName, Object[] specificInterceptors, TargetSource targetSource) {
			//Spring提供了两种代理工厂,CglibProxyFactory和JDKDynamicProxyFactory
			//这里以JDKDynamicProxyFactory为例
			Advisor[] advisors = buildAdvisors(beanName, specificInterceptors);
		proxyFactory.addAdvisors(advisors);
	return proxyFactory.getProxy(getProxyClassLoader());
}

@Override
	public Object getProxy(ClassLoader classLoader) {
		if (logger.isDebugEnabled()) {
			logger.debug("Creating JDK dynamic proxy: target source is " + this.advised.getTargetSource());
		}
		Class<?>[] proxiedInterfaces = AopProxyUtils.completeProxiedInterfaces(this.advised, true);
		findDefinedEqualsAndHashCodeMethods(proxiedInterfaces);
		//这里吧JdkDynamicAopProxy实现了InvocationHandler,所以用this作为参数
		return Proxy.newProxyInstance(classLoader, proxiedInterfaces, this);
}
到此,代理对象的床架过程就分析完了,总结起来,其实很简单
- bean初始化的生命周期触发对BeanPostProcessor的after方法的调用
- AspectJAwareAdvisorAutoProxyCreator 刚好是一个BeanPostProcessor
- 执行AspectJAwareAdvisorAutoProxyCreator的after方法
- 首先获取容器中所有的Advisor
- 根据Bean低下过滤可以引用的Advisor对象
- 对Advisor实例进行排序
- 将Advisor列表复制给ProxyFactory
- ProxyFactoy通过动态代理创建目标对象的代理对象,代理对象内部封装了所有Advisor实例
下面我们来看看代理对象的调用过程,调用的起点在Proxy对象的invoke方法,也就是JdkDynamicAopProxy
@Override
public Object invoke(Object proxy, Method method, Object[] args) throws Throwable {
	//这里我删除了一些边角逻辑,留下了主逻辑
	//这里拿到了一个由所有Advisor构成的调用链
	// Get the interception chain for this method.
	List<Object> chain = this.advised.getInterceptorsAndDynamicInterceptionAdvice(method, targetClass);
	//将调用链封装成了一个Invocation对象
	// We need to create a method invocation...
	invocation = new ReflectiveMethodInvocation(proxy, target, method, args, targetClass, chain);
	// Proceed to the joinpoint through the interceptor chain.
	//调用Invocation的procced方法,也就是说,调用核心逻辑在ReflectiveMethodInvocation中
	retVal = invocation.proceed();
}

/**
	这个方法就是最后干活的苦力,可惜没叫doProcced().
	interceptorsAndDynamicMethodMatchers 这个变量厉害了,还记得前面说过Advisor会被排序么
	这里存储着所有排好序的advisor,前面我们说的排序顺序是
	1. AfterThrowAdvisor  异常通知
	2. AfterReturningAdvisor  返回通知
	3. AfterAdvisor 后置通知
	4. AroundAdvisor 环绕通知
	5. BeforeAdvisor 前置通知
*/
@Override
	public Object proceed() throws Throwable {
			/**
				删除了一些边角逻辑,留下最重要的一句,你可能会差异这里怎么变成了MethodInterceptor
				实际上是在获取List<Object> chain对象时,把Advisor转换成了MethodInterceptor,
				向看的话可以自己翻一下

				那么这里的调用逻辑是什么,只看代码并不直观,请看下图
			**/
				// been evaluated statically before this object was constructed.
				return ((MethodInterceptor) interceptorOrInterceptionAdvice).invoke(this);
	}
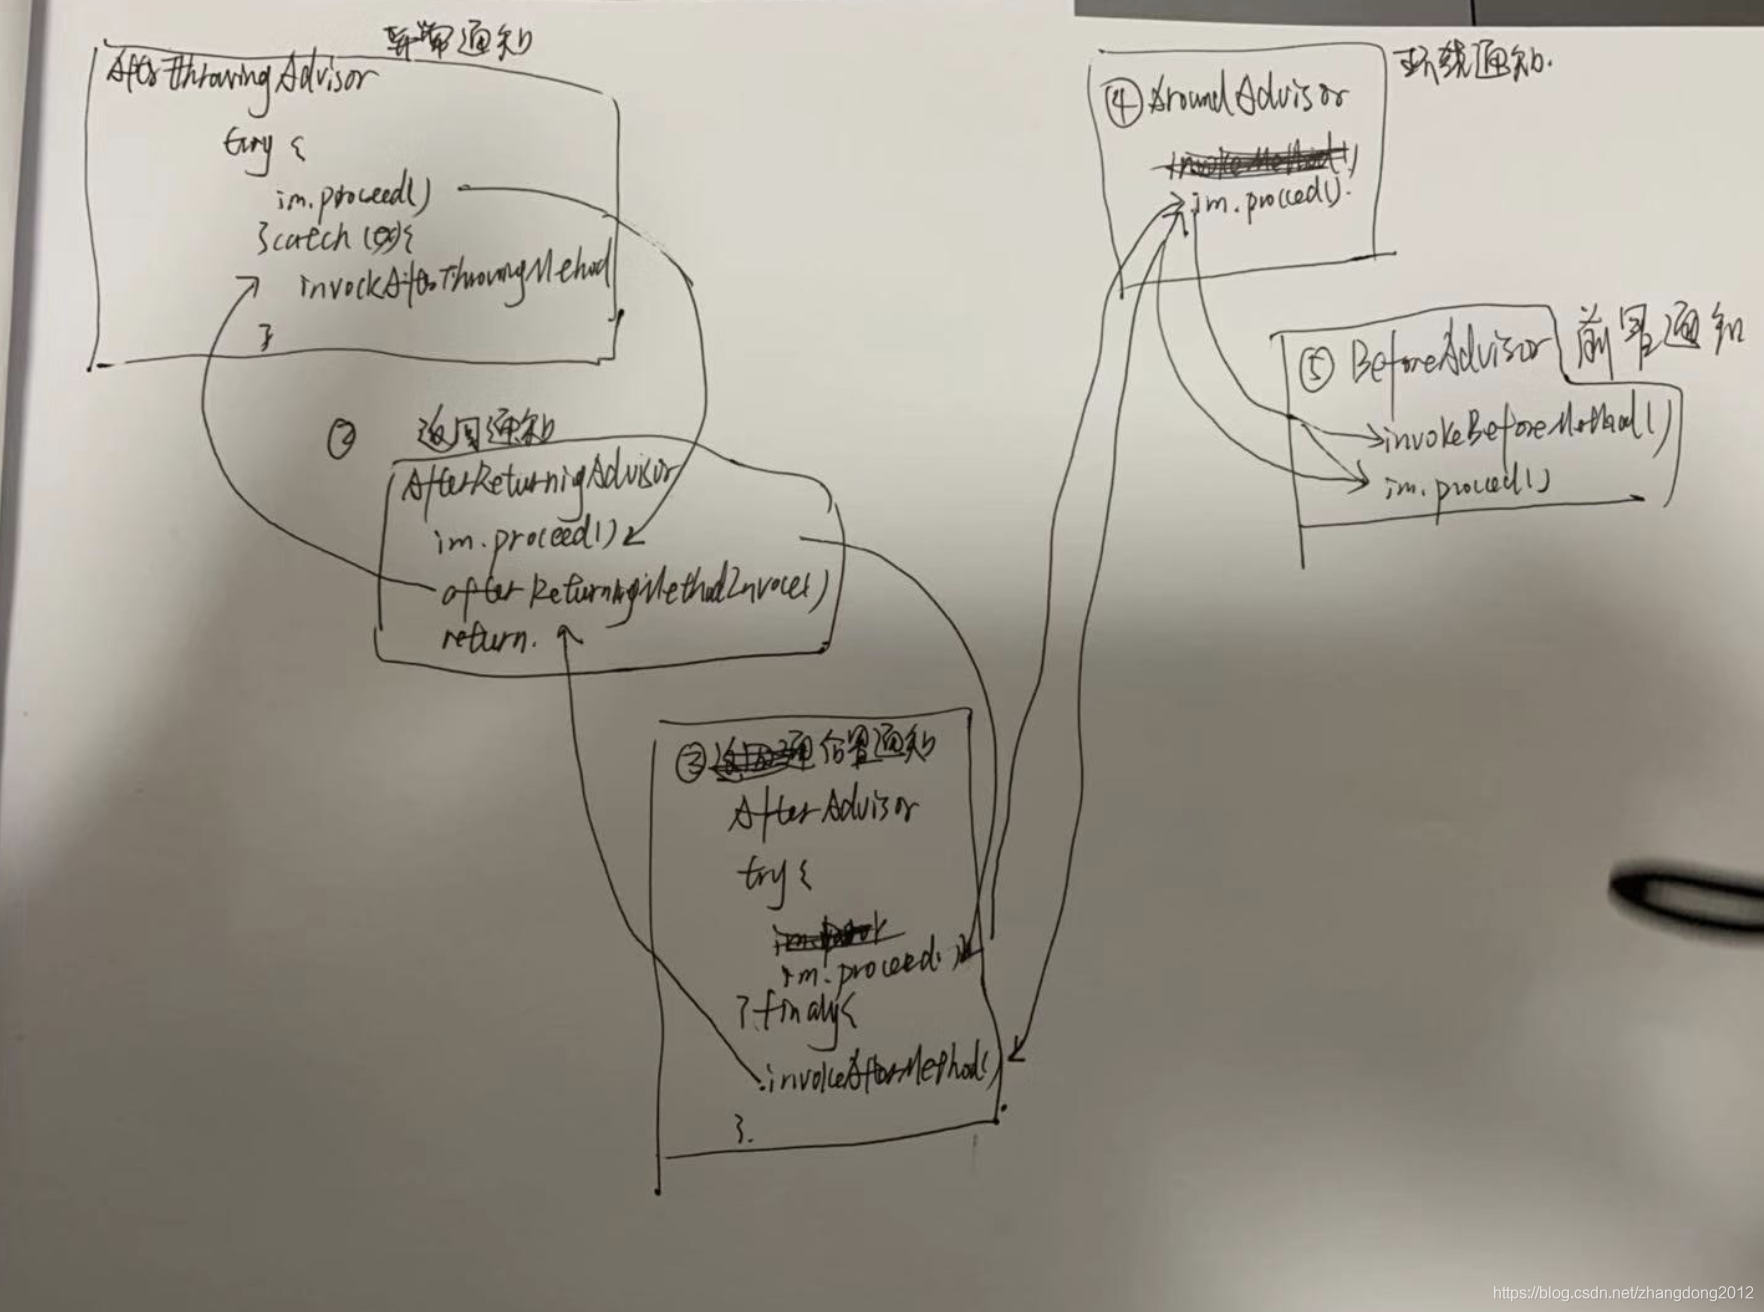
这个图应该只有我自己能看到, 哈哈哈。 简单来说就是按照排好序的Advisor的顺序,一次顺序调用,在原路返回。
调用流程可以简单总结一下:
- 对目标对象的调用首先会到Proxy的invoke方法中
- 在invoke中,根据排好序的Advisor创建调用链,创建过程中奖所有Advisor转成MethodInterceptor
- 然后逐层调用代表了不同类型的通知的MethodInterceptor
- 最后返回
Spring事务
Spring的事务是就与Aop实现的,下面我们先来看一下基于注解的Spring事务的配置
@ComponentScan("spring.dao")
@ComponentScan("spring.service")
@ComponentScan("spring.log")
@Configuration
@EnableAspectJAutoProxy
//开启事务支持
@EnableTransactionManagement
public class SpringConfig {
    //注册数据源
    @Lazy
    @Bean
    public DataSource dataSource() {
        DruidDataSource dataSource = new DruidDataSource();
        dataSource.setUsername("root");
        dataSource.setPassword("zd1991..");
        dataSource.setDriverClassName("com.mysql.jdbc.Driver");
        dataSource.setUrl("jdbc:mysql://localhost:3306/test");
        return dataSource;
    }
	//注册事务管理器
    @Bean
    public PlatformTransactionManager transactionManager() {
        return new DataSourceTransactionManager(dataSource());
    }
	 //注册JdbcTemplete
    @Bean
    public JdbcTemplate jdbcTemplate() {
        return new JdbcTemplate(dataSource());
    }
}


@Service
public class UserService implements InitializingBean {
    @Autowired
    private UserDao userDao;
    //开始事务
    @Transactional
    public void queryUser() {
        int i = 10 / 0;  //ex
        System.out.println("Query User");
    }
}
在开启事务支持的@EnableTransactionManagement注解中,其实也注册了一个BeanPostProcessor
public class TransactionManagementConfigurationSelector extends AdviceModeImportSelector<EnableTransactionManagement> {
	@Override
	protected String[] selectImports(AdviceMode adviceMode) {
	   //这里注册了两个Bean对象到IoC容器
	   //AutoProxyRegistrar注册了一个用于实现事务代理的BeanPostProcessor
	   //ProxyTransactionManagementConfiguration 注册了与事务相关的Advisor,包含了事务相关的Aop核心逻辑
		return new String[] {AutoProxyRegistrar.class.getName(), ProxyTransactionManagementConfiguration.class.getName()};
	}
}

public class AutoProxyRegistrar implements ImportBeanDefinitionRegistrar {
	@Override
	public void registerBeanDefinitions(AnnotationMetadata importingClassMetadata, BeanDefinitionRegistry registry) {
			/**
				这里实际上注册了一个InfrastructureAdvisorAutoProxyCreator,它也是一个PostProcessor
			*/
			AopConfigUtils.registerAutoProxyCreatorIfNecessary(registry);
	 }
}

/**
	可以看到,继承了AbstractAdvisorAutoProxyCreator,这里定义了Aop的核心逻辑
*/
public class InfrastructureAdvisorAutoProxyCreator extends AbstractAdvisorAutoProxyCreator {
	private ConfigurableListableBeanFactory beanFactory;
	@Override
	protected void initBeanFactory(ConfigurableListableBeanFactory beanFactory) {
		super.initBeanFactory(beanFactory);
		this.beanFactory = beanFactory;
	}
	@Override
	protected boolean isEligibleAdvisorBean(String beanName) {
		return (this.beanFactory.containsBeanDefinition(beanName) &&
				this.beanFactory.getBeanDefinition(beanName).getRole() == BeanDefinition.ROLE_INFRASTRUCTURE);
	}
}
下面在看一下ProxyTransactionManagementConfiguration,这个类特别重要
@Configuration
public class ProxyTransactionManagementConfiguration extends AbstractTransactionManagementConfiguration {

	/**
		这里注册了一个Advisor,由于Spring Aop执行过程中,会加载Spring中的所有Advisor,所以
		这个Bean对象也会被加载到,这个Advisor还调用了transactionInterceptor(),
		这个方法返回的TransactionInterceptor实际上就是Aop中生成调用链用的MethodInterceptor
		其实解释Aop将Advisor转换成MethodInterceptor的时候,BeanFactoryTransactionAttributeSourceAdvisor被转成
		MethodInterceptor的时候,返回了TransactionInterceptor,所以,事务的核心逻辑就在TransactionInterceptor中
	*/
	@Bean(name = TransactionManagementConfigUtils.TRANSACTION_ADVISOR_BEAN_NAME)
	@Role(BeanDefinition.ROLE_INFRASTRUCTURE)
	public BeanFactoryTransactionAttributeSourceAdvisor transactionAdvisor() {
		BeanFactoryTransactionAttributeSourceAdvisor advisor = new BeanFactoryTransactionAttributeSourceAdvisor();
		advisor.setTransactionAttributeSource(transactionAttributeSource());
		advisor.setAdvice(transactionInterceptor());
		advisor.setOrder(this.enableTx.<Integer>getNumber("order"));
		return advisor;
	}

	@Bean
	@Role(BeanDefinition.ROLE_INFRASTRUCTURE)
	public TransactionAttributeSource transactionAttributeSource() {
		return new AnnotationTransactionAttributeSource();
	}

	@Bean
	@Role(BeanDefinition.ROLE_INFRASTRUCTURE)
	public TransactionInterceptor transactionInterceptor() {
		TransactionInterceptor interceptor = new TransactionInterceptor();
		interceptor.setTransactionAttributeSource(transactionAttributeSource());
		if (this.txManager != null) {
			interceptor.setTransactionManager(this.txManager);
		}
		return interceptor;
	}
}


public class TransactionInterceptor extends TransactionAspectSupport implements MethodInterceptor, Serializable {

	@Override
	public Object invoke(final MethodInvocation invocation) throws Throwable {
		Class<?> targetClass = (invocation.getThis() != null ? AopUtils.getTargetClass(invocation.getThis()) : null);
		return invokeWithinTransaction(invocation.getMethod(), targetClass, new InvocationCallback() {
			@Override
			public Object proceedWithInvocation() throws Throwable {
				return invocation.proceed();
			}
		});
	}
}

/**
	 这个方法就是最终代理事务的地方:
	 出现异时常回滚
	 正常执行则提交事务
*/
protected Object invokeWithinTransaction(Method method, Class<?> targetClass, final InvocationCallback invocation)
			throws Throwable {

		// If the transaction attribute is null, the method is non-transactional.
		final TransactionAttribute txAttr = getTransactionAttributeSource().getTransactionAttribute(method, targetClass);
		//获取事务管理器
		final PlatformTransactionManager tm = determineTransactionManager(txAttr);
		final String joinpointIdentification = methodIdentification(method, targetClass, txAttr);

		if (txAttr == null || !(tm instanceof CallbackPreferringPlatformTransactionManager)) {
			// Standard transaction demarcation with getTransaction and commit/rollback calls.
			TransactionInfo txInfo = createTransactionIfNecessary(tm, txAttr, joinpointIdentification);
			Object retVal = null;
			try {
				// This is an around advice: Invoke the next interceptor in the chain.
				// This will normally result in a target object being invoked.
				//调用目标方法
				retVal = invocation.proceedWithInvocation();
			}
			catch (Throwable ex) {
				// target invocation exception
				//异常回滚
				completeTransactionAfterThrowing(txInfo, ex);
				throw ex;
			}
			finally {
			   //清理状态
				cleanupTransactionInfo(txInfo);
			}
			//提交事务
			commitTransactionAfterReturning(txInfo);
			return retVal;
		}

		else {
			final ThrowableHolder throwableHolder = new ThrowableHolder();

			// It's a CallbackPreferringPlatformTransactionManager: pass a TransactionCallback in.
			try {
				Object result = ((CallbackPreferringPlatformTransactionManager) tm).execute(txAttr,
						new TransactionCallback<Object>() {
							@Override
							public Object doInTransaction(TransactionStatus status) {
								TransactionInfo txInfo = prepareTransactionInfo(tm, txAttr, joinpointIdentification, status);
								try {
									return invocation.proceedWithInvocation();
								}
								catch (Throwable ex) {
									if (txAttr.rollbackOn(ex)) {
										// A RuntimeException: will lead to a rollback.
										if (ex instanceof RuntimeException) {
											throw (RuntimeException) ex;
										}
										else {
											throw new ThrowableHolderException(ex);
										}
									}
									else {
										// A normal return value: will lead to a commit.
										throwableHolder.throwable = ex;
										return null;
									}
								}
								finally {
									cleanupTransactionInfo(txInfo);
								}
							}
						});

				// Check result state: It might indicate a Throwable to rethrow.
				if (throwableHolder.throwable != null) {
					throw throwableHolder.throwable;
				}
				return result;
			}
			catch (ThrowableHolderException ex) {
				throw ex.getCause();
			}
			catch (TransactionSystemException ex2) {
				if (throwableHolder.throwable != null) {
					logger.error("Application exception overridden by commit exception", throwableHolder.throwable);
					ex2.initApplicationException(throwableHolder.throwable);
				}
				throw ex2;
			}
			catch (Throwable ex2) {
				if (throwableHolder.throwable != null) {
					logger.error("Application exception overridden by commit exception", throwableHolder.throwable);
				}
				throw ex2;
			}
		}
	}
Spring应用
SpringMVC的初始化与Servlet 3.0
在Servlet3.0中,引入了一些很方便的特性,例如异步支持、各种组件的注解支持以及初始化器自动加载机制等,这里我们主要说一说自动初始化器加载即使。
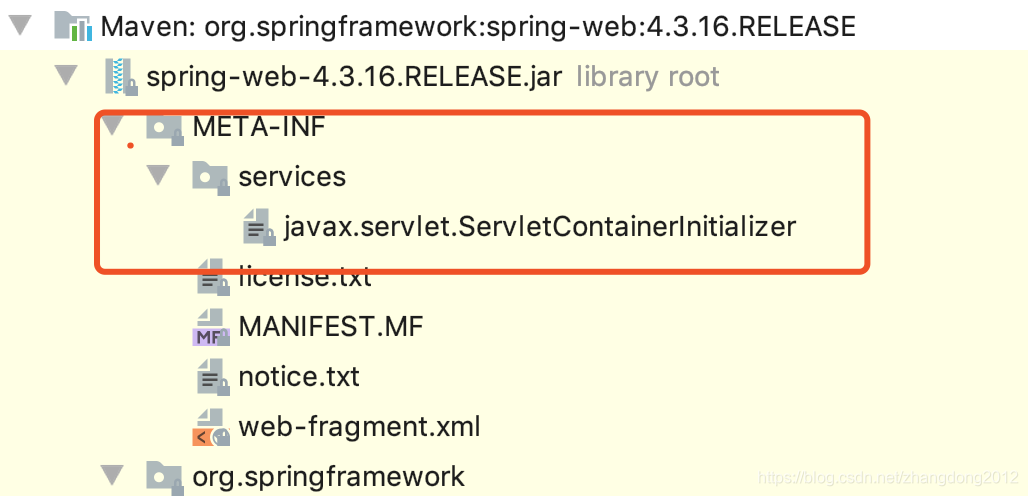
在Servlet3.0中规定,如果在META-INF/services下指定了一个基于SPI规则的ServletContainerInitializer的话,Servlet容器就会自动加载(对于Java SPI不了解的老铁自己百度一下,这里不做扩展),就像下面这样:
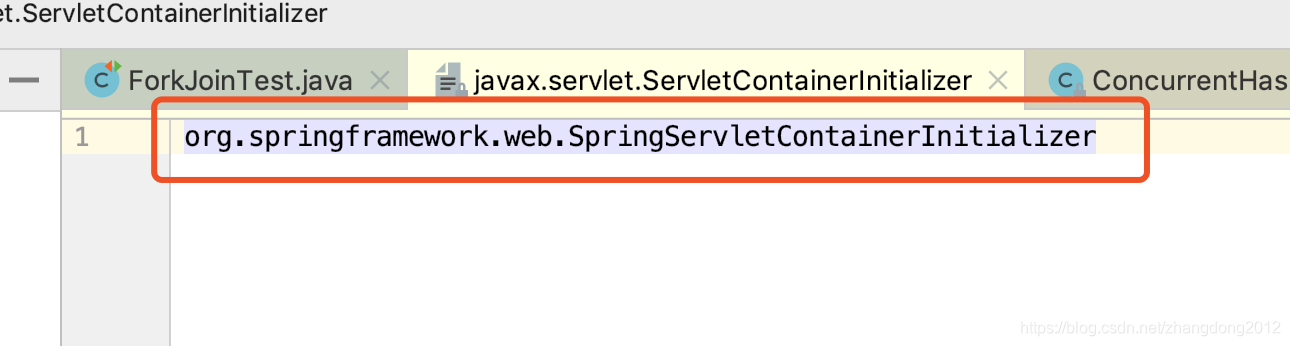
上面就是SpringMVC提供的ServletContainerInitializer的实现,实际上,也是SpringMVC在Servlet 3.0中注解化配置和启动的一个入口,下面我们来看看这个SpringServletContainerInitializer做了些什么。
/**
	@HandlersTypes 这个注解是一个入口,被这个注解修饰的类,当启动Servlet时,就会被自动加载
	实际上这里加载的WebApplicationInitializer也就是我们自己定义的 继承了
	AbstractAnnotationConfigDispatcherServletInitializer 这个类的配置类
*/
@HandlesTypes(WebApplicationInitializer.class)
public class SpringServletContainerInitializer implements ServletContainerInitializer {

    /**
		被实例化的WebApplicationInitializer对象,会通过这个Set<Class>集合注入到这个onStartup注入进来
		这就给了SpringMVC一个启动自己的hook接口
	*/
	@Override
	public void onStartup(Set<Class<?>> webAppInitializerClasses, ServletContext servletContext)
			throws ServletException {
		List<WebApplicationInitializer> initializers = new LinkedList<WebApplicationInitializer>();

		if (webAppInitializerClasses != null) {
			for (Class<?> waiClass : webAppInitializerClasses) {
			     /**
					这里很简单了,判断所有被加载的Class对象,如果是抽象类就跳过
					如果不是,就放到list中,其实最终就是我们的自定义配置类
				*/
				if (!waiClass.isInterface() && !Modifier.isAbstract(waiClass.getModifiers()) &&
						WebApplicationInitializer.class.isAssignableFrom(waiClass)) {
					try {
						initializers.add((WebApplicationInitializer) waiClass.newInstance());
					}
					catch (Throwable ex) {
						throw new ServletException("Failed to instantiate WebApplicationInitializer class", ex);
					}
				}
			}
		}
		servletContext.log(initializers.size() + " Spring WebApplicationInitializers detected on classpath");
		AnnotationAwareOrderComparator.sort(initializers);
		/**
			这里就执行了SpringMVC的hook方法了
			遍历所有的WebApplicationInitializer,并调用onStartup方法
		*/
		for (WebApplicationInitializer initializer : initializers) {
			initializer.onStartup(servletContext);
		}
	}
}
入口找到了,下面我们继续往下看
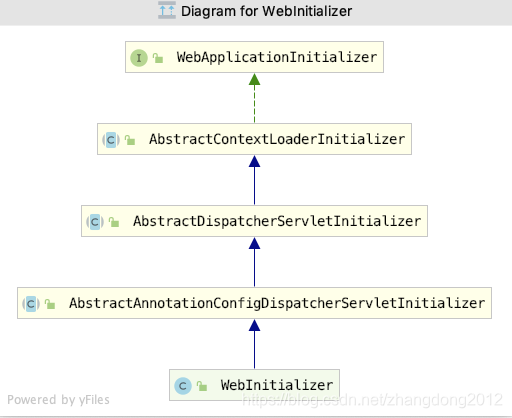
从名字就可以看出来,这些类主要功能就是初始化DispatcherServlet,也就是SpringMVC环境。图中的WebInitializer是我自定义的一个配置类,就像下面这样。
/**
	实际上,这个类就相当于我们用xml和web.xml配置spring mvc时的
	ContextLoadListener 和 DispatcherServlet 的集合
*/
public class WebInitializer extends AbstractAnnotationConfigDispatcherServletInitializer {
	//这里用来指定Root IoC容器的配置
    @Override
    protected Class<?>[] getRootConfigClasses() {
        return new Class[0];
    }
    //这里用来指定 Web IoC容器的配置
    @Override
    protected Class<?>[] getServletConfigClasses() {
        return new Class[0];
    }
	//这里用来设置DispatcherServlet的服务路径
    @Override
    protected String[] getServletMappings() {
        return new String[0];
    }
}
为了不懵逼,先把spring mvc整个环节的初始流程梳理一下,然后再对照源码来看:
- 创建Root ApplicationContext,用这个ApplicationContext创建ContextLoadListener,并注册到ServletContext
- 创建Sevlet ApplicationContext,用这个ApplicationContext创建DispatcherServlet,并注册到ServletContext
- Servlet容器继续启动流程,触发ContextLoadListener的contextInitialized()和Dispatcher的init()方法
- 在contextInitialized()中触发Root ApplicationContext的refresh,开始Root IoC容器初始化流程
- 在init()方法中,把初始化好的Root IoC与Servlet IoC进行关联,然后触发Servlet IoC的refresh方法,开始初始化Servlet IoC容器
- 初始化Spring MVC的核心组件
- Spring MVC初始化完成
从流程可以看出,实际上,就是把xml的配置方式转换成了Java 配置,没有什么特别的地方,下面来看看源码
AbstractDispatcherServletInitializer.java
public void onStartup(ServletContext servletContext) throws ServletException {
        super.onStartup(servletContext);   //这里创建Root IoC,注意,是创建!!
        this.registerDispatcherServlet(servletContext); 这里创建DispatcherServlet ,注意,是创建!!
}
一点点里看
AbstractContextLoaderInitializer.java
public void onStartup(ServletContext servletContext) throws ServletException {
		registerContextLoaderListener(servletContext);
}
/**
    这个方法就非常清楚了
    创建一个Root IoC容器,然后用这个IoC容器构造ContextLoadListener
    最终,把这个Listener注册到ServletContext中,交给Serlvet容器管理
*/
protected void registerContextLoaderListener(ServletContext servletContext) {
			WebApplicationContext rootAppContext = createRootApplicationContext();
			ContextLoaderListener listener = new ContextLoaderListener(rootAppContext);
			listener.setContextInitializers(getRootApplicationContextInitializers());
			servletContext.addListener(listener);
}

然后在看看这个Root IoC容器是怎么创建出来的
AbstractAnnotationConfigDispatcherServletInitializer.java
protected WebApplicationContext createRootApplicationContext() {
        //这里获取根容器相关的配置类
        Class<?>[] configClasses = this.getRootConfigClasses();
        if (!ObjectUtils.isEmpty(configClasses)) {
            AnnotationConfigWebApplicationContext rootAppContext = new AnnotationConfigWebApplicationContext();
            //将这个配置类注册到容器中
            rootAppContext.register(configClasses);
            return rootAppContext;
        } else {
            return null;
        }
}
//这个方法熟悉吧!,就是我们自定义配置类的时候其中一个方法
protected abstract Class<?>[] getRootConfigClasses();
到这儿,根容器就创建完了,但是此时还没有对其进行初始化,那么是在哪初始化呢?前面不是说把这个创建出来的ApplicationContext交给了ContextLoadListener吗,对其进行初始化就是在Listener的contextInitialized()方法中触发的,也就是说,Servlet容器初始化完成后,就会着手初始Spring环境
ContextLoaderListener.java
@Override
public void contextInitialized(ServletContextEvent event) {
		initWebApplicationContext(event.getServletContext());
}

public WebApplicationContext initWebApplicationContext(ServletContext servletContext) {
	//触发容器初始化流程
	configureAndRefreshWebApplicationContext(cwac, servletContext);
	将根容器注册到ServletContext中
	servletContext.setAttribute(WebApplicationContext.ROOT_WEB_APPLICATION_CONTEXT_ATTRIBUTE, this.context);
}

protected void configureAndRefreshWebApplicationContext(ConfigurableWebApplicationContext wac, ServletContext sc) {
    //到这里就是IoC容器初始流程了
	wac.refresh();
}
根容器创建完了,也初始化完了,下面在看看Servlet IoC容器的创建和初始。
AbstractDispatcherServletInitializer.java
 this.registerDispatcherServlet(servletContext); 这里创建DispatcherServlet ,注意,是创建!!
上接这个方法。
protected void registerDispatcherServlet(ServletContext servletContext) {
    //创建web IoC容器
	WebApplicationContext servletAppContext = this.createServletApplicationContext();
	//创建DispatcherServlet
	FrameworkServlet dispatcherServlet = this.createDispatcherServlet(servletAppContext);
	//向Servlet容器注册DispatcherServlet
	Dynamic registration = servletContext.addServlet(servletName, dispatcherServlet);
	registration.setLoadOnStartup(1);
	//这个了getServletMapping 调用的就是我们自己实现的方法,用来设置DispatcherServlet的入口url
    registration.addMapping(this.getServletMappings());
    registration.setAsyncSupported(this.isAsyncSupported());
}
着重看一下第一步和第二步
AbstractAnnotationConfigDispatcherServletInitializer.java
 protected WebApplicationContext createServletApplicationContext() {
        //创建了一个热乎乎的ApplicationContext
        AnnotationConfigWebApplicationContext servletAppContext = new AnnotationConfigWebApplicationContext();
        //调用获取配置类信息的hook方法
        Class<?>[] configClasses = this.getServletConfigClasses();
        if (!ObjectUtils.isEmpty(configClasses)) {
            servletAppContext.register(configClasses);
        }
        return servletAppContext;
 }
 //这个方法就是我们自己实现的返回Web IoC容器配置类的方法
 protected abstract Class<?>[] getServletConfigClasses();

//这个方法就很简单里,直接new 了一个对象,简单粗暴 俺喜欢 O(∩_∩)O
protected FrameworkServlet createDispatcherServlet(WebApplicationContext servletAppContext) {
        return new DispatcherServlet(servletAppContext);
}
到此,Web IoC容器就创建完了,但是还没初始化,它的初始化时由DispatcherServlet的init()方法触发的,这个方法时Servlet规范中定义的方法,由Servlet容器调用,下面来看看
HttpServletBean.java
public final void init() throws ServletException {
	this.initServletBean();
}

FrameServlet.java
protected final void initServletBean() throws ServletException {
     //想要的都在这里
	 this.webApplicationContext = this.initWebApplicationContext();
     this.initFrameworkServlet();
}

protected WebApplicationContext initWebApplicationContext() {
         /**
			这里是一个重点:
			从ServletContext中获取前面初始化完成的Root IoC容器
		*/
		WebApplicationContext rootContext = WebApplicationContextUtils.getWebApplicationContext(this.getServletContext());
        WebApplicationContext wac = null;
        if (this.webApplicationContext != null) {
            wac = this.webApplicationContext;
            if (wac instanceof ConfigurableWebApplicationContext) {
                ConfigurableWebApplicationContext cwac = (ConfigurableWebApplicationContext)wac;
                if (!cwac.isActive()) {
                    if (cwac.getParent() == null) {
                        /**
							这里将两个IoC容器进行关联
						*/
                        cwac.setParent(rootContext);
                    }
					//这里调用了WebApplicationContext的refresh()方法对容器进行初始,就不贴代码了,没什么好看的
                    this.configureAndRefreshWebApplicationContext(cwac);
                }
            }
        }
        if (!this.refreshEventReceived) {
            //这个方法也比较厉害,主要是初始Spring MVC中的核心组件
            //例如HandlerMapping,HandlerAdapter HandlerExceptionResolver ViewResulver MultipartResolver等
            this.onRefresh(wac);
        }
         return wac;
}
到此,所有的初始工作都完成了,就等着请求过来了。
Spring MVC内部把IoC容器拆分成了Root 和Web两个,在日常开发的时候,用利用这个特性把Service和Dao层的Bean放到Root IoC容器中,把Web相关的Bean放到Web IoC容器中,这样可以在Bean 容器层进行解耦,但是,在有些项目中,配置@ComponentScan的时候,并没有进行合理的规划,瞎扫,项目中的Bean对象哪里都有,笔者在使用SpringMVC的很长时间里都没有注意到这一点,经常出现properties配置文件中属性无法加载的问题,造成这个问题的原因在于:
- 把属性配置文件加载到了Root IoC容器中
- 你却在Web IoC容器中拿
Spring 把这个权利交给了程序员,那么在使用的时候就要好好利用。


 1229
1229

 被折叠的 条评论
为什么被折叠?
被折叠的 条评论
为什么被折叠?
 到【灌水乐园】发言


