


 这篇博客主要介绍了乐优商城Day09的学习内容,包括Thymeleaf模板引擎的简介、快速入门和语法,商品详情页的后台实现,页面静态化以及虚拟机中Rabbitmq的安装。Thymeleaf以其动静结合、开箱即用的特点,成为SpringBoot项目中常用的模板引擎。商品详情页的实现涉及到Thymeleaf的使用,而页面静态化则通过Thymeleaf将动态页面保存为静态HTML,提高并发处理能力。
乐优商城学习Day09:
注意:此次代码都是在第八天的基础上
第八天的链接如下:
https://blog.youkuaiyun.com/zcylxzyh/article/details/100859210
此次笔记内容主要为:
1、了解thymeleaf
2、商品详情页的实现(后台)
3、页面静态化
4、虚拟机安装Rabbitmq
下面开始第九天的学习:
1、了解thymeleaf
1.1 thymeleaf简介
官方网站:https://www.thymeleaf.org/index.html
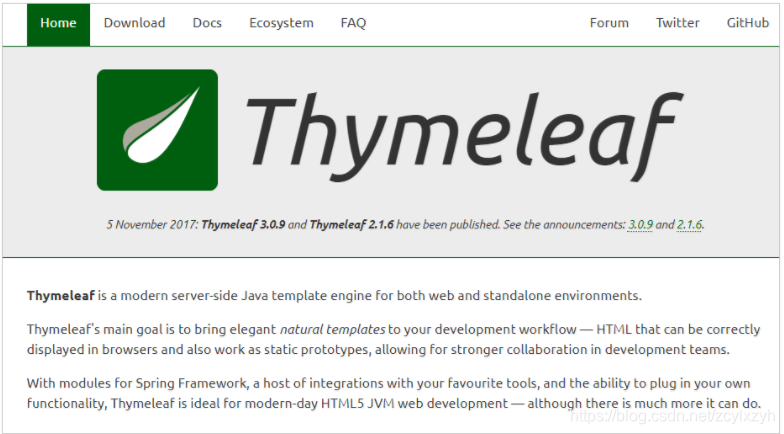
Thymeleaf是用来开发Web和独立环境项目的现代服务器端Java模板引擎。
Thymeleaf的主要目标是为您的开发工作流程带来优雅的自然模板 - HTML。可以在直接浏览器中正确显示,并且可以作为静态原型,从而在开发团队中实现更强大的协作。
借助Spring Framework的模块,可以根据自己的喜好进行自由选择,可插拔功能组件,Thymeleaf是现代HTML5 JVM Web开发的理想选择 - 尽管它可以做的更多。
Spring官方支持的服务的渲染模板中,并不包含jsp。而是Thymeleaf和Freemarker等,而Thymeleaf与SpringMVC的视图技术,及SpringBoot的自动化配置集成非常完美,几乎没有任何成本,你只用关注Thymeleaf的语法即可。
特点:
- 动静结合:Thymeleaf 在有网络和无网络的环境下皆可运行,即它可以让美工在浏览器查看页面的静态效果,也可以让程序员在服务器查看带数据的动态页面效果。这是由于它支持 html 原型,然后在 html 标签里增加额外的属性来达到模板+数据的展示方式。浏览器解释 html 时会忽略未定义的标签属性,所以 thymeleaf 的模板可以静态地运行;当有数据返回到页面时,Thymeleaf 标签会动态地替换掉静态内容,使页面动态显示。
- 开箱即用:它提供标准和spring标准两种方言,可以直接套用模板实现JSTL、 OGNL表达式效果,避免每天套模板、该jstl、改标签的困扰。同时开发人员也可以扩展和创建自定义的方言。
- 多方言支持:Thymeleaf 提供spring标准方言和一个与 SpringMVC 完美集成的可选模块,可以快速的实现表单绑定、属性编辑器、国际化等功能。
- 与SpringBoot完美整合,SpringBoot提供了Thymeleaf的默认配置,并且为Thymeleaf设置了视图解析器,我们可以像以前操作jsp一样来操作Thymeleaf。代码几乎没有任何区别,就是在模板语法上有区别。
1.2 thymeleaf快速入门
这里为了方便就直接把thymeleaf入门案例在商品详情微服务中写啦
创建微服务:

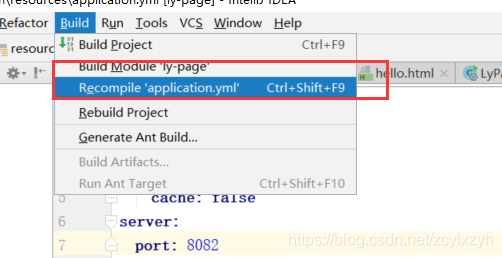
配置文件:(注:这里的配置文件是商品微服务的配置文件)
server:
  port: 8084
spring:
  application:
    name: page-service
  thymeleaf:
    cache: false
eureka:
  client:
    service-url:
      defaultZone: http://127.0.0.1:10086/eureka
创建目录:templates
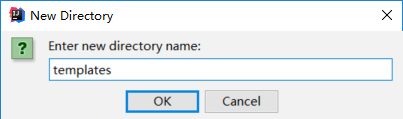
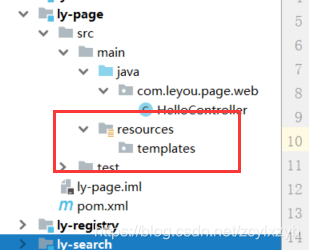
名字一定要是这个templates,他会自动取这里目录里面找页面
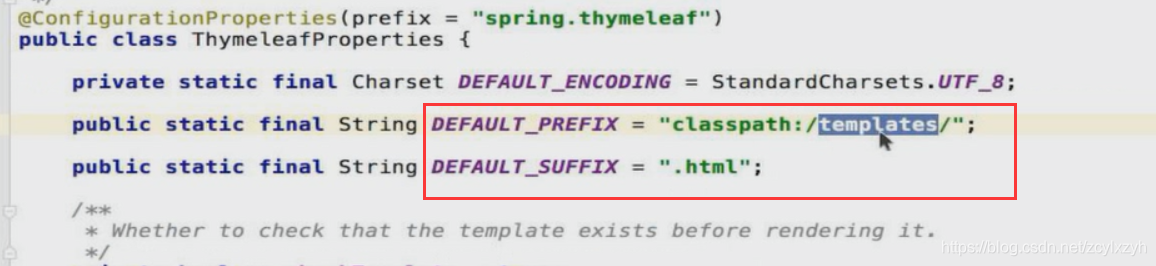
这个代表了前缀后缀,classpath意味着在java或者resources中
创建hello.html和HelloController、User以及启动类:(SpringBoot 任何项目要想启动就需要有启动类)
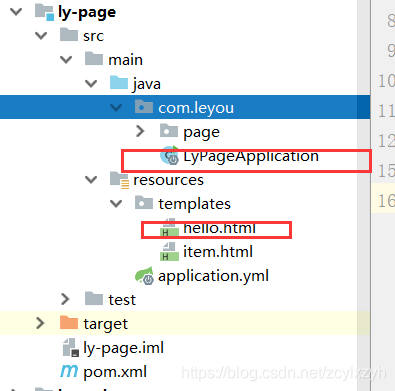
LyPageApplication 启动类代码:
package com.leyou;

import org.springframework.boot.SpringApplication;
import org.springframework.boot.autoconfigure.SpringBootApplication;
import org.springframework.cloud.client.discovery.EnableDiscoveryClient;
import org.springframework.cloud.openfeign.EnableFeignClients;

@SpringBootApplication
@EnableDiscoveryClient
@EnableFeignClients
public class LyPageApplication {

    public static void main(String[] args) {

        SpringApplication.run(LyPageApplication.class);
    }
}
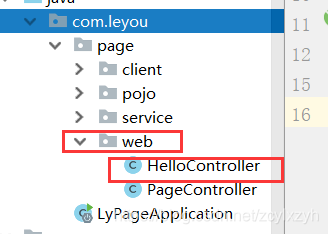
HelloController:
package com.leyou.page.web;
import com.leyou.page.pojo.User;
import org.springframework.stereotype.Controller;
import org.springframework.ui.Model;
import org.springframework.web.bind.annotation.GetMapping;
@Controller
public class HelloController {
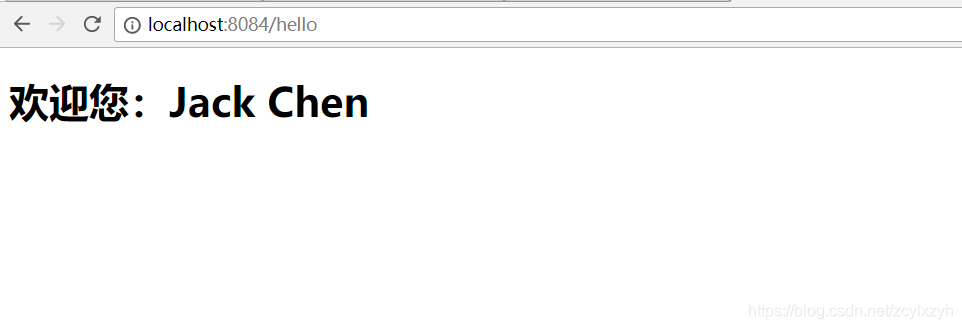
@GetMapping("hello")
public String toHello(Model model){
User user = new User();
user.setAge(21);
user.setName("Jack Chen");
user.setFriend(new User("李小龙", 30,null));
model.addAttribute("user", user);
//普通字符串被当成视图名称,结合前缀和后缀寻找视图
return "hello";
}
}
显示提示:xmlns:th=“http://www.thymeleaf.org”
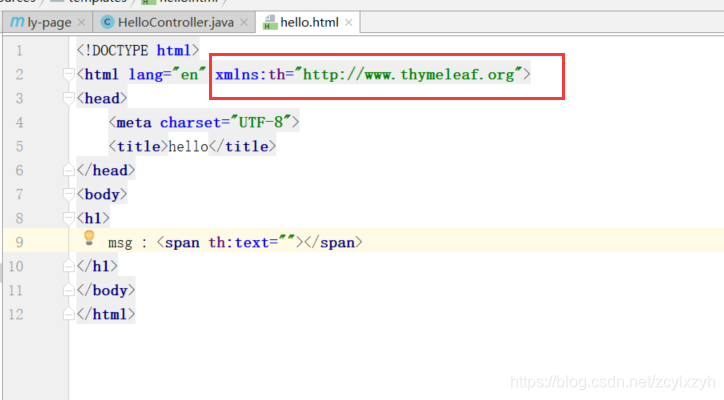
hello代码:
<!DOCTYPE html>
<html lang="en" xmlns:th="http://www.thymeleaf.org">
<head>
    <meta charset="UTF-8">
    <title>hello</title>
</head>
<body>
<h1>
       欢迎您:<span th:text="${user.name}"></span>
</h1>
</body>
</html>
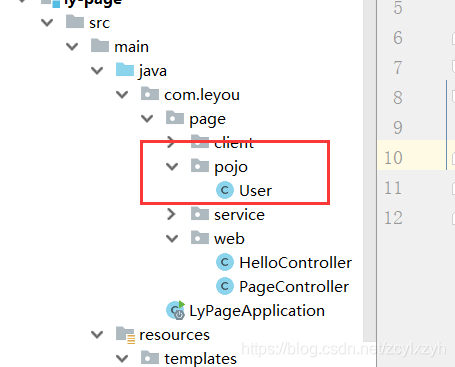
User:
package com.leyou.page.pojo;

import lombok.AllArgsConstructor;
import lombok.Data;
import lombok.NoArgsConstructor;

@Data
@AllArgsConstructor
@NoArgsConstructor
public class User {

    String name;
    int age;
    User friend;// 对象类型属性
}
在IDEA中需要重新加载文件:
1.3 Thymeleaf 语法(含有对1.2的解释)
Thymeleaf的主要作用是把model中的数据渲染到html中,因此其语法主要是如何解析model中的数据。从以下方面来学习:
- 变量
- 方法
- 条件判断
- 循环
- 运算
- 逻辑运算
- 布尔运算
- 比较运算
- 条件运算
- 其它
4.1.变量
变量案例
我们先新建一个实体类:User
public class User {
    String name;
    int age;
    User friend;// 对象类型属性
}
然后在模型中添加数据
@GetMapping("show2")
public String show2(Model model){
    User user = new User();
    user.setAge(21);
    user.setName("Jack Chen");
    user.setFriend(new User("李小龙", 30));

    model.addAttribute("user", user);
    return "show2";
}
语法说明:
Thymeleaf通过${}来获取model中的变量,注意这不是el表达式,而是ognl表达式,但是语法非常像。
示例:
我们在页面获取user数据:
<h1>
    欢迎您:<span th:text="${user.name}">请登录</span>
</h1>
效果:

感觉跟el表达式几乎是一样的。不过区别在于,我们的表达式写在一个名为:th:text的标签属性中,这个叫做指令
动静结合
指令:
Thymeleaf崇尚自然模板,意思就是模板是纯正的html代码,脱离模板引擎,在纯静态环境也可以直接运行。现在如果我们直接在html中编写 ${}这样的表达式,显然在静态环境下就会出错,这不符合Thymeleaf的理念。
Thymeleaf中所有的表达式都需要写在指令中,指令是HTML5中的自定义属性,在Thymeleaf中所有指令都是以th:开头。因为表达式${user.name}是写在自定义属性中,因此在静态环境下,表达式的内容会被当做是普通字符串,浏览器会自动忽略这些指令,这样就不会报错了!
现在,我们不经过SpringMVC,而是直接用浏览器打开页面看看:
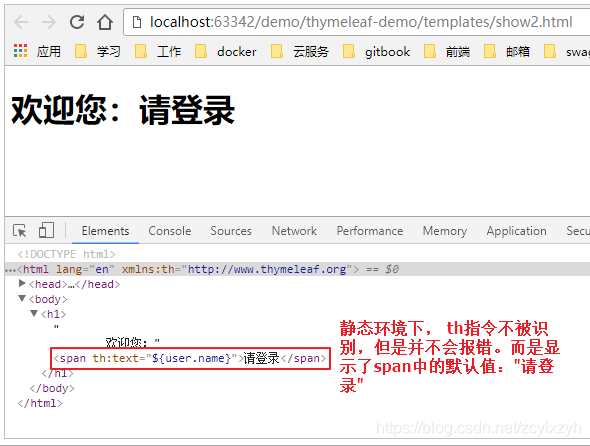
- 静态页面中,th指令不被识别,但是浏览器也不会报错,把它当做一个普通属性处理。这样span的默认值请登录就会展现在页面
- 如果是在Thymeleaf环境下,th指令就会被识别和解析,而th:text的含义就是替换所在标签中的文本内容,于是user.name的值就替代了 span中默认的请登录
指令的设计,正是Thymeleaf的高明之处,也是它优于其它模板引擎的原因。动静结合的设计,使得无论是前端开发人员还是后端开发人员可以完美契合。
向下兼容
但是要注意,如果浏览器不支持Html5怎么办?
如果不支持这种th:的命名空间写法,那么可以把th:text换成 data-th-text,Thymeleaf也可以兼容。
escape
另外,th:text指令出于安全考虑,会把表达式读取到的值进行处理,防止html的注入。
例如,
你好
将会被格式化输出为 l t ; p lt;p lt;pgt;你好 l t ; / p lt;/p lt;/plt;。如果想要不进行格式化输出,而是要输出原始内容,则使用th:utext来代替.
ognl表达式的语法糖
刚才获取变量值,我们使用的是经典的对象.属性名方式。但有些情况下,我们的属性名可能本身也是变量,怎么办?
ognl提供了类似js的语法方式:
例如: u s e r . n a m e 可 以 写 作 {user.name} 可以写作 user.name可以写作{user[‘name’]}
4.2.自定义变量
场景
看下面的案例:
<h2>
    <p>Name: <span th:text="${user.name}">Jack</span>.</p>
    <p>Age: <span th:text="${user.age}">21</span>.</p>
    <p>friend: <span th:text="${user.friend.name}">Rose</span>.</p>
</h2>
我们获取用户的所有信息,分别展示。
当数据量比较多的时候,频繁的写user.就会非常麻烦。
因此,Thymeleaf提供了自定义变量来解决:
示例:
<h2 th:object="${user}">
    <p>Name: <span th:text="*{name}">Jack</span>.</p>
    <p>Age: <span th:text="*{age}">21</span>.</p>
    <p>friend: <span th:text="*{friend.name}">Rose</span>.</p>
</h2>
- 首先在 h2上 用 th:object="${user}"获取user的值,并且保存
- 然后,在h2内部的任意元素上,可以通过 *{属性名}的方式,来获取user中的属性,这样就省去了大量的user.前缀了
方法
ognl表达式中的方法调用
ognl表达式本身就支持方法调用,例如:
<h2 th:object="${user}">
    <p>FirstName: <span th:text="*{name.split(' ')[0]}">Jack</span>.</p>
    <p>LastName: <span th:text="*{name.split(' ')[1]}">Li</span>.</p>
</h2>
- 这里我们调用了name(是一个字符串)的split方法。
Thymeleaf内置对象
Thymeleaf中提供了一些内置对象,并且在这些对象中提供了一些方法,方便我们来调用。获取这些对象,需要使用#对象名来引用。
- 一些环境相关对象
| 对象 | 作用 |
|---|---|
| #ctx | 获取Thymeleaf自己的Context对象 |
| #requset | 如果是web程序,可以获取HttpServletRequest对象 |
| #response | 如果是web程序,可以获取HttpServletReponse对象 |
| #session | 如果是web程序,可以获取HttpSession对象 |
| #servletContext | 如果是web程序,可以获取HttpServletContext对象 |
- Thymeleaf提供的全局对象:
| 对象 | 作用 |
|---|---|
| #dates | 处理java.util.date的工具对象 |
| #calendars | 处理java.util.calendar的工具对象 |
| #numbers | 用来对数字格式化的方法 |
| #strings | 用来处理字符串的方法 |
| #bools | 用来判断布尔值的方法 |
| #arrays | 用来护理数组的方法 |
| #lists | 用来处理List集合的方法 |
| #sets | 用来处理set集合的方法 |
| #maps | 用来处理map集合的方法 |
- 举例
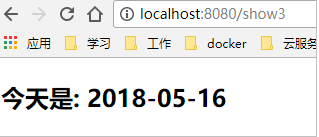
我们在环境变量中添加日期类型对象
@GetMapping("show3") public String show3(Model model){ model.addAttribute("today", new Date()); return "show3"; }
在页面中处理
<p> 今天是: <span th:text="${#dates.format(today,'yyyy-MM-dd')}">2018-04-25</span> </p>
效果:
字面值
有的时候,我们需要在指令中填写基本类型如:字符串、数值、布尔等,并不希望被Thymeleaf解析为变量,这个时候称为字面值。
-
字符串字面值
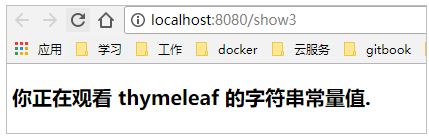
使用一对’引用的内容就是字符串字面值了:
<p> 你正在观看 <span th:text="'thymeleaf'">template</span> 的字符串常量值. </p>
th:text中的thymeleaf并不会被认为是变量,而是一个字符串
-
数字字面值
数字不需要任何特殊语法, 写的什么就是什么,而且可以直接进行算术运算
<p>今年是 <span th:text="2018">1900</span>.</p>
<p>两年后将会是 <span th:text="2018 + 2">1902</span>.</p>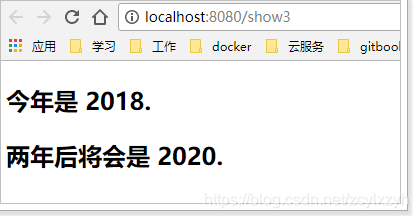
-
布尔字面值
布尔类型的字面值是true或false:
<div th:if="true"> 你填的是true </div>
这里引用了一个th:if指令,跟vue中的v-if类似
4.5 拼接
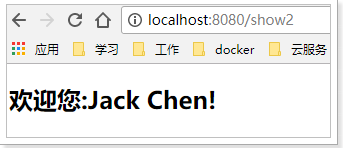
我们经常会用到普通字符串与表达式拼接的情况:
<span th:text="'欢迎您:' + ${user.name} + '!'"></span>
字符串字面值需要用’’,拼接起来非常麻烦,Thymeleaf对此进行了简化,使用一对|即可:
<span th:text="|欢迎您:${user.name}|"></span>
与上面是完全等效的,这样就省去了字符串字面值的书写。
运算
需要注意: 内 部 的 是 通 过 O G N L 表 达 式 引 擎 解 析 的 , 外 部 的 才 是 通 过 T h y m e l e a f 的 引 擎 解 析 , 因 此 运 算 符 尽 量 放 在 {}内部的是通过OGNL表达式引擎解析的,外部的才是通过Thymeleaf的引擎解析,因此运算符尽量放在 内部的是通过OGNL表达式引擎解析的,外部的才是通过Thymeleaf的引擎解析,因此运算符尽量放在{}外进行。
-
算术运算
支持的算术运算符:+ - * / %<span th:text="${user.age}"></span> <span th:text="${user.age}%2 == 0"></span>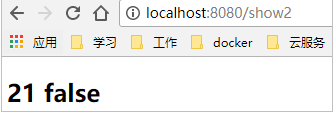
-
比较运算
支持的比较运算:>, <, >= and <= ,但是>, <不能直接使用,因为xml会解析为标签,要使用别名。
注意 == and !=不仅可以比较数值,类似于equals的功能。
可以使用的别名:gt (>), lt (<), ge (>=), le (<=), not (!). Also eq (==), neq/ne (!=). -
条件运算
-
三元运算
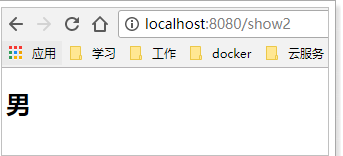
<span th:text="${user.sex} ? '男':'女'"></span>
三元运算符的三个部分:conditon ? then : else
condition:条件
then:条件成立的结果
else:不成立的结果
其中的每一个部分都可以是Thymeleaf中的任意表达式。
- 默认值
有的时候,我们取一个值可能为空,这个时候需要做非空判断,可以使用 表达式 ?: 默认值简写:
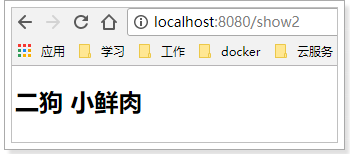
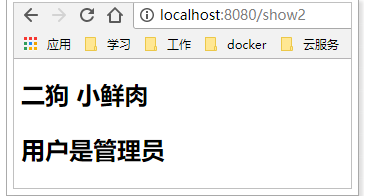
<span th:text="${user.name} ?: '二狗'"></span>
当前面的表达式值为null时,就会使用后面的默认值。
注意:?:之间没有空格。

-
循环
循环也是非常频繁使用的需求,我们使用th:each指令来完成:
假如有用户的集合:users在Context中。
<tr th:each="user : ${users}">
    <td th:text="${user.name}">Onions</td>
    <td th:text="${user.age}">2.41</td>
</tr>
- ${users} 是要遍历的集合,可以是以下类型:
- Iterable,实现了Iterable接口的类
- Enumeration,枚举
- Interator,迭代器
- Map,遍历得到的是Map.Entry
- Array,数组及其它一切符合数组结果的对象
在迭代的同时,我们也可以获取迭代的状态对象:
<tr th:each="user,stat : ${users}">
    <td th:text="${user.name}">Onions</td>
    <td th:text="${user.age}">2.41</td>
</tr>
stat对象包含以下属性:
- index,从0开始的角标
- count,元素的个数,从1开始
- size,总元素个数
- current,当前遍历到的元素
- even/odd,返回是否为奇偶,boolean值
- first/last,返回是否为第一或最后,boolean值
逻辑判断
有了if和else,我们能实现一切功能_。
Thymeleaf中使用th:if 或者 th:unless ,两者的意思恰好相反。
<span th:if="${user.age} < 24">小鲜肉</span>
如果表达式的值为true,则标签会渲染到页面,否则不进行渲染。
以下情况被认定为true:
- 表达式值为true
- 表达式值为非0数值
- 表达式值为非0字符
- 表达式值为字符串,但不是"false",“no”,“off”
- 表达式不是布尔、字符串、数字、字符中的任何一种
其它情况包括null都被认定为false
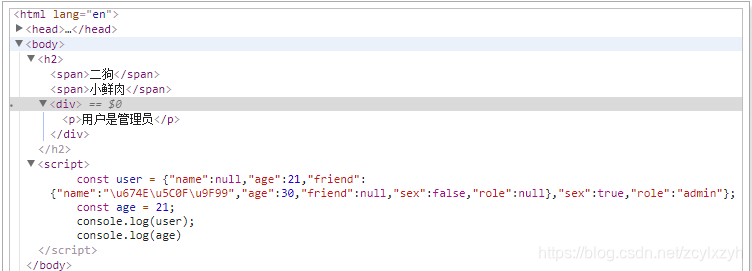
4.9 分支控制switch
这里要使用两个指令:th:switch 和 th:case
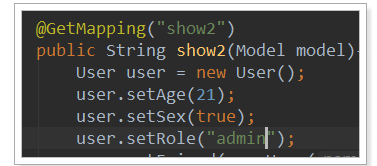
<div th:switch="${user.role}">
  <p th:case="'admin'">用户是管理员</p>
  <p th:case="'manager'">用户是经理</p>
  <p th:case="*">用户是别的玩意</p>
</div>
需要注意的是,一旦有一个th:case成立,其它的则不再判断。与java中的switch是一样的。
另外th:case="*"表示默认,放最后。
页面:
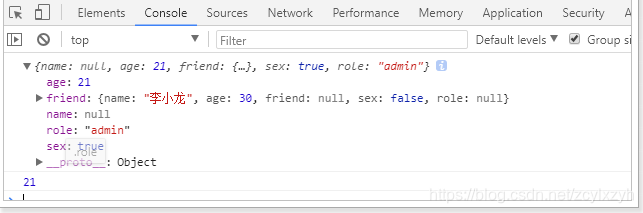
JS模板
模板引擎不仅可以渲染html,也可以对JS中的进行预处理。而且为了在纯静态环境下可以运行,其Thymeleaf代码可以被注释起来:
<script th:inline="javascript">
    const user = /*[[${user}]]*/ {};
    const age = /*[[${user.age}]]*/ 20;
    console.log(user);
    console.log(age)
</script>
- 在script标签中通过th:inline="javascript"来声明这是要特殊处理的js脚本
- 语法结构:
const user = /*[[Thymeleaf表达式]]*/ "静态环境下的默认值";
因为Thymeleaf被注释起来,因此即便是静态环境下, js代码也不会报错,而是采用表达式后面跟着的默认值。
看看页面的源码:
我们的User对象被直接处理为json格式了,非常方便。
控制台:
第一部分结束。
2、商品详情页的实现(后台)
我们在ly-page中完成商品详情页的实现。
启动类,配置文件,还有pom文件为上面所示。
导入item.html页面导入到项目中:
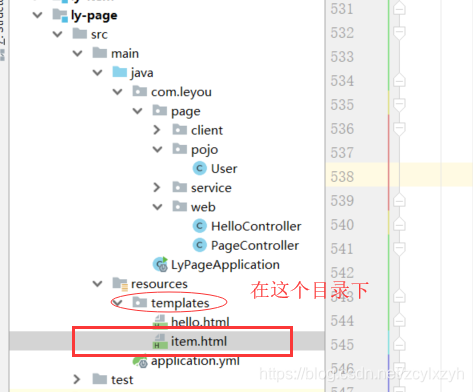
item.html
<!DOCTYPE html>
<html xmlns:th="http://www.thymeleaf.org">
<head>
<meta charset="utf-8"/>
<meta http-equiv="X-UA-Compatible" content="IE=9; IE=8; IE=7; IE=EDGE">
<meta http-equiv="X-UA-Compatible" content="IE=EmulateIE7"/>
<title>乐优商城--商品详情页</title>
<link rel="icon" href="/assets/img/favicon.ico">
<link rel="stylesheet" type="text/css" href="/css/webbase.css"/>
<link rel="stylesheet" type="text/css" href="/css/pages-item.css"/>
<link rel="stylesheet" type="text/css" href="/css/pages-zoom.css"/>
<link rel="stylesheet" type="text/css" href="/css/widget-cartPanelView.css"/>
<style type="text/css">
.goods-intro-list li {
display: inline-block;
width: 300px;
}
.Ptable {
margin: 10px 0;
}
.Ptable-item {
padding: 12px 0;
line-height: 220%;
color: #999;
font-size: 12px;
border-bottom: 1px solid #eee;
}
.Ptable-item h3 {
width: 110px;
text-align: right;
}
.Ptable-item h3, .package-list h3 {
font-weight: 400;
font-size: 12px;
float: left;
}
h3 {
display: block;
font-size: 1.17em;
-webkit-margin-before: 1em;
-webkit-margin-after: 1em;
-webkit-margin-start: 0px;
-webkit-margin-end: 0px;
font-weight: bold;
}
.Ptable-item dl {
margin-left: 110px;
}
dl {
display: block;
-webkit-margin-before: 1em;
-webkit-margin-after: 1em;
-webkit-margin-start: 0px;
-webkit-margin-end: 0px;
}
.Ptable-item dt {
width: 160px;
float: left;
text-align: right;
padding-right: 5px;
}
.Ptable-item dd {
margin-left: 210px;
}
dd {
display: block;
-webkit-margin-start: 40px;
}
.package-list {
padding: 12px 0;
line-height: 220%;
color: #999;
font-size: 12px;
margin-top: -1px;
}
.package-list h3 {
width: 130px;
text-align: right;
}
.package-list p {
margin-left: 155px;
padding-right: 50px;
}
</style>
</head>
<body>
<!-- 头部栏位 -->
<!--页面顶部,由js动态加载-->
<div id="itemApp">
<div id="nav-bottom">
<ly-top/>
</div>
<div class="py-container">
<div id="item">
<div class="crumb-wrap">
<ul class="sui-breadcrumb">
<li th:each="c : ${categories}">
<a href="#" th:text="${c.name}">手机</a>
</li>
<li>
<a href="#" th:text="${brand.name}">Apple</a>
</li>
<li class="active" th:text="${title}">Apple iPhone 6s</li>
</ul>
</div>
<!--product-info-->
<div class="product-info">
<div class="fl preview-wrap">
<!--放大镜效果-->
<div class="zoom">
<!--默认第一个预览-->
<div id="preview" class="spec-preview">
<span class="jqzoom">
<img :jqimg="images[0]" :src="images[0]" width="400px" height="400px"/>
</span>
</div>
<!--下方的缩略图-->
<div class="spec-scroll">
<a class="prev"><</a>
<!--左右按钮-->
<div class="items">
<ul>
 最低0.47元/天 解锁文章


 被折叠的 条评论
为什么被折叠?
被折叠的 条评论
为什么被折叠?
 到【灌水乐园】发言


