


注意:在正式执行expect脚本之前,两个节点需配置好yum源,并且安装expect和rsync
[root@test01 ~]# curl -o /etc/yum.repos.d/CentOS-Base.repo https://mirrors.aliyun.com/repo/Centos-7.repo
[root@test01 ~]# curl -o /etc/yum.repos.d/epel.repo https://mirrors.aliyun.com/repo/epel-7.repo
[root@test01 ~]# yum install -y expect
[root@test01 ~]# yum install -y rsync
1.使用expect脚本实现远程登录
[root@test01 ~]# cat login.expect
#!/usr/bin/expect
# 设置超时时间
set timeout 30
# 指定目标服务器的 IP 地址、用户名和密码
set ip "192.168.20.35"
set username "root"
set password "000000"
# 启动 SSH 连接
spawn ssh $username@$ip
# 期望出现的提示符,通常是密码提示
expect {
    "yes/no" { send "yes\r"; exp_continue }
    "password:" { send "$password\r" }
}
# 等待会话结束
expect of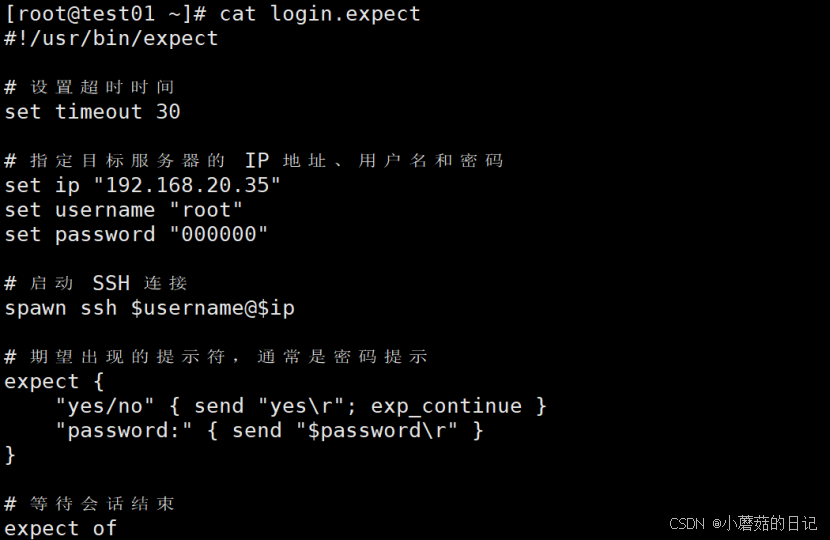

2.使用expect脚本远程执行编辑
[root@test01 ~]# cat create_file.expect
#!/usr/bin/expect -f
# 设置超时时间(秒)
set timeout 30
# 指定目标服务器的 IP 地址、用户名和密码
set ip "192.168.20.35"
set username "root"
set password "000000"
set file_to_create "/tmp/123.txt"
set content "This is an 123.txt created using expect."
# 启动 SSH 连接
spawn ssh -o StrictHostKeyChecking=no $username@$ip
# 期望出现的提示符,通常是密码提示
expect {
    "Are you sure you want to continue connecting (yes/no)?" { send "yes\r"; exp_continue }
    "*assword:*" { send "$password\r" }
}
# 等待命令提示符出现
expect -re {\$ | # }
# 创建文件并写入内容
send "echo '$content' > $file_to_create\r"
# 等待命令提示符出现
expect -re {\$ | # }
# 验证文件创建
send "cat $file_to_create\r"
# 读取文件内容并存储在变量中
expect -re {\$ | # } {
    set file_content $expect_out(buffer)
    # 使用正则表达式提取文件内容
    if {[regexp -nocase -- "^$content\n" $file_content]} {
        puts "File created and content verified."
    } else {
        puts "File creation failed or content mismatch."
        exit 1
    }
}
# 退出 SSH 会话
send "exit\r"
expect eof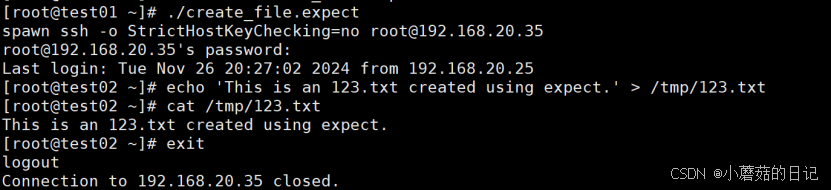
 3.使用expect脚本远程执行命令
[root@test01 ~]# cat remote_commands.expect
#!/usr/bin/expect
# 设置超时时间
set timeout 30
# 指定目标服务器的 IP 地址、用户名和密码
set ip "192.168.20.35"
set username "root"
set password "000000"
# 启动 SSH 连接
spawn ssh $username@$ip
# 期望出现的提示符,通常是密码提示
expect {
    "yes/no" { send "yes\r"; exp_continue }
    "password:" { send "$password\r" }
}
# 等待命令提示符出现
expect "# "
# 执行命令:列出当前目录的内容
send "ls -la\r"
expect "# "
# 执行命令:显示当前用户
send "whoami\r"
expect "# "
# 执行命令:显示当前日期和时间
send "date\r"
expect "# "
# 退出 SSH 会话
send "exit\r"
# 等待会话结束
expect eof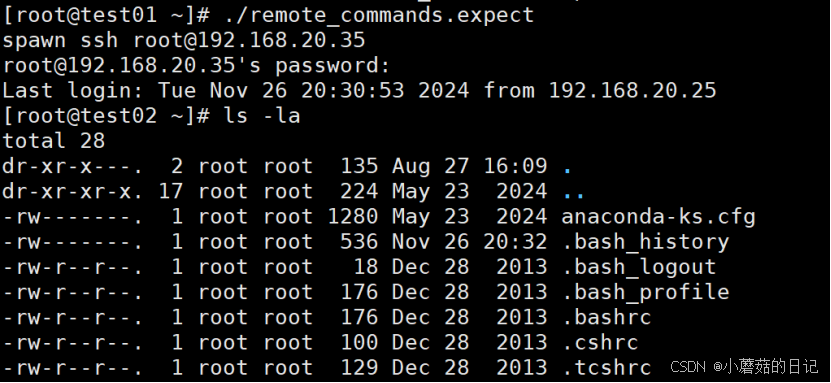
4.使用expect脚本远程同步文件
[root@test01 ~]# cat sync_files.expect
#!/usr/bin/expect
# 设置超时时间
set timeout 30
# 指定目标服务器的 IP 地址、用户名和密码
set ip "192.168.20.35"
set username "root"
set password "000000"
# 指定要同步的目录和目标路径
set local_dir "/root/zc"
set remote_path "/tmp/zc"
# 启动 rsync 同步
spawn rsync -avz $local_dir $username@$ip:$remote_path
# 期望出现的提示符,通常是密码提示
expect {
    "yes/no" { send "yes\r"; exp_continue }
    "password:" { send "$password\r" }
}
# 等待同步完成
expect "total size is"
# 等待会话结束
expect eof
5.使用expect脚本批量分发文件
5.1使用expect编写一个脚本文件rsync.expect(实现文件同步)
[root@test01 ~]# cat rsync.expect
#!/usr/bin/expect
# 目标机器的登录密码
set passwd "000000"
set host [lindex $argv 0]
set file [lindex $argv 1]
# 核心命令,同步多个文件
spawn rsync -avR --files-from=$file / root@$host:/
expect {
"yes/no" { send "yes\r"}
"password:" { send "$passwd\r" }
}
expect eof
5.2编辑一个文本文件,用来存放需要同步的文件列表
[root@test01 ~]# cat /tmp/list.txt
/tmp/12.txt
/root/test.sh
/tmp/test.txt
5.3编辑一个ip.list,用于存放需要同步的目标机器ip地址
[root@test01 ~]# cat /tmp/ip.list
192.168.20.35
192.168.20.45
5.4编写一个shell脚本rsync.sh,用rsync.expect脚本去调用
[root@test01 ~]# cat rsync.sh
#!/bin/bash
for ip in `cat /tmp/ip.list`
do
    echo $ip
    # 第二个参数就是需要同步的文件列表
    ./rsync.expect $ip /tmp/list.txt
done
5.5最后我们仅需要执行rsync.sh
[root@test01 ~]# ./rsync.sh 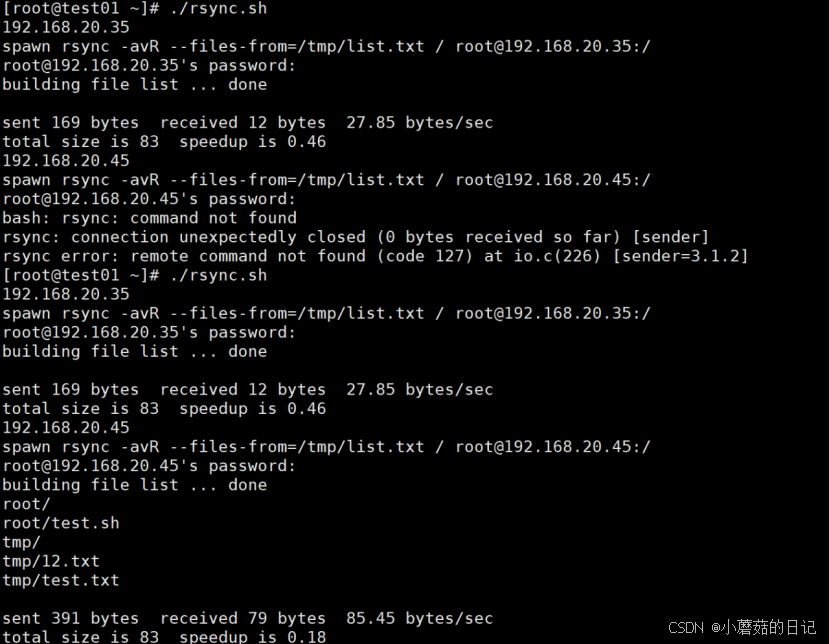

6.使用expect脚本批量执行命令
6.1使用expect编写远程登录的脚本文件exe.expect
[root@test01 ~]# cat exe.expect
#!/usr/bin/expect
set host [lindex $argv 0]
set passwd "000000"
set cm [lindex $argv 1]
spawn ssh root@$host
expect {
"yes/no" { send "yes\r"}
"password:" { send "$passwd\r" }
}
expect "]*"
send "$cm\r"
expect "]*"
send "exit\r"
6.2编写一个shell脚本exe.sh,遍历ip.list文件的ip
[root@test01 ~]# cat exe.sh

#!/bin/bash

for ip in `cat /tmp/ip.list`

do

    echo $ip

    # 第二个参数就是需要执行的命令

    ./exe.expect $ip "who;ls"

done
6.3最后仅需执行exe.sh
[root@test01 ~]# ./exe.sh 


 2245
2245

 被折叠的 条评论
为什么被折叠?
被折叠的 条评论
为什么被折叠?
 到【灌水乐园】发言


