


一、创建型模式
创建型模式说白了就是创建一个对象,就是通常用的 new()、set() 这些方法,只不过提供了一些更友好或者或者有限制的使用方法。
1、简单工厂模式
//抽象产品
abstract class Animal {
	public abstract void eat();
}
//抽象产品的实现类
class Cat extends Animal {
	public void eat() {
		System.out.println("猫吃鱼");
	}
}
class Dog extends Animal {
	public void eat() {
		System.out.println("狗吃肉");
	}
}
//定义输出产品的工厂
class AnimalFactory {
	public static Animal createAnimal(String name){
		if (name.equals("dog")) {
			return new Dog();
		}else if (name.equals("cat")) {
			return new Cat();
		}else {
		return null;
		}
	}
}
简单工厂强调有一个工厂类,里面有一个静态方法,根据我们的不同参数,返回不同的实体类对象。
2、工厂模式
//抽象产品
abstract class Animal {
    public abstract void eat();
}
//抽象产品的实现类
class Cat extends Animal {
    public void eat() {
        System.out.println("猫吃鱼");
    }
}
class Dog extends Animal {
    public void eat() {
        System.out.println("狗吃肉");
    }
}
//抽象工厂
interface Factory {
	public Animal createAnimal();
}
//不同的实现类返回不同的产品实现类
class CatFactory implements Factory {
    public Animal createAnimal() {
        return new Cat();
    }
}
class DogFactory implements Factory {
    public Animal createAnimal() {
        return new Dog();
    }
}
工厂模式强调有一个工厂的抽象接口,里面规定好我们这个接口需要做什么,返回什么,再由它的实现类来决定到底怎么实现接口。比如有一个LogFactory 接口,实现类有 FileLogFactory 和 KafkaLogFactory,分别对应将日志写入文件和写入 Kafka 中。
3、抽象工厂
//抽象产品和实现类cpu和主板
interface Cpu{}
class IntelCpu implements Cpu{}
class AmdCpu implements Cpu{}
interface MainBoard{}
class IntelMainBoard implements MainBoard{}
class AmdMainBoard implements MainBoard{}
//抽象工厂,定义需要返回的产品类型
interface ComputerFactory{
    Cpu makeCpu();
    MainBoard makeMainBoard();
}
//工厂实现类,返回不同的但是可以在一起兼容的产品
class IntelComputerFactory implements ComputerFactory{
    public Cpu makeCpu() {
        return new IntelCpu();
    }
    public MainBoard makeMainBoard() {
        return new IntelMainBoard();
    }
}
class AmdComputerFactory implements ComputerFactory{
    public Cpu makeCpu() {
        return new AmdCpu();
    }
    public MainBoard makeMainBoard() {
        return new AmdMainBoard();
    }
}
抽象工厂强调对工厂生产的产品有一个严格的规定,cpu和主板的厂商也许会有很多,intel的cpu与amd的主板不兼容,所以工厂的实现类中必须确定好组件的兼容性,返回可以兼容在一起的对象,而不是客户端在调用时,需要自己来判断不同的cpu和主板厂商是否可以兼容在一起。当然这种模式违背了对修改关闭,对扩展开放的原则,主要再需要添加显示器类,则需要修改所有代码。
4、单例设计模式
饿汉式
class Singleton{
	private Singleton() {};
	private static Singleton singleton = new Singleton();
	public static Singleton getInstance(){
		return singleton ;
	}
}
懒汉式,单例延迟加载模式
class Singleton{
	private Singleton() {};
	private static volatile Singleton singleton = null ;
	public static Singleton getInstance(){
		if(singleton == null){
			synchronized (Singleton.class) {
				if(singleton == null){
					singleton = new Singleton();
				}
			}
		}
		return singleton ;
	}
}
嵌套式:
class Singleton{
    private Singleton(){}
    private static class Holder{
        private static Singleton singleton = new Singleton();
    }
    public static Singleton getInstance(){
        return Holder.singleton;
    }
}
5、建造者模式
//定义需要的产品
@Data
@NoArgsConstructor
class User{
    private String name;
    private int age;
    public static UserBuilder builder(){
        return new UserBuilder();
    }
    //在此产品中创建一个可以提供此产品的类,具体的产品由它来提供
    public static class UserBuilder{
        private String name;
        private int age;
        public UserBuilder name(String name){
            this.name = name;
            return this;
        }
        public UserBuilder age(int age){
            this.age = age;
            return this;
        }
        //提供需要的产品
        public User build(){
            if (Objects.equals("", name)) {
                throw new RuntimeException("用户名不能为空");
            }
            User user = new User();
            user.setAge(age);
            user.setName(name);
            return user;
        }
    }
}
调用:
User user = User.builder()
        .name("test")
        .age(20)
        .build();
建造者模式强调不自己手动来创建一个对象,通过这种链式编程方法获取一个对象。通过它的 builder() 方法来设置需要获取对象的属性名称,设置完成后最后再 build() 方法来获取这个对象。这种方式,可以设置必填参数和选填参数。
6、原型模式
原型模式是一种浅克隆模式,基本就是有一个原型的对象,通过实现 Cloneable 接口,对外提供 clone() 方法,也就是克隆出一个属性相同的对象。
总结:
创建型模式总体上比较简单,它们的作用就是为了产生实例对象,算是各种工作的第一步了,因为我们写的是面向对象的代码,所以我们第一步当然是需要创建一个对象了。
简单工厂模式最简单;工厂模式在简单工厂模式的基础上增加了选择工厂的维度,需要第一步选择合适的工厂;抽象工厂模式有产品族的概念,如果各个产品是存在兼容性问题的,就要用抽象工厂模式。单例模式就不说了,为了保证全局使用的是同一对象,一方面是安全性考虑,一方面是为了节省资源;建造者模式专门对付属性很多的那种类,为了让代码更优美;原型模式用得最少,了解和 Object 类中的 clone() 方法相关的知识即可。
二、结构型模式
结构型模式旨在通过改变代码结构来达到解偶的目的,是我们的代码容易维护和扩展。
7、装饰模式
//抽象产品基类
abstract class Tea{
    public abstract String description();
}
//提供基类的几种基础实现方式
class BlackTea extends Tea{
    public String description() {
        return "这是红茶";
    }
}
class GreenTea extends Tea{
    public String description() {
        return "这是绿茶";
    }
}
//为这些基础的实现类提供装饰器
abstract class Condiment extends Tea{}
//通过不同的装饰方式,实现原有基础实现方式的增强
class Lemon extends Condiment{
    private Tea tea;
    public Lemon(Tea tea){
        this.tea = tea;
    }
    public String description() {
        return tea.description() + "加柠檬";
    }
    public String addTip(){
        return description() + ",还需要添加小费";
    }
}
class Mango extends Condiment{
    private Tea tea;
    public Mango(Tea tea){
        this.tea = tea;
    }
    public String description() {
        return tea.description() + "加芒果";
    }
    public String addTip(){
        return description() + ",还需要添加小费";
    }
}
调用:
Tea t1 = new Lemon(new BlackTea());
Tea t2 = new Lemon(new Mango(new GreenTea()));
装饰模式是为了增加某个类的使用,最常见应用就是IO。InputStream 是所有输入流的基类,它下面有几个基础的实现类:文件(FileInputStream)、管道(PipedInputStream)、数组(ByteArrayInputStream)等,我们也可以直接使用这些基本的实现类,不过用起来可能比较吃力,FilterInputStream 承接了装饰模式的关键节点,其实现类是一系列装饰器,比如 BufferedInputStream 代表用缓冲来装饰,也就使得输入流具有了缓冲的功能,LineNumberInputStream 代表用行号来装饰,在操作的时候就可以取得行号了,DataInputStream 的装饰,使得我们可以从输入流转换为 java 中的基本类型值。
8、代理模式
//接口定义需要实现的功能
interface Food{
    void eat();
}
//具体的实现类来实现接口的功能
class FoodImpl implements Food{
    private String name;
    public FoodImpl(String name){
        this.name = name;
    }
    public void eat(){
        System.out.println("吃" + name);
    }
}
//创建一个实现类的代理类,隐藏真实的实现方法,前后增强原有的实现逻辑
class FoodImplProxy implements Food{
    private Food food;
    private String name;
    public FoodImplProxy(String name){
        this.name = name;
        food = new FoodImpl(name);
    }
    public void eat(){
        System.out.println("吃前先削皮");
        food.eat();
        System.out.println("吃完后记得清理");
    }
}
调用:
Food food = new FoodImplProxy("苹果");
food.eat();
代理模式在于我们不改变实现类的实现细节,只是隐藏实现细节,代理类在真实的实现细节前后加入逻辑,向外表现就好像代理类真的实现了业务逻辑。
代理模式说白了就是做 “方法包装” 或做 “方法增强”,在 AOP 中,其实就是动态代理的过程。比如 Spring 中,我们自己不定义代理类,但是 Spring 会帮我们动态来定义代理,然后把我们定义在 @Before、@After、@Around 中的代码逻辑动态添加到代理中。
9、适配器模式
1)接口适配器模式
//接口定义需要实现的功能
interface Student {
	void write();
	void read();
	void study();
}
//定义为抽象,目的是不让创建本类对象,本类对象都是空的方法,创建对象调用没有任何意义,适配器类只是一个过度类
abstract class Adapter implements Action{
	public void write() {}
	public void read() {}
	public void study() {}
}
//只重写需要的方法,其他的方法同样拥有,但是不进行重写
class Student extends Adapter{
	@Override
	public void study() {}
}
我们举 Appache commons-io 包中的 FileAlterationListener 为例,用于对文件或文件夹进行监控,一旦发生了对应的操作,就会触发相应的方法。此接口的一大问题是抽象方法太多了,如果我们要用这个接口,意味着我们要实现每一个抽象方法,如果我们只是想要监控文件夹中的文件创建和文件删除事件,可是我们还是不得不实现所有的方法,所以我们使用适配器类,只要重写我们自己需要的方法。
2)对象适配器模式
//两个接口定义自己需要实现的功能
interface Student {
    void write();
    void read();
    void study();
}
interface Worker {
    void work();
    void study();
}
//现在有一个实现类实现了第一个接口
class MiddleStudent implements Student {
    public void write() {
        System.out.println("写字");
    }
    public void read() {
        System.out.println("读书");
    }
    public void study() {
        System.out.println("学习");
    }
}
//做一个适配器,表面上适配器是实现第二个接口,但是本质还是借用第一个接口的方法
class WorkerAdapter implements Worker{
    //构造方法中需要一个学生的实例,此类就是将这只学生适配成工人来用
    private Student student;
    public WorkerAdapter(Student student) {
        this.student = student;
    }
    public void work() {
        System.out.println("工作");
    }
    public void study() {
        student.study();
    }
}
3)类适配器模式
//接口定义自己需要实现的功能
interface Student {
    void write();
    void read();
    void study();
}
//类中有自己的方法
class MiddleStudent {
    public void write() {
        System.out.println("写字");
    }
    public void read() {
        System.out.println("读书");
    }
}
//做一个适配器,分别继承和实现上面的接口和类
class SutdentAdapter extends MiddleStudent implements Student{
    //这个方法需要自己来实现
    public void study() {
        System.out.println("学习");
    }
}
10、桥梁模式
//规定一个进行绘画的接口
interface DrawApi {
    void draw(int x, int y);
}
//绘画接口的实现类
class RedPen implements DrawApi {
    public void draw(int x, int y) {
        System.out.println("红色笔画图,x:" + x + ",y:" + y);
    }
}
class GreenPen implements DrawApi {
    public void draw(int x, int y) {
        System.out.println("绿色笔画图,x:" + x + ",y:" + y);
    }
}
//定义一个形状的抽象类
//把这个抽象类与绘画接口的实现类分离
abstract class Shape {
    public DrawApi drawApi;
    public Shape(DrawApi drawApi) {
        this.drawApi = drawApi;
    }
    public abstract void draw();
}
//不同的实现类可以画出不同的形状
class Circle extends Shape {
    public Circle(DrawApi drawApi) {
        super(drawApi);
    }
    public void draw() {
        drawApi.draw(0, 0);
    }
}
class Rectangle extends Shape {
    private int x;
    private int y;
    public Rectangle(int x, int y, DrawApi drawApi) {
        super(drawApi);
        this.x = x;
        this.y = y;
    }
    public void draw() {
        drawApi.draw(x, y);
    }
}
这模式的优点在于,如果我们有一个api接口,实现它的方式或者说是维度,有很多种,比绘画来说,画不同形状,画不同的粗细,画不同的颜色。假如每种维度都有三种实现方式,那么这个接口最终的实现方法会有 3 * 3 * 3 = 27 这么多种,使用起来不要太复杂了。桥梁模式就是把继承转化为组合的方式,最终会达到 3 + 3 + 3 = 9 的效果。
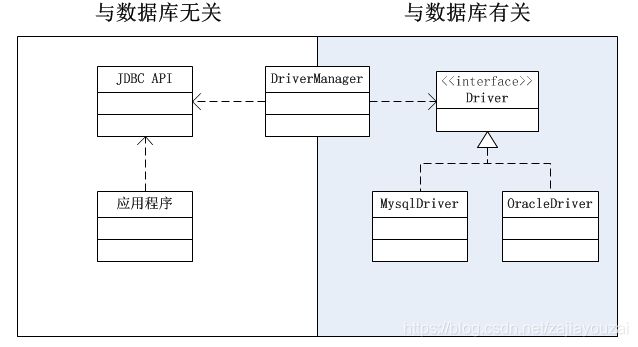
桥梁模式最典型的应用就是JDBC,我们去调用JDBC的 api ,它可以根据任何数据库发出查询指令,它不与数据库引擎发生直接关系,我们只需要从 DriverManager 中得到数据库连接 Connection 即可。由于JDBC驱动器的存在,应用系统可以不依赖于数据库引擎的细节而独立地演化;同时数据库引擎也可以独立于应用系统的细节而独立的演化。
11、门面模式
//定义接口
interface Shape {
    void draw();
}
//接口的不同实现类
class Circle implements Shape {
    public void draw() {
        System.out.println("画圆");
    }
}
class Rectangle implements Shape {
    public void draw() {
        System.out.println("画方");
    }
}
//其实到这里,客户端调用就可以了,但是我们为了提供一种更友好的方式,不去关系具体的实现类有了下面这个门面
class ShapeMaker {
    private Shape circle;
    private Shape rectangle;
    public ShapeMaker() {
        circle = new Circle();
        rectangle = new Rectangle();
    }
    public void drawCircle() {
        circle.draw();
    }
    public void drawRenctangle() {
        rectangle.draw();
    }
}
slf4j 就是这种模式的一个简单应用,直接调用门面的方法即可。
12、组合模式
class Employee {
    private String name;
    private String dept;
    private int salary;
    private List<Employee> subordinates; // 下属
    public Employee(String name,String dept, int sal) {
        this.name = name;
        this.dept = dept;
        this.salary = sal;
        subordinates = new ArrayList<Employee>();
    }
    public void add(Employee e) {
        subordinates.add(e);
    }
    public void remove(Employee e) {
        subordinates.remove(e);
    }
    public List<Employee> getSubordinates(){
        return subordinates;
    }
    public String toString(){
        return ("Employee :[ Name : " + name + ", dept : " + dept + ", salary :" + salary+" ]");
    }
}
组合模式不多说,给单一对象和组合对象提供一致的访问性。
13、享元模式
享元模式就是共享元器件,复用已经生成的对象,最简单的例子就是 HashMap,每次存放对象时查看是否已经有此元素,有次元素进行修改,没有的生成新的对象。
总结:
- 代理模式:通过与真实实现类一样的创建方式创建对象后,调用该对象的方法,不改变原有的方法,只是做了一个前后增强的操作;
- 装饰模式:选定一个基础的实现类,可能它原有的方法不能满足我们的要求,但是达到新的要求又离不开它原有的实现方法,所以在它原有的方法基础上增加它的逻辑,增强原有的实现方法,达到我们的使用要求;
- 适配器模式:通过选择与接口可以进行适配的类,来达到实现接口方法的目的,简单的说就是把工人适配成学生;
- 桥梁模式:解偶;
- 门面模式:不关系具体的实现细节,只要调用需要的方法即可;
- 组合模式:梳理具有层次结构的数据;
- 享元模式:利用已经创建的对象,提供性能
三、行为型模式
行为型模式关注的是各个类之间的相互作用,将职责划分清楚,使得我们的代码更加地清晰。
14、策略模式
//抽象策略类及实现类
interface Strategy {
    public void operate();
}
class RedStrategy implements Strategy{
	public void operate() {
		System.out.println("这是红色");
	}
}
class BlueStrategy implements Strategy{
	public void operate() {
		System.out.println("这是蓝色");
	}
}
//环境类
class Context {
    private Strategy strategy;
    public Context(Strategy strategy){
         this.strategy = strategy;
    }
    public void setStrategy(Strategy strategy){
         this.strategy = strategy;
    }
    public void operate(){
         this.strategy.operate();
    }
}
策略模式简单应用就是 SpringBoot 中根据不同的配置文件名称,区分生产环境、测试环境、本地环境等,来初始化 Spring 容器。策略模式与桥梁模式很相近,只不过桥梁模式耦合更低,结构更复杂。
15、观察者模式
//观察者接口及实现类
interface Watcher {
	void update(String str);
}
class ConcreteWatcher implements Watcher{
    public ConcreteWatcher(Watched watched) {
        watched.addWatcher(this);
    }
	public void update(String str) {
		System.out.println(str);
	}
}
//被观察者接口及实现类
interface Watched {
	void addWatcher(Watcher watcher);
	void removeWatcher(Watcher watcher);
	void notifyWatchers(String str);
}
class ConcreteWatched implements Watched{
	//存放观察者
	private List<Watcher> list = new ArrayList<>();
	public void addWatcher(Watcher watcher) {
		list.add(watcher);
	}
	public void removeWatcher(Watcher watcher) {
		list.remove(watcher);
	}
	public void setState(String state){
	    notifyWatchers(state);
    }
	public void notifyWatchers(String str) {
		for (Watcher watcher : list) {
			watcher.update(str);
		}
	}
}
观察者模式的功能不外乎就是观察者订阅自己需要的主题,当主题有变化时告知所有观察者。
16、责任链模式
//记录日志基类
abstract class AbstractLogger {
    public final static int INFO = 1;
    public final static int DEBUG = 2;
    public final static int ERROR = 3;
    public int level;
    protected AbstractLogger nextLogger;
    public void setNextLogger(AbstractLogger nextLogger){
        this.nextLogger = nextLogger;
    }
    public void logMessage(int level, String message){
        if(this.level <= level){
            write(message);
        }
        if(nextLogger !=null){
            nextLogger.logMessage(level, message);
        }
    }
    abstract protected void write(String message);
}
//控制台级别日志
class ConsoleLogger extends AbstractLogger {
    public ConsoleLogger(int level) {
        this.level = level;
    }
    public void write(String message) {
        System.out.println("控制台打印:" + message);
    }
}
//info文件级别日志
class FileLogger extends AbstractLogger {
    public FileLogger(int level) {
        this.level = level;
    }
    public void write(String message) {
        System.out.println("文件记录:" + message);
    }
}
//error错误级别日志
class ErrorLogger extends AbstractLogger {
    public ErrorLogger(int level) {
        this.level = level;
    }
    public void write(String message) {
        System.out.println("错误记录:" + message);
    }
}
class LoggerUtils{
    public static AbstractLogger normal(){
        ErrorLogger errorLogger = new ErrorLogger(AbstractLogger.ERROR);
        FileLogger fileLogger = new FileLogger(AbstractLogger.DEBUG);
        ConsoleLogger consoleLogger = new ConsoleLogger(AbstractLogger.INFO);
        consoleLogger.setNextLogger(fileLogger);
        fileLogger.setNextLogger(errorLogger);
        return consoleLogger;
    }
}
责任链模式是为创建一个接受者对象的链,每个接受者都包括下一个接受这的引用,请求沿着链向下传递,直到有对象处理为止。目的是为了给请求的发送者和接受者进行解偶,客户端只需要把请求发送到链上即可,不必去关心请求的处理细节。
17、模板模式
//模板抽象类
abstract class template{
	abstract void colorPrint();
	abstract void transportation();
	public void show(){
		colorPrint();
		transportation();
	}
}
//模版实现类
class templateImpl1 extends template{
	void colorPrint() {
		System.out.println("打印红色");
	}
	void transportation() {
		System.out.println("自行车出行");
	}
}
class templateImpl2 extends template{
	void colorPrint() {
		System.out.println("打印蓝色");
	}
	void transportation() {
		System.out.println("开车出行");
	}
}
这种模式很好理解,子类自由的实现抽象方法,具体的实现中子类可以有各自的算法,并把通用的算法抽象出来,客户端直接调用即可。
18、状态模式
//定一个类,这个类的行为是根据它的状态改变的
class Context {
    private State state;
    private String name;
    public Context(String name) {
        this.name = name;
    }
    public void setState(State state) {
        this.state = state;
    }
    public State getState() {
        return this.state;
    }
}
//将具体的状态抽象出来
interface State {
    void doAction(Context context);
}
class DeductState implements State {
    public void doAction(Context context) {
        System.out.println("商品卖出,准备减库存");
        context.setState(this);
    }
}
class RevertState implements State {
    public void doAction(Context context) {
        System.out.println("给此商品补库存");
        context.setState(this);
    }
}
这种模式主要是根据类的状态改变类的行为,类的状态抽象为接口,可以有不同的实现状态,同时也方便添加新的状态。


 171万+
171万+

 被折叠的 条评论
为什么被折叠?
被折叠的 条评论
为什么被折叠?
 到【灌水乐园】发言


