


 本文详细介绍如何配置bonding网络接口、team接口及网桥连接,包括设置步骤、监控方法及常见测试,适用于希望提高网络稳定性和速度的系统管理员。
#1、配置bonding网络接口(支持2块网卡)
什么是bond呢?简单地说,bonding就是把多个物理网络接口绑定到一起,使它们就像一个网络接口那样运行。 通过Bonding技术,可以实现网口冗余,负载均衡,从而达到高可用高可靠的目的。
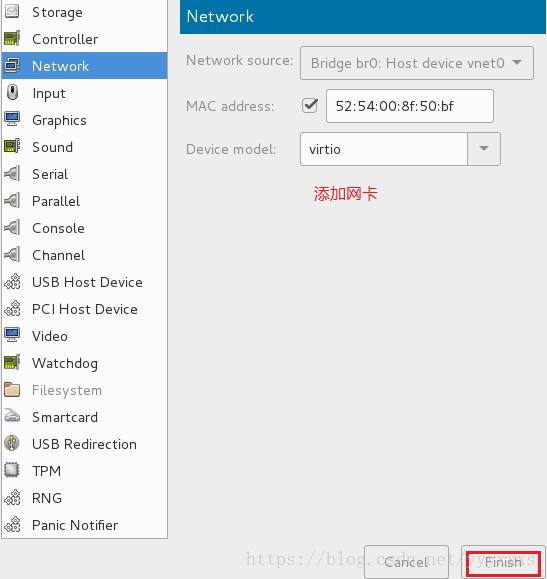
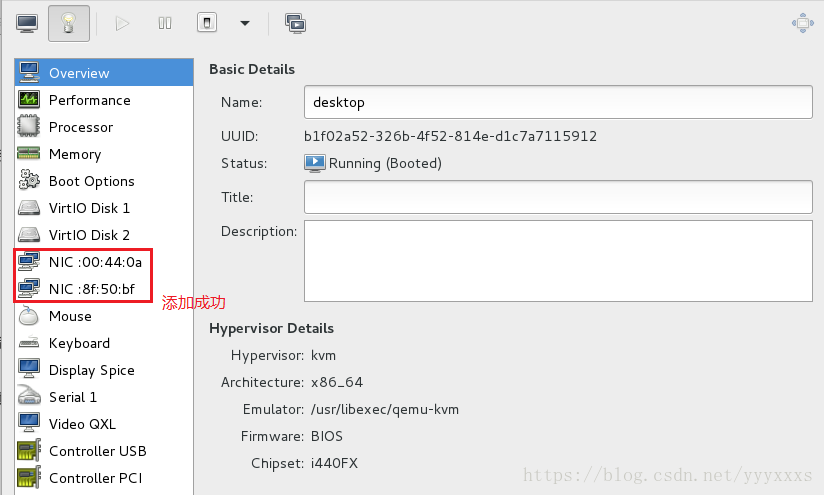
首先,为虚拟机再添加一个网卡,删除原有的网卡配置
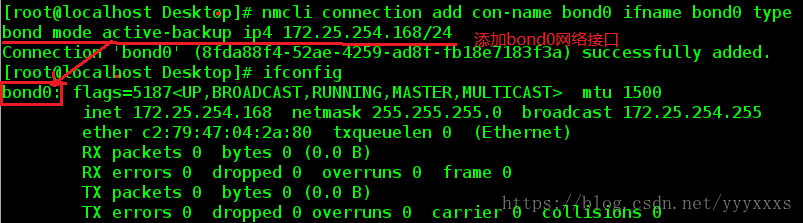
(1)nmcli connection add con-name bond0 ifname bond0 type bond mode active-backup ip4 172.25.254.168/24 #
添加bonding网络接口,类型为bond,名称为bond0,工作模式为active-backup
(2)ifconfig
(3)nmcli connection add con-name eth0 ifname eth0 type bond-slave master bond0 #将bond0连接到eth0
(4)nmcli connection add con-name eth1 ifname eth1 type bond-slave master bond0 #将bond0连接到eth1
(5)ifconfig eth0 down #关闭eth0网卡
(6)ifconfig eth0 up #启动eth0网卡
1)nmcli connection add con-name bond0 ifname bond0 type bond mode active-backup ip4 172.25.254.125/24 #
添加bonding网络接口,类型为bond,名称为bond0,工作模式为active-backup
(2)ifconfig
(3)nmcli connection add con-name eth0 ifname eth0 type bond-slave master bond0 #将bond0连接到eth0
(4)nmcli connection add con-name eth1 ifname eth1 type bond-slave master bond0 #将bond0连接到eth1
(5)ifconfig eth0 down #关闭eth0网卡
(6)ifconfig eth0 up #启动eth0网卡
监控:
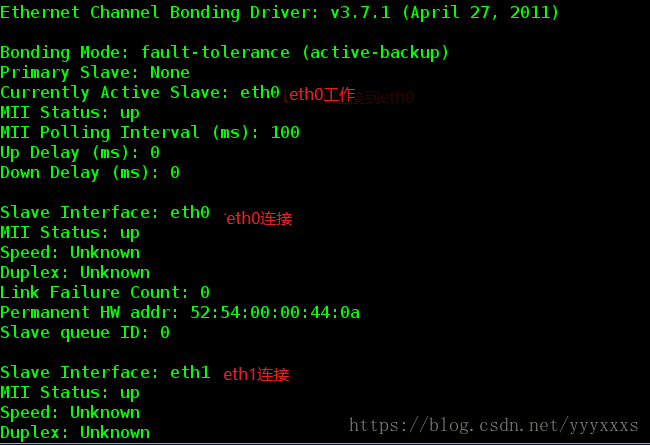
watch -n 1 cat /proc/net/bonding/bond0
测试:
ping 172.25.254.68
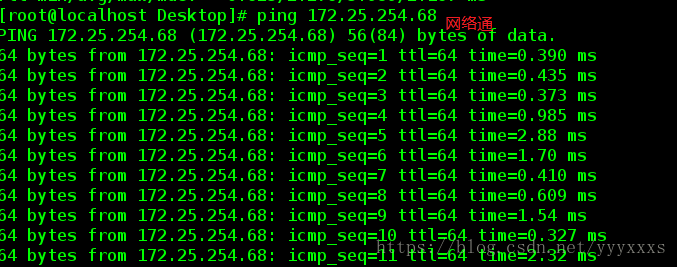
注:eth0关闭时,eth1顶替工作,网络不会短;开启eth0后,仍然是eth1工作。
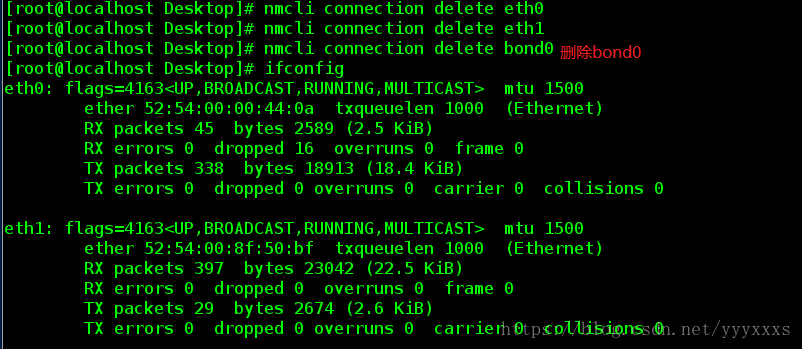
删除bond0接口:
nmcli connection delete eth0
nmcli connection delete eth1
nmcli connection delete bond0
#2、team接口(可支持8块网卡,企业7后才有)
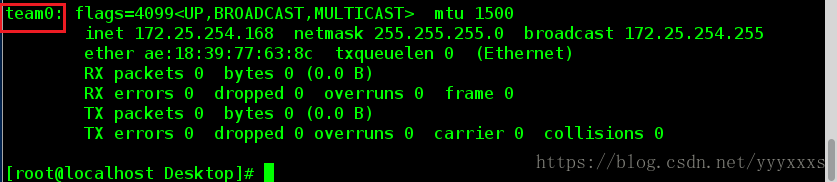
(1)nmcli connection add con-name team0 ifname team0 type team config '{"runner":
{"name":"activebackup"}}' ip4 172.25.254.168/24 #添加team网络接口,类型为team,名称为team0,工作模式为active-
backup
(2)ifconfig
(3)nmcli connection add con-name eth0 ifname eth0 type team-slave master team0 #将team0连接到eth0
(4)nmcli connection add con-name eth1 ifname eth1 type team-slave master team0 #将team0连接到eth1
(5)ifconfig eth0 down #关闭eth0网卡
(6)ifconfig eth0 up #开启eth0网卡
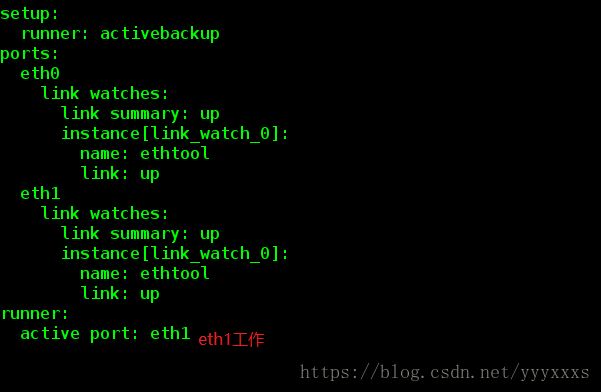
监控:
watch -n 1 teamdctl team0 stat #监控
测试:
ping 172.25.254.68

#3、配置网桥连接
所谓网桥,就是网络桥接,用来连接不同的网段可以使虚拟机的网卡直接连接到真机的真实网卡,上网速度更快
(1)cd /etc/sysconfig/network-scripts/
(2)ls
(3)mv ifcfg-br0 ifcfg-enp0s25 /opt #将ifcfg-br0、ifcfg-enp0s25作备份
(4)cd /opt
(5)nm-connection-editor #除virbr0、virbr1以外,其余均删除
(6)systemctl restart network #重启网络
编辑ifcfg-enp0s25文件
(7)vim ifcfg-enp0s25
DEVICE=enp0s25
ONBOOT=yes
BOOTPROTO=none
BRIDGE=br0
编辑ifcfg-br0文件
(7)vim ifcfg-br0
DEVICE=br0
ONBOOT=yes
BOOTOROTO=none
IPADDR=172.25.254.68
PERFIX=24
TYPE=Bridge
重启网络
(8)systemctl stop NetworkManager.service
(9)systemctl restart network
(10)brctl show
#4、管理网桥连接
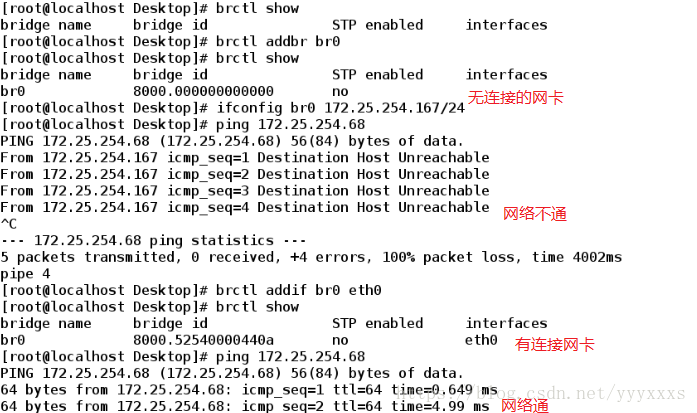
(1)brctl show #查看网桥
(2)brctl addbr br0 #添加网桥
(3)brctl show
(4)ifconfig br0 172.25.254.167/24
(5)ping 172.25.254.25 #不通,因为br0没有网桥连接
(6)brctl addif br0 eth0 #给br0添加网桥连接
(7)brctl show
(8)ping 172.25.254.25 #ping通
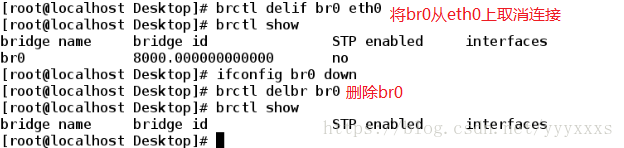
(9)brctl delif br0 eth0 #从eth0上去掉br0
(10)brctl show
(11)ifconfig br0 down #停止br0
(12)brctl show
(13)ifconfig #无br0
(14)brctl delbr br0 #删除br0
(15)brctl show


 被折叠的 条评论
为什么被折叠?
被折叠的 条评论
为什么被折叠?
 到【灌水乐园】发言


