


5.1、构造器注入
其实就是前面我们使用的创建bean对象的时候,我们不使用property标签进行初始化值,而是使用constructor-arg来进行初始化。
5.2、Set方式注入(重点)
- 依赖注入:set注入
- 依赖:bean对象的创建依赖于容器
- 注入:bean对象中的所有属性,由容器注入
【环境搭建】
- 复杂类型
-
  package com.yu.pojo;

  public class Address {
      private String address;

      public String getAddress() {
          return address;
      }

      public void setAddress(String address) {
          this.address = address;
      }
  }
2.真实测试对象
-
学生类作为测试的基本pojo类
-
public class Student { private String name; private Address address; private String[] books; private List<String> hobbies; private Map<String,String> card; private Set<String> games; private Properties info; private String wife; -
  package com.yu.pojo;

  public class Address {
      private String address;
3.bean.xml
-
<bean id="student" class="com.yu.pojo.Student"> <!-- 第一种 普通的注入,这是基本类型的注入,只需要直接设置就可以--> <property name="name" value="林"/> </bean> -
  <bean id="address" class="com.yu.pojo.Address"/>
      <bean id="student" class="com.yu.pojo.Student">
  <!--        第一种  普通的注入,这是基本类型的注入,只需要直接设置就可以
  			第二种,是bean的注入,注入的是bean-->
          <property name="name" value="林"/>
          <property name="address" ref="address"/>
      </bean>
<!-- 第三钟 array注入 使用array 标签 --> <property name="books"> <array> <value>西游记</value> <value>红楼梦</value> <value>水浒传</value> <value>三国演义</value> </array> </property><!-- 第四种 List的注入 --> <property name="hobbies"> <list> <value>听歌</value> <value>敲代码</value> <value>看电影</value> </list> </property><!-- 第五种 map注入--> <property name="card"> <map> <entry key="身份证" value="450481199806232222"/> <entry key="英汉卡" value="1232134343122"/> </map> </property><!-- 第六种 可以发现list array set这三个的使用方式差不多--> <property name="games"> <set> <value>LOL</value> <value>COC</value> <value>BOB</value> </set> </property><!-- 设置null时候--> <property name="wife"> <null/> </property><!-- 设置配置类 properties--> <property name="info"> <props> <prop key="学号">20172727</prop> <prop key="姓名">林</prop> <prop key="学院">计算机</prop> </props> </property>
4.测试类
-
  public class MyTest {
      public static void main(String[] args) {
          ApplicationContext context = new ClassPathXmlApplicationContext("beans.xml");
         Student student = context.getBean("student",Student.class);
       System.out.println(student);
     }
  }
5.3、拓展方式注入
p命名注入(Property首字母,对应的就是set注入)
我们需要在头部导入
xmlns:p="http://www.springframework.org/schema/p"命名空间
<?xml version="1.0" encoding="UTF-8"?>
<beans xmlns="http://www.springframework.org/schema/beans"
       xmlns:xsi="http://www.w3.org/2001/XMLSchema-instance"
       xmlns:p="http://www.springframework.org/schema/p"
       xsi:schemaLocation="http://www.springframework.org/schema/beans
        https://www.springframework.org/schema/beans/spring-beans.xsd">


<!--    p命名空间注入  这是property的简写
         需要在头文件中填入下面
         xmlns:p="http://www.springframework.org/schema/p"       -->
        <bean id="user" class="com.yu.pojo.User" p:name="林" p:age="18"/>
</beans>
但是我没有想到应该对list等等类型怎么进行注入,所以我决定p标签作用也不大,只是稍微简化了一些开发。
可以值直接赋予参数,不需要另外创建property标签
<!--    发现好像只能赋予基本类型和引用类型,引用的只能够选择bean-->
    <bean id="student2" class="com.yu.pojo.Student" p:name="林" p:address-ref="address"/>
  @Test
    public void test2(){
        ApplicationContext context = new ClassPathXmlApplicationContext("userbeans.xml");
        //后面指定了类的类型之后自动填变量类型也会指定
        User user = context.getBean("user", User.class);
        System.out.println(user);

    }
C命名注入(Contructor首字母,对应的是构造器注入)
这里使用的就是构造器注入
<?xml version="1.0" encoding="UTF-8"?>
<beans xmlns="http://www.springframework.org/schema/beans"
       xmlns:xsi="http://www.w3.org/2001/XMLSchema-instance"
       xmlns:c="http://www.springframework.org/schema/c"
       xmlns:p="http://www.springframework.org/schema/p"
       xsi:schemaLocation="http://www.springframework.org/schema/beans
        https://www.springframework.org/schema/beans/spring-beans.xsd">


<!--    p命名空间注入  这是property的简写
         需要在头文件中填入下面
         xmlns:p="http://www.springframework.org/schema/p"       -->
        <bean id="user" class="com.yu.pojo.User" p:name="林" p:age="18"/>
        <bean id="user2" class="com.yu.pojo.User" c:age="18" c:name="lin1"/>
</beans>
注意:
-
需要导入c-namespace
-
需要有有惨构造器
5.4、Bean作用域(Bean scopes)

1、The Singleton Scope(单例模式)
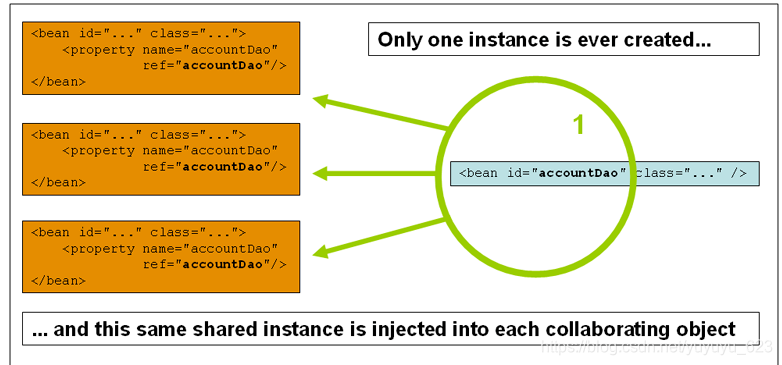
<bean id="user2" class="com.yu.pojo.User" c:age="18" c:name="lin1" scope="singleton"/>
Spring中的bean默认就是使用单例模式
就是说每次从context中获取的bean对象都是同一个,引用的是一个东西,所以说一个改变,就会改变多个
 @Test
    public void test2(){
        ApplicationContext context = new ClassPathXmlApplicationContext("userbeans.xml");
        //后面指定了类的类型之后自动填变量类型也会指定
        User user = context.getBean("user", User.class);
        User user2 = context.getBean("user", User.class);
        System.out.println(user==user2);
		//true
    }
2、Prototype Scope(原型模式)

<bean id="user2" class="com.yu.pojo.User" c:age="18" c:name="lin1" scope="prototype"/>
 @Test
    public void test2(){
        ApplicationContext context = new ClassPathXmlApplicationContext("userbeans.xml");
        //后面指定了类的类型之后自动填变量类型也会指定
        User user = context.getBean("user", User.class);
        User user2 = context.getBean("user", User.class);
        System.out.println(user==user2);
		//false
    }
可以看出原型模式中,虽然取同一个bean,但是spring给我们创建了不同的对象,对象在那种没有初始化赋值,且与多个对象关联的bean使用
3、其余的只能在web开发中使用
request:就是在请求的时候创建对象,然后就失效了,其他同理,但是具体如何我暂时不了解,只能后续学习的时候进行补充了


 被折叠的 条评论
为什么被折叠?
被折叠的 条评论
为什么被折叠?
 到【灌水乐园】发言


