


前言
本人是一个刚刚学习Java的小萌新,在淘宝上购买的黑马讲的java教程,通过看他的教程学习,总结一点自己的学习过程和碰到的问题,和大家分享一下,若有不对,欢迎大家评论留言呀!!!
五、Java客户端Jedis
Jedis:一款java操作redis数据库的工具
一个简单的实例:
第一步:建立一个maven的工程,不选择然后的依赖。
然后在pom.xml里加入:
 <dependencies>
       <dependency>
           <groupId>org.springframework.data</groupId>
           <artifactId>spring-data-redis</artifactId>
           <version>1.8.1.RELEASE</version>
       </dependency>

       <dependency>
           <groupId>commons-pool</groupId>
           <artifactId>commons-pool</artifactId>
           <version>1.6</version>
       </dependency>
       <dependency>
           <groupId>redis.clients</groupId>
           <artifactId>jedis</artifactId>
           <version>3.5.2</version>
       </dependency>
       <dependency>
           <groupId>org.springframework</groupId>
           <artifactId>spring-context</artifactId>
           <version>5.0.3.RELEASE</version>
       </dependency>
       <dependency>
           <groupId>org.springframework</groupId>
           <artifactId>spring-jdbc</artifactId>
           <version>4.3.19.RELEASE</version>
       </dependency>
       <dependency>
           <groupId>org.springframework</groupId>
           <artifactId>spring-test</artifactId>
           <version>5.1.6.RELEASE</version>
       </dependency>
       <dependency>
           <groupId>org.springframework</groupId>
           <artifactId>spring-tx</artifactId>
           <version>4.3.19.RELEASE</version>
       </dependency>
       <dependency>
           <groupId>mysql</groupId>
           <artifactId>mysql-connector-java</artifactId>
           <version>5.1.40</version>
       </dependency>
       <dependency>
           <groupId>org.aspectj</groupId>
           <artifactId>aspectjweaver</artifactId>
           <version>1.9.4</version>
       </dependency>
       <dependency>
           <groupId>junit</groupId>
           <artifactId>junit</artifactId>
           <version>4.12</version>
           <scope>test</scope>
       </dependency>
       <dependency>
           <groupId>org.junit.jupiter</groupId>
           <artifactId>junit-jupiter</artifactId>
           <version>RELEASE</version>
           <scope>compile</scope>
       </dependency>
   </dependencies>
然后构建如下的的格式:得一个test文件,在文件里配置代码:

代码如下:
package cn.itcast.jedis.test;
import org.junit.jupiter.api.Test;
import redis.clients.jedis.Jedis;
// jedis的测试类
public class JedisTest {
    /**
     * 快速入门
     */
    @Test
    public void test1() {
         // 获取连接
        Jedis jedis = new Jedis("localhost", 6379);
        // 操作
        jedis.set("username", "zhangsan");
        // 关闭连接
        jedis.close();
    }
}
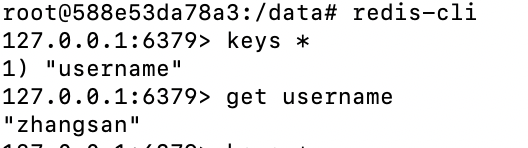
如果编辑运行成功:
转移到终端输入keys *,看到新填加的key:username。
注意了:如果你更改过redis的端口号,但没有更改完.conf文件,可能报错:redis.clients.jedis.exceptions.JedisConnectionException: Failed connecting to hocalhost:端口号或者是:jedis connection exception unexpected end of stream
六、Jedis连接池:JedisPool
什么是连接池呢?
简单的说:为了减少内存,和提速代码的运行速度,组成了一个堆放资源的一个池子。当我们运行代码产生的资源,可以放入连接池中,需要的时候将其取出,而不是重新将代码运行。
下面我们通过前一篇学到的5种不同value类型命令,在基于连接池知识并在IDEA软件上,实操一遍吧!
第一步:构建如下的格式:
注:项目搭建最好是分层哟!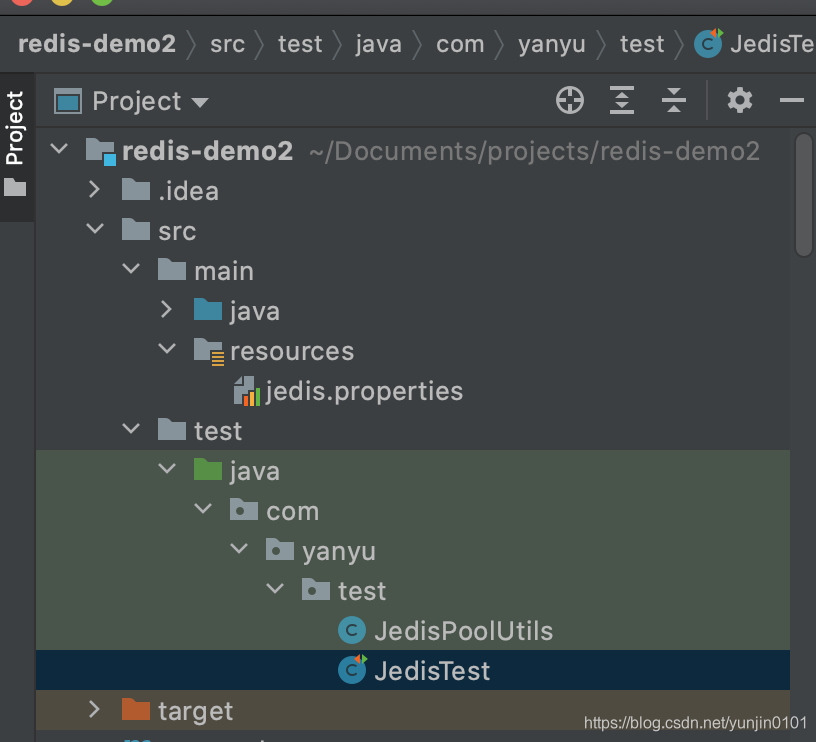
第二步在pom.xml文件填写jar
可能稍微一点点多
<dependencies>
        <dependency>
            <groupId>org.springframework.data</groupId>
            <artifactId>spring-data-redis</artifactId>
            <version>1.8.1.RELEASE</version>
        </dependency>

        <dependency>
            <groupId>commons-pool</groupId>
            <artifactId>commons-pool</artifactId>
            <version>1.6</version>
        </dependency>
        <dependency>
            <groupId>redis.clients</groupId>
            <artifactId>jedis</artifactId>
            <version>3.5.2</version>
        </dependency>
        <dependency>
            <groupId>org.springframework</groupId>
            <artifactId>spring-context</artifactId>
            <version>5.0.3.RELEASE</version>
        </dependency>
        <dependency>
            <groupId>org.springframework</groupId>
            <artifactId>spring-jdbc</artifactId>
            <version>4.3.19.RELEASE</version>
        </dependency>
        <dependency>
            <groupId>org.springframework</groupId>
            <artifactId>spring-test</artifactId>
            <version>5.1.6.RELEASE</version>
        </dependency>
        <dependency>
            <groupId>org.springframework</groupId>
            <artifactId>spring-tx</artifactId>
            <version>4.3.19.RELEASE</version>
        </dependency>
        <dependency>
            <groupId>mysql</groupId>
            <artifactId>mysql-connector-java</artifactId>
            <version>5.1.40</version>
        </dependency>
        <dependency>
            <groupId>org.aspectj</groupId>
            <artifactId>aspectjweaver</artifactId>
            <version>1.9.4</version>
        </dependency>
        <dependency>
            <groupId>junit</groupId>
            <artifactId>junit</artifactId>
            <version>4.12</version>
            <scope>test</scope>
        </dependency>
        <dependency>
            <groupId>org.junit.jupiter</groupId>
            <artifactId>junit-jupiter</artifactId>
            <version>RELEASE</version>
            <scope>compile</scope>
        </dependency>
    </dependencies>
第三步:在jedis.properties文件下添加代码:
注:maxTotal是最大连接数
maxIdle是最大空闲数
host=127.0.0.1
port=6379
maxTotal=50
maxIdle=10
第四步:添加JedisPoolUtils的代码:
package com.yanyu.test;

import redis.clients.jedis.Jedis;
import redis.clients.jedis.JedisPool;
import redis.clients.jedis.JedisPoolConfig;

import java.io.IOException;
import java.io.InputStream;
import java.util.Properties;

/**
 * JedisPool工具类
 * 加载配置文件,配置连接池的参数
 * 提供获取连接的方式
 */
public class JedisPoolUtils {
    /**
     * 获取连接方法
     */
    private static JedisPool jedisPool;
    static {
       // 读取配置文件

        InputStream is = JedisPoolUtils.class.getClassLoader().getResourceAsStream("jedis.properties");
        Properties pro = new Properties();
       // 创建Properties对象
        try {
            pro.load(is);
        } catch (IOException e) {
            e.printStackTrace();
        }
        // 获取数据,设置到JedisPoolConfig中
        JedisPoolConfig config = new JedisPoolConfig();
        config.setMaxTotal(Integer.parseInt(pro.getProperty("maxTotal")));
        config.setMaxTotal(Integer.parseInt(pro.getProperty("maxIdle")));
        jedisPool = new JedisPool(config, pro.getProperty("host"), Integer.parseInt(pro.getProperty("port")));
    }

    public static Jedis getJedis() {
        return jedisPool.getResource();
    }
}
第五步:写JedisTest测试类
package com.yanyu.test;

import org.junit.Test;
import redis.clients.jedis.Jedis;
import redis.clients.jedis.JedisPool;
import redis.clients.jedis.JedisPoolConfig;


// jedis的测试类
public class JedisTest {
    /**
     * 快速入门,测试String类
     */
    @Test
    public void test1() {
        // 获取连接
        Jedis jedis = new Jedis("localhost", 6379);
        // 操作
        jedis.set("username", "zhangsan");
        System.out.println(jedis.get("username"));
        // 关闭连接
        jedis.close();
    }

    /**
     * 测试hash类
     */
    @Test
    public void test2() {
        // 获取连接
        Jedis jedis = new Jedis("localhost", 6379);
        // 操作
        jedis.hset("my", "one", "two");
        jedis.hset("my1", "three", "four");
        System.out.println(jedis.hget("my", "one"));
        jedis.setex("month", 20, "h");
        // setex的功能是:将该键对存入redis里,20秒后会自动消失,适合当验证码使用。
        // 关闭连接
        jedis.close();
    }
编译通过,就可以测试了。由于测试类的代码太多了,就放了两个方法。
两个实例的代码,我放在百度网盘了,感兴趣的可以看看。
链接: https://pan.baidu.com/s/1QHXA3csc1FDvcwXLirSRqQ 密码: 7nlu
特别说一下:代码是没有问题的。但是如果你打开,重新刷新maven后,还是爆红,可能是因为我用的是自己本地的maven。你用的是IEDA自带maven。一个比较笨的方法是,你自己新建工程,手添pom.xml里jar,然后将我其他文件拷贝过去就好了。


 被折叠的 条评论
为什么被折叠?
被折叠的 条评论
为什么被折叠?
 到【灌水乐园】发言


