


目录
一、力扣打卡
二、maven
1.maven介绍
maven是一个项目管理工具,主要作用是在项目开发阶段对java项目进行依赖管理和项目构建
依赖管理:就是对jar包的管理。通过导入maven坐标就相当于将仓库中的jar包导入进去了
项目构建:通过maven的一个命令就可以完成项目从清理、编译、测试、报告、打包、部署的整个过程
2. maven的仓库类型
(1)本地仓库
(2)远程仓库
①maven中央仓库
http://www.sonatype.org/nexus/
http://mvnrepository.com/ (本人推荐仓库)
http://repo1.maven.org/maven2
②maven私服(需要自己搭建)
③其他公共远程仓库(比如apache提供的远程仓库)
3. maven常用命令
clean:清理
compile:编译
test:测试
package:打包
install:安装
4. maven坐标的书写规范
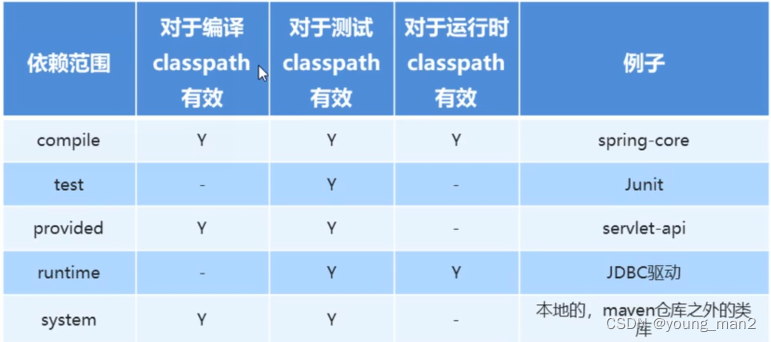
5. maven的依赖范围
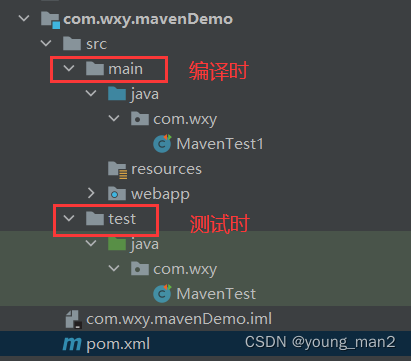
我们来进行测试
首先,我们导入对应的依赖
        <dependency>
            <groupId>junit</groupId>
            <artifactId>junit</artifactId>
            <version>4.12</version>
        </dependency>
我们可以知道在这种情况下我们可以在编译的时候运行也对测试的时候有效
但是如果我们做如下的修改就可以知发现,对编译的时候就无效了
        <dependency>
            <groupId>junit</groupId>
            <artifactId>junit</artifactId>
            <version>4.12</version>
            <scope>test</scope>
        </dependency>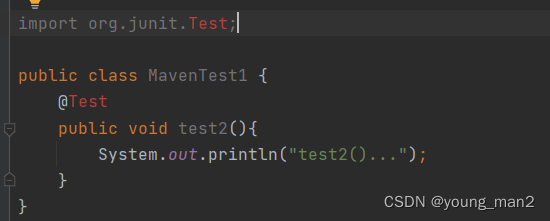
6. maven的依赖传递
6.1 什么是依赖传递?
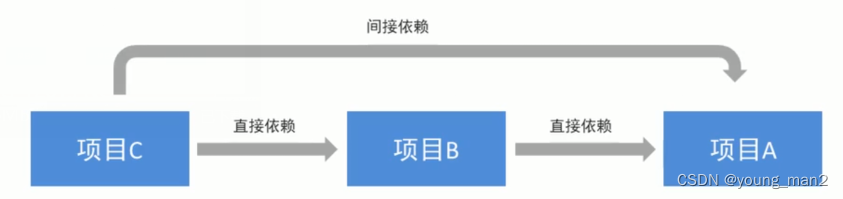
在maven中,依赖是可以传递的,假设存在三个项目,分别是项目A、项目B以及项目C。C依赖于B,B依赖于A,那么我们可以根据maven项目依赖的特征推出项目C也依赖于项目A。
6.2 什么是依赖冲突?
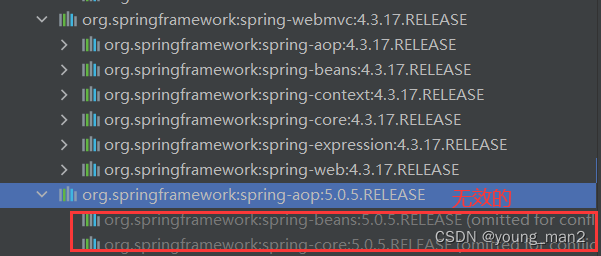
6.3 解决依赖冲突
假设我们想要使用更高版本的jar包,那么我们如何做到?
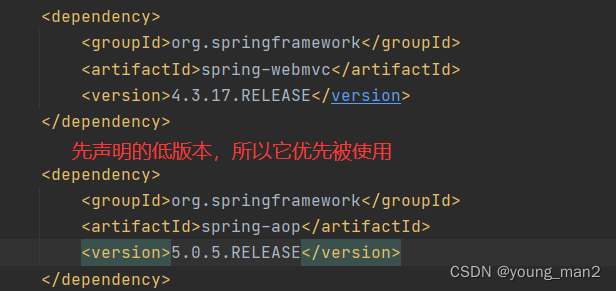
1. 使用maven提供的依赖调解原则
·第一声明者优先原则
在pom文件中,谁先声明就以谁为主
· 路径近者优先原则 
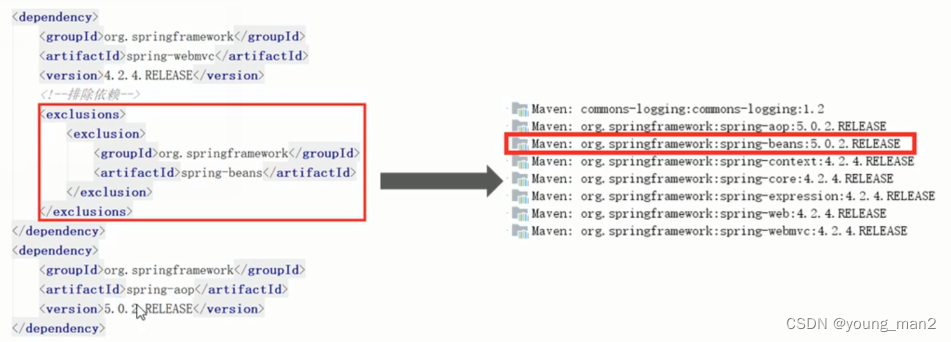
2. 排除依赖
可以使用exclusions标签将传递过来的依赖排除出去
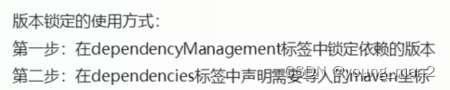
3. 锁定版本

7. 基于maven构建SSM工程案例
7.1 需求描述
通过maven坐标进行依赖管理。最终实现根据id查询商品信息的功能
7.2 实现步骤分析
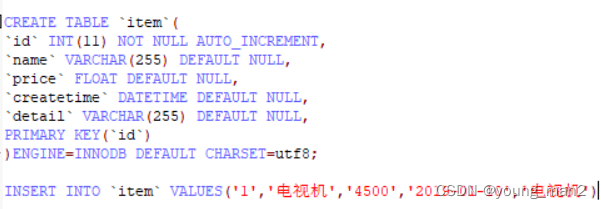
1. 数据库环境搭建
①创建数据库ssmtest
②创建商品表item
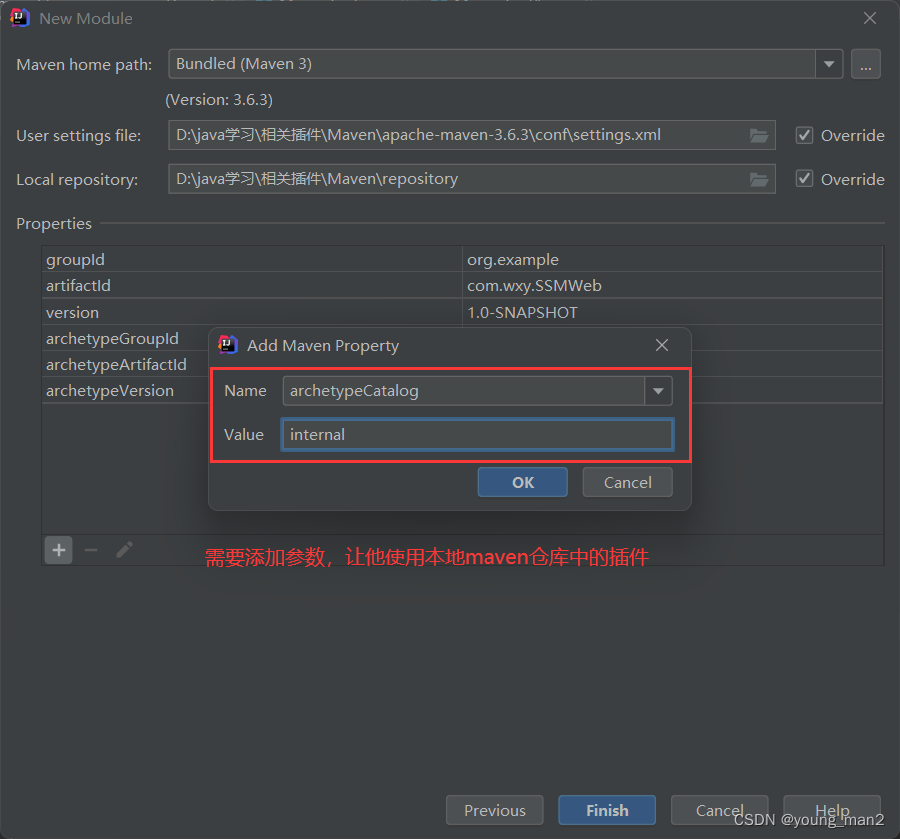
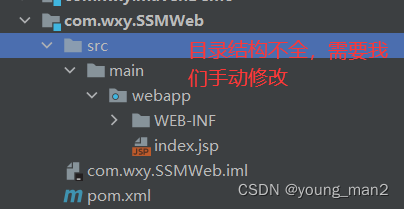
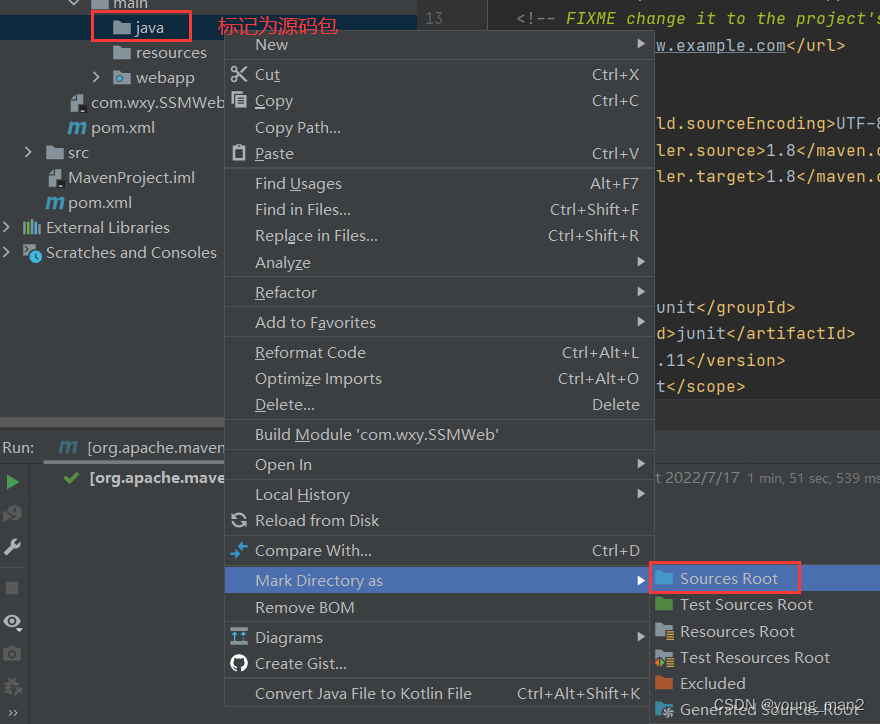
2. maven项目构建
①创建maven web项目
②配置pom.xml文件
<?xml version="1.0" encoding="UTF-8"?>

<project xmlns="http://maven.apache.org/POM/4.0.0" xmlns:xsi="http://www.w3.org/2001/XMLSchema-instance"
  xsi:schemaLocation="http://maven.apache.org/POM/4.0.0 http://maven.apache.org/xsd/maven-4.0.0.xsd">
  <modelVersion>4.0.0</modelVersion>

  <groupId>org.example</groupId>
  <artifactId>com.wxy.SSMWeb</artifactId>
  <version>1.0-SNAPSHOT</version>
  <packaging>war</packaging>

  <name>com.wxy.SSMWeb Maven Webapp</name>
  <!-- FIXME change it to the project's website -->
  <url>http://www.example.com</url>


  <properties>
    <project.build.sourceEncoding>UTF-8</project.build.sourceEncoding>
    <maven.compiler.source>1.8</maven.compiler.source>
    <maven.compiler.target>1.8</maven.compiler.target>
    <spring.version>5.0.5.RELEASE</spring.version>
    <springmvc.version>5.0.5.RELEASE</springmvc.version>
    <mybatis.version>3.4.5</mybatis.version>
  </properties>
  <!--锁定jar版本-->
  <dependencyManagement>
    <dependencies>
      <!-- Mybatis -->
      <dependency>
        <groupId>org.mybatis</groupId>
        <artifactId>mybatis</artifactId>
        <version>${mybatis.version}</version>
      </dependency>
      <!-- springMVC -->
      <dependency>
        <groupId>org.springframework</groupId>
        <artifactId>spring-webmvc</artifactId>
        <version>${springmvc.version}</version>
      </dependency>
      <!-- spring -->
      <dependency>
        <groupId>org.springframework</groupId>
        <artifactId>spring-context</artifactId>
        <version>${spring.version}</version>
      </dependency>
      <dependency>
        <groupId>org.springframework</groupId>
        <artifactId>spring-core</artifactId>
        <version>${spring.version}</version>
      </dependency>
      <dependency>
        <groupId>org.springframework</groupId>
        <artifactId>spring-aop</artifactId>
        <version>${spring.version}</version>
      </dependency>
      <dependency>
        <groupId>org.springframework</groupId>
        <artifactId>spring-web</artifactId>
        <version>${spring.version}</version>
      </dependency>
      <dependency>
        <groupId>org.springframework</groupId>
        <artifactId>spring-expression</artifactId>
        <version>${spring.version}</version>
      </dependency>
      <dependency>
        <groupId>org.springframework</groupId>
        <artifactId>spring-beans</artifactId>
        <version>${spring.version}</version>
      </dependency>
      <dependency>
        <groupId>org.springframework</groupId>
        <artifactId>spring-aspects</artifactId>
        <version>${spring.version}</version>
      </dependency>
      <dependency>
        <groupId>org.springframework</groupId>
        <artifactId>spring-context-support</artifactId>
        <version>${spring.version}</version>
      </dependency>
      <dependency>
        <groupId>org.springframework</groupId>
        <artifactId>spring-test</artifactId>
        <version>${spring.version}</version>
      </dependency>
      <dependency>
        <groupId>org.springframework</groupId>
        <artifactId>spring-jdbc</artifactId>
        <version>${spring.version}</version>
      </dependency>
      <dependency>
        <groupId>org.springframework</groupId>
        <artifactId>spring-tx</artifactId>
        <version>${spring.version}</version>
      </dependency>
    </dependencies>
  </dependencyManagement>
  <dependencies>
    <!-- Mybatis和mybatis与spring的整合 -->
    <dependency>
      <groupId>org.mybatis</groupId>
      <artifactId>mybatis</artifactId>
    </dependency>
    <dependency>
      <groupId>org.mybatis</groupId>
      <artifactId>mybatis-spring</artifactId>
      <version>1.3.1</version>
    </dependency>
    <!-- MySql驱动 -->
    <dependency>
      <groupId>mysql</groupId>
      <artifactId>mysql-connector-java</artifactId>
      <version>5.1.32</version>
    </dependency>
    <!-- druid数据库连接池 -->
    <dependency>
      <groupId>com.alibaba</groupId>
      <artifactId>druid</artifactId>
      <version>1.0.9</version>
    </dependency>
    <!-- springMVC核心-->
    <dependency>
      <groupId>org.springframework</groupId>
      <artifactId>spring-webmvc</artifactId>
    </dependency>
    <!-- spring相关 -->
    <dependency>
      <groupId>org.springframework</groupId>
      <artifactId>spring-context</artifactId>
    </dependency>
    <dependency>
      <groupId>org.springframework</groupId>
      <artifactId>spring-core</artifactId>
    </dependency>
    <dependency>
      <groupId>org.springframework</groupId>
      <artifactId>spring-aop</artifactId>
    </dependency>
    <dependency>
      <groupId>org.springframework</groupId>
      <artifactId>spring-web</artifactId>
    </dependency>
    <dependency>
      <groupId>org.springframework</groupId>
      <artifactId>spring-expression</artifactId>
    </dependency>
    <dependency>
      <groupId>org.springframework</groupId>
      <artifactId>spring-beans</artifactId>
    </dependency>
    <dependency>
      <groupId>org.springframework</groupId>
      <artifactId>spring-aspects</artifactId>
    </dependency>
    <dependency>
      <groupId>org.springframework</groupId>
      <artifactId>spring-context-support</artifactId>
    </dependency>
    <dependency>
      <groupId>org.springframework</groupId>
      <artifactId>spring-test</artifactId>
    </dependency>
    <dependency>
      <groupId>org.springframework</groupId>
      <artifactId>spring-jdbc</artifactId>
    </dependency>
    <dependency>
      <groupId>org.springframework</groupId>
      <artifactId>spring-tx</artifactId>
    </dependency>
    <!-- junit测试 -->
    <dependency>
      <groupId>junit</groupId>
      <artifactId>junit</artifactId>
      <version>4.12</version>
    </dependency>
    <dependency>
      <groupId>javax.servlet</groupId>
      <artifactId>servlet-api</artifactId>
      <version>2.5</version>
      <scope>provided</scope>
    </dependency>
    <dependency>
      <groupId>javax.servlet</groupId>
      <artifactId>jsp-api</artifactId>
      <version>2.0</version>
      <scope>provided</scope>
    </dependency>
    <!-- jstl -->
    <dependency>
      <groupId>javax.servlet</groupId>
      <artifactId>jstl</artifactId>
      <version>1.2</version>
    </dependency>
  </dependencies>
  <build>
    <plugins>
      <plugin>
        <groupId>org.apache.maven.plugins</groupId>
        <artifactId>maven-compiler-plugin</artifactId>
        <version>3.1</version>
        <configuration>
          <source>1.8</source>
          <target>1.8</target>
          <encoding>UTF-8</encoding>
        </configuration>
      </plugin>
    </plugins>
  </build>

</project>
③实现spring+mybatis整合
· 创建POJO类
package com.wxy.ssm.pojo;

import java.util.Date;

/*
* 订单实体
* */
public class Item {
    private int id;
    private String name;
    private float price;
    private Date createtime;
    private String detail;

    public int getId() {
        return id;
    }

    public void setId(int id) {
        this.id = id;
    }

    public String getName() {
        return name;
    }

    public void setName(String name) {
        this.name = name;
    }

    public float getPrice() {
        return price;
    }

    public void setPrice(float price) {
        this.price = price;
    }

    public Date getCreatetime() {
        return createtime;
    }

    public void setCreatetime(Date createtime) {
        this.createtime = createtime;
    }

    public String getDetail() {
        return detail;
    }

    public void setDetail(String detail) {
        this.detail = detail;
    }

    @Override
    public String toString() {
        return "Item{" +
                "id=" + id +
                ", name='" + name + '\'' +
                ", price=" + price +
                ", createtime=" + createtime +
                ", detail='" + detail + '\'' +
                '}';
    }
}
· 持久层DAO接口编写
package com.wxy.ssm.dao;

import com.wxy.ssm.pojo.Item;

public interface ItemMapper {
    public Item findById(int id);
}
· Mapper映射文件编写
<?xml version="1.0" encoding="UTF-8" ?>
<!DOCTYPE mapper PUBLIC "-//mybatis.org//DTD Mapper 3.0//EN"
        "http://mybatis.org/dtd/mybatis-3-mapper.dtd">
<mapper namespace="com.wxy.ssm.dao.ItemMapper">
    <select id="findById" parameterType="int" resultType="Item">
        select * from item where id=#{id}
    </select>
</mapper>
· 业务层Service编写
package com.wxy.ssm.service;

import com.wxy.ssm.pojo.Item;

public interface ItemService {
    public Item findById(int id);
}
package com.wxy.ssm.service;

import com.wxy.ssm.dao.ItemMapper;
import com.wxy.ssm.pojo.Item;
import org.springframework.beans.factory.annotation.Autowired;
import org.springframework.stereotype.Service;
import org.springframework.transaction.annotation.Transactional;


@Service
@Transactional
public class ItemServiceImpl implements ItemService{
    @Autowired
    private ItemMapper itemMapper;
    @Override
    public Item findById(int id) {
        return itemMapper.findById(id);
    }
}
· spring配置文件applicationContext-dao.xml编写
<?xml version="1.0" encoding="UTF-8"?>
<beans xmlns="http://www.springframework.org/schema/beans"
       xmlns:context="http://www.springframework.org/schema/context"
       xmlns:p="http://www.springframework.org/schema/p"
       xmlns:aop="http://www.springframework.org/schema/aop"
       xmlns:tx="http://www.springframework.org/schema/tx"
       xmlns:xsi="http://www.w3.org/2001/XMLSchema-instance"
       xsi:schemaLocation="http://www.springframework.org/schema/beans
						   http://www.springframework.org/schema/beans/spring-beans.xsd
						   http://www.springframework.org/schema/context
						   http://www.springframework.org/schema/context/spring-context.xsd
						   http://www.springframework.org/schema/aop
						   http://www.springframework.org/schema/aop/spring-aop.xsd
						   http://www.springframework.org/schema/tx
						   http://www.springframework.org/schema/tx/spring-tx.xsd">
    <!--配置数据源信息,使用阿里提供的druid连接池-->
    <bean id="dataSource" class="com.alibaba.druid.pool.DruidDataSource">
        <property name="driverClassName" value="com.mysql.jdbc.Driver"></property>
        <property name="url" value="jdbc:mysql://localhost:3306/ssmtest"/>
        <property name="username" value="root"></property>
        <property name="password" value="546871893wxy."/>
    </bean>
    <!--配置spring整合mybatis框架的sqlSessionFactoryBean-->
    <bean id="sqlSessioFactory" class="org.mybatis.spring.SqlSessionFactoryBean">
        <property name="dataSource" ref="dataSource"></property>
        <!--扫描pojo包,为实体类创建别名-->
        <property name="typeAliasesPackage" value="com.wxy.ssm.pojo"></property>
    </bean>
    <!--mapper的扫描器,用于产生代理对象-->
    <bean class="org.mybatis.spring.mapper.MapperScannerConfigurer">
        <property name="basePackage" value="com.wxy.ssm.dao"></property>
    </bean>

</beans>
· spring配置文件applicationContext-service.xml编写
<?xml version="1.0" encoding="UTF-8"?>
<beans xmlns="http://www.springframework.org/schema/beans"
       xmlns:context="http://www.springframework.org/schema/context"
       xmlns:p="http://www.springframework.org/schema/p"
       xmlns:aop="http://www.springframework.org/schema/aop"
       xmlns:tx="http://www.springframework.org/schema/tx"
       xmlns:xsi="http://www.w3.org/2001/XMLSchema-instance"
       xsi:schemaLocation="http://www.springframework.org/schema/beans
						   http://www.springframework.org/schema/beans/spring-beans.xsd
						   http://www.springframework.org/schema/context
						   http://www.springframework.org/schema/context/spring-context.xsd
						   http://www.springframework.org/schema/aop
						   http://www.springframework.org/schema/aop/spring-aop.xsd
						   http://www.springframework.org/schema/tx
						   http://www.springframework.org/schema/tx/spring-tx.xsd">

    <!--配置扫描器,扫描service-->
    <context:component-scan base-package="com.wxy.ssm.service"></context:component-scan>


    <!--配置事务管理器-->
    <bean id="transactionManager" class="org.springframework.jdbc.datasource.DataSourceTransactionManager">
        <property name="dataSource" ref="dataSource"/>
    </bean>

    <!--配置事务的注解驱动-->
    <tx:annotation-driven transaction-manager="transactionManager"></tx:annotation-driven>

</beans>
④加入springmvc的相关配置
· 表示层Controller的编写
package com.wxy.ssm.controller;

import com.wxy.ssm.pojo.Item;
import com.wxy.ssm.service.ItemService;
import org.springframework.beans.factory.annotation.Autowired;
import org.springframework.stereotype.Controller;
import org.springframework.ui.Model;
import org.springframework.web.bind.annotation.PathVariable;
import org.springframework.web.bind.annotation.RequestMapping;

@Controller
@RequestMapping("/item")
public class ItemController {
    @Autowired
    private ItemService itemservice;

    @RequestMapping("/showItem/{id}")
    /*注意,这里的@RequestMapping("/showItem/{id}标识的是在我们请求的时候需要在请求的串(url)中给予id的值")*/
    /*这里的注解@PathVariable表示的是将url中的id提取出来赋值给这里的id*/
    public String findById(@PathVariable("id") int id, Model model){
        Item item = itemservice.findById(id);
        /*这里我们拿到了item数据,那么我们需要减肥item在页面中进行展示,那么怎么展示?使用spring-mvc提供的Model*/
        model.addAttribute("item",item);
        /*这里的“item”是逻辑视图名*/
        return "item";

    }


}
·springmvc.xml的编写
<?xml version="1.0" encoding="UTF-8"?>
<beans xmlns="http://www.springframework.org/schema/beans"
       xmlns:context="http://www.springframework.org/schema/context"
       xmlns:p="http://www.springframework.org/schema/p"
       xmlns:aop="http://www.springframework.org/schema/aop"
       xmlns:tx="http://www.springframework.org/schema/tx"
       xmlns:xsi="http://www.w3.org/2001/XMLSchema-instance"
       xsi:schemaLocation="http://www.springframework.org/schema/beans
						   http://www.springframework.org/schema/beans/spring-beans.xsd
						   http://www.springframework.org/schema/context
						   http://www.springframework.org/schema/context/spring-context.xsd
						   http://www.springframework.org/schema/aop
						   http://www.springframework.org/schema/aop/spring-aop.xsd
						   http://www.springframework.org/schema/tx
						   http://www.springframework.org/schema/tx/spring-tx.xsd">

    <!--配置扫描器,扫描Controller-->
    <context:component-scan base-package="com.wxy.ssm.controller"></context:component-scan>

    <!--配置视图解析器-->
    <bean class="org.springframework.web.servlet.view.InternalResourceViewResolver">
        <property name="prefix" value="/WEB-IBF/jsp"></property>
        <property name="suffix" value=".jsp"/>
    </bean>
</beans>
·jsp页面的编写
<%--默认是没有开启EL表达式的,所以在这里需要开启 isELIgnored="false"--%>
<%@ page contentType="text/html;charset=UTF-8" isELIgnored="false" language="java" %>
<html>
<head>
    <title>Title</title>
</head>
<body>
    ${item}
</body>
</html>
·配置web.xml文件
<!DOCTYPE web-app PUBLIC
 "-//Sun Microsystems, Inc.//DTD Web Application 2.3//EN"
 "http://java.sun.com/dtd/web-app_2_3.dtd" >

<web-app>
  <display-name>Archetype Created Web Application</display-name>

  <!--指定spring配置文件的位置-->
  <context-param>
    <param-name>contextConfigLocation</param-name>
    <!--*表示可以加载jar包中的文件,所以可以加也可以不加-->
    <param-value>classpath*:applicationContext-dao.xml,applicationContext-service.xml</param-value>
  </context-param>

  <!--配置spring框架启动时使用的监听器  帮助我们加载spring的配置文件-->
  <listener>
    <listener-class>org.springframework.web.context.ContextLoaderListener</listener-class>
  </listener>
  <!--配置spring-mvc的前端控制器-->
  <servlet>
    <servlet-name>springmvc</servlet-name>
    <servlet-class>org.springframework.web.servlet.DispatcherServlet</servlet-class>
  </servlet>
  <servlet-mapping>
    <servlet-name>springmvc</servlet-name>
    <url-pattern>*.do</url-pattern>
  </servlet-mapping>
</web-app>
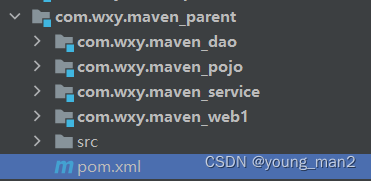
8. 分模块构建maven工程
8.1 分模块构建maven工程分析
在企业项目开发中,由于项目规模庞大,业务复杂,参与的人员比较多,一般会通过合理的模块拆分将一个大型的项目拆分为N多个小模块,分别进行开发。而且拆分出的模块可以很容易的被其他模块复用。
常见的两种拆分方式:
①按照业务模块进行拆分,每个模块拆分为一个maven工程,例如将一个项目分为用户模块、订单模块等,每个模块对应一个maven工程
②按照层进行拆分,例如持久层、业务层、表现层等,每一层就是一个maven工程
不管是哪种拆分方式,都会提供一个父工程,将一些公共的代码和配置进行统一管理和配置
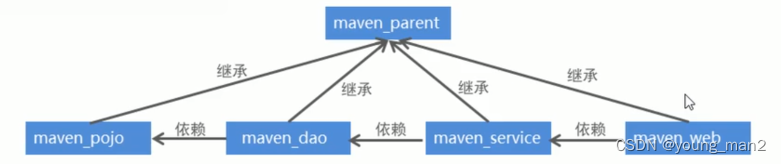
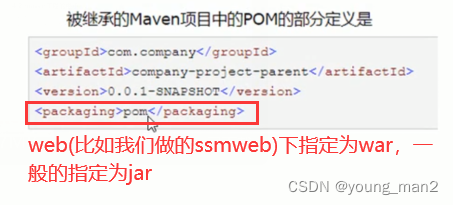
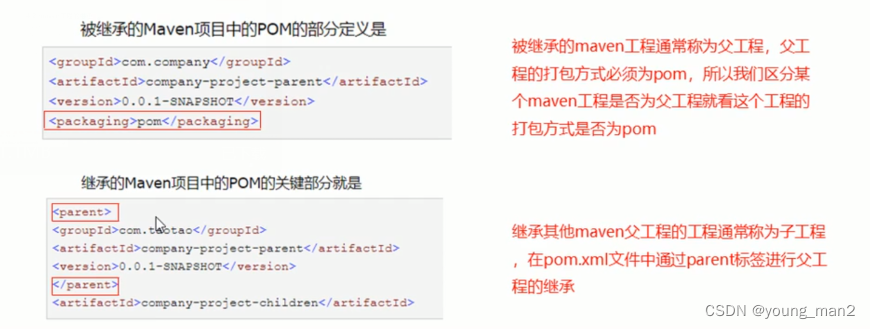
8.2 maven工程的继承
在Java语言中,类之间是可以继承的,通过继承,子类就可以引用父类中非private的属性和方法。同样,在maven工程之间也可以继承,子工程继承父工程之后,就可以使用在父工程中引入的依赖。继承的目的是为了消除重复代码。
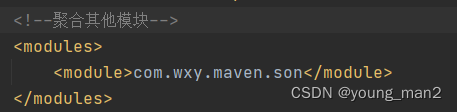
8.3maven工程的聚合
在maven工程的pom.xm|文件中可以使用<modules>标签将其他maven工程聚合到-起,聚合的目的是为了进行统一操作。
例如拆分后的maven工程有多个,如果要进行打包,就需要针对每个工程分别执行打包命令,操作起来非常繁琐。这时就可以使用<modules>标签将这些工程统一聚合到maven工程中, 需要打包的时候,只需要在此工程中执行一次打包命令, 其下被聚合的工程就都会被打包了。
【聚合不表示继承】
【父工程用来锁定jar包,子工程用来指定坐标】
在指定坐标(引入依赖)的时候,只需要在一个子工程里面引用,别的工程只用使用依赖的关系进行调用就行,代码如下所示:
    <dependencies>
        <dependency>
            <groupId>org.example</groupId>
            <artifactId>com.wxy.maven_dao</artifactId>
            <version>1.0-SNAPSHOT</version>
        </dependency>
    </dependencies>
9. 将第三方jar包安装到本地仓库和maven私服
9.1 将第三方jar包安装到maven私服
①下载oracle的jar包
②在maven中的setting.xml的配置文件中配置第三方仓库的server信息
③执行mvn deploy命令进行安装


 被折叠的 条评论
为什么被折叠?
被折叠的 条评论
为什么被折叠?
 到【灌水乐园】发言


