


目录
前言
好好学习,为了自己!
一、力扣打卡
给定一个仅包含数字
2-9的字符串,返回所有它能表示的字母组合。答案可以按 任意顺序 返回。示例:
输入:digits = "23"
输出:["ad","ae","af","bd","be","bf","cd","ce","cf"]
        //1. 告诉编译器,你的每个数字分别对应什么字母?使用集合的方式,键值对
        //2. 对于不存在的数字应该可以查错,比如输入的数字中包含0或者1就输出不存在对应字母的错误
        //3. 对于存在的数字,进行一个结合,就是求全排列
        class Solution {
    public List<String> letterCombinations(String digits) {
        List<String> combinations = new ArrayList<String>();
        if (digits.length() == 0) {
            return combinations;
        }
        Map<Character, String> phoneMap = new HashMap<Character, String>() {{
            put('2', "abc");
            put('3', "def");
            put('4', "ghi");
            put('5', "jkl");
            put('6', "mno");
            put('7', "pqrs");
            put('8', "tuv");
            put('9', "wxyz");
        }};
        backtrack(combinations, phoneMap, digits, 0, new StringBuffer());
        return combinations;
    }

    public void backtrack(List<String> combinations, Map<Character, String> phoneMap, String digits, int index, StringBuffer combination) {
        if (index == digits.length()) {
            combinations.add(combination.toString());
        } else {
            char digit = digits.charAt(index);
            String letters = phoneMap.get(digit);
            int lettersCount = letters.length();
            for (int i = 0; i < lettersCount; i++) {
                combination.append(letters.charAt(i));
                backtrack(combinations, phoneMap, digits, index + 1, combination);
                combination.deleteCharAt(index);
            }
        }
    }
}
二、SpringMVC拦截器
1.拦截器(interceptor)的作用
Springmvc的拦截器类似于Servlet开发中的过滤器Filter,用于对处理器进行预处理和后处理
将拦截器按一定的顺序联结成一条链,这条链称为拦截器链(Interceptor Chain) 。在访问被拦截的方法或字段时,拦截器链中的拦截器就会按其之前定义的顺序被调用。拦截器也是AOP思想的具体现。
2. 拦截器和过滤器的区别

3. 拦截器(interceptor)入门
自定义拦截器很简单,步骤为:
①创建拦截器类实现HandlerIntercptor接口
package com.wxy.interceptor;

import org.springframework.web.servlet.HandlerInterceptor;
import org.springframework.web.servlet.ModelAndView;

import javax.servlet.http.HttpServletRequest;
import javax.servlet.http.HttpServletResponse;

public class MyInterceptor1 implements HandlerInterceptor {
    @Override
    //在目标方法执行之前执行
    public boolean preHandle(javax.servlet.http.HttpServletRequest httpServletRequest, javax.servlet.http.HttpServletResponse httpServletResponse, Object o) throws Exception {
        System.out.println("preHandle......");
        String param = httpServletRequest.getParameter("param");
        if("yes".equals(param)){
            return true;
        }
        else {
            httpServletRequest.getRequestDispatcher("/error.jsp").forward(httpServletRequest,httpServletResponse);
            return false; //返回true代表放行,返回false代表不放行
        }
    }

    //在目标方法执行之后 试图返回之前执行
    @Override
    public void postHandle(javax.servlet.http.HttpServletRequest httpServletRequest, javax.servlet.http.HttpServletResponse httpServletResponse, Object o, ModelAndView modelAndView) throws Exception {
        modelAndView.addObject("name","exy");
        System.out.println("postHandle.....");
    }

    //在整个流程都执行完毕之后执行
    @Override
    public void afterCompletion(HttpServletRequest httpServletRequest, HttpServletResponse httpServletResponse, Object o, Exception e) throws Exception {
        System.out.println("afterCompletion......");
    }
}
②配置拦截器
<?xml version="1.0" encoding="UTF-8"?>
<beans xmlns="http://www.springframework.org/schema/beans"
       xmlns:xsi="http://www.w3.org/2001/XMLSchema-instance"
       xmlns:context="http://www.springframework.org/schema/context"
       xmlns:mvc="http://www.springframework.org/schema/mvc"
       xsi:schemaLocation="http://www.springframework.org/schema/beans http://www.springframework.org/schema/beans/spring-beans.xsd
       http://www.springframework.org/schema/tool http://www.springframework.org/schema/tool/spring-tool.xsd
       http://www.springframework.org/schema/context http://www.springframework.org/schema/context/spring-context.xsd
       http://www.springframework.org/schema/mvc http://www.springframework.org/schema/mvc/spring-mvc.xsd
">

    <!-- 1、mvc注解驱动 -->
    <mvc:annotation-driven/>
    <!-- 2、配置视图解析器 -->
    <bean class="org.springframework.web.servlet.view.InternalResourceViewResolver">
        <property name="prefix" value="/"/>
        <property name="suffix" value=".jsp"/>
    </bean>
    <!-- 3、静态资源权限开放 -->
    <mvc:default-servlet-handler/>
    <!-- 4、组件扫描  扫描Controller -->
    <context:component-scan base-package="com.wxy.controller"/>


    <!--配置拦截器-->
    <mvc:interceptors>
        <mvc:interceptor>
            <!--对哪些资源执行拦截操作-->
            <mvc:mapping path="/**"/>
            <bean class="com.wxy.interceptor.MyInterceptor1"/>
        </mvc:interceptor>
    </mvc:interceptors>
</beans>
③测试拦截器的拦截效果
package com.wxy.controller;

import org.springframework.stereotype.Controller;
import org.springframework.web.bind.annotation.RequestMapping;
import org.springframework.web.bind.annotation.ResponseBody;
import org.springframework.web.servlet.ModelAndView;

@Controller
public class TargetController {

    @RequestMapping("/target")
    public ModelAndView show(){
        System.out.println("目标资源执行......");
        ModelAndView modelAndView = new ModelAndView();
        modelAndView.addObject("name","itcast");
        modelAndView.setViewName("index");
        return modelAndView;
    }

}
4. 拦截器方法说明

5. 案例----用户登录权限控制
6. SpringMVC的异常处理机制
6.1 异常处理思路
系统中的异常主要包含两类:预期异常和运行时异常RuntimeException,前者通过捕获异常从而获取异常信息,后者主要通过规范代码开发、测试等手段减少运行时异常的发生。
系统的Dao、service、controller出现都通过throws Exception向上抛出,最后由Springmvc前端控制器交由异常处理器进行异常处理,如下图:

6.2 异常处理的两种方式
1. 使用Spring MVC提供的简单异常处理器SimpleMappingExceptionResolver
 <!--配置异常处理器-->
    <bean class="org.springframework.web.servlet.handler.SimpleMappingExceptionResolver">
        <!--<property name="defaultErrorView" value="error"/>-->
        <property name="exceptionMappings">
            <map>
                <entry key="java.lang.ClassCastException" value="error1"/>
                <entry key="com.itheima.exception.MyException" value="error2"/>
            </map>
        </property>
    </bean>
2. 使用Spring的异常处理接口HandleExceptionResolver自定义自己的异常处理器
①创建异常处理实现类HandleExceptionResolver
public class MyExceptionResolver implements HandlerExceptionResolver {

    /*
        参数Exception:异常对象
        返回值ModelAndView:跳转到错误视图信息
     */
    public ModelAndView resolveException(HttpServletRequest httpServletRequest, HttpServletResponse httpServletResponse, Object o, Exception e) {
        ModelAndView modelAndView = new ModelAndView();

        if(e instanceof MyException){
            modelAndView.addObject("info","自定义异常");
        }else if(e instanceof ClassCastException){
            modelAndView.addObject("info","类转换异常");
        }

        modelAndView.setViewName("error");

        return modelAndView;
    }
}
②配置异常处理器
!--自定义异常处理器-->
    <bean class="com.itheima.resolver.MyExceptionResolver"/>
③编写异常页面
<%@ page contentType="text/html;charset=UTF-8" language="java" %>
<html>
<head>
    <title>Title</title>
</head>
<body>
    <h1>通用的错误提示页面</h1>
    <h1>${info}</h1>
</body>
</html>
④测试异常跳转
三、Spring的相关练习
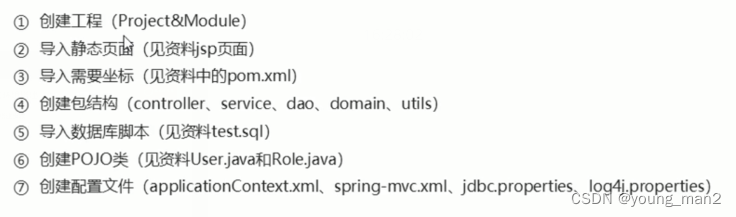
1.Spring练习环境搭建
1.1环境搭建步骤
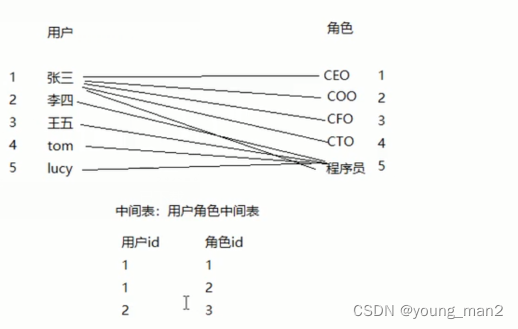
1.2 用户和角色之间的关系
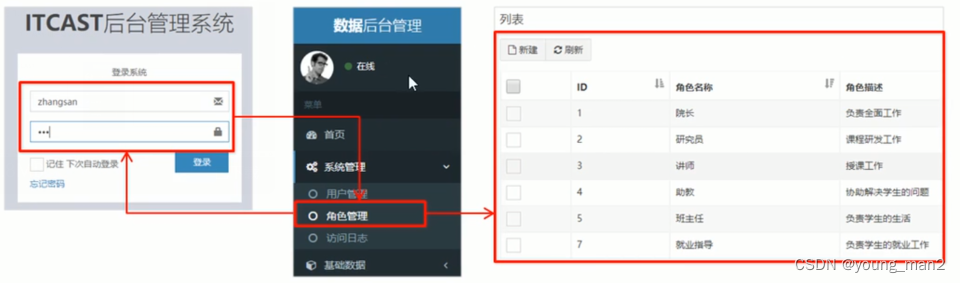
2. 角色列表展示和添加操作
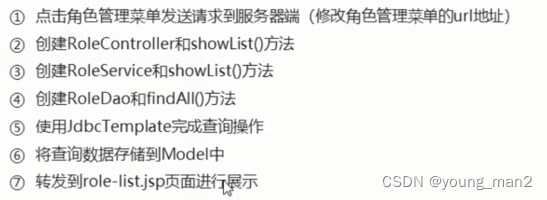
2.1 角色列表的展示步骤分析
总结
提示:这里对文章进行总结:
例如:以上就是今天要讲的内容,本文仅仅简单介绍了pandas的使用,而pandas提供了大量能使我们快速便捷地处理数据的函数和方法。


 被折叠的 条评论
为什么被折叠?
被折叠的 条评论
为什么被折叠?
 到【灌水乐园】发言


