


springsecurity过滤器链中重要的三个过滤器

UsernamePasswordAuthenticationFilter此过滤器用来认证(通俗的讲用来判断此用户是否是本系统中的用户)
ExceptionTranslationFilter此过滤器用来处理过滤器链中抛出的任何异常,它将捕获的异常转换为Spring Security的标准异常类型,比如 AuthenticationException(认证异常)和 AccessDeniedException(访问拒绝异常)等。
FilterSecurityInterceptor此过滤器用来授权,权限不够的访问会被拦截且抛状态码为401的异常
springboot集成springsecurity认证过程默认流程图
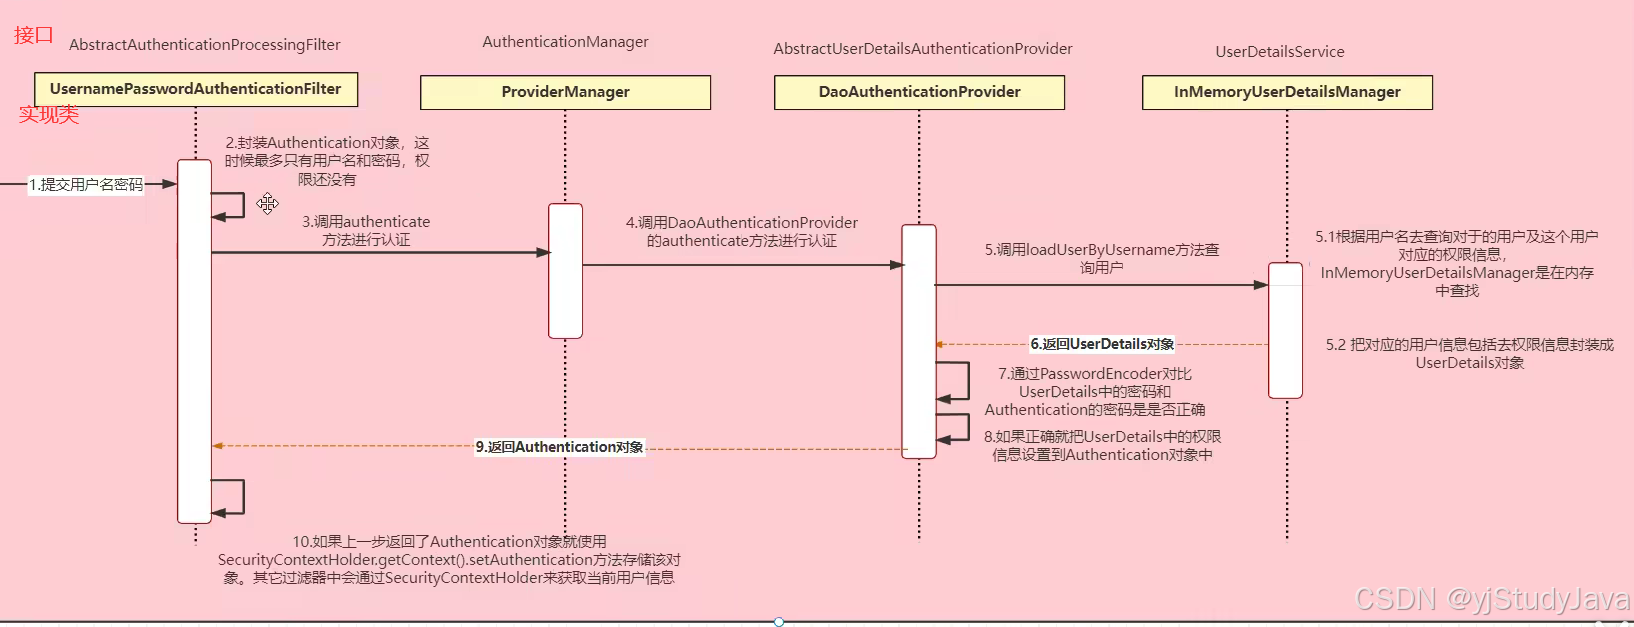
此流程图主要是针对认证过程的,我们通过追踪源码的方式了解过程
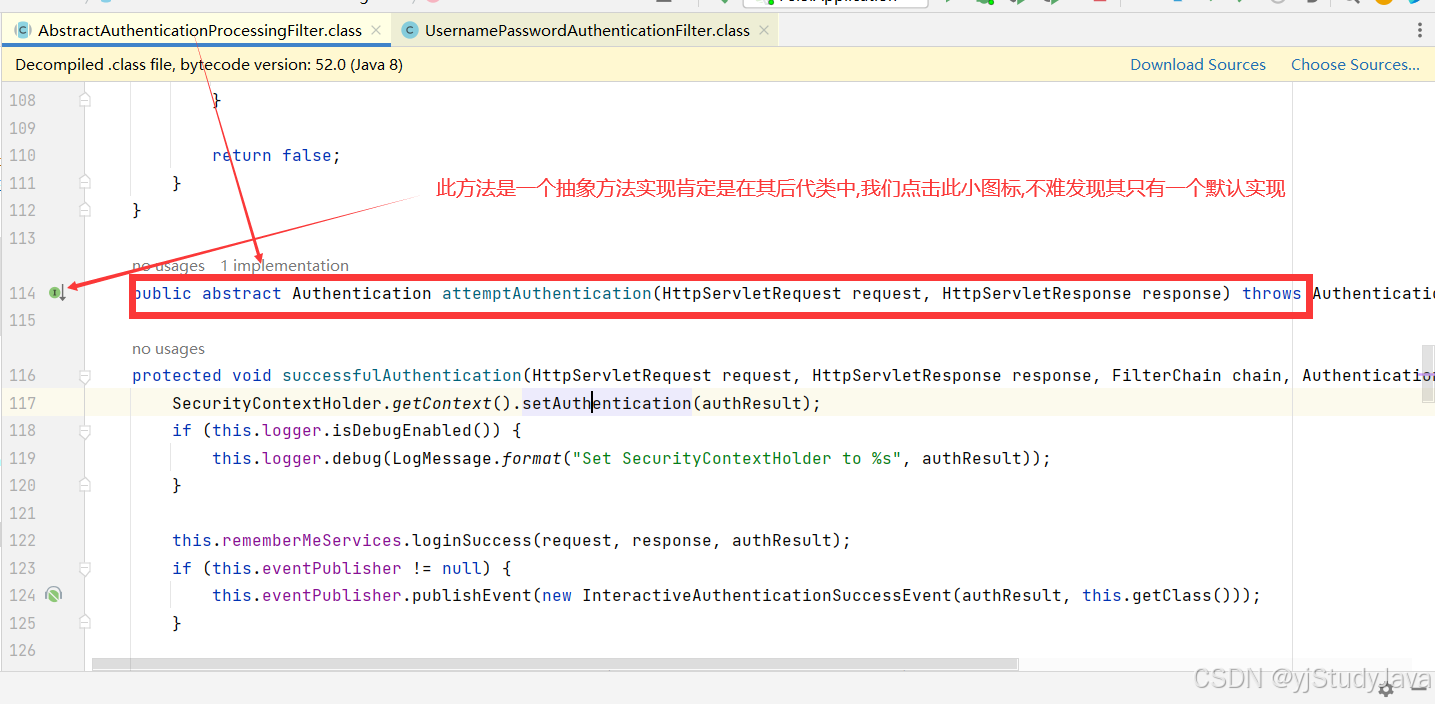
1.接收到用户名和密码,这个过程我们肯定会经过AbstractAuthenticationProcessingFilter过滤器,让我们来看一下他是怎么做的
public abstract class AbstractAuthenticationProcessingFilter extends GenericFilterBean implements ApplicationEventPublisherAware, MessageSourceAware {
   //过滤器的doFilter方法,调用本类的重载方法
   public void doFilter(ServletRequest request, ServletResponse response, FilterChain chain) throws IOException, ServletException {
       this.doFilter((HttpServletRequest)request, (HttpServletResponse)response, chain);
   }

   private void doFilter(HttpServletRequest request, HttpServletResponse response, FilterChain chain) throws IOException, ServletException {
       //如果没有认证对象(表示没有认证)
       if (!this.requiresAuthentication(request, response)) {
           //直接放行
           chain.doFilter(request, response);
       } else {
           try {
               //尝试认证方法attemptAuthentication()通过源码我们不难看出这恶鬼方法是此抽象类中的抽象方法,其具体实				  现肯定在其子类中实现
               Authentication authenticationResult = this.attemptAuthentication(request, response);
               if (authenticationResult == null) {
                   return;
               }

               this.sessionStrategy.onAuthentication(authenticationResult, request, response);
               if (this.continueChainBeforeSuccessfulAuthentication) {
                   chain.doFilter(request, response);
               }

               this.successfulAuthentication(request, response, chain, authenticationResult);
           } catch (InternalAuthenticationServiceException var5) {
               this.logger.error("An internal error occurred while trying to authenticate the user.", var5);
               this.unsuccessfulAuthentication(request, response, var5);
           } catch (AuthenticationException var6) {
               this.unsuccessfulAuthentication(request, response, var6);
           }

       }
   }
}
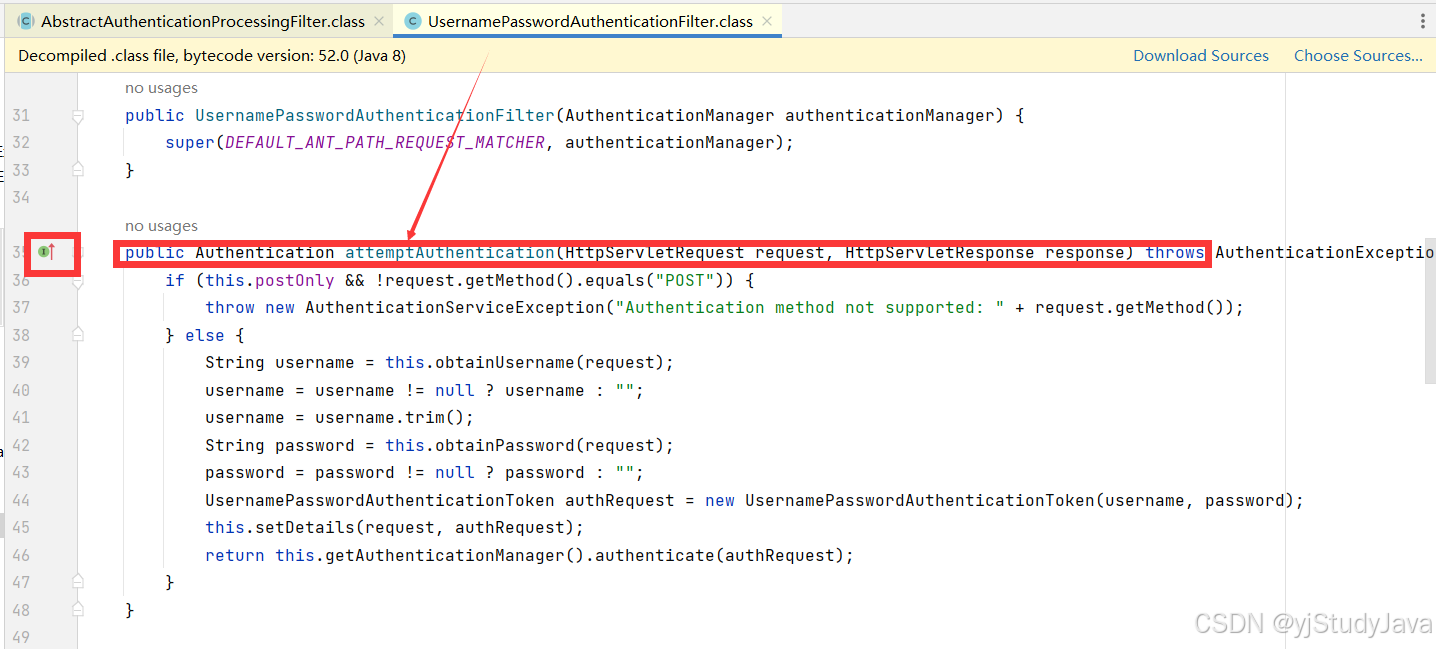
我们来看具体代码
public Authentication attemptAuthentication(HttpServletRequest request, HttpServletResponse response) throws AuthenticationException {
        if (this.postOnly && !request.getMethod().equals("POST")) {
            throw new AuthenticationServiceException("Authentication method not supported: " + request.getMethod());
        } else {
            //下面的代码在获取用户名及密码
            String username = this.obtainUsername(request);
            username = username != null ? username : "";
            username = username.trim();
            String password = this.obtainPassword(request);
            password = password != null ? password : "";
            //把用户名及密码封装到了一个类中我们可以去探索一下
            UsernamePasswordAuthenticationToken authRequest = new UsernamePasswordAuthenticationToken(username, password);
            this.setDetails(request, authRequest);
            //获取认证管理器,调用认证方法
            return this.getAuthenticationManager().authenticate(authRequest);
        }
    }
2.将接收到的用户名和密码封装成一个Authentication对象


由此可以得出UsernamePasswordAuthenticationToken是Authentication的子类,那么authRequest就是Authentication对象,第二步完成
3.调用authenticate()方法认证
我们同样可以在UsernamePasswordAuthenticationFilter的源码中得到答案
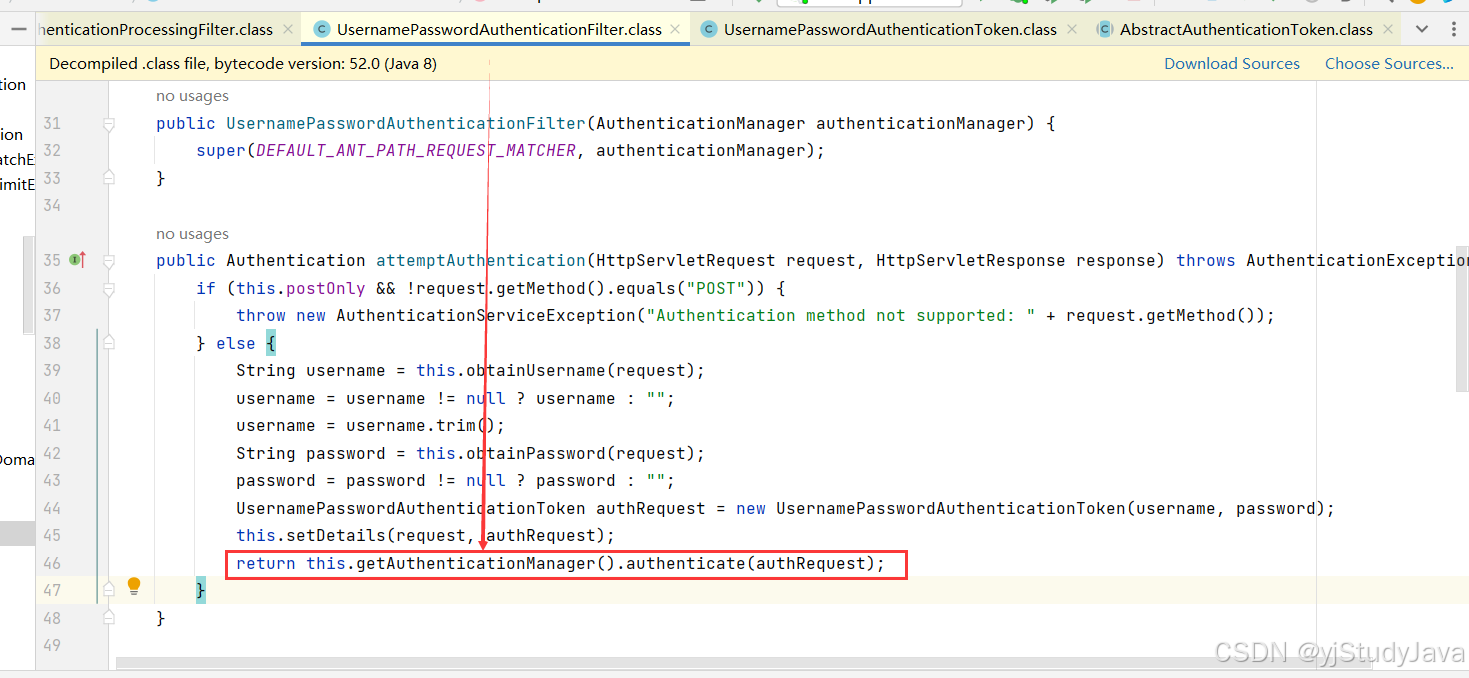
UsernamePasswordAuthenticationToken authRequest = new UsernamePasswordAuthenticationToken(username, password);
this.setDetails(request, authRequest);
return this.getAuthenticationManager().authenticate(authRequest);
4.我们来看看getAuthenticationManager()到底获取的是哪一个验证管理器
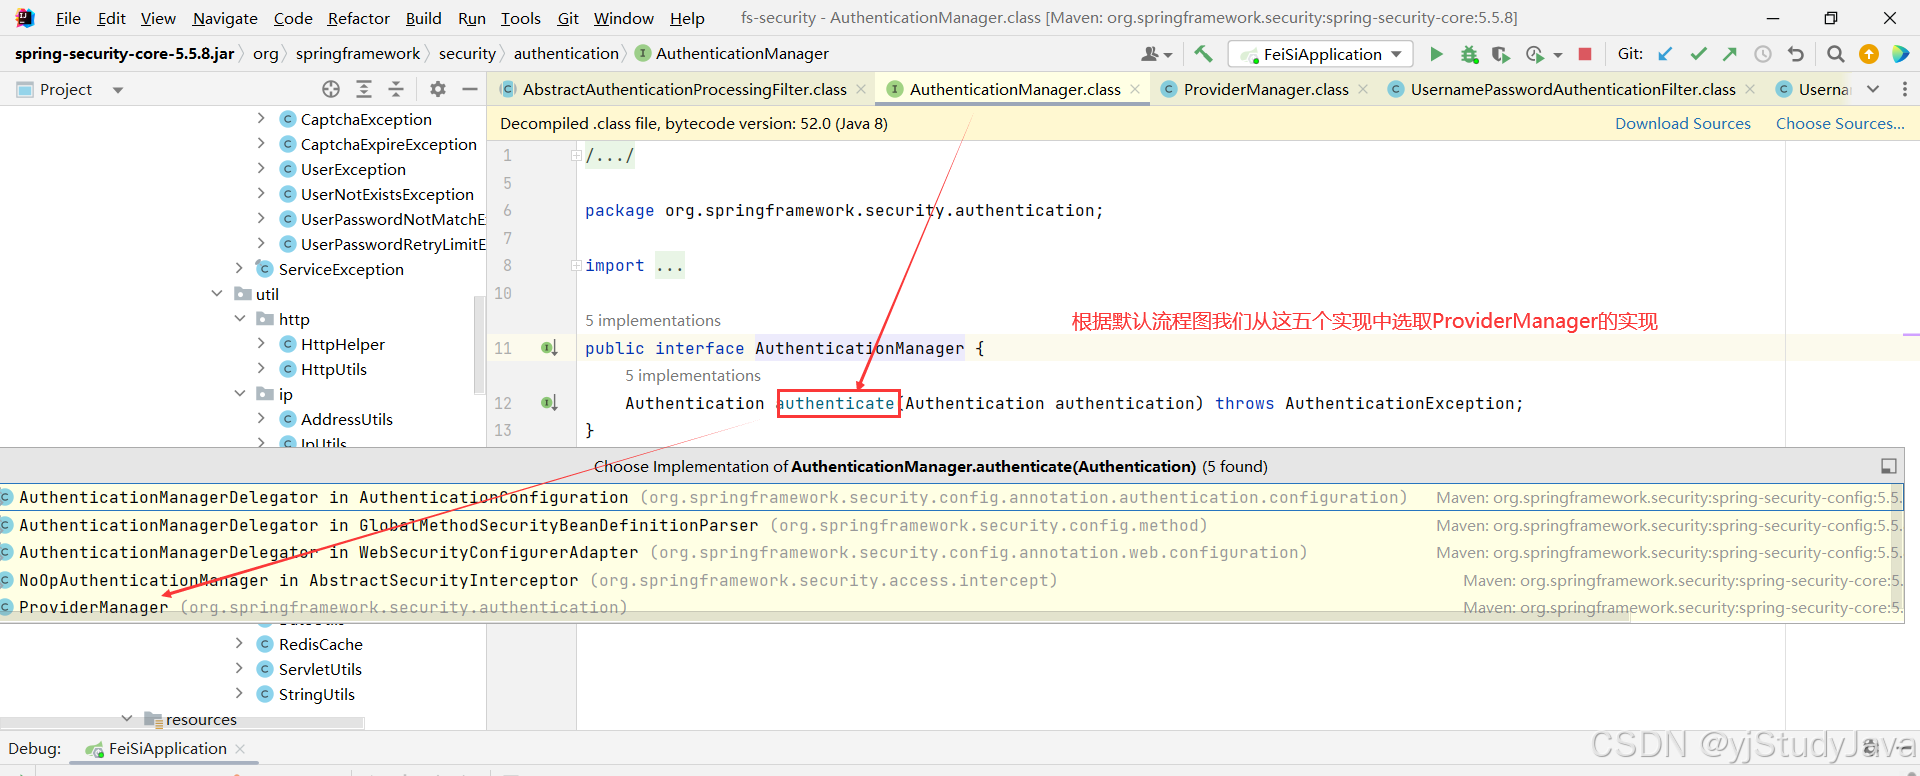
public class ProviderManager implements AuthenticationManager, MessageSourceAware, InitializingBean {
    public Authentication authenticate(Authentication authentication) throws AuthenticationException {
        Class<? extends Authentication> toTest = authentication.getClass();
        AuthenticationException lastException = null;
        AuthenticationException parentException = null;
        Authentication result = null;
        Authentication parentResult = null;
        int currentPosition = 0;
        //认证器集合
        int size = this.providers.size();
        Iterator var9 = this.getProviders().iterator();
        //使用迭代器遍历认证器(因为springsecurity支持很多种认证,具体可以看官网其中包括但不限于http、ldap等等)
        while(var9.hasNext()) {
            AuthenticationProvider provider = (AuthenticationProvider)var9.next();
            //这里判断此认证器支持此认证对象么
            if (provider.supports(toTest)) {
                if (logger.isTraceEnabled()) {
                    Log var10000 = logger;
                    String var10002 = provider.getClass().getSimpleName();
                    ++currentPosition;
                    var10000.trace(LogMessage.format("Authenticating request with %s (%d/%d)", var10002, currentPosition, size));
                }

                try {
                    //支持的话就直接调用此认证器的认证方法了,注意此认证器是AuthenticationProvider类
                    //根据流程图我们可以推断这里是AbstractUserDetailsAuthenticationProvider的子类
                    //DaoAuthenticationProvider
                    result = provider.authenticate(authentication);
                    if (result != null) {
                        this.copyDetails(authentication, result);
                        break;
                    }
                } catch (InternalAuthenticationServiceException | AccountStatusException var14) {
                    this.prepareException(var14, authentication);
                    throw var14;
                } catch (AuthenticationException var15) {
                    lastException = var15;
                }
            }
        }

        if (result == null && this.parent != null) {
            try {
                parentResult = this.parent.authenticate(authentication);
                result = parentResult;
            } catch (ProviderNotFoundException var12) {
            } catch (AuthenticationException var13) {
                parentException = var13;
                lastException = var13;
            }
        }

        if (result != null) {
            if (this.eraseCredentialsAfterAuthentication && result instanceof CredentialsContainer) {
                ((CredentialsContainer)result).eraseCredentials();
            }

            if (parentResult == null) {
                this.eventPublisher.publishAuthenticationSuccess(result);
            }

            return result;
        } else {
            if (lastException == null) {
                lastException = new ProviderNotFoundException(this.messages.getMessage("ProviderManager.providerNotFound", new Object[]{toTest.getName()}, "No AuthenticationProvider found for {0}"));
            }

            if (parentException == null) {
                this.prepareException((AuthenticationException)lastException, authentication);
            }

            throw lastException;
        }
    }
}
如果一切正常的话那我们就会执行这一行代码
try {
                    //支持的话就直接调用此认证器的认证方法了
                    result = provider.authenticate(authentication);
                    if (result != null) {
                        this.copyDetails(authentication, result);
                        break;
                    }
                } catch (InternalAuthenticationServiceException | AccountStatusException var14) {
                    this.prepareException(var14, authentication);
                    throw var14;
                } catch (AuthenticationException var15) {
                    lastException = var15;
                }

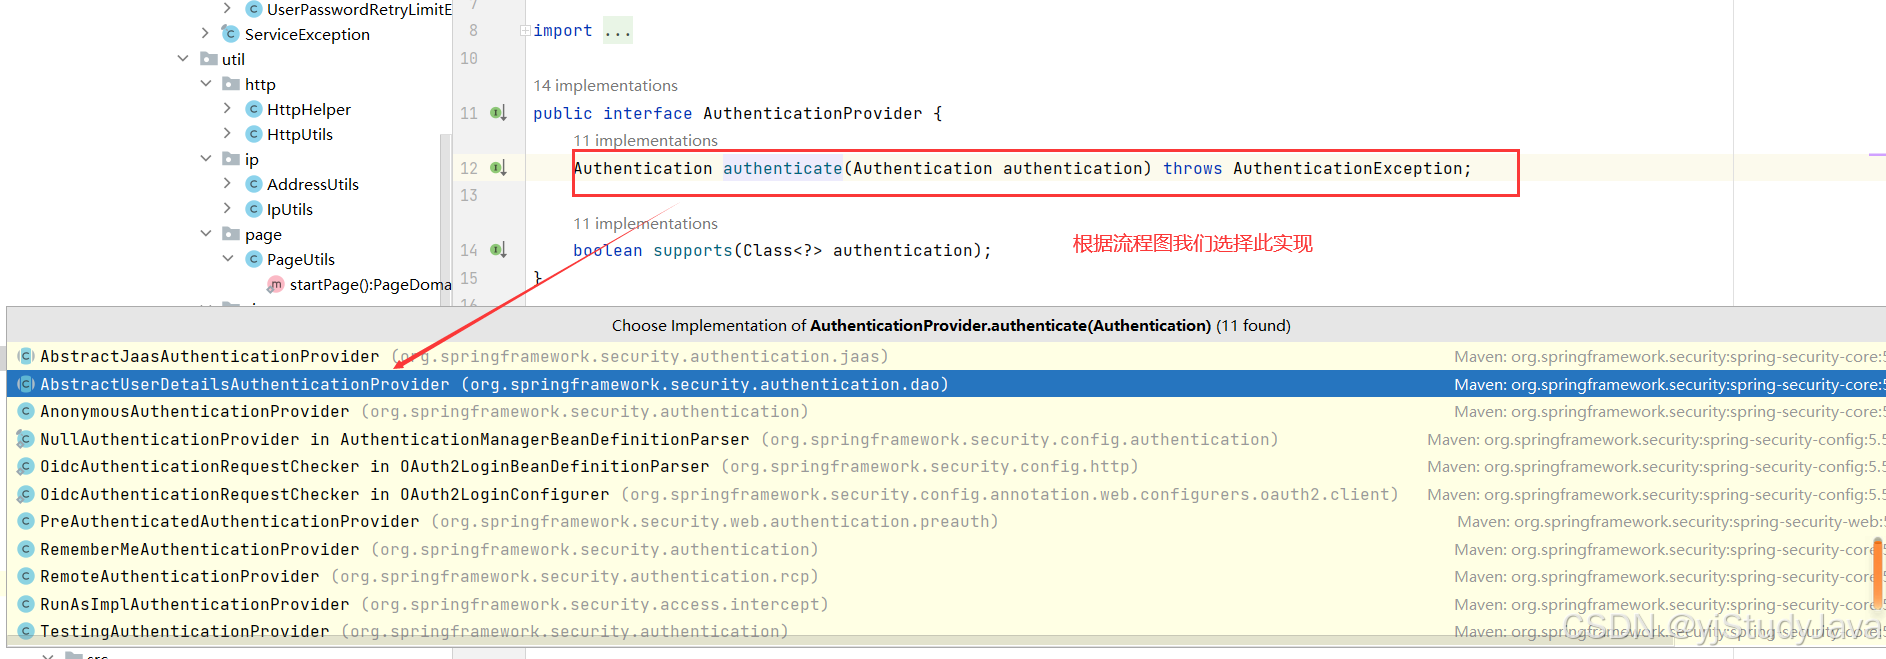
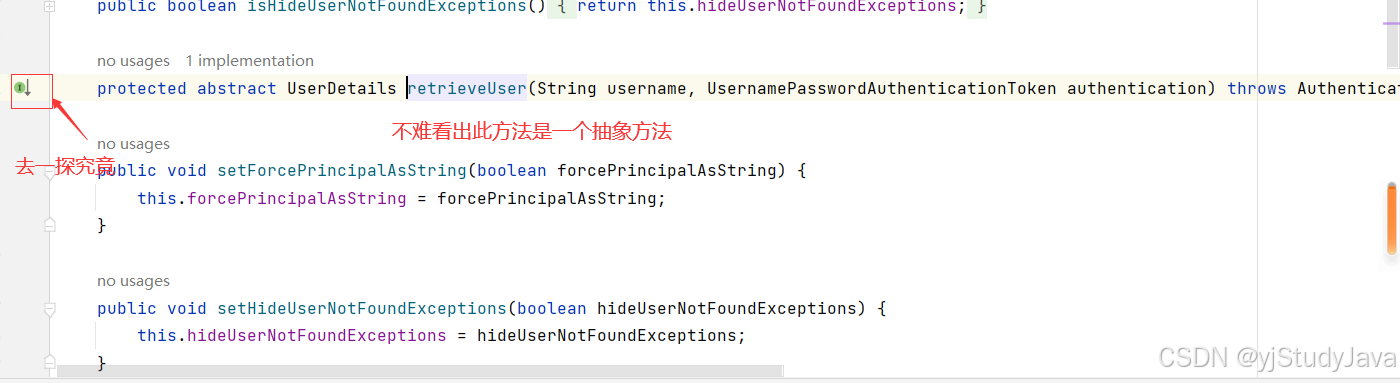
public abstract class AbstractUserDetailsAuthenticationProvider implements AuthenticationProvider, InitializingBean, MessageSourceAware {
    protected final Log logger = LogFactory.getLog(this.getClass());
    protected MessageSourceAccessor messages = SpringSecurityMessageSource.getAccessor();
    private UserCache userCache = new NullUserCache();
    private boolean forcePrincipalAsString = false;
    protected boolean hideUserNotFoundExceptions = true;
    private UserDetailsChecker preAuthenticationChecks = new DefaultPreAuthenticationChecks();
    private UserDetailsChecker postAuthenticationChecks = new DefaultPostAuthenticationChecks();
    private GrantedAuthoritiesMapper authoritiesMapper = new NullAuthoritiesMapper();

    public AbstractUserDetailsAuthenticationProvider() {

    }
    //抽象方法给其子类具体实现(认证检查方法这里用于密码的校验)
    protected abstract void additionalAuthenticationChecks(UserDetails userDetails, UsernamePasswordAuthenticationToken authentication) throws AuthenticationException;

    public final void afterPropertiesSet() throws Exception {
        Assert.notNull(this.userCache, "A user cache must be set");
        Assert.notNull(this.messages, "A message source must be set");
        this.doAfterPropertiesSet();
    }
    public Authentication authenticate(Authentication authentication) throws AuthenticationException {
        Assert.isInstanceOf(UsernamePasswordAuthenticationToken.class, authentication, () -> {
            return this.messages.getMessage("AbstractUserDetailsAuthenticationProvider.onlySupports", "Only UsernamePasswordAuthenticationToken is supported");
        });
        String username = this.determineUsername(authentication);
        boolean cacheWasUsed = true;
        UserDetails user = this.userCache.getUserFromCache(username);
        if (user == null) {
            cacheWasUsed = false;

            try {
                //重点是这个方法,通过用户名获取用户信息,
                user = this.retrieveUser(username, (UsernamePasswordAuthenticationToken)authentication);
            } catch (UsernameNotFoundException var6) {
                this.logger.debug("Failed to find user '" + username + "'");
                if (!this.hideUserNotFoundExceptions) {
                    throw var6;
                }

                throw new BadCredentialsException(this.messages.getMessage("AbstractUserDetailsAuthenticationProvider.badCredentials", "Bad credentials"));
            }

            Assert.notNull(user, "retrieveUser returned null - a violation of the interface contract");
        }

        try {
            this.preAuthenticationChecks.check(user);
            this.additionalAuthenticationChecks(user, (UsernamePasswordAuthenticationToken)authentication);
        } catch (AuthenticationException var7) {
            if (!cacheWasUsed) {
                throw var7;
            }

            cacheWasUsed = false;
            user = this.retrieveUser(username, (UsernamePasswordAuthenticationToken)authentication);
            this.preAuthenticationChecks.check(user);
            this.additionalAuthenticationChecks(user, (UsernamePasswordAuthenticationToken)authentication);
        }

        this.postAuthenticationChecks.check(user);
        if (!cacheWasUsed) {
            this.userCache.putUserInCache(user);
        }

        Object principalToReturn = user;
        if (this.forcePrincipalAsString) {
            principalToReturn = user.getUsername();
        }

        return this.createSuccessAuthentication(principalToReturn, authentication, user);
    }
}


5.我们看看AuthenticationProvider类是怎么执行认证方法的,由流程图不难得出此实现类是DaoAuthenticationProvider,我们来看看这个类,聊一下这个类
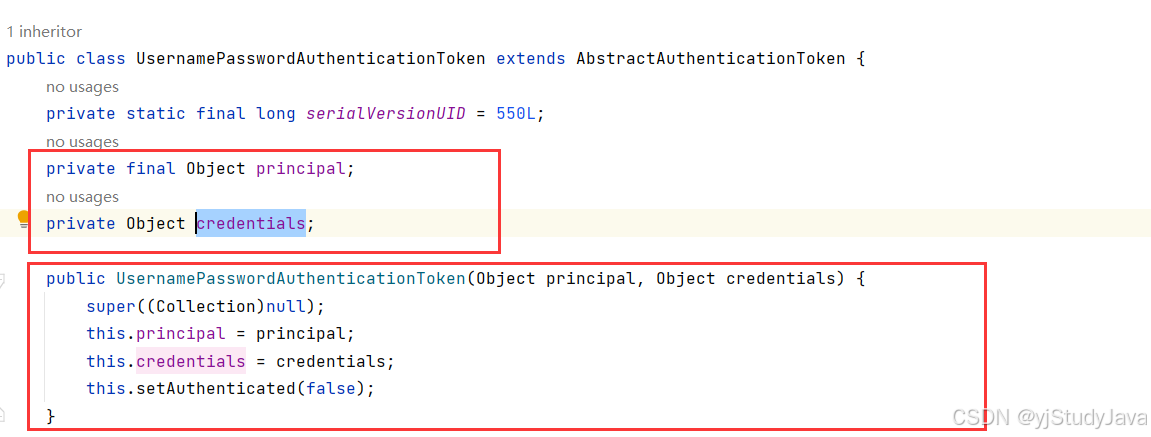
public class DaoAuthenticationProvider extends AbstractUserDetailsAuthenticationProvider {
    private static final String USER_NOT_FOUND_PASSWORD = "userNotFoundPassword";
    //密码编码器
    private PasswordEncoder passwordEncoder;
    private volatile String userNotFoundEncodedPassword;
    //用户细节service
    private UserDetailsService userDetailsService;
    private UserDetailsPasswordService userDetailsPasswordService;

    //上述两个属性是可以在流程图中看到的,很重要的两个步骤所需要的类


    //构造方法,设置密码编码器
    public DaoAuthenticationProvider() {
        this.setPasswordEncoder(PasswordEncoderFactories.createDelegatingPasswordEncoder());
    }
    //实现了AbstractUserDetailsAuthenticationProvider的抽象方法,用于密码校验
    protected void additionalAuthenticationChecks(UserDetails userDetails, UsernamePasswordAuthenticationToken authentication) throws AuthenticationException {
        //getCredentials()
        //要知道UsernamePasswordAuthenticationToken authRequest = new UsernamePasswordAuthenticationToken(username, password); 因为前面我们说了UsernamePasswordAuthenticationToken就是Authentication的子类所以我们这里可以理解为用username和password分别给
        //principal和credentials赋值,我们可以去下面的图片求证
        //所以这里就是判断密码是否为空
        if (authentication.getCredentials() == null) {
            this.logger.debug("Failed to authenticate since no credentials provided");
            throw new BadCredentialsException(this.messages.getMessage("AbstractUserDetailsAuthenticationProvider.badCredentials", "Bad credentials"));
        } else {
            String presentedPassword = authentication.getCredentials().toString();
            //利用passwordEncoder中的matches方法校验密码正确性
            if (!this.passwordEncoder.matches(presentedPassword, userDetails.getPassword())) {
                this.logger.debug("Failed to authenticate since password does not match stored value");
                throw new BadCredentialsException(this.messages.getMessage("AbstractUserDetailsAuthenticationProvider.badCredentials", "Bad credentials"));
            }
        }
    }
    //重写了父类中的retrieveUser用于通过用户名获取用户信息
   protected final UserDetails retrieveUser(String username, UsernamePasswordAuthenticationToken authentication) throws AuthenticationException {
        this.prepareTimingAttackProtection();

        try {
            //这里的this.getUserDetailsService()在流程图中获取的是默认的
            UserDetails loadedUser = this.getUserDetailsService().loadUserByUsername(username);
            if (loadedUser == null) {
                throw new InternalAuthenticationServiceException("UserDetailsService returned null, which is an interface contract violation");
            } else {
                return loadedUser;
            }
        } catch (UsernameNotFoundException var4) {
            this.mitigateAgainstTimingAttack(authentication);
            throw var4;
        } catch (InternalAuthenticationServiceException var5) {
            throw var5;
        } catch (Exception var6) {
            throw new InternalAuthenticationServiceException(var6.getMessage(), var6);
        }
    }
}
我们发现这里默认实现类是InMemoryUserDetailsManager
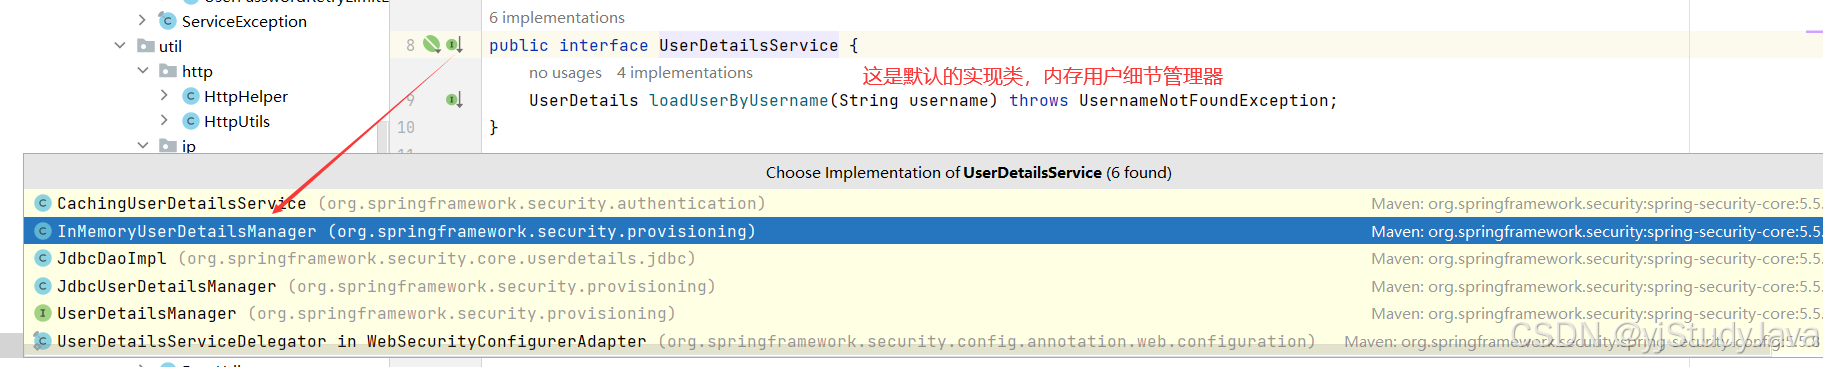
这样是非常不合适的,符合我们日常开发的常理是,用户信息用关系型数据库mysql存储,所以我们不妨模仿此默认实现,自定义一个UserDetailsService,这样就可以实现从数据库中查询了,当然我们不能忘记需要让springsecurity框架接收并使用我们自定义的UserDetailsService,这种操作简直就是spring集成自定义或者第三方框架时的经典操作:
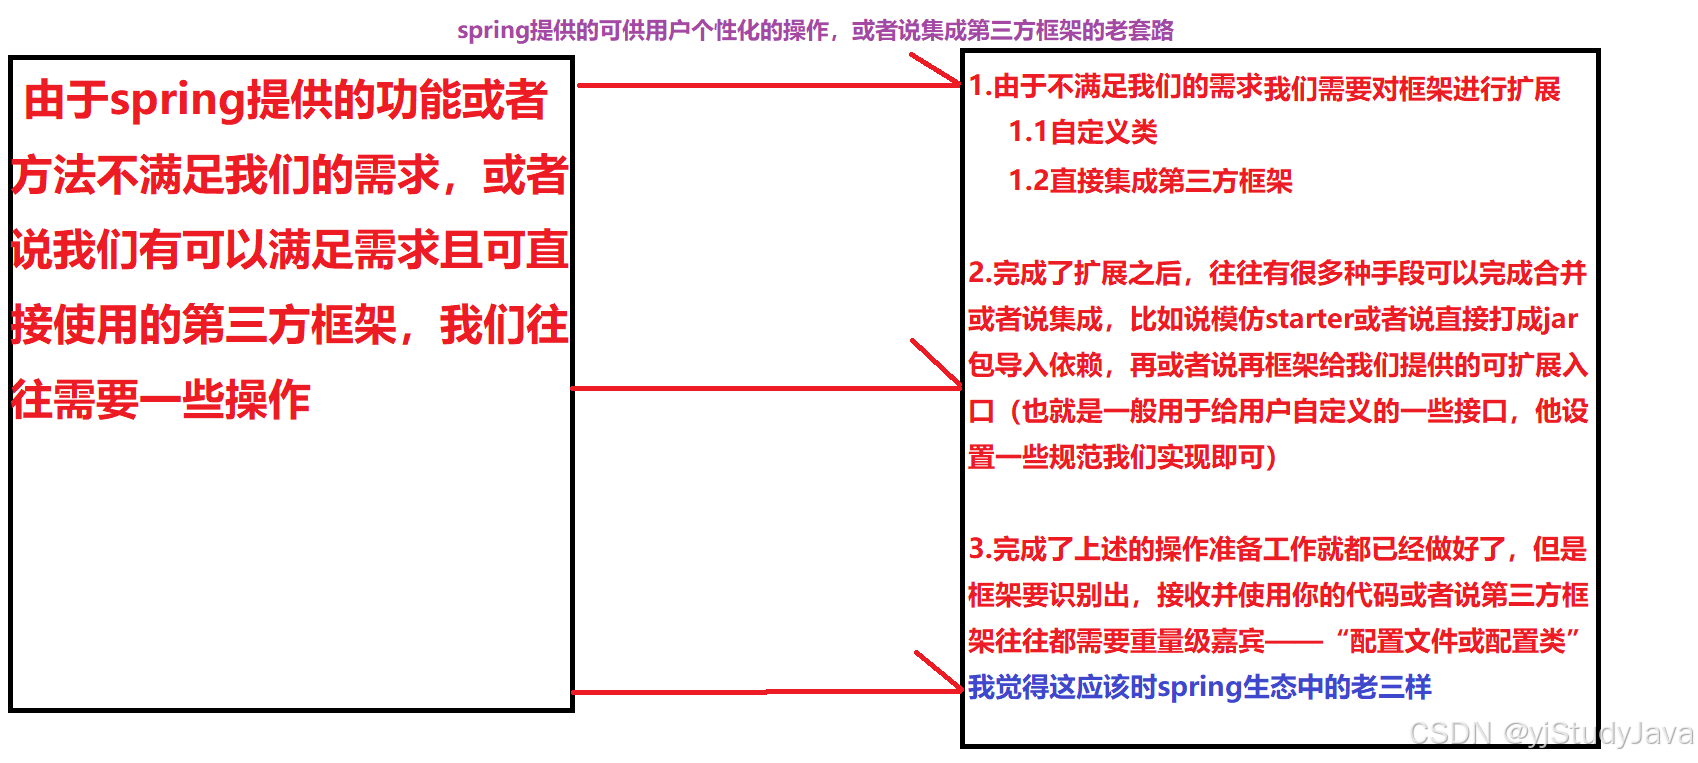
所以这里由于springsecurity的流程不符合我们的实际需求,所以我们也一样需要走上面的老三样:
按照我们自己的需求:
1.我们的用户信息存在数据库中
2.我们的密码加密方式和springsecurity提供的默认加密方式并不相同
3.我们在实现认证以及授权之后不只需要将认证对象存入springsecurity上下文中,还需要返回token给前端
为了这三个需求我们大概要做的事情按照上面的图片老三样应该能推断一二了
首先解决用户信息的获取途径,上面有说到,我们需要自定义UserDetailsService,当然就需要将他放入到springioc容器中且需要找一个入口,将其融入springsecurity中,从上面的源码分析我们可以知道AbstractUserDetailsAuthenticationProvider的子类DaoAuthenticationProvider中有UserDetailsService属性,还有PasswordEncoder属性,所以说到这我们的第二个需求是不是也一并解决了? 自定义一个配置类继承WebSecurityConfigurerAdapter(web安全配置适配器),让我们来看看这个类(有删减,挑重要的说)
public abstract class WebSecurityConfigurerAdapter implements WebSecurityConfigurer<WebSecurity> {
    private AuthenticationConfiguration authenticationConfiguration;
    private AuthenticationManagerBuilder authenticationBuilder;
    private AuthenticationManagerBuilder localConfigureAuthenticationBldr;
    private boolean disableLocalConfigureAuthenticationBldr;
    private boolean authenticationManagerInitialized;
    private AuthenticationManager authenticationManager;
    private AuthenticationTrustResolver trustResolver;
    private HttpSecurity http;
    private boolean disableDefaults;

    protected WebSecurityConfigurerAdapter(boolean disableDefaults) {
        this.logger = LogFactory.getLog(WebSecurityConfigurerAdapter.class);
        this.contentNegotiationStrategy = new HeaderContentNegotiationStrategy();
        this.objectPostProcessor = new ObjectPostProcessor<Object>() {
            public <T> T postProcess(T object) {
                throw new IllegalStateException(ObjectPostProcessor.class.getName() + " is a required bean. Ensure you have used @EnableWebSecurity and @Configuration");
            }
        };
        this.trustResolver = new AuthenticationTrustResolverImpl();
        this.disableDefaults = disableDefaults;
    }

    //这个反法是关键,是我们将UserDetailsService和PasswordEncoder融入其中的关键,具体实现在下面的代码片段中
    protected void configure(AuthenticationManagerBuilder auth) throws Exception {
        this.disableLocalConfigureAuthenticationBldr = true;
    }

    //这个方法返回的是一个AuthenticationManager,从流程中我们可以知道此类的重要性,在满足我们第三个需求的时候这个类显得格外的重要。所以我们肯定需要将这个类放入springioc容器中
    public AuthenticationManager authenticationManagerBean() throws Exception {
        return new AuthenticationManagerDelegator(this.authenticationBuilder, this.context);
    }
}
@SpringBootConfiguration public class SpringSecurityConfig extends WebSecurityConfigurerAdapter { //注入自定义的UserDetailsService @Autowired private UserDetailsServiceImpl userDetailsService; @Override protected void configure(AuthenticationManagerBuilder auth) throws Exception { // super.configure(auth); //把自定义的UserDetailsService的bean 交给认证管理器 auth.userDetailsService(userDetailsService).passwordEncoder(passwordEncoder()); } //将我们自定义的PasswordEncoder注册进入springioc容器中 @Bean public PasswordEncoder passwordEncoder(){ return new MyPasswordEncoder(); } /** * 解决 无法直接注入 AuthenticationManager * * @return * @throws Exception */ @Bean @Override public AuthenticationManager authenticationManagerBean() throws Exception { return super.authenticationManagerBean(); } //这些代码就是用于设置springsecurity的规则 @Override protected void configure(HttpSecurity httpSecurity) throws Exception { httpSecurity // CSRF禁用,因为不使用session .csrf().disable() // 禁用HTTP响应标头 .headers().cacheControl().disable().and() // 基于token,所以不需要session .sessionManagement().sessionCreationPolicy(SessionCreationPolicy.STATELESS).and() // 过滤请求 .authorizeRequests() // 对于登录login 注册register 验证码captchaImage 允许匿名访问 .antMatchers("/login", "/register", "/captchaImage").permitAll() // 静态资源,可匿名访问 .antMatchers(HttpMethod.GET, "/", "/*.html", "/**/*.html", "/**/*.css", "/**/*.js", "/profile/**").permitAll() .antMatchers("/swagger-ui.html", "/swagger-resources/**", "/webjars/**", "/*/api-docs", "/druid/**").permitAll() // 除上面外的所有请求全部需要鉴权认证 .anyRequest().authenticated() .and() .headers().frameOptions().disable(); } }自此前两个需求基本完成了
还有第三个需求,我们灵机一动想到,我们需要上面流程图中的后面部分,但是接收用户名及密码这些操作需要在我们自己定义的api接口中完成,按照这样说我们好像不太需要UsernamePasswordAuthenticationFilter或者说需要在它之前或之后做些什么,所以有什么办法呢?看下列代码我们来分析一下
public class UsernamePasswordAuthenticationFilter extends AbstractAuthenticationProcessingFilter {
    public static final String SPRING_SECURITY_FORM_USERNAME_KEY = "username";
    public static final String SPRING_SECURITY_FORM_PASSWORD_KEY = "password";
    private static final AntPathRequestMatcher DEFAULT_ANT_PATH_REQUEST_MATCHER = new AntPathRequestMatcher("/login", "POST");
    private String usernameParameter = "username";
    private String passwordParameter = "password";
    private boolean postOnly = true;


	public Authentication attemptAuthentication(HttpServletRequest request, HttpServletResponse response) throws AuthenticationException {
        if (this.postOnly && !request.getMethod().equals("POST")) {
            throw new AuthenticationServiceException("Authentication method not supported: " + request.getMethod());
        } else {
            //-------------------------------------------------
            String username = this.obtainUsername(request);
            username = username != null ? username : "";
            username = username.trim();
            String password = this.obtainPassword(request);
            password = password != null ? password : "";
            //--------------------------------------------------
            UsernamePasswordAuthenticationToken authRequest = new UsernamePasswordAuthenticationToken(username, password);

            this.setDetails(request, authRequest);
            return this.getAuthenticationManager().authenticate(authRequest);
        }
    }
}
不难看出我分隔出来的代码不过就是在接收用户名和密码,真正的重点时将这两个信息封装在UsernamePasswordAuthenticationToken中所以我们反过来想想我们在我们自定义的api接口中可以直接这样封装我们从前端接收到的用户名和密码且执行这行代码return this.getAuthenticationManager().authenticate(authRequest);也就是执行UsernamePasswordAuthenticationFilter这之后的流程
所以我们还是可以做到第三个需求的,代码细节无非就是结合流程图写代码,什么时候该干啥事自己心里有个数就行了。


 2428
2428

 被折叠的 条评论
为什么被折叠?
被折叠的 条评论
为什么被折叠?
 到【灌水乐园】发言


