### MiniXception模型介绍
MiniXception是一种轻量级卷积神经网络架构,专为实时面部表情识别设计[^1]。该模型基于更广泛的Xception架构构建,后者是对Google Inception系列架构的一种改进版本[^2]。
#### 架构特点
- **深度可分离卷积层**:与标准卷积不同的是,Xception及其衍生模型采用了一种称为“深度可分离”的方法来减少计算成本并提高效率。
- **紧凑的设计**:为了适应资源受限环境下的部署需求,mini_XCEPTION通过简化原版Xception中的某些组件,在保持良好性能的同时显著降低了参数数量和运算复杂度。
```python
from keras.layers import Conv2D, DepthwiseConv2D, BatchNormalization, Activation, Input
from keras.models import Model
def mini_XCEPTION(input_shape=(48, 48, 1), num_classes=7):
img_input = Input(shape=input_shape)
# Entry flow
x = _conv_block(img_input, 32, kernel_size=3, strides=2)
x = _depthwise_conv_block(x, 64)
# Middle flow with depthwise separable convolutions
for i in range(4):
residual = x
prefix = 'residual_{}'.format(i + 1)
x = _depthwise_conv_block(x, 128, block_id=prefix + '_a')
x = _depthwise_conv_block(x, 128, block_id=prefix + '_b')
x = add([x, residual])
# Exit flow
x = _depthwise_conv_block(x, 512)
# Classification layer
x = GlobalAveragePooling2D()(x)
output = Dense(num_classes, activation='softmax')(x)
model = Model(inputs=img_input, outputs=output)
return model
def _conv_block(inputs, filters, alpha=1.0, kernel_size=3, strides=1):
channel_axis = 1 if K.image_data_format() == 'channels_first' else -1
x = ZeroPadding2D(padding=((0, 1), (0, 1)))(inputs)
x = Conv2D(filters,
kernel_size,
padding='valid',
use_bias=False,
strides=strides)(x)
x = BatchNormalization(axis=channel_axis)(x)
return Activation('relu')(x)
def _depthwise_conv_block(inputs, pointwise_filters, alpha=1.0, strides=1, block_id=None):
channel_axis = 1 if K.image_data_format() == 'channels_first' else -1
if strides == 1:
x = inputs
else:
x = ZeroPadding2D(((0, 1), (0, 1)))(inputs)
x = DepthwiseConv2D((3, 3),
padding='same' if strides == 1 else 'valid',
depth_multiplier=alpha,
strides=strides,
use_bias=False)(x)
x = BatchNormalization(axis=channel_axis)(x)
x = Activation('relu')(x)
x = Conv2D(pointwise_filters,
kernel_size=1,
padding='same',
use_bias=False,
strides=1)(x)
x = BatchNormalization(axis=channel_axis)(x)
return Activation('relu')(x)
```
此代码片段展示了如何创建一个简单的`mini_XCEPTION`实例,并配置其输入形状以及类别数目。值得注意的是,这里实现了两个辅助函数 `_conv_block()` 和 `_depthwise_conv_block()` 来处理不同的卷积操作,从而使得主逻辑更加清晰易读。
#### 编译过程
在完成上述定义之后,可以使用如下方式对该模型进行编译:
```python
model.compile(optimizer='adam', loss='categorical_crossentropy', metrics=['accuracy'])
```
这一步骤指定了用于训练的优化算法(Adam)、损失函数(分类交叉熵),同时还设置了评估指标——准确性得分。


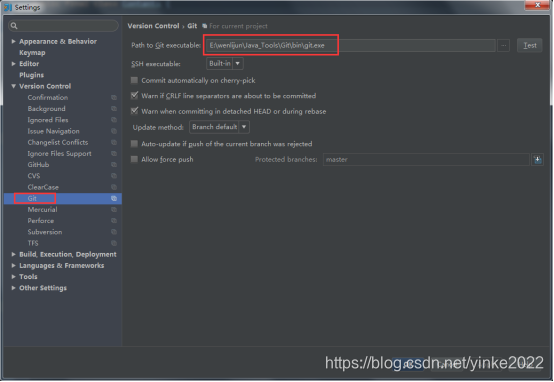
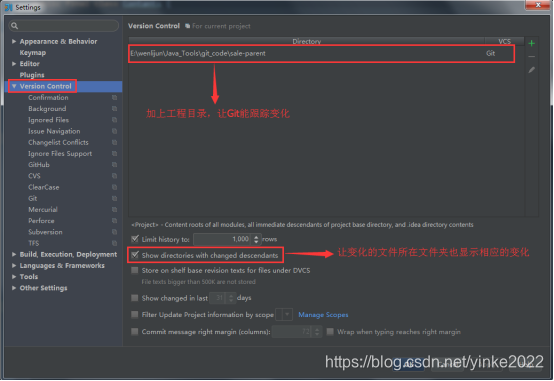
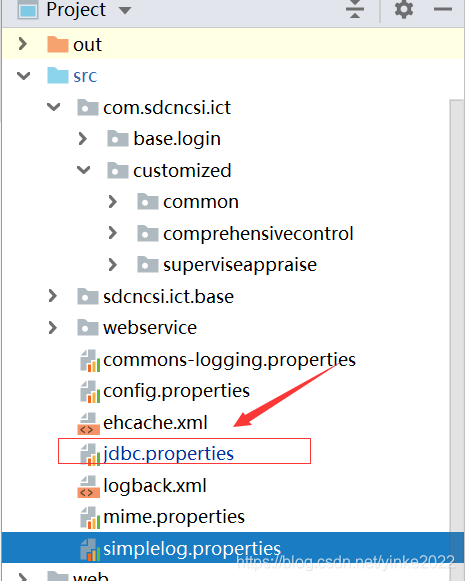
 本文介绍如何在IDE中设置版本控制,包括添加执行文件和工程目录,以便版本控制软件能跟踪文件和文件夹的变化,并高亮显示有差异的文件。


 1274
1274

 被折叠的 条评论
为什么被折叠?
被折叠的 条评论
为什么被折叠?
 到【灌水乐园】发言


