Install the Arduino IDE in Ubuntu 12.04

Ubuntu:Arduino IDE 开发环境配置【保姆级】 本章主要介绍在Ubuntu系统搭建Arduino IDE 开发环境 阅读详情

Install the Arduino IDE in Ubuntu 12.04

Installing the Arduino IDE in Ubuntu only takes a few minutes. As usual, it’s a better idea to install the Arduino straight from the source, instead of relying on the version in Ubuntu’s repository. While it wasn’t hard to install the Arduino IDE, I noticed that the Arduino GUI was really slow and laggy. This is because the startup script tells Java to use Ubuntu’s GTK look and feel, which makes everything run slowly. It’s easily fixed by changing a single line in the startup script.

Update: In the Arduino 1.0.1 update, “Serial Port” is greyed out. The fix is outlined in the troubleshooting section.

Install the Arduino IDE in Ubuntuarduino_logo

  1. Install gcc-avr, avr-libc and openjdk-6-jre if you don’t have it already.
  2. Plug in the board, see where it’s connected
  3. Download and unpack the Arduino IDEtarball
  4. Run the IDE
  5. Select your board model and serial port
  6. Run a sample program
  7. Fix the buggy interface (optional)
  8. Troubleshooting

Everything worked out of the box, other than the interface.

Install gcc-avr and avr-libc

Gcc-avr and avr-libc give your system the tools it needs to compile c into AVR machine code:

$ sudo apt-get install gcc-avr avr-libc

If you don’t have openjdk-6-jre already, install and configure that too:

$ sudo apt-get install openjdk-6-jre
$ sudo update-alternatives –config java
(select the correct JRE if you have more than one installed)

Once those are installed plug in your board and type  $ dmesg . It will print the kernel’s ring buffer and show you what USB port your Arduino is plugged into:

$ dmesg

– snip –
[226470.727790] usb 1-1.1: new full-speed USB device number 6 using ehci_hcd
[226470.861077] cdc_acm 1-1.1:1.0: ttyACM0: USB ACM device
[226470.861654] usbcore: registered new interface driver cdc_acm
[226470.861659] cdc_acm: USB Abstract Control Model driver for USB modems and ISDN adapters

According to dmesg, our board is plugged into ttyACM0.

Download and Run the Arduino IDE

Go to the downloads page on Arduino’s download page to get the latest Arduino IDE tarball (.tgz file) for your architecture. My laptop is 64-bit, so I chose accordingly. Once the file was finished downloading, I unzipped and ran it with the following command:

~/Downloads$ tar xzvf arduino-1.0.1-linux64.tgz
~/Downloads$ cd arduino-1.0.1
~/Downloads/arduino-1.0.1$ ./arduino
./arduino launches the Arduino IDE.

Select your board model and serial port

I’m using an Arduino MEGA 2560, so I went to Tools>Board>”Arduino Mega 2560 or Mega ADK.” At this point, I noticed that the GUI was really slow and hard to use. If you want to fix it before proceeding, exit the IDE and skip to the  ”Fixing the Interface” section before proceeding.

The IDE flashed an error about how my board wasn’t accessible over the COM1 port. COM1 usually refers to a 9-pin serial port, and my laptop doesn’t even have one. I went toTools>Serial Port and selected /dev/ttyACM0, which reflected the output I saw when I checked dmesg.

The errors went away, and I went to File>Examples>Basics>Blink and clicked upload. Sure enough, the LED started blinking. You should be ready to start writing and running Arduino programs!

Fix the Arduino IDE to make it run more smoothly in Ubuntu

Exit the Arduino IDE and go to the installation folder (the folder you unzipped from the .tgz file). Edit the “arduino” script in your favorite text editor. To make Arduino use the native Swing windowing instead of forcing the GTK look and feel, which is the cause of the bugginess, change the following line:

#comment out this line:
#java -Dswing.defaultlaf=com.sun.java.swing.plaf.gtk.GTKLookAndFeel processing.app.Base
#change it to this:
java processing.app.Base

Just delete the -D flag and its argument. Personally, I get nostalgic about the old-school Swing look and feel, but either way, it fixed all of the lagginess issues I was experiencing.arduino_ide_ubuntu
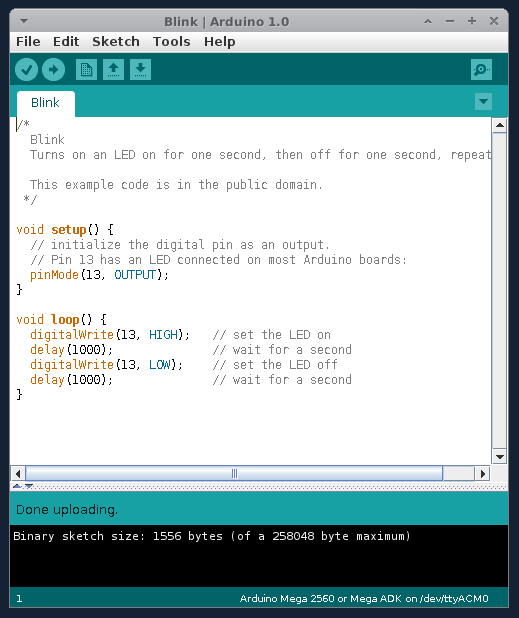
My Arduino IDE, running in Ubuntu (using SWT instead of GTK)

Troubleshooting USB and the grayed out Serial Port

When I got the Arduino 1.0.1 update, “Serial Port” was grayed out in the tools menu. Running arduino as root ( sudo ./arduino) resolved the issue, but it’s not an acceptable solution. In my case, serial port was grayed out because my user didn’t have permission to read and write to the device.

I added my user to the dialout group with the command  sudo usermod -a -G dialout mark . Usually, that would have fixed it but iserial port was still grayed out.

Changing the permissions on /dev/ttyACM0 to world readable and writeable fixed the grayed out serial port. I ran  sudo chmod a+rw /dev/ttyACM0 and the serial port menu worked again.

I’ve noticed that running programs that send lots of data over USB can cause issues with the arduino programming software, making it give errors while uploading code. Holding down the reset button fixed my upload and USB errors in most cases.

Further Reading

If you read nothing else before you start writing programs, look at the official Arduino Reference page. It might be the most concise, complete language reference I’ve ever seen.

保姆级教程:(树莓派4B+Ubuntu22.04 Server) 上安装 Arduino IDE 配置ESP32开发板 让LED闪起来 在Ubuntu 22.04 Server系统上安装Arduino IDE,将示例程序烧录至ESP32开发板。 - 通过本章学习,初步了解Arduino开发环境的使用; - ESP32与上位机连接并进行程序的烧录,让LED闪起来。 阅读详情

相关推荐

在Ubuntu 22.04上手动安装Arduino IDE 1.8.19,解决桌面图标闪退和中文乱码问题

本文详细指导在Ubuntu 22.04上手动安装Arduino IDE 1.8.19版本,解决桌面图标闪退和中文乱码等常见问题。通过源码安装方式,提供从环境准备到高级配置的完整解决方案,帮助开发者顺利使用这一经典版本进行硬件开发。

ahhli4007的博客 357

Linux系统中源码安装Arduino IDE

Linux系统中源码安装Arduino IDE

phmatthaus的专栏 2288

ubuntu下使用arduino IDE

1、$sudo apt-get install arduino 2、ubuntu下配置arduino开发环境很简单,但是由于权限,还是碰到了一些问题。 linux对arduino设备是能够自动识别的,不需要单独安装驱动。lsusb可以查看到插入的设备,如图,最后一行就是新的usb设备: 这样就可以了,打开arduino的开发IDE,选择Tools->Board->选择你的ardu

z659941528的专栏 8220

Ubuntu22.04安装Arduino IDE及Arduino UNO(使用CH341驱动)调试方法

本文介绍了安装Arduino IDE的方法和调试Arduino UNO的方法,文章主要以Arduino官方文档为参考,介绍的安装/调试方法等尽可能的贴合官方,推荐将这篇文章作为你在Ubuntu系统中安装Arduino开发板的参考。

killmiledc的博客 8396

告别AppImage和Snap:在Linux Mint/Ubuntu上通过源码包安装Arduino IDE 1.8.x的完整指南

本文提供了在Linux Mint/Ubuntu系统上通过源码包安装Arduino IDE 1.8.x的完整指南,帮助开发者避开AppImage和Snap的限制。详细介绍了源码安装的优势、准备工作、安装步骤及常见问题解决方案,确保获得稳定且高度可定制的开发环境。

ahhli4007的博客 598

IDE本质解析:从编辑器到开发智能体的演进

集成开发环境(IDE)是软件开发的核心工作台,其本质并非高级文本编辑器,而是融合代码编辑、语法分析、构建编译、调试执行、版本控制与测试验证的系统化工具链。依托语言服务器协议(LSP)和调试适配器协议(DAP),现代IDE实现跨语言、跨平台的智能感知能力,显著降低开发者认知负荷。在Ubuntu 20.04等典型Linux环境中,code-server与Arduino IDE等工具的部署实践,凸显了IDE对操作系统兼容性、硬件抽象能力和领域知识固化的深度依赖。随着Trae IDE、Cursor等AI增强型平台兴

weixin_33901641的博客 356

android studio ubuntu12.04,Install the Arduino IDE in Ubuntu 12.04

转自http://blog.markloiseau.com/2012/05/install-arduino-ubuntu/Install the Arduino IDE in Ubuntu 12.04Installing the Arduino IDE in Ubuntu only takes a few minutes. As usual, it’s a better idea to insta...

weixin_32848617的博客 187

ardwino:葡萄园监控

阿德维诺 介绍 一个有一群热情的朋友管理着一个葡萄园。 他们面临的一个问题是春天初的霜冻。 为了解决这个问题,他计划安装巨大的风扇和管道,这些风扇和管道将从“更高”的高度吸入空气并将其吹到地板上方。 小的温差就足够了。 希望... 需求 测量葡萄园边界(距中央单元100m)的温度,并在靠近中央单元的12m杆上以5个高度测量温度。 根据要定义的逻辑来驱动风扇。 记录一段时间内的温度和风扇状态。 描述 使用 模块就位 用ini文件反映实际配置 进行一些测试,以确保阈值得到正确遵守,并且继电器被良好激活。 打开ArdWino.html分析发布到Thingspeak的内容 致谢 很多事情都是基于他人的工作。 这部分需要完成。

【Linux软件安装】Ubuntu 12.04:Arduino IDE

Install the Arduino IDE in Ubuntu 12.04

dukeyunz blog 1614

毕业设计(论文)-基于物联网的智能家居设计

毕业设计(论文)-基于物联网的智能家居设计,毕业设计RFID,m2m,智能家居,GPRS,远程控制

分组背包问题(MCKP)三大算法对比:贪心、Dyer-Zemel和动态规划谁更强?

本文深入对比了分组背包问题(MCKP)的三大主流算法:贪心算法、Dyer-Zemel算法和动态规划。通过分析各自的原理、实现及性能表现,揭示了贪心算法速度快但非最优,动态规划精确但受限于规模,而Dyer-Zemel算法则在效率与最优性间取得了最佳平衡,是解决中等至大规模MCKP问题的首选方案。

vscode6remote的博客 227

2.1 arduino系列:ubuntu下安装arduino IDE

1、下载arduino ide安装包 官方下载链接:https://www.arduino.cc/en/Main/Software 2、使用tar命令对压缩包解压(这里我提起把下载的压缩包移动到了home下,版本为1.8.9) cd ~ tar -xvf arduino-1.8.9-linux64.tar.xz 3.将解压后的文件移动到/opt下 sudo mv arduino-...

国庆的博客 4925

连接HP C7000 OA管理口操作文档

必备工具:1台便携式笔记本电脑、1根网线 2、 在C7000机箱背面找到 OA管理模块,如图:图标1和2为OA主备管理模块 将网线一端接至左边的OA管理网口,另一端接至便携式笔记本电脑网口,如图下位置: 在C7000液晶面板下查看OA管理口地址,如图,按下液晶面板的OK按钮 然后按下▼按钮调至Enclosure Info这一项后,按下OK按钮,输出界面如图:可以看到当前Active的OA管理口IP地址 比如显示地址为172.16.25.30,则个人笔记本电脑则配置172.16...

马晓援的博客 6014

Install Arduino IDE on Ubuntu 14.04

one stop only sudo apt-get install arduino

stevenchen81的博客 420

GD32F4系列定时器正交译码器实战:用TIMER1读取旋转编码器信号(附完整代码)

本文详细介绍了GD32F4系列定时器正交译码器的实战应用,重点讲解如何使用TIMER1模块高效读取旋转编码器信号。内容涵盖硬件连接、定时器配置、方向判断与速度计算等关键环节,并提供了完整的代码实现和优化建议,帮助开发者快速掌握GD32微控制器在工业控制和消费电子领域的编码器接口设计。

weixin_29169505的博客 203

设置Solidworks导出文件的坐标系,stl坐标系平移

使用solidworks输出的模型坐标不再原点,怎么平行坐标系,这个方法很简单

weixin_45650767的博客 1万+

Ubuntu 20.04下IDE深度解析:七个耦合模块与实战排障

集成开发环境(IDE)是现代软件工程的核心工作流引擎,其本质并非编辑器、编译器与调试器的简单叠加,而是基于操作系统底层能力(如inotify、fanotify、udev、IPC)深度耦合的多子系统协同平台。理解IDE需从Linux系统原理切入:文件监听依赖内核事件机制,语言服务(LSP)需跨进程符号解析,构建调度依赖状态机与缓存一致性,设备通信直面权限博弈(dialout组、AppArmor、pulseaudio劫持)。在Ubuntu 20.04这一广泛用于嵌入式与AI开发的稳定发行版中,IDE稳定性高度受

hck341204的专栏 400

qPCRtools | 神仙R包分分钟搞定你的qPCR实验结果!~

1写在前面 不知道大家都是怎么完成qPCR的计算的,在不会R的时候,我是用一个祖传的Excel表进行计算的。🤣 但是,一直有个缺点,如果需要计算的量比较大时,就不方便了,去搜了一下文献,发现了一个最近发表的R包,不仅可以计算反转录的RNA体积,还可以帮助选择定量方法,简直是神仙R包,本期就介绍一下它的使用吧。🥰 感谢原作者的开发,嘿嘿,文末有引用方法。👀 2用到的包 rm(list = ls())library(tidyverse)library(ggsci)library(qPCRtools)librar

m0_72224305的博客 3987

ubuntu上安装Arduino IDE

ubuntu版本:14.04第一种方法:直接用apt-get install 命令安装arduinosudo apt-get install arduino然后在命令行中执行arduino就可以了。第二种方法:到度娘上下载最新的安装包,解压后,执行里面的install.sh文件。...

sunyoop的博客 9814

手把手教你用OPA运放和MOS管搭建恒流源电路(附完整电路图)

本文详细介绍了如何使用OPA运放和MOS管搭建高精度恒流源电路,涵盖核心元器件选型、电路设计、工作原理及实际搭建步骤。通过负反馈控制机制和MOS管工作区设置技巧,实现稳定的电流输出,适用于LED驱动、电池充电等场景。附完整电路图和调试技巧,助您快速掌握恒流源设计。

weixin_29239279的博客 543

交通仿真软件:SUMO_(1).SUMO基础知识

SUMO 中的交通网络由节点(junctions)和边(edges)组成。节点表示交叉口或路网的连接点,边表示连接节点之间的道路。节点:节点文件(.nod.xml)定义了网络中的所有节点。每个节点有一个唯一的 ID 和坐标。</边:边文件(.edg.xml)定义了连接节点的边。每个边有一个唯一的 ID、起点节点 ID 和终点节点 ID。</车辆文件(.vtype.xml)定义了不同类型的车辆。每个车辆类型可以有不同的参数,例如长度、最大速度、加速度等。</

kkchenjj的博客 1433

IDE本质是数字工作台:从Ubuntu 20.04实战看四大支柱与Web IDE选型

IDE(集成开发环境)并非高级文本编辑器,而是融合编辑、构建、调试与集成能力的开发者数字工作台。其核心原理在于通过语言服务器协议(LSP)、自动化构建系统、可视化调试前端及深度工具链集成,将多状态、多依赖的混沌开发流程收敛为可预测的操作闭环。技术价值体现在显著降低环境配置成本、提升跨平台协同效率、加速硬件-软件联调周期。典型应用场景覆盖嵌入式开发(如Arduino/STM32)、AI原生编程(Cursor/TRAe IDE)、Linux系统级开发(VS Code+Remote-SSH)及跨平台GUI构建。在

weixin_34194359的博客 424

Ollama本地大模型-个性化AI:训练自己的风格模型和数据投喂打造专属智能体验

之前我们使用Ollama下载了deepseek模型,现在我想将其训练成自己风格的模型,应该怎么做?

瑶山的博客 1784

Ubuntu22.04下Arduino IDE 2.x安装避坑指南:从代理配置到桌面快捷方式

本文详细介绍了在Ubuntu22.04系统上安装和配置Arduino IDE 2.x的完整流程与避坑指南。内容涵盖AppImage与ZIP归档安装策略选择、首次启动卡顿的代理网络配置解决方案、创建桌面快捷方式与修复图标显示问题、以及解决串口设备访问权限等核心难点,旨在帮助开发者快速构建稳定高效的嵌入式开发环境。

brown的博客 148

复分析 阿尔福斯(Ahlfors) 第三版答案 英文

答案分为十章,有部分习题没有答案,全英文复分析阿尔福斯(Ahlfors) 第三版答案

VB摄像头监控

该VB模块可对摄像头捕获的画面进行录像等,可在创建的窗口进行控制

Install Arduino IDE on Ubuntu for ESP32

ubuntu下为ESP32安装arduino IDE并进行配置

szhmonkey的博客 357

visio安装包

Microsoft Office Visio 是一款专业的制图软件。利用经过更新的形状、协作工具和数据链接图表,创建专业级图表以简化复杂的信息。

上一篇: drupal优化全攻略
下一篇: arduino学习笔记1 - 什么是arduino?
yingcloud
博客等级 码龄15年 66粉丝 8原创
评论
成就一亿技术人!
拼手气红包6.0元
还能输入1000个字符
 
 条评论被折叠 查看
添加红包

请填写红包祝福语或标题

个

红包个数最小为10个

元

红包金额最低5元

当前余额3.43元 前往充值 >
需支付:10.00元
成就一亿技术人!
领取后你会自动成为博主和红包主的粉丝 规则
hope_wisdom
发出的红包
实付元
使用余额支付
点击重新获取
扫码支付
钱包余额 0

抵扣说明:

1.余额是钱包充值的虚拟货币,按照1:1的比例进行支付金额的抵扣。
2.余额无法直接购买下载,可以购买VIP、付费专栏及课程。

余额充值