


 本文介绍如何为 RESTful API 设计统一的响应格式,包括定义返回对象、异常处理及工具类封装等,确保 API 响应的一致性和易读性。
我们采用RESTful API 时,为了让接口看起来更清晰,更优雅,我们需要对一些特殊情况进行一些处理。
1.统一返回格式
有时由于,返回的数据不一样,造成返回json数据的格式不一样,看起来很别扭,例如:
DELETE http://localhost:8080/hero
//什么也没有返回{
"id": 6,
"name": "刘备"
}能不能,一眼就看出来执行有没有成功:例如POST接口我想返回类似这样的数据:
//状态码,提示信息,数据
{
  "code": 1,
  "msg": "成功",
  "data": {
    "id": 7,
    "name": "刘备"
  }
}
1.1定义一个统一返回对象
public class Result<T> {

    private Integer code;//错误码

    private String msg;//提示信息

    private T data;//具体的数据内容

    public Integer getCode() {
        return code;
    }

    public void setCode(Integer code) {
        this.code = code;
    }

    public String getMsg() {
        return msg;
    }

    public void setMsg(String msg) {
        this.msg = msg;
    }

    public T getData() {
        return data;
    }

    public void setData(T data) {
        this.data = data;
    }
}
1.2 Controller层
@PostMapping(value="/hero")
    public Result<Hero> addHero(@Valid Hero hero , BindingResult bindingResult){
    if(bindingResult.hasErrors()){
        return ResultUtil.error(0, bindingResult.getFieldError().getDefaultMessage());
    }
    hero.setName(hero.getName());
    heroService.addHero(hero);
    return ResultUtil.success(hero);
}
在这里我对返回成功或者失败进行了封装,封装成了ResultUtil 工具类
public class ResultUtil {

    public static Result success(Object object){
        Result result = new Result();
        result.setCode(1);
        result.setMsg("成功");
        result.setData(object);
        return result;
    }

    public static Result success(){
        return success(null);
    }

    public static Result error(Integer code , String msg){
        Result result = new Result();
        result.setCode(code);
        result.setMsg(msg);
        return result;
    }
}
1.3 结果测试
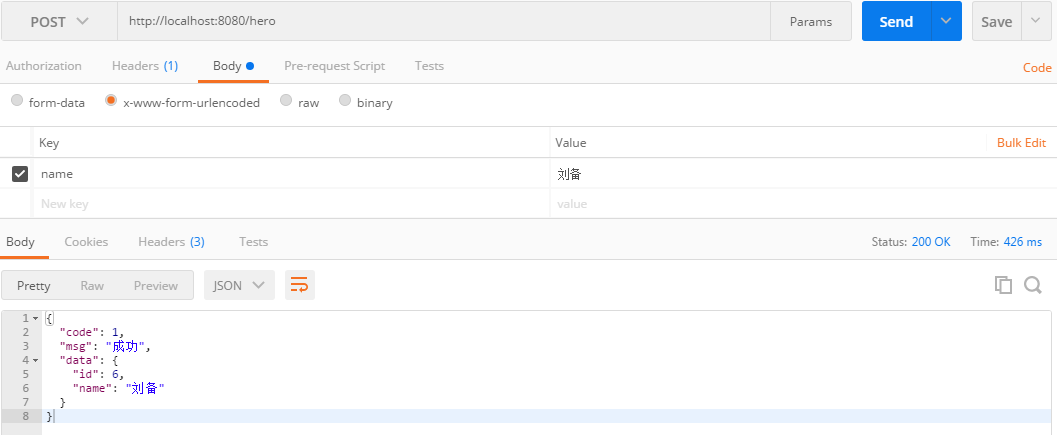
现在在对新增方法进行测试发现,已经实现了预期的效果,返回json数据格式如下:
2 现在发生了异常将会返回什么
2.1 在Service 抛出异常
public int addHero(Hero hero){
String name = hero.getName();
if(name.equals("张飞")){
throw new HeroException(100, "这个是刘备的三弟");
} else if(name.equals("关羽")){
throw new HeroException(101, "这个是刘备的二弟");
}
return heroDao.addHero(hero);
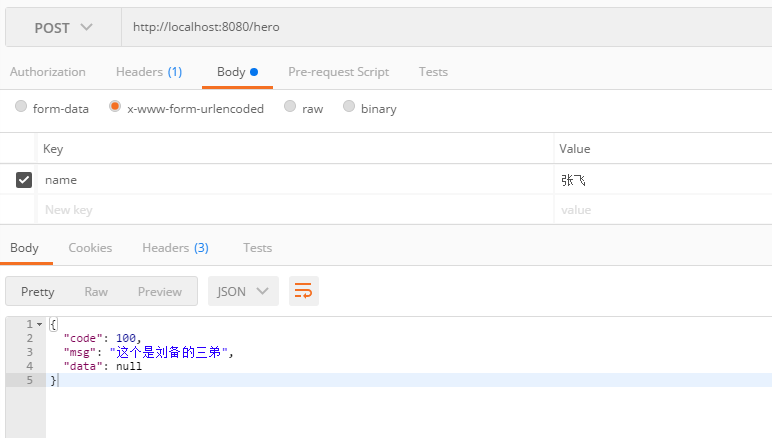
}传递name=”张飞”看看结果
发现我们设置的Result类不在起作用,返回的json数据又乱了。现在我们需要对Exception进行捕获处理。
2.2 自定义Exception
在自定义异常时,一定要注意Spring 只回滚RuntimeException 异常,如果继承Exception spring是不回滚的
public class HeroException extends RuntimeException{

    private Integer code;

    public HeroException(Integer code, String message){
        super(message);
        this.code = code;
    }

    public Integer getCode() {
        return code;
    }

    public void setCode(Integer code) {
        this.code = code;
    }
}
2.3 捕获异常
对自己抛出的异常进行捕获处理,对系统异常进行提示,并写入日志。
@ControllerAdvice
public class ExceptionHandle {
    private final static Logger logger = LoggerFactory.getLogger(ExceptionHandle.class);

    @ExceptionHandler(value = Exception.class)
    @ResponseBody
    public Result handle(Exception e){
        if(e instanceof HeroException){
            HeroException heroException = (HeroException) e;
            return ResultUtil.error(heroException.getCode(), heroException.getMessage());
        } else {
            logger.error("【系统异常】{}",e);
            return ResultUtil.error(-1, "未知错误");
        }
    }
}
2.4 测试结果
现在的效果就是我们所预期的了


 被折叠的 条评论
为什么被折叠?
被折叠的 条评论
为什么被折叠?
 到【灌水乐园】发言


