


脚手架安装的问题:
1.安装node.js,配置环境变量,cmd输入node -v和npm -v可以看到版本号(如果显示不是命令,确认环境变量是否配置成功,记得配置环境变量之后重新打开cmd,再去验证)
2.在安装cnmp时,大堆错误提示,记得以管理员身份打开cmd,在安装东西
3.在创建脚手架时,cmd中在索要创建脚手架项目的文件夹目录下输入vue create myvue1,选择Vue2,下载完成之后,输入npm run serve,打开所给网址,看到vue2的网页
4.运行main.js文件,右键->open in Integrated Terminal(或快捷键ctrl+~),打开终端,

在终端中输入:npm run serve

如果出现错误,提示没有脚本权限

解决方法:参考(npm : 无法加载文件 C:\Program Files\nodejs\npm.ps1,因为在此系统上禁止运行脚本。有关详细信息,请参阅 https:/go.microsoft.com/fwlink-优快云博客),我这个执行到第二步就可以解决了

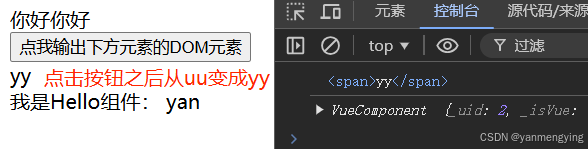
ref属性:
实现效果:点击按钮,获取uu和组件的dom元素,在控制台输出,并对uu的内容进行修改
代码:
App.vue
<template>
  <div id="app">
    {{ msg }}<br>
     <button @click="showDom">点我输出下方元素的DOM元素</button><br>
     <!-- <span id="ye">uu</span> -->
     <span ref="ye">uu</span>
     <HelloYa ref="hello"/>
     <!-- <HelloYa id="hello"/>  -->
  </div>
</template>

<script>
import HelloYa from './components/Hello.vue'
export default {
  name: 'App',
  data(){
    return {
      msg:'你好你好'
    }
  },
  methods:{
    showDom(){
      //使用refs获得HTML的标签元素,
      //和document.getElementById实现同样的效果
      // console.log(document.getElementById('ye'));
      // document.getElementById('ye').innerHTML = 'yy'
      console.log(this.$refs.ye);
      this.$refs.ye.innerHTML = 'yy'
      //获取hello组件的实例对象
      console.log(this.$refs.hello);
      //获取hello组件的根元素(比如template中的div)
      // console.log(document.getElementById('hello'));
    }
  },
  components: {
    HelloYa
  }
}
</script>
Hello.vue:
<template>
  <div>
    我是Hello组件:
     {{ message }}
  </div>
</template>

<script>
export default {
    name:'HelloYa',
    data(){
        return {
            message:'yan'
        }
    }
}
</script>
props的使用:组件可以复用,但是组件中的数据是动态的,可以被设置
实现效果:
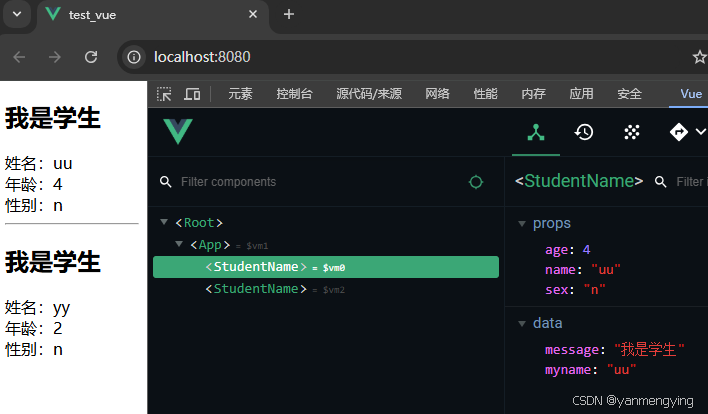
文件App.vue、Student.vue(Student.vue报错时,注意可能时组件的name声明是没有使用驼峰法(例:StudentName))
App.vue:
<template>
  <div>
    <!-- 组件复用,数据是动态的 -->
    <!-- <StudentName name="uu" sex="n" age="19"/> -->
    <!-- age前加:代表,:代表动态绑定,运行引号中的表达式, -->
    <StudentName name="uu" sex="n" :age="4"/>
    <hr>
    <StudentName name="yy" sex="n" :age="2"/>

  </div>
</template>

<script>
import StudentName from './components/Student'
export default {
  name: 'App',
  data(){
    return {
      msg:'你好你好'
    }
  },
  methods:{
  },
  components: {
    StudentName
  }
}
</script>
Student.vue:
<template>
  <div>
    <h2>{{ message }}</h2>
    姓名:{{ name }}<br>
    <!-- 性别:{{ age+1 }}<br> -->
    年龄:{{ age }}<br>
    性别:{{ sex }}<br>
  </div>
</template>

<script>
export default {
    name:'StudentName',
    data(){
        return {
            message:'我是学生',
            // name:'yan',
            // age:19,
            // sex:'nv'
            myname:this.name
        }
    },
    //props属性值一般不让修改,可以改但会报错,
    // 并且props中的数据优先级高于data中的数据(也就是说同时给相同属性赋值时,data中的数据会被覆盖)
    //要想实现修改props中的属性值,可以在data中加《myname:this.name》,在模板中使用{{ myname }},methods中使用myname进行操作

    //简单声明接收
    // props:['name', 'sex', 'age'],

    //限制接收:在接收的同时对数据进行类型限制
    // props:{
    //   name:String,
    //   age:Number,
    //   sex:String
    // },

    //限制接收:在接收的同时对数据进行类型限制+默认值指定+必要性限制
    props:{
      //required和default一般不同时设置
      name:{
        type:String,
        required:true //name是必要的
      },
      age:{
        type:Number,
        //在App组件中:使用<StudentName name="uu" sex="n" :age="4"/>验证default功能
        default:1
        // required:false
      },
      sex:{
        type:String,
        default:'女'
      }
    }

}
</script>
mixin混合(混入)
实现效果: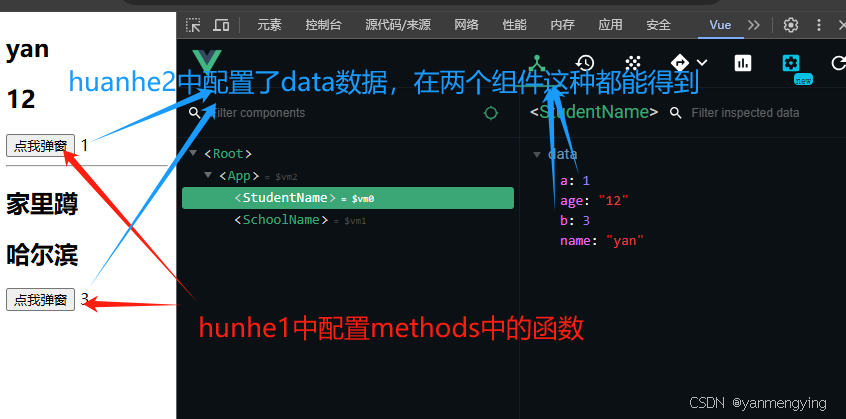
局部配置混合:

全局配置混合:
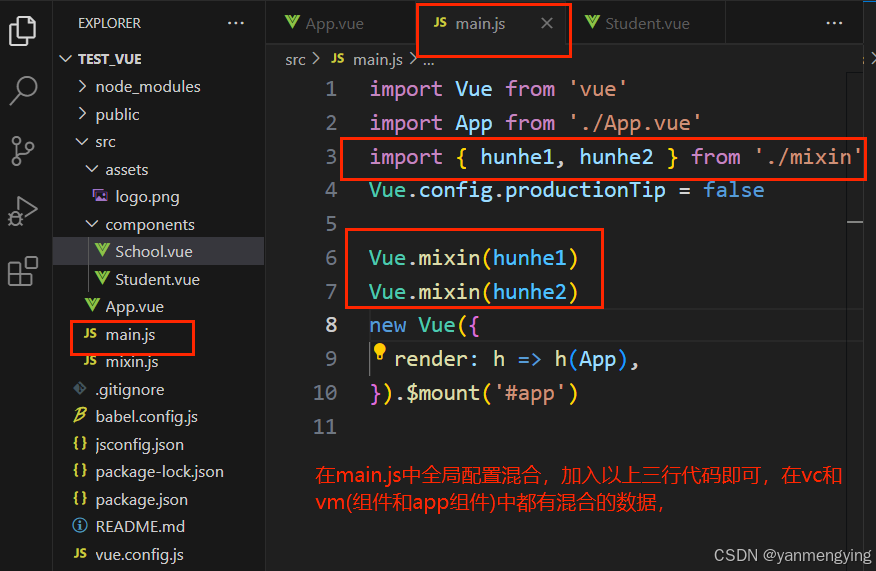
代码:
Student.vue:
<template>
  <div>
    <h2>{{ name }}</h2>
    <h2>{{ age }}</h2>
    <button @click="showName">点我弹窗</button>
    {{ a }}
  </div>
</template>

<script>
import { hunhe1, hunhe2 } from '../mixin';
export default {
    name:'StudentName',
    data(){
        return {
            name:'yan',
            age:'12'
        }
    },
    mixins:[hunhe1, hunhe2],
}
</script>
School.vue:
<template>
    <div>
      <h2>{{ name }}</h2>
      <h2>{{ address }}</h2>
      <button @click="showName">点我弹窗</button>
      {{ b }}
    </div>
  </template>

  <script>
  import { hunhe1, hunhe2 } from '../mixin';
  export default {
      name:'SchoolName',
      data(){
          return {
            name:'家里蹲',
            address:'哈尔滨',
            //当混合中的设置与组件中冲突时,以组件中为主
            a:2,
          }
      },
      mixins:[hunhe1, hunhe2],
      //当混合与组件中的钩子函数冲突时,都执行,先执行混合中的
      mounted(){
      console.log('你好,student');
    }
  }
  </script>
mixin.js:
//功能:把多个组件公用的配置提取成一个混入对象
//组件中可借助混合复用配置相同的数据、函数
export const hunhe1 = {
    methods: {
        showName() {
            alert(this.name)
        }
    },
    mounted() {
        console.log('你好,混合1');
    }
}
export const hunhe2 = {
    data() {
        return {
            a: 1,
            b: 3
        }
    }
}
App.vue
<template>
  <div>
    <StudentName/>
    <hr>
    <SchoolName/>
  </div>
</template>

<script>
import StudentName from './components/Student'
import SchoolName from './components/School'
export default {
  name: 'App',
  methods:{
  },
  components: {
    StudentName,
    SchoolName
  }
}
</script>
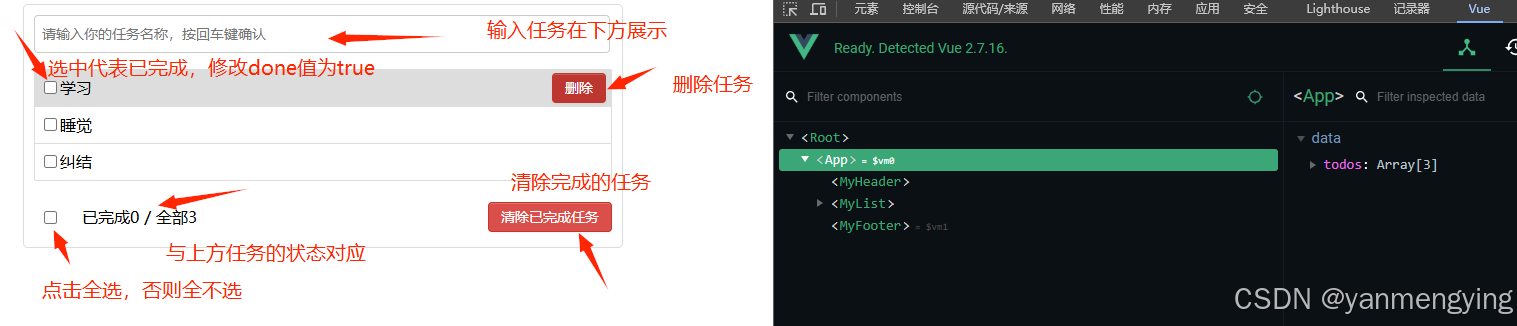
记事本案例:实现效果:
 代码:
代码:
App.vue:
<template>
	<div id="root">
		<div class="todo-container">
			<div class="todo-wrap">
				<MyHeader :addTodo="addTodo"/>
				<!-- App给Item传数据需先传给List,再由List传给Item -->
				<MyList :todos="todos" :deleteTodo="deleteTodo" :checkTodo="checkTodo"/>
				<MyFooter :todos="todos" :clearAllTodo="clearAllTodo" :checkAllTodo="checkAllTodo"/>
			</div>
		</div>
	</div>
</template>

<script>
	import MyHeader from './components/MyHeader'
	import MyList from './components/MyList'
	import MyFooter from './components/MyFooter.vue'

	export default {
		name:'App',
		components:{MyHeader,MyList,MyFooter},
		data() {
			return {
				todos:[
					{id:'001',title:'学习',done:false},
					{id:'002',title:'睡觉',done:false},
					{id:'003',title:'纠结',done:false},
				]
			}
		},
		methods: {
			//添加任务,与MyHeader相关
			addTodo(todoObj){
				//这个也可以
				// this.todos=this.todos.concat(todoObj)
				this.todos.push(todoObj)
			},
			// 删除任务,与MyItem有关
			deleteTodo(id){
				//这样删出问题,id索引不到他的数组当中的对象位置
				// this.todos.splice(id,1)

				//filter通过遍历数组每个元素,过滤出满足函数的元素值组成的数组
				//id为所要删除的元素id
				this.todos = this.todos.filter( todo => todo.id !== id )
			},
			// 选中任务(将任务中的done值取反),与MyItem有关
			checkTodo(id){
				this.todos.forEach((todo)=>{
					if(todo.id==id){
						todo.done =! todo.done
					}
				})
			},
			//底部中的清除已完成任务按钮(将todos中的todo中的done值为真的元素删除),与MyFooter有关
			clearAllTodo(){
				//filter函数为数组中的每个元素调用函数一次,并构造一个由所有返回真值的元素值组成的新数组
				// this.todos = this.todos.filter((todo)=>todo.done !== true)
				this.todos = this.todos.filter((todo)=>{
					return !todo.done
				})
			},
			//全选or取消全选(将全选按钮的状态与每个任务(todo)的选中状态(true or false)相关联),与MyFooter有关
			checkAllTodo(done){
				this.todos.forEach((todo)=>{
					todo.done = done
				})
			},
		}
	}
</script>

<style>
	/*base*/
	body {
		background: #fff;
	}
	.btn {
		display: inline-block;
		padding: 4px 12px;
		margin-bottom: 0;
		font-size: 14px;
		line-height: 20px;
		text-align: center;
		vertical-align: middle;
		cursor: pointer;
		box-shadow: inset 0 1px 0 rgba(255, 255, 255, 0.2), 0 1px 2px rgba(0, 0, 0, 0.05);
		border-radius: 4px;
	}
	.btn-danger {
		color: #fff;
		background-color: #da4f49;
		border: 1px solid #bd362f;
	}
	.btn-danger:hover {
		color: #fff;
		background-color: #bd362f;
	}
	.btn:focus {
		outline: none;
	}
	.todo-container {
		width: 600px;
		margin: 0 auto;
	}
	.todo-container .todo-wrap {
		padding: 10px;
		border: 1px solid #ddd;
		border-radius: 5px;
	}
</style>
MyHeader:
<template>
	<div class="todo-header">
		<input type="text" placeholder="请输入你的任务名称,按回车键确认" v-model="title" @keyup.enter="add"/>
	</div>
</template>

<script>
	import {nanoid} from 'nanoid'
	export default {
		name:'MyHeader',
		props:['addTodo'],
		data() {
			return {
				title:''
			}
		},
		methods:{
			add(){
				const todoObj={id:nanoid(),title:this.title,done:false}
				//要在APP组件中修改todos
				this.addTodo(todoObj)
				//回车之后,输入框清空
				this.title = ''
			}
		}
	}
</script>

<style scoped>
	/*header*/
	.todo-header input {
		width: 560px;
		height: 28px;
		font-size: 14px;
		border: 1px solid #ccc;
		border-radius: 4px;
		padding: 4px 7px;
	}

	.todo-header input:focus {
		outline: none;
		border-color: rgba(82, 168, 236, 0.8);
		box-shadow: inset 0 1px 1px rgba(0, 0, 0, 0.075), 0 0 8px rgba(82, 168, 236, 0.6);
	}
</style>
MyList:
<template>
	<ul class="todo-main">
		<MyItem :todos="todos" :deleteTodo="deleteTodo" :checkTodo="checkTodo"/>
	</ul>
</template>

<script>
	import MyItem from './MyItem'
	export default {
		name:'MyList',
		props:['todos','deleteTodo','checkTodo'],
		components:{MyItem},
	}
</script>

<style scoped>
	/*main*/
	.todo-main {
		margin-left: 0px;
		border: 1px solid #ddd;
		border-radius: 2px;
		padding: 0px;
	}

	.todo-empty {
		height: 40px;
		line-height: 40px;
		border: 1px solid #ddd;
		border-radius: 2px;
		padding-left: 5px;
		margin-top: 10px;
	}
</style>
MyItem:
<template>
	<div>
		<li v-for="todo in todos" :key="todo.id">
		<label>
			<input type="checkbox" :checked="todo.done" @click="handleCheck(todo.id)"/>
			<span>{{ todo.title }}</span>
		</label>
		<button class="btn btn-danger" @click="handleDelete(todo.id)">删除</button>
	</li>
	</div>
</template>

<script>
	export default {
		name:'MyItem',
		props:['todos','deleteTodo','checkTodo'],
		methods: {
			//每个任务后面的删除事件
			handleDelete(id){
				this.deleteTodo(id)
			},
			//每个任务前面的复选框的点击事件
			// //(修改todo中的done值,然后复选框的状态在上面设置为:checked="todo.done"
			//就可以修改复选框的选中状态)
			handleCheck(id){
				this.checkTodo(id)
			}
		},
	}
</script>

<style scoped>
	/*item*/
	li {
		list-style: none;
		height: 36px;
		line-height: 36px;
		padding: 0 5px;
		border-bottom: 1px solid #ddd;
	}

	li label {
		float: left;
		cursor: pointer;
	}

	li label li input {
		vertical-align: middle;
		margin-right: 6px;
		position: relative;
		top: -1px;
	}

	li button {
		float: right;
		display: none;
		margin-top: 3px;
	}

	li:before {
		content: initial;
	}

	li:last-child {
		border-bottom: none;
	}

	li:hover{
		background-color: #ddd;
	}

	li:hover button{
		display: block;
	}
</style>
MyFooter.vue
<template>
<!-- 当没有任务时,底下的footer模块不show -->
<div class="todo-footer" v-show="todos.length">
<label>
<!-- 全选框 -->
<!-- 方法1 -->
<input type="checkbox" :checked="isAll" @change="checkAll"/>
<!-- 方法2 -->
<!-- <input type="checkbox" v-model="isAll"/> -->
</label>
<span>
<span>已完成{{ doneTotal }}</span> / 全部{{ todos.length }}
</span>
<!-- 清除已完成任务 -->
<button class="btn btn-danger" @click="clearAll">清除已完成任务</button>
</div>
</template>
<script>
export default {
name:'MyFooter',
props:['todos','clearAllTodo','checkAllTodo'],
computed:{
//已完成任务的数量
doneTotal(){
//计算todos中的每个todo中的done值为true的数量
return this.todos.reduce((pre,todo) => pre + (todo.done?1:0),0);
},
// 已完成前面的对勾(全选对勾)
//方法1,使用checked和@change搭配使用
isAll(){
return this.doneTotal === this.todos.length && this.todos.length > 0
}
//方法2 与v-model搭配使用
// isAll:{
// //全选框是否勾选
// get(){
// return this.doneTotal === this.todos.length && this.todos.length > 0
// },
// //isAll被修改时set被调用
// set(value){
// this.checkAllTodo(value)
// }
// },
},
methods:{
//清除所有完成的任务
clearAll(){
this.clearAllTodo()
},
//点击全选框时调用函数,拿到此时复选框按钮的状态(e.target.checked)
checkAll(e){
this.checkAllTodo(e.target.checked)
}
}
}
</script>
<style scoped>
/*footer*/
.todo-footer {
height: 40px;
line-height: 40px;
padding-left: 6px;
margin-top: 5px;
}
.todo-footer label {
display: inline-block;
margin-right: 20px;
cursor: pointer;
}
.todo-footer label input {
position: relative;
top: -1px;
vertical-align: middle;
margin-right: 5px;
}
.todo-footer button {
float: right;
margin-top: 5px;
}
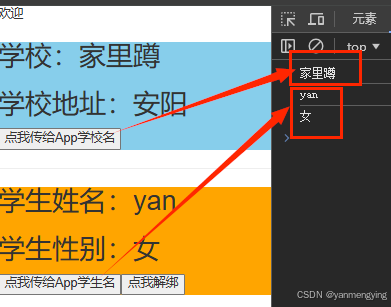
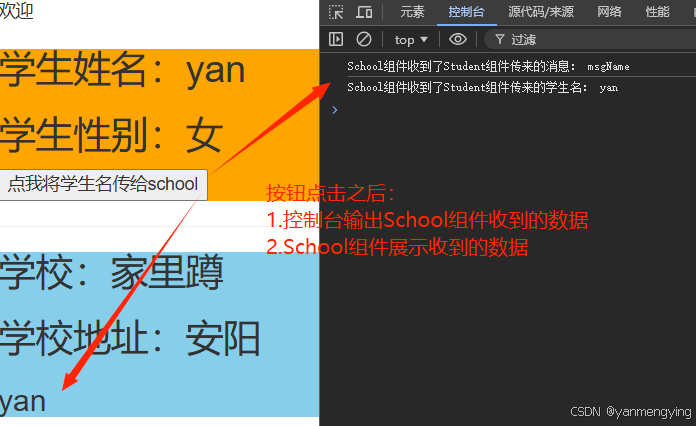
</style>组件自定义事件的绑定、解绑,实现子给父传数据
代码:
App.vue
<template>
    <div>
        {{ message }}
     <!-- 通过父组件给子组件传递函数类型的props实现:子给父传递数据 -->
     <School :getSchoolName="getSchoolName"/>
     <hr>
     <!-- 通过父组件给子组件绑定一个自定义事件实现:子给父传递数据(第一种写法,使用@或v-on) -->
     <Student v-on:ai="getStudentName" @ai2="getStudentSex"/>
      <!-- 通过父组件给子组件绑定一个自定义事件实现:子给父传递数据(第二种写法,使用ref) -->
     <!-- <Student ref="student"/> -->
     <hr>
     <!-- 组件中不能直接绑定原生DOM事件,组件会把它当作自定义事件执行,需要在Student组件中绑定一下($emit) -->
     <!-- <Student @click="show"/> -->
      <!-- 可以通过加上.native给组件添加原生事件,把click给组件的根元素中执行 -->
     <!-- <Student @click.native="show"/> -->
    </div>
</template>

<script>
import Student from './components/Student.vue';
import School from './components/School.vue'
export default {
    name:'App',
    components:{
        Student,
        School
    },
    data(){
        return {
            message:'欢迎'
        }
    },
    methods:{
        show(){
            alert('你好')
        },
        getSchoolName(e){
            console.log(e);
        },
        getStudentName(name){
            console.log(name);
        },
        getStudentSex(sex){
            console.log(sex);
        }
    },
    mounted(){
        //绑定自定义事件
        // this.$refs.student.$on('ai',this.getStudentName)
        //绑定自定义事件(一次性)
        // this.$refs.student.$once('ai',this.getStudentName)
    }
}
</script>
Student.vue
<template>
  <div class="test">
    <h2>学生姓名:{{ name }}</h2>
    <h2>学生性别:{{ sex }}</h2>
    <button @click="sendStudentName">点我传给App学生名</button>
    <button @click="unbind">点我解绑</button>
  </div>
</template>

<script>
export default {
    name:'Student',
    data() {
        return {
            name:'yan',
            sex:'女'
        }
    },
    methods:{
      sendStudentName(){
        //触发Student组件实例上的ai事件
        this.$emit('ai', this.name)
        this.$emit('ai2', this.sex)
        this.$emit('click')
      },
      unbind(){
        //解绑一个自定义事件
        // this.$off('ai')
        //解绑多个自定义事件
        this.$off(['ai','ai2'])
        //解绑所有的自定义事件
        // this.$off()
      }
    }
}
</script>
<style  scoped>
.test {
  background-color: orange;
}
</style>
School.vue
<template>
<div class="test">
<h2 >学校:{{ name }}</h2>
<h2>学校地址:{{ address}}</h2>
<button @click="sendSchoolName">点我传给App学校名</button>
</div>
</template>
<script>
export default {
name:'School',
props:['getSchoolName'],
data() {
return {
name:'家里蹲',
address:'安阳'
}
},
methods:{
sendSchoolName(){
this.getSchoolName(this.name)
}
}
}
</script>
<style>
.test {
background-color: skyblue;
}
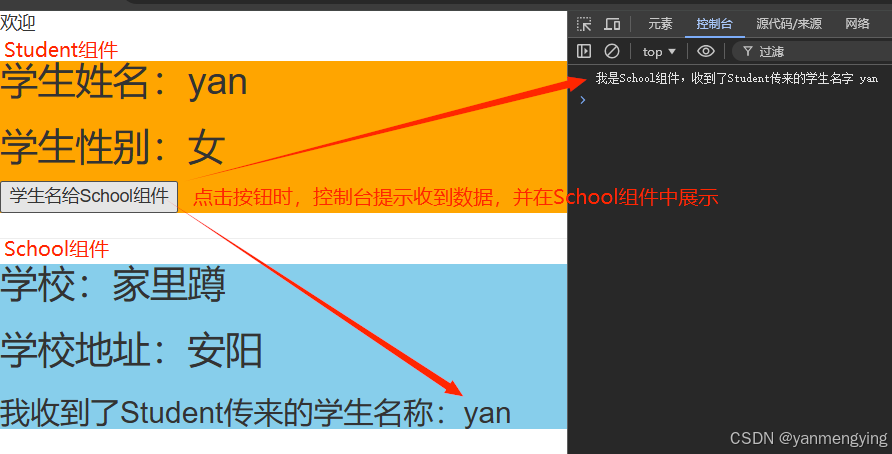
</style>全局事件总线:
实现效果:两个子组件之间传数据(Student传给School)。
收数据的在mounted中绑定:this.$bus.$on('checkTodo',this.checkTodo),并且在beforeDestroy中解绑:this.$bus.$off('checkTodo')
发送数据的在methods中的(点击)事件的函数中:this.$bus.$emit('checkTodo',id)
关键语句:min.js中的Vue.prototype.$bus = this//安装全局事件总线
Student中的this.$bus.$emit('hello',this.name)
School中的this.$bus.$on('hello',(data)=> { this.studentName = data})
代码:
main.js
//引入vue
import Vue from 'vue'
//引入App
import App from './App.vue'
//关闭Vue的生产提示
Vue.config.productionTip = false

//创建vm
new Vue({
    el: '#app',
    render: h => h(App),
    beforeCreate() {
        Vue.prototype.$bus = this//安装全局事件总线
    }
})
App.vue
<template>
    <div>
        {{ message }}
     <Student/>
     <hr>
     <School/>
    </div>
</template>

<script>
//引入Student组件
import Student from './components/Student.vue';
import School from './components/School.vue'
export default {
    name:'App',
    components:{
        Student,
        School
    },
    data(){
        return {
            message:'欢迎'
        }
    },
}
</script>
Student.vue
<template>
  <div class="test">
    <h2>学生姓名:{{ name }}</h2>
    <h2>学生性别:{{ sex }}</h2>
    <button @click="sendStudentName">学生名给School组件</button>
  </div>
</template>

<script>
export default {
    name:'Student',
    data() {
        return {
            name:'yan',
            sex:'女'
        }
    },
    methods:{
      sendStudentName(){
        this.$bus.$emit('hello',this.name)
      }
    }
}
</script>
<style  scoped>
.test {
  background-color: orange;
}
</style>
School.vue
<template>
  <div class="test">
    <h2 >学校:{{ name }}</h2>
    <h2>学校地址:{{ address}}</h2>
    <h3>我收到了Student传来的学生名称:{{ studentName }}</h3>
  </div>
</template>

<script>
export default {
    name:'School',
    data() {
        return {
            name:'家里蹲',
            address:'安阳',
            studentName:''
        }
    },
    mounted(){
      this.$bus.$on('hello',(data)=> {
        console.log('我是School组件,收到了Student传来的学生名字', data);
        this.studentName = data
      })
    },
    beforeDestroy() {
      //注意,括号空的话,会把所有绑定的事件解绑
      this.$bus.$off('hello')
    }
}
</script>
<style>
   .test {
      background-color: skyblue;
    }
</style>
消息的订阅与发布:可以实现任意两个组件之间的数据接收
pubsub库的安装(消息与订阅):终端输入:npm i pubsub-js(消息与订阅相关的库很多,可以从github中下载)
使用:接收数据的组件,在mounted中订阅消息,在beforeDestroy取消订阅(注意,在接收的函数中,默认第一个接收的参数为消息名称,第二个才是传过来的数据id,需要在这个函数的参数中使用_占位符接收一下)
实现效果:将Student组件中的学生name传给school组件,并展示出来:
代码:main.js、App.vue、Student.vue、School.vue
main.js
//引入vue
import Vue from 'vue'
//引入App
import App from './App.vue'
//关闭Vue的生产提示
Vue.config.productionTip = false

//创建vm
new Vue({
    el: '#app',
    render: h => h(App)
})
App.vue
<template>
    <div>
        {{ message }}
     <Student/>
     <hr>
     <School/>
     <hr>

    </div>

</template>

<script>
import Student from './components/Student.vue';
import School from './components/School.vue'
export default {
    name:'App',
    components:{
        Student,
        School
    },
    data(){
        return {
            message:'欢迎'
        }
    },
}
</script>
Student.vue
<template>
  <div class="test">
    <h2>学生姓名:{{ name }}</h2>
    <h2>学生性别:{{ sex }}</h2>
    <Button @click="sendStudentName">点我将学生名传给school</Button>
  </div>
</template>

<script>
import pubsub from 'pubsub-js';
export default {
    name:'Student',
    data() {
        return {
            name:'yan',
            sex:'女'
        }
    },
    methods:{
      // student组件发布数据
      // 将student的name传给school
      sendStudentName(){
        pubsub.publish('msgName',this.name)
      }
    },
}
</script>
<style  scoped>
.test {
  background-color: orange;
}
</style>
School.vue
<template>
  <div class="test">
    <h2 >学校:{{ name }}</h2>
    <h2>学校地址:{{ address}}</h2>
    <h3>{{ sname }}</h3>
  </div>
</template>

<script>
import pubsub from 'pubsub-js';
export default {
    name:'School',
    data() {
        return {
            name:'家里蹲',
            address:'安阳',
            sname:''
        }
    },
    methods:{
      //第一个传入的参数默认是消息名,如果不需要,也要使用_占位符接一下
      getStudentName(msgName,studentName){
        console.log('School组件收到了Student组件传来的消息:',msgName);
        console.log('School组件收到了Student组件传来的学生名:',studentName);
        this.sname = studentName
      }
    },
    //需要数据的订阅消息
    mounted(){
      this.pubName = pubsub.subscribe('msgName',this.getStudentName)
      //或者直接在这写函数
      // this.pubName = pubsub.subscribe('msgName',(msgName,data)=>{
      //   console.log(msgName);
      //   console.log(data);
      // })
    },
    //取消订阅
    beforeDestroy(){
      pubsub.unsubscribe(this.pubName)
    }
}
</script>
<style>
   .test {
      background-color: skyblue;
    }
</style>
todolist案例中的消息订阅发布实现deleteTodo(每个任务后面的删除功能)
methods: {
			deleteTodo(_,id){
				this.todos = this.todos.filter( todo => todo.id !== id )
			},
		},
mounted(){
			this.$bus.$on('checkTodo',this.checkTodo)
			// this.$bus.$on('deleteTodo',this.deleteTodo)
			//App接收数据,使用pubsub.subscribe订阅消息
			this.pubId = pubsub.subscribe('deleteTodo',this.deleteTodo)
		},
beforeDestroy(){
			// this.$bus.$off(['checkTodo','deleteTodo'])
			this.$bus.$off('checkTodo')
			pubsub.unsubscribe(this.pubId)
		}
发布数据的组件在methods函数中发布消息
<template>
	<div>
		<button class="btn btn-danger" @click="handleDelete(todo.id)">删除</button>
	</div>
</template>

<script>
import pubsub from 'pubsub-js';
	export default {
		name:'MyItem',
		props:['todo'],
		methods: {
			handleDelete(id){
				//deleteTodo是函数名
				// this.deleteTodo(id)
				//deleteTodo是事件名
				// this.$bus.$emit('deleteTodo',id)
				//deleteTodo是消息名
				pubsub.publish('deleteTodo',id)
			},
	}
</script>
注意,开发者工具可以看到事件总线,但是看不到消息与订阅,因为是第三方库,vue的开发者工具不支持。另外,pubsub只能传两个参数,一个是消息名,一个是参数(传递的数据),要想传两个数据的话,不能用pubsub(以我目前的知识储备),通过实验,它接收不到第二个数据!!!
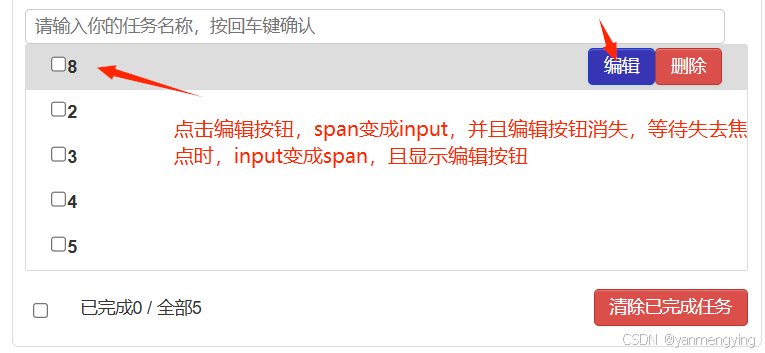
todoList加编辑功能:点击编辑按钮,span变成输入框(v-show="todo.isEdit")且自动获取焦点($nextTick和focus()),输入数据之后文本框失去焦点后,将todo中的值改为文本框输入的值,变回span,
实现效果:
关键语句:
给todo一个新的属性isEdit,并给其赋True值:this.$set(todo,'isEdit','true')
获得输入框中的值,当不能使用v-model时,可以使用e.targrt.value得到:
<template>
<input type="text" v-model="todo.title" v-show="todo.isEdit" @blur="handleBlur(todo.id,$event)" ref="inputTitle">
</template>
methods:{
handleBlur(id,e){
if(!e.target.value.trim()) return alert('不能为空')
//console.log(e.target.value);
this.$bus.$emit('updateTodo',id,e.target.value)
}
}
通过ref获得input,通过this.$refs.inputTitle.focus(),让文本框获取焦点,但如果没有成功,考虑是否在文本框出现前就执行这句才导致失败的,修改为:让函数在Dom更新时调用(dom会在元素修改时更新) 函数,更新模板时调用函数让输入框获取焦点
this.$nextTick(function(){
this.$refs.inputTitle.focus()
})
主要实现的组件App.vue和MyItem.vue
App.vue
<template>
	<div id="root">
		<div class="todo-container">
			<div class="todo-wrap">
				<!-- <MyHeader :addTodo="addTodo"/> -->
				<MyHeader @addTodo="addTodo"/>
				<!-- App给Item传数据需先传给List,再由List传给Item -->
				<MyList :todos="todos"/>
				<MyFooter :todos="todos" @clearAllTodo="clearAllTodo" @checkAllTodo="checkAllTodo"/>
			</div>
		</div>
	</div>
</template>

<script>
import pubsub from 'pubsub-js'
	import MyHeader from './components/MyHeader'
	import MyList from './components/MyList'
	import MyFooter from './components/MyFooter.vue'
import { event } from 'jquery';

	export default {
		name:'App',
		components:{MyHeader,MyList,MyFooter},
		data() {
			return {
				todos:JSON.parse(localStorage.getItem('todos')) || []
				// todos:[
					// {id:'001',title:'学习',done:false},
					// {id:'002',title:'睡觉',done:false},
					// {id:'003',title:'纠结',done:false},
				// ]
			}
		},
		methods: {
			//添加任务,与MyHeader相关
			addTodo(todoObj){
				//这个也可以
				// this.todos=this.todos.concat(todoObj)
				this.todos.push(todoObj)
			},
			// 删除任务,与MyItem有关
			deleteTodo(_,id){
				//这样删出问题,id索引不到他的数组当中的对象位置
				// this.todos.splice(id,1)
				//filter通过遍历数组每个元素,过滤出满足函数的元素值组成的数组
				//id为所要删除的元素id
				this.todos = this.todos.filter( todo => todo.id !== id )
			},
			// 选中任务(将任务中的done值取反),与MyItem有关
			checkTodo(id){
				this.todos.forEach((todo)=>{
					if(todo.id==id){
						todo.done =! todo.done
					}
				})
			},
			//底部中的清除已完成任务按钮(将todos中的todo中的done值为真的元素删除),与MyFooter有关
			clearAllTodo(){
				//filter函数为数组中的每个元素调用函数一次,并构造一个由所有返回真值的元素值组成的新数组
				// this.todos = this.todos.filter((todo)=>todo.done !== true)
				this.todos = this.todos.filter((todo)=>{
					return !todo.done
				})
			},
			//全选or取消全选(将全选按钮的状态与每个任务(todo)的选中状态(true or false)相关联),与MyFooter有关
			checkAllTodo(done){
				this.todos.forEach((todo)=>{
					todo.done = done
				})
			},
			updateTodo(id,e){
				this.todos.forEach((todo)=>{
					if(todo.id == id){
						todo.title = e
						todo.isEdit =! todo.isEdit
					}
				})
			}
		},
		mounted(){
			this.$bus.$on('checkTodo',this.checkTodo)
			//this.$bus.$on('deleteTodo',this.deleteTodo)
			//App接收数据,使用pubsub.subscribe订阅消息
			//注意这样写,调用deleteTodo时,第一个传的参数为订阅的消息名称,
			//需要在这个函数中的参数位置,使用_占位符接一下,否则,id传不过来
			this.pubId = pubsub.subscribe('deleteTodo',this.deleteTodo)

			//update函数需要接两个参数过来,id和事件的输入框的值,这里使用pubsub的话只能传过来消息名和一个数据值
			//传两个数据目前不知道方法
			//所以总的来说,还是事件总线更方便
			this.$bus.$on('updateTodo',this.updateTodo)
		},
		beforeDestroy(){
			this.$bus.$off('checkTodo')
			pubsub.unsubscribe(this.pubId)
			this.$bus.$off('updateTodo')
		},
		watch:{
			todos:{
				deep:true,
				handler(value){
					localStorage.setItem('todos',JSON.stringify(value))
				}
			}
		}
	}
</script>

<style>
	/*base*/
	body {
		background: #fff;
	}
	.btn {
		display: inline-block;
		padding: 4px 12px;
		margin-bottom: 0;
		font-size: 14px;
		line-height: 20px;
		text-align: center;
		vertical-align: middle;
		cursor: pointer;
		box-shadow: inset 0 1px 0 rgba(255, 255, 255, 0.2), 0 1px 2px rgba(0, 0, 0, 0.05);
		border-radius: 4px;
	}
	.btn-danger {
		color: #fff;
		background-color: #da4f49;
		border: 1px solid #bd362f;
	}
	.btn-edit {
		color: #fff;
		background-color: #3735b3;
		border: 1px solid hsla(226, 89%, 47%, 0.788);
	}

	.btn-danger:hover {
		color: #fff;
		background-color: #bd362f;
	}
	.btn:focus {
		outline: none;
	}
	.todo-container {
		width: 600px;
		margin: 0 auto;
	}
	.todo-container .todo-wrap {
		padding: 10px;
		border: 1px solid #ddd;
		border-radius: 5px;
	}
</style>
MyItem.vue
<template>
	<div>
		<li>
		<label>
			<input type="checkbox" :checked="todo.done" @click="handleCheck(todo.id)"/>
			<span v-show="!todo.isEdit">{{ todo.title }}</span>
			<!-- 通过传递事件,e.target.value拿到文本框中输入的数据 -->
			<input
			type="text"
			v-model="todo.title"
			v-show="todo.isEdit"
			@blur="handleBlur(todo.id,$event)"
			ref="inputTitle">
		</label>
		<button class="btn btn-danger" @click="handleDelete(todo.id)">删除</button>
		<button class="btn btn-edit" @click="handleEdit(todo)" v-show="!todo.isEdit">编辑</button>
	</li>
	</div>
</template>

<script>
import pubsub from 'pubsub-js';
	export default {
		name:'MyItem',
		props:['todo'],
		methods: {
			//每个任务后面的删除事件
			handleDelete(id){
				//deleteTodo是函数名
				// this.deleteTodo(id)
				//deleteTodo是事件名
				// this.$bus.$emit('deleteTodo',id)
				//deleteTodo是消息名
				pubsub.publish('deleteTodo',id)
			},
			//每个任务前面的复选框的点击事件
			// //(修改todo中的done值,然后复选框的状态在上面设置为:checked="todo.done"
			//就可以修改复选框的选中状态)
			handleCheck(id){
				// this.checkTodo(id)
				this.$bus.$emit('checkTodo',id)
			},
			handleEdit(todo){
				//当前任务第一次被点击编辑按钮时,才会赋给todo一个isEdit的属性,否则直接赋值
				if(todo.hasOwnProperty('isEdit')){
					todo.isEdit = true
				}else{
					this.$set(todo,'isEdit','true')
				}
				//实现点击编辑按钮后,让输入框获取自动焦点的功能
				//这样不行,vue会先执行完hanleEdit之后,再解析模板,此时还没有input框(v-show的isEdit没有)
				// this.$refs.inputTitle.focus()
				//$nextTick在更新dom操作时调用函数
				this.$nextTick(function(){
					this.$refs.inputTitle.focus()
				})
			},
			handleBlur(id,e){
				if(!e.target.value.trim()) return alert('不能为空')
				this.$bus.$emit('updateTodo',id,e.target.value)
			console.log(e.target.value);
			}
		},
	}
</script>

<style scoped>
	/*item*/
	li {
		list-style: none;
		height: 36px;
		line-height: 36px;
		padding: 0 20px;
		border-bottom: 1px solid #ddd;
	}

	li label {
		/* float: left; */
		cursor: pointer;
	}

	li label li input {
		vertical-align: middle;
		margin-right: 6px;
		position: relative;
		top: -1px;
	}

	li button {
		float: right;
		display: none;
		margin-top: 3px;
	}

	li:before {
		content: initial;
	}

	li:last-child {
		border-bottom: none;
	}

	li:hover{
		background-color: #ddd;
	}

	li:hover button{
		display: block;
	}
</style>
默认插槽:
实现效果:

代码:
App.vue:
<template>
	<div class="container">
		<Category title="美食">
			<img src="../images/flower.jpg" alt="">
		</Category>
		<Category title="游戏">
			<li v-for="(item, index) in games" :key="index">
				{{ item }}
			</li>
		</Category>
		<Category title="电影">
			<video controls src="../images/school.mp4"></video>
		</Category>
	</div>
</template>

<script>
import Category from './components/Category.vue';

export default {
	name:'App',
	components:{Category},
	data(){
		return {
			foods:['鱼','虾'],
			games:['你好','你好好'],
			films:['猪猪侠','武林外传']
		}
	}
}
</script>

<style>
/* img、video放这里或者Category都行 */
img {
    width: 100%;
}
video {
    width: 100%;
}
</style>
Category.vue
<template>
  <div class="category">
    <h3>{{ title }}分类</h3>
    <!-- 插槽 -->
    <slot>我是默认插槽,当没有内容时,我就会出现</slot>
  </div>
</template>

<script>
export default {
    props:['title','listData']

}
</script>

<style>
.category {
    background-color: skyblue;
    width: 200px;
    height: 300px;
    float: left;
    margin-left: 20px;
}
.category h3 {
    text-align: center;
    background-color: orange;
}
.category li {
    padding-left: 30px;
}
</style>
创建服务器,
新建一个文件夹(demo),使用VScode打开文件夹,打开终端(ctrl+~),输入npm int ,生成package.json,在终端中输入服务器的名字(test_server),一路回车,输入npm i express,生成package-lock.json文件。之后创建server.js文件,输入内容如下,
//server.js文件
const express = require('express')
const app = express()
app.use(express.static(__dirname + '/static'))
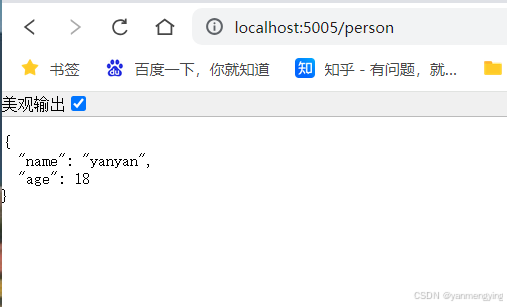
app.get('/person', (req, res) => {
res.send({
name: 'yanyan',
age: 18
})
})
app.listen(5005, (err) => {
if (!err) console.log('服务器启动成功了');
}),在终端中输入:node server,启动服务器,浏览器输入"http://localhost:5005/person"可以看到服务器的数据,
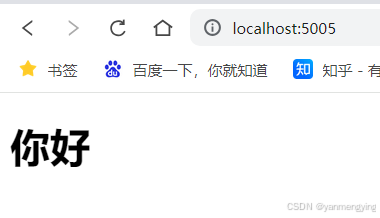
再创建static文件夹,将前端写的静态资源放入static文件夹中,加入index.html文件,输入“你好”,再浏览器中输入 “http://localhost:5005/”,看到页面
如果是自己写好的文件夹,再Vue脚手架中写的页面,(有public\src等文件夹),在终端中输入:npm run build,得到dist文件,将此文件夹中的东西放入static文件夹中(将原来的index.html文件删掉),就可以了,ctrl+c停以下终端,再node server重启一下,在浏览器上输入Locahost:5005看到所写页面。
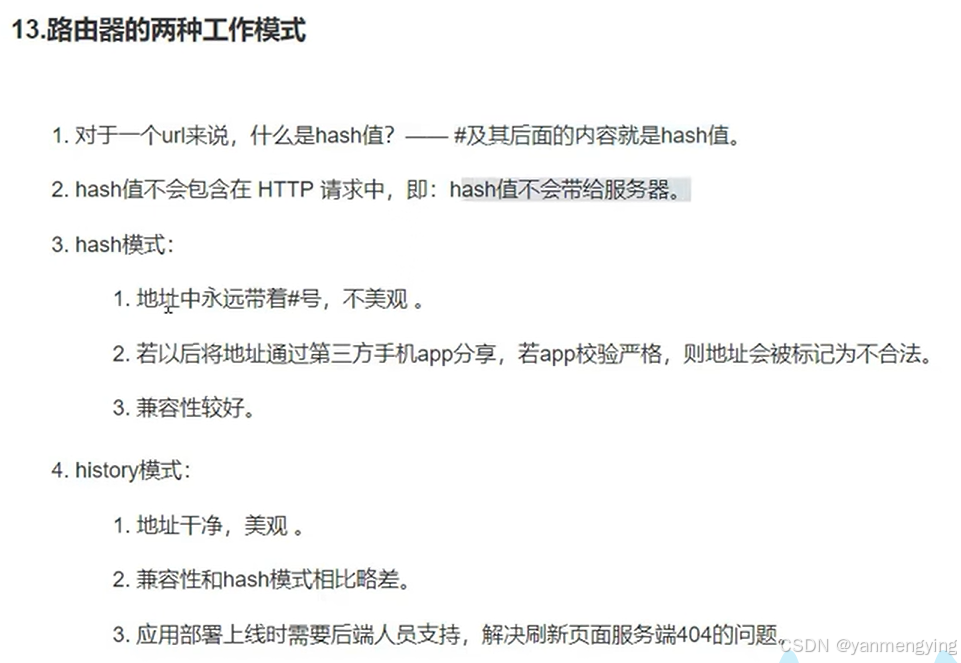
路由组件写的页面在 Vuerouter中的mode修改,hash就是路径中带有#,这个在服务器部署后的浏览器中可以刷新,history不可以刷新,(刷新出现404)
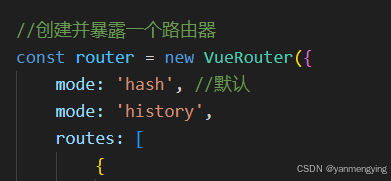
history和hash的区别
要想用history刷新不会出现404,得在server.js中修改:(参考链接https://www.npmjs.com/package/connect-history-api-fallback)
在终端中输入: npm i connect-history-api-fallback,
在server.js中添加:
const express = require('express')
const history = require('connect-history-api-fallback');//新添加


const app = express()
app.use(history()) //新添加
app.use(express.static(__dirname + '/static'))

app.get('/person', (req, res) => {
    res.send({
        name: 'yanyan',
        age: 18
    })
})

app.listen(5005, (err) => {
    if (!err) console.log('服务器启动成功了');
})
之后在终端中输入node server就可以实现页面更新了
elementUI的使用:
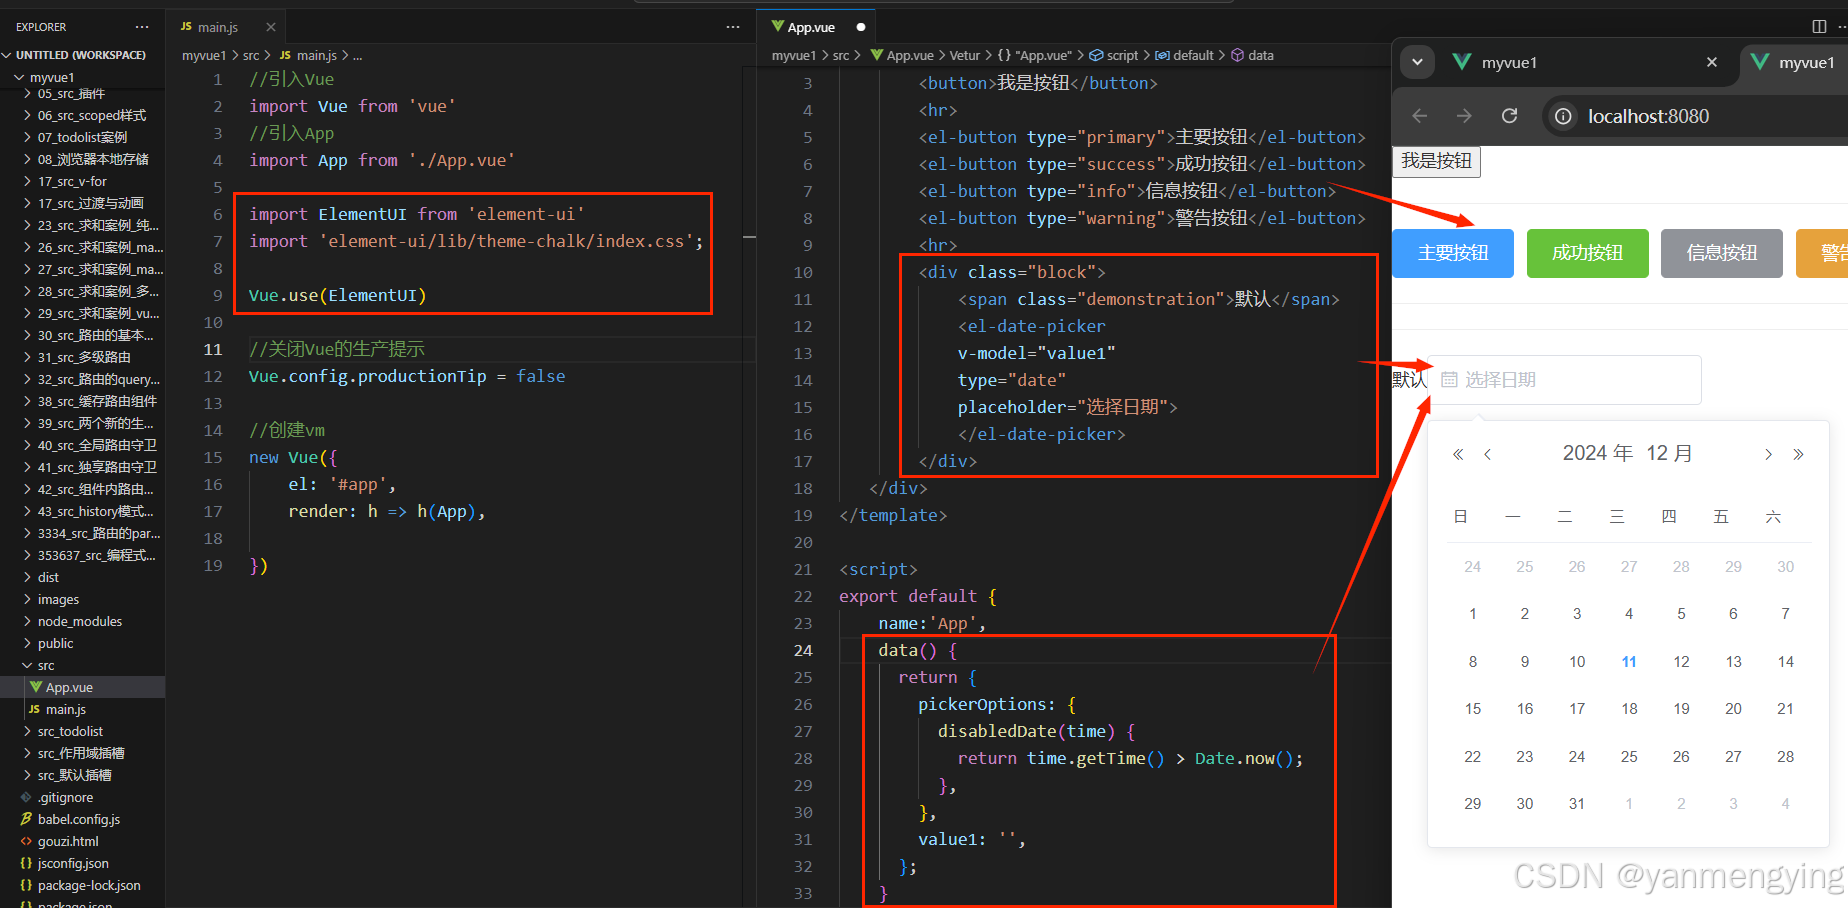
在main.js中引入elementUI,在APP.vue中使用,代码如下:
使用方法见官方文档(Element - The world's most popular Vue UI framework)
也可以按需引入,方法参加网络
main.js
//引入Vue
import Vue from 'vue'
//引入App
import App from './App.vue'


//完整引入
import ElementUI from 'element-ui'
import 'element-ui/lib/theme-chalk/index.css';

Vue.use(ElementUI)

//关闭Vue的生产提示
Vue.config.productionTip = false

//创建vm
new Vue({
	el: '#app',
	render: h => h(App),

})
App.vue
<template>
	<div>
		<button>我是按钮</button>
		<hr>
		<el-button type="primary">主要按钮</el-button>
		<el-button type="success">成功按钮</el-button>
		<el-button type="info">信息按钮</el-button>
		<el-button type="warning">警告按钮</el-button>
		<hr>
		<div class="block">
			<span class="demonstration">默认</span>
			<el-date-picker
			v-model="value1"
			type="date"
			placeholder="选择日期">
			</el-date-picker>
		</div>
   </div>
</template>

<script>
export default {
	name:'App',
    data() {
      return {
        pickerOptions: {
          disabledDate(time) {
            return time.getTime() > Date.now();
          },
        },
        value1: '',
      };
    }
  };
</script>

<style>

</style>


 被折叠的 条评论
为什么被折叠?
被折叠的 条评论
为什么被折叠?
 到【灌水乐园】发言


