


前端项目初始化和脚手架的搭建
一、项目初始化和Webpack的安装
1.新建gitee仓库
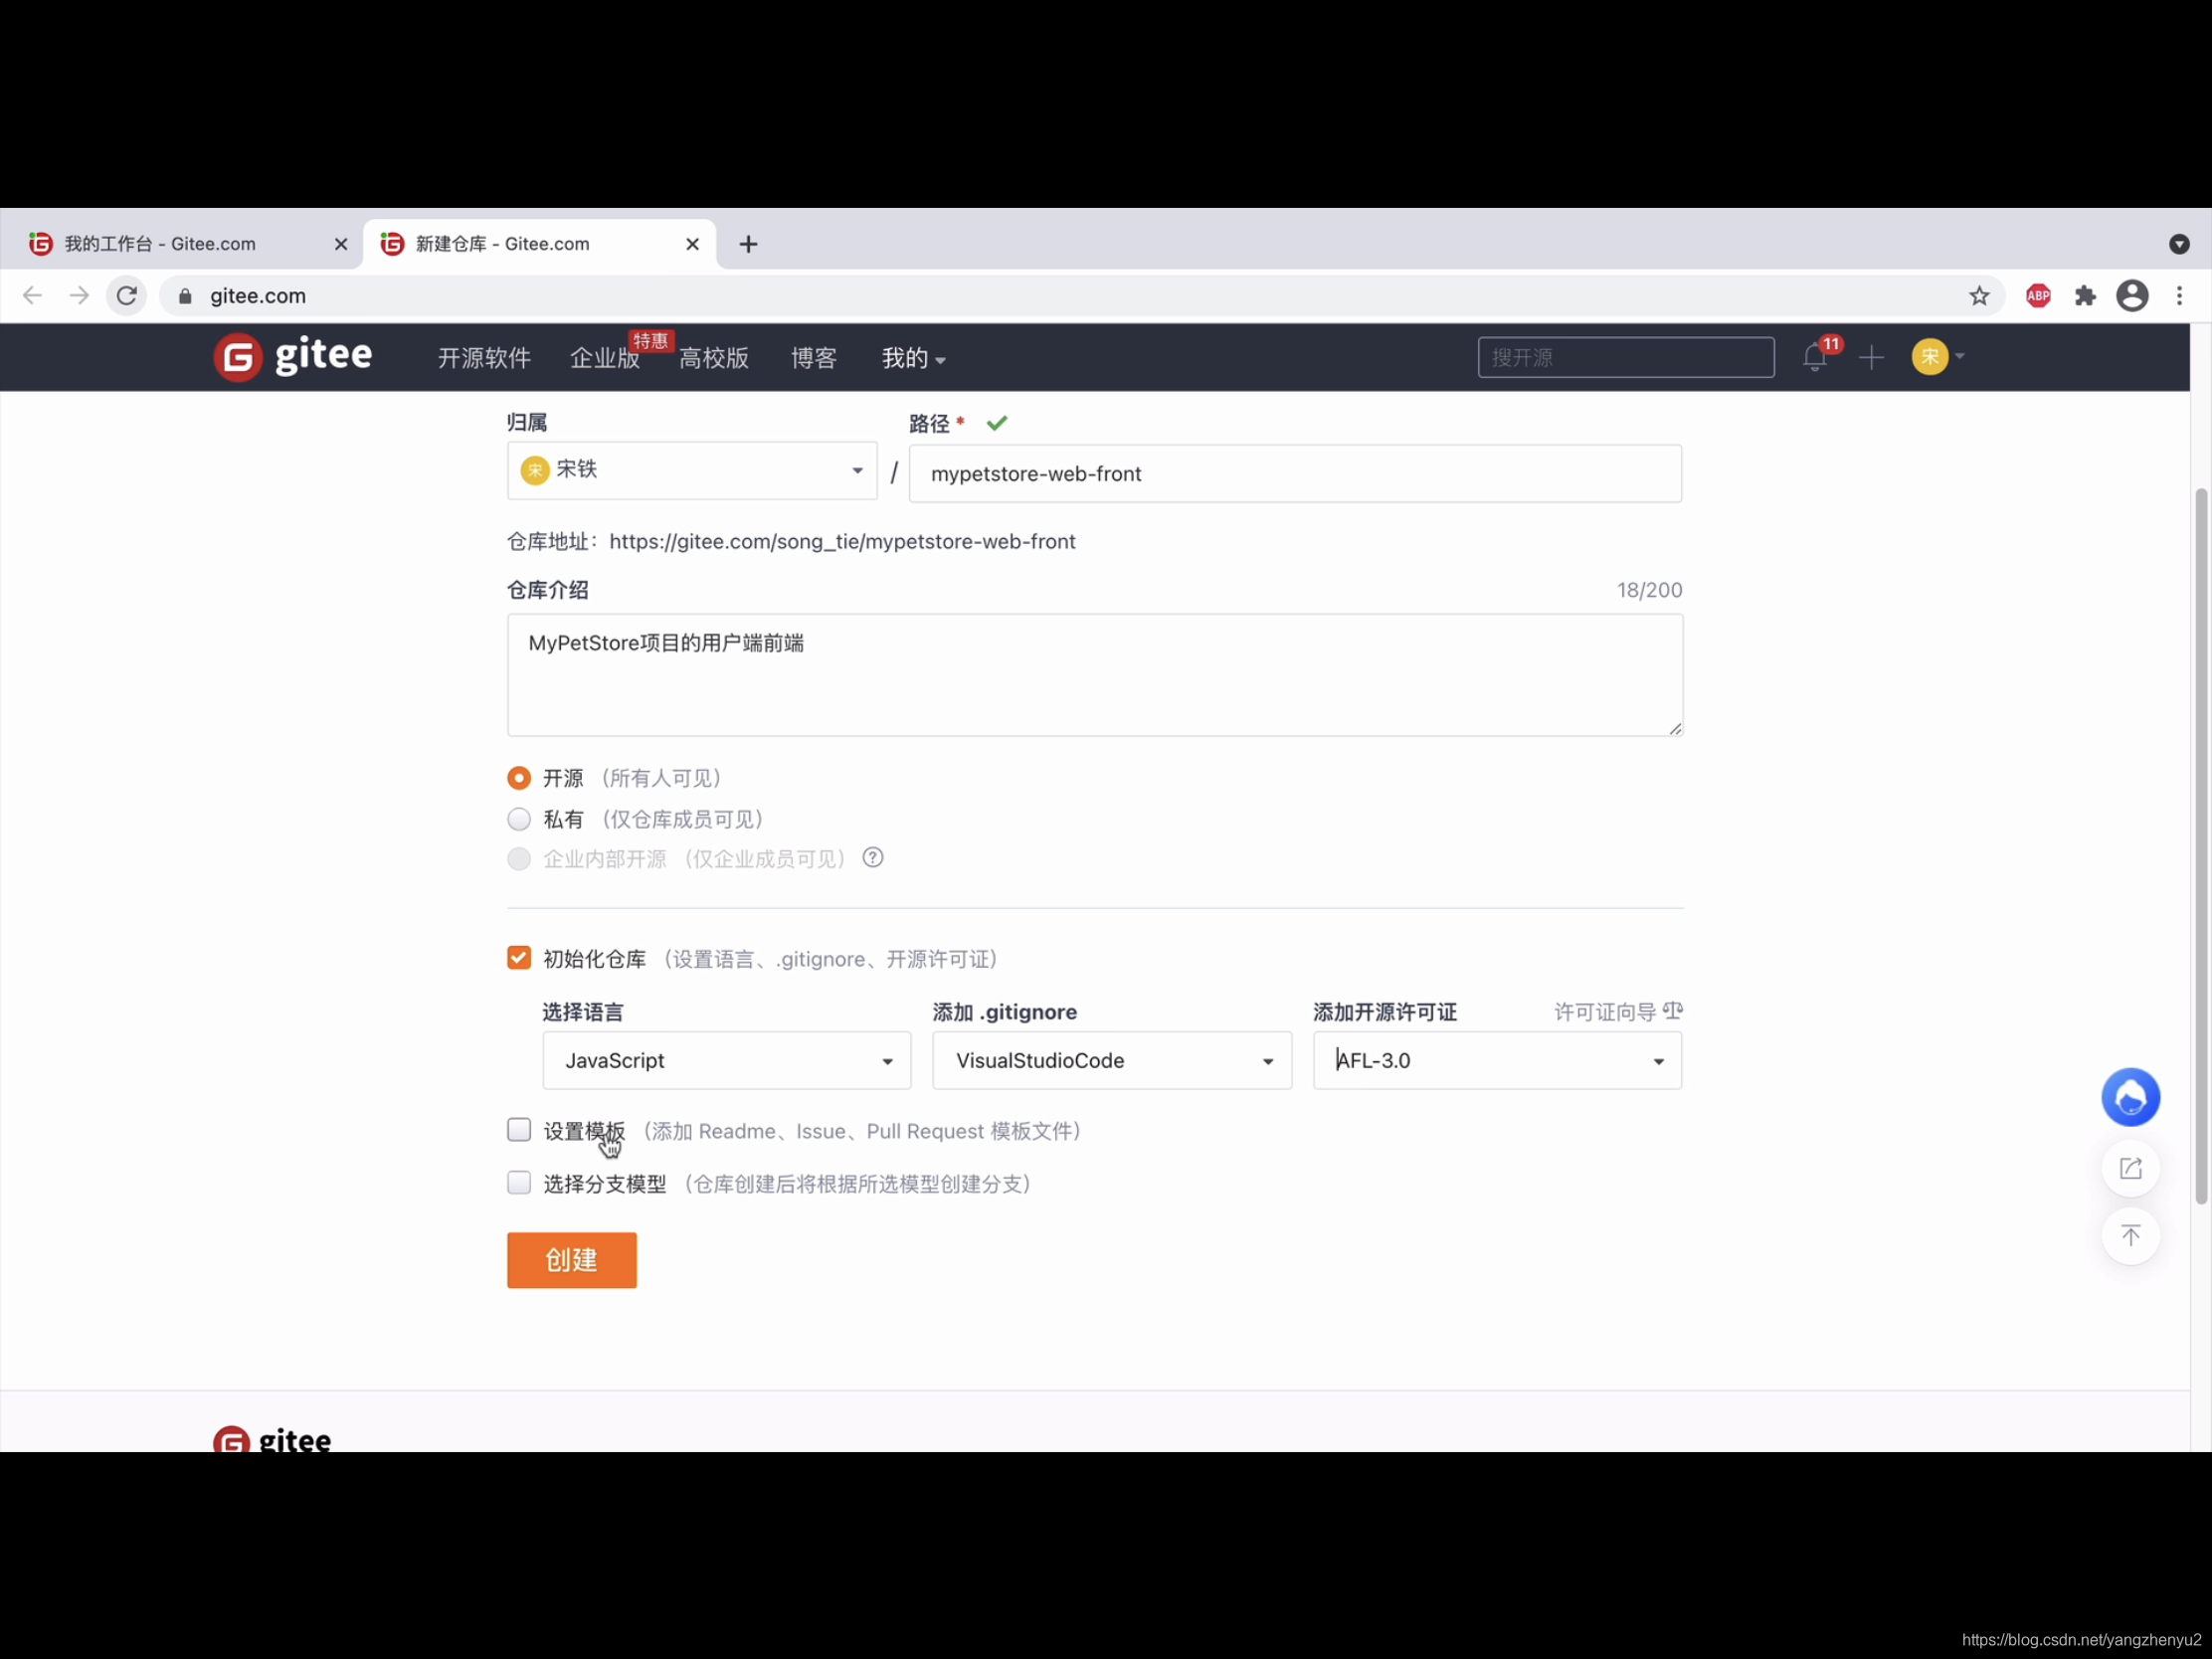
2.将项目克隆下来并用VisualStudioCode打开
- 初始化.gitignore文件
在下面添加:
#Mac 隐藏文件
.DS_Store

#npm包
/node_modules/

#输出目录
/dist/
- 提交到gitee中
	git status
	git add .
	git commit -am '初始化gitignore'
	git push -u origin master
4.配置npm环境(以及安装过的可以)
5.在项目目录使用npm init初始化项目,回生成一个package.json文件
npm init
6.建立项目目录
-- README.md
-- .gitignore
-- src
	--images
	--page
	--view
7.安装Webpack和Webpack-cli:package.json会生成依赖,会生成node_modules包
参考webpack中文文档:webpack中文文档
npm install --save-dev webpack
npm install --save-dev webpack-cli
…一系列操作
8.使用npx webpack将我们的脚本作为入口起点,然后 输出 为 main.js进行打包
npx webpack
9.根据文档往下进行配置
10再次打包前需要清理 /dist 文件夹
官方文档有问题,需要进行修改
	//const CleanWebpackPlugin = require('clean-webpack-plugin');  改为:
	const {CleanWebpackPlugin} = require('clean-webpack-plugin');

	//new CleanWebpackPlugin(['dist'])  改为:
	new CleanWebpackPlugin() //每次build都会清空dist目录
禁止webpack5生成license.txt文件:https://blog.youkuaiyun.com/qq_39903567/article/details/114384242
在webpack.config.js假如下面代码:
	const TerserPlugin = require("terser-webpack-plugin");

	optimization: {
        minimize: true,  //是否压缩,改为false可以格式化打包后的bundle.js
        minimizer: [
          new TerserPlugin({
            extractComments: false,//不将注释提取到单独的文件中
          }),
        ],
      }
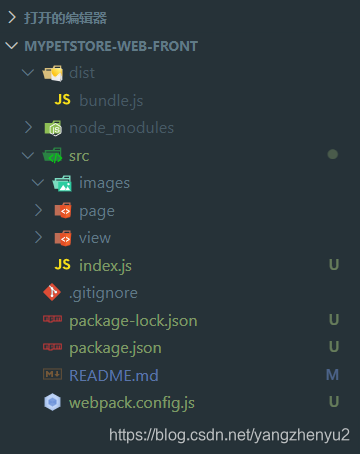
11.回到起步文档使用配置可以用npm run build更方便地打包
最终的项目目录如下:
二、Webpack对JavaScript的处理
1.多页面应用
新建多个index.js
--src
	--image
	--page
		--index
			--index.js
		--login
			--index.js
	--view
webpack.config.js配置
//entry: './src/index.js',
//output: {
//    filename: 'bundle.js',
//    path: path.resolve(__dirname, 'dist')
//}

改为:

entry: {
	'index':['./src/page/index/index.js'],
	'login':['./src/page/login/index.js']
},
output: {
    filename: 'js/[name].js',
    path: path.resolve(__dirname, 'dist')
}
重构:
npm run build
2.卸载lodash插件
npm uninstall --save-dev lodash
3.删掉项目目录下已经没用的index.js
4.jQuery的引用
- 模块化方式:只在js中引用
例子:
npm install jquery --save
在src/view中新建一个index.html,并在body中使用script引用…/…/dist/js/index.js
<script src="../../dist/js/index.js"></script>
在src/page/index/index.js中引用jQuery模块:
var $ = require('jquery');

$('body').html('hello jquery');
- 传统HTML直接饮用:只在html中引用
如果上面安装了jquery依赖需要卸载掉:
npm uninstall jquery --save
下面跟方式一一样操作,不过需要在src/page/index/index.js中去掉jquery的引用:
在src/view中新建一个index.html,并在body中使用script引用…/…/dist/js/index.js
<script src="../../dist/js/index.js"></script>
在src/page/index/index.js中引用jQuery模块:
//var $ = require('jquery');

$('body').html('hello jquery');
并且在src/view/index.html中添加jquery的cdn引用:
<script src="https://cdn.bootcdn.net/ajax/libs/jquery/3.6.0/jquery.js"></script>
<script src="../../dist/js/index.js"></script>
- 传统引用+模块化方式:在html和js中都能引用
完成方式二的基础上,在webpack.config.js中添加:
optimization: {   //优化
	......
},
externals :{
	'jquery' : 'window.jQuery'
}
修改需要引用jquery的文件:
var $$ = require('jquery');    //使用$$是为了区分引用方式

$$('body').html('hello jquery');
三、公共模块的提取
1.新建文件
--src
	--page
		--util
			--util.js
2.编写公共模块util.js内容
	module.exports = {
		test : 'abc'
	}
3.在其他js代码中引用公共模块
var util = require('xx/util.js');
4.重构
npm run build
5.优化加载效率,避免打包时重复复制,会将公共部分独立打包
- 修改webpack.config.js
optimization: {   //优化
    ...,
    splitChunks : {
		cacheGroups : {
			commons : {
				name 	  : 'util',
				chunks 	  : 'all',
				minChunks : 2,
				minSize   : 0
			}
		}
	}
  }
- 在需要在html中引用dist目录下的uitil.js
四、Webpack对HTML、CSS和图片的处理
1.CSS的处理
方式一:单独CSS文件方式(推荐)
- 安装插件
npm install --save-dev css-loader
npm install --save-dev mini-css-extract-plugin
- 配置webpack.config.js
  const path = require('path');
+ const MiniCssExtractPlugin = require('mini-css-extract-plugin');

  module.exports = {
    entry: './src/index.js',
    output: {
      filename: 'bundle.js',
      path: path.resolve(__dirname, 'dist')
    },
+   module: {
+     rules: [
+       {
+         test: /\.css$/,
+         use: [
+           {
+ 				loader : MiniCssExtractPlugin.loader,
+ 				options : {
+ 					publicPath : '../'
+ 				}
+ 			},
+           'css-loader'
+         ]
+       }
+     ]
+   },
   plugins: [    //插件
      new CleanWebpackPlugin(),
+ 	  new MiniCssExtractPlugin({
+			filename : 'css/[name].css'
+	  })
    ],
  };
- 创建一个新的css文件,并在js中引用:
import './index.css';
- 在html中的head引用
<link rel="stylesheet" href="../../dist/css/index.css">
方式二:注入JS方式
- css-loader的安装
npm install --save-dev style-loader css-loader
- webpack.config.js
  const path = require('path');

  module.exports = {
    entry: './src/index.js',
    output: {
      filename: 'bundle.js',
      path: path.resolve(__dirname, 'dist')
    },
+   module: {
+     rules: [
+       {
+         test: /\.css$/,
+         use: [
+           'style-loader',
+           'css-loader'
+         ]
+       }
+     ]
+   }
  };
- 创建一个新的css文件,并在js中引用:
import './style.css';
2.图片的加载
- 安装插件
npm install --save-dev file-loader url-loader
方式一:url-loader (推荐)
- 配置webpack.config.js
 const path = require('path');

  module.exports = {
    entry: './src/index.js',
    output: {
      filename: 'bundle.js',
      path: path.resolve(__dirname, 'dist')
    },
    module: {
      rules: [
        {
          test: /\.css$/,
          use: [
            'style-loader',
            'css-loader'
          ]
        },
+       {
+         test: /\.(png|svg|jpg|gif)$/,
+         use: [
+           'url-loader?limit=1000&name=images/[name].[ext]'
+         ]
+       }
      ]
    }
  };
- project
  webpack-demo
  |- package.json
  |- webpack.config.js
  |- /dist
    |- bundle.js
    |- index.html
  |- /src
+   |images
+   	|- icon.png
    |- style.css
    |- index.js
  |- /node_modules
- src/style.css
  .hello {
    color: red;
+   background: url('./iamges/icon.png');
  }
- 重新构建
npm run build
方式二:file-loader
- 配置webpack.config.js
 const path = require('path');

  module.exports = {
    entry: './src/index.js',
    output: {
      filename: 'bundle.js',
      path: path.resolve(__dirname, 'dist')
    },
    module: {
      rules: [
        {
          test: /\.css$/,
          use: [
            'style-loader',
            'css-loader'
          ]
        },
+       {
+         test: /\.(png|svg|jpg|gif)$/,
+         use: [
+           'file-loader'
+         ]
+       }
      ]
    }
  };
- project
  webpack-demo
  |- package.json
  |- webpack.config.js
  |- /dist
    |- bundle.js
    |- index.html
  |- /src
+   |- icon.png
    |- style.css
    |- index.js
  |- /node_modules
- src/index.js
  import _ from 'lodash';
  import './style.css';
+ import Icon from './icon.png';

  function component() {
    var element = document.createElement('div');

    // Lodash,现在由此脚本导入
    element.innerHTML = _.join(['Hello', 'webpack'], ' ');
    element.classList.add('hello');

+   // 将图像添加到我们现有的 div。
+   var myIcon = new Image();
+   myIcon.src = Icon;
+
+   element.appendChild(myIcon);

    return element;
  }

  document.body.appendChild(component());
- src/style.css
  .hello {
    color: red;
+   background: url('./icon.png');
  }
- 重新构建
npm run build
3.HTML的处理
方式一:多页面应用(单页面只需要在此基础上稍作修改)
- 安装插件
npm install --save-dev html-webpack-plugin
- webpack.config.js
  const path = require('path');
+ const HtmlWebpackPlugin = require('html-webpack-plugin');

+ const getHtmlConfig = function(name){
+ 		return {
+ 			template : './src/view/' + name + '.html',
+ 			filename : 'view/' + name + '.html',
+ 			inject   : true,              //自动根据引入的js注入css等静态资源,无需在html中重复注入
+ 		    hash     : true,              //生成版本号
+ 		    chunks   : ['common',name],  //表示引入的js模块,此时无需在HTML再次引用,它会自动帮我们引用一次
+           minify  : {
+ 				collapseWhitespace : false   //按网页格式生成
+ 			}
+ 		}
+ }

  module.exports = {
    entry: {
+     'common': ['./src/page/common/index.js'],  //公共模块的另一种方式引入,此时不需在多个js中引用来形成公共模块
+
      app: './src/index.js',
      print: './src/print.js'
    },
+   plugins: [
+     new HtmlWebpackPlugin(getHtmlConfig('index')),    //多页面应用
+ 	  new HtmlWebpackPlugin(getHtmlConfig('login')),
+   ],
    output: {
      filename: '[name].bundle.js',
      path: path.resolve(__dirname, 'dist')
    }
  };
五、WebpackDevServer的配置和使用
1.解决一些版本问题
- 降低webpack-cli的版本: 参考版本兼容问题
	npm uninstall --save-dev webpack-cli
	npm install webpack-cli@3.3.10 -g
2.WebpackDevServer的配置
- 安装插件
npm install --save-dev webpack-dev-server
- webpack.config.js
const path = require('path');

const TerserPlugin = require("terser-webpack-plugin");
const {CleanWebpackPlugin} = require('clean-webpack-plugin');
const MiniCssExtractPlugin = require('mini-css-extract-plugin');
const HtmlWebpackPlugin = require('html-webpack-plugin');
+ const webpack = require('webpack');//webpack全局变量

const getHtmlConfig = function(name){
    return {
      template : './src/view/' + name + '.html',
      filename : 'view/' + name + '.html',
      inject   : true,              //自动根据引入的js注入css等静态资源,无需在html中重复注入
      hash     : true,              //生成版本号
      chunks   : ['common',name],  //表示引入的js模块,此时无需在HTML再次引用,它会自动帮我们引用一次
      minify  : {
        collapseWhitespace : false   //按网页格式生成
      }
    }
  }

var config = {
  entry: {
    'common' : ['./src/page/common/index.js'],
    'index'  : ['./src/page/index/index.js'],
    'login'  : ['./src/page/login/index.js']
  },  //输入
  output: {    //输出
    filename: 'js/[name].js',
    path: path.resolve(__dirname, 'dist')
  },
+ devServer : {
+   port : 8888,
+ 	contentBase  : path.resolve(__dirname, 'dist')
+ },
  module: {
      rules: [
        {
            test: /\.css$/,
            use : [
              {
                  loader : MiniCssExtractPlugin.loader,
                  options : {
                    publicPath : '../'
                  }
              },
              'css-loader'
            ]
        },
        {
            test: /\.(png|svg|jpg|gif)$/,
            use : [
              'url-loader?limit=1000&name=images/[name].[ext]'
            ]
        }
      ]
    },
  plugins: [    //插件
-   new CleanWebpackPlugin(), //每次build都会清空dist目录
    new MiniCssExtractPlugin({  //CSS插件
        filename : 'css/[name].css'
    }),
    new HtmlWebpackPlugin(getHtmlConfig('index')),   //html插件
    new HtmlWebpackPlugin(getHtmlConfig('login')),
+   new webpack.HotModuleReplacementPlugin()  //热替换
  ],
  optimization: {   //优化
    minimize: false,  //是否压缩,改为false可以格式化打包后的bundle.js
    minimizer: [
      new TerserPlugin({
        extractComments: false,//不将注释提取到单独的文件中
      })
    ],
    splitChunks : {
      cacheGroups : {
        commons : {
          name 	  : 'util',
          chunks 	  : 'all',
          minChunks : 2,
          minSize   : 0
        }
      }
    }
  },
  externals :{
    'jquery' : 'window.jQuery'
  }

};

module.exports =config;
- package.json
  "scripts": {
    "test": "echo \"Error: no test specified\" && exit 1",
    "build": "webpack",
+   "start": "webpack-dev-server --open"
  }
- 运行
	//每次调试完
	npm run build
	//运行启动dev-server
	npm run start


 被折叠的 条评论
为什么被折叠?
被折叠的 条评论
为什么被折叠?
 到【灌水乐园】发言


